2000 Chevrolet Silverado 1500 Pickup Owner's Manual - Page 183
2000 Chevrolet Silverado 1500 Pickup Manual

Page 183 highlights
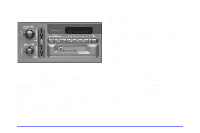
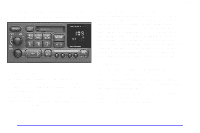
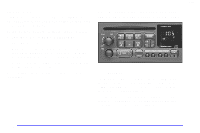
yellowblue SCAN: Press and hold SEEK for two seconds until SCAN appears on the display. SCAN allows you to listen to stations for a few seconds. The receiver will continue to scan and momentarily stop at each station until you press the button again. The sound will mute while scanning. PUSHBUTTONS: The six numbered pushbuttons let you return to your favorite stations. You can set up to 18 stations (six AM, six FM1 and six FM2). Just: 1. Turn the radio on. 2. Press AM-FM to select the band. 3. Tune in the desired station. 4. Press AUTO TONE to select the setting you prefer. 5. Press and hold one of the six pushbuttons. The sound will mute. When it returns, release the button. Whenever you press that numbered button, the station you set will return and the tone you selected will be automatically selected for that button. 6. Repeat the steps for each pushbutton. P.SCAN: The preset scan button lets you scan through your favorite stations stored on your pushbuttons. Select either the AM, FM1 or FM2 mode and then press P. SCAN. It will scan through each station stored on your pushbuttons and stop for a few seconds before continuing to scan through all of the pushbuttons. Press P. SCAN again or one of the pushbuttons to stop scanning to listen to a specific preset station. P. SCAN will light up on the display while in this mode. If one of the stations stored on a pushbutton is too weak for the location you are in, the radio display will show the channel number (P1-P6) for several seconds before advancing to the next preset station. Setting the Tone BASS: Press lightly on this knob to release it from its stored position. Turn the knob clockwise to increase bass and counterclockwise to decrease bass. When the BASS control is rotated, the AUTO TONE display will go blank. TREB: Press lightly on this knob to release it from its stored position. Turn the knob clockwise to increase treble and counterclockwise to decrease treble. When the TREB control is rotated, the AUTO TONE display will go blank. If a station is weak or noisy, you may want to decrease the treble. Push these knobs back into their stored positions when you're not using them. 3-15
-
 1
1 -
2
-
3
-
4
-
5
-
6
-
7
-
8
-
9
-
10
-
11
-
12
-
13
-
14
-
15
-
16
-
17
-
18
-
19
-
20
-
21
-
22
-
23
-
24
-
25
-
26
-
27
-
28
-
29
-
30
-
31
-
32
-
33
-
34
-
35
-
36
-
37
-
38
-
39
-
40
-
41
-
42
-
43
-
44
-
45
-
46
-
47
-
48
-
49
-
50
-
51
-
52
-
53
-
54
-
55
-
56
-
57
-
58
-
59
-
60
-
61
-
62
-
63
-
64
-
65
-
66
-
67
-
68
-
69
-
70
-
71
-
72
-
73
-
74
-
75
-
76
-
77
-
78
-
79
-
80
-
81
-
82
-
83
-
84
-
85
-
86
-
87
-
88
-
89
-
90
-
91
-
92
-
93
-
94
-
95
-
96
-
97
-
98
-
99
-
100
-
101
-
102
-
103
-
104
-
105
-
106
-
107
-
108
-
109
-
110
-
111
-
112
-
113
-
114
-
115
-
116
-
117
-
118
-
119
-
120
-
121
-
122
-
123
-
124
-
125
-
126
-
127
-
128
-
129
-
130
-
131
-
132
-
133
-
134
-
135
-
136
-
137
-
138
-
139
-
140
-
141
-
142
-
143
-
144
-
145
-
146
-
147
-
148
-
149
-
150
-
151
-
152
-
153
-
154
-
155
-
156
-
157
-
158
-
159
-
160
-
161
-
162
-
163
-
164
-
165
-
166
-
167
-
168
-
169
-
170
-
171
-
172
-
173
-
174
-
175
-
176
-
177
-
 178
178 -
 179
179 -
 180
180 -
 181
181 -
 182
182 -
 183
183 -
 184
184 -
 185
185 -
 186
186 -
 187
187 -
 188
188 -
189
-
190
-
191
-
192
-
193
-
194
-
195
-
196
-
197
-
198
-
199
-
200
-
201
-
202
-
203
-
204
-
205
-
206
-
207
-
208
-
209
-
210
-
211
-
212
-
213
-
214
-
215
-
216
-
217
-
218
-
219
-
220
-
221
-
222
-
223
-
224
-
225
-
226
-
227
-
228
-
229
-
230
-
231
-
232
-
233
-
234
-
235
-
236
-
237
-
238
-
239
-
240
-
241
-
242
-
243
-
244
-
245
-
246
-
247
-
248
-
249
-
250
-
251
-
252
-
253
-
254
-
255
-
256
-
257
-
258
-
259
-
260
-
261
-
262
-
263
-
264
-
265
-
266
-
267
-
268
-
269
-
270
-
271
-
272
-
273
-
274
-
275
-
276
-
277
-
278
-
279
-
280
-
281
-
282
-
283
-
284
-
285
-
286
-
287
-
288
-
289
-
290
-
291
-
292
-
293
-
294
-
295
-
296
-
297
-
298
-
299
-
300
-
301
-
302
-
303
-
304
-
305
-
306
-
307
-
308
-
309
-
310
-
311
-
312
-
313
-
314
-
315
-
316
-
317
-
318
-
319
-
320
-
321
-
322
-
323
-
324
-
325
-
326
-
327
-
328
-
329
-
330
-
331
-
332
-
333
-
334
-
335
-
336
-
337
-
338
-
339
-
340
-
341
-
342
-
343
-
344
-
345
-
346
-
347
-
348
-
349
-
350
-
351
-
352
-
353
-
354
-
355
-
356
-
357
-
358
-
359
-
360
-
361
-
362
-
363
-
364
-
365
-
366
-
367
-
368
-
369
-
370
-
371
-
372
-
373
-
374
-
375
-
376
-
377
-
378
-
379
-
380
-
381
-
382
-
383
-
384
-
385
-
386
-
387
-
388
-
389
-
390
-
391
-
392
-
393
-
394
-
395
-
396
-
397
-
398
-
399
-
400
-
401
-
402
-
403
-
404
-
405
-
406
-
407
-
408
-
409
-
410
-
411
-
412
-
413
-
414
-
415
-
416
-
417
-
418
-
419
-
420
-
421
 |
 |