2003 Chevrolet Monte Carlo Owner's Manual - Page 114
2003 Chevrolet Monte Carlo Manual

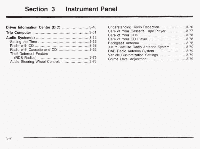
Page 114 highlights
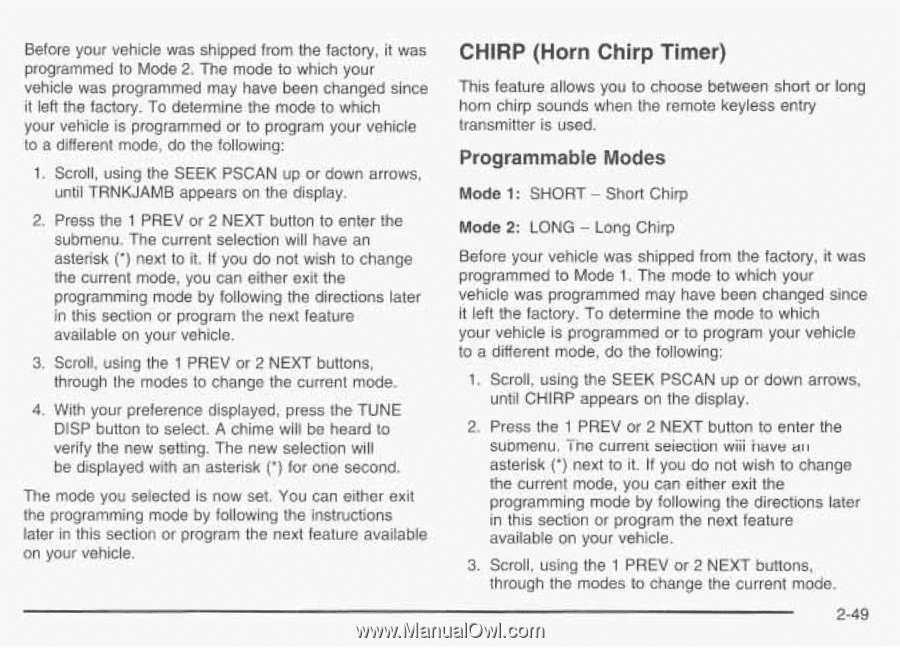
Before your vehicle was shipped from the factory, it was programmed to Mode 2. The mode to which your vehicle was programmed may have been changed since it left the factory. To determine the mode to which your vehicle is programmed or to program your vehicle to a different mode, do the following: CHIRP (Horn Chirp Timer) This feature allows you to choose between short or long horn chirp sounds when the remote keyless entry transmitter is used. 1. Scroll, using the SEEK PSCAN up or down until TRNKJAMB appears on the display. arrows, Programmable Modes Mode 1: SHORT - Short Chirp Mode 2 LONG - Long Chirp : Before your vehicle was shipped from the factory, it was programmed to Mode 1. The mode to which your vehicle was programmed may have been changed since it left the factory. To determine the mode to which your vehicle is programmed or to program your vehicle to a different mode, do the following: 2. Press the 1 PREV or 2 NEXT button to enter the submenu. The current selection will have an asterisk (*) next to it. If you do not wish to change the current mode, you can either exit the programming mode by following the directions later in this section or program the next feature available on your vehicle. 3. Scroll, using the 1 PREV or 2 NEXT buttons, through the modes to change the current mode. 4. With your preference displayed, press the TUNE DlSP button to select. A chime will be heard to verify the new setting. The new selection will be displayed with an asterisk (*) for one second. The mode you selected is now set. You can either exit the programming mode by following the instructions later in this section or program the next feature available on your vehicle. 1. Scroll, using the SEEK PSCAN up or down arrows, until CHIRP appears on the display. 2. Press the 1 PREV or 2 NEXT button to enter the submenu. Tne current seieciion wiii nave arl asterisk (*) next to it. If you do not wish to change the current mode, you can either exit the programming mode by following the directions later in this section or program the next feature available on your vehicle. 3. Scroll, using the 1 PREV or 2 NEXT buttons, through the modes to change the current mode. 2-49
-
 1
1 -
2
-
3
-
4
-
5
-
6
-
7
-
8
-
9
-
10
-
11
-
12
-
13
-
14
-
15
-
16
-
17
-
18
-
19
-
20
-
21
-
22
-
23
-
24
-
25
-
26
-
27
-
28
-
29
-
30
-
31
-
32
-
33
-
34
-
35
-
36
-
37
-
38
-
39
-
40
-
41
-
42
-
43
-
44
-
45
-
46
-
47
-
48
-
49
-
50
-
51
-
52
-
53
-
54
-
55
-
56
-
57
-
58
-
59
-
60
-
61
-
62
-
63
-
64
-
65
-
66
-
67
-
68
-
69
-
70
-
71
-
72
-
73
-
74
-
75
-
76
-
77
-
78
-
79
-
80
-
81
-
82
-
83
-
84
-
85
-
86
-
87
-
88
-
89
-
90
-
91
-
92
-
93
-
94
-
95
-
96
-
97
-
98
-
99
-
100
-
101
-
102
-
103
-
104
-
105
-
106
-
107
-
108
-
 109
109 -
 110
110 -
 111
111 -
 112
112 -
 113
113 -
 114
114 -
 115
115 -
 116
116 -
 117
117 -
 118
118 -
 119
119 -
120
-
121
-
122
-
123
-
124
-
125
-
126
-
127
-
128
-
129
-
130
-
131
-
132
-
133
-
134
-
135
-
136
-
137
-
138
-
139
-
140
-
141
-
142
-
143
-
144
-
145
-
146
-
147
-
148
-
149
-
150
-
151
-
152
-
153
-
154
-
155
-
156
-
157
-
158
-
159
-
160
-
161
-
162
-
163
-
164
-
165
-
166
-
167
-
168
-
169
-
170
-
171
-
172
-
173
-
174
-
175
-
176
-
177
-
178
-
179
-
180
-
181
-
182
-
183
-
184
-
185
-
186
-
187
-
188
-
189
-
190
-
191
-
192
-
193
-
194
-
195
-
196
-
197
-
198
-
199
-
200
-
201
-
202
-
203
-
204
-
205
-
206
-
207
-
208
-
209
-
210
-
211
-
212
-
213
-
214
-
215
-
216
-
217
-
218
-
219
-
220
-
221
-
222
-
223
-
224
-
225
-
226
-
227
-
228
-
229
-
230
-
231
-
232
-
233
-
234
-
235
-
236
-
237
-
238
-
239
-
240
-
241
-
242
-
243
-
244
-
245
-
246
-
247
-
248
-
249
-
250
-
251
-
252
-
253
-
254
-
255
-
256
-
257
-
258
-
259
-
260
-
261
-
262
-
263
-
264
-
265
-
266
-
267
-
268
-
269
-
270
-
271
-
272
-
273
-
274
-
275
-
276
-
277
-
278
-
279
-
280
-
281
-
282
-
283
-
284
-
285
-
286
-
287
-
288
-
289
-
290
-
291
-
292
-
293
-
294
-
295
-
296
-
297
-
298
-
299
-
300
-
301
-
302
-
303
-
304
-
305
-
306
-
307
-
308
-
309
-
310
-
311
-
312
-
313
-
314
-
315
-
316
-
317
-
318
-
319
-
320
-
321
-
322
-
323
-
324
-
325
-
326
-
327
-
328
-
329
-
330
-
331
-
332
-
333
-
334
-
335
-
336
-
337
-
338
-
339
-
340
-
341
-
342
-
343
-
344
-
345
-
346
-
347
-
348
-
349
-
350
-
351
-
352
-
353
-
354
-
355
-
356
-
357
-
358
-
359
-
360
-
361
-
362
-
363
-
364
-
365
-
366
-
367
-
368
-
369
-
370
-
371
-
372
-
373
-
374
-
375
-
376
-
377
-
378
-
379
-
380
-
381
-
382
-
383
-
384
-
385
-
386
 |
 |