2004 Chevrolet Cavalier Owner's Manual - Page 142
2004 Chevrolet Cavalier Manual
Page 142 highlights
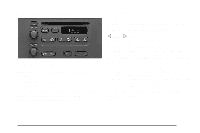
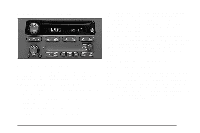
Playing the Radio PWR (Power): Press this knob to turn the system on and off. VOL (Volume): Turn this knob to increase or to decrease volume. AUTO VOL (Automatic Volume): With automatic volume, your audio system adjusts automatically to make up for road and wind noise as you drive. Set the volume at the desired level. Press this button to select LOW, MEDIUM, or HIGH. AVOL will appear on the display. Each higher setting will allow for more volume compensation at faster vehicle speeds. Then as you drive, automatic volume increases the volume, as necessary, to overcome noise at any speed. The volume level should always sound the same to you as you drive. NONE will appear on the display if the radio cannot determine the vehicle speed. If you don't want to use automatic volume, select OFF. DISPL (Display): Press this knob to switch the display between the radio station frequency and the time. Time display is available with the ignition turned off. For RDS, press the DISPL knob to change what appears on the display while using RDS. The display options are station name, RDS station frequency, PTY, and the name of the program (if available). For XM™ (48 contiguous US states, if equipped), press the DISPL knob while in XM mode to retrieve four different categories of related to the current song or channel: Artist, Song Title, Category or PTY, Channel Number/Channel Name. To change the default on the display, press the DISPL knob until you see the display you want, then hold this knob for two seconds. The radio will produce one beep and the selected display will now be the default. Finding a Station BAND: Press this button to switch between FM1, FM2, AM, or XM1 or XM2 (48 contiguous US states, if equipped). The display will show your selection. TUNE: Turn this knob to select radio stations. q SEEK r: Press the right or the left arrow to go to the next or to the previous station and stay there. The radio will seek only to stations that are in the selected band and only to those with a strong signal. 3-44
-
 1
1 -
2
-
3
-
4
-
5
-
6
-
7
-
8
-
9
-
10
-
11
-
12
-
13
-
14
-
15
-
16
-
17
-
18
-
19
-
20
-
21
-
22
-
23
-
24
-
25
-
26
-
27
-
28
-
29
-
30
-
31
-
32
-
33
-
34
-
35
-
36
-
37
-
38
-
39
-
40
-
41
-
42
-
43
-
44
-
45
-
46
-
47
-
48
-
49
-
50
-
51
-
52
-
53
-
54
-
55
-
56
-
57
-
58
-
59
-
60
-
61
-
62
-
63
-
64
-
65
-
66
-
67
-
68
-
69
-
70
-
71
-
72
-
73
-
74
-
75
-
76
-
77
-
78
-
79
-
80
-
81
-
82
-
83
-
84
-
85
-
86
-
87
-
88
-
89
-
90
-
91
-
92
-
93
-
94
-
95
-
96
-
97
-
98
-
99
-
100
-
101
-
102
-
103
-
104
-
105
-
106
-
107
-
108
-
109
-
110
-
111
-
112
-
113
-
114
-
115
-
116
-
117
-
118
-
119
-
120
-
121
-
122
-
123
-
124
-
125
-
126
-
127
-
128
-
129
-
130
-
131
-
132
-
133
-
134
-
135
-
136
-
 137
137 -
 138
138 -
 139
139 -
 140
140 -
 141
141 -
 142
142 -
 143
143 -
 144
144 -
 145
145 -
 146
146 -
 147
147 -
148
-
149
-
150
-
151
-
152
-
153
-
154
-
155
-
156
-
157
-
158
-
159
-
160
-
161
-
162
-
163
-
164
-
165
-
166
-
167
-
168
-
169
-
170
-
171
-
172
-
173
-
174
-
175
-
176
-
177
-
178
-
179
-
180
-
181
-
182
-
183
-
184
-
185
-
186
-
187
-
188
-
189
-
190
-
191
-
192
-
193
-
194
-
195
-
196
-
197
-
198
-
199
-
200
-
201
-
202
-
203
-
204
-
205
-
206
-
207
-
208
-
209
-
210
-
211
-
212
-
213
-
214
-
215
-
216
-
217
-
218
-
219
-
220
-
221
-
222
-
223
-
224
-
225
-
226
-
227
-
228
-
229
-
230
-
231
-
232
-
233
-
234
-
235
-
236
-
237
-
238
-
239
-
240
-
241
-
242
-
243
-
244
-
245
-
246
-
247
-
248
-
249
-
250
-
251
-
252
-
253
-
254
-
255
-
256
-
257
-
258
-
259
-
260
-
261
-
262
-
263
-
264
-
265
-
266
-
267
-
268
-
269
-
270
-
271
-
272
-
273
-
274
-
275
-
276
-
277
-
278
-
279
-
280
-
281
-
282
-
283
-
284
-
285
-
286
-
287
-
288
-
289
-
290
-
291
-
292
-
293
-
294
-
295
-
296
-
297
-
298
-
299
-
300
-
301
-
302
-
303
-
304
-
305
-
306
-
307
-
308
-
309
-
310
-
311
-
312
-
313
-
314
-
315
-
316
-
317
-
318
-
319
-
320
-
321
-
322
-
323
-
324
-
325
-
326
-
327
-
328
-
329
-
330
-
331
-
332
-
333
-
334
-
335
-
336
-
337
-
338
-
339
-
340
-
341
-
342
-
343
-
344
-
345
-
346
-
347
-
348
-
349
-
350
-
351
-
352
 |
 |