2005 Chevrolet Aveo Owner's Manual - Page 136
2005 Chevrolet Aveo Manual

Page 136 highlights
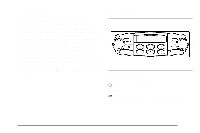
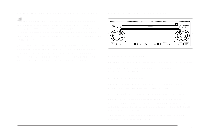
Setting Preset Stations Up to 18 stations (six FM1, six FM2, and six AM), can be programmed on the six numbered pushbuttons, by performing the following steps: 1. Turn the radio on. 2. Press AM/FM to select FM1, FM2, or AM. 3. Tune in the desired station. 4. Press and hold one of the six numbered pushbuttons for longer than two seconds. The pushbutton number will flash on the display when the station has been set. Whenever that numbered pushbutton is pressed, the station that was set will return. 5. Repeat the steps for each pushbutton. Setting the Tone (Bass/Treble) SOUND (Bass/Treble): Press this button until BAS appears on the display. Then turn the volume knob to increase or to decrease the bass. The display will show the bass level. When finished making the selection, press this button to select the bass level. Press this button until TRE appears on the display. Turn the volume knob to increase or to decrease the treble. The display will show the treble level. When finished making the selection, press this button to select the treble level. If a station is weak or noisy, decrease the treble. SOUND (Equalization): Press this button until EQ OFF appears on the display to select customized equalization settings designed for classic, pop, rock, jazz, and voice. Turn the volume knob until the desired equalization setting appears on the display. When finished making the selection, press the SOUND button to select the equalization setting. To cancel an equalization setting, press the SOUND button until EQ OFF appears on the display, turn the volume knob until OFF appears on the display, then press the SOUND button again to select the equalization setting. Automatic Store Six FM1 preset stations with the strongest reception in the region can be automatically stored. Press the AST button for longer than one second. Once the stations are stored, the radio will switch to FM1 and the first preset station will begin to play. FM-A will appear on the display when listening to the automatic stored stations. Press the AM-FM button to cancel automatic store. 3-38
-
 1
1 -
2
-
3
-
4
-
5
-
6
-
7
-
8
-
9
-
10
-
11
-
12
-
13
-
14
-
15
-
16
-
17
-
18
-
19
-
20
-
21
-
22
-
23
-
24
-
25
-
26
-
27
-
28
-
29
-
30
-
31
-
32
-
33
-
34
-
35
-
36
-
37
-
38
-
39
-
40
-
41
-
42
-
43
-
44
-
45
-
46
-
47
-
48
-
49
-
50
-
51
-
52
-
53
-
54
-
55
-
56
-
57
-
58
-
59
-
60
-
61
-
62
-
63
-
64
-
65
-
66
-
67
-
68
-
69
-
70
-
71
-
72
-
73
-
74
-
75
-
76
-
77
-
78
-
79
-
80
-
81
-
82
-
83
-
84
-
85
-
86
-
87
-
88
-
89
-
90
-
91
-
92
-
93
-
94
-
95
-
96
-
97
-
98
-
99
-
100
-
101
-
102
-
103
-
104
-
105
-
106
-
107
-
108
-
109
-
110
-
111
-
112
-
113
-
114
-
115
-
116
-
117
-
118
-
119
-
120
-
121
-
122
-
123
-
124
-
125
-
126
-
127
-
128
-
129
-
130
-
 131
131 -
 132
132 -
 133
133 -
 134
134 -
 135
135 -
 136
136 -
 137
137 -
 138
138 -
 139
139 -
 140
140 -
 141
141 -
142
-
143
-
144
-
145
-
146
-
147
-
148
-
149
-
150
-
151
-
152
-
153
-
154
-
155
-
156
-
157
-
158
-
159
-
160
-
161
-
162
-
163
-
164
-
165
-
166
-
167
-
168
-
169
-
170
-
171
-
172
-
173
-
174
-
175
-
176
-
177
-
178
-
179
-
180
-
181
-
182
-
183
-
184
-
185
-
186
-
187
-
188
-
189
-
190
-
191
-
192
-
193
-
194
-
195
-
196
-
197
-
198
-
199
-
200
-
201
-
202
-
203
-
204
-
205
-
206
-
207
-
208
-
209
-
210
-
211
-
212
-
213
-
214
-
215
-
216
-
217
-
218
-
219
-
220
-
221
-
222
-
223
-
224
-
225
-
226
-
227
-
228
-
229
-
230
-
231
-
232
-
233
-
234
-
235
-
236
-
237
-
238
-
239
-
240
-
241
-
242
-
243
-
244
-
245
-
246
-
247
-
248
-
249
-
250
-
251
-
252
-
253
-
254
-
255
-
256
-
257
-
258
-
259
-
260
-
261
-
262
-
263
-
264
-
265
-
266
-
267
-
268
-
269
-
270
-
271
-
272
-
273
-
274
-
275
-
276
-
277
-
278
-
279
-
280
-
281
-
282
-
283
-
284
-
285
-
286
-
287
-
288
-
289
-
290
-
291
-
292
-
293
-
294
-
295
-
296
-
297
-
298
-
299
-
300
-
301
-
302
-
303
-
304
-
305
-
306
-
307
-
308
-
309
-
310
-
311
-
312
-
313
-
314
-
315
-
316
-
317
-
318
-
319
-
320
-
321
-
322
 |
 |