2005 Chrysler Crossfire Owner's Manual - Page 176
2005 Chrysler Crossfire Manual
Page 176 highlights
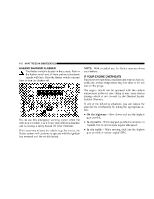
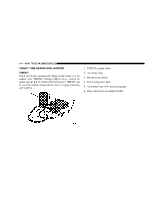
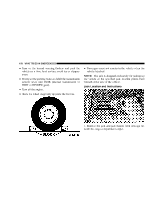
176 WHAT TO DO IN EMERGENCIES 10. Insert the power plug (4) into the power point on the instrument panel. 11. Turn the ignition key to the ON/RUN position. 12. Press the switch on the air pump to 1. The air pump should start to inflate the tire. 13. After five minutes, the tire should be inflated to at least 26 psi (180 kPa) on the pressure gauge. 14. If the tire doesn't inflate to this level, press the air pump switch to 0, disconnect the TIREFIT system from the tire, and drive the vehicle back and forth approximately 30 feet (9.1 m) to distribute the sealant more evenly within the tire. 15. Attach the air pump hose directly to the tire, press the switch to 1, and inflate the tire again. NOTE: If a tire pressure of 26 psi (180 kPa) is not reached after five minutes, the tire is too badly damaged. Do not attempt to drive the vehicle further, and call for assistance. 16. If a tire pressure of 26 psi (180 kPa) is obtained, press the air pump switch to 0, turn the ignition switch to the OFF/LOCK position, and disconnect the TIREFIT system. 17. Drive the vehicle for about 10 minutes to ensure optimum distribution of the tire sealant within the tire. 18. Check the pressure in the tire. If the pressure is above 19 psi (130 kPa), inflate the tire to the pressure indicated on the tire pressure label on the driver side latch pillar. 19. Have the tire inspected at the earliest opportunity at an authorized dealer or tire service center. NOTE: Do not exceed 50 mph (80 km/h) until the tire has been inspected. NOTE: If a pressure of at least 19 psi (130 kPa) cannot be maintained in the tire, the tire is too badly damaged. Do not attempt to drive the vehicle further, and call for assistance.
-
 1
1 -
2
-
3
-
4
-
5
-
6
-
7
-
8
-
9
-
10
-
11
-
12
-
13
-
14
-
15
-
16
-
17
-
18
-
19
-
20
-
21
-
22
-
23
-
24
-
25
-
26
-
27
-
28
-
29
-
30
-
31
-
32
-
33
-
34
-
35
-
36
-
37
-
38
-
39
-
40
-
41
-
42
-
43
-
44
-
45
-
46
-
47
-
48
-
49
-
50
-
51
-
52
-
53
-
54
-
55
-
56
-
57
-
58
-
59
-
60
-
61
-
62
-
63
-
64
-
65
-
66
-
67
-
68
-
69
-
70
-
71
-
72
-
73
-
74
-
75
-
76
-
77
-
78
-
79
-
80
-
81
-
82
-
83
-
84
-
85
-
86
-
87
-
88
-
89
-
90
-
91
-
92
-
93
-
94
-
95
-
96
-
97
-
98
-
99
-
100
-
101
-
102
-
103
-
104
-
105
-
106
-
107
-
108
-
109
-
110
-
111
-
112
-
113
-
114
-
115
-
116
-
117
-
118
-
119
-
120
-
121
-
122
-
123
-
124
-
125
-
126
-
127
-
128
-
129
-
130
-
131
-
132
-
133
-
134
-
135
-
136
-
137
-
138
-
139
-
140
-
141
-
142
-
143
-
144
-
145
-
146
-
147
-
148
-
149
-
150
-
151
-
152
-
153
-
154
-
155
-
156
-
157
-
158
-
159
-
160
-
161
-
162
-
163
-
164
-
165
-
166
-
167
-
168
-
169
-
170
-
 171
171 -
 172
172 -
 173
173 -
 174
174 -
 175
175 -
 176
176 -
 177
177 -
 178
178 -
 179
179 -
 180
180 -
 181
181 -
182
-
183
-
184
-
185
-
186
-
187
-
188
-
189
-
190
-
191
-
192
-
193
-
194
-
195
-
196
-
197
-
198
-
199
-
200
-
201
-
202
-
203
-
204
-
205
-
206
-
207
-
208
-
209
-
210
-
211
-
212
-
213
-
214
-
215
-
216
-
217
-
218
-
219
-
220
-
221
-
222
-
223
-
224
-
225
-
226
-
227
-
228
-
229
-
230
-
231
-
232
-
233
-
234
-
235
-
236
-
237
-
238
-
239
-
240
-
241
-
242
-
243
-
244
-
245
-
246
-
247
-
248
-
249
-
250
-
251
-
252
-
253
-
254
-
255
-
256
-
257
-
258
-
259
-
260
-
261
-
262
-
263
-
264
-
265
-
266
-
267
-
268
-
269
-
270
-
271
-
272
-
273
-
274
-
275
-
276
-
277
-
278
-
279
-
280
-
281
-
282
-
283
-
284
-
285
-
286
-
287
-
288
 |
 |