1999 Ford Escort Owner Guide 1st Printing
1999 Ford Escort Manual
1999 Ford Escort manual content summary:
- 1999 Ford Escort | Owner Guide 1st Printing - Page 1
Introduction Instrumentation Controls and features Seating and safety restraints Starting and driving Starting Driving Roadside emergencies Servicing Maintenance and retrieval system or translation in whole or part is not permitted without written authorization from Ford Motor Company. Copyright - 1999 Ford Escort | Owner Guide 1st Printing - Page 2
this Owner Guide contains information on this subject. Please refer to the Index to locate the appropriate section which will provide you moving parts a chance to break in. INFORMATION ABOUT THIS GUIDE The information found in this guide was in effect at the time of printing. Ford may change the - 1999 Ford Escort | Owner Guide 1st Printing - Page 3
Instrumentation 3 - 1999 Ford Escort | Owner Guide 1st Printing - Page 4
(pg. 42) 60 50 40 100 80 70 80 120 140 THEFT 90 160 E FUEL FILL 1 / 2 3 2 1 4 5 RPMx1000 6 7 8 F C H 30 60 0 00113 100 LOW FUEL MIRROR L Power side view mirrors* (pg. 14) Speed control* (pg. 44) Instrument panel dimmer switch (pg. 14) *if equipped Driver side air bag (pg. 71) 4 - 1999 Ford Escort | Owner Guide 1st Printing - Page 5
(pg. 49) Passenger side air bag (pg. 71) F MIST OFF IN AM FM SEEK TRACK SCAN TUNE DISCS H M TAPE CD BASS TREB EJ VOL PUSH ON PREMIUM SOUND DOLBY B NR REW FF + SIDE 1-2 1 2 3 4 5 COMP 6 SHUF OFF A/C BAL FADE LO R.DEF HI MAX A/C Climate control system (pg. 37) Electronic - 1999 Ford Escort | Owner Guide 1st Printing - Page 6
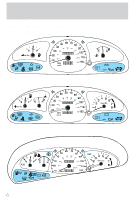
20 10 40 0 00000 20 100 110 120 3 2 1 4 5 RPMx1000 6 7 8 180 LOW FUEL SERVICE ENGINE SOON P ! BRAKE MPH km/h ABS 0 0 0 0 200 - + THEFT ZX2 coupe instrument cluster 60 50 40 80 100 70 80 120 140 THEFT 90 160 E FUEL FILL 1 / 2 3 2 1 4 5 RPMx1000 6 7 8 F C H 30 20 10 40 60 - 1999 Ford Escort | Owner Guide 1st Printing - Page 7
to check the bulb. If it comes on after the engine is started, one of the engine's emission control systems may be malfunctioning. The light may illuminate without a driveability concern being noted. The vehicle will usually be drivable and will not require towing. What you should do if the Service - 1999 Ford Escort | Owner Guide 1st Printing - Page 8
opportunity. Light is blinking: Engine misfire is occurring which could damage your catalytic converter. You should drive in a moderate fashion (avoid heavy acceleration and deceleration) and have your vehicle serviced at the first available opportunity. Under engine misfire conditions, excessive - 1999 Ford Escort | Owner Guide 1st Printing - Page 9
shift indicator light illuminates when the manual transmission should be shifted to the next highest gear. Anti-lock brake system (ABS) (If equipped) Momentarily illuminates when the ignition is turned on and the engine ABS is off. If the light does not illuminate momentarily at start up, remains - 1999 Ford Escort | Owner Guide 1st Printing - Page 10
service. Engine oil pressure Momentarily illuminates when the ignition is turned to the ON position and the engine is off. Illuminates when the oil pressure falls below the normal range. Stop the vehicle as soon as safely possible and switch off the engine immediately. Check driver's door is opened - 1999 Ford Escort | Owner Guide 1st Printing - Page 11
40 0 00000 20 100 110 120 3 2 1 4 5 RPMx1000 6 7 8 180 LOW FUEL SERVICE ENGINE SOON P ! BRAKE MPH km/h ABS 0 0 0 0 200 - + THEFT ZX2 coupe instrument cluster gauges 60 50 40 80 100 70 80 120 140 THEFT 90 160 E FUEL FILL 1 / 2 3 2 1 4 5 RPMx1000 6 7 8 F C H 30 20 10 40 60 - 1999 Ford Escort | Owner Guide 1st Printing - Page 12
overheating. Stop the vehicle as soon as safely possible, switch off the engine immediately and let the engine cool. Refer to Engine coolant in the Maintenance and care chapter. C H Never remove the coolant reservoir cap while the engine is running or hot. This gauge indicates the temperature of - 1999 Ford Escort | Owner Guide 1st Printing - Page 13
Registers the kilometers (miles) of individual journeys. To reset, depress the control. 40 30 20 10 40 MPH 0 0 0 0 120 60 Tachometer (if equipped) Indicates the engine speed in revolutions per minute. Driving with your tachometer pointer in the red zone may damage the engine. THEFT 3 2 1 4 5 - 1999 Ford Escort | Owner Guide 1st Printing - Page 14
and features PANEL DIMMER CONTROL Use to adjust the brightness of the instrument panel during headlamp and parklamp operation. Coupe • Rotate up to brighten. • Rotate down to dim. Sedan/Wagon • Rotate left to brighten. • Rotate right to dim. POWER SIDE VIEW MIRRORS (IF EQUIPPED) The - 1999 Ford Escort | Owner Guide 1st Printing - Page 15
you wish to tilt the mirror. MIRRORS L R 3. Return to the center position to lock mirrors in place. TRUNK REMOTE CONTROL Press the remote trunk release control on the instrument panel to open the trunk. TRUN SE K RELEA TRUN SE USING YOUR AUDIO SYSTEM AM/FM stereo H M SEEK SCAN TUNE BASS - 1999 Ford Escort | Owner Guide 1st Printing - Page 16
level and the ignition is turned off, the volume will come back on at a "nominal" listening level when the ignition switch is turned back on. If you wish to maintain your preset volume level, turn the audio system off with the power control before switching off the ignition. AM/FM select The AM/FM - 1999 Ford Escort | Owner Guide 1st Printing - Page 17
and features Tune adjust The tune control works in radio mode. SEEK TUNE Tune adjust in radio mode • Press the to move for quick movement. located there). Hold the Seek function The seek function control works in radio mode. SEEK TUNE SEEK TUNE Scan function The scan function works in radio mode - 1999 Ford Escort | Owner Guide 1st Printing - Page 18
the sound returns, indicating the station is held in memory on the control you selected. Bass/treble adjust • The bass adjust control allows you to increase or decrease the audio system's bass output. • The treble adjust control allows you to increase or decrease the audio system's treble output - 1999 Ford Escort | Owner Guide 1st Printing - Page 19
and left speakers. • Press the BAL control. Toggle - + between the + and - control to adjust the speaker sound. BAL FADE • Speaker sound can be adjusted between the front and rear speakers. • Press the FADE control. Toggle between the + and - control to adjust the speaker sound. Setting the clock To - 1999 Ford Escort | Owner Guide 1st Printing - Page 20
system on or off. VOL PUSH ON Turn control to raise or lower volume. VOL PUSH ON If the volume is set above a certain level and the ignition is turned off, the volume will come back on at a "nominal" listening level when the ignition switch is turned back on. If you wish to - 1999 Ford Escort | Owner Guide 1st Printing - Page 21
AM or FM frequency bands. Press the control to switch between AM, FM1 or FM2 memory preset stations. AM FM AM/FM select in tape mode Press this control to stop tape play and begin radio play. Tune adjust The tune control works in radio mode. SEEK TUNE Tune adjust in radio mode • Press the to - 1999 Ford Escort | Owner Guide 1st Printing - Page 22
on the tape. (The tape scans in a forward direction. At the end of the tape's first side, direction automatically reverses to the opposite side of the tape.) To stop on a particular selection, press the control again. Radio station memory preset The radio is equipped with six station memory preset - 1999 Ford Escort | Owner Guide 1st Printing - Page 23
returns, indicating the station is held in memory on the control you selected. SIDE 1-2 Bass/treble adjust • The bass adjust control allows you to increase or decrease the audio system's bass output. • The treble adjust control allows you to increase or decrease the audio system's treble output - 1999 Ford Escort | Owner Guide 1st Printing - Page 24
beginning of the tape is reached. Fast forward The fast forward control works in tape mode. • In the tape mode, tape direction will automatically reverse when the end of the tape is reached. Tape side select Press this control to play the alternate side of a tape. REW FF REW FF 1 SIDE 1-2 24 - 1999 Ford Escort | Owner Guide 1st Printing - Page 25
and features Eject function Press the control to stop and eject a tape. EJ DOLBY B NR REW FF and deactivate) Dolby noise reduction. Setting the clock To set the hour, press the hour (h) control and press: • (+) to increase hour and • (−) to decrease hour 2 H M 12: + To set the - 1999 Ford Escort | Owner Guide 1st Printing - Page 26
and features Premium AM/FM Stereo/Cassette/ Premium Sound (Radio Controlled CD Changer Compatible) AM FM SEEK TRACK SCAN TUNE DISCS BASS TREB H M TAPE CD EJ VOL PUSH ON PREMIUM SOUND DOLBY B NR REW FF + 1 SIDE 1-2 2 3 4 5 COMP 6 SHUF OFF A/C BAL FADE LO R.DEF HI MAX A/C Volume - 1999 Ford Escort | Owner Guide 1st Printing - Page 27
radio play. AM FM AM FM AM/FM select in CD mode Press this control to stop CD play and begin radio play. You can switch from CD play to tape play by simply inserting a tape into the cassette deck. Tune adjust The tune control works in radio or CD mode (if equipped). SEEK TRACK TUNE DISCS 27 - 1999 Ford Escort | Owner Guide 1st Printing - Page 28
quick movement. Tune adjust for CD mode (if equipped) • Press the to select the SEEK previous disc in the CD changer. TRACK (Play will begin on the first track of the disc unless the CD changer TUNE is in shuffle mode. Refer to DISCS Shuffle feature for more information. Hold the control to continue - 1999 Ford Escort | Owner Guide 1st Printing - Page 29
seconds or more and you press , the CD changer will replay that selection from the beginning. to seek forward to the next track of the current disc. After • Press the last track has been completed, the first track of the current disc will automatically replay. Scan function The scan function works - 1999 Ford Escort | Owner Guide 1st Printing - Page 30
1-2 COMP SHUF indicating the station is held in memory on the control you selected. Bass/treble adjust • The bass adjust control allows you to increase or decrease the audio system's bass output. • The treble adjust control allows you to increase or decrease the audio system's treble output. BASS - 1999 Ford Escort | Owner Guide 1st Printing - Page 31
results in fast rewind. Fast forward The fast forward control works in tape and CD modes (if equipped). REW FF • In the tape mode, tape direction will automatically reverse when the end of the tape is reached. • In CD mode, pressing the control for less than three seconds results in slow forward - 1999 Ford Escort | Owner Guide 1st Printing - Page 32
playback. Press the button to activate (and deactivate) Dolby noise reduction. Compression adjust Compression adjust works in CD mode (if equipped), and brings soft and loud CD passages together for a more consistent listening level. Press the COMP control to activate and deactivate compression - 1999 Ford Escort | Owner Guide 1st Printing - Page 33
current disc in random order. If equipped with the CD changer, the shuffle feature continues to the next disc after all tracks are played. Press the SHUFFLE control to start this feature. Random order play will continue until the SHUFFLE control is pressed again. Setting the clock To set the hour - 1999 Ford Escort | Owner Guide 1st Printing - Page 34
Controls and features CD changer (if equipped) The CD changer is located in the trunk of your vehicle. Slide the door to access the CD changer magazine. Press to eject the magazine. Make sure only one disc is inserted in each slot. Each disc must be inserted with the label surface - 1999 Ford Escort | Owner Guide 1st Printing - Page 35
off. Troubleshooting the CD changer (if equipped) The laser beam used in the compact disc player is harmful to the eyes. Do not attempt to disassemble the case. If sound skips: • You may be traveling on a rough road, playing badly scratched discs or the disc may be dirty. Skipping will not scratch - 1999 Ford Escort | Owner Guide 1st Printing - Page 36
• Handle discs by their edges only. Never touch the playing surface. • Do not expose discs to direct sunlight or heat sources for extended periods of time. • Do not insert more than one disc into each slot of the CD changer magazine. Cleaning cassette player (if equipped) Clean the tape player head - 1999 Ford Escort | Owner Guide 1st Printing - Page 37
is displayed. The audio system automatically switches to single channel reception if it will improve the reception of a station normally received in stereo. Audio system warranties and service Refer to the "Warranty Guide" for audio system warranty information. If service is necessary, see your - 1999 Ford Escort | Owner Guide 1st Printing - Page 38
Mode selector control Controls the direction of the airflow to the inside of the vehicle. OFF (Panel)-Distributes outside air through the instrument panel registers. OFF-Outside air is shut out and the fan will not operate. (Panel and floor)-Distributes outside air through the instrument - 1999 Ford Escort | Owner Guide 1st Printing - Page 39
Controls the direction of the airflow to the inside of the vehicle. OFF A/C MAX A/C and The air conditioning compressor will operate in all modes except . However, the air conditioning will only function if the outside temperature is about 10°C (50°F) or higher. Since the air conditioner removes - 1999 Ford Escort | Owner Guide 1st Printing - Page 40
from the instrument panel registers. (Panel)-Distributes outside air through the instrument panel • registers. However, the air will not be cooled below the outside temperature because the air conditioning does not operate in this mode. • OFF-Outside air is shut out and the fan will not operate. For - 1999 Ford Escort | Owner Guide 1st Printing - Page 41
Controls and features instrument panel registers. If the temperature is about 10°C (50°F) or higher, the air conditioner will automatically dehumidify the air to reduce fogging. • -Distributes outside air through the windshield defroster ducts. It can be used to clear ice or fog from the windshield. - 1999 Ford Escort | Owner Guide 1st Printing - Page 42
3. Press and release the control again to turn off. The defroster will automatically turn off after fifteen minutes. POSITIONS OF THE IGNITION 1. LOCK, locks the steering wheel, 3 gearshift lever (automatic transaxle only) and allows key removal. On 2 vehicles with a manual transaxle ON push the key - 1999 Ford Escort | Owner Guide 1st Printing - Page 43
• the headlamp control is in the OFF or Parking lamps position. Always remember to turn on your headlamps at dusk or during inclement weather. The Daytime Running Light (DRL) System does not activate your tail lamps and generally may not provide adequate lighting during these conditions. Failure to - 1999 Ford Escort | Owner Guide 1st Printing - Page 44
(IF EQUIPPED) Rotate forward to activate. OFF OFF SPEED CONTROL (IF EQUIPPED) To turn speed control on • Press ON. Vehicle speed cannot be controlled until the vehicle is traveling at or above 48 km/h (30 mph). ON OFF Do not use the speed control in heavy traffic or on roads that are winding - 1999 Ford Escort | Owner Guide 1st Printing - Page 45
control is switched off, the previously programmed set speed will be erased. To set a speed • Press SET/SET ACC/SET ACCEL. For speed control to operate, the speed control may want to shift to the next lower gear or apply the brakes to reduce your vehicle speed. If your vehicle slows down more than - 1999 Ford Escort | Owner Guide 1st Printing - Page 46
a lower set speed • Press and hold CST/COAST. Release the control when the desired speed is reached or • Press and release CST/COAST. Each press will decrease the set speed by 1.6 km/h (1 mph) or CST RSM SET ACC • Depress the brake pedal. When the desired vehicle speed is reached, press SET/SET - 1999 Ford Escort | Owner Guide 1st Printing - Page 47
Controls and features To disengage speed control • Depress the brake pedal or • Depress the clutch pedal (if equipped) Disengaging the speed control will not erase the previously programmed set speed. Pressing OFF will erase the previously programmed set speed. ON OFF 47 - 1999 Ford Escort | Owner Guide 1st Printing - Page 48
down to move the steering wheel up or down. Hold the control while adjusting the wheel to the desired position, then push the control back up to lock the steering wheel in position. Never adjust the steering wheel when the vehicle is moving. HAZARD FLASHER For information on the hazard flasher - 1999 Ford Escort | Owner Guide 1st Printing - Page 49
AND WASHER • For intermittent wiping, move the control down one position and rotate the wiper switch to the desired position. F MIST OFF INT 1 2 INT PULL S • For low speed wiping, move the control down two positions. • For high speed wiping, move the control down three positions. F MIST OFF INT - 1999 Ford Escort | Owner Guide 1st Printing - Page 50
To turn rear washers on briefly (for quick cleaning), rotate the wiper/washer control downward to the position and release. MOON ROOF (IF EQUIPPED) • Press open the moon roof. • Press the opposite end of the toggle control to close the moon roof from either position. OPEN Sliding shade The moon - 1999 Ford Escort | Owner Guide 1st Printing - Page 51
between the driver and passenger seats. The dome lamp will stay on if the control is moved to the ON position. When the control is moved to the DOOR position, the lamp will only come on if a door is opened. If the control is moved to the OFF position, the lamp will not come on at all. The map - 1999 Ford Escort | Owner Guide 1st Printing - Page 52
can be opened from the outside when the doors are unlocked. The childproof locks are located on rear edge of each rear door and must be set separately for each door. Setting the lock for one door will not automatically set the lock for both doors. Move lock control down to engage the lock. Move - 1999 Ford Escort | Owner Guide 1st Printing - Page 53
windows. • Press the top portion of the rocker switch to close. • Press the bottom portion of the rocker switch to open. Express down To make the driver window open fully without holding the window control, press the driver window control completely down and release quickly. Depress again to stop - 1999 Ford Escort | Owner Guide 1st Printing - Page 54
with the operation of the accelerator or the brake pedal. To remove the floor mat, reverse the installation procedure. FUEL PUMP SHUT-OFF SWITCH Refer to the Roadside emergencies chapter for instructions on how to operate the fuel pump shut-off switch. CARGO COVER (IF EQUIPPED) Your vehicle may be - 1999 Ford Escort | Owner Guide 1st Printing - Page 55
remote keyless entry problem with your vehicle, ensure ALL key fobs (remote entry transmitters) are brought to the dealership, to aid in troubleshooting. Unlocking the doors Press this control to unlock the driver's door. The interior lamps will illuminate. With the all-door remote entry system - 1999 Ford Escort | Owner Guide 1st Printing - Page 56
quick chirps, reminding you to properly close the doors. This process will also arm your anti-theft system (if equipped). For more information on arming the anti-theft system, refer to Anti-theft system in this chapter. Opening the trunk Press the control once to open the trunk. On wagons, pressing - 1999 Ford Escort | Owner Guide 1st Printing - Page 57
be caused by: • weather conditions • nearby radio towers • structures around the vehicle • other vehicles parked next to the vehicle To replace the battery: 1. Twist a thin coin between the two halves of the transmitter near the key ring. DO NOT TAKE THE FRONT PART OF THE TRANSMITTER APART. 2. Place - 1999 Ford Escort | Owner Guide 1st Printing - Page 58
control is pressed. The dome lamp must be set to the DOOR position in order for the illuminated entry system to operate. ANTI-THEFT SYSTEM (IF EQUIPPED) When armed, the anti-theft system will help prevent your vehicle from unauthorized entry. If there is any potential perimeter anti-theft problem - 1999 Ford Escort | Owner Guide 1st Printing - Page 59
will stay illuminated until all the doors are closed and then illuminate for 30 seconds and begin flashing. When an unauthorized entry occurs, the activated system will: • flash the parking lamps and the THEFT light • sound the horn The flashing parking lamps and the honking horn automatically shut - 1999 Ford Escort | Owner Guide 1st Printing - Page 60
sounding until the trunk is closed again. Using the ignition key to unlock doors/trunk/liftgate will not disarm the anti-theft system. Disarming a triggered anti-theft system Press either the unlock or panic control to disarm the system. A triggered system may also be disarmed by inserting the - 1999 Ford Escort | Owner Guide 1st Printing - Page 61
properly adjust your head restraints, lift the head restraint so that it is located directly behind your head or as close to that position as possible. Refer to the following to raise and lower the head restraints. The head restraints can be moved up and down. Push control to lower head restraint - 1999 Ford Escort | Owner Guide 1st Printing - Page 62
front manual seat Never adjust the driver's seat or seatback when the vehicle is moving. Do not pile cargo higher than the seatbacks to avoid injuring people in a collision or sudden stop. Always drive and ride with your seatback upright and the lap belt snug and low across the hips. Lift handle to - 1999 Ford Escort | Owner Guide 1st Printing - Page 63
Driver seat memory recliner (if equipped) • Pull control to adjust seatback. • To retain selected seatback position, release seatback by moving memory recliner control forward to release seatback. • Push seatback rearward until the seatback latches. This will be the first position selected. 63 - 1999 Ford Escort | Owner Guide 1st Printing - Page 64
control downward or pull up on strap and • Pull the seatback forward and down. Returning the seat to the upright position Check to see that the seat and seatback is latched securely in position. Keep floor area free of objects that would prevent proper seat engagement. Never attempt to adjust - 1999 Ford Escort | Owner Guide 1st Printing - Page 65
cannot protect the child from injury in a collision. All occupants of the vehicle, including the driver, should always properly wear their safety belts, even when an air bag SRS is provided. It is extremely dangerous to ride in a cargo area, inside or outside of a vehicle. In a collision, people - 1999 Ford Escort | Owner Guide 1st Printing - Page 66
locking mode In this mode, the shoulder belt is automatically pre-locked. The belt will still retract to remove any slack in the shoulder belt. The automatic locking mode is not available on the driver safety belt. When to use the automatic locking mode • When a tight lap/shoulder fit is desired - 1999 Ford Escort | Owner Guide 1st Printing - Page 67
portion and pull downward until the entire belt is extracted. • Allow the belt to retract. As the belt retracts, you will hear a clicking sound. This indicates the safety belt is now in the automatic locking mode. How to disengage the automatic locking mode Disconnect the combination lap/shoulder - 1999 Ford Escort | Owner Guide 1st Printing - Page 68
middle of your shoulder. Failure to adjust the safety belt properly could reduce the effectiveness of the safety belt and increase the risk of injury in a collision. Lap belts (if equipped) Adjusting the lap belt The lap belt does not adjust automatically. The lap belts should fit snugly and as low - 1999 Ford Escort | Owner Guide 1st Printing - Page 69
is too short for you when fully extended. Do not use extensions to change the fit of the shoulder belt across the torso. Safety belt warning light and indicator chime The seat belt warning light illuminates in the instrument cluster and a chime sounds to remind the occupants to fasten their safety - 1999 Ford Escort | Owner Guide 1st Printing - Page 70
nicks, wears or cuts, replacing if necessary. All safety belt assemblies, including retractors, buckles, front seat belt buckle assemblies, buckle support assemblies (slide bar-if equipped), shoulder belt height adjusters (if equipped), child safety seat tether bracket assemblies (if equipped), and - 1999 Ford Escort | Owner Guide 1st Printing - Page 71
to work with the safety belt to help protect the driver and right front passenger from certain upper body injuries. Air bags DO NOT inflate slowly or gently and the risk of injury from a deploying air bag is greatest close to the trim covering the air bag module. All occupants of the vehicle - 1999 Ford Escort | Owner Guide 1st Printing - Page 72
or over the air bag module. Placing objects on or over the air bag inflation area may cause those objects to be propelled by the air bag into your face and torso causing serious injury. Do not attempt to service, repair, or modify the Air Bag Supplemental Restraint System or its fuses. See your Ford - 1999 Ford Escort | Owner Guide 1st Printing - Page 73
in this guide. Children must always be properly restrained. Accident statistics suggest that children are safer when properly restrained in the rear seating positions than in the front seating position. Failure to follow these instructions may increase the risk of injury in a collision. Air bags can - 1999 Ford Escort | Owner Guide 1st Printing - Page 74
immediately. If the air bag is not replaced, the unrepaired area will increase the risk of injury in a collision. The SRS consists of: • driver and passenger air bag modules (which include the inflators and air bags), • one or more impact and safing sensors, • a readiness light and tone, • and - 1999 Ford Escort | Owner Guide 1st Printing - Page 75
Seating and safety restraints The diagnostic module monitors its own internal circuits and the supplemental air bag electrical system warning (including the impact sensors), the system wiring, the air bag system readiness light, the air bag back up power and the air bag ignitors. Determining if the - 1999 Ford Escort | Owner Guide 1st Printing - Page 76
a collision. Always follow the instructions and warnings that come with size, restrain the child in a safety seat. Children who are too large for child safety seats (as specified by your child safety seat manufacturer) should always wear safety belts. Follow all the important safety restraint and air - 1999 Ford Escort | Owner Guide 1st Printing - Page 77
size and weight of the child. Carefully follow all of the manufacturer's instructions Air Bag Supplemental Restraint System section in this chapter. • Use the correct safety belt buckle for that seating position. • Insert the belt safety belt in the automatic locking mode. Refer to Automatic locking - 1999 Ford Escort | Owner Guide 1st Printing - Page 78
injured in a sudden stop or collision. Installing child safety seats in combination lap and shoulder belt seating positions 1. Position the child safety seat in a seat with a combination lap and shoulder belt. An air bag can kill or injure a child in a child seat. If you must use a forward-facing - 1999 Ford Escort | Owner Guide 1st Printing - Page 79
and safety restraints 3. While holding the shoulder and lap belt portions together, route the tongue through the child seat according to the child seat manufacturer's instructions. Be sure the belt webbing is not twisted. 4. Insert the belt tongue into the proper buckle (the buckle closest to the - 1999 Ford Escort | Owner Guide 1st Printing - Page 80
about ordering a tether strap. Tether anchorage hardware (Coupe) Attachment holes (at both rear seating positions) have been provided in your vehicle to attach anchor hardware, if desired. Tether anchorage hardware kits (part number 613D74) including instructions, may be obtained at no charge from - 1999 Ford Escort | Owner Guide 1st Printing - Page 81
shoulder belt seating positions in this chapter. 2. Refer to the instructions provided in the tether anchor kit. 3. Refer to the instructions provided built for sale in Canada include a tether anchor hardware kit. Be sure to follow the child safety seat manufacturer's instructions. Tighten the - 1999 Ford Escort | Owner Guide 1st Printing - Page 82
Seating and safety restraints • Sedan • Wagon 82 - 1999 Ford Escort | Owner Guide 1st Printing - Page 83
fumes. Important safety precautions A computer system controls the engine's idle revolutions per minute (RPM). When the engine starts, the idle RPM runs faster to warm the engine. If the engine idle speed does not slow down automatically, have the vehicle checked. Do not allow the vehicle to idle - 1999 Ford Escort | Owner Guide 1st Printing - Page 84
2. Make sure the headlamps and vehicle accessories are off. 3. Make sure the parking brake is set. If starting a vehicle with an automatic transaxle: • Make sure the gearshift is in P (Park). P R N D D L If starting a vehicle with a manual transaxle: • Push the clutch pedal to the floor. 84 - 1999 Ford Escort | Owner Guide 1st Printing - Page 85
to 3 (ON) without turning the key to 4 (START). 3 2 CK O0 AC I C ON II 4 ART ST III 1 50 60 70 100 120 E FUEL FILL 1 / 2 40 80 90 140 160 80 60 F 30 20 10 40 0 00000 20 100 110 120 180 LOW FUEL SERVICE ENGINE SOON P ! BRAKE MPH km/h ABS 0 0 0 0 200 50 40 E FUEL FILL 80 60 - 1999 Ford Escort | Owner Guide 1st Printing - Page 86
FUEL SERVICE ENGINE SOON MPH 0 0 0 0 120 P ! BRAKE - + ABS Make sure the corresponding lights illuminate briefly. If a light fails to illuminate, have the vehicle serviced. • If the driver's safety belt is fastened, the light may not illuminate. STARTING THE ENGINE Whenever you start your - 1999 Ford Escort | Owner Guide 1st Printing - Page 87
vehicle immediately. Do not drive if you smell exhaust fumes. These fumes are harmful and could kill you. Have the exhaust and body ventilation systems checked whenever: • the vehicle is raised for service. • the sound of the exhaust system changes. • the vehicle has been damaged in a collision. 87 - 1999 Ford Escort | Owner Guide 1st Printing - Page 88
harm. Important ventilating information If the engine is idling while the vehicle is stopped in an open area for long periods of time, open the windows at least 2.5 cm (one inch). Adjust the heating or air conditioning (if equipped) to bring in fresh air. Improve vehicle ventilation by keeping all - 1999 Ford Escort | Owner Guide 1st Printing - Page 89
functioning of the vehicle's anti-lock brake system. The ABS performs a self-check at 17 km/h (10 mph) after you start the engine and begin to drive away. A brief mechanical noise may be heard during this test. This is normal. If a malfunction is found, the ABS warning light will come on. If the - 1999 Ford Escort | Owner Guide 1st Printing - Page 90
at start up, remains on or continues to flash, the ABS needs to be serviced. With the ABS light on, the anti-lock P ! brake system is disabled and normal braking is still effective unless the brake warning light also remains BRAKE illuminated with parking brake released. (If your brake warning - 1999 Ford Escort | Owner Guide 1st Printing - Page 91
gearshift is securely latched in P (Park) (automatic transaxle) or in 1 (First) (manual transaxle). Push the button on the end of the parking brake and push the handle down as far as possible to release the brake. Driving with the parking brake on will cause the brakes to wear out quickly and reduce - 1999 Ford Escort | Owner Guide 1st Printing - Page 92
interlock that prevents cranking of the engine unless the clutch pedal is depressed. When starting a vehicle with a manual transaxle, you must: 1. Put the gearshift in the neutral position. 1 2 3 4 5 R 2. Hold down the brake pedal. 3. Depress the clutch pedal. 1 92 L 4. Turn the ignition key - 1999 Ford Escort | Owner Guide 1st Printing - Page 93
Driving the clutch pedal to hold your vehicle at a standstill while waiting on a hill. These actions will seriously reduce clutch life. Parking your vehicle 1. Apply the brake and shift into the neutral position. 1 2 3 4 5 R 2. Set the parking brake. 3. Shift into 1 (First). 1 2 3 4 5 R 93 - 1999 Ford Escort | Owner Guide 1st Printing - Page 94
Driving 4. Turn engine off and remove the key. 3 2 CK O0 AC I C ON II 4 ART ST III 1 Do not park your vehicle in Neutral, it may move unexpectedly and injure someone. Use 1 (First) gear and set the parking brake fully. Recommended shift speeds Upshift according to the following charts for best - 1999 Ford Escort | Owner Guide 1st Printing - Page 95
a special lockout feature which prevents you from shifting into R (Reverse) when you downshift from 5 (Fifth). Automatic transaxle (if equipped) Brake-shift interlock This vehicle is equipped with a brake-shift interlock feature that prevents the gearshift from being moved from P (Park) unless the - 1999 Ford Escort | Owner Guide 1st Printing - Page 96
Continue depressing the brake pedal, and remove the shift-lock that a fuse has blown and the vehicle's brakelamps may not be operating properly. Refer to Fuses and relays in the Roadside stopping between shifts, in a steady pattern. Press lightly on the accelerator in each gear. Do not rock - 1999 Ford Escort | Owner Guide 1st Printing - Page 97
you leave your vehicle. If the parking brake is fully released, but the brake warning lamp remains illuminated, the brakes may not be working properly. See your dealer or a qualified service technician. Understanding gearshift positions Hold the brake pedal down while you move the gearshift lever - 1999 Ford Escort | Owner Guide 1st Printing - Page 98
in R (Reverse), the vehicle will move backward. You should always come to a complete stop before shifting in and out of R (Reverse). P R N D D L N (Neutral) With the gearshift in the N (Neutral) position, the vehicle can be started and is free to roll. Hold the brake pedal down while in this - 1999 Ford Escort | Owner Guide 1st Printing - Page 99
automatic overdrive transaxle. It works the same way as D (Drive) but shifts to a fourth gear-an overdrive gear-when your vehicle cruises at a constant speed for any length of time. This fourth gear will . It also gives more engine braking than overdrive to slow your vehicle on downgrades. P R N D D - 1999 Ford Escort | Owner Guide 1st Printing - Page 100
Driving L (Low) Use L (Low) when added engine braking is desired or when descending steep hills. P R N D D L The automatic transaxle will shift into the proper gear to ascend any grade without any need to shift to L (Low). Do not go faster than 61 km/h (38 mph) - 1999 Ford Escort | Owner Guide 1st Printing - Page 101
of a trailer the vehicle is permitted to tow. The maximum trailer weight rating is determined by subtracting the vehicle curb weight for each engine/transmission combination, any required option weight for trailer towing and the weight of the driver from the GCWR for the towing vehicle. • Maximum - 1999 Ford Escort | Owner Guide 1st Printing - Page 102
applying light pressure on the brake pedal. Driving through deep water where the transmission is submerged may allow water into the transmission and cause internal transmission damage. TRAILER TOWING Your vehicle is capable of towing a trailer up to 454 kg (1 000 lbs.) gross trailer weight with - 1999 Ford Escort | Owner Guide 1st Printing - Page 103
weight exceeds the limit of the vehicle and could result in engine damage, transaxle damage, structural damage, loss of control, brakes Electric brakes and manual, automatic or surge-type brakes are safe if installed properly and adjusted to the manufacturer's specifications. The trailer brakes - 1999 Ford Escort | Owner Guide 1st Printing - Page 104
weight. • After you have traveled 80 km (50 miles), thoroughly check your hitch, electrical connections and trailer wheel lug nuts. • When stopped in traffic for long periods of time in hot weather, place the gearshift in P (Park) and increase idle speed. This aids engine cooling and air conditioner - 1999 Ford Escort | Owner Guide 1st Printing - Page 105
hazard flashers simultaneously. • Slide the control to the left to turn the flashers off. RESETTING THE FUEL PUMP SHUT-OFF SWITCH After a collision, if the engine cranks but does not start, the fuel pump shut-off switch may have been activated. The shut-off switch is a device intended to stop the - 1999 Ford Escort | Owner Guide 1st Printing - Page 106
right side of the trunk behind the trunk liner or in the driver's foot well, behind the kick panel. Use the following procedure to reset the fuel pump shut-off switch. 1. Turn the ignition to the OFF position. 2. Check the fuel system for leaks. 3. If no fuel leak is apparent, reset the fuel pump - 1999 Ford Escort | Owner Guide 1st Printing - Page 107
Roadside emergencies FUSES AND RELAYS Fuses If electrical components in the vehicle are not working, a fuse may have blown. Blown fuses are identified by a broken wire within the fuse. Check the appropriate fuses before replacing any electrical components. 15 Always replace a fuse with one that - 1999 Ford Escort | Owner Guide 1st Printing - Page 108
Chime, Instrument Cluster 15A Electronic Automatic Transaxle, Ignition System, Constant Control Relay Module (PCM Relay) 5A Power Mirrors, Radio, RAP System 30A Power Door Locks 15A Horn, Shift Lock 15A A/C-Heater, ABS 10A Backup Lamps, Engine Coolant Level Switch, Instrument Cluster, Rear Window - 1999 Ford Escort | Owner Guide 1st Printing - Page 109
Speed Control Power Windows Cigar Lighter Air Bags Fog Lamps, Daytime Running Lamps (DRL) Premium Sound Amplifier, CD Changer H02S, Evaporative Emission Purge Flow Sensor Blower Motor Relay Sedan/Wagon The fuses are coded as follows: P. Window (C.B.) HEATER R. WIPER HAZARD ROOM ENGINE MIRROR (DOOR - 1999 Ford Escort | Owner Guide 1st Printing - Page 110
15A Air Bag, Engine Controls, TR Sensor 5A Power Mirrors, Radio, Remote Keyless Entry (RKE) 30A Power Door Locks 15A 15A 10A Horn A/C-Heater, ABS Backup Lamps, Engine Controls, Instrument Cluster, Rear Window Defrost, Shift Lock, Warning Chime, Turn Signal Switch Wiper/Washer, Blower Relay Stop - 1999 Ford Escort | Owner Guide 1st Printing - Page 111
30A* Air Bags, Constant Control Relay Module (PCM Relay), Generator 30A* Rear Window Defrost 100A* Overall Circuit Protection 40A* Hazard, Stop, Door Lock, Tail, Room and Horn Fuses of the I/P Fuse Panel 60A* ABS Main Relay 40A* Constant Control Relay Module (Cooling Fan) 111 COOLING FAN 40A FUEL - 1999 Ford Escort | Owner Guide 1st Printing - Page 112
LH 10A HEAD RH 10A USE THE DESIGNATED FUSES ONLY Fuse/Relay Location FUEL INJ. DEFOG MAIN BTN ABS Fuse Amp Description Rating 30A* Air Bags, Engine Controls, Generator 30A* Rear Window Defrost 100A* Charging System, BTN, Cooling Fan, Fuel Pump, OBD-II, ABS Fuses, Ignition Switch, Headlamps 40A - 1999 Ford Escort | Owner Guide 1st Printing - Page 113
emergencies Fuse/Relay Location COOLING FAN OBD-II Fuse Amp Description Rating 40A* Constant Control Relay Module 10A** Data Link Connector (DLC), Instrument Cluster Engine Controls FUEL 20A** PUMP HEAD RH 10A** Headlamps HEAD LH 10A** Headlamps * Fuse Link Cartridge ** Fuse Relays Relays are - 1999 Ford Escort | Owner Guide 1st Printing - Page 114
the ground, the transaxle alone will not prevent the vehicle from moving or slipping off the jack, even if the vehicle is in P (Park) (automatic transaxle) or R (Reverse) (manual transaxle). To prevent the vehicle from moving when you change a tire, be sure the parking brake is set, then block (in - 1999 Ford Escort | Owner Guide 1st Printing - Page 115
Roadside emergencies • Automatic P R N D D L • Manual 1 2 3. Remove the jack, jack handle and spare tire. 3 4 5 R 115 - 1999 Ford Escort | Owner Guide 1st Printing - Page 116
the jack in the jack notch next to the door of the tire you are changing. Turn the handle clockwise until the wheel is completely off the ground. 6. Remove the lug nuts with the lug wrench. 7. Replace the flat tire with the spare tire, making sure the valve stem is facing outward. Reinstall the lug - 1999 Ford Escort | Owner Guide 1st Printing - Page 117
of the disabled vehicle making sure the two vehicles do not touch. Set the parking brake on both vehicles and stay clear of the engine cooling fan and other moving parts. 4. Check all battery terminals and remove any excessive corrosion before you attach the battery cables. Ensure that vent caps are - 1999 Ford Escort | Owner Guide 1st Printing - Page 118
Roadside emergencies Connecting the jumper cables 1. Connect the positive (+) booster cable to the positive (+) terminal of the discharged battery. Note: In the illustrations, lightning bolts are used to designate the assisting (boosting) battery. 2. Connect the other end of the positive (+) cable - 1999 Ford Escort | Owner Guide 1st Printing - Page 119
locations of an exposed metal part (to ground the circuit) are the alternator mounting brackets or an engine lifting eye. Do not use fuel lines, engine rocker covers or the intake Be sure that the cables are clear of fan blades, belts and other moving parts of both engines. 119 - - - + + + + - - 1999 Ford Escort | Owner Guide 1st Printing - Page 120
Jump starting 1. Start the engine of the booster vehicle and run the engine at moderately increased speed. 2. Start the engine of the disabled vehicle. 3. Once the disabled vehicle has been started, run both engines for an additional three minutes before disconnecting the jumper cables. Removing the - 1999 Ford Escort | Owner Guide 1st Printing - Page 121
's battery. 4. Remove the jumper cable from the positive (+) terminal of the disabled vehicle's battery. After the disabled vehicle has been started and the jumper cables removed, allow it to idle for several minutes so the engine computer can relearn its idle conditions. - - - + + - + + 121 - 1999 Ford Escort | Owner Guide 1st Printing - Page 122
to the transaxle. Ford Motor Company provides a towing manual for all authorized tow truck operators. Have your tow truck operator refer to this manual for proper hook-up and towing procedures for your vehicle. TOWING BEHIND ANOTHER VEHICLE If your vehicle has an automatic transaxle, it cannot be - 1999 Ford Escort | Owner Guide 1st Printing - Page 123
and all fuel related parts. If you disconnect the battery, the engine must "relearn" its idle conditions before your vehicle will drive properly, as explained in the Battery section in this chapter. Working with the engine off • Automatic transaxle: 1. Set the parking brake and ensure the gearshift - 1999 Ford Escort | Owner Guide 1st Printing - Page 124
Maintenance and care 2. Turn off the engine and remove the key. P R N D D L 3. Block the wheels to prevent the vehicle from moving unexpectedly. • Manual transaxle: 1. Set the parking brake, depress the clutch and place the gearshift in 1 (First). 124 - 1999 Ford Escort | Owner Guide 1st Printing - Page 125
Maintenance and care 2. Turn off the engine and remove the key. 3. Block the wheels to prevent the vehicle from moving unexpectedly. 1 2 3 4 5 R Working with the engine on • Automatic transaxle: 1. Set the parking brake and ensure the gearshift is securely latched in P (Park). 125 - 1999 Ford Escort | Owner Guide 1st Printing - Page 126
2. Block the wheels to prevent the vehicle from moving unexpectedly. P R N D D L Do not start your engine with the air cleaner removed and do not remove it while the engine is running. • Manual transaxle: 1. Set the parking brake, depress the clutch and place the gearshift in N (Neutral). 126 - 1999 Ford Escort | Owner Guide 1st Printing - Page 127
wheels to prevent the vehicle from moving unexpectedly. 1 2 3 4 5 R Do not start your engine with the air cleaner removed and do not remove it while the engine is running. OPENING THE HOOD 1. Inside the vehicle, pull the hood release handle located under the bottom left corner of the instrument - 1999 Ford Escort | Owner Guide 1st Printing - Page 128
Maintenance and care 2. Go to the front of the vehicle and release the auxiliary latch that is located under the front center of the hood. 3. Lift the hood and secure it with the prop rod. 128 - 1999 Ford Escort | Owner Guide 1st Printing - Page 129
and care IDENTIFYING COMPONENTS IN THE ENGINE COMPARTMENT 2.0L SOHC I4 engine 9 1 2 3 4 8 1. 2. 3. 4. 5. 6. 7. 8. 9. 7 6 5 Engine oil dipstick Brake fluid reservoir Transmission fluid dipstick (automatic transaxle) Battery Air filter assembly Engine oil filler cap Power steering fluid - 1999 Ford Escort | Owner Guide 1st Printing - Page 130
4. 5. 6. 7. 8. 9. Transmission fluid dipstick (automatic transaxle) Battery Air filter assembly Engine oil filler cap Engine oil dipstick Power steering fluid reservoir Engine coolant reservoir Windshield washer fluid reservoir Brake fluid reservoir ENGINE OIL Checking the engine oil Refer to the - 1999 Ford Escort | Owner Guide 1st Printing - Page 131
oil pan. 3. Set the parking brake and ensure the gearshift is securely latched in P (automatic transaxle) or 1st (manual transaxle). 4. Open the hood. Protect yourself from engine heat. 5. Locate and carefully remove the engine oil indicator (dipstick). • 2.0L SOHC I4 engine ADD FULL • 2.0L DOHC - 1999 Ford Escort | Owner Guide 1st Printing - Page 132
levels above the F in FULL may cause engine damage. Some oil must be removed from the engine by a service technician. 7. Put the indicator back in and ensure it is fully seated. Adding engine oil 1. Check the engine oil. For instructions, refer to Checking the engine oil in this chapter. 2. If the - 1999 Ford Escort | Owner Guide 1st Printing - Page 133
covered by your warranty. Change your engine oil and filter according to the appropriate schedule listed in the Scheduled Maintenance Guide. Ford production and aftermarket (Motorcraft) oil filters are designed for added engine protection and long life. If a replacement oil filter is used that does - 1999 Ford Escort | Owner Guide 1st Printing - Page 134
Maintenance and care BRAKE FLUID Checking and adding brake fluid Brake fluid should be checked and refilled as needed. Refer to the Scheduled Maintenance Guide for the service interval schedules: 1. Clean the reservoir cap before removal to prevent dirt or water from entering the reservoir. 2. - 1999 Ford Escort | Owner Guide 1st Printing - Page 135
FLUID (IF EQUIPPED) Check the clutch fluid level. Refer to the Scheduled Maintenance Guide for the service interval schedules. The clutch master cylinder and brake master cylinder are part of the same system; both are refillable through the brake master cylinder with brake fluid. During normal - 1999 Ford Escort | Owner Guide 1st Printing - Page 136
and adding washer fluid •Coupe •Sedan/Wagon Check the washer fluid whenever you stop for fuel. The reservoir is symbol. highlighted with a If the level is low, add enough fluid to fill the reservoir. In very cold weather, do not fill the reservoir all the way. Do not put engine coolant in the - 1999 Ford Escort | Owner Guide 1st Printing - Page 137
access cover. Refill this reservoir with the same fluid you use for your windshield. ENGINE COOLANT • Coupe • Sedan/Wagon Check the level of the engine coolant in the reservoir. Refer to the Scheduled Maintenance Guide for service interval schedules. Be sure to read and understand Precautions when - 1999 Ford Escort | Owner Guide 1st Printing - Page 138
Life Engine Coolant F6AZ-19544-AA (orange in color). • DO NOT USE a DEX-COOL engine coolant or an equivalent engine coolant engine is cool, add a 50/50 mixture of engine coolant and distilled water to the engine coolant reservoir. Plain water may be added in an emergency, but you must replace - 1999 Ford Escort | Owner Guide 1st Printing - Page 139
remove the cap. Change your engine coolant according to the appropriate schedule listed in the Scheduled Maintenance Guide. Recycled engine coolant Ford Motor cooling system can hold, refer to Refill capacities in the Capacities and specifications chapter. Have your dealer check the engine cooling - 1999 Ford Escort | Owner Guide 1st Printing - Page 140
such that the coolant will not freeze at the CHECKING AND ADDING POWER STEERING FLUID Check the power steering fluid. Refer to the Scheduled Maintenance Guide for the service interval schedules. If adding fluid is necessary, use only MERCON ATF. • Coupe • Sedan/Wagon 1. Start the engine - 1999 Ford Escort | Owner Guide 1st Printing - Page 141
the MIN and MAX lines. Be sure to put the cap back on the reservoir. TRANSMISSION FLUID Checking automatic transmission fluid Refer to your Scheduled Maintenance Guide for scheduled intervals for fluid checks and changes. Your transaxle does not consume fluid. However, the fluid level should be - 1999 Ford Escort | Owner Guide 1st Printing - Page 142
condition. Adjusting automatic transmission fluid levels Before adding any fluid, make sure the correct type is used. The type of fluid used is normally indicated on the dipstick and/or dipstick handle should be removed by a qualified 20 C 65 C technician. An overfill condition of transmission fluid - 1999 Ford Escort | Owner Guide 1st Printing - Page 143
Maintenance and care Checking and adding manual transmission fluid 1. Clean the filler plug. 2. Remove the filler plug and inspect the fluid level. 3. Fluid level should be at bottom of the opening. 4. Add enough fluid through the filler opening so - 1999 Ford Escort | Owner Guide 1st Printing - Page 144
cells with distilled water. If the battery needs water often, have the charging system checked. If your battery has a cover/shield, make sure it is reinstalled after the battery has been cleaned or replaced. For longer, trouble-free operation, keep the top of the battery clean and dry. Also, make - 1999 Ford Escort | Owner Guide 1st Printing - Page 145
process: 1. Set your parking brake. 2. Put the gearshift in P (Park) (automatic transaxle) or the neutral position (manual transaxle), turn off all accessories and start the engine. 3. Let the engine idle for at least one minute. 4. The relearning process will automatically complete as you drive the - 1999 Ford Escort | Owner Guide 1st Printing - Page 146
Guide for the appropriate intervals for changing the air filter element. For information on replacement air filter elements, refer to Motorcraft Part Numbers in the Capacities and specifications chapter. Do not start your engine with the air cleaner removed and do not remove it while the engine - 1999 Ford Escort | Owner Guide 1st Printing - Page 147
some hot wax treatments used by commercial car washes reduce the effectiveness of wiper blades. Checking the wiper blades If the wiper other solvents. Changing the wiper blades To replace the wiper blades: 1. Pull the wiper arm away from the windshield and lock into the service position. 2. Turn - 1999 Ford Escort | Owner Guide 1st Printing - Page 148
tires for use on passenger cars. They do not apply Federal Regulations Part 575.104 controlled conditions on specified government test surfaces of asphalt and concrete. A tire marked C may have poor traction performance. The traction grade assigned to this tire is based on straight-ahead braking - 1999 Ford Escort | Owner Guide 1st Printing - Page 149
gauge. • Check the tire pressure when tires are cold, after the vehicle has been parked for at least one hour or has been driven less than 5 km (3 miles). • Adjust tire pressure to recommended specifications found on the Certification Label. Improperly inflated tires can affect vehicle handling and - 1999 Ford Escort | Owner Guide 1st Printing - Page 150
the wear band is visible through the tire treads. When replacing full size tires, never mix radial bias-belted, or bias-type tires. Use only the tire sizes that are listed on the Certification Label. Make sure that all tires are the same size, speed rating, and load-carrying capacity. Use only the - 1999 Ford Escort | Owner Guide 1st Printing - Page 151
your vehicle. • Do not use tire chains with 38 cm (15 inch) wheel/tire options. Using chains on this size tire may cause damage to steering, suspension and/or body components. • Remove the tire chains when they are no longer needed. Do not use tire chains on dry roads. • The suspension insulation - 1999 Ford Escort | Owner Guide 1st Printing - Page 152
vapor or if you hear a hissing sound, wait until it stops before completely removing the fuel filler cap. Otherwise, fuel may spray out and injure you or death if misused or mishandled. Observe the following guidelines when handling automotive fuel: • Extinguish all smoking materials and any open - 1999 Ford Escort | Owner Guide 1st Printing - Page 153
on the skin and/or clothing, promptly remove contaminated clothing and wash skin thoroughly with shut the engine off and never allow sparks or open flames near the filler neck. Never smoke while refueling. Fuel vapor is extremely hazardous under certain conditions handle in the fill position. 153 - 1999 Ford Escort | Owner Guide 1st Printing - Page 154
the filler cap clockwise 1/8 of a turn until it stops. If the "Service Engine Soon/Check Engine" indicator comes on and stays on when you start the engine, the fuel filler cap may not be properly installed. Turn off the engine, remove the fuel filler cap, align the cap properly and reinstall it. If - 1999 Ford Escort | Owner Guide 1st Printing - Page 155
if your engine sometimes knocks lightly. However, if it knocks heavily under most driving conditions while you are using fuel with the recommended octane rating, see your dealer or a qualified service technician to prevent any engine damage. 87 Fuel quality If you are experiencing starting, rough - 1999 Ford Escort | Owner Guide 1st Printing - Page 156
the "Service Engine Soon" indicator, refer to the Instrumentation chapter. Fuel Filter For fuel filter replacement, see your dealer or a qualified service technician. Refer to the Scheduled Maintenance Guide for the appropriate intervals for changing the fuel filter. Replace the fuel filter with an - 1999 Ford Escort | Owner Guide 1st Printing - Page 157
conditions. Additionally, keeping records during summer and winter will show how temperature impacts fuel economy. In general, lower temperatures give lower fuel economy. Driving style - good driving and fuel economy habits Give consideration to the lists that follow and you may be able to change - 1999 Ford Escort | Owner Guide 1st Printing - Page 158
/h [65 mph]). • Revving the engine before turning it off may reduce fuel economy. • Using the air conditioner or defroster may reduce fuel economy. • Using speed control (if equipped) may improve fuel economy. Speed control can help maintain a constant speed and reduce speed changes. You may want to - 1999 Ford Escort | Owner Guide 1st Printing - Page 159
rollover/light bars, to driving on hilly terrain. • Transmissions give their best fuel economy when window sticker should be your guide for the fuel economy conditions. EMISSION CONTROL SYSTEM Your vehicle is equipped with various emission control components and a catalytic converter which will - 1999 Ford Escort | Owner Guide 1st Printing - Page 160
Please consult your "Warranty Guide" for complete emission warranty information. Readiness for Inspection/Maintenance (I/M) testing In some localities, it may be a legal requirement to pass an I/M test of the on-board diagnostics system. If your "Check Engine/Service Engine Soon" light is on, refer - 1999 Ford Escort | Owner Guide 1st Printing - Page 161
warm up to its normal operating temperature. Once started, do not turn off the engine until the above driving cycle is complete. EXTERIOR BULBS Replacing exterior bulbs It is a good idea to check the operation of the following lights frequently: • Headlamps • Turn signals • Foglamps (if equipped - 1999 Ford Escort | Owner Guide 1st Printing - Page 162
headlamp bulbs 1. Make sure that the headlamps are turned OFF. • Coupe • Sedan/wagon 2. Open the hood and disconnect the headlamp wiring socket from the in-line connector. This will make it easier to change the bulb. 3. Remove the protective dust shield from the housing by turning the dust shield - 1999 Ford Escort | Owner Guide 1st Printing - Page 163
from the lamp assembly by pulling it straight back out of the lamp assembly and replace. 7. Install the new bulb in lamp assembly by pushing straight in with the bulb they work properly. If the headlamp was correctly aligned before you changed the bulb, you should not need to align it again. 163 - 1999 Ford Escort | Owner Guide 1st Printing - Page 164
connector to the new foglamp bulb. 4. Install the bulb socket in the foglamp turning clockwise. High-mount brakelamp bulbs To remove the brakelamp bulb: 1. Push the center of the push pins in to release tension. 2. Pull the push pins out of the cover and slide the cover away from the package tray - 1999 Ford Escort | Owner Guide 1st Printing - Page 165
hitting the lamp, with the side of your hand, toward the side of the vehicle. 3. Pull lamp assembly away from vehicle for access to bulbs. 4. Remove the bulb socket by rotating it counterclockwise, then pulling it out of the lamp assembly. 5. Pull the bulb from the socket and push in the - 1999 Ford Escort | Owner Guide 1st Printing - Page 166
the tail lamp assembly, one just below the other. Follow the same steps to replace either bulb. 1. Open liftgate to expose the tail lamp assembly. Remove the three screws and lamp assembly from the vehicle. 2. Remove the bulb socket by rotating it counterclockwise, then pulling it out of the lamp - 1999 Ford Escort | Owner Guide 1st Printing - Page 167
BULBS Dome lamp 1. Remove the lens up on the assembly. OFF DOOR ON Map lamps For bulb replacement, see a qualified service technician or your dealer. Using the right mount brake lamp 921 Backup lamps 3156K Brake lamps 3157K Interior overhead lamp 12V/10W To replace all instrument panel lights - - 1999 Ford Escort | Owner Guide 1st Printing - Page 168
surface, the slope will be included in the vertical indication. Therefore, vertical and horizontal headlamp adjustment should be performed only to the directional change (left or right) of the horizontal aim. 4. Use a 4 mm wrench or socket to turn the horizontal adjusting screw until the forward - 1999 Ford Escort | Owner Guide 1st Printing - Page 169
, polishes and waxes. DN UP 3. The "UP" and "DN" on the bubble indicate the directional change (up or down) of the vertical aim. 4. Use a 4 mm wrench or socket to turn the vertical adjusting screw clockwise or counterclockwise until the bubble is centered between the lines. DN L R UP 169 - 1999 Ford Escort | Owner Guide 1st Printing - Page 170
and Finishing Kit (#F7AZ-19K507-BA), touch-up paint (#ALBZ-19500-XXXXA), or aerosol paint spray (#ALAZ-19500- XXXXA) from the Ford Car Care Chemicals line. Please note that the part numbers (shown as XXXX above) will vary with your vehicle's specific coloring. Observe the application instructions on - 1999 Ford Escort | Owner Guide 1st Printing - Page 171
as the body of your vehicle. Do not use acid-based or alcohol-based wheel cleaners, steel wool, fuel or strong detergents. Never use abrasives that will damage the finish of special wheel surfaces. Use a tar remover to remove grease and tar. The brushes used in some automatic car washes may - 1999 Ford Escort | Owner Guide 1st Printing - Page 172
engine while it is running; water in the running engine may cause internal damage. Cleaning plastic exterior parts Use vinyl cleaner for routine cleaning. Clean with a tar remover if necessary. Do not clean plastic parts some hot wax treatments used by commercial car washes. Clean the outside of the - 1999 Ford Escort | Owner Guide 1st Printing - Page 173
to remove soap residue. Dry with a soft cloth. For tougher soiling concerns, Ford recommends using the Deluxe Leather Care Kit F8AZ-19G253-AA, which is available from your Ford Dealer. This mild cleaner and special pad, cleans the leather and maintains its natural beauty. Follow the instructions on - 1999 Ford Escort | Owner Guide 1st Printing - Page 174
DOT 3 Motor Vehicle Brake Fluid Premium Engine Coolant Application All Capacity Fill to line on reservoir Engine coolant1 Engine oil (includes filter change) Fuel tank capacity Power steering fluid Motorcraft 5W-30 Super Premium Motor Oil N/A Motorcraft MERCON ATF Automatic transaxles Manual - 1999 Ford Escort | Owner Guide 1st Printing - Page 175
Brake Fluid Door latch, hood Multi-Purpose latch, auxiliary Grease hood latch, trunk latch, seat tracks. Lock cylinder Penetrating and Lock Lubricant Automatic Motorcraft transaxle MERCON ATF Manual transaxle Motorcraft MERCON ATF Engine oil Motorcraft 5W-30 Super Premium Motor Oil Ford Part - 1999 Ford Escort | Owner Guide 1st Printing - Page 176
Capacities and specifications Item Constant velocity joints Engine coolant1 Ford Part Name or Equivalent CV Joint Grease (High Temp.) Ford Premium Engine Coolant Ford Part Number E43Z-19590-A Ford Specification ESP-M1C207-A Power steering fluid Windshield washer fluid Motorcraft MERCON ATF Ultra- - 1999 Ford Escort | Owner Guide 1st Printing - Page 177
Capacities and specifications VEHICLE DIMENSIONS Vehicle dimensions (1) Overall length (2) Overall width (3) Overall height (4) Wheelbase (5) Track Front (5) Track - Rear Coupe mm (in) Sedan mm (in) Wagon mm (in) 4 451.0 (175.2) 4 432.3 (174.5) 4 392.0 (172.9) 1 712.0 (67.4) 1 328.4 (52.3) 2 499.0 ( - 1999 Ford Escort | Owner Guide 1st Printing - Page 178
Capacities and specifications 3 4 1 • Coupe model 4 1 • Sedan model 178 - 1999 Ford Escort | Owner Guide 1st Printing - Page 179
Capacities and specifications 5 2 • Wagon model 4 1 • Wagon model 179 - 1999 Ford Escort | Owner Guide 1st Printing - Page 180
door latch pillar on the driver's side. MFD. BY FORD MOTOR TRAILER TOWING - SEE OWNER GUIDE EXT PNT: XXXXXX XXXXXX RC panel. AIR BAG XXXXXXXXXXXXXXXXX Engine number The engine number (the last eight numbers of the vehicle identification number) is stamped on the engine block and transmission - 1999 Ford Escort | Owner Guide 1st Printing - Page 181
the New Vehicle Limited Warranty. The service is available: • 24-hours, will cover: • changing a flat tire • jump-starts • lock-out assistance • fuel delivery • towing to the nearest Ford of Canada or Ford Motor this card is found in the Owner Guide portfolio in the glove compartment in Ford vehicles - 1999 Ford Escort | Owner Guide 1st Printing - Page 182
plan You can get more protection for your new car or light truck by purchasing Ford Extended Service Plan (Ford ESP) coverage. Ford ESP is an optional service contract which is backed by Ford Motor Company or Ford Motor Service Company (in the U.S.) and Ford of Canada (in Canada). It provides - 1999 Ford Escort | Owner Guide 1st Printing - Page 183
most cases, your concern will be resolved at this level. Ford Motor Company and Ford of Canada dealerships also carry genuine Ford parts and accessories, providing you with original equipment reliability. Away from home If you are away from home when your vehicle needs service, or if you need more - 1999 Ford Escort | Owner Guide 1st Printing - Page 184
by state law, before pursuing replacement or repurchase remedies provided by certain state laws. This dispute handling procedure is not required prior to . Ford Motor Company reserves the right to change eligibility limitations, modify procedures and/or to discontinue this service without notice - 1999 Ford Escort | Owner Guide 1st Printing - Page 185
sales disputes between customer and dealer except those associated with warranty repairs or concerns with the vehicle's performance as designed • a request for reimbursement of consequential expenses unless a service , you will receive an acknowledgment indicating: • the file number assigned to your - 1999 Ford Escort | Owner Guide 1st Printing - Page 186
or serviced the vehicle • a brief description of your unresolved concern • a brief summary of the action taken by the dealer(s) and Ford Motor Company oral presentation before the Board, this is not a requirement and the Board will decide the case whether or not an oral presentation is made. Oral - 1999 Ford Escort | Owner Guide 1st Printing - Page 187
office. The use of leaded fuel in your vehicle without proper conversion may damage the effectiveness of your emission control system and may cause engine knocking or serious engine damage. Ford Motor Company/Ford of Canada is not responsible for any damage caused by use of improper fuel. In the - 1999 Ford Escort | Owner Guide 1st Printing - Page 188
number (VIN) and new address with Ford Motor Company Worldwide Direct Market Operations. FORD ACCESSORIES Remover* Ford Extra Strength Upholstery Cleaner Ford Metal Surface Cleaner Ford Multi-Purpose Cleaner* Motorcraft Car Wash Concentrate Motorcraft Carlite Glass Cleaner Ford Spot and Stain Remover - 1999 Ford Escort | Owner Guide 1st Printing - Page 189
Styled wheel protector locks Vehicle security systems Comfort and convenience Air conditioner Air filtration systems Cargo nets Cargo organizers Cargo shades Cargo trays Dash trim Engine block heaters Gear shift knob Luggage presenter (Continental only) Manual sliding rear window Tire step 189 - 1999 Ford Escort | Owner Guide 1st Printing - Page 190
Removable luggage rack Removable luggage rack adapters Retractable bed hooks and loops Running boards Snow traction cables Soft luggage cover Speed control Towing mirrors Trailer hitch Trailer hitch bars and balls Trailer hitch wiring adaptor Protection and appearance equipment Air bag anti-theft - 1999 Ford Escort | Owner Guide 1st Printing - Page 191
Molded vinyl floor mats Rallye bars Rear air deflectors Rear decklid spoilers Side window air deflectors Spare tire lock Step bumpers Step/sill , equipment, passengers and luggage to your vehicle, do not exceed the total weight capacity of the vehicle or of the front or rear axle (GVWR or - 1999 Ford Escort | Owner Guide 1st Printing - Page 192
engine to stumble or stall. In addition, such systems may be damaged or their performance may be affected by operating your vehicle. (Citizens band [CB] transceivers, garage door openers and other transmitters with outputs of five watts or less will Ford Motor Company of Canada, Ltd. Service - 1999 Ford Escort | Owner Guide 1st Printing - Page 193
safety defect exists in a group of vehicles, it may order a recall and remedy campaign. However, NHTSA cannot become involved in individual problems between you, your dealer or Ford Motor Company. To contact NHTSA, you may either call the Auto Safety Hotline toll-free at 1-800-424-9393 (202-366-0123 - 1999 Ford Escort | Owner Guide 1st Printing - Page 194
bag ...73 indicator light ...8,75 operation ...73 passenger air bag ...73 Air cleaner filter ...146,174 Air conditioning ...37 Anti-theft system ...58,59 arming the system ...59 disarming a triggered system ...59,60 disarming an untriggered system ...59 warning light ...9 Automatic transaxle ...95 - 1999 Ford Escort | Owner Guide 1st Printing - Page 195
engine/ service engine soon light ...7 coolant ...137 idle speed control ...144 lubrication specifications ...175,176 refill capacities ...174 service points ...129,130 starting after a collision ...105 Engine block heater ...87 Engine oil ...130 checking and adding ...130,132 dipstick ...130 filter - 1999 Ford Escort | Owner Guide 1st Printing - Page 196
165,166 Lane change indicator (see Turn signal) ...43 Lights, warning and indicator ...6 air bag ...8 196 anti-lock brakes (ABS) ...9,89 anti-theft ...9 brake ...8 charging system ...10 high beam ...9 liftgate ajar ...10 low fuel ...7 oil pressure ...10 safety belt ...8 service engine soon ...7 turn - 1999 Ford Escort | Owner Guide 1st Printing - Page 197
replacing ...150 rotating ...149 snow tires and chains ...151 tire grades ...149 treadwear ...148 Towing wrecker ...122 Transaxle ...92 automatic operation ...95 fluid, refill capacities ...174 lubricant specifications ...176 manual operation ...92 Transmission fluid, checking and adding (automatic - 1999 Ford Escort | Owner Guide 1st Printing - Page 198
198 - 1999 Ford Escort | Owner Guide 1st Printing - Page 199
199 - 1999 Ford Escort | Owner Guide 1st Printing - Page 200
filter change) Engine oil Information Unleaded fuel only - 87 octane 48.5L (12.8 gallons) Refer to the Certification Label inside of driver's door. Pull handle under the left side of the instrument panel. Sedan/wagon-3.8L (4.0 quarts) ZX2-4.25L (4.5 quarts) Use Motorcraft 5W30 Super Premium Motor
-
 1
1 -
 2
2 -
 3
3 -
 4
4 -
 5
5 -
 6
6 -
 7
7 -
8
-
9
-
10
-
11
-
12
-
13
-
14
-
15
-
16
-
17
-
18
-
19
-
20
-
21
-
22
-
23
-
24
-
25
-
26
-
27
-
28
-
29
-
30
-
31
-
32
-
33
-
34
-
35
-
36
-
37
-
38
-
39
-
40
-
41
-
42
-
43
-
44
-
45
-
46
-
47
-
48
-
49
-
50
-
51
-
52
-
53
-
54
-
55
-
56
-
57
-
58
-
59
-
60
-
61
-
62
-
63
-
64
-
65
-
66
-
67
-
68
-
69
-
70
-
71
-
72
-
73
-
74
-
75
-
76
-
77
-
78
-
79
-
80
-
81
-
82
-
83
-
84
-
85
-
86
-
87
-
88
-
89
-
90
-
91
-
92
-
93
-
94
-
95
-
96
-
97
-
98
-
99
-
100
-
101
-
102
-
103
-
104
-
105
-
106
-
107
-
108
-
109
-
110
-
111
-
112
-
113
-
114
-
115
-
116
-
117
-
118
-
119
-
120
-
121
-
122
-
123
-
124
-
125
-
126
-
127
-
128
-
129
-
130
-
131
-
132
-
133
-
134
-
135
-
136
-
137
-
138
-
139
-
140
-
141
-
142
-
143
-
144
-
145
-
146
-
147
-
148
-
149
-
150
-
151
-
152
-
153
-
154
-
155
-
156
-
157
-
158
-
159
-
160
-
161
-
162
-
163
-
164
-
165
-
166
-
167
-
168
-
169
-
170
-
171
-
172
-
173
-
174
-
175
-
176
-
177
-
178
-
179
-
180
-
181
-
182
-
183
-
184
-
185
-
186
-
187
-
188
-
189
-
190
-
191
-
192
-
193
-
194
-
195
-
196
-
197
-
198
-
199
-
200
 |
 |

Before driving
Introduction
2
Instrumentation
3
Controls and features
14
Seating and safety restraints
61
Starting and driving
Starting
83
Driving
89
Roadside emergencies
105
Servicing
Maintenance and care
123
Capacities and specifications
174
Customer assistance
181
Reporting safety defects
193
Index
194
All rights reserved. Reproduction by any means, electronic or mechanical
including photocopying, recording or by any information storage and retrieval
system or translation in whole or part is not permitted without written
authorization from Ford Motor Company.
Copyright
r
1998 Ford Motor Company
Contents
1