2000 Ford F250 Owner's Manual - Page 157
2000 Ford F250 Manual

Page 157 highlights
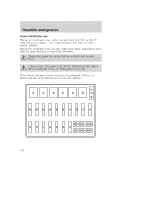
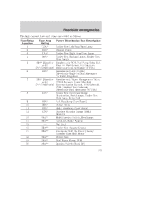
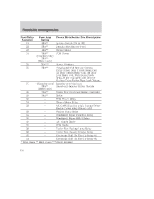
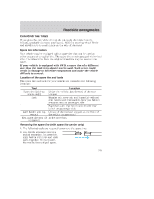
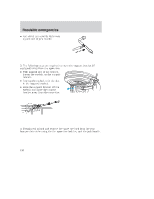
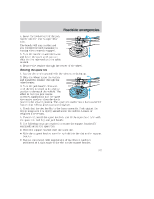
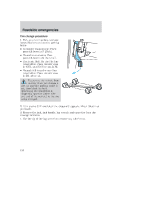
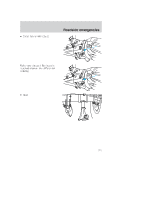
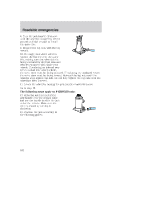
Roadside emergencies 4. Insert the hooked end of the jack handle into the rear bumper drive tube. The handle will stop moving and you will feel forward resistance to turning when properly engaged. 5. Turn the handle counterclockwise and lower the spare until you can slide the tire rearward and the cable is slack. 6. Remove the retainer through the center of the wheel. Stowing the spare tire 1. Lay the tire on the ground with the valve stem facing up. 2. Slide the wheel under the vehicle and install the retainer through the wheel center. 3. Turn the jack handle clockwise until the tire is raised to its original position underneath the vehicle. The effort to turn the jack handle increases significantly and the spare tire carrier ratchets when the tire is raised to the stowed position. The spare tire carrier has a built-in ratchet feature that will not allow you to overtighten. 4. Check that the tire lies flat to the frame assembly. Push against the tire to make sure it is tightly seated under the vehicle. Loosen or retighten if necessary. 5. If removed, install the spare tire lock into the bumper drive tube with the spare tire lock key and jack handle. 6. The following steps are required to secure the support bracket (if equipped) under the spare tire: • Move the support bracket over the spare tire. • Slide the support bracket over the eyebolt into the slot on the support bracket. • Tighten the eyebolt with tapered end of lug wrench leaving it positioned at a right angle of the slot on the support bracket. 157
-
 1
1 -
2
-
3
-
4
-
5
-
6
-
7
-
8
-
9
-
10
-
11
-
12
-
13
-
14
-
15
-
16
-
17
-
18
-
19
-
20
-
21
-
22
-
23
-
24
-
25
-
26
-
27
-
28
-
29
-
30
-
31
-
32
-
33
-
34
-
35
-
36
-
37
-
38
-
39
-
40
-
41
-
42
-
43
-
44
-
45
-
46
-
47
-
48
-
49
-
50
-
51
-
52
-
53
-
54
-
55
-
56
-
57
-
58
-
59
-
60
-
61
-
62
-
63
-
64
-
65
-
66
-
67
-
68
-
69
-
70
-
71
-
72
-
73
-
74
-
75
-
76
-
77
-
78
-
79
-
80
-
81
-
82
-
83
-
84
-
85
-
86
-
87
-
88
-
89
-
90
-
91
-
92
-
93
-
94
-
95
-
96
-
97
-
98
-
99
-
100
-
101
-
102
-
103
-
104
-
105
-
106
-
107
-
108
-
109
-
110
-
111
-
112
-
113
-
114
-
115
-
116
-
117
-
118
-
119
-
120
-
121
-
122
-
123
-
124
-
125
-
126
-
127
-
128
-
129
-
130
-
131
-
132
-
133
-
134
-
135
-
136
-
137
-
138
-
139
-
140
-
141
-
142
-
143
-
144
-
145
-
146
-
147
-
148
-
149
-
150
-
151
-
 152
152 -
 153
153 -
 154
154 -
 155
155 -
 156
156 -
 157
157 -
 158
158 -
 159
159 -
 160
160 -
 161
161 -
 162
162 -
163
-
164
-
165
-
166
-
167
-
168
-
169
-
170
-
171
-
172
-
173
-
174
-
175
-
176
-
177
-
178
-
179
-
180
-
181
-
182
-
183
-
184
-
185
-
186
-
187
-
188
-
189
-
190
-
191
-
192
-
193
-
194
-
195
-
196
-
197
-
198
-
199
-
200
-
201
-
202
-
203
-
204
-
205
-
206
-
207
-
208
-
209
-
210
-
211
-
212
-
213
-
214
-
215
-
216
-
217
-
218
-
219
-
220
-
221
-
222
-
223
-
224
-
225
-
226
-
227
-
228
-
229
-
230
-
231
-
232
-
233
-
234
-
235
-
236
-
237
-
238
-
239
-
240
-
241
-
242
-
243
-
244
-
245
-
246
-
247
-
248
-
249
-
250
-
251
-
252
-
253
-
254
-
255
-
256
 |
 |
