2000 Ford F350 Owner's Manual
2000 Ford F350 Manual
2000 Ford F350 manual content summary:
- 2000 Ford F350 | Owner's Manual - Page 1
Controls and features Seating and safety restraints Starting and driving Starting Driving Roadside emergencies Servicing Maintenance and care or translation in whole or part is not permitted without written authorization from Ford Motor Company. Ford may change the contents without notice and - 2000 Ford F350 | Owner's Manual - Page 2
California law: CALIFORNIA Proposition 65 Warning Engine exhaust, some if its constituents, and certain Seating and safety restraints for more information. Indicates that this Owner Guide contains information on this subject. Please refer to the Index to locate the appropriate section which will - 2000 Ford F350 | Owner's Manual - Page 3
parts a chance to break in. INFORMATION ABOUT THIS GUIDE The information found in this guide was in effect at the time of printing. Ford may change the Guide Supplement for information regarding correct operation and maintenance of your diesel-powered light truck. Notice to owners of pickup trucks - 2000 Ford F350 | Owner's Manual - Page 4
the recommendations of the Ford Incomplete Vehicle Manual, Ford Truck Body Builder's Layout Book and the QVM guidelines as well as pertinent supplements. For additional information, please contact the Truck Body Builders Advisory Service 1-877-840-4338. Use of your Ford light truck as an ambulance - 2000 Ford F350 | Owner's Manual - Page 5
is equipped with the Ford Ambulance Preparation Package, it will be indicated on the Certification label. The label is located on the driver's side door pillar or on the rear edge of the driver's door. You can determine whether the ambulance manufacturer followed Ford's recommendations by directly - 2000 Ford F350 | Owner's Manual - Page 6
Safety Belt Air Bag-Front Air Bag-Side Child Seat Installation Warning Brake System Brake Fluid Non-Petroleum Based Master Lighting Switch Child Seat Child Seat Tether Anchorage Anti-Lock Brake System Traction Control Hazard Warning Flasher Fog Lamps-Front Fuse Compartment Fuel Pump Reset - 2000 Ford F350 | Owner's Manual - Page 7
Child Safety Door Lock/Unlock Panic Alarm Engine Coolant Interior Luggage Compartment Release Symbol Engine Oil Engine Coolant Temperature Battery Do Not Open When Hot Avoid Smoking, Flames, or Sparks Explosive Gas Battery Acid Fan Warning Maintain Correct Fluid Level Engine Air Filter Jack MAX - 2000 Ford F350 | Owner's Manual - Page 8
. 61) Speed control* (pg. 56) FUEL FILL LOW FUEL 40 30 20 40 20 60 50 80 60 70 100 120 3 2 4 5 ABS F H E L 80 90 1 RPM X1000 LOW RANGE 4X4 000000 140 160 - + H 18 C 8 10 0 CRUISE MPH 0 0 0 0 km/h 100 0 SERVICE ENGINE SOON 6 BRAKE P RN D 21 ! DOOR AJAR P PANEL DIM O RES ON - 2000 Ford F350 | Owner's Manual - Page 9
. 114) VOL - PUSH ON AM BASS TREB FM1 ST CLK BAL FADE TAPE AMS FM SEEK VE RDRI OVE SCAN EJ TUNE SIDE REW 1-2 FF 4X4 4X4 WD HIGH LOW 1 2 3 4 5 6 PASSENGER AIR BAG OFF OFF ON OFF Climate control system (pg. 27) 4WD selector* (pg. 123) Passenger - 2000 Ford F350 | Owner's Manual - Page 10
40 30 20 40 20 60 50 80 60 70 100 120 3 2 4 5 ABS F H E L 80 90 1 RPM X1000 LOW RANGE 4X4 000000 140 160 MPH 0 0 0 0 km/h - + H 18 C 8 10 0 CRUISE 100 0 SERVICE ENGINE SOON 6 BRAKE P RN D 21 ! DOOR AJAR Low fuel Illuminates as an early reminder of a low fuel condition indicated on - 2000 Ford F350 | Owner's Manual - Page 11
. Light is blinking: Engine misfire is occurring which could damage your catalytic converter. You should drive in a moderate fashion (avoid heavy acceleration and deceleration) and have your vehicle serviced at the first available opportunity. Under engine misfire conditions, excessive exhaust - 2000 Ford F350 | Owner's Manual - Page 12
. Light is blinking: Engine misfire is occurring which could damage your catalytic converter. You should drive in a moderate fashion (avoid heavy acceleration and deceleration) and have your vehicle serviced at the first available opportunity. Under engine misfire conditions, excessive exhaust - 2000 Ford F350 | Owner's Manual - Page 13
if the light flashes steadily, have your vehicle serviced as soon as possible, damage to the transmission could occur. Safety belt Momentarily illuminates when the ignition is turned to the ON position to remind you to fasten your safety belts. For more information, refer to the Seating and safety - 2000 Ford F350 | Owner's Manual - Page 14
) Momentarily illuminates when the ignition is turned to the ON ABS position. If the light remains on, continues to flash or fails to illuminate, have the system serviced immediately. With the ABS light on, the anti-lock brake system is disabled and normal braking is still effective unless the brake - 2000 Ford F350 | Owner's Manual - Page 15
is turned to the START position. Illuminates when 4x4 range is engaged. If the light continues to flash have the system serviced. Door ajar Illuminates when the ignition is in the ON or START position and any door is open. DOOR AJAR Oil pressure/Engine coolant This light will illuminate when the - 2000 Ford F350 | Owner's Manual - Page 16
position (and the key is not in the ignition) and the driver's door is opened. GAUGES FUEL FILL LOW FUEL 40 30 20 40 20 60 50 80 60 70 100 120 3 2 4 5 ABS F H E L 80 90 1 RPM X1000 LOW RANGE 000000 140 160 MPH 0 0 0 0 km/h - + H 18 C 8 10 0 CRUISE 100 0 SERVICE ENGINE SOON 6 BRAKE 4X4 - 2000 Ford F350 | Owner's Manual - Page 17
the OFF position while the vehicle is being refueled. When the gauge first indicates empty, there is a small amount of reserve fuel in the tank. When refueling the vehicle from an empty indication, the amount of fuel that can be added will be less than the - 2000 Ford F350 | Owner's Manual - Page 18
coolant is not at its proper level the gauge indication will not be accurate. Odometer Registers the total kilometers (miles) of the vehicle. Trip odometer Registers the kilometers (miles) of individual journeys. To reset, depress the control. 40 30 20 10 0 40 20 60 50 80 60 70 100 120 80 90 - 2000 Ford F350 | Owner's Manual - Page 19
the battery voltage when the ignition is in the ON position. If the pointer moves and stays outside the normal operating range (as indicated), have the immediately. Check the oil level. Add oil if needed (refer to Engine oil in the Maintenance and care chapter). If the oil level is correct, have - 2000 Ford F350 | Owner's Manual - Page 20
liters of fuel used by 100 kilometers traveled (miles traveled by gallons used), your figure may be different than displayed for the following reasons: • your vehicle was not perfectly level during fill-up • differences in the automatic shut-off points on the fuel pumps at service stations 20 - 2000 Ford F350 | Owner's Manual - Page 21
of kilometers (miles) left to drive before the fuel tank is empty. The indicated distance to empty may be inaccurate: • with sustained, drastic changes in fuel economy (such as trailer towing), but will eventually recover. • if the vehicle is started while parked on an incline. • if less than 30 - 2000 Ford F350 | Owner's Manual - Page 22
will alternate from "ICE" to the outside temperature at a two second rate for one minute. MODE E/M Off. In this mode the display is off. Compass The compass display is contained in the overhead console affect compass accuracy. Adjustments may need to be made to the zone and calibration of the - 2000 Ford F350 | Owner's Manual - Page 23
Instrumentation Compass zone adjustment 1. Determine which magnetic zone you are in for your geographic location by referring to the zone map. 2. Locate the trip computer on the overhead console. 3. Turn ignition to the ON position. 1 2 3 13 4 12 5 6 7 8 9 10 11 15 14 4. Press and hold both trip - 2000 Ford F350 | Owner's Manual - Page 24
high voltage lines. For optimum calibration, turn off all electrical accessories (heater/air conditioning, wipers, etc.) and make sure all vehicle doors are shut. 1. Locate the trip computer located in the overhead console. 2. Start the vehicle. 3. Press and hold both trip computer controls. After - 2000 Ford F350 | Owner's Manual - Page 25
is in the OFF or Parking lamps position. Always remember to turn on your headlamps at dusk or during inclement weather. The Daytime Running Light (DRL) System does not activate your tail lamps and generally may not provide adequate lighting during these conditions. Failure to activate your headlamps - 2000 Ford F350 | Owner's Manual - Page 26
toward you to activate and release to deactivate. PANEL DIMMER CONTROL Use to adjust the brightness of the instrument panel during headlamp and parklamp operation. • Rotate up to brighten. • Rotate down to dim. • Rotate to full up position (past detent) to turn on interior lamps. 4WD CONTROL (IF - 2000 Ford F350 | Owner's Manual - Page 27
The auxiliary power point is located on the instrument panel. Do not plug optional electrical accessories into the cigarette lighter. Use the power point. POWER POINT CLIMATE CONTROL SYSTEM Heater only system (if equipped) OFF Fan speed control Controls the volume of air circulated in the vehicle - 2000 Ford F350 | Owner's Manual - Page 28
the climate control system in the OFF position. • Don't put objects under the front seat that will interfere with the airflow to the rear seats (if equipped). • Remove any snow, ice or leaves from the air intake area (at the bottom of the windshield under the hood). • Do not place objects over the - 2000 Ford F350 | Owner's Manual - Page 29
inside of the vehicle. OFF A/C MAX A/C The air conditioning compressor will operate in all modes except (Panel) and (Floor). However, the air conditioning will only function if the outside temperature is about 10°C (50°F) or higher. Since the air conditioner removes considerable moisture from the - 2000 Ford F350 | Owner's Manual - Page 30
defroster ducts. If the temperature is about 10°C (50°F) or higher, the air conditioner will automatically dehumidify the air to reduce fogging. (Defrost) -Distributes outside air through the windshield defroster ducts. It can be used to clear ice or fog from the windshield. If the temperature is - 2000 Ford F350 | Owner's Manual - Page 31
Controls and features • Remove any snow, ice or leaves from the air intake area (at the bottom of the windshield under the hood). • If your vehicle has been parked with the windows closed during hot weather, the air conditioner will do a much faster job of cooling if you drive for two or three - 2000 Ford F350 | Owner's Manual - Page 32
Controls and features USING YOUR AUDIO SYSTEM AM/FM Stereo (with 2 speakers) VOL PUSH ON TONE CLK TONE VOL ST DX FM 12 SEEK TUNE 1 2 3 4 AM/FM AM/FM - 2000 Ford F350 | Owner's Manual - Page 33
a certain level and the ignition is turned off, the volume will come back on at a "nominal" listening level when the ignition switch is turned back on. AM/FM select The AM/FM select control works in radio mode. AM/FM AM/FM select in radio mode This control allows you to select AM or FM - 2000 Ford F350 | Owner's Manual - Page 34
Tune adjust in radio mode to move to the next • Press SEEK frequency down the band (whether or not a listenable TUNE station is located there). band. SEEK TUNE Radio station memory preset The radio is equipped with four station memory preset controls. These controls can be used to select up - 2000 Ford F350 | Owner's Manual - Page 35
allows you to increase or decrease the audio system's bass output. Press the TONE control once, then use the volume knob to adjust the desired level. Treble adjust The treble adjust control allows you to increase or decrease the audio system's treble output. Press the TONE control twice, then - 2000 Ford F350 | Owner's Manual - Page 36
and clock display mode (time). When in clock mode, the media information will display for ten seconds, when the radio is turned on, and then revert to clock information. Anytime that the media is changed, (new radio station, etc.), the media information will again display for ten seconds before 36 - 2000 Ford F350 | Owner's Manual - Page 37
Controls and features reverting back to the clock. In media mode, the media information will always be displayed. AM/FM stereo cassette VOL - PUSH ON AM BASS TREB FM1 ST CLK BAL FADE TAPE AMS FM SEEK TUNE SCAN EJ - 2000 Ford F350 | Owner's Manual - Page 38
this control to stop tape play and begin radio play. Tune adjust The tune control works in radio mode. Tune adjust in radio mode to move to the next • Press SEEK frequency down the band (whether or not a listenable TUNE station is located there). Hold the control to move through the frequencies - 2000 Ford F350 | Owner's Manual - Page 39
all listenable stations on the frequency band. Press the SCAN control again to stop the scan mode. Radio station memory preset The radio is equipped with six station memory preset controls. These controls can be used to select up to six preset AM stations and twelve FM stations (six in FM1 and six - 2000 Ford F350 | Owner's Manual - Page 40
to increase or decrease the audio system's bass output. BASS Treble adjust The treble adjust control allows you to increase or decrease the audio system's treble output. TREB Speaker balance adjust Speaker sound distribution can be adjusted between the right and left speakers. BAL Speaker fade - 2000 Ford F350 | Owner's Manual - Page 41
mode while in radio mode, press the TAPE AMS control. CLK TAPE AMS Automatic Music Search The Automatic Music Search feature allows you to quickly locate the beginning of and 1-2 at the same time to play the alternate side of a tape. Eject function Press the control to stop and eject a tape. SIDE - 2000 Ford F350 | Owner's Manual - Page 42
. Dolby noise reduction is manufactured under license from Dolby Laboratories Licensing Corporation. "Dolby " and the double-D symbol are trademarks of Dolby Laboratories Licensing Corporation. Setting the clock Press CLK to toggle between listening frequencies and clock mode while in radio mode - 2000 Ford F350 | Owner's Manual - Page 43
, and then revert to clock information. Anytime that the media is changed, (new radio station, etc.), the media information will again display for 10 seconds before reverting back to the clock. In media mode, the media information will always be displayed. Premium AM/FM Stereo/Cassette/Single CD VOL - 2000 Ford F350 | Owner's Manual - Page 44
/CD select control. Audio power is turned off by using the volume/power control. VOL - PUSH ON Turn will come back on at a "nominal" listening level when the ignition switch is turned back on. AM/FM select The AM/FM select control works in radio, tape and CD modes. AM FM AM/FM select in radio - 2000 Ford F350 | Owner's Manual - Page 45
the band (whether or not a listenable station is located there). Hold for quick movement. SEEK TUNE SEEK TUNE Tune adjust for CD changer (if equipped) to select the previous • Press SEEK SEEK disc in the CD changer. (Play will begin on the first track of the TUNE TUNE disc unless the CD changer - 2000 Ford F350 | Owner's Manual - Page 46
from the beginning. SEEK to seek forward to the • Press TUNE next track of the current disc. After the last track has been completed, the first track of the current disc will automatically replay. Scan function The scan function works in radio, tape or CD mode. SEEK TUNE SCAN Scan function in - 2000 Ford F350 | Owner's Manual - Page 47
direction automatically back to the first track at the end of the CD.) To stop on a particular selection, press the control again. Radio station memory preset The radio is equipped with six station memory preset controls. These controls can be used radio stations without losing your original manually - 2000 Ford F350 | Owner's Manual - Page 48
using the AM/FM select controls. 2. Press the AUTO control. 3. When the first six strong stations AUTO are filled, the station stored in memory preset control 1 will start your audio system's manually set memory stations, press the AUTO control again. Bass adjust The bass adjust control allows you to - 2000 Ford F350 | Owner's Manual - Page 49
the BAL control then press: to shift sound to the left and • • to shift sound to the right. BAL FADE SEL Speaker fade adjust Speaker sound can be adjusted between the front and rear speakers. Press the FADE control then press: to shift the sound to the • front and to shift the - 2000 Ford F350 | Owner's Manual - Page 50
and CD modes. 1 • In tape mode, radio play will continue until rewind is stopped (with the TAPE will automatically reverse when the end of the tape is reached. • In CD mode, pressing the control fast forwards the CD within the current track. Tape direction select Press SIDE 1-2 to play the alternate - 2000 Ford F350 | Owner's Manual - Page 51
stop and eject a CD. EJ EJ Dolby noise reduction Dolby noise reduction operates in tape mode. Dolby noise reduction 4 reduces the amount of hiss and disc after all tracks on the current disc are played. Press the SHUFFLE control to start this feature. Random order play will continue until the - 2000 Ford F350 | Owner's Manual - Page 52
TUNE To set the minute, press and hold the CLK control and press TUNE: AUTO CLK to decrease minutes and • to increase minutes. • If your vehicle has a separate clock module, (other than the digital radio display), the CLK button will not function in the above manner. SEEK TUNE SEEK TUNE 52 - 2000 Ford F350 | Owner's Manual - Page 53
on, and then revert to clock information. Anytime that the media is changed, (new radio station, etc.), the media information will again display for 10 seconds before reverting back to the clock. In media mode, the media information will always be displayed. Mute mode Press the control to mute the - 2000 Ford F350 | Owner's Manual - Page 54
cleaner and wipe from the center out to the edge. Do not use circular motion. CD and use for their broadcasts. Allowable frequencies are: • AM 530, 540-1600, 1610 kHza • FM 87.9b, 88.1-107.7, 107.9 MHz Not all frequencies are used in a given area. a Some radios may tune up to 1710 kHz. b Some radios - 2000 Ford F350 | Owner's Manual - Page 55
information. If service is necessary, see your dealer or a qualified technician. POSITIONS OF THE IGNITION 1. ACCESSORY, allows the electrical 3 accessories such as the radio to 2 operate while the engine is not running. 2. LOCK, locks the steering wheel, automatic transmission gearshift 4 1 lever - 2000 Ford F350 | Owner's Manual - Page 56
control on • Press ON. Vehicle speed cannot be controlled until the vehicle is traveling at or above 48 km/h (30 mph). ON OFF Do not use the speed control in heavy traffic or on roads that are winding, slippery, or unpaved. Do not shift the gearshift lever into - 2000 Ford F350 | Owner's Manual - Page 57
ON OFF Once speed control is switched off, the previously programmed set speed will be erased. To set a speed • Press SET/SET ACC/SET ACCEL. on an uphill, your speed control will disengage. This is normal. Pressing RES/RSM/RESUME will re-engage it. Do not use the speed control in heavy traffic or - 2000 Ford F350 | Owner's Manual - Page 58
the desired vehicle speed is reached, press and release SET/SET ACC/SET ACCEL. You can accelerate with the accelerator pedal at any time during speed control usage. Releasing the accelerator pedal will return your vehicle to the previously programmed set speed. To set a lower set speed • Press and - 2000 Ford F350 | Owner's Manual - Page 59
Controls and features To disengage speed control • Depress the brake pedal or • Depress the clutch pedal (if equipped). Disengaging the speed control will not erase the previously programmed set speed. Pressing OFF will erase the previously programmed set speed. ON OFF 59 - 2000 Ford F350 | Owner's Manual - Page 60
COAST TILT STEERING WHEEL (IF EQUIPPED) Pull the tilt steering control toward you to move the steering wheel up or down. Hold the control while adjusting the wheel to the desired position, then release the control to lock the steering wheel in position. Never adjust the steering wheel when the - 2000 Ford F350 | Owner's Manual - Page 61
normal drive position for the best fuel economy. The overdrive function allows automatic upshifts and downshifts through all available gears. Deactivating overdrive Press the Transmission Control Switch (TCS) located on the end of the gearshift lever. The Transmission Control Indicator Light (TCIL - 2000 Ford F350 | Owner's Manual - Page 62
. When you shut off and re-start your vehicle, the transmission will (Overdrive) mode. automatically return to normal For additional information about the gearshift lever and the transmission control switch operation refer to the Automatic Transmission Operation section of the Driving chapter - 2000 Ford F350 | Owner's Manual - Page 63
the right side to restore the window controls. Accessory delay (if equipped) With accessory delay, the window switches may be used for up to ten minutes after the ignition switch is turned to the OFF position or until any door is opened. POWER DOOR LOCKS (IF EQUIPPED) Press U to unlock all doors and - 2000 Ford F350 | Owner's Manual - Page 64
each door. Setting the lock for one door will not automatically set the lock for both doors. Move lock control up to engage the childproof lock. Move control down to disengage childproof locks. POWER SIDE VIEW MIRRORS (IF EQUIPPED) The ignition can be in any position to adjust the power side view - 2000 Ford F350 | Owner's Manual - Page 65
Controls and features 3. Return to the center position to lock mirrors in place. Fold-away mirrors Pull the side mirrors in carefully when driving through a narrow space, like an automatic car wash. Heated outside mirrors (if equipped) Both mirrors are heated automatically to remove ice, mist and - 2000 Ford F350 | Owner's Manual - Page 66
, slide the mirror cover open. To turn off the visor mirror lamps, slide the mirror cover closed. CENTER CONSOLE (IF EQUIPPED) Your vehicle may be equipped with a variety of console features. These include: • Utility compartment with cassette/CD holder • Coin holder • Pen holder • Writing surface - 2000 Ford F350 | Owner's Manual - Page 67
entry features only operate with the ignition in the OFF position. If there is any potential remote keyless entry problem with your vehicle, ensure ALL key fobs (remote entry transmitters) are brought to the dealership, to aid in troubleshooting. Unlocking the doors Press this control to unlock the - 2000 Ford F350 | Owner's Manual - Page 68
three-volt lithium battery CR2032 or equivalent. Typical operating range will allow you to be up to 10 meters (33 feet) away from your vehicle. A decrease in operating range can be caused by: • weather conditions • nearby radio towers • structures around the vehicle • other vehicles parked next to - 2000 Ford F350 | Owner's Manual - Page 69
Controls and features To replace the battery: 1. Twist a thin coin between the two halves of the transmitter near the key ring. DO NOT TAKE THE FRONT PART OF THE TRANSMITTER APART. 2. Place the positive (+) side of new battery in the same orientation. Refer to the diagram inside the transmitter unit - 2000 Ford F350 | Owner's Manual - Page 70
Controls and features Replacing lost transmitters If a remote transmitter has been lost ) position. 2 The doors will lock/unlock to confirm that programming mode has been entered. 1 • Within 20 seconds, program a remote transmitter by pressing any button on a transmitter. The doors will lock/unlock - 2000 Ford F350 | Owner's Manual - Page 71
(within 10 seconds). After doors lock/unlock, press any control on all Use a screwdriver to pry the spring clip (on each connector) past the head of the support screw. Disconnect cable. 3. Disconnect the other cable. 4. Lift tailgate to a 45 degree angle. 5. Lift right side off of its hinge. 6. Lift - 2000 Ford F350 | Owner's Manual - Page 72
seat (if equipped) • Lift the track release bar to move the seat forward or backward. Ensure that the seat is relatched into place. • Pull up on the release lever located at the bottom of the seatback to quickly fold the seatback forward. 60/40 split bench seat (if equipped) • Lift the release bar - 2000 Ford F350 | Owner's Manual - Page 73
if equipped) • Lift the track release bar to move the seat forward or rearward. Make sure that the seat is relatched into place. • Pull the seatback handle up to recline the seat. • Push down the release lever located at the bottom of the seatback to quickly fold the seatback forward. Adjusting the - 2000 Ford F350 | Owner's Manual - Page 74
the seat cushion. Press the control to move the seat forward, backward, up or down. Turn the lumbar support control toward the front of vehicle to move the lumbar support forward for more direct support. Turn the lumbar support control toward the rear of vehicle to move the lumbar support back for - 2000 Ford F350 | Owner's Manual - Page 75
can be flipped up into the seatback position. 1. Pull control to release seat cushion. 2. Rotate seat cushion up until it locks into vertical storage position. Returning the seat to seating position Always be sure that the seat is in a latched position, whether the seat is occupied or empty. If not - 2000 Ford F350 | Owner's Manual - Page 76
Seating and safety restraints Never let a passenger hold a child on his or her lap while the vehicle is moving. The passenger cannot protect the child from injury in a collision. All occupants of the vehicle, including the driver, should always properly wear their safety belts, even when an air bag - 2000 Ford F350 | Owner's Manual - Page 77
shoulder belt length adjustment to your movements and locking in response to vehicle will lock to help reduce forward movement of the driver and passengers. On SuperCab and CrewCab models, the front seat belt system can also be made to lock manually by quickly pulling on the shoulder belt. Rear seat - 2000 Ford F350 | Owner's Manual - Page 78
pre-locked. The belt will still retract to remove any slack in the shoulder belt. The automatic locking mode is not available on the driver safety belt. When to use the automatic locking mode • Anytime a child safety seat is installed in a passenger front or outboard rear seating position (if - 2000 Ford F350 | Owner's Manual - Page 79
. BELT AND RETRACTOR ASSEMBLY MUST BE REPLACED if the seat belt assembly "automatic locking retractor" feature or any other seat belt function is not operating properly when checked according to the procedures in Workshop Manual. Failure to replace the Belt and Retractor assembly could increase - 2000 Ford F350 | Owner's Manual - Page 80
Seating and safety restraints Safety belt replacement label (Crew Cab Only) The short plastic boot on the front safety belt at the passenger outboard anchor location covers a "Replace Belt" label on the safety belt. In the event of a collision, the colored label (REPLACE BELT) may become visible. - 2000 Ford F350 | Owner's Manual - Page 81
Seating and safety restraints Failure to follow these instructions will affect the performance of the safety belts and increase the risk of personal injury. Front safety belt height adjustment Your vehicle has safety belt height adjustments for the driver and front passenger. Adjust the height of - 2000 Ford F350 | Owner's Manual - Page 82
up. Pull down on the height adjuster to make sure it is locked in place. Position the shoulder belt height adjusters so that the belt rests across the middle of your shoulder. Failure to adjust the safety belt properly could reduce the effectiveness of the seat belt and increase the risk of injury - 2000 Ford F350 | Owner's Manual - Page 83
is too short, even when fully extended, 20 cm (8 inches) can be added to the safety belt assembly by adding a safety belt extension assembly (part number 611C22). Safety belt extension assemblies can be obtained from your dealer at no cost. Use only extensions manufactured by the same supplier as - 2000 Ford F350 | Owner's Manual - Page 84
Seating and safety restraints Conditions of operation If...The driver's safety belt is not buckled before the ignition switch is turned to the ON position...Then...The safety belt warning light illuminates1-2 minutes and the warning chime sounds 4-8 seconds. The safety belt warning light and warning - 2000 Ford F350 | Owner's Manual - Page 85
up. Safety belts, when used properly, reduce risk of death to front seat occupants by 45% in cars, and by 60% in light trucks. Nearly 1 of 2 brothers/sisters imitate behavior they see. Air bags offer greater protection when used with safety belts. Frontal airbags are not designed to inflate in rear - 2000 Ford F350 | Owner's Manual - Page 86
procedure, make sure that: • the parking brake is set • the gearshift is in P (Park) (automatic transmission) or the neutral position (manual transmission). • the ignition switch is in the OFF position • all vehicle doors are closed • the driver's safety belt is unbuckled • the parklamps/headlamps - 2000 Ford F350 | Owner's Manual - Page 87
are no nicks, wears or cuts, replacing if necessary. All safety belt assemblies, including retractors, buckles, front seat belt buckle assemblies, buckle support assemblies (slide bar-if equipped), shoulder belt height adjusters (if equipped), shoulder belt guide on seatback (if equipped), child - 2000 Ford F350 | Owner's Manual - Page 88
Seating and safety restraints AIR BAG SUPPLEMENTAL RESTRAINT SYSTEM (SRS) 40 F H 50 80 60 70 100 120 2 80 1 90 100 DIESEL FUEL ONLY 30 20 40 60 3 VOL - PUSH ON AM FM BASS TREB FM1 ST BAL FADE 140 20 AUTO SET H 18 10 0 4 SEEK RPM x 1000 TUNE 160 MPH km/h SCAN EJ DOLBY B NR - 2000 Ford F350 | Owner's Manual - Page 89
12 years old and under in the back seat and always properly use appropriate child restraints. National Highway Traffic Safety Administration (NHTSA) recommends a minimum distance of at least 25 cm (10 inches) between an occupant's chest and the driver air bag module. Never place your arm over the - 2000 Ford F350 | Owner's Manual - Page 90
Seating and safety restraints How does the air bag supplemental restraint system work? The air bag SRS is designed to activate when the vehicle sustains sufficient longitudinal deceleration. The fact that the air bags or are otherwise out of position at the time of air bag deployment. Thus, it is - 2000 Ford F350 | Owner's Manual - Page 91
. If the air bag is not replaced, the unrepaired area will increase the risk of injury in a collision. The SRS consists of: • driver and passenger (if equipped) air bag modules (which include the inflators and air bags), • one or more impact and safing sensors, • a readiness light and tone - 2000 Ford F350 | Owner's Manual - Page 92
switch to be sure the switch is in the proper position in accordance with these instructions and warnings. Failure to put the switch in a proper position can increase the risk of serious injury or death in a collision. Turning the passenger air bag off 1. Insert the ignition key, turn the switch to - 2000 Ford F350 | Owner's Manual - Page 93
turn the switch to ON. PASSENGER AIR BAG 2. The OFF light will briefly OFF ON illuminate when the ignition is turned to On. This indicates that the OFF passenger air bag is operational. If the light is illuminated when the passenger air bag switch is in the ON position and the ignition switch is in - 2000 Ford F350 | Owner's Manual - Page 94
system with the air bags. Read all air bag Warning labels in the vehicle as well as the other important air bag instructions and Warnings in this Owner's Guide. NHTSA deactivation criteria (excluding Canada) 1. Infant. An infant (less than 1 year old) must ride in the front seat because: • the - 2000 Ford F350 | Owner's Manual - Page 95
necessary for the child to ride in the front seat so that the driver can constantly monitor the child's condition. 3. Medical condition. A passenger has a medical condition which, according to his or her physician: • causes the passenger air bag to pose a special risk for the passenger; and • makes - 2000 Ford F350 | Owner's Manual - Page 96
under the Transport Canada deactivation criteria. SAFETY RESTRAINTS FOR CHILDREN See the following sections for directions on how to properly use safety restraints for children. Also see Air Bag Supplemental Restraint System (SRS) in this chapter for special instructions about using air bags. 96 - 2000 Ford F350 | Owner's Manual - Page 97
position. Children and safety belts If the child is the proper size, restrain the child in a safety seat. Children who are too large for child safety seats (as specified by your child safety seat manufacturer) should always wear safety belts. Follow all the important safety restraint and air bag - 2000 Ford F350 | Owner's Manual - Page 98
the manufacturer's instructions with the safety seat you put in your vehicle. If you do not install and use the safety seat properly, the child may be injured in a sudden stop or collision. When installing a child safety seat: • Review and follow the information presented in the Air Bag Supplemental - 2000 Ford F350 | Owner's Manual - Page 99
accidental unbuckling. • Place seat back in upright position. • Put the safety belt in the automatic locking mode. Refer to Automatic locking mode (passenger side front and outboard rear seating positions) (if equipped). Ford recommends the use of a child safety seat having a top tether strap - 2000 Ford F350 | Owner's Manual - Page 100
An air bag can kill or injure a child in a child seat. Child seats should never be placed in the front seats, unless passenger air bag switch is turned off, See Passenger air bag deactivation switch. Rear facing child seats should NEVER be placed in the front seats unless the passenger airbag switch - 2000 Ford F350 | Owner's Manual - Page 101
seating position until you hear and feel the latch engage. Make sure the tongue is latched securely by pulling on it. 5. To put the retractor in the automatic locking belt will click as it retracts to indicate it is in the automatic locking mode. 7. Pull the lap belt portion across the child seat - 2000 Ford F350 | Owner's Manual - Page 102
anchorage hardware kit. Tether anchorage hardware kits (part number 613D74) including instructions, may be obtained at no charge from any Ford or Lincoln/Mercury dealer. If you have a Super Cab or Crew Cab, Ford recommends you attach tether safety seats in the rear seating position (if possible - 2000 Ford F350 | Owner's Manual - Page 103
Seating and safety restraints Tighten the anchor according to specifications. Otherwise, the safety seat may not be properly secured and the child may be injured in a sudden stop or collision. 103 - 2000 Ford F350 | Owner's Manual - Page 104
impulse electrical field strength of radio noise. When starting a fuel-injected engine, avoid pressing the accelerator before or during starting. Only use the accelerator when you have difficulty starting the engine. For more information on starting the vehicle, refer to Starting the engine in this - 2000 Ford F350 | Owner's Manual - Page 105
headlamps and vehicle accessories are off. If starting a vehicle with an automatic transmission: • Make sure the parking brake is set. • If • • Make sure the gearshift is in P (Park). starting a vehicle with a manual transmission: Make sure the parking brake is set. Push the clutch pedal to the - 2000 Ford F350 | Owner's Manual - Page 106
to illuminate, have the vehicle serviced. light may not illuminate. • If the driver's safety belt is fastened, the STARTING THE ENGINE 1. Turn the key to 5 (START) without pressing the accelerator pedal and release as soon as the engine starts. The key will return to 4 (ON). 2. If the temperature - 2000 Ford F350 | Owner's Manual - Page 107
for longer than three hours will not harm the engine, so the heater can be plugged in the night before starting the vehicle. To prevent electrical shock, do not use your heater with ungrounded electrical systems or two-pronged (cheater) adapters. Guarding against exhaust fumes Although odorless and - 2000 Ford F350 | Owner's Manual - Page 108
Starting Engine exhaust, some of its constituents, and certain vehicle components open the windows at least 2.5 cm (one inch). Adjust the heating or air conditioning (if equipped) to bring in fresh air. Improve vehicle ventilation by keeping all air inlet vents clear of snow, leaves and other - 2000 Ford F350 | Owner's Manual - Page 109
momentarily illuminates when the ignition is turned to the ON position. If the light does not illuminate momentarily at start up, remains on or continues to flash, the ABS needs to be serviced. With the ABS light on, the anti-lock brake system is disabled and normal braking is still effective - 2000 Ford F350 | Owner's Manual - Page 110
(if equipped) On vehicles equipped with an anti-lock braking system (ABS), a noise from the hydraulic pump motor and pulsation in the pedal may be observed during ABS braking events. Pedal pulsation coupled with noise while braking under panic conditions or on loose gravel, bumps, wet or snowy roads - 2000 Ford F350 | Owner's Manual - Page 111
ABS light on, the anti-lock brake system is disabled and normal braking is still effective unless the brake warning light also remains illuminated with parking brake released. (If your brake warning lamp illuminates, have your vehicle serviced immediately.) Using ABS brake pedal down until the pedal - 2000 Ford F350 | Owner's Manual - Page 112
sure that the gearshift is securely latched in P (Park) (automatic transmission) or in 1 (First) (manual transmission). The parking brake is not recommended to stop a moving vehicle. However, if the normal brakes fail, the parking brake can be used to stop your vehicle in an emergency. Since the - 2000 Ford F350 | Owner's Manual - Page 113
differently than vehicles with a lower center of gravity. Utility and four-wheel drive vehicles are not designed for cornering at speeds as high as passenger cars any more than low-slung sports cars are designed to perform satisfactorily under off-road conditions. Avoid sharp turns, excessive speed - 2000 Ford F350 | Owner's Manual - Page 114
OFF position. 3. Press and hold down the brake pedal and shift into N (Neutral). 4. Start the vehicle. If it is necessary to use the above procedure to move the gearshift lever, it is possible that a fuse has blown or the vehicle's brakelamps are not operating properly. Refer to Fuses and relays in - 2000 Ford F350 | Owner's Manual - Page 115
Driving with a 4-speed automatic transmission Understanding gearshift positions To put your vehicle in gear, start the engine, depress the brake pedal, then move gearshift lever out of P (Park). Hold the brake pedal down while you move the gearshift lever from P (Park) to another position. If you do - 2000 Ford F350 | Owner's Manual - Page 116
the vehicle is started, the transmission will automatically return to normal overdrive mode. Every time the vehicle is shut off and restarted, you must press the transmission control switch to cancel overdrive operation if driving in overdrive is not desired. 2 (Second) Use 2 (Second) to start-up on - 2000 Ford F350 | Owner's Manual - Page 117
conditions do not function normally, see your dealer or a qualified service technician as soon as possible. MANUAL TRANSMISSION OPERATION (IF EQUIPPED) Using the clutch Vehicles equipped with a manual transmission have a starter interlock that prevents cranking the engine unless the clutch pedal - 2000 Ford F350 | Owner's Manual - Page 118
Driving When starting a vehicle with a manual transmission, you must: 1. Make sure the parking brake is fully set. R 1 3 D 1 3 D 2. Depress the clutch pedal fully. 2 4 R L 2 4 3. Put the gearshift lever in N (Neutral). 4. Turn the ignition to position 5 (START) to start the engine, let the engine - 2000 Ford F350 | Owner's Manual - Page 119
) 23 km/h (14 mph) 3-2 32 km/h (20 mph) 13 km/h (8 mph) 2-1 8 km/h (5 mph) 0 km/h (0 mph) Use 2H or 4H for 4WD equipped vehicles. Downshift at lower speeds when driving on slippery surfaces. Maximum downshift speeds 1 6-speed transmission Shift from: Transfer case position (if equipped)2 2H or 4H 4L - 2000 Ford F350 | Owner's Manual - Page 120
Driving Parking your vehicle 1. Disengage the clutch, apply brake and shift into N (Neutral). 1 2 3 4 D R R 1 3 D L 2 4 2. Set parking brake. 3. Shift into 1 (First). 4. Turn the ignition key to position 3 (OFF). 4 3 5 2 1 120 - 2000 Ford F350 | Owner's Manual - Page 121
Do not park your vehicle in Neutral, it may move unexpectedly and injure someone. Use 1 (First) gear and set the parking brake fully. Reverse Make sure that your vehicle is at a complete stop before you shift into R (Reverse). Failure to do so may damage the transmission. Put the gearshift lever in - 2000 Ford F350 | Owner's Manual - Page 122
TCIL will not be illuminated), in N (Neutral), during engine cranking. Transmission upshift and downshift schedules will be reduced by about 15% and will have a firmer shift feel during PTO mobile applications. The PTO cannot be disabled while the transmission is in Manual 3 (Overdrive position with - 2000 Ford F350 | Owner's Manual - Page 123
disengagement while the vehicle is moving. • is operated by a rotary control located on the instrument panel that allows you select 2WD, 4x4 High or 4x4 Low operation. • uses hub locks that can be engaged and disengaged automatically by using a rotary control located on the instrument panel. 123 - 2000 Ford F350 | Owner's Manual - Page 124
from AUTO to LOCK. Automatic operation of the hub locks is recommended. • For proper operation, make sure that the arrow and the indicator dot on the hub are aligned. Manual 4x4 system (if equipped) The 4WD system is engaged or disengaged by rotating the control for both front wheel hub locks from - 2000 Ford F350 | Owner's Manual - Page 125
when the ignition is turned to the ON position. Illuminates when 4L (4x4 Low) is engaged. Using a manual 4WD system (if equipped) 2H (2WD High) - Power to rear axle only. 4H (4WD High) - Power to front and rear axles. N (Neutral) - No power to either axle. 4L (4WD Low) - Power to front and rear - 2000 Ford F350 | Owner's Manual - Page 126
and the indicator dot on the hub are aligned. Shifting from 4H (4WD high) to 4L (4WD low) 1. Bring the vehicle to a complete stop. 2. Depress the brake. 3. Place the gearshift lever in N (Neutral) (automatic transmission) or depress the clutch (manual transmission). 4. Move the transfer case shift - 2000 Ford F350 | Owner's Manual - Page 127
) or 2H (2WD high) and hold the shift lever in position until the transfer case has fully engaged (up to 15 seconds). 5. If the transfer case does not engage, repeat steps 1 through 4. 2H 4H N 4L Using the N (Neutral) position The transfer case neutral position overrides the transmission and puts - 2000 Ford F350 | Owner's Manual - Page 128
to operate the vehicle in R (Reverse) to disengage your front hubs. Shifting from 4x4 HIGH (4WD high) to 4x4 LOW (4WD low) 1. Bring the vehicle to a complete stop. 2. Depress the brake. 3. Place the gearshift in N (Neutral) (automatic transmission) or depress the clutch (manual transmission). 128 - 2000 Ford F350 | Owner's Manual - Page 129
. 3. Place the gearshift in N (Neutral) (automatic transmission) or depress the clutch (manual transmission). 4. Move the 4WD control to the 4x4 HIGH (4WD high) or 2WD (2WD 4X4 4X4 HIGH high) position. LOW 2WD 5. Hold the shift command until the LOW RANGE indicator light shuts off. 6. If the LOW - 2000 Ford F350 | Owner's Manual - Page 130
accelerator in each gear. Do not rock the vehicle if the engine is not at normal operating temperature or damage to the transmission may occur. Do not rock the vehicle for more than a few minutes or damage to the transmission and tires may occur or the engine may overheat. Do not spin the wheels - 2000 Ford F350 | Owner's Manual - Page 131
over 2WD vehicles in snow and ice but can skid like any other vehicle. Avoid sudden applications of power and quick changes of direction on snow and ice. Apply the accelerator slowly and steadily when starting from a full stop. If your vehicle is equipped with a Rear Anti-lock Brake System - 2000 Ford F350 | Owner's Manual - Page 132
Anti-lock Brake System (ABS), apply the brakes as you normally would. In order to allow the ABS to operate properly, keep steady pressure on the brake pedal. When driving on snow or ice with either braking system, allow more stopping distance and drive slower than usual. Consider using one of the - 2000 Ford F350 | Owner's Manual - Page 133
the GAWR specified on the certification label. Do not use replacement tires with lower load carrying capacities than the originals because they may lower including both gross vehicle weight and Front and rear gross axle weight rating limits. Under no circumstance should these limitations be - 2000 Ford F350 | Owner's Manual - Page 134
Water may also enter your engine's air intake and severely damage your engine. If driving through deep or standing water is unavoidable, proceed very slowly. Never drive through water that is higher than the bottom of the hubs (for trucks) or the bottom of the wheel rims (for cars). Once through the - 2000 Ford F350 | Owner's Manual - Page 135
water into the transmission and cause internal transmission damage. TOWING A TRAILER Your vehicle may tow a Conventional/Class IV trailer or fifth wheel trailer provided the maximum trailer weight is less than or equal to the maximum trailer weight listed for your engine and rear axle ratio on the - 2000 Ford F350 | Owner's Manual - Page 136
536 (10 000) 1 Conventional/Class IV trailer hitch only. Fifth wheel trailer maximum weights can be calculated by subtracting GVW from GCWR. Engine 5.4L 5.4L 6.8L 6.8L 1 F-250 with automatic transmission Rear axle Maximum Maximum trailer ratio GCWR-kg (lbs.) weight-kg (lbs.) 1 3.73 6 124 (13 500 - 2000 Ford F350 | Owner's Manual - Page 137
automatic transmission Rear axle Maximum Maximum trailer ratio GCWR-kg (lbs.) weight-kg (lbs.) 1 3.73 6 124 (13 500) 4 536 (10 000) 4.10 6 804 (15 000) 4 536 (10 000) 3.73 7 711 (17 000) 4 536 (10 000) 4.30 9 072 (20 000) 4 536 (10 000) Conventional/Class IV trailer hitch only. Fifth wheel trailer - 2000 Ford F350 | Owner's Manual - Page 138
Hitches Do not use hitches that clamp onto the vehicle's bumper or attach to the axle. You must center of the vehicle. 3. Attach the trailer to the vehicle and adjust the hitch equalizers so that the front bumper height is within 0-13 mm (1/2 inch) of the reference point. After proper adjustment - 2000 Ford F350 | Owner's Manual - Page 139
off automatically when you are towing on long, steep grades. • Consult your local motor vehicle speed regulations for towing a trailer. • Use a lower gear when towing up or down steep hills. This will eliminate excessive downshifting and upshifting for optimum fuel economy and transmission cooling - 2000 Ford F350 | Owner's Manual - Page 140
(automatic transmissions) or N (Neutral) (manual transmissions). This aids engine cooling and air conditioner efficiency. • Vehicles with trailers should not be parked on a grade. If you must park on a grade, place wheel chocks under the trailer's wheels. Launching or retrieving a boat When backing - 2000 Ford F350 | Owner's Manual - Page 141
fluid loss, damage to the driveshaft and internal transmission components. RWD vehicles with 4x4 electronic shift transfer case or All Wheel Drive (AWD) vehicles with automatic transmissions Regarding recreational towing or having your vehicle towed, 4x4 vehicles with electronic shift on the fly and - 2000 Ford F350 | Owner's Manual - Page 142
). These specifications are located in the vehicle's Workshop Manual. Adherence to the toe, tire pressures and ride height specification is important for proper tire wear, ride, handling and headlight aim. Also, maintain the engine oil and transmission fluid change intervals following the severe - 2000 Ford F350 | Owner's Manual - Page 143
, repair, or modify the Air Bag Supplemental Restraint System or its fuses. See your Ford or Lincoln-Mercury dealer. Engine temperature while plowing When driving with a plow, your engine may run at a higher temperature than normal because the attached snowplow blade will restrict airflow to the - 2000 Ford F350 | Owner's Manual - Page 144
24 km (15 miles) at speeds up to 64 km/h (40 mph) in cold weather, you will not need to worry about blade position to provide maximum airflow. 4WD operation while plowing • Shift transfer case to 4x4 LOW (4WD Low) when plowing in small areas at speeds below 8 km/h (5 mph). • Shift transfer case - 2000 Ford F350 | Owner's Manual - Page 145
four years or 80,000 km (50,000 miles) on Lincoln vehicles Roadside assistance will cover: • changing a flat tire • jump-starts • lock-out assistance • fuel delivery • towing of your disabled vehicle to the nearest Ford dealership, or your selling dealer if within 25 kms (15.5 miles) of the nearest - 2000 Ford F350 | Owner's Manual - Page 146
the Ford Roadside Assistance Club brochure or by calling 1-877-294-CLUB (1-877-894-2582). HAZARD FLASHER Use only in an emergency to warn traffic of vehicle breakdown, approaching danger, etc. The hazard flashers can be operated when the ignition is off. • The hazard lights control is located on - 2000 Ford F350 | Owner's Manual - Page 147
The fuel pump shut-off switch is located in the passenger's foot well, by the kick panel. Use the following procedure to reset the fuel pump shut-off switch. 1. Turn the ignition to the OFF position. 2. Check the fuel system for leaks. 3. If no fuel leak is apparent, reset the fuel pump shut-off - 2000 Ford F350 | Owner's Manual - Page 148
Always replace a fuse with one that has the specified amperage rating. Using a fuse with a higher amperage rating can cause severe wire damage and could start a fire. Standard fuse amperage rating and color COLOR Fuse Rating 2A 3A 4A 5A 7.5A 10A 15A 20A 25A 30A 40A 50A 60A 70A 80A Mini Fuses Grey - 2000 Ford F350 | Owner's Manual - Page 149
cover, turn the panel fasteners counterclockwise. To remove a fuse use the fuse puller tool provided on the fuse panel cover. 22 23 24 25 26 27 28 29 30 12 13 14 15 16 17 18 19 20 10 9 FUSE1 RELAY 4 RELAY 1 (NOT USED) RELAY 3 RELAY 5 11 2 3 4 5 6 7 8 21 31 149 - 2000 Ford F350 | Owner's Manual - Page 150
Airbag Module Cigar Lighter, Data Link Connector Glove Box Lamp, Map Lamps, Power Mirrors, Underhood Lamp Not Used Not Used Power Window/Lock Switch Illumination Radio, Headlamp Switch Illumination Not Used Dual Fuel Tanks Wiper Motor, Wiper Run/Park Relay Coil, Wiper Hi/LO Relay Coil, Washer Pump - 2000 Ford F350 | Owner's Manual - Page 151
, Diesel PCM via Clutch 15A Starter Motor Relay Coil, Clutch Switch - Not Used 10A Air Bag Module, Passenger Air Bag Activation/Deactivation Switch, Blower Motor Relay Coil - Not Used 10A A/C Clutch, Blend Door Actuator, Trailer Tow Battery Charge Relay Coil, Four Wheel Anti-Lock Brake System (4WABS - 2000 Ford F350 | Owner's Manual - Page 152
the fly relay blocks are located in the engine compartment near the brake master cylinder. The power distribution box contains high-current fuses that protect your vehicle's main electrical systems from overloads. Always disconnect the battery before servicing high current fuses. Always replace the - 2000 Ford F350 | Owner's Manual - Page 153
Distribution Box Description 8 9 10 11 12 13 14 15 16 17 18 19 20 Trailer Tow Left Stop/Turn Lamp Washer Pump Trailer Tow Right Stop/Turn Lamp Trailer Tow Backup Lamps, Trailer Tow Park Lamps 20A* (Gasoline Gasoline only-PCM, Fuel Pump Relay Coil, only) Mass Air Flow Sensor, Fuel Injectors 5A - 2000 Ford F350 | Owner's Manual - Page 154
Tow Electronic Brake Controller 29 20A** Radio 30 -PCM Power Relay 31 -Blower Motor Relay 32 -A/C CASS (Gasoline only), Injector Driver Module Power Relay (Diesel only) 33 -Washer Pump Relay 34 -Windshield Wiper Park/Run Relay 35 -Windshield Wiper HI/LO Relay 36 -A/C Clutch Diode 37 -PCM Diode 38 - 2000 Ford F350 | Owner's Manual - Page 155
trim from the original wheel/tire may be used on the spare. If your vehicle is equipped with 4WD, a spare tire of a different size than the road tires should not be used. Such a tire could result in damage to driveline components and make the vehicle difficult to control. Location of the spare tire - 2000 Ford F350 | Owner's Manual - Page 156
up the eyebolt with the slot in the support bracket. • Slide the support bracket off the eyebolt and move the support bracket away from the spare tire. 3. If equipped, unlock and remove the spare tire lock from the rear bumper drive tube using the the spare tire lock key and the jack handle. 156 - 2000 Ford F350 | Owner's Manual - Page 157
on the ground with the valve stem facing up. 2. Slide the wheel under the vehicle and install the retainer through the wheel center. 3. Turn the jack handle clockwise until the tire is raised to its original position underneath the vehicle. The effort to turn the jack handle increases significantly - 2000 Ford F350 | Owner's Manual - Page 158
change procedure 1. Park on a level surface, activate hazard flashers and set the parking brake. • Automatic transmission: Place gearshift lever in P (Park). • Manual transmission: Place gearshift lever in R (Reverse). • Electronic Shift On the Fly four wheel drive: Place transfer case in 2WD, 4x4 - 2000 Ford F350 | Owner's Manual - Page 159
one of the rear wheels is off the ground, the transmission alone will not prevent the vehicle from moving or slipping off the jack, even if the transmission is in P (Park) (automatic transmission) or R (Reverse) (manual transmission). To prevent the vehicle from moving when you change the tire, be - 2000 Ford F350 | Owner's Manual - Page 160
Roadside emergencies • Front (4x2) • Front passenger side (4x4) 160 - 2000 Ford F350 | Owner's Manual - Page 161
Roadside emergencies • Front driver side (4x4) Make sure the jack fits into the notched area on the differential housing. • Rear 161 - 2000 Ford F350 | Owner's Manual - Page 162
stem must be facing outward. If replacing the outboard wheel, the valve stem must be facing inward. Reinstall the lug nuts until the wheel is snug against the hub. Do not fully tighten the lug nuts until the wheel has been lowered. 11. Lower the wheel by turning the jack handle counterclockwise - 2000 Ford F350 | Owner's Manual - Page 163
Roadside emergencies • Front (4x2) • Front driver side (4x4) • Front passenger side (4x4) 163 2000 F250/350/450/550 (f23) Owners Guide (owners) USA English (fus) - 2000 Ford F350 | Owner's Manual - Page 164
against the hub. Do not fully tighten the lug nuts until the wheel has been lowered. 18. Lower the wheel by slowly turning the release valve counterclockwise. Opening the release valve slowly will provide a more controlled rate of descent. 164 2000 F250/350/450/550 (f23) Owners Guide (owners) USA - 2000 Ford F350 | Owner's Manual - Page 165
free of dirt and rust. Use only Ford recommended replacement fasteners. On all two-piece flat wheel nuts, apply one drop of motor oil between the flat washer and the nut. Do not apply motor oil to the wheel nut threads or the wheel stud threads. Bolt size When a wheel is installed, always remove - 2000 Ford F350 | Owner's Manual - Page 166
. Automatic transmissions do not have push-start capability. Preparing your vehicle 1. Use only a 12-volt supply to start your vehicle. 2. Do not disconnect the battery of the disabled vehicle as this could damage the vehicle's electrical system. 3. Park the booster vehicle close to the hood of - 2000 Ford F350 | Owner's Manual - Page 167
Note: In the illustrations, lightning bolts are used to designate the assisting (boosting) battery. 2. Connect the other end of the positive (+) cable to the positive (+) terminal of the assisting battery. 2000 F250/350/450/550 (f23) Owners Guide (owners) USA English (fus) - - - + - + + + 167 - 2000 Ford F350 | Owner's Manual - Page 168
Make the final connection of the negative (-) cable to an exposed metal part of the stalled vehicle's engine, away from the battery and the carburetor/fuel injection system. Do not use fuel lines, engine rocker covers or the intake manifold as grounding points. Do not connect the end of the second - 2000 Ford F350 | Owner's Manual - Page 169
the engine of the booster vehicle and run the engine at moderately increased speed. 2. Start the engine of the disabled vehicle. 3. Once the disabled vehicle has been started, run both engines for an additional three minutes before disconnecting the jumper cables. Removing the jumper cables Remove - 2000 Ford F350 | Owner's Manual - Page 170
(+) terminal of the booster vehicle's battery. 4. Remove the jumper cable from the positive (+) terminal of the disabled vehicle's battery. After the disabled vehicle has been started and the jumper cables removed, allow it to idle for several minutes so the engine computer can relearn its idle - 2000 Ford F350 | Owner's Manual - Page 171
towed, contact a professional towing service or, if you are a member, your roadside assistance center. On 4x2 vehicles, it is acceptable to tow the vehicle with the front wheels on the ground and the rear wheels off the ground using a wheel lift or a slingbelt with T-hooks. On 4x4 vehicles, it is - 2000 Ford F350 | Owner's Manual - Page 172
for easy location. • We provide a Scheduled Maintenance Guide which makes tracking routine service easy. If your vehicle requires professional service, your dealership can provide necessary parts and service. Check your "Warranty Guide" to find out which parts and services are covered. Use only - 2000 Ford F350 | Owner's Manual - Page 173
not remove it while the engine is running. • Manual transmission: 1. Set the parking brake, depress the clutch and place the gearshift in N (Neutral). 2. Block the wheels to prevent the vehicle from moving unexpectedly. Do not start your engine with the air cleaner removed and do not remove it while - 2000 Ford F350 | Owner's Manual - Page 174
the hood release handle located under the bottom left corner of the instrument panel. HOOD 2. Go to the front of the vehicle and release the auxiliary latch located under the right center of the hood. Slide the handle to release the auxiliary latch. 3. Lift the hood until the lift cylinders hold - 2000 Ford F350 | Owner's Manual - Page 175
Diesel Owner's Guide Supplement for diesel engine component locations. 9 10 11 1 2 3 4 5 8 7 6 1. Engine oil dipstick 2. Clutch fluid reservoir (manual transmission) 3. Brake fluid reservoir 4. Power distribution box 5. Power steering fluid reservoir 6. Air filter assembly 7. Engine - 2000 Ford F350 | Owner's Manual - Page 176
and ensure the gearshift is securely latched in P (Park) (automatic transmission) or 1 (First) (manual transmission). 4. Open the hood. Protect yourself from engine heat. 5. Locate and carefully remove the engine oil level indicator (dipstick). MIN MAX 6. Wipe the indicator clean. Insert the - 2000 Ford F350 | Owner's Manual - Page 177
cause engine damage. Some oil must be removed from the engine by a service technician. 7. Put the indicator back in and ensure it is fully seated. Adding engine oil 1. Check the engine oil. For instructions, refer to Checking the engine oil in this chapter. 2. If the engine oil level is not within - 2000 Ford F350 | Owner's Manual - Page 178
in the Scheduled Maintenance Guide. Ford production and aftermarket (Motorcraft) oil filters are designed for added engine protection and long life. If a replacement oil filter is used that does not meet Ford material and design specifications, start-up engine noises or knock may be experienced - 2000 Ford F350 | Owner's Manual - Page 179
and refilled as needed. Refer to the Scheduled Maintenance Guide for the service interval schedules. 1. Clean the reservoir cap before removal to induce vomiting. Seek medical attention immediately. If you use a brake fluid that is not DOT 3, you will cause permanent damage to your brakes. Do not - 2000 Ford F350 | Owner's Manual - Page 180
and care Checking and adding brake fluid-diesel engine Check and refill the Hydromax brake fluid reservoir using the following procedure. Refer to the Scheduled Maintenance Guide for the service interval. 1. Clean the reservoir caps before removal to prevent dirt or water from entering the reservoir - 2000 Ford F350 | Owner's Manual - Page 181
clutch fluid level. Refer to the Scheduled Maintenance Guide for the service interval schedules. Use only a DOT 3 brake fluid designed to meet Ford vehicles equipped with the 5-speed manual transmission, during normal operation, the fluid level in the clutch reservoir will drop slightly. As this - 2000 Ford F350 | Owner's Manual - Page 182
, add enough fluid to fill the reservoir. In very cold weather, do not fill the reservoir all the way. Only use a washer fluid that meets Ford specifications. Refer to Lubricant specifications in the Capacities and specifications chapter. State or local regulations on volatile organic compounds may - 2000 Ford F350 | Owner's Manual - Page 183
Refer to the Scheduled Maintenance Guide for service interval schedules. • Be sure to read and understand Precautions when servicing your vehicle in this chapter ; do not use engine coolant, antifreeze or windshield washer fluid outside of its specified function and vehicle location. 183 - 2000 Ford F350 | Owner's Manual - Page 184
meets Ford specification ESE-M97B44-A. • DO NOT USE Ford Extended Life Engine Coolant F6AZ-19544-AA (orange in color). • DO NOT USE a will decrease the freeze protection characteristics of the engine coolant and may cause engine damage. Plain water may be added in an emergency, but you must replace - 2000 Ford F350 | Owner's Manual - Page 185
pressure begins to release. 3. Step back while the pressure releases. 4. When you are sure that all the pressure has been released, use the cloth to turn it counterclockwise and remove the cap. Recycled engine coolant Ford Motor Company recommends the use of a recycled engine coolant produced by - 2000 Ford F350 | Owner's Manual - Page 186
chart on the coolant container to ensure the coolant concentration in your vehicle will provide adequate protection at the temperatures in which you drive. Vehicles driven year-round in non-extreme climates should use a 50/50 mixture of engine coolant and distilled water for optimum cooling system - 2000 Ford F350 | Owner's Manual - Page 187
hot) area. and symbol will • the illuminate. C • the Service Engine Soon indicator light will illuminate. If the engine reaches a preset over-temperature condition, the engine will automatically switch to alternating cylinder operation. Each disabled cylinder acts as an air pump and cools the engine - 2000 Ford F350 | Owner's Manual - Page 188
fluid. Refer to the Scheduled Maintenance Guide for the service interval schedules. If adding fluid is necessary, use only MERCON ATF. Check the fluid level when it is at ambient temperature, 20° - 80° F (-7° - 25° C): 1. Check the fluid level on the dipstick. It should be between the arrows - 2000 Ford F350 | Owner's Manual - Page 189
dipstick back in the reservoir. TRANSMISSION FLUID Checking automatic transmission fluid Refer to your Scheduled Maintenance Guide for scheduled intervals for fluid checks and changes. Your transmission brake engaged and your foot on the brake pedal, start the engine and move the gearshift lever - 2000 Ford F350 | Owner's Manual - Page 190
bottom of the dipstick and the ambient 20 miles) of driving. You can check the fluid without driving if the ambient temperature is above 10°C (50°F). However, if fluid is added at this time, an overfill condition could result when the vehicle reaches normal operating temperature. The transmission - 2000 Ford F350 | Owner's Manual - Page 191
Maintenance and care Adjusting automatic transmission fluid levels Before adding any fluid, make sure the correct type is used. The type of fluid used is normally indicated on the dipstick and also in the Lubricant specifications section in the Capacities and specifications chapter. Use of a non- - 2000 Ford F350 | Owner's Manual - Page 192
filler opening so that the fluid level is at the bottom of the opening. 5. Install and tighten the fill plug securely. Use only fluid that meets Ford specifications. Refer to the Capacities and specifications chapter. Checking and adding transfer case fluid (if equipped) 1. Clean the filler plug - 2000 Ford F350 | Owner's Manual - Page 193
Maintenance Guide for the appropriate intervals for changing the air filter element. When changing the air filter element, use only the Motorcraft air filter element listed. Refer to Motorcraft Part Numbers in the Capacities and specifications chapter. Do not start your engine with the air cleaner - 2000 Ford F350 | Owner's Manual - Page 194
the engine if not properly seated. 5. Replace the two halves of the air filter housing and secure the clamp. DRIVELINE UNIVERSAL JOINT AND SLIP YOKE Your vehicle may be equipped with universal joints that require lubrication. Refer to the Scheduled Maintenance Guide for maintenance intervals. If the - 2000 Ford F350 | Owner's Manual - Page 195
Guide for the service cleaned or replaced. For longer, trouble-free operation neutralize the acid with a solution of baking soda and water. Batteries normally produce explosive gases which can cause personal injury. Therefore, do not allow flames, sparks or lighted or battery. Lift the battery with - 2000 Ford F350 | Owner's Manual - Page 196
some control conditions are automatic transmission) or the neutral position (manual transmission), turn off all accessories and start clock and the preset radio stations must be reset local authorized recycling center to find used by commercial car washes reduce the effectiveness of wiper blades. 196 - 2000 Ford F350 | Owner's Manual - Page 197
blades, do not use fuel, kerosene, paint thinner or other solvents. Changing the wiper blades To replace the wiper blades: 1. Pull the wiper arm away from the windshield and lock into the service position. 2. Turn the blade at an angle from the wiper arm. Push the lock pin manually to release the - 2000 Ford F350 | Owner's Manual - Page 198
inches or limited production tires as defined in Title 49 Code of Federal Regulations Part 575.104(c)(2). U.S. Department of Transportation-Tire quality grades: The U.S. Department of Transportation requires Ford under controlled conditions on a specified indoor laboratory test wheel. Sustained high - 2000 Ford F350 | Owner's Manual - Page 199
SERVICING YOUR TIRES Checking the tire pressure • Use an accurate tire pressure gauge. • Check the tire pressure when tires are cold, after the vehicle has been parked for at least one hour or has been driven less than 5 km (3 miles). • Adjust in the Scheduled Maintenance Guide. If you notice - 2000 Ford F350 | Owner's Manual - Page 200
Maintenance and care • Four tire rotation • Five tire rotation 200 - 2000 Ford F350 | Owner's Manual - Page 201
, type, load-carrying capacity and tread design (e.g., "All Terrain", etc.), as originally offered by Ford. Do not replace your tires with "high performance" tires or larger size tires. Failure to follow these precautions may adversely affect the handling of the vehicle and make it easier for the - 2000 Ford F350 | Owner's Manual - Page 202
snow tires and chains. If you need to use chains, it is recommended that steel wheels (of the same size and specifications) be used as chains may chip aluminum wheels. Follow these guidelines when using snow tires and chains: • Use only SAE Class S chains. • Install chains securely, verifying that - 2000 Ford F350 | Owner's Manual - Page 203
Maintenance and care Automotive fuels can cause serious injury or death if misused or mishandled. Gasoline may contain benzene, which is a cancer-causing agent. Observe the following guidelines when handling automotive fuel: • Extinguish all smoking materials and any open flames before fueling your - 2000 Ford F350 | Owner's Manual - Page 204
while it is in the vehicle. • Keep the fuel pump nozzle in contact with the fuel container while filling. • DO NOT use a device that would hold the fuel pump handle in the fill position. Choosing the right fuel Use only UNLEADED FUEL. The use of leaded fuel is prohibited by law and could damage - 2000 Ford F350 | Owner's Manual - Page 205
problems to become more pronounced. If the problems persist, see your dealer or a qualified service technician. It should not be necessary to add any aftermarket products to your fuel tank if you continue to use air Ford approves the use of reformulated "cleaner-burning" gasolines to improve air - 2000 Ford F350 | Owner's Manual - Page 206
service technician. Refer to the Scheduled Maintenance Guide for the appropriate intervals for changing the fuel filter. Replace the fuel filter with an authorized Motorcraft part. The customer warranty may be void for any damage to the fuel system if an authorized Motorcraft fuel filter is not used - 2000 Ford F350 | Owner's Manual - Page 207
setting (low - medium - high) each time the tank is filled. • Allow three automatic click-offs when filling. • Always use fuel with the recommended octane rating. • Use a known quality gasoline, preferably a national brand. • Use the same side of the same pump and have the vehicle facing the same - 2000 Ford F350 | Owner's Manual - Page 208
. Divide total miles traveled by total gallons used. Keep a record for at least one month and record the type of driving (city or highway). This will provide an accurate estimate of the vehicle's fuel economy under current driving conditions. Additionally, keeping records during summer and winter - 2000 Ford F350 | Owner's Manual - Page 209
stop-and-go driving. Maintenance • Keep tires properly inflated and use only recommended size. • Operating a vehicle with the wheels out of alignment will reduce fuel economy. • Use recommended engine oil. Refer to Lubricant Specifications. • Perform all regularly scheduled maintenance items - 2000 Ford F350 | Owner's Manual - Page 210
items listed in the Scheduled Maintenance Guide are essential to the life and performance of your vehicle and to its emissions system. If other than Ford, Motorcraft or Ford-authorized parts are used for maintenance replacements or for service of components affecting emission control, such - 2000 Ford F350 | Owner's Manual - Page 211
vehicle may not pass the I/M test with the "Check Engine/Service Engine Soon" light on. If the vehicle's powertrain system or its battery has just been serviced, the on-board diagnostics system is reset to a "not ready for I/M test" condition. To ready the on-board diagnostics system for I/M testing - 2000 Ford F350 | Owner's Manual - Page 212
signals • License plate lamp • Tail lamps • Back-up lamps Do not remove lamp bulbs unless they can be replaced immediately with new ones. If a bulb is lamp performance. Replacing headlamp bulbs (aerodynamic) 1. Make sure that the headlamp control is in the OFF position. 2. Open the hood. 3. - 2000 Ford F350 | Owner's Manual - Page 213
lock the ring into the socket by turning it clockwise until you feel a "stop." 8. Connect the electrical connector into the rear of the plastic base until it "snaps." Replacing headlamp bulbs (sealed beam) To remove the headlamp bulb: 1. Make sure headlamp switch is in OFF position. 2. Open the hood - 2000 Ford F350 | Owner's Manual - Page 214
the electrical connector and remove headlamp. To install the new headlamp, reverse the removal procedure. Replacing tail lamp/turn/backup lamp bulbs - F250/F350 only The tail lamp/backup lamp bulbs are located in the same portion of the tail lamp assembly, one just below the other. Follow the - 2000 Ford F350 | Owner's Manual - Page 215
brake/tail/backup lamp bulbs - F450/F550 only The brake/tail/backup lamp bulbs are located in the same portion of the tail lamp assembly. Follow the same steps to replace either bulb: 1. Remove the four screws and the lamp lens from lamp assembly. 2. Carefully pull the bulb straight out of the - 2000 Ford F350 | Owner's Manual - Page 216
it clockwise. Using the right bulbs Replacement bulbs are specified in the chart below. Headlamp bulbs must be marked with an authorized "D.O.T." for North America and an "E" for Europe to assure lamp performance, light brightness and pattern and safe visibility. The correct bulbs will not damage - 2000 Ford F350 | Owner's Manual - Page 217
visor lamp (if equipped) 4 194 Rear identification 3 194 All replacement bulbs are clear in color except where noted. To replace all instrument panel lights - see your dealer (a) Replace entire lamp assembly; bulb is not serviceable. AIMING THE HEADLAMPS The headlamps on your vehicle are properly - 2000 Ford F350 | Owner's Manual - Page 218
vehicle's paintwork. Remove any exterior accessories (such as antennas) and fold your vehicle on a regular basis will reduce minor scratches and paint conditions. Use only carnauba or synthetic-based waxes. Use a cleaning fluid with a clean cloth to remove any bugs before waxing your vehicle. Use - 2000 Ford F350 | Owner's Manual - Page 219
), or Exterior Acrylic Spray Lacquer (#ALAZ-19500-XXXXA) from the Ford Car Care Chemicals line. Please note that the part numbers (shown as XXXX above) will vary with your vehicle's specific coloring. Observe the application instructions on the products. Remove particles such as bird droppings, tree - 2000 Ford F350 | Owner's Manual - Page 220
If necessary, use a tar remover such as Ford Extra Strength Tar and Road Oil Remover (B7A-19520-AA). To avoid scratching the lamps, do not use a dry Do not use chemical solvents or strong detergents when cleaning the steering wheel or instrument panel to avoid contamination of the air bag system. - 2000 Ford F350 | Owner's Manual - Page 221
soft cloth. For tougher soiling concerns, Ford recommends using the Deluxe Leather Care Kit F8AZ-19G253-AA, which is available from your Ford Dealer. This mild cleaner and special pad, cleans the leather and maintains its natural beauty. Follow the instructions on the cleaner label. Regular cleaning - 2000 Ford F350 | Owner's Manual - Page 222
Diesel Owner's Guide Supplement for Motorcraft diesel engine service part numbers. **Refer to Vehicle Emissions Control Information (VECI) decal for spark plug gap information. REFILL CAPACITIES Fluid Front axle Ford Part Name Motorcraft SAE 75W-90 Premium 4x4 Front Axle Lubricant Motorcraft SAE - 2000 Ford F350 | Owner's Manual - Page 223
3 Ford Part Application Name Premium Engine 5.4L V8 engine Coolant without A/C 5.4L V8 engine with A/C 6.8L V10 engine Capacity 16.9L (17.9 quarts) 18.4L (19.4 quarts) 29.0L (30.6 quarts) 5.7L (6.0 quarts) Engine oil (includes filter change)-Gas engines Engine oil (includes filter change)-Diesel - 2000 Ford F350 | Owner's Manual - Page 224
the correct automatic transmission fluid is used. Transmission fluid requirements are indicated on the dipstick or on the dipstick handle. Check the container to verify the fluid being added is of the correct type. Refer to your Scheduled Maintenance Guide to determine the correct service interval - 2000 Ford F350 | Owner's Manual - Page 225
equipped with an in-tank cooler. The amount of transmission fluid and fluid level should be set by the indication on the dipstick's normal operating range. LUBRICANT SPECIFICATIONS Ford part name or equivalent Motorcraft SAE Front axle 75W-90 Premium (4X4) 4x4 Front Axle Lubricant Motorcraft SAE 75W - 2000 Ford F350 | Owner's Manual - Page 226
specifications Ford part name or equivalent Motorcraft SAE 5W-30 Super Engine oil Premium Motor Oil Hinges, Multi-Purpose latches, striker Grease plates, fuel filler door hinge and seat tracks Transmission/ Premium steering/ Long-Life Grease parking brake linkages and pivots, brake and clutch pedal - 2000 Ford F350 | Owner's Manual - Page 227
a synthetic lubricant but do require a change. Refer to your "Service Guide" for change intervals on Dana rear axles. 2 Ensure the correct automatic transmission fluid is used. Transmission fluid requirements are indicated on the dipstick or on the dipstick handle. Check the container to verify the - 2000 Ford F350 | Owner's Manual - Page 228
180 mm (243.3 in)b F250-Crew Cab Dimension (1) Overall height (2) Track (Front / Rear) (3) Overall width (4) Wheelbase (5) Overall length a Short wheel base 1 1 1 1 .4 in)b 242 mm (245.8 in)a / 654 mm (262.0 in)b b Long wheel base style Crew Cab 4x4 2 053mm (80.8 in)a / 2 052 mm (80.8 in)b 1 736 mm - 2000 Ford F350 | Owner's Manual - Page 229
013.2 mm (158.0 in)b 5 879 mm (231.4 in)a / 6 288 mm (247.6 in)b Super Cab 4x4 1 960 mm (77.2 in) (1) Overall height (2) Track (Front / Rear) 1 736.3 mm (68.3 in) / 1 879.6 mm (74.0 in) 1 736.3 6 291 mm (247.7 in) a Short wheel base Long wheel base c Single rear wheels d Dual rear wheels b 229 - 2000 Ford F350 | Owner's Manual - Page 230
mm height (80.5 in) (2) Track 1 736 mm (Front / (68.4 in) / Rear) 1 610 mm (63.4 in) (3) Overall 2 025 mm width (79.7 in) (4) 3 576 mm Wheelbase (140.8 in) (5) Overall 5 732 mm length (225.6 in)a 6 341 mm (249.6 in)b a Short wheel base b Long wheel base Body Chassis Cab 4x4 2 051 mm (80.7 in) 1 736 - 2000 Ford F350 | Owner's Manual - Page 231
mm height (81.7 in) (2) Track 1 736 mm (Front / (68.3 in) / Rear) 1 879 mm (74 in) (3) Overall 2 025 mm width (79.7 in) (4) 3 576 mm Wheelbase (140.8 in) (5) Overall 5 732 mm length (225.6 in)a 6 341 mm (249.6 in)b a Short wheel base b Long wheel base Body Chassis Cab 4x4 2 075 mm (81.6 in) 1 736 - 2000 Ford F350 | Owner's Manual - Page 232
located. The Certification Label is located on the front door latch pillar on the driver's side. MFD. BY FORD TYPE: XXXXXXXXXXXXXXX TRAILER TOWING - SEE OWNER GUIDE MAXIMUM LOAD=OCCUPANTS + LUGGAGE=XXXKG/XXXXLB OCCUPANTS BAR INT TR TP/PS R AXLE TR SPR T0000 X XX XXX X XX X XXXX UTC ∇FOHT-15294A10 - 2000 Ford F350 | Owner's Manual - Page 233
number The vehicle identification number is attached to a metal tag and is located on the driver side instrument panel. (Please note that in the graphic XXXX numbers of the vehicle identification number) is stamped on the engine block, transmission, frame and transfer case (if equipped). 233 - 2000 Ford F350 | Owner's Manual - Page 234
can get more protection for your new car or light truck by purchasing Ford Extended Service Plan (Ford ESP) coverage. Ford ESP is an optional service contract which is backed by Ford Motor Company or Ford Motor Service Company (in the U.S.) and Ford of Canada (in Canada). It provides the following - 2000 Ford F350 | Owner's Manual - Page 235
the dealership. 3. If the inquiry or concern cannot be resolved at the dealership level, please contact the Ford Customer Assistance Center. Ford Motor Company and Ford of Canada dealerships also carry quality parts and accessories, providing you with equipment reliability. Away from home If you own - 2000 Ford F350 | Owner's Manual - Page 236
Motor Company of Canada, Limited P.O. Box 2000 Oakville, Ontario L6J 5E4 1-800-565-3673 (FORD) In order to help you service your Ford or Lincoln Mercury vehicle, please have the following information available when contacting a Customer Assistance Center: • Your telephone number (home and business - 2000 Ford F350 | Owner's Manual - Page 237
replacement Ford Motor Company reserves the right to change eligibility limitations, modify procedures and/or to discontinue this service review? Unresolved warranty repair concerns or vehicle performance as designed concerns on Ford and Lincoln Mercury cars and Ford and Lincoln Mercury light trucks - 2000 Ford F350 | Owner's Manual - Page 238
Ford and Lincoln Mercury dealership management, recognized for their business leadership qualities. What the Board needs To have your case reviewed you must complete the application in the DSB brochure and mail it to the address provided on the application form. Some states will require you to use - 2000 Ford F350 | Owner's Manual - Page 239
by the dealer(s) and Ford Motor Company • the names (if known) of all the people you contacted at the dealership(s) • a description of the action you expect to resolve your concern You will receive a letter of explanation if your application does not qualify for Board review. Oral presentations If - 2000 Ford F350 | Owner's Manual - Page 240
by writing to the Center at the following address: Ford Motor Company Customer Assistance Center 16800 Executive Plaza Drive P.O. Box 6248 Dearborn, Michigan 48121 places in an informal environment. These impartial arbitrators review the positions of the parties, make decisions and, when appropriate - 2000 Ford F350 | Owner's Manual - Page 241
materials and that meet or exceed Ford's rigid specifications. For best results, use the following or products of equivalent quality: Ford Custom Clearcoat Polish* Ford Custom Silicone Gloss Polish Ford Custom Vinyl Protectant* (not available in Canada) Motorcraft Vinyl Conditioner (Canada only) 241 - 2000 Ford F350 | Owner's Manual - Page 242
of your vehicle. In addition, each accessory is made from high quality materials and meets or exceeds Ford's rigid engineering and safety specifications. Ford accessories are warranted for up to 12 months or 20 000 km (12 000 miles) on all cars and light trucks and 12 months with unlimited distance - 2000 Ford F350 | Owner's Manual - Page 243
mirror with compass and temperature display Fog lights Framed luggage covers Heavy-duty battery Off road lights Pickup box rails Running boards and tubular running bars Speed control Towing mirrors Trailer hitch, Class IV Trailer hitch bars and balls Trailer hitch mounted bike carrier Trailer hitch - 2000 Ford F350 | Owner's Manual - Page 244
Diamond plate splash guards Diamond plate tool box Flat splash guards Front end covers (full) Hood deflectors Locking gas cap Lubricants and oils Molded splash guards Molded vinyl floor mats Rallye bars/Combo bars Side window air deflectors Spare tire lock Step bumpers Step/sill plates Tailgate - 2000 Ford F350 | Owner's Manual - Page 245
Monday-Friday 8:00 a.m. - 6:00 p.m. EST, for credit card holders only Obtaining a French owner's guide French Owner's Guides can be obtained from your dealer or by writing to Ford Motor Company of Canada, Limited, Service Publications, P.O. Box 1580, Station B, Mississauga, Ontario L4Y 4G3. 245 - 2000 Ford F350 | Owner's Manual - Page 246
of vehicles, it may order a recall and remedy campaign. However, NHTSA cannot become involved in individual problems between you, your dealer or Ford Motor Company. To contact NHTSA, you may either call the Auto Safety Hotline toll-free at 1-800-424-9393 (202-366-0123 in the Washington D.C. area) or - 2000 Ford F350 | Owner's Manual - Page 247
...90 passenger air bag ...90 passenger deactivation switch ...92 Air cleaner filter ...193,222 Air conditioning ...27 Ambulance packages ...4 Antifreeze (see Engine coolant) ...182 Anti-lock brake system (see Brakes) ...110,111 Audio system (see Radio) ...32 Automatic transmission driving an - 2000 Ford F350 | Owner's Manual - Page 248
...240 Daytime running lamps (see Lamps) ...25 Dipstick automatic transmission fluid ...189 engine oil ...176 Doors door ajar warning ...15 lubricant specifications ...225 Driveline universal joint and slip yoke ...194 Driving under special conditions ...130,131 mud ...130 sand ...130 248 snow - 2000 Ford F350 | Owner's Manual - Page 249
and air conditioning system ...29 Hood ...174 Ignition ...227,228 positions of the ignition ...55 removing the key ...122 Infant seats (see Safety seats) ..98 Inspection/ maintenance (I/M) testing ...211 Instrument panel cleaning ...220 cluster ...10,220 lighting up panel and interior ...26 location - 2000 Ford F350 | Owner's Manual - Page 250
...132 Loading instructions ...134 Locks childproof ...64 Lubricant specifications ...225,227 Lumbar support, seats ...75 Manual transmission ...117 fluid capacities ...222 lubricant specifications ...227 reverse ...121 Message center ...20 english/metric button ...20 menu button ...20 Mirrors ...66 - 2000 Ford F350 | Owner's Manual - Page 251
starting ...166 Steering wheel tilting ...60 Tachometer ...19 Tailgate ...71 Tires ...155,197,198,199 changing ...155,158 checking the pressure ...199 replacing ...201 rotating ...199 snow tires and chains ...201 tire grades ...198 treadwear ...198 Towing ...199 wrecker ...171 Traction-lok rear axle - 2000 Ford F350 | Owner's Manual - Page 252
252 - 2000 Ford F350 | Owner's Manual - Page 253
253 - 2000 Ford F350 | Owner's Manual - Page 254
254 - 2000 Ford F350 | Owner's Manual - Page 255
information Item Required fuel Fuel tank capacity Engine oil (includes filter change) Tire size and pressure Hood release Coolant capacity Power steering fluid capacity Manual transmission (5-speed) 2 Manual transmission (6-speed) 2 Automatic transmission fluid capacity 2 1 Information Unleaded - 2000 Ford F350 | Owner's Manual - Page 256
usage (MERCON and MERCON V) in an automatic transmission application requiring MERCON may cause transmission damage. Use of any fluid other than the recommended fluid may cause transmission damage. 3 Service refill capacity is determined by filling the transmission to the bottom of the filler hole
-
 1
1 -
 2
2 -
 3
3 -
 4
4 -
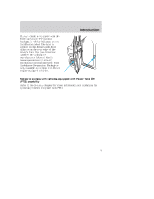 5
5 -
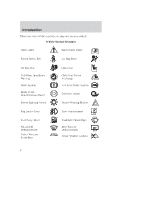 6
6 -
 7
7 -
8
-
9
-
10
-
11
-
12
-
13
-
14
-
15
-
16
-
17
-
18
-
19
-
20
-
21
-
22
-
23
-
24
-
25
-
26
-
27
-
28
-
29
-
30
-
31
-
32
-
33
-
34
-
35
-
36
-
37
-
38
-
39
-
40
-
41
-
42
-
43
-
44
-
45
-
46
-
47
-
48
-
49
-
50
-
51
-
52
-
53
-
54
-
55
-
56
-
57
-
58
-
59
-
60
-
61
-
62
-
63
-
64
-
65
-
66
-
67
-
68
-
69
-
70
-
71
-
72
-
73
-
74
-
75
-
76
-
77
-
78
-
79
-
80
-
81
-
82
-
83
-
84
-
85
-
86
-
87
-
88
-
89
-
90
-
91
-
92
-
93
-
94
-
95
-
96
-
97
-
98
-
99
-
100
-
101
-
102
-
103
-
104
-
105
-
106
-
107
-
108
-
109
-
110
-
111
-
112
-
113
-
114
-
115
-
116
-
117
-
118
-
119
-
120
-
121
-
122
-
123
-
124
-
125
-
126
-
127
-
128
-
129
-
130
-
131
-
132
-
133
-
134
-
135
-
136
-
137
-
138
-
139
-
140
-
141
-
142
-
143
-
144
-
145
-
146
-
147
-
148
-
149
-
150
-
151
-
152
-
153
-
154
-
155
-
156
-
157
-
158
-
159
-
160
-
161
-
162
-
163
-
164
-
165
-
166
-
167
-
168
-
169
-
170
-
171
-
172
-
173
-
174
-
175
-
176
-
177
-
178
-
179
-
180
-
181
-
182
-
183
-
184
-
185
-
186
-
187
-
188
-
189
-
190
-
191
-
192
-
193
-
194
-
195
-
196
-
197
-
198
-
199
-
200
-
201
-
202
-
203
-
204
-
205
-
206
-
207
-
208
-
209
-
210
-
211
-
212
-
213
-
214
-
215
-
216
-
217
-
218
-
219
-
220
-
221
-
222
-
223
-
224
-
225
-
226
-
227
-
228
-
229
-
230
-
231
-
232
-
233
-
234
-
235
-
236
-
237
-
238
-
239
-
240
-
241
-
242
-
243
-
244
-
245
-
246
-
247
-
248
-
249
-
250
-
251
-
252
-
253
-
254
-
255
-
256
 |
 |

Before driving
Introduction
2
Instrumentation
8
Controls and features
25
Seating and safety restraints
72
Starting and driving
Starting
104
Driving
109
Roadside emergencies
145
Servicing
Maintenance and care
172
Capacities and specifications
222
Customer assistance
234
Reporting safety defects
246
Index
247
All rights reserved. Reproduction by any means, electronic or mechanical including
photocopying, recording or by any information storage and retrieval system or translation
in whole or part is not permitted without written authorization from Ford Motor Company.
Ford may change the contents without notice and without incurring obligation.
Copyright © 1999 Ford Motor Company
Contents
1