2009 Ford F250 Quick Reference Guide 1st Printing
2009 Ford F250 Manual

2009 Ford F250 manual content summary:
- 2009 Ford F250 | Quick Reference Guide 1st Printing - Page 1
in your Owner's Guide for spare tire and tool location in addition to complete details on how to change your tire. Roadside Assistance Your new Ford Super Duty comes with the assurance and support of 24-hour emergency roadside assistance. Roadside assistance includes such services as: lockout - 2009 Ford F250 | Quick Reference Guide 1st Printing - Page 2
YOUR 2009 FORD 1. Service Engine Soon Light an exhaust system with clean diesel after-treatment technology which includes a diesel oxidation catalytic converter and a diesel particulate filter (DPF). Do not modify the exhaust after-treatment. See Owner's Guide for more information. Draining the
-
 1
1 -
 2
2
 |
 |

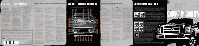
AUDIOPHILE IN-DASH SIX CD/MP3/SATELLITE COMPATIBLE SOUND SYSTEM
Tire Pressure
Your tire pressure needs to be
properly set according to the
recommended specifcations.
These specifcations can be
Found on the SaFety Compliance
Certifcation Label or Tire Label
which is located on the B-Pillar or
the edge oF the driver’s door. Please
check your tire pressure during
routine maintenance and seasonal
changes and when the Tire Pressure
Monitoring System warning indicator
is illuminated. Tire pressure is
specifed to provide the appropriate
load capacity For your vehicle’s axle
load ratings. Keeping the tires at
the proper pressure is an important
part oF maintaining your vehicle.
Improperly in±ated tires can aFFect
vehicle handling and can Fail
suddenly, resulting in a possible
loss oF vehicle control.
Fuses
IF your electrical components are
not working properly, a Fuse may
have blown. Please reFer to your
Owner’s Guide For Fuse locations.
LocaTion oF sPare Tire and
TooLs/changing The Tires
IF you get a ±at tire while driving, do
not apply the brake heavily. Instead,
gradually decrease your speed. Hold
the steering wheel frmly and slowly
move to a saFe place on the side oF
the road. Your vehicle is equipped
with a temporary spare tire which
is designed For emergency use only
and should be replaced as soon
as possible. Due to the diFFerent
possible cab confgurations, please
reFer to the Roadside Emergencies
chapter in your Owner’s Guide
For spare tire and tool location in
addition to complete details on
how to change your tire.
roadside assisTance
Your new ²ord Super Duty comes
with the assurance and support
oF 24-hour emergency roadside
assistance. Roadside assistance
includes such services as: lockout
assistance, limited Fuel delivery,
battery jump starts, changing a ±at
tire, towing, and winch out. To receive
roadside assistance in the United
States, call 1 (800) 241-3673. In
Canada, call 1 (800) 665-2006. ²or
more inFormation on coverage period
and details oF service, reFer to your
roadside assistance inFormation.
s.o.s. PosT crash aLerT sysTem
Your vehicle is equipped with the
S.O.S. Post Crash Alert system. This
system provides audible and visual
alarms in the event oF a crash
which causes the deployment oF
airbags or the activation oF the
saFety belt pretensioners. The turn
signals will ±ash and the horn will
sound. To deactivate the system,
press the hazard ±asher control
,
or you can press
on your
remote transmitter.
imProve your FueL economy
Below are several ways to improve
Fuel economy while driving:
• Drive sensibly
• Keep tires properly in±ated
• Use cruise control
•
Don’t carry more than you need
(you will lose up to 1% in Fuel
economy per 100 lbs. [45 kg])
•
Observe the speed limit (speeds
in excess oF 70 mpg decrease
overall Fuel economy)
•
Make sure your vehicle is
properly maintained
•
Check and replace air
flter regularly
•
Use recommended grade
oF motor oil
• Avoid excessive idling
•
Add tonneau cover (available
as a ²ord accessory)
memory FeaTure (If EqUIppED)
Your vehicle may be equipped with a memory Feature, which allows your vehicle to ‘remember’ your desired settings
For your seats, mirrors and adjustable pedals (iF equipped). To set, move your seat, mirrors and adjustable pedals
(iF equipped) to the desired position.
Press and hold either memory button 1 or 2 For fve seconds. Continue to hold
until two tones are heard.
Within three seconds oF the second tone, press
on your remote transmitter. Your settings
are now saved and will be activated when that remote transmitter is used to unlock your vehicle.
TaiLgaTe sTeP (If EqUIppED)
Your vehicle may be equipped with a tailgate step that allows easy entry into
the truck bed. To use, open the tailgate. Pull the yellow latch lever to the
unlock position to release the grab handle From its stowed position and raise
the handle upright until you Feel it latch and see the latch lever in the lock
position. (The yellow lever only needs to be used when releasing the grab
handle.) Rotate the center molding to unlatch the tailgate. ²lip open the panel
to widen the step. Always use the grab handle when stepping up or down on
the tailgate step. Keep the step load (you + load) below 350 lbs. (159 kg).
To close the tailgate step, Fold the step panel, then liFt and Fully slide the tailgate step into the tailgate. Slide the latch
at the bottom oF the handle, then lower the handle. Never drive with the step deployed. Ensure that you Fully close and
latch the tailgate step beFore moving the vehicle.
Bed exTender (If EqUIppED)
Your vehicle may be equipped with a cargo management Feature in the truck bed.
To open the bed extender into tailgate mode, start with the right side panels by
pulling the locking pin toward the driver’s side oF the vehicle. Unlatch
the panels and then rotate the panels toward the tailgate. Rotate
the storage hinge rearward and then rotate the panels
toward the tailgate. Engage locking pin to the right.
Repeat For the leFt side panels oF the bed extender.
Connect the two panels at the center, then rotate
both knobs a quarter turn clockwise to secure
them. Ensure that the latch rod is inserted into
the tailgate hole and the locking pins on BOTH
sides are engaged into their holes in the pick-up
box. Please reFer to your Owner’s Guide For
complete details on this Feature.
reverse camera (If EqUIppED)
Your vehicle may be equipped with a reverse camera located
on the liFtgate, which provides a visual display oF the area
behind the vehicle. The display will automatically appear in
the rear view mirror or on the navigation system screen
(iF equipped) whenever the vehicle is in Reverse (R) and uses
colors (green, yellow and red) to alert you oF your proximity to
objects. ReFer to your Owner’s guide For more inFormation.
Keep the lens clean so the video image remains clear and undistorted.
Clean the lens with a soFt, lint-Free cloth and non-abrasive cleaner. IF the
reverse camera system image is not clear or seems distorted it may be
covered with water droplets, snow, mud or any other substance. IF this occurs,
clean the camera lens beFore using the reverse camera system.
The reverse camera system is not a replacement For the rear view and side view mirrors. Always make sure there are
no people or objects behind the vehicle beFore using reverse. ²or complete details on the reverse camera system,
please consult your Owner’s Guide.
Use extreme caution when using
any device or Feature that may take
your attention oFF the road. Your
primary responsibility is the saFe
operation oF the vehicle. Only use
non-essential Features and devices
when it is saFe to do so.
1.
seTTing memory PreseTs
To set a station: Select a Frequency
band with the AM/²M button, then
select a station. Press and hold a
numbered preset button 1–6 until
the sound returns.
2.
TexT/scan FuncTion
Press and hold For a brieF sampling
oF radio stations or satellite radio
channels (iF equipped). Press again
to stop. In CD/MP3 mode, press
and release to display track title,
artist name, disc title and fle name
(iF available).
3.
am/Fm and cd seLecT
In radio mode, press AM/²M
repeatedly to cycle through AM,
²M1 or ²M2 Frequency bands.
Press CD to begin CD play. In CD
mode, press AM/²M to stop CD
play and begin radio play.
4.
on/oFF/voLume conTroL
Press to turn on/oFF. Turn to
increase/decrease the volume.
5.
Loading cds
To load a CD into the system, press
LOAD. When prompted, select the
desired slot (1-6) using the memory
presets and insert the CD into the
system. Press and hold LOAD to
autoload up to six discs.
6.
eJecTing cds
Press
to eject a CD. Press and
hold to auto-eject all CDs present
in the system.
7.
seeK FuncTion
Press to access the next listenable
station , CD track, or previous
satellite radio station.
8.
Press to access SYNC phone
Features (iF equipped). IF your
vehicle is not equipped with SYNC,
the display will read NO PHONE.
9.
Tune/disc seLecTor
Press to go up or down the radio
Frequency or to select a desired disc.
10.
menu
Press repeatedly to access the
Following settings, among others:
SPEED VOLUME
(speed sensitive volume,
if equipped):
The volume
automatically changes slightly
with vehicle speed to compensate
For road and wind noise. Use
/
to adjust.
SETTING THE CLOCK:
Press MENU
until SELECT HOUR or SELECT MINS
is displayed. Press
/
to adjust the
hours/minutes.
SATELLITE RADIO MENU:
(if equipped):
Press MENU when
satellite radio mode is active to
access. Press OK to enter into the
satellite radio menu. Press
/
to
cycle through the Following options:
Category, Save Song, Delete Song,
Delete All Songs, Enable Alerts/
Disable Alerts.
SIRIUS Satellite Radio is a
subscription based satellite radio
service that broadcasts music,
sports, news and entertainment
programming. ²or more inFormation
and a complete list oF SIRIUS
satellite radio channels, visit
www.sirius.com in the United States,
www.sirius-canada.ca in Canada,
or call SIRIUS at 1–888–539–7474.
11.
aux
Repeatedly press to cycle through
²ES/DVD (iF equipped), SAT1, SAT2,
SAT3 (satellite mode iF equipped)
or LINE IN (auxiliary audio mode
iF equipped).
VOICE-ACTIVATED NAVIGATION
SYSTEM
(iF equipped):
Your vehicle may be equipped with
a voice-activated navigation system
which integrates several Functions
including voice recognition,
destination entry and SIRIUS
satellite radio (iF equipped) in one
easy to use system.
NOTE:
Some
Features are unavailable while
driving. ReFer to your Navigation
supplement For more inFormation.
DUAL AUTOMATIC TEMPERATURE CONTROL SYSTEM
a.
auTo
Press to engage automatic
temperature control, and select
the desired temperature using the
temperature control. The system will
automatically determine Fan speed,
air±ow location, A/C on or oFF, and
outside or recirculated air to heat or
cool the vehicle, allowing it to reach
the desired temperature.
B.
driver/Passenger
TemPeraTure conTroLs
Press to increase or decrease the
temperature on the driver or
passenger side oF the vehicle.
c.
exT
Press to display outside temperature.
Press again to display cabin
temperature settings.
d.
Fan sPeed conTroL
Press to increase or decrease the
Fan speed.
e.
heaTed seaT conTroLs
Press to turn the heated seats on
and oFF. The heated seats turn oFF
when the ignition is turned oFF.
F.
manuaL override conTroL
Allows you to manually select
where air±ow is directed. Press
repeatedly to cycle through all
possible options. To return to Full
automatic control, press AUTO.
g.
a/c conTroL
Press to activate/deactivate air
conditioning. Use with recirculated
air to improve cooling perFormance
and eFfciency. Engages automatically
in AUTO,
(deFrost) and
(±oor/deFrost).
h.
recircuLaTion conTroL
Recirculates air in the cabin, thereby
reducing the amount oF time needed
to cool down the interior oF the
vehicle when used with A/C.
i.
duaL:
Press to activate duel zone climate
control where the passenger and
driver can set their own individual
climate settings. Press again to
deactivate and return to single zone
where the driver’s climate settings
determine the climate settings For
the entire vehicle.
J.
heaTed mirrors
Press to deFrost the outside rear
view mirrors. The heated mirrors
will turn oFF aFter 10 minutes or
can be shut oFF by pressing the
button again.
K.
deFrosT
Use to clear ice or Fog From the
windshield by distributing air
through the windshield deFroster
and demister vents.
max a/c oPeraTion
Automatic Operation:
Press AUTO
For Full automatic operation. Do not
override A/C or recirculated air.
Set the temperature to 60˚² (16˚C).
Override Operation:
Select air
distribution
. Select A/C and
recirculated air. Use recirculated
air with A/C to provide colder
air±ow. Set temperature to 60˚²
(16˚C). Set to highest Front Fan
speed initially, then adjust to
maintain comFort.
raPid heaT
suPPLemenTaL
heaTing sysTem (If EqUIppED)
IF your vehicle is equipped with a
diesel engine, it may be equipped
with a supplemental heater to assist
in heating the inside oF your vehicle
in cold weather. ²or maximum
eFFectiveness, mid to lower blower
speed is recommended during
initial warm-up.
When operating in
automatic mode (if equipped),
the climate control system will
determine the appropriate blower
speed for existing conditions.
²or complete details on these and
other climate control Features or
iF your vehicle is equipped with a
climate control system other than
the one shown, please reFer to your
Owner’s Guide.
4
3
3
2
1
6
9
8
7
11
B
A
D
E
G
H
E
I
C
10
K
B
J
5
F
Ford Motor Company Customer Relationship Center
|
P.O. Box 6248
|
Dearborn, MI 48121
1-800-392-3673 (FORD)
(TDD for the hearing impaired: 1-800-232-5952)
This Quick Reference Guide is not intended to replace your vehicle Owner’s Guide which contains more
detailed information concerning the features of your vehicle, as well as important safety warnings designed to
help reduce the risk of injury to you and your occupants. Please read your entire Owner’s Guide carefully as
you begin learning about your new vehicle and refer to the appropriate chapters when questions arise.
All information contained in this Quick Reference Guide was accurate at the time of duplication. We reserve
the right to change features, operation and/or functionality of any vehicle specification at any time. Your Ford
dealer is the best source for the most current information. For detailed operating and safety information,
please consult your Owner’s Guide.
August 2008
First Printing
Quick Reference Guide
Super Duty
Litho in U.S.A.
9C3J 19G217 AA
AUDIOPHILE IN-DASH SIX CD/MP3/SATELLITE COMPATIBLE SOUND SYSTEM
(iF equipped)
DUAL AUTOMATIC TEMPERATURE CONTROL SYSTEM
WITH HEATED SEATS AND HEATED MIRRORS (iF equipped)