2005 Honda Civic Owner's Manual - Page 116
2005 Honda Civic Manual
Page 116 highlights
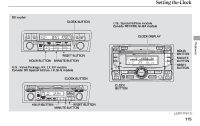
Setting the Clock If your vehicle's battery is disconnected or goes dead, you will need to set the clock. On models with in-dash CD player/ changer To set the time, press the CLOCK (SCAN/RPT, AUX) button until you hear a beep, then release the button. The displayed time begins to blink. Change the hours by pressing the H (preset 4) button until the numbers advance to the desired time. Change the minutes by pressing the M (preset 5) button until the numbers advance to the desired time. Press the CLOCK (SCAN/RPT, AUX) button again to enter the set time. On models with in-dash CD changer, press the CLOCK button until you hear a beep. You can quickly set the time to the nearest hour. If the displayed time is before the half hour, pressing the CLOCK (SCAN/RPT, AUX) button until you hear a beep, then pressing the R (preset 6) button sets the clock back to the previous hour. If the displayed time is after the half hour, the clock sets forward to the beginning of the next hour. For example: 1:06 will reset to 1:00 1:52 will reset to 2:00 advance to the desired time. To quickly set the time to the nearest hour, press and hold the CLOCK button, then press the R (preset 6) button. On models with in-dash CD changer Cancelling Clock Display To turn off the clock display, press the CLOCK (AUX) button until you hear a beep, then press the Preset 3 (Clock Off) button. The displayed time will be turned off. To show the time again, press the CLOCK (AUX) button again until you hear a beep. On models without in-dash CD player/ changer You can set the time only when the clock is displayed. To set the hours, press and hold the CLOCK button, then press the H (preset 4) button until the numbers advance to the desired time. To set the minutes, press and hold the CLOCK button, then press the M (preset 5) button until the numbers 116
-
 1
1 -
2
-
3
-
4
-
5
-
6
-
7
-
8
-
9
-
10
-
11
-
12
-
13
-
14
-
15
-
16
-
17
-
18
-
19
-
20
-
21
-
22
-
23
-
24
-
25
-
26
-
27
-
28
-
29
-
30
-
31
-
32
-
33
-
34
-
35
-
36
-
37
-
38
-
39
-
40
-
41
-
42
-
43
-
44
-
45
-
46
-
47
-
48
-
49
-
50
-
51
-
52
-
53
-
54
-
55
-
56
-
57
-
58
-
59
-
60
-
61
-
62
-
63
-
64
-
65
-
66
-
67
-
68
-
69
-
70
-
71
-
72
-
73
-
74
-
75
-
76
-
77
-
78
-
79
-
80
-
81
-
82
-
83
-
84
-
85
-
86
-
87
-
88
-
89
-
90
-
91
-
92
-
93
-
94
-
95
-
96
-
97
-
98
-
99
-
100
-
101
-
102
-
103
-
104
-
105
-
106
-
107
-
108
-
109
-
110
-
 111
111 -
 112
112 -
 113
113 -
 114
114 -
 115
115 -
 116
116 -
 117
117 -
 118
118 -
 119
119 -
 120
120 -
 121
121 -
122
-
123
-
124
-
125
-
126
-
127
-
128
-
129
-
130
-
131
-
132
-
133
-
134
-
135
-
136
-
137
-
138
-
139
-
140
-
141
-
142
-
143
-
144
-
145
-
146
-
147
-
148
-
149
-
150
-
151
-
152
-
153
-
154
-
155
-
156
-
157
-
158
-
159
-
160
-
161
-
162
-
163
-
164
-
165
-
166
-
167
-
168
-
169
-
170
-
171
-
172
-
173
-
174
-
175
-
176
-
177
-
178
-
179
-
180
-
181
-
182
-
183
-
184
-
185
-
186
-
187
-
188
-
189
-
190
-
191
-
192
-
193
-
194
-
195
-
196
-
197
-
198
-
199
-
200
-
201
-
202
-
203
-
204
-
205
-
206
-
207
-
208
-
209
-
210
-
211
-
212
-
213
-
214
-
215
-
216
-
217
-
218
-
219
-
220
-
221
-
222
-
223
-
224
-
225
-
226
-
227
-
228
-
229
-
230
-
231
-
232
-
233
-
234
 |
 |