2006 Infiniti FX35 Owner's Manual - Page 149
2006 Infiniti FX35 Manual

Page 149 highlights
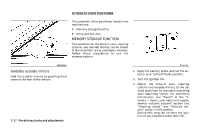
4. Push the SET switch and, within 5 seconds, push the memory switch (1 or 2) fully for at least 1 second. The indicator light for the pushed memory switch will come on and stay on for approximately 5 seconds after pushing the switch. After the indicator light goes off, the selected positions are stored in the selected memory (1 or 2). If a new memory is stored in the same memory switch, the previous memory will be deleted. With the key removed from the ignition button on the switch, press the keyfob or Intelligent Key. The driver's seat, steering wheel and outside mirrors will move to the memorized position. 2. Turn the ignition ON. 3. Push the memory switch (1 or 2) fully for at least 1 second. The driver's seat, steering column and outside mirrors will move to the memorized position with the indicator light flashing, and then the light will stay on for approximately 5 seconds. Confirming memory storage Turn the ignition ON and push the SET switch. If the main memory has not been stored, the indicator light will come on for approximately 0.5 seconds. When the memory has stored the position, the indicator light will stay on for approximately 5 seconds. If the battery cable is disconnected, or if the fuse opens, the memory will be canceled. In such a case, reset the desired positions using the following procedures. 1. Open and close the driver's door more than two times with the ignition key in the LOCK position. 2. Reset the desired position using the previous procedure. ENTRY/EXIT FUNCTION This system is designed so that the driver's seat, steering column and door mirrors will automatically move when the automatic transmission selector lever is in the P (Park) position. This allows the driver to get into and out of the driver's seat more easily. The driver's seat will slide backward and the steering wheel will move up: When the driver's door is opened after removing the key from the ignition switch or the ignition switch (if so equipped), or returning the ignition switch to lock position. When the driver's door is opened with the key turned to LOCK. When the key is turned from ACC to LOCK or returning the ignition switch to Linking a keyfob or Intelligent Key to a stored memory position A keyfob or Intelligent Key can be linked to a stored memory position with the following procedure. 1. Follow the steps for storing a memory position. 2. While the indicator light for the memory switch being set is illuminated for 5 seconds, press the button on the keyfob or Intelligent Key. The indicator light will blink. After the indicator light goes off, the keyfob or Intelligent Key is linked to that memory setting. Selecting the memorized position 1. Set the selector lever to the P (Park) position. Pre-driving checks and adjustments 3-33
-
 1
1 -
2
-
3
-
4
-
5
-
6
-
7
-
8
-
9
-
10
-
11
-
12
-
13
-
14
-
15
-
16
-
17
-
18
-
19
-
20
-
21
-
22
-
23
-
24
-
25
-
26
-
27
-
28
-
29
-
30
-
31
-
32
-
33
-
34
-
35
-
36
-
37
-
38
-
39
-
40
-
41
-
42
-
43
-
44
-
45
-
46
-
47
-
48
-
49
-
50
-
51
-
52
-
53
-
54
-
55
-
56
-
57
-
58
-
59
-
60
-
61
-
62
-
63
-
64
-
65
-
66
-
67
-
68
-
69
-
70
-
71
-
72
-
73
-
74
-
75
-
76
-
77
-
78
-
79
-
80
-
81
-
82
-
83
-
84
-
85
-
86
-
87
-
88
-
89
-
90
-
91
-
92
-
93
-
94
-
95
-
96
-
97
-
98
-
99
-
100
-
101
-
102
-
103
-
104
-
105
-
106
-
107
-
108
-
109
-
110
-
111
-
112
-
113
-
114
-
115
-
116
-
117
-
118
-
119
-
120
-
121
-
122
-
123
-
124
-
125
-
126
-
127
-
128
-
129
-
130
-
131
-
132
-
133
-
134
-
135
-
136
-
137
-
138
-
139
-
140
-
141
-
142
-
143
-
 144
144 -
 145
145 -
 146
146 -
 147
147 -
 148
148 -
 149
149 -
 150
150 -
 151
151 -
 152
152 -
 153
153 -
 154
154 -
155
-
156
-
157
-
158
-
159
-
160
-
161
-
162
-
163
-
164
-
165
-
166
-
167
-
168
-
169
-
170
-
171
-
172
-
173
-
174
-
175
-
176
-
177
-
178
-
179
-
180
-
181
-
182
-
183
-
184
-
185
-
186
-
187
-
188
-
189
-
190
-
191
-
192
-
193
-
194
-
195
-
196
-
197
-
198
-
199
-
200
-
201
-
202
-
203
-
204
-
205
-
206
-
207
-
208
-
209
-
210
-
211
-
212
-
213
-
214
-
215
-
216
-
217
-
218
-
219
-
220
-
221
-
222
-
223
-
224
-
225
-
226
-
227
-
228
-
229
-
230
-
231
-
232
-
233
-
234
-
235
-
236
-
237
-
238
-
239
-
240
-
241
-
242
-
243
-
244
-
245
-
246
-
247
-
248
-
249
-
250
-
251
-
252
-
253
-
254
-
255
-
256
-
257
-
258
-
259
-
260
-
261
-
262
-
263
-
264
-
265
-
266
-
267
-
268
-
269
-
270
-
271
-
272
-
273
-
274
-
275
-
276
-
277
-
278
-
279
-
280
-
281
-
282
-
283
-
284
-
285
-
286
-
287
-
288
-
289
-
290
-
291
-
292
-
293
-
294
-
295
-
296
-
297
-
298
-
299
-
300
-
301
-
302
-
303
-
304
-
305
-
306
-
307
-
308
-
309
-
310
-
311
-
312
-
313
-
314
-
315
-
316
-
317
-
318
-
319
-
320
-
321
-
322
-
323
-
324
-
325
-
326
-
327
-
328
-
329
-
330
-
331
-
332
-
333
-
334
-
335
-
336
-
337
-
338
-
339
-
340
-
341
-
342
-
343
-
344
-
345
-
346
-
347
-
348
-
349
-
350
-
351
-
352
-
353
-
354
-
355
-
356
-
357
-
358
-
359
-
360
-
361
-
362
-
363
-
364
-
365
-
366
-
367
-
368
-
369
-
370
-
371
-
372
-
373
-
374
-
375
-
376
-
377
-
378
-
379
-
380
-
381
-
382
-
383
-
384
-
385
-
386
-
387
-
388
-
389
-
390
-
391
-
392
 |
 |