2007 Infiniti M35 Owner's Manual - Page 152
2007 Infiniti M35 Manual
Page 152 highlights
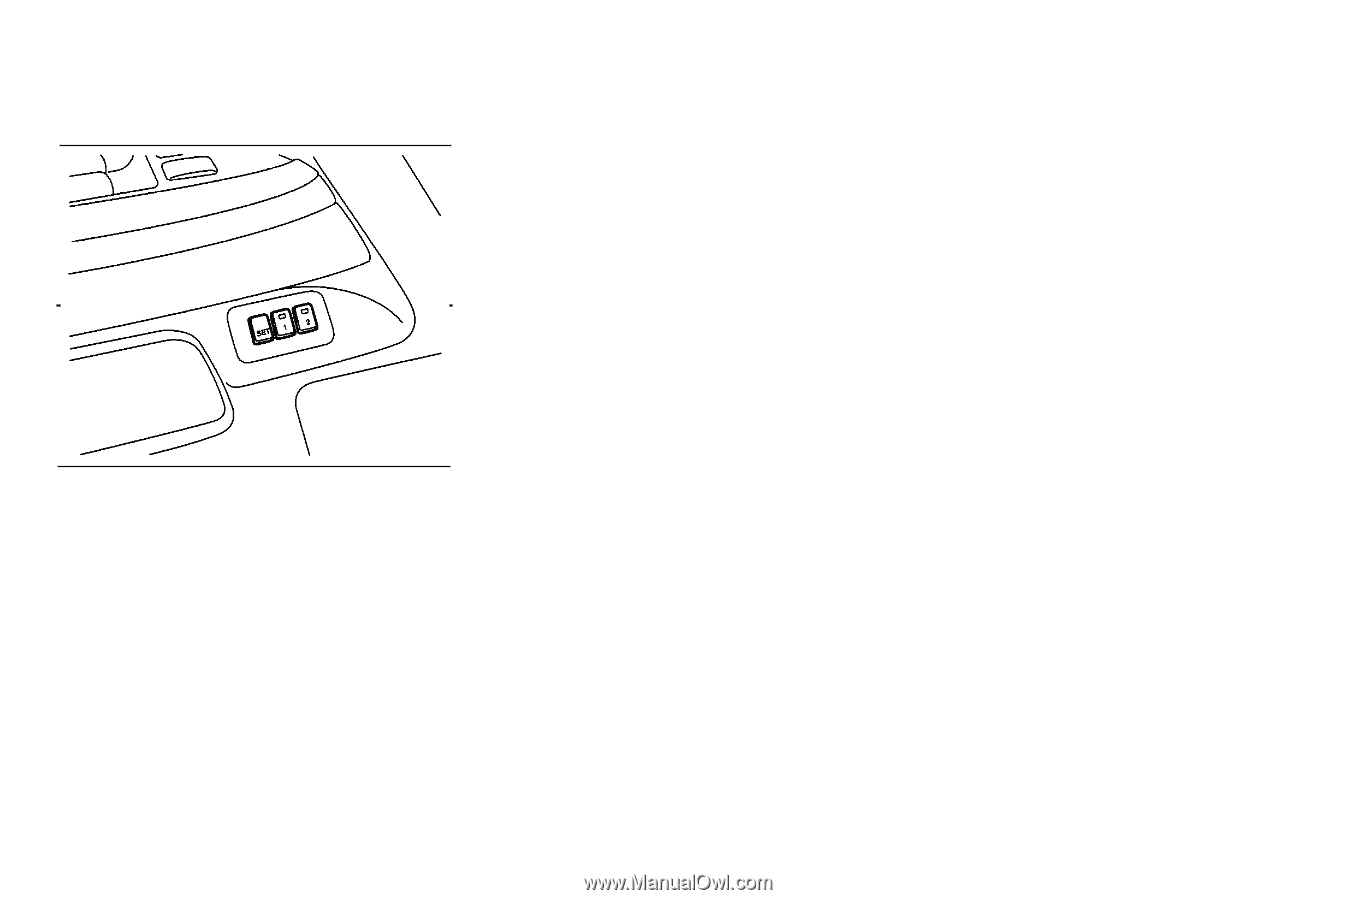
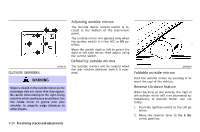
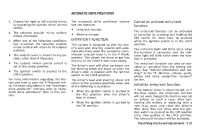
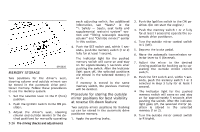
each adjusting switch. For additional information, see "Seats" in the "1. Safety - Seats, seat belts and supplemental restraint system" section and "Tilting telescopic steering column" and "Outside mirrors" earlier in this section. 4. Push the SET switch and, within 5 seconds, push the memory switch (1 or 2) fully for at least 1 second. The indicator light for the pushed memory switch will come on and stay on for approximately 5 seconds after pushing the switch. After the indicator light goes off, the selected positions are stored in the selected memory (1 or 2). If memory is stored in the same memory switch, the previous memory will be deleted. 2. Push the ignition switch to the ON position. (Do not start the engine.) 3. Push the memory switch 1 or 2 fully for at least 1 second to operate the automatic drive positioner. 4. Turn the outside mirror control switch to L (left). 5. Depress the brake pedal. 6. Move the automatic transmission selector lever to R (Reverse). 7. Adjust the mirror to the desired viewing position for backing up by operating the outside mirror control switch. 8. Push the SET switch and, within 5 seconds, push the memory switch 1 or 2 selected in step 3 fully for at least 1 second. The indicator light for the pushed memory switch will come on and stay on for approximately 5 seconds after pushing the switch. After the indicator light goes off, the selected mirror position is stored in the selected memory (1 or 2). 9. Turn the outside mirror control switch to R (right). SPA2020 MEMORY STORAGE Two positions for the driver's seat, steering column and outside mirrors can be stored in the automatic drive positioner memory. Follow these procedures to use the memory system. 1. Set the selector lever to the P (Park) position. 2. Push the ignition switch to the ON position. 3. Adjust the driver's seat, steering column and outside mirrors to the desired positions by manually operating Procedure for storing the outside mirror positions for best visibility at reverse tilt-down feature Two outside mirror positions for backing up can be stored in the automatic drive positioner memory. 1. Apply the parking brake. 3-26 Pre-driving checks and adjustments
-
 1
1 -
2
-
3
-
4
-
5
-
6
-
7
-
8
-
9
-
10
-
11
-
12
-
13
-
14
-
15
-
16
-
17
-
18
-
19
-
20
-
21
-
22
-
23
-
24
-
25
-
26
-
27
-
28
-
29
-
30
-
31
-
32
-
33
-
34
-
35
-
36
-
37
-
38
-
39
-
40
-
41
-
42
-
43
-
44
-
45
-
46
-
47
-
48
-
49
-
50
-
51
-
52
-
53
-
54
-
55
-
56
-
57
-
58
-
59
-
60
-
61
-
62
-
63
-
64
-
65
-
66
-
67
-
68
-
69
-
70
-
71
-
72
-
73
-
74
-
75
-
76
-
77
-
78
-
79
-
80
-
81
-
82
-
83
-
84
-
85
-
86
-
87
-
88
-
89
-
90
-
91
-
92
-
93
-
94
-
95
-
96
-
97
-
98
-
99
-
100
-
101
-
102
-
103
-
104
-
105
-
106
-
107
-
108
-
109
-
110
-
111
-
112
-
113
-
114
-
115
-
116
-
117
-
118
-
119
-
120
-
121
-
122
-
123
-
124
-
125
-
126
-
127
-
128
-
129
-
130
-
131
-
132
-
133
-
134
-
135
-
136
-
137
-
138
-
139
-
140
-
141
-
142
-
143
-
144
-
145
-
146
-
 147
147 -
 148
148 -
 149
149 -
 150
150 -
 151
151 -
 152
152 -
 153
153 -
 154
154 -
 155
155 -
 156
156 -
 157
157 -
158
-
159
-
160
-
161
-
162
-
163
-
164
-
165
-
166
-
167
-
168
-
169
-
170
-
171
-
172
-
173
-
174
-
175
-
176
-
177
-
178
-
179
-
180
-
181
-
182
-
183
-
184
-
185
-
186
-
187
-
188
-
189
-
190
-
191
-
192
-
193
-
194
-
195
-
196
-
197
-
198
-
199
-
200
-
201
-
202
-
203
-
204
-
205
-
206
-
207
-
208
-
209
-
210
-
211
-
212
-
213
-
214
-
215
-
216
-
217
-
218
-
219
-
220
-
221
-
222
-
223
-
224
-
225
-
226
-
227
-
228
-
229
-
230
-
231
-
232
-
233
-
234
-
235
-
236
-
237
-
238
-
239
-
240
-
241
-
242
-
243
-
244
-
245
-
246
-
247
-
248
-
249
-
250
-
251
-
252
-
253
-
254
-
255
-
256
-
257
-
258
-
259
-
260
-
261
-
262
-
263
-
264
-
265
-
266
-
267
-
268
-
269
-
270
-
271
-
272
-
273
-
274
-
275
-
276
-
277
-
278
-
279
-
280
-
281
-
282
-
283
-
284
-
285
-
286
-
287
-
288
-
289
-
290
-
291
-
292
-
293
-
294
-
295
-
296
-
297
-
298
-
299
-
300
-
301
-
302
-
303
-
304
-
305
-
306
-
307
-
308
-
309
-
310
-
311
-
312
-
313
-
314
-
315
-
316
-
317
-
318
-
319
-
320
-
321
-
322
-
323
-
324
-
325
-
326
-
327
-
328
-
329
-
330
-
331
-
332
-
333
-
334
-
335
-
336
-
337
-
338
-
339
-
340
-
341
-
342
-
343
-
344
-
345
-
346
-
347
-
348
-
349
-
350
-
351
-
352
-
353
-
354
-
355
-
356
-
357
-
358
-
359
-
360
-
361
-
362
-
363
-
364
-
365
-
366
-
367
-
368
-
369
-
370
-
371
-
372
-
373
-
374
-
375
-
376
-
377
-
378
-
379
-
380
-
381
-
382
-
383
-
384
-
385
-
386
-
387
-
388
-
389
-
390
 |
 |