2003 Mazda MAZDA6 Owner's Manual - Page 204
2003 Mazda MAZDA6 Manual
Page 204 highlights
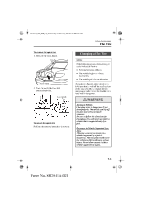
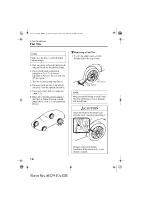
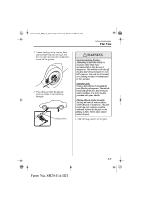
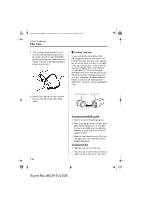
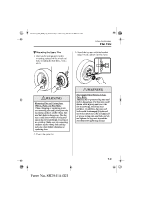
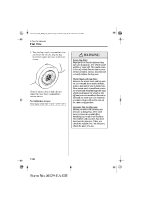
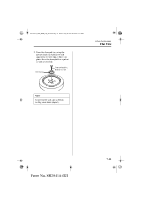
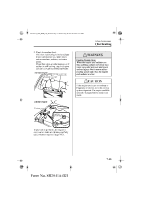
shuseizumi_J56J_8R29_EA_02I.book Page 8 Wednesday, October 16, 2002 9:51 AM In Case of an Emergency Flat Tire 5. Turn the lug wrench clockwise and raise the vehicle high enough so that the spare tire can be installed. Before removing the lug nuts, make sure your Mazda is firmly in position and that it cannot slip or move. M Locking Lug Nuts If your vehicle has optional antitheft wheel lug nuts, one on each wheel will lock the tires and you must use a special key to unlock them. This key is attached to the lug wrench and is stored with the spare tire. Register them with the lock manufacturer by filling out the card provided in the glove box and mailing it in the accompanying envelope. If you lose your key, consult an Authorized Mazda Dealer or use the lock manufacturer's order form, which is with the registration card. Antitheft lug nut Special key 6. Remove the lug nuts by turning them counterclockwise; then remove the wheel. To remove an antitheft lug nut 1. Get the key for the locking lug nut. 2. Place it on top of the nut, and be sure to hold the key square to it. If you hold the key at an angle, you may damage both key and nut. Don't use a power impact wrench. 3. Place the lug wrench on top of the key and apply pressure. Turn the wrench counterclockwise. To replace the nut 1. Place the key on top of the nut. 2. Place the lug wrench on top of the key, apply pressure, and turn it clockwise. 7-8 Form No. 8R29-EA-02I
-
 1
1 -
2
-
3
-
4
-
5
-
6
-
7
-
8
-
9
-
10
-
11
-
12
-
13
-
14
-
15
-
16
-
17
-
18
-
19
-
20
-
21
-
22
-
23
-
24
-
25
-
26
-
27
-
28
-
29
-
30
-
31
-
32
-
33
-
34
-
35
-
36
-
37
-
38
-
39
-
40
-
41
-
42
-
43
-
44
-
45
-
46
-
47
-
48
-
49
-
50
-
51
-
52
-
53
-
54
-
55
-
56
-
57
-
58
-
59
-
60
-
61
-
62
-
63
-
64
-
65
-
66
-
67
-
68
-
69
-
70
-
71
-
72
-
73
-
74
-
75
-
76
-
77
-
78
-
79
-
80
-
81
-
82
-
83
-
84
-
85
-
86
-
87
-
88
-
89
-
90
-
91
-
92
-
93
-
94
-
95
-
96
-
97
-
98
-
99
-
100
-
101
-
102
-
103
-
104
-
105
-
106
-
107
-
108
-
109
-
110
-
111
-
112
-
113
-
114
-
115
-
116
-
117
-
118
-
119
-
120
-
121
-
122
-
123
-
124
-
125
-
126
-
127
-
128
-
129
-
130
-
131
-
132
-
133
-
134
-
135
-
136
-
137
-
138
-
139
-
140
-
141
-
142
-
143
-
144
-
145
-
146
-
147
-
148
-
149
-
150
-
151
-
152
-
153
-
154
-
155
-
156
-
157
-
158
-
159
-
160
-
161
-
162
-
163
-
164
-
165
-
166
-
167
-
168
-
169
-
170
-
171
-
172
-
173
-
174
-
175
-
176
-
177
-
178
-
179
-
180
-
181
-
182
-
183
-
184
-
185
-
186
-
187
-
188
-
189
-
190
-
191
-
192
-
193
-
194
-
195
-
196
-
197
-
198
-
 199
199 -
 200
200 -
 201
201 -
 202
202 -
 203
203 -
 204
204 -
 205
205 -
 206
206 -
 207
207 -
 208
208 -
 209
209 -
210
-
211
-
212
-
213
-
214
-
215
-
216
-
217
-
218
-
219
-
220
-
221
-
222
-
223
-
224
-
225
-
226
-
227
-
228
-
229
-
230
-
231
-
232
-
233
-
234
-
235
-
236
-
237
-
238
-
239
-
240
-
241
-
242
-
243
-
244
-
245
-
246
-
247
-
248
-
249
-
250
-
251
-
252
-
253
-
254
-
255
-
256
-
257
-
258
-
259
-
260
-
261
-
262
-
263
-
264
-
265
-
266
-
267
-
268
-
269
-
270
-
271
-
272
-
273
-
274
-
275
-
276
-
277
-
278
-
279
-
280
-
281
-
282
-
283
-
284
-
285
-
286
-
287
-
288
-
289
-
290
 |
 |