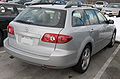
2004 Mazda MAZDA6 Owner's Manual
2004 Mazda MAZDA6 Manual
2004 Mazda MAZDA6 manual content summary:
- 2004 Mazda MAZDA6 | Owner's Manual - Page 1
J56J_8S11-EA-03G_Edition1.book Page 1 Tuesday, June 24, 2003 6:29 PM Form No. 8S11-EA-03G - 2004 Mazda MAZDA6 | Owner's Manual - Page 2
J56J_8S11-EA-03G_Edition1.book Page 2 Tuesday, June 24, 2003 6:29 PM - 2004 Mazda MAZDA6 | Owner's Manual - Page 3
trouble-free operation of your Mazda, read this manual carefully and follow its recommendations. An Authorized Mazda Dealer knows your vehicle best. So when maintenance or service air conditioner does not operate properly, consult an Authorized Mazda Dealer. Please be aware that this manual applies - 2004 Mazda MAZDA6 | Owner's Manual - Page 4
, when read from cover to cover, can do that in many ways. Illustrations complement the words of the manual to best explain how to enjoy your Mazda. By reading your manual, you can find out about the features, important safety information, and driving under various road conditions. Index: A good - 2004 Mazda MAZDA6 | Owner's Manual - Page 5
; opening/closing and adjustment of various parts. Before Driving Your Mazda Important information about driving your Mazda. Driving Your Mazda Explanation of instruments and controls. Interior Comfort Use of various features for drive comfort, including climate control and audio system. In Case - 2004 Mazda MAZDA6 | Owner's Manual - Page 6
J56J_8S11-EA-03G_Edition1.book Page 6 Tuesday, June 24, 2003 6:29 PM - 2004 Mazda MAZDA6 | Owner's Manual - Page 7
J56J_8S11-EA-03G_Edition1.book Page 1 Tuesday, June 24, 2003 6:29 PM 1 Your Vehicle at a Glance Interior, exterior views and part identification of your Mazda. Dashboard Overview ...1-2 Interior Overview ...1-3 Exterior Overview ...1-4 1-1 Form No. 8S11-EA-03G - 2004 Mazda MAZDA6 | Owner's Manual - Page 8
display (page 6-44) Lighting control/Turn signals (page 5-40) Hazard warning flasher (page 5-45) Fog lights switch* (page 5-42) Audio system (page 6-16) Power window switches (page 3-14) Shift lever (page 5-9) (page 5-11) Passenger-side air bag (page 2-36) Glove box (page 6-51) Center - 2004 Mazda MAZDA6 | Owner's Manual - Page 9
book Page 3 Tuesday, June 24, 2003 6:29 PM Your Vehicle at a Glance Interior Overview Sunvisors (page 6-41) Map light (page 6-43) Curtain air bags* (page 2-36) Rearview mirror (page 3-26) Interior light (page 6-41) Vanity mirror (page 6-41) Rear seat (page 2-9) Front seats (page 2-2) Seat - 2004 Mazda MAZDA6 | Owner's Manual - Page 10
J56J_8S11-EA-03G_Edition1.book Page 4 Tuesday, June 24, 2003 6:29 PM Your Vehicle at a Glance Exterior Overview Antenna (page 6-16) Brake lights/Taillights (page 8-30) High-mount brake light (page 8-30) Rear window defroster (page 5-44) Trunk lid (page 3-10) Power windows (page 3-14) Tires - 2004 Mazda MAZDA6 | Owner's Manual - Page 11
Rear Seat ...2-9 Seat Belt Systems ...2-12 Seat Belt Precautions ...2-12 3-Point Type Seat Belt ...2-15 Front Seat Belt Pretensioner and Load Limiting Systems ...2-17 Rear Center Position Seat Belt ...2-19 Seat Belt Extender ...2-21 Seat Belt Warning Light ...2-23 Seat Belt Warning Beep ...2-23 - 2004 Mazda MAZDA6 | Owner's Manual - Page 12
J56J_8S11-EA-03G_Edition1.book Page 2 Tuesday, June 24, 2003 6:29 PM Essential Safety Equipment Seats Front Seats (Manually Operated Seats) M Seat Slide WARNING Driver's Seat Adjustment: Adjusting the driver's seat while the vehicle is moving is dangerous. The driver could lose control of the - 2004 Mazda MAZDA6 | Owner's Manual - Page 13
belts. During sudden braking or a collision, you can slide under the lap belt and suffer serious internal injuries. For maximum protection, sit well back in severe injury. After adjusting the seatback at any time support the seatback while operating the seatback lever. If the seatback is not supported - 2004 Mazda MAZDA6 | Owner's Manual - Page 14
moving the seat lever up or down, the seat bottom height can be adjusted. Up M Head Restraint WARNING Head Restraints Adjustment: Driving with the head restraints adjusted too low or removed is dangerous. With no support behind your head, your neck could be seriously injured in a collision. Always - 2004 Mazda MAZDA6 | Owner's Manual - Page 15
for modification purposes is dangerous. The front seats contain air bag components or essential to the supplemental restraint system. Such modification could damage the supplemental restraint system and result in serious injury. Consult an Authorized Mazda Dealer if there is any need to remove or - 2004 Mazda MAZDA6 | Owner's Manual - Page 16
use can damage the motors. • To prevent the battery from running down, avoid using the power adjustment when the engine is stopped. The adjuster uses a great amount of electric power. • Don't use the switch to make more than one adjustment at a time. WARNING Reclining: Sitting in a reclined - 2004 Mazda MAZDA6 | Owner's Manual - Page 17
pressing down on the center of the switch. Release the switch at the desired position. Switch Rear height adjustment Raise or lower the back of the switch to adjust the rear height of the seat-bottom. Switch M Lumber Support Adjustment (Driver's Seat) To adjust the lumbar support, pull the lever - 2004 Mazda MAZDA6 | Owner's Manual - Page 18
the seat warmer on or off. When the switch is in the ON position, the indicator light will come on. WARNING Head Restraints Adjustment: Driving with the head restraints adjusted too low or removed is dangerous. With no support behind your head, your neck could be seriously injured in a collision - 2004 Mazda MAZDA6 | Owner's Manual - Page 19
child-restraint system and seat belt could be thrown forward, back or even out braking or a collision, objects can fly around and become projectiles that may hit and injure passengers. Don't stack cargo higher than the seatbacks or place articles on the rear package tray. Securing Seats: Adjustable - 2004 Mazda MAZDA6 | Owner's Manual - Page 20
, pull the rear seatback forward from inside the vehicle. 1. Unfasten the lap portion of the rear center seat belt (page 2-19). WARNING Folding Seatbacks with Remote Handle Levers: Not checking the rear seat area before folding the seatbacks with the remote handle levers is dangerous. The rear seat - 2004 Mazda MAZDA6 | Owner's Manual - Page 21
upright. Pull on the tops of the seatbacks from inside the vehicle to make sure they are locked. 2. Fasten the rear-center lap/shoulder belt and check that all seat belts are routed properly for passenger use (page 2-19). M Armrest The armrest can be used or placed upright. Armrest WARNING Seat - 2004 Mazda MAZDA6 | Owner's Manual - Page 22
in a collision. Whether a front seat was occupied or not, if the front air bags deployed the pretensioners also deployed and both front seat belts must be replaced. Have an Authorized Mazda Dealer inspect all seat belt systems in use during an accident before they are used again. Twisted Seat - 2004 Mazda MAZDA6 | Owner's Manual - Page 23
Equipment Seat Belt Systems CAUTION Belt retraction may become difficult if the belts and belt should be worn across your shoulder properly, but never across the stomach area. Persons with serious medical conditions also should wear seat belts. Check with your doctor for any special instructions - 2004 Mazda MAZDA6 | Owner's Manual - Page 24
you can stop the vehicle in a safe area, retract the belt fully to convert it back to emergency locking mode and then again extend it around you. M Automatic Locking Mode Always use the automatic locking mode to keep the child-restraint system from shifting to an unsafe position in the event of an - 2004 Mazda MAZDA6 | Owner's Manual - Page 25
arm, on your neck, or on your upper arm. 4. Make sure the shoulder belt is snugly fitted against your body. When using the rear center seat belt, refer to "Rear Center Position Seat Belt" (page 2-19). M Fastening the Seat Belts 1. Grasp the buckle and tongue. 2. Slowly pull out the lap/shoulder - 2004 Mazda MAZDA6 | Owner's Manual - Page 26
Page 16 Tuesday, June 24, 2003 6:29 PM Essential Safety Equipment Seat Belt Systems M Unfastening the Seat Belts Depress the button on the buckle. M Shoulder Belt Adjuster Adjust the height of the shoulder belt if the seat belt touches your neck, or if it crosses your arm instead of your shoulder - 2004 Mazda MAZDA6 | Owner's Manual - Page 27
recommended in this owner's manual. Expended Seat Belt Pretensioners: Use of front seat belts with the pretensioner system expended is dangerous. The seat belt pretensioners will only function once. After they are expended, they will not work again and both must be replaced immediately. If the seat - 2004 Mazda MAZDA6 | Owner's Manual - Page 28
Belt Systems WARNING Modification or Testing of the Pretensioner System: Modifying the components or wiring of the pretensioner system, including the use of electronic testing experience light skin irritation. If residue from the deployment of the air bags or the front pretensioner system gets on - 2004 Mazda MAZDA6 | Owner's Manual - Page 29
(B) If the air bag/front seat belt pretensioner system is OK, the warning light illuminates when the ignition switch is turned to the ON position or after the engine is cranked. After about 6 seconds it goes out. A system malfunction is indicated when the warning light constantly flashes, stays on - 2004 Mazda MAZDA6 | Owner's Manual - Page 30
Belt Systems M Unfastening the Seat Belt Depress the button on the buckle. WARNING Fastening the Rear-Center Seat Belt with Only One Buckle: Fastening the rear-center seat belt sure the shoulder belt is snugly fitted against your body. M Unfastening the Lap Portion of the Seat Belt Insert a small - 2004 Mazda MAZDA6 | Owner's Manual - Page 31
Belt Systems M Fastening the Lap Portion of the Seat Belt Grasp tongue (A) and insert it into the anchor buckle (B) until you hear a click. It is now secure for passenger use. NOTE Seat Belt Extender If your seat belt fasten the seat belt properly. Please contact your Authorized Mazda Dealer for - 2004 Mazda MAZDA6 | Owner's Manual - Page 32
between the extender's buckle and the center of the user's body is less than 15cm (6 in). NOTE When not in use, remove the seat belt extender and store it in the vehicle. If the seat belt extender is left connected, the seat belt warning light will not illuminate and function properly. 2-22 - 2004 Mazda MAZDA6 | Owner's Manual - Page 33
for about 6 seconds. If the driver's seat belt is not fastened when the ignition switch is turned to the ON position, the seat belt warning light will remain on until the belt is fastened. If the system does not operate correctly, consult an Authorized Mazda Dealer. 2-23 Form No. 8S11-EA-03G - 2004 Mazda MAZDA6 | Owner's Manual - Page 34
one for the age and size of the child, obey the law and follow the instructions that come with the individual child-restraint system. A child who has outgrown child-restraint systems should sit in the rear and use seat belts, both lap and shoulder. If the shoulder belt crosses the neck or face - 2004 Mazda MAZDA6 | Owner's Manual - Page 35
must be properly restrained using a seat belt or child-restraint system depending on age and size. If not, the child could be seriously injured or even killed in an accident. Follow the Manufacturer's Instructions and Always Keep the Child-Restraint System Buckled Down: An unsecured child-restraint - 2004 Mazda MAZDA6 | Owner's Manual - Page 36
handle levers for the rear seat. CAUTION A seat belt or child-restraint system can become very hot in a closed vehicle during warm weather. To avoid burning yourself or a child, check them before you or your child touches them. NOTE Your Mazda is equipped with LATCH lower anchors for attachment of - 2004 Mazda MAZDA6 | Owner's Manual - Page 37
If you are not sure whether you have a LATCH system or tether, check in the child-restraint system manufacturer's instructions and follow them accordingly. Depending on the type of child-restraint system, it may not employ seat belts which are in automatic locking mode. 1. Secure the child-restraint - 2004 Mazda MAZDA6 | Owner's Manual - Page 38
during retraction if the system is in the automatic locking mode. If the belt does not lock the seat down tight, repeat this step. 4. If your child-restraint system requires the use of a tether strap, hook and tighten the tether strap by following the manufacturer's instructions. Anchor bracket For - 2004 Mazda MAZDA6 | Owner's Manual - Page 39
child-restraint system on the front seat is unavoidable, follow these instructions when using a front-facing child-restraint system in the system in the front seat with an air bag that could deploy. To check if your Mazda front seats have side air bags: Every Mazda side air bag will have a "SRS-Air - 2004 Mazda MAZDA6 | Owner's Manual - Page 40
the lap portion of the lap/shoulder belt. See the instructions on the childrestraint system for belt routing instructions. 3. To get the retractor into the automatic locking mode, pull the shoulder belt portion of the seat belt until the entire length of the belt is out of the retractor. 4. Push the - 2004 Mazda MAZDA6 | Owner's Manual - Page 41
belt out of the retractor while the system is in the automatic locking mode. When you remove the child-restraint system, be sure the belt fully retracts to return the system to emergency locking mode before occupants use the seat belts. • Follow the child-restraint system manufacturer's instruction - 2004 Mazda MAZDA6 | Owner's Manual - Page 42
-Restraint Systems Your Mazda is equipped with LATCH lower anchors for attachment of specially designed LATCH child-restraint systems in death to the child or other occupants. Follow the child-restraint system manufacturer's instructions on belt routing to secure the seat just as you would with a - 2004 Mazda MAZDA6 | Owner's Manual - Page 43
, that probably means it is very important to properly secure the tether for child safety, please carefully follow the child-restraint system manufacturer's instructions when installing tethers. Anchor bracket location For rear right seat For rear left seat LATCH lower anchor Open For rear right - 2004 Mazda MAZDA6 | Owner's Manual - Page 44
which are 466 mm (18.35 in) apart. LATCH compatible child-restraint systems (with attachments on belt webbing) can be used at this seating position only if the child-restraint system instructions state that the childrestraint system can be installed to LATCH lower anchors that are 466 mm (18.35 - 2004 Mazda MAZDA6 | Owner's Manual - Page 45
PM Essential Safety Equipment Child Restraint WARNING Child-Restraint Tether Usage: Using the tether or tether anchor to secure anything but a child-restraint system is dangerous. This could weaken or damage the tether or tether anchor and result in injury. Use the tether and tether anchor only - 2004 Mazda MAZDA6 | Owner's Manual - Page 46
Precautions Read this owner's manual carefully to verify what air bags (driver-side air bag, passengerside air bag, side and curtain air bags) are equipped in your vehicle. The front and side supplemental restraint systems (SRS) include up to 6 air bags (verify "SRS AIRBAG" location indicator marks - 2004 Mazda MAZDA6 | Owner's Manual - Page 47
vary on the size a child must be to use a child-restraint system (page 2-24). Carefully consider which child-restraint system is necessary for your child and follow the installation directions in this Owner's Manual as well as the child-restraint system manufacturer's instructions. WARNING Air Bags - 2004 Mazda MAZDA6 | Owner's Manual - Page 48
side of the front seats, impeding the added protection of the side air bag system or redirecting the air bag in a way that is dangerous. Furthermore, the bag could be cut open spewing exhaust. Do not hang net bags, map pouches or back pads with side straps on the front seats. Never use seat covers - 2004 Mazda MAZDA6 | Owner's Manual - Page 49
You could get burned. Don't touch the internal components of the air bag storage areas system. This includes installing trim, badges, or anything else over the air bag storage areas. It also includes installing extra electric equipment on or near system components or wiring. An Authorized Mazda - 2004 Mazda MAZDA6 | Owner's Manual - Page 50
cause injury, however, the texture of the air bags may cause light skin injuries on body parts not covered with clothing through friction. • Should you sell your Mazda, we urge you to tell the new owner of its air bag systems and that familiarization with all instructions about them, from the Owner - 2004 Mazda MAZDA6 | Owner's Manual - Page 51
the center of the steering wheel, the passenger-side of the dashboard, in the outboard sides of the front seatbacks and the front and rear window pillars*, along the roof edge*. They are out of sight until activated. Dual stage inflators and air bags*3 Seat belt buckle switches*2 Inflators and air - 2004 Mazda MAZDA6 | Owner's Manual - Page 52
. Gases are produced to inflate the air bags and after the inflation, the air bags quickly deflate. The air bags will function only once. After that, the air bags will not work again and must be replaced. Only an Authorized Mazda Dealer can replace the systems. The front air bags will deploy only in - 2004 Mazda MAZDA6 | Owner's Manual - Page 53
EA-03G_Edition1.book Page 43 Tuesday, June 24, 2003 6:29 PM Essential Safety Equipment SRS Air Bags M Air Bag Activation/Deactivation Front air bag activation A greater than moderate impact will cause the front air bags to inflate in the following cases: Hitting a solid wall straight on at greater - 2004 Mazda MAZDA6 | Owner's Manual - Page 54
-EA-03G_Edition1.book Page 44 Tuesday, June 24, 2003 6:29 PM Essential Safety Equipment SRS Air Bags Limitations to front air bag activation Depending on the severity of impact, the front air bags may not inflate in the following cases: Impacts involving trees or poles cause severe cosmetic - 2004 Mazda MAZDA6 | Owner's Manual - Page 55
cases: Collision from the rear. Vehicle roll-over, may deploy the side* and curtain* air bags but not the front air bags. Impact to the side, but it may deploy the side* and curtain* air bags. Side* and curtain* air bag activation Greater than moderate impact to one side of the vehicle (driver or - 2004 Mazda MAZDA6 | Owner's Manual - Page 56
bags. Side impacts with two-wheeled vehicles may not provide enough force to deploy the side* and curtain* air bags. Non-activation of side* and curtain* air bag The side and curtain air bags will not normally inflate in the following cases: Collision from the rear. Collision from the front, but - 2004 Mazda MAZDA6 | Owner's Manual - Page 57
ignition switch is turned to the ON position. If any of these occur, consult an Authorized Mazda Dealer as soon as possible. The system may not work in an accident. M Air Bag/Front Seat Belt Pretensioner Systems Warning Light WARNING Self-Servicing the Air Bag/ Pretensioner Systems: Self-servicing - 2004 Mazda MAZDA6 | Owner's Manual - Page 58
the following occurs, take your vehicle to an Authorized Mazda Dealer as soon as possible: • The air bag system warning light flashes. • The air bag system warning light remains illuminated. • The air bag system warning light remains off when the ignition switch is turned to the ON position. • The - 2004 Mazda MAZDA6 | Owner's Manual - Page 59
.book Page 1 Tuesday, June 24, 2003 6:29 PM 3 Knowing Your Mazda Explanation of basic operations and controls; opening/closing and adjustment of various parts. Doors and Locks ...3-2 Keys ...3-2 Keyless Entry System ...3-3 Door Locks ...3-7 Trunk Lid ...3-10 Trunk Release Slide Lever ...3-12 - 2004 Mazda MAZDA6 | Owner's Manual - Page 60
(Gray) Key code number plate Here's what the keys are used for: Lock Operates Ignition switch and steering column lock Driver's door Glove box Trunk lid Master key Yes Yes Yes Yes Valet key Yes Yes No No Refer to Immobilizer System (page 3-20) for information regarding keys and engine starting on - 2004 Mazda MAZDA6 | Owner's Manual - Page 61
. To install a new battery, refer to Maintenance (page 3-5). • Additional transmitters can be obtained at an Authorized Mazda Dealer. Up to 3 transmitters can be used with the keyless entry system per vehicle. Bring all transmitters to an Authorized Mazda Dealer when the electronic codes need to be - 2004 Mazda MAZDA6 | Owner's Manual - Page 62
Mazda Doors and Locks M Transmitter Lock button Unlock button Lock button To lock the doors, press the LOCK button and the hazard warning lights will flash and the hazard warning lights will flash once. NOTE Panic button Trunk button NOTE • (U.S.A.) This device complies with part 15 of the FCC - 2004 Mazda MAZDA6 | Owner's Manual - Page 63
or get oil on them. Also be careful not to get dirt in the transmitter as it could damage it. • Danger of battery explosion if it is incorrectly replaced. • Replace only with the same type battery (CR2025 or the equivalent). • Dispose of used batteries according to the following instructions - 2004 Mazda MAZDA6 | Owner's Manual - Page 64
-EA-03G_Edition1.book Page 6 Tuesday, June 24, 2003 6:29 PM Knowing Your Mazda Doors and Locks Replacing the transmitter battery 1. Insert a small screwdriver into the slot and gently pry open the transmitter. 3. Install a new battery (CR2025 or the equivalent) into the front portion of the holder - 2004 Mazda MAZDA6 | Owner's Manual - Page 65
Mazda Doors and Locks M Service If you have a problem with the keyless entry system, consult an Authorized Mazda Dealer. If your transmitter is lost or stolen, bring all remaining transmitters to an Authorized Mazda Dealer as soon as possible for a replacement from the ignition switch, close all - 2004 Mazda MAZDA6 | Owner's Manual - Page 66
-03G_Edition1.book Page 8 Tuesday, June 24, 2003 6:29 PM Knowing Your Mazda Doors and Locks M Locking, Unlocking with Key The driver's door can be locked/unlocked with the key. Turn the key toward the front to unlock, toward the back to lock. To lock any door with the door-lock knob from - 2004 Mazda MAZDA6 | Owner's Manual - Page 67
Mazda Doors and Locks M Power Door Locks Locking, unlocking with key All doors lock automatically switch All doors lock automatically when LOCK is pushed. They all unlock when the unmarked part of the door-lock switch and then immediately return it to the center position. These locks are intended to - 2004 Mazda MAZDA6 | Owner's Manual - Page 68
J56J_8S11-EA-03G_Edition1.book Page 10 Tuesday, June 24, 2003 6:29 PM Knowing Your Mazda Doors and Locks Trunk Lid M Opening and Closing the Trunk WARNING Open Trunk and Exhaust Gas: Exhaust gas in the cabin of a vehicle is dangerous. This gas contains CO (carbon monoxide), which is colorless, - 2004 Mazda MAZDA6 | Owner's Manual - Page 69
6:29 PM Knowing Your Mazda Doors and Locks Opening the from opening the trunk without the master key. With the switch in the OFF position, the remote trunk lid release cannot opened by operating the keyless entry system transmitter, refer to Keyless Entry System (page 3-3). Opening the trunk lid - 2004 Mazda MAZDA6 | Owner's Manual - Page 70
Tuesday, June 24, 2003 6:29 PM Knowing Your Mazda Doors and Locks M Trunk Light The trunk light is on when the lid is open and off when such levers. NOTE To prevent the battery from being discharged, do not leave the trunk open for a long period when the engine is not running. 3-12 Form No. - 2004 Mazda MAZDA6 | Owner's Manual - Page 71
Page 13 Tuesday, June 24, 2003 6:29 PM Knowing Your Mazda Doors and Locks M Opening the Trunk Lid from the Inside that will glow for hours in the darkness of the trunk following a brief exposure to ambient light. The trunk release slide lever is located on the inside of the trunk lid. WARNING Open - 2004 Mazda MAZDA6 | Owner's Manual - Page 72
vehicle, and never allow children to play with power window switches. Auto-opening To fully open the window automatically, push the switch completely down. To stop the window partway, lightly pull up the switch and then release it. Engine-off power window operation The power window can be operated - 2004 Mazda MAZDA6 | Owner's Manual - Page 73
Knowing Your Mazda Doors and Locks M Operating the Passenger Power Windows The power windows may be operated when the power window lock switch on control switches on the driver's door. Engine-off power window operation The power window can be operated about 40 seconds after the ignition switch is - 2004 Mazda MAZDA6 | Owner's Manual - Page 74
causing serious burns and injuries. Before refueling, stop the engine, and always Mazda fuel cap or an approved equivalent, available at Authorized Mazda Dealers. The wrong cap can result in a serious malfunction of the fuel and emission control systems. It may also cause the check engine light - 2004 Mazda MAZDA6 | Owner's Manual - Page 75
securely. The check engine light may illuminate on when the cap isn't tightened securely. If the light remains on (even after you have tightened the cap securely, driven, and restarted the engine several times), it may indicate a different problem. Contact an Authorized Mazda Dealer as soon - 2004 Mazda MAZDA6 | Owner's Manual - Page 76
or closed electrically only when the ignition switch is in the ON position. Slide switch 3. Use the support rod to hold the hood open. Tilt switch WARNING Extending the Head or Arms Through the Moonroof: Extending the head, arms, or other parts of the body through the moonroof is dangerous. The - 2004 Mazda MAZDA6 | Owner's Manual - Page 77
Sunshade The sunshade can be opened and closed by hand. The sunshade opens automatically when the moonroof is opened, but must be closed by hand. Sunshade NOTE After washing your Mazda or after a rain, wipe the water off the moonroof before operating it. M Tilt Operation The rear of the moonroof - 2004 Mazda MAZDA6 | Owner's Manual - Page 78
Mazda Security System Immobilizer System The immobilizer system allows the engine to start only with a key the system recognizes. If someone attempts to start the engine with an unrecognized key, the engine direct sunlight. • Metal parts of other keys or metal objects touch the key grip - 2004 Mazda MAZDA6 | Owner's Manual - Page 79
Your Mazda Security System M Operation Arming The system is armed when the ignition switch is turned from the ON to the ACC position. The security indicator light in the instrument panel flashes every 2 seconds until the system is disarmed. NOTE • (U.S.A.) This device complies with part 15 - 2004 Mazda MAZDA6 | Owner's Manual - Page 80
don't shut off the engine. Go to an Authorized Mazda Dealer and have it checked. If you shut off the engine while the light is flashing you won't be able to restart it. • The keys carry a unique electronic code. For this reason, and to assure your safety, replacement keys require some waiting time - 2004 Mazda MAZDA6 | Owner's Manual - Page 81
2003 6:29 PM Knowing Your Mazda Security System Theft-Deterrent System* The optional theft-deterrent system is designed to prevent your vehicle the hazard warning lights flash. • The alarm continues for about 3 minutes, then stops. If the system is triggered again, the lights and horn will - 2004 Mazda MAZDA6 | Owner's Manual - Page 82
that your vehicle is equipped with a Theft-Deterrent System are in the glove box. Mazda recommends that you affix them to the lower rear corner of the front door windows. If you have any problem with the theftdeterrent system, consult an Authorized Mazda Dealer. 3-24 Form No. 8S11-EA-03G - 2004 Mazda MAZDA6 | Owner's Manual - Page 83
.book Page 25 Tuesday, June 24, 2003 6:29 PM Knowing Your Mazda Steering Wheel and Mirrors Steering Wheel Mirrors M Outside Mirrors Check the mirrors' angles before driving. WARNING Adjusting the Steering Wheel: Adjusting the steering wheel while the vehicle is moving is dangerous. Moving it - 2004 Mazda MAZDA6 | Owner's Manual - Page 84
switch is in the ON position. Press the OFF button ( ) to cancel the automatic dimming function. The indicator light will go off. To reactivate the automatic dimming function, press the ON button ( ). The indicator light will illuminate. For the manual day/night mirror, perform the adjustment - 2004 Mazda MAZDA6 | Owner's Manual - Page 85
objects on or around the light sensor. Otherwise, light sensor sensitivity will be affected and may not operate normally. Light sensor Light sensor • For information regarding the 3 buttons ( , , ) on the autodimming mirror, refer to HomeLink Wireless Control System (page 5-46). 3-27 Form No - 2004 Mazda MAZDA6 | Owner's Manual - Page 86
J56J_8S11-EA-03G_Edition1.book Page 28 Tuesday, June 24, 2003 6:29 PM 3-28 Form No. 8S11-EA-03G - 2004 Mazda MAZDA6 | Owner's Manual - Page 87
6:29 PM 4 Before Driving Your Mazda Important information about driving your Mazda. Fuel and Engine Exhaust Precautions ...4-2 Fuel Requirements ...4-2 Emission Control System ...4-3 Engine Exhaust (Carbon Monoxide) ...4-4 Before Starting the Engine ...4-5 Before Getting In ...4-5 After Getting - 2004 Mazda MAZDA6 | Owner's Manual - Page 88
on gasoline station pumps. Fuel with a rating lower than 87 octane (91 RON) could cause the emission control system to lose effectiveness. It could also cause engine knocking and serious engine damage. CAUTION • USE ONLY UNLEADED FUEL. Leaded fuel is harmful to the catalytic converter or the oxygen - 2004 Mazda MAZDA6 | Owner's Manual - Page 89
Page 3 Tuesday, June 24, 2003 6:29 PM Before Driving Your Mazda Fuel and Engine Exhaust Precautions Emission Control System Your vehicle is equipped with an emission control system (the catalytic converter is part of this system) that enables your vehicle to comply with existing exhaust emissions - 2004 Mazda MAZDA6 | Owner's Manual - Page 90
Your Mazda Fuel and Engine Exhaust Precautions Engine Exhaust (Carbon Monoxide) WARNING Carbon Monoxide: Engine cabin. Loss of consciousness or even death could occur. Open the windows or adjust the heating or cooling system to draw fresh air. Snow Blocking the Exhaust Gas: Running the engine - 2004 Mazda MAZDA6 | Owner's Manual - Page 91
the lights work? • Check all gauges. • Check all warning lights when the ignition switch is turned to the ON position. • Release the parking brake and make sure the brake warning light goes off. Always be thoroughly familiar with your Mazda. Engine oil, engine coolant, brake/ clutch fluid, washer - 2004 Mazda MAZDA6 | Owner's Manual - Page 92
fuel and repairs. • Avoid long warm-ups. Once the engine runs smoothly, begin driving. • Avoid fast starts. • Keep the engine tuned. Follow the maintenance schedule (page 8-3) and have an Authorized Mazda Dealer perform inspections and servicing. • Use the air conditioner only when necessary. • Slow - 2004 Mazda MAZDA6 | Owner's Manual - Page 93
is not equipped with ABS, brake with the pedal by using a light up-down motion. Don't hold the pedal down constantly. If your vehicle is equipped with ABS, don't pump the brakes. Continue to press down on the brake pedal. • If you get stuck, select a lower gear and accelerate slowly. Don't spin the - 2004 Mazda MAZDA6 | Owner's Manual - Page 94
or salt. Ask an Authorized Mazda Dealer to perform the following precautions: • Have the proper ratio of antifreeze in the radiator. • Inspect the battery and its cables. Cold reduces battery capacity. • Use only cold-weather engine oil (page 8-10). • Inspect the ignition system for damage and loose - 2004 Mazda MAZDA6 | Owner's Manual - Page 95
could result in a serious accident. Light braking will indicate whether the brakes have been affected. Dry the brakes by driving very slowly and applying the brakes lightly until brake performance returns to normal. WARNING Vehicle Load Weight: The gross axle weight rating (GAWR) and the gross - 2004 Mazda MAZDA6 | Owner's Manual - Page 96
J56J_8S11-EA-03G_Edition1.book Page 10 Tuesday, June 24, 2003 6:29 PM Before Driving Your Mazda Towing Trailer Towing Never tow a trailer with your Mazda. 4-10 Form No. 8S11-EA-03G - 2004 Mazda MAZDA6 | Owner's Manual - Page 97
, June 24, 2003 6:29 PM 5 Driving Your Mazda Explanation of instruments and controls. Starting and Driving ...5-2 Ignition Switch ...5-2 Starting the Engine ...5-3 Brake System ...5-4 Manual Transaxle Operation ...5-9 Automatic Transaxle Controls ...5-11 Power Steering ...5-18 Cruise Control - 2004 Mazda MAZDA6 | Owner's Manual - Page 98
Your Mazda Starting and Driving Ignition Switch M Ignition Switch Positions Automatic transaxle brake is not set. This could cause an accident. Before leaving the driver's seat, always set the parking brake and make sure the shift lever is in P with an automatic transaxle or in 1 or R with a manual - 2004 Mazda MAZDA6 | Owner's Manual - Page 99
seat belts. 2. Make sure the parking brake is on. 3. Depress the brake pedal. 4. (Manual transaxle) Depress the clutch pedal all the way and shift into neutral. Keep the pedal depressed while cranking the engine. NOTE When the ignition switch is turned to the ON position, the sound of the fuel pump - 2004 Mazda MAZDA6 | Owner's Manual - Page 100
, 2003 6:29 PM Driving Your Mazda Starting and Driving 5. Turn the ignition switch to the START position and hold (up to 10 seconds at a time) until the engine starts. Brake System M Foot Brake Your Mazda has power-assisted brakes that adjust automatically through normal use. Should power-assist - 2004 Mazda MAZDA6 | Owner's Manual - Page 101
6:29 PM Driving Your Mazda Starting and Driving M Parking Brake WARNING Coasting with the Engine Off: Continuing to coast when the engine is stalled or turned off is dangerous. Braking will require more effort, and the brake's power-assist could be depleted if you pump the brake. This will cause - 2004 Mazda MAZDA6 | Owner's Manual - Page 102
with the ignition switch in the START or ON position. It goes off when the parking brake is fully released. Low brake fluid level warning/ Electronic brake force distribution system warning If the light stays on after the parking brake is fully released, you may have a brake problem. Drive to the - 2004 Mazda MAZDA6 | Owner's Manual - Page 103
checking that the parking brake is released, have the brakes inspected immediately. Don't drive with this light on, and contact an Authorized Mazda Dealer to have the brakes inspected as soon as possible. ABS Warning Light and Brake Warning Light on at the Same Time: Driving when the brake system - 2004 Mazda MAZDA6 | Owner's Manual - Page 104
noise from the brake system. This is normal when the ABS operates. Don't pump the brakes, continue to press down on the brake pedal. M ABS Warning Light* The warning light stays on for a few seconds when the ignition switch is turned to the ON position. If the ABS warning light stays on while - 2004 Mazda MAZDA6 | Owner's Manual - Page 105
Your Mazda Starting and Driving Manual Transaxle Operation M Manual Transaxle Shift Pattern NOTE When the engine is jump-started to charge the battery, uneven rpm occurs and the ABS warning light comes on. This is due to a weak battery, not a malfunction. Recharge the battery. M Brake Pad Wear - 2004 Mazda MAZDA6 | Owner's Manual - Page 106
Driving Your Mazda Starting and Driving M Recommendations for Shifting Upshifting 2.3-liter engine For normal acceleration, we recommend these shift points. 1 to 2 2 to 3 3 to 4 4 to 5 26 km/h (16 mph) 45 km/h (28 mph) 53 km/h (33 mph) 63 km/h (39 mph) CAUTION • Keep your foot off the clutch pedal - 2004 Mazda MAZDA6 | Owner's Manual - Page 107
depress the brake pedal to shift (The ignition switch must be in the ACC or ON position). Indicates the shift lever can be shifted freely into any position. • Shifting into P, N or R while the vehicle is moving can damage your transaxle. • Shifting into a driving gear or reverse when the engine is - 2004 Mazda MAZDA6 | Owner's Manual - Page 108
N when driving the vehicle. M Shift-Lock System The shift-lock system prevents shifting out of P unless the brake pedal is depressed. To shift from P: 1. Depress and hold the brake pedal. 2. Start the engine. 3. Move the shift lever. NOTE • When the ignition switch is in the LOCK position, the - 2004 Mazda MAZDA6 | Owner's Manual - Page 109
Mazda Starting and Driving M Manual Shift Mode This mode gives you the feel of driving a manual transaxle vehicle by operating the shift lever and allows you to control engine To return to automatic shift mode, shift the lever from M to D. NOTE NOTE • If you change to manual shift mode when - 2004 Mazda MAZDA6 | Owner's Manual - Page 110
.book Page 14 Tuesday, June 24, 2003 6:29 PM Driving Your Mazda Starting and Driving Shifting Manually Shifting up (M1→M2→M3→M4→M5*) To shift up to a higher gear, tap the shift lever back ( ) once. *3.0-liter engine model Manually Shifting down (M5*→M4→M3→M2→M1) To shift down to a lower - 2004 Mazda MAZDA6 | Owner's Manual - Page 111
June 24, 2003 6:29 PM Driving Your Mazda Starting and Driving Shifting down If the vehicle automatically shift down depending on vehicle speed. • When depressing the accelerator fully, the transaxle will shift to a lower gear, depending on vehicle speed. Shifting specification (2.3-liter engine - 2004 Mazda MAZDA6 | Owner's Manual - Page 112
24, 2003 6:29 PM Driving Your Mazda Starting and Driving Shifting specification (3.0-liter engine model) Shifting up If the vehicle down automatically when speed is reduced to the following: Gear Vehicle speed Between 44 and 86 km/h (27 and 53 mph), depending on how much the accelerator pedal - 2004 Mazda MAZDA6 | Owner's Manual - Page 113
Your Mazda Starting and Driving Recommendations for shifting Upshifting For normal acceleration and cruising, we recommend these shift points. (2.3-liter engine) slowly, using the brakes only occasionally to prevent them from overheating. (3.0-liter engine) For normal acceleration and cruising, we - 2004 Mazda MAZDA6 | Owner's Manual - Page 114
the steering wheel to the extreme left or right for more than 5 seconds with the engine running. This could damage the power steering system. M Cruise Main Indicator Light This light comes on when the ON/OFF switch is pressed and the cruise control system is activated. 5-18 Form No. 8S11-EA-03G - 2004 Mazda MAZDA6 | Owner's Manual - Page 115
Page 19 Tuesday, June 24, 2003 6:29 PM Driving Your Mazda Starting and Driving M Cruise Set Indicator Light WARNING Cruise Main Switch: Leaving the ON/OFF switch on when not using the cruise control is dangerous as it may be switched on accidentally. This could result in loss of vehicle control - 2004 Mazda MAZDA6 | Owner's Manual - Page 116
2003 6:29 PM Driving Your Mazda Starting and Driving M To Set Speed 1. Activate the cruise control system. 2. Accelerate to the desired speed, which SET function can't be activated until about 2 seconds after the ON/ OFF switch has been engaged. • On a steep grade, the vehicle may momentarily slow - 2004 Mazda MAZDA6 | Owner's Manual - Page 117
Mazda Starting and Driving M To Resume Cruising Speed at More Than 40 km/h (25 mph) If some other method besides the ON/ OFF switch was used to cancel cruising speed and the system is still activated, the most recent set speed will automatically your foot off the accelerator to return to the set - 2004 Mazda MAZDA6 | Owner's Manual - Page 118
methods: • Press the ON/OFF switch. • Slightly depress the brake pedal. • Depress the clutch pedal. (Manual transaxle only) • Press the CANCEL button. Traction Control System (TCS)* The Traction Control System (TCS) enhances traction and safety by regulating engine torque. When the TCS detects - 2004 Mazda MAZDA6 | Owner's Manual - Page 119
pressed and TCS is switched off. If the light stays on when the TCS is not switched off, take your vehicle to an Authorized Mazda Dealer. The TCS may have a malfunction. NOTE NOTE • In addition to the indicator light flashing, a slight lugging sound will come from the engine. This indicates that - 2004 Mazda MAZDA6 | Owner's Manual - Page 120
. Press the switch again to turn the TCS back on. The TCS OFF indicator light will go out. NOTE • When TCS is on and you attempt to free the vehicle when it is stuck, or drive it out of freshly fallen snow, the TCS will activate. Depressing the accelerator will not increase engine power and - 2004 Mazda MAZDA6 | Owner's Manual - Page 121
J56J_8S11-EA-03G_Edition1.book Page 25 Tuesday, June 24, 2003 6:29 PM Driving Your Mazda Instrument Cluster and Indicators Meters and Gauges (Black-out meter) When the ignition switch is in the ON position, the dashboard gauges illuminate. 1 2 3 4 5 6 Speedometer ...5-26 Odometer, Trip Meter and - 2004 Mazda MAZDA6 | Owner's Manual - Page 122
(Standard meter) The odometer and trip meter can be displayed as follows even when the ignition switch is in the ACC or LOCK position. The headlight switch must be in the or position to see the display. • Displays for 10 minutes after the ignition switch is turned to the ACC or LOCK position from - 2004 Mazda MAZDA6 | Owner's Manual - Page 123
Tuesday, June 24, 2003 6:29 PM Driving Your Mazda Instrument Cluster and Indicators The trip meter records the interrupted (blown fuse or the battery is disconnected). • The vehicle is driven over 999.9 km (mile). M Tachometer The tachometer shows engine speed in thousands of revolutions per - 2004 Mazda MAZDA6 | Owner's Manual - Page 124
return to the previous illumination intensity. M Dashboard Illumination When the headlight switch is in the or position, rotate the thumb-wheel to adjust the brightness of the dashboard lights. Bright Dim NOTE Black-out meter When the instrument cluster dimmer is canceled, the instrument cluster - 2004 Mazda MAZDA6 | Owner's Manual - Page 125
areas Signal Warning/Indicator Lights Brake System Warning Light Page 5-31 Charging System Warning Light 5-32 Engine Oil Pressure Warning Light 5-33 Check Engine Light 5-33 ABS Warning Light 5-34 Air Bag/Front Seat Belt Pretensioner System Warning Light 5-34 Low Fuel Warning - 2004 Mazda MAZDA6 | Owner's Manual - Page 126
6:29 PM Driving Your Mazda Warning/Indicator Lights and Beep Sounds Signal Warning/Indicator Lights Seat Belt Warning Light Page 5-35 Door-Ajar Warning Light 5-35 Low Washer Fluid Level Warning Light 5-35 Automatic Transaxle Warning Light 5-35 Security Indicator Light 5-36 Headlight High - 2004 Mazda MAZDA6 | Owner's Manual - Page 127
to stop the vehicle. 1. With the engine stopped, check the brake fluid level immediately and add fluid as required (page 8-16). 2. After adding fluid, check the light again. Electronic brake force distribution system warning If the electronic brake force distribution control unit determines that - 2004 Mazda MAZDA6 | Owner's Manual - Page 128
checking that the parking brake is released, have the brakes inspected immediately. Don't drive with this light on, and contact an Authorized Mazda Dealer to have the brakes inspected as soon as possible. ABS Warning Light and Brake Warning Light on at the Same Time: Driving when the brake system - 2004 Mazda MAZDA6 | Owner's Manual - Page 129
emission control system has a problem. • The fuel-filler cap is missing or not tightened securely. If the check engine light remains on or flashes continuously, do not drive at high speeds and consult an Authorized Mazda Dealer as soon as possible. CAUTION Don't run the engine if oil pressure is - 2004 Mazda MAZDA6 | Owner's Manual - Page 130
't drive with both lights on, and contact an Authorized Mazda Dealer to have the brakes inspected as soon as possible. If the air bag/front seat belt pretensioner system is OK, the warning light illuminates when the ignition switch is turned to the ON position or after the engine is cranked. After - 2004 Mazda MAZDA6 | Owner's Manual - Page 131
Automatic Transaxle Warning Light M Seat Belt Warning Light If the driver's seat belt is not fastened when the ignition switch is turned to the ON position, the seat belt warning light will remain on until the belt is fastened. If the system does not operate correctly, consult an Authorized Mazda - 2004 Mazda MAZDA6 | Owner's Manual - Page 132
the immobilizer system is disarmed and the light illuminates for about 3 seconds and then goes out. If the engine doesn't start with the correct ignition key, and the security indicator light keeps illuminating or flashing, the system may have a malfunction. Consult an Authorized Mazda Dealer. 5-36 - 2004 Mazda MAZDA6 | Owner's Manual - Page 133
and it may not operate correctly. Take your vehicle to an Authorized Mazda Dealer. NOTE Gear position indicator • In addition to the indicator light flashing, a slight lugging sound will come from the engine. This indicates that the TCS is operating properly. • On slippery surfaces, such - 2004 Mazda MAZDA6 | Owner's Manual - Page 134
an Authorized Mazda Dealer. The TCS may have a malfunction. NOTE This light comes on when the ON/OFF switch is pressed and the cruise control system is activated. M Cruise Set Indicator Light After starting the engine when the coolant temperature is extremely low, the TCS is automatically turned - 2004 Mazda MAZDA6 | Owner's Manual - Page 135
is opened. M Lights-On Reminder If lights are on and the key is removed from the ignition switch, a beep sound will be heard when the driver's door is opened. If an indicator light remains illuminated (does not flash) or if it flashes abnormally, the turn signal bulb may be burned out. 5-39 Form - 2004 Mazda MAZDA6 | Owner's Manual - Page 136
30 seconds after turning the ignition switch to the LOCK position or removing the key. The lights will automatically switch back on when the ignition switch is turned to the ACC or ON position. • To prevent discharging the battery, don't leave the lights on while the engine is off. 5-40 Form No - 2004 Mazda MAZDA6 | Owner's Manual - Page 137
lever slightly toward the direction of the change -until the indicator flashes- and hold it there. It will return to the off position when released. NOTE If an indicator light stays on without flashing or if it flashes abnormally, the turn signal bulb may be burned out. 5-41 Form No. 8S11-EA-03G - 2004 Mazda MAZDA6 | Owner's Manual - Page 138
, June 24, 2003 6:29 PM Driving Your Mazda Switches and Controls Fog Lights* Use this switch to turn on the fog lights. They help you to see as well as to be seen. To turn the front fog lights on, rotate the fog light switch to the position. The headlight switch must be in the position to turn on - 2004 Mazda MAZDA6 | Owner's Manual - Page 139
J56J_8S11-EA-03G_Edition1.book Page 43 Tuesday, June 24, 2003 6:29 PM Driving Your Mazda Switches and Controls M Windshield Wipers One-touch wipers For a single wiping cycle, push the inspect the fluid level (page 8-20). If it's OK, consult an Authorized Mazda Dealer. 5-43 Form No. 8S11-EA-03G - 2004 Mazda MAZDA6 | Owner's Manual - Page 140
turns off. The indicator light illuminates during operation. To turn off the rear window defroster before the 15 minutes has elapsed, press the switch again. CAUTION Don't it before using the defroster. Manual Type Air-Conditioning Fully Automatic Type Air-Conditioning 5-44 Form No. 8S11-EA-03G - 2004 Mazda MAZDA6 | Owner's Manual - Page 141
flasher Depress the hazard warning flasher and all four turn signals will flash at once. NOTE • The turn signals don't work when the hazard warning lights are on. • Check local regulations about the use of hazard warning lights while the vehicle is being towed. They may forbid it. 5-45 Form - 2004 Mazda MAZDA6 | Owner's Manual - Page 142
system replaces up to 3 hand-held transmitters with a single builtin component in the auto-dimming mirror. Pressing the HomeLink button on the auto-dimming mirror activates garage doors, gates and other devices surrounding your home. Indicator light HomeLink button CAUTION HomeLink has been tested - 2004 Mazda MAZDA6 | Owner's Manual - Page 143
Mazda Switches and Controls M Programming the HomeLink System NOTE FCC ID: NZLSTDHL3 CANADA:4112104541A This device complies with FCC rules part buttons (buttons one and three) - releasing only when the indicator light begins to flash (after 20 seconds). Do not hold the buttons for longer than 30 - 2004 Mazda MAZDA6 | Owner's Manual - Page 144
J56J_8S11-EA-03G_Edition1.book Page 48 Tuesday, June 24, 2003 6:29 PM Driving Your Mazda Switches and Controls 4. After the HomeLink indicator light changes from a slow to a rapidly blinking light, release both the HomeLink and hand-held transmitter buttons. NOTE 7. Firmly press and release the " - 2004 Mazda MAZDA6 | Owner's Manual - Page 145
replace "Programming HomeLink" step 3 with the following: NOTE M Operating the HomeLink System Press the programmed HomeLink button to operate a programmed device. The code ( , ) on the auto-dimming mirror until the HomeLink indicator light begins to flash after approximately 20 seconds. Verify - 2004 Mazda MAZDA6 | Owner's Manual - Page 146
J56J_8S11-EA-03G_Edition1.book Page 50 Tuesday, June 24, 2003 6:29 PM 5-50 Form No. 8S11-EA-03G - 2004 Mazda MAZDA6 | Owner's Manual - Page 147
Manual Type ...6-6 Fully Automatic Type ...6-11 Audio System ...6-16 Antenna ...6-16 Operating Tips for Audio System ...6-16 Audio Set ...6-23 Audio Control Switch Operation* ...6-38 Safety Certification ...6-40 Interior Equipment ...6-41 Sunvisors ...6-41 Interior Lights ...6-41 Information Display - 2004 Mazda MAZDA6 | Owner's Manual - Page 148
up easily in humid weather. Use the climate control system to defog the windows. To help defog the windows, operate the air conditioner to dehumidify the air. M Replacement of the Cabin Air Filter If your vehicle is equipped with an air filter for the air conditioner, it is necessary to change the - 2004 Mazda MAZDA6 | Owner's Manual - Page 149
Control System Vent Operation M Adjusting the Vents Directing airflow 1. Press the upper part of the air vent to open it. 2. Rotate the air vent left and right to adjust the direction of airflow. NOTE When using the air conditioner, mist may come out from the vents. This is not a sign of trouble - 2004 Mazda MAZDA6 | Owner's Manual - Page 150
J56J_8S11-EA-03G_Edition1.book Page 4 Tuesday, June 24, 2003 6:29 PM Interior Comfort Climate Control System M Selecting the Airflow Mode Dashboard Vents Defroster and Floor Vents Dashboard and Floor Vents Defroster Vents Floor Vents 6-4 Form No. 8S11-EA-03G - 2004 Mazda MAZDA6 | Owner's Manual - Page 151
Climate Control System Manual type and fully automatic type climate control systems are explained separately. Check your vehicle's climate control type and read the appropriate pages. Climate control information is displayed on the information display. Manual Type ...6-6 Fully Automatic Type...6-11 - 2004 Mazda MAZDA6 | Owner's Manual - Page 152
PM Interior Comfort Climate Control System Manual Type Air intake selector Rear window A/C Switch defroster switch (page 5-44) Temperature control dial Fan control dial Mode selector dial M Control Switches Temperature control dial Fan control dial Cold Hot This dial controls temperature - 2004 Mazda MAZDA6 | Owner's Manual - Page 153
alternate between the and positions. The indicator light for the selected mode will illuminate. It is recommended that under normal conditions the switch be kept in the outside air position. Outside air position ( ) Push the switch to turn the air conditioner on. The indicator light on the switch - 2004 Mazda MAZDA6 | Owner's Manual - Page 154
air conditioner. 5. Adjust the fan control dial and temperature control dial to maintain maximum comfort. WARNING The Recirculated Air Position: Using the position in cold 5-27). The air conditioner may cause engine overheating. If the gauge indicates overheating, turn the air conditioner off. • If - 2004 Mazda MAZDA6 | Owner's Manual - Page 155
If warm air is desired at the floor, set the mode selector dial to the position. or position, air • In the conditioning is automatically turned on to defrost the windshield quickly (however, the indicator light does not illuminate) and the position is automatically selected. The air intake selector - 2004 Mazda MAZDA6 | Owner's Manual - Page 156
Control System M Dehumidifying (With Air Conditioner) Operate the air conditioner in cool or cold weather to help defog the windshield and side windows. 1. Set the mode selector dial to the desired position. 2. Set the air intake - 2004 Mazda MAZDA6 | Owner's Manual - Page 157
Switch OFF switch Mode selector switch Auto switch Windshield defroster switch M Control Switches AUTO switch • Outside/Recirculated air selection • Air conditioner operation NOTE AUTO switch indicator light • When on, it indicates AUTO operation, and the system will function automatically - 2004 Mazda MAZDA6 | Owner's Manual - Page 158
.Turn it clockwise for hot and counterclockwise for cold. Fan control dial Low High The fan has seven speeds. The selected speed will be displayed. With the AUTO or fan control dial ON, press the A/C switch to select the air conditioning (cooling/dehumidifying functions) on or off. 6-12 - 2004 Mazda MAZDA6 | Owner's Manual - Page 159
air conditioner may not function when the outside temperature approaches 0 °C (32 °F). (Indicator remains on even when system is off.) Air intake selector Press the switch to defrost the windshield and front door windows. M Standard Use 1. Press the AUTO switch. Selection of the airflow mode, air - 2004 Mazda MAZDA6 | Owner's Manual - Page 160
the air conditioner automatically turned on (however, the indicator light does not illuminate). The air conditioner will direct dehumidified air to the front windshield and side windows (page 6-4). Airflow amount will be increased. To turn off the system press the windshield defroster switch again - 2004 Mazda MAZDA6 | Owner's Manual - Page 161
J56J_8S11-EA-03G_Edition1.book Page 15 Tuesday, June 24, 2003 6:29 PM Interior Comfort Climate Control System M Sunlight/Temperature Sensor The fully automatic air conditioner function measures inside and outside temperatures, and sunlight. It then sets temperatures inside the passenger - 2004 Mazda MAZDA6 | Owner's Manual - Page 162
Comfort Audio System Antenna M Detachable Type To remove the antenna, turn it counterclockwise. To install the antenna, turn it clockwise. Make sure the antenna is securely installed. Operating Tips for Audio System WARNING Do Not Adjust Audio While Driving the Vehicle Adjusting the audio while - 2004 Mazda MAZDA6 | Owner's Manual - Page 163
29 PM Interior Comfort Audio System M Radio Reception AM 200 km (60-120 miles) Station 1 Station 2 Signals from an FM transmitter are similar to beams of light because they be heard as a broken sound or a distortion. This problem may also be encountered when in close proximity to the transmitter - 2004 Mazda MAZDA6 | Owner's Manual - Page 164
J56J_8S11-EA-03G_Edition1.book Page 18 Tuesday, June 24, 2003 6:29 PM Interior Comfort Audio System Flutter/Skip noise Signals from an FM transmitter move in straight lines and become weak in valleys between tall buildings, mountains, and other obstacles. When a vehicle passes - 2004 Mazda MAZDA6 | Owner's Manual - Page 165
the unit not operate normally, consult an Authorized Mazda Dealer. Never attempt to repair it or insert a screwdriver or anything else. Handling the cassette tape player The following precautions should be observed. • Do not spill any liquid on the audio system. • If the cassette tape is loose, it - 2004 Mazda MAZDA6 | Owner's Manual - Page 166
The following precautions should be observed. • Do not spill any liquid on the audio system. • The MD player can also play MDLPs that have been recorded in MDLP as shown. No other MDs can be played. • Do not touch the internal part of the MD. If the MD shutter is slid open for no reason, it may - 2004 Mazda MAZDA6 | Owner's Manual - Page 167
Audio System M Operating Tips for CD Player/InDash CD Changer Condensation phenomenon Immediately after turning on the heater when the vehicle is cold, the CD or optical components (prism and lens) in the CD CD player/ changer will not play the CD. Remove the rough edges in advance by using a ball- - 2004 Mazda MAZDA6 | Owner's Manual - Page 168
, June 24, 2003 6:29 PM Interior Comfort Audio System • When driving over uneven surfaces, the sound may jump. • Dust, finger smudges, and dirt can decrease the amount of light reflected from the signal surface, thus affecting sound quality. If the CD should become soiled, gently wipe it with - 2004 Mazda MAZDA6 | Owner's Manual - Page 169
J56J_8S11-EA-03G_Edition1.book Page 23 Tuesday, June 24, 2003 6:29 PM Interior Comfort Audio System Audio Set CD Player* In-dash CD Changer* Illustration is of a representative audio unit. Cassette Tape Player* Mini Disc (MD) Player* Power/Volume/Sound Controls ...6-24 Operating the Radio - 2004 Mazda MAZDA6 | Owner's Manual - Page 170
to select the function. The selected function will be indicated. * To prevent the battery from being discharged, do not leave the audio system on for a long period when the engine is not running. * Volume adjustment To adjust the volume, turn the power/ volume dial. Turn the power/volume dial to - 2004 Mazda MAZDA6 | Owner's Manual - Page 171
6:29 PM Interior Comfort Audio System 2. Turn the audio control dial to adjust the selected functions as follows automatically selected. To reset bass, mid-range, treble, fade, and balance, press the audio control dial for 2 seconds. The unit will beep and "CLEAR" will be displayed. Turn the audio - 2004 Mazda MAZDA6 | Owner's Manual - Page 172
" will be displayed. NOTE Tuning , or The radio has the following tuning methods: Manual, Seek, Scan, Preset channel, and Auto memory tuning. The easiest way to tune stations is to set them on preset channels. NOTE If the power supply is interrupted (fuse blows or the battery is disconnected), the - 2004 Mazda MAZDA6 | Owner's Manual - Page 173
-EA-03G_Edition1.book Page 27 Tuesday, June 24, 2003 6:29 PM Interior Comfort Audio System Seek tuning Pressing the seek tuning button ( , ) will cause the tuner to seek a higher or lower frequency automatically. NOTE Auto memory tuning This is especially useful when driving in an area where the - 2004 Mazda MAZDA6 | Owner's Manual - Page 174
Tuesday, June 24, 2003 6:29 PM Interior Comfort Audio System M Operating the Cassette Tape Player* Cassette tape play tape will begin play, and "TAPE PLAY" will be displayed. At the end of the cassette tape, the unit automatically reverses cassette tape play. When is lit, the cassette tape's - 2004 Mazda MAZDA6 | Owner's Manual - Page 175
Interior Comfort Audio System NOTE NOTE The cassette tape can be ejected when the ignition switch is in displayed). Press the repeat button ( ) once again to cancel repeat play. NOTE When the cassette tape ends during fast-forward or rewind, it automatically stops and starts playing. Reversing - 2004 Mazda MAZDA6 | Owner's Manual - Page 176
24, 2003 6:29 PM Interior Comfort Audio System M Operating the Mini Disc (MD) Player* MD play button Fast-forward button Track up button Scan button Track down button MD slot Display button Reverse button Repeat button MD eject button Random button Display feed dial Inserting the MD Insert - 2004 Mazda MAZDA6 | Owner's Manual - Page 177
Audio System Music scan This feature helps to find a program by playing about the first 10 seconds of each track. Press the scan button ( ) during play to start scan play operation (the track number will flash). Press the scan button ( ) once again to cancel scan play. NOTE Changing the display - 2004 Mazda MAZDA6 | Owner's Manual - Page 178
Comfort Audio System M Operating the Compact Disc (CD) Player* Fast-forward button CD slot Track up button CD play button CD eject button Scan button Track down button Reverse button Repeat button Random button Inserting the CD Insert the CD into the slot, label-side up. The auto-loading - 2004 Mazda MAZDA6 | Owner's Manual - Page 179
, June 24, 2003 6:29 PM Interior Comfort Audio System Music scan This feature helps to find a program by playing about the first 10 seconds of each track. Press the scan button ( ) during play to start scan play operation (the track number will flash). Press the scan button ( ) once again to - 2004 Mazda MAZDA6 | Owner's Manual - Page 180
24, 2003 6:29 PM Interior Comfort Audio System M Operating the In-Dash CD Changer* Channel preset buttons Load button Track up button CD slot CD play button CD eject button Scan button Track down button Disc down button Repeat button Disc up button Reverse button Fast-forward button Random - 2004 Mazda MAZDA6 | Owner's Manual - Page 181
, 2003 6:29 PM Interior Comfort Audio System Multiple insertion 1. Press and hold the load button ( ) for about 2 seconds until a beep is heard. 2. Wait 5 seconds or press the load button ( ) again within 5 seconds after the beep is heard. 3. When "IN" is displayed, insert the CD. 4. When "IN" is - 2004 Mazda MAZDA6 | Owner's Manual - Page 182
, June 24, 2003 6:29 PM Interior Comfort Audio System Playing Press the CD play button ( ) to start play when a CD is in the unit. If there isn't a CD in the unit when the CD play button ( ) is pressed, "NO DISC" will flash on and off. Fast-forward/Reverse Press and hold the fast-forward button - 2004 Mazda MAZDA6 | Owner's Manual - Page 183
, June 24, 2003 6:29 PM Interior Comfort Audio System M Error Indications If you see an error indication on the display, find the cause in the chart. If you cannot clear the error indication, take the vehicle to an Authorized Mazda Dealer. Indication CHECK MD Cause MD is inserted upside down - 2004 Mazda MAZDA6 | Owner's Manual - Page 184
6:29 PM Interior Comfort Audio System Audio Control Switch Operation* M Changing the Source Press the mode switch ( ) to change the audio source (AM radio>FM1 radio>FM2 radio>Cassette tape player or MD player>CD player or CD changer>cyclical). NOTE Mazda installed this system to help you avoid - 2004 Mazda MAZDA6 | Owner's Manual - Page 185
Page 39 Tuesday, June 24, 2003 6:29 PM Interior Comfort Audio System M Seek Switch M Mute Switch Press the mute switch ( ) once to mute audio, press it again to resume audio output. When listening to the radio Press the seek switch ( , ) to recall previously stored radio stations. Press the seek - 2004 Mazda MAZDA6 | Owner's Manual - Page 186
Interior Comfort Audio System Safety Certification This CD player is made and tested to meet exacting safety standards. It meets FCC requirements and complies with safety performance standards of the U.S. Department of Health and Human Services. CAUTION • This CD player should not be adjusted or - 2004 Mazda MAZDA6 | Owner's Manual - Page 187
lower it for use in front or swing it to the side. Sunvisor Interior Lights M Illuminated Entry System When the illuminated entry system operates, the overhead light (switch is in the DOOR position) and the courtesy lights turn on for: • About 30 seconds after the driver's door is unlocked and the - 2004 Mazda MAZDA6 | Owner's Manual - Page 188
DOOR DOOR OFF OFF OFF Without sunroof DOOR Light off • Light on when any door is open • Light on or off when the illuminated entry system is on DOOR OFF OFF DOOR Light off • Light on when any door is open • Light on or off when the illuminated entry system is on 6-42 Form No. 8S11-EA-03G - 2004 Mazda MAZDA6 | Owner's Manual - Page 189
PM Interior Comfort Interior Equipment M Map Lights The map lights are switched on or off by pressing the switches. Front (with sunroof) M Courtesy Lights Turns on when any door is open or the illuminated entry system is on. Courtesy light Front (without sunroof) Center 6-43 Form No. 8S11-EA - 2004 Mazda MAZDA6 | Owner's Manual - Page 190
button DIMMER button SET button AMB button M Information Display Functions The information display has the following functions: • Clock • Ambient Temperature Display (Outside Temperature Display) • Climate Control Display • Audio Display • Display Dimmer Cancel Function 6-44 Form No. 8S11-EA - 2004 Mazda MAZDA6 | Owner's Manual - Page 191
SET button to switch between "12Hr" and "24Hr" displays. The selected display will flash. To select the desired clock setting, press the CLOCK button again while the preferred setting is flashing. 3. "Hr. ADJUST" will be displayed next, and the hour portion of the display will flash. Press the SET - 2004 Mazda MAZDA6 | Owner's Manual - Page 192
the AMB button 2 seconds or more to switch the display from Fahrenheit to Centigrade or vice versa. • (With fully automatic climate control system) Press the AMB button again to switch the display from ambient temperature to the temperature set for the air conditioner. 6-46 Form No. 8S11-EA-03G - 2004 Mazda MAZDA6 | Owner's Manual - Page 193
touch the metal part of the lighter, you may burn yourself. • Don't hold the lighter in because it will overheat. • Don't use the lighter socket for plug-in accessories such as shavers and coffee pots. They may damage it or cause electrical failure. Use only a genuine Mazda lighter or the equivalent - 2004 Mazda MAZDA6 | Owner's Manual - Page 194
Other Than Cups or Drink-cans in Cup Holder: Putting objects other than cups or drink-cans in a cup holder is dangerous. During sudden braking or maneuvering, occupants could be hit and injured, or objects could be thrown around the vehicle, causing interference with the driver and the possibility - 2004 Mazda MAZDA6 | Owner's Manual - Page 195
.book Page 49 Tuesday, June 24, 2003 6:29 PM Interior Comfort Interior Equipment M Front To use the cup holder, open the center console by pressing the lower center part of its cover. Bottle Holder Bottle holders are on the inside of the front doors. Bottle holder M Rear The rear cup holder - 2004 Mazda MAZDA6 | Owner's Manual - Page 196
material in eyeglasses could deform and crack from high temperature. M Center Box with Lid To use, pull the knob, and the lid opens automatically. Knob M Overhead Console This console box is designed to store eyeglasses or other accessories. Push and release to open. 6-50 Form No. 8S11-EA - 2004 Mazda MAZDA6 | Owner's Manual - Page 197
Equipment M Glove Box To open the glove box, pull the latch toward you. Insert the master key and turn it clockwise to lock, counterclockwise to unlock. M Center Console To open, pull the lower release catch. Unlock Lock Small items can be placed in the tray of the center console lid. To open - 2004 Mazda MAZDA6 | Owner's Manual - Page 198
Mazda accessories or the equivalent. • Close the cover when the accessory socket is not in use. • Correctly insert the plug into the accessory socket. NOTE 4. Open the tray by pulling the lower release catch. To prevent discharging the battery, don't use the socket for long periods with the engine - 2004 Mazda MAZDA6 | Owner's Manual - Page 199
, 2003 6:29 PM Interior Comfort Interior Equipment 5. Pass the plug cord through the hole of the tray and insert the plug in the socket. 7. Set the plug cord into the slit of the tray mat and replace the tray mat. Plug 6. Make sure the plug cord is running through the cap slot; reinstall the - 2004 Mazda MAZDA6 | Owner's Manual - Page 200
J56J_8S11-EA-03G_Edition1.book Page 54 Tuesday, June 24, 2003 6:29 PM 6-54 Form No. 8S11-EA-03G - 2004 Mazda MAZDA6 | Owner's Manual - Page 201
Spare Tire and Tool Storage ...7-3 Changing a Flat Tire ...7-5 Overheating ...7-12 Overheating ...7-12 Emergency Starting ...7-14 Starting a Flooded Engine ...7-14 Jump-Starting ...7-15 Push-Starting ...7-18 Emergency Towing ...7-19 Towing Description ...7-19 Recreational Towing ...7-20 7-1 Form - 2004 Mazda MAZDA6 | Owner's Manual - Page 202
flasher Depress the hazard warning flasher and all four turn signals will flash at once. NOTE • The turn signals don't work when the hazard warning lights are on. • Check local regulations about the use of hazard warning lights while the vehicle is being towed. They may forbid it. 7-2 Form No - 2004 Mazda MAZDA6 | Owner's Manual - Page 203
J56J_8S11-EA-03G_Edition1.book Page 3 Tuesday, June 24, 2003 6:29 PM In Case of an Emergency Flat Tire Spare Tire and Tool Storage Spare tire and tools are stored in the locations illustrated in the diagram. Spare tire Jack Lug wrench Conventional tire hold-down bolt 7-3 Form No. 8S11-EA-03G - 2004 Mazda MAZDA6 | Owner's Manual - Page 204
jack container lid. M Spare Tire Your Mazda has a temporary spare tire. The temporary the spare tire on the rear axle and move a regular tire to obstacles. Also, don't drive through an automatic car wash. This tire's diameter is smaller only for your Mazda. • Use only one temporary spare - 2004 Mazda MAZDA6 | Owner's Manual - Page 205
Allowing someone to remain in a vehicle supported by a jack is dangerous. The occupant could cause the vehicle to fall resulting in serious injury. Never allow anyone inside a vehicle supported by a jack. To secure the spare tire Perform the removal procedure in reverse. 7-5 Form No. 8S11-EA-03G - 2004 Mazda MAZDA6 | Owner's Manual - Page 206
set the parking brake. 2. Put a vehicle with an automatic transaxle in Park (P), a manual transaxle in Reverse (R) or 1, and turn off the engine. 3. Turn on When blocking a tire, use a rock or wood block of sufficient size to hold the tire in place. Damage could occur during installation if the - 2004 Mazda MAZDA6 | Owner's Manual - Page 207
the jack and seriously injure or even kill someone. Use only the front and rear jacking positions recommended in this manual. Improper Jack: Using a jack that isn't designed for your Mazda is dangerous. The vehicle could slip off the jack and seriously injure someone. Use only the jack provided with - 2004 Mazda MAZDA6 | Owner's Manual - Page 208
card provided in the glove box and mailing it in the accompanying envelope. If you lose your key, consult an Authorized Mazda Dealer or use the lug wrench on top of the key and apply pressure. Turn the wrench counterclockwise. To replace the nut 1. Place the key on top of the nut. 2. Place the lug - 2004 Mazda MAZDA6 | Owner's Manual - Page 209
accident. Make sure the mounting surfaces of the wheel, hub and lug nuts are clean before changing or replacing tires. 2. Mount the spare tire. Don't Apply Oil or Grease to Lug Nuts, Bolts: Applying oil or grease to lug nuts and bolts is dangerous. The lug nuts could loosen while driving and cause - 2004 Mazda MAZDA6 | Owner's Manual - Page 210
the wheel studs and lug nuts on your Mazda have metric threads, using a non-metric nut replace them with metric nuts of the same configuration. Incorrect Tire Air Pressure: Driving on tires with incorrect air have incorrect air pressure. When you check the regular tires' air pressure, check the spare - 2004 Mazda MAZDA6 | Owner's Manual - Page 211
J56J_8S11-EA-03G_Edition1.book Page 11 Tuesday, June 24, 2003 6:29 PM In Case of an Emergency Flat Tire 5. Store the damaged tire, using the conventional tire hold-down bolt supplied in the tool bag to hold it in place. Have the damaged tire repaired as soon as possible. Conventional tire hold- - 2004 Mazda MAZDA6 | Owner's Manual - Page 212
off the right-of-way. 2. Put a vehicle with an automatic transaxle in park (P), a manual transaxle in neutral. Apply the parking brake. 3. Turn off the air conditioner. Cooling Fan and Engine Inspection: Inspecting the engine with the ignition switch in the ON position is dangerous. The cooling fan - 2004 Mazda MAZDA6 | Owner's Manual - Page 213
Emergency Overheating 6. When cool, check the coolant level. If it's low, look for coolant leaks from the radiator and hoses. If you find a leak or other damage, or if coolant is still leaking: Stop the engine and call an Authorized Mazda Dealer. 2.3-liter engine Cooling system cap CAUTION If the - 2004 Mazda MAZDA6 | Owner's Manual - Page 214
Case of an Emergency Emergency Starting Starting a Flooded Engine If the engine fails to start, it may be flooded (excessive fuel in the engine). Follow this procedure: 1. Depress the accelerator all the way and hold it there. 2. Turn the ignition switch to the START position and hold it there-for - 2004 Mazda MAZDA6 | Owner's Manual - Page 215
terminal to contact the vehicle body. Battery-Related Explosion: Flames and sparks near open battery cells are dangerous. Hydrogen gas, produced during normal battery operation, could ignite and cause the battery to explode. An exploding battery can cause serious burns and injuries. Keep all flames - 2004 Mazda MAZDA6 | Owner's Manual - Page 216
injure someone. Connect the cable to a point away from the battery. Connecting Jumper Cable to Moving Parts: Connecting a jumper cable near or to moving parts (cooling fans, belts) is dangerous. The cable could get caught when the engine starts and cause serious injury. Never connect a jumper cable - 2004 Mazda MAZDA6 | Owner's Manual - Page 217
, the strut mounting bolt) away from the discharged battery (4). 4. Start the engine of the booster vehicle and run it a few minutes. Then start the engine of the other vehicle. 5. When finished, carefully disconnect the cables in the reverse order described in Step 3. Jumper cables Connect cables - 2004 Mazda MAZDA6 | Owner's Manual - Page 218
engine starts, causing the two vehicles to collide. The occupants could be injured. Never tow a vehicle to start it. You can't start a vehicle with an automatic transaxle by pushing it. CAUTION You shouldn't push-start a vehicle that has a manual transaxle. It can damage the emission control system - 2004 Mazda MAZDA6 | Owner's Manual - Page 219
Emergency Towing Towing Description We recommend that towing be done only by an Authorized Mazda Dealer or a commercial tow-truck service. Proper lifting and towing are necessary to prevent damage to the vehicle. the rear wheels on the ground, release the parking brake. 7-19 Form No. 8S11-EA-03G - 2004 Mazda MAZDA6 | Owner's Manual - Page 220
not designed for towing this vehicle on all 4 wheels. When doing recreational towing refer to " Towing Description " (page 7-19) and carefully follow the instructions. CAUTION Do not use the hooks under the rear bumper for towing and tying down, as they cannot hold the load and it will damage the - 2004 Mazda MAZDA6 | Owner's Manual - Page 221
Engine Compartment Overview ...8-9 Engine Oil ...8-10 Engine Coolant ...8-13 Brake/Clutch Fluid ...8-16 Power Steering Fluid ...8-17 Automatic transaxle Fluid (ATF) ...8-18 Washer Fluid ...8-20 Body Lubrication ...8-21 Air Filter ...8-21 Wiper Blades ...8-23 Battery ...8-25 Tires ...8-26 Light Bulbs - 2004 Mazda MAZDA6 | Owner's Manual - Page 222
an Authorized Mazda Dealer. Factory-trained Mazda technicians and genuine Mazda parts are best for your vehicle. Without this expertise and the parts that have been designed and made especially for your Mazda, inadequate, incomplete, and insufficient servicing may result in problems. This could - 2004 Mazda MAZDA6 | Owner's Manual - Page 223
driving • Driving in dusty conditions • Driving with extended use of brakes • Driving in areas where salt or other corrosive materials are being of idling or low-speed operation • Driving for long periods in cold temperatures or extremely humid climates NOTE After the prescribed period, continue - 2004 Mazda MAZDA6 | Owner's Manual - Page 224
plugs CHASSIS and BODY Brake lines, hoses and connections Disc brakes Tire (Rotation) Steering operation and linkages Front suspension ball joints Driveshaft dust boots Exhaust system and heat shields All locks and hinges AIR CONDITIONER SYSTEM (if installed) Cabin air filter I I Replace at first - 2004 Mazda MAZDA6 | Owner's Manual - Page 225
belts (tension) Engine valve clearance (2.3-liter engine) Engine oil Engine oil filter COOLING SYSTEM Cooling system Engine coolant Engine coolant level FUEL SYSTEM Air filter Fuel lines and hoses *1 Hoses and tubes for emission *1 IGNITION SYSTEM Spark plugs USA Others *2 Replace every 96,000km (60 - 2004 Mazda MAZDA6 | Owner's Manual - Page 226
repair, clean, adjust, or replace if necessary. L: Lubricate Months Maintenance Interval (Number of months ×1000 km or kilometers (miles), whichever comes first) ×1000 miles ELECTRICAL SYSTEM Function of all lights CHASSIS and BODY Brake lines, hoses and connections Brake and clutch fluid level Disc - 2004 Mazda MAZDA6 | Owner's Manual - Page 227
safe and dependable operation. Bring any problem to the attention of an Authorized Mazda Dealer or qualified service technician as soon as possible. M When Refueling • Brake and clutch fluid level (page 8-16) • Engine coolant level (page 8-13) • Engine oil level (page 8-10) • Washer fluid level - 2004 Mazda MAZDA6 | Owner's Manual - Page 228
or incomplete service may result in problems. This section gives instructions only for items you entrust the oil and fluid changes of your vehicle to an Authorized Mazda Dealer. WARNING Maintenance entangled in moving parts and result in injury. Therefore, if you must run the engine while working - 2004 Mazda MAZDA6 | Owner's Manual - Page 229
reservoir 3.0-liter engine Cooling system cap Engine coolant reservoir Fuse block Air filter Cooling system cap Automatic transaxle fluid-level dipstick (only for automatic transaxle) Brake/Clutch fluid reservoir Battery Windshield washer fluid reservoir Engine oil dipstick Engine oil-filler cap - 2004 Mazda MAZDA6 | Owner's Manual - Page 230
(starting and oil flow). Low-viscosity engine oils can provide improved fuel economy and cold-weather performance. But high-temperature weather conditions require higher-viscosity engine oils for satisfactory lubrication. Full OK Low -30 -20 -10 0 10 20 30 40 50 -20 0 20 40 60 80 100 - 2004 Mazda MAZDA6 | Owner's Manual - Page 231
the level to MAX. Handling Used Engine Oil: Continuous contact with used engine oil is dangerous. It could cause skin cancer. Always wash with soap and water immediately after changing oil and filter. CAUTION Don't add engine oil over MAX. This may cause engine damage. 6. Make sure the O-ring is - 2004 Mazda MAZDA6 | Owner's Manual - Page 232
be seriously burned. Don't check or change the engine oil when the engine is hot. 1. Warm up the engine for a few minutes and turn it off. Remove the oil-filler cap. 2. Remove the drain plug and drain the oil into a suitable container. 3. Replace the drain plug washer after the oil has thoroughly - 2004 Mazda MAZDA6 | Owner's Manual - Page 233
L marks on the coolant reservoir when the engine is cool. 2.3-liter engine WARNING Hot Engine: A hot engine is dangerous. If the engine has been running, parts of the engine compartment can become very hot. You could be burned. Carefully inspect the engine coolant in the coolant reservoir, but do - 2004 Mazda MAZDA6 | Owner's Manual - Page 234
water. Always add a proper coolant mixture. • The engine has aluminum parts and must be protected by an ethyleneglycol-based coolant to prevent corrosion and freezing. • DO NOT USE alcohol or methanol antifreeze. DO NOT MIX alcohol or methanol with the coolant. This could damage the cooling system - 2004 Mazda MAZDA6 | Owner's Manual - Page 235
the used coolant. 3. Flush out the system with running water. 4. Drain the system completely. Insert and tighten the plug. Add as much ethylene-glycol-based coolant and water as necessary to provide freezing and corrosion protection. 5. In extremely cold climates, add the amount recommended in the - 2004 Mazda MAZDA6 | Owner's Manual - Page 236
with water and get medical attention. Brake fluid spilled on a hot engine could cause a fire. Be careful not to spill brake fluid on yourselfor on the engine. Low Brake/Clutch Fluid Levels: Low brake/clutch fluid levels are dangerous. Low levels could signal brake lining wear or a brake system leak - 2004 Mazda MAZDA6 | Owner's Manual - Page 237
brake/clutch system frequently requires new fluid, consult an Authorized Mazda Dealer. CAUTION To avoid damage to the power steering pump, don't operate the vehicle for long periods when the power steering fluid level is low. NOTE Use specified power steering fluid (page 10-3). 2.3-liter engine - 2004 Mazda MAZDA6 | Owner's Manual - Page 238
frequently, consult an Authorized Mazda Dealer. 3.0-liter engine Inspect the fluid level at each engine oil change. Add fluid if necessary; it does not require periodic changing. Automatic transaxle Fluid (ATF) M Inspecting Automatic transaxle Fluid Level The automatic transaxle fluid level should - 2004 Mazda MAZDA6 | Owner's Manual - Page 239
pull out the dipstick, wipe it clean, and put it back. 5. Pull it out again. The proper fluid level is marked on the dipstick as follows. 2.3-liter engine Full A Full Low B Low 3.0-liter engine Full A Low Full B Low CAUTION • Use the cold scale only as a reference. • If outside temperature is lower - 2004 Mazda MAZDA6 | Owner's Manual - Page 240
affect your visibility, and could result in an accident. Use only windshield washer fluid or plain water in the reservoir. Using Washer Fluid Without Antifreeze Protection in Cold Weather: Operating your vehicle in temperatures below 4 degrees C (40 degrees F) using washer fluid without anti-freeze - 2004 Mazda MAZDA6 | Owner's Manual - Page 241
of the body, such as door and hood hinges and locks, should be lubricated each time the engine oil is changed. Use a nonfreezing lubricant on locks during cold weather. Make sure the engine hood's secondary latch keeps the hood from opening when the primary latch is released. Air Filter CAUTION - 2004 Mazda MAZDA6 | Owner's Manual - Page 242
or replace the filter. 5. Install in the reverse order of removal. Replace the filter according to Scheduled Maintenance (page 8-3). Clamp 2. Tilt or lift the air filter cover and remove the filter. 2.3-liter engine Air filter cover Air filter 3.0-liter engine Air filter cover Air filter 8-22 - 2004 Mazda MAZDA6 | Owner's Manual - Page 243
well, the blades are probably worn or cracked. Replace them. CAUTION • Hot waxes applied by automatic car washers have been known to affect the the windshield or the blades with foreign matter can reduce wiper effectiveness. Common sources are insects, tree sap, and hot wax treatments used by some - 2004 Mazda MAZDA6 | Owner's Manual - Page 244
free of the metal support. CAUTION • Don't bend the stiffeners. You need to use them again. • If the metal stiffeners are switched, the blade's wiping blade rubber. Then install the blade assembly in the reverse order of removal. Metal support Tab Pull out 3. Remove the metal stiffeners from - 2004 Mazda MAZDA6 | Owner's Manual - Page 245
terminal to contact the vehicle body. Battery-Related Explosion: Flames and sparks near open battery cells are dangerous. Hydrogen gas, produced during normal battery operation, could ignite and cause the battery to explode. An exploding battery can cause serious burns and injuries. Keep all flames - 2004 Mazda MAZDA6 | Owner's Manual - Page 246
the best service from a battery: • braking; leading to loss of control. Except for the limited use of the temporary spare tire, use only the same type tires (radial, bias-belted, bias-type) on all four wheels. Using Wrong-Sized Tires: Using any other tire size than what is specified for your Mazda - 2004 Mazda MAZDA6 | Owner's Manual - Page 247
monthly (including the spare) when the tires are cold. Maintain recommended pressures for the best ride, top handling, and minimum tire wear. • Warm tires normally exceed recommended pressures. Don't release air from warm tires to adjust the pressure. • Underinflation can cause reduced fuel economy - 2004 Mazda MAZDA6 | Owner's Manual - Page 248
tire pressure • Improper wheel alignment • Out-of-balance wheel • Severe braking After rotation, inflate all tire pressures to specification (page 10-6) and inspect the lug nuts for tightness. New tread Worn tread You should replace it before the band is across the entire tread. 8-28 Form No - 2004 Mazda MAZDA6 | Owner's Manual - Page 249
should be as soon as possible. Maintain its pressure at 420 kPa (4.2 kgf/ cm2 or bar, 60 psi). M Replacing a Wheel WARNING Using a Wrong-Sized Wheel: Using a wrong-sized wheel is dangerous. Braking and handling could be affected, leading to loss of control and an accident. Always use wheels of - 2004 Mazda MAZDA6 | Owner's Manual - Page 250
Light Bulbs Overhead light/Map lights Headlights(Low beam) Fog lights Headlights (High beam) Parking lights Side-marker lights Front turn signal lights High-mount brake light Brake lights/Taillights Trunk light Courtesy lights Rear turn signal lights Reverse lights Taillights License plate lights - 2004 Mazda MAZDA6 | Owner's Manual - Page 251
Mazda's headlights and fog lights have replaceable halogen bulbs. M Replacing Exterior Light Bulbs Replacing the headlight, fog light and parking light bulbs with bare hands, body oil could cause the bulb to overheat and explode when lit. Never touch the glass portion of the bulb with your bare - 2004 Mazda MAZDA6 | Owner's Manual - Page 252
partially peel back the mudguard. Brake lights/Taillights, Rear turn signal lights 1. Pull the center section of the plastic retainer and remove the retainers and partially open the trunk side trim. Trunk side trim Removal Installation 2. Turn the socket and bulb assembly counterclockwise and - 2004 Mazda MAZDA6 | Owner's Manual - Page 253
Maintenance Reverse lights, Taillights 1. Pull the center section of the plastic retainer and remove the retainers, then remove the trunk rear trim. High-mount brake light 1. Remove the high-mount brake light component. 2. Detach the electrical connector from the socket. 3. Turn the socket and bulb - 2004 Mazda MAZDA6 | Owner's Manual - Page 254
lens with a flathead screwdriver. 2. Disconnect the bulb by pulling it out. M Replacing Interior Light Bulbs Overhead light/Map lights (With overhead console) 1. Remove the screws. 2. Wrap a flathead screwdriver with a soft cloth to prevent damage to the trim and gently insert it in the overhead - 2004 Mazda MAZDA6 | Owner's Manual - Page 255
the bulb by pulling it out. Courtesy lights Edge 2. Turn the socket and bulb assembly counterclockwise and remove it. 3. Disconnect the bulb from the socket. Socket Vanity mirror lights Edge 3. Install the new bulb in the reverse order of removal. 4. Install the new bulb in the reverse order - 2004 Mazda MAZDA6 | Owner's Manual - Page 256
fuse blows again, avoid using that system and consult an Authorized Mazda Dealer as soon as possible. M Fuse Replacement If the electrical system doesn't work, first inspect fuses on the vehicle's left side. 3. Install the new bulb in the reverse order of removal. 1. Turn off the ignition switch - 2004 Mazda MAZDA6 | Owner's Manual - Page 257
't work and the fuses in the cabin are OK, inspect the fuse block under the hood. If a fuse is blown, it must be replaced. Follow these steps: Engine compartment fuse box 4. Inspect it and replace if it's blown. 1. Turn off the ignition switch and all other switches. 2. Remove the fuse block cover - 2004 Mazda MAZDA6 | Owner's Manual - Page 258
-EA-03G_Edition1.book Page 38 Tuesday, June 24, 2003 6:29 PM Maintenance and Care Owner Maintenance 3. If a fuse is blown, replace it with a new one of the same rating . Normal Blown NOTE To replace the MAIN fuse, contact an Authorized Mazda Dealer (page 8-39). 8-38 Form No. 8S11-EA-03G - 2004 Mazda MAZDA6 | Owner's Manual - Page 259
10A 10A 10A 7.5A PROTECTED COMPONENT Injector Air flow sensor, EGR control valve O2 sensor lights Brake/Taillights TCM O2 sensor PCM, TCM Fuel pump Windshield wiper and washer, Engine control unit, Lighter Power window - - Reverse lights, Heater control unit *12.3-liter *2 engine 3.0-liter engine - 2004 Mazda MAZDA6 | Owner's Manual - Page 260
PROTECTED COMPONENT Blower motor Overhead light, Power door lock - Rear window defroster ABS* Cooling fan Cooling fan Brake/Taillights, License plate lights, Parking lights Dashboard illumination Magnet clutch Audio system Power seat* Fuel lid opener - - Fog lights* For protection of all circuits - 2004 Mazda MAZDA6 | Owner's Manual - Page 261
washer ABS unit*, SAS unit Reverse lights Heater Instrument cluster Lighter Overhead light * DESCRIPTION 14 15 16 17 R.CIGAR - D.LOCK - FUSE RATING 15A - 30A - PROTECTED COMPONENT Accessory socket - Power door lock - 12 13 R.WIP* MIRROR 10A 5A Rear wiper* Power control mirror, Audio system - 2004 Mazda MAZDA6 | Owner's Manual - Page 262
clear and color base coat water. If you are traveling and these are not available, a moistened tissue may also take care of the problem. The cleaned area should be waxed according to the instructions air and mix with rain or dew to form acids. These acids can settle on a vehicle's finish. As the water - 2004 Mazda MAZDA6 | Owner's Manual - Page 263
you find water marks on your vehicle's finish. M Paint Chipping Occurrence Paint chipping occurs when gravel thrown in the air by another to rust forming on your Mazda. Before this happens, repair the damage by using Mazda touch-up paint according to the instructions in this section. Failure to - 2004 Mazda MAZDA6 | Owner's Manual - Page 264
Mazda thoroughly and frequently, at least once a month, with lukewarm or cold water -plated or anodized aluminum parts. This may damage the antenna, remove it before entering a car wash facility or passing beneath a low overhead clearance. • Mazda is not responsible for scratches caused by automatic - 2004 Mazda MAZDA6 | Owner's Manual - Page 265
. In addition to the vehicle body, wax the metal trim to maintain its luster. 1. Use wax which contains no abrasives. Waxes containing abrasive will remove paint and could damage bright metal parts. 2. Use a good grade of natural wax for metallic, mica, and solid colors. 3. When waxing, coat evenly - 2004 Mazda MAZDA6 | Owner's Manual - Page 266
, rocker panels, and frame members have drain holes that should not be clogged. Water trapped there will cause rusting. CAUTION If your Mazda is damaged and needs metal parts repaired or replaced, make sure the body shop applies anticorrosion materials to all parts, both repaired and new. This will - 2004 Mazda MAZDA6 | Owner's Manual - Page 267
cold water. automatic car wash that uses highspeed or hard brushes. • If your aluminum wheels lose luster, wax the wheels. CAUTION Do not use glazing agents. Glazing agents contain ingredients which may cause discoloration, wrinkling, cracks and peeling. M Cleaning the Upholstery and Interior Trim - 2004 Mazda MAZDA6 | Owner's Manual - Page 268
Follow instructions. Don't bleach or dye the webbing; this may weaken it. After cleaning the belts, thoroughly dry the belt webbing and Belt: Using damaged seat belts is dangerous. In a collision, damaged belts cannot provide adequate protection. Have an Authorized Mazda Dealer replace damaged belts - 2004 Mazda MAZDA6 | Owner's Manual - Page 269
12 Add-On Non-Genuine Parts and Accessories ...9-13 Cell Phones ...9-14 Cell Phones Warning ...9-14 Type Approval of Equipment ...9-15 Type Approval of Equipment ...9-15 Uniform Tire Quality Grading System (UTQGS) ...9-16 Uniform Tire Quality Grading System (UTQGS) ...9-16 Reporting Safety Defects - 2004 Mazda MAZDA6 | Owner's Manual - Page 270
the issue. If your concern has not been resolved by the CUSTOMER RELATIONS, SALES, SERVICE, or PARTS MANAGER, then please contact the GENERAL MANAGER of the dealership or the OWNER. M STEP 2: Contact Mazda North American Operations If for any reason you feel the need for further assistance after - 2004 Mazda MAZDA6 | Owner's Manual - Page 271
corner of the dash) 4. Purchase date and current mileage 5. Your dealer's name and location 6. Your question(s) If you live outside the U.S.A., please contact your nearest Mazda Distributor. 9-3 Form No. 8S11-EA-03G - 2004 Mazda MAZDA6 | Owner's Manual - Page 272
Mazda in top condition. In our experience, any questions, problems, or complaints regarding the operation of your Mazda or any other general service Refer to the "Vehicle Identification Labels" page of section 10 of this manual for the location of the VIN. 4. Purchase date 5. Present odometer reading - 2004 Mazda MAZDA6 | Owner's Manual - Page 273
that the resolution of service problems in most cases requires the use of your Mazda dealer's service facilities, personnel and equipment Mazda's Customer Satisfaction Program. If after exhausting the procedures in this manual your concern is still not resolved, you have another option. Mazda - 2004 Mazda MAZDA6 | Owner's Manual - Page 274
942-7166 (416) 596-8824 (902) 422-5413 (418) 649-1330 M Regional Offices REGIONAL OFFICES MAZDA CANADA INC. WESTERN REGION 8171 ACKROYD ROAD SUITE 2000 RICHMOND B.C. V6X 3K1 (604) 303-5670 MAZDA CANADA INC. CENTRAL/ATLANTIC REGION 305 MILNER AVENUE SUITE 400 SCARBOROUGH, ONTARIO M1B 3V4 1 (800) 263 - 2004 Mazda MAZDA6 | Owner's Manual - Page 275
the following steps: M STEP 1 Discuss the matter with an Authorized Mazda Dealer. This is the quickest and best way to address the issue. If your concern has not been resolved by the CUSTOMER RELATIONS, SALES, SERVICE, or PARTS MANAGER, then please contact the GENERAL MANAGER of the dealership or - 2004 Mazda MAZDA6 | Owner's Manual - Page 276
June 24, 2003 6:29 PM Customer Information and Reporting Safety Defects Mazda Importer/Distributors Importer/Distributor M U.S.A. Mazda North American Operations 7755 Irvine Center Drive Irvine, CA 92618-2922 U.S.A. P.O. Box 19734 Irvine, CA 92623-9734 U.S.A. TEL:1 (800) 222-5500 (in U.S.A.) (949 - 2004 Mazda MAZDA6 | Owner's Manual - Page 277
Your Mazda • New Vehicle Limited Warranty • Distributor Major Component Limited Warranty (Canada only) • Safety Restraint System Limited Canada only) • Replacement Parts and Accessories Limited Warranty • Tire Warranty NOTE Detailed warranty information is provided with your Mazda. 9-9 Form No. - 2004 Mazda MAZDA6 | Owner's Manual - Page 278
your vehicle to receive satisfactory servicing in other countries. We strongly recommend that you NOT take your Mazda outside the United States. However damage the emission controls and engine. • Proper repair facilities, tools, testing equipment, and replacement parts may not be available. Please - 2004 Mazda MAZDA6 | Owner's Manual - Page 279
following problems if you do take your vehicle outside of Canada: • Recommended fuel may be unavailable. Any kind of leaded fuel or low-octane fuel will affect vehicle performance and damage the emission controls and engine. • Proper repair facilities, tools, testing equipment, and replacement parts - 2004 Mazda MAZDA6 | Owner's Manual - Page 280
registration problems, satisfactory service may be difficult or even impossible in another country. The fuel specified for your vehicle may be unavailable. Parts, servicing techniques, and tools necessary to maintain and repair your vehicle may be unavailable. There might not be an Authorized Mazda - 2004 Mazda MAZDA6 | Owner's Manual - Page 281
Authorized Mazda Dealer before you install non-genuine parts or accessories. Add-On Electrical and Electronic Equipment: Incorrectly choosing or installing improper add-on equipment or choosing an improper installer is dangerous. Essential systems could be damaged, causing engine stalling, air-bag - 2004 Mazda MAZDA6 | Owner's Manual - Page 282
device, pull off the right-of-way to a safe area before use. If use of a cell phone is necessary despite this warning, use a hands-free system to at least leave the hands free to drive the vehicle. Never use a cell phone or other electrical devices while the vehicle is moving and - 2004 Mazda MAZDA6 | Owner's Manual - Page 283
J56J_8S11-EA-03G_Edition1.book Page 15 Tuesday, June 24, 2003 6:29 PM Customer Information and Reporting Safety Defects Type Approval of Equipment Type Approval of Equipment Immobilizer system 9-15 Form No. 8S11-EA-03G - 2004 Mazda MAZDA6 | Owner's Manual - Page 284
System (UTQGS) Uniform Tire Quality Grading System (UTQGS) This information relates to the tire grading system norm because of variations in driving habits, service practices and differences in road characteristics and climate braking (straight ahead) traction tests and does not include acceleration - 2004 Mazda MAZDA6 | Owner's Manual - Page 285
PM Customer Information and Reporting Safety Defects Uniform Tire Quality Grading System (UTQGS) WARNING The temperature grade for this tire is established . The grade of tires available as standard or optional equipment on Mazda vehicle may vary with respect to grade. ALL PASSENGER VEHICLE TIRES - 2004 Mazda MAZDA6 | Owner's Manual - Page 286
NOTE If you live in the U.S.A., all correspondence to Mazda Motor Corporation should be forwarded to: Mazda North American Operations 7755, Irvine Center Drive Irvine, California 92618-2922 P.O. Box 19734 Irvine, CA 92623-9734 Customer Assistance Center or toll free at 1 (800) 222-5500 If you - 2004 Mazda MAZDA6 | Owner's Manual - Page 287
'S MANUAL 2004 OWNER'S MANUAL 2004 OWNER'S MANUAL M WORKSHOP MANUAL: Covers recommended maintenance and repair procedures of the drive train, body and chassis. M WIRING DIAGRAM: Provides electrical schematics as well as component location for the entire electrical system. M OWNER'S MANUAL: This - 2004 Mazda MAZDA6 | Owner's Manual - Page 288
J56J_8S11-EA-03G_Edition1.book Page 20 Tuesday, June 24, 2003 6:29 PM 9-20 Form No. 8S11-EA-03G - 2004 Mazda MAZDA6 | Owner's Manual - Page 289
J56J_8S11-EA-03G_Edition1.book Page 1 Tuesday, June 24, 2003 6:29 PM 10 Specifications Technical information about your Mazda. Identification Numbers ...10-2 Vehicle Information Labels ...10-2 Specifications ...10-3 Specifications ...10-3 10-1 Form No. 8S11-EA-03G - 2004 Mazda MAZDA6 | Owner's Manual - Page 290
of the dashboard. This plate can easily be seen through the windshield. M Vehicle Emission Control Information Label M Tire Pressure Label M Motor Vehicle Safety Standard Label M Engine Number (3.0-liter engine only) Front 10-2 Form No. 8S11-EA-03G - 2004 Mazda MAZDA6 | Owner's Manual - Page 291
-5 75W-90 GL-4 or GL-5 80W-90 GL-4 or GL-5 75W-90 ATF M-V ATF M-III, M-V, or equivalent (e.g. Dexron® III) SAE J1703, or FMVSS116 DOT-3 Manual transmission oil 3.0-liter engine Automatic transaxle fluid Power steering fluid Brake fluid Above 10°C (50°F) API Service SAE 10-3 Form No. 8S11-EA-03G - 2004 Mazda MAZDA6 | Owner's Manual - Page 292
6.3 8.1 15.0 (Imp gal) 2.3-liter engine Engine oil 3.0-liter engine 2.3-liter engine 3.0-liter engine 2.3-liter engine 3.0-liter engine 2.3-liter engine 3.0-liter engine Coolant Manual transaxle oil Automatic transaxle fluid Fuel tank Check oil and fluid levels with dipsticks or reservoir gauges - 2004 Mazda MAZDA6 | Owner's Manual - Page 293
24, 2003 6:29 PM Specifications M Light Bulbs Exterior light Light bulb Headlights Front turn signal lights Parking lights Fog lights* Side-marker lights High-mount brake lights Rear turn signal lights Brake lights/Taillights Taillights Reverse lights License plate lights Type A Type B High beam - 2004 Mazda MAZDA6 | Owner's Manual - Page 294
replacing tires, Mazda recommends that you replace tires of the same type originally fitted to your vehicle. For details, contact an Authorized Mazda Dealer. Check the tire pressure label for tire size spare tire Tire size T115/70R15 T115/70D15 Inflation pressure 420 kPa (60 psi) M Fuses Refer - 2004 Mazda MAZDA6 | Owner's Manual - Page 295
J56J_8S11-EA-03G_Edition1.book Page 1 Tuesday, June 24, 2003 6:29 PM 11 Index 11-1 Form No. 8S11-EA-03G - 2004 Mazda MAZDA6 | Owner's Manual - Page 296
Non-Genuine Parts and Accessories ...9-13 Air Bag Systems ...2-36 Air Filter ...8-21 Ambient Temperature Display ...6-46 Antenna ...6-16 Anti-Lock Brake System (ABS) ...5-8 Warning light ...5-8 Appearance Care ...8-42 Ashtray ...6-48 Audio Audio control switch ...6-38 Audio System ...6-16 Audio set - 2004 Mazda MAZDA6 | Owner's Manual - Page 297
36 Panel description ...8-39 Replacement ...8-36 E Emergency Starting ...7-14 Flooded engine ...7-14 Jump-starting ...7-15 Push-starting ...7-18 Emergency Towing ...7-19 Emission Control System ...4-3 Engine Coolant ...8-13 Exhaust gas ...4-4 Hood release ...3-17 Oil ...8-10 Overheating ...7-12 - 2004 Mazda MAZDA6 | Owner's Manual - Page 298
39 Information Display ...6-44 Ambient temperature display ...6-46 Audio display ...6-46 Climate control display ...6-46 Clock ...6-45 Display dimmer cancel function ...6-46 Information display functions ...6-44 L Label Information ...10-2 Lane-Change Signals ...5-41 Light Bulbs Replacement ...8-30 - 2004 Mazda MAZDA6 | Owner's Manual - Page 299
-center lap/shoulder ...2-19 Seat belt precautions ...2-12 Warning beep ...2-23 Warning light ...2-23 Seats Front seat (Electricall operated seats) ...2-5 Front seat (Manually operated seats) ...2-2 Rear seat ...2-9 Security System Immobilizer system ...3-20 Theft-deterrent system ...3-23 Service - 2004 Mazda MAZDA6 | Owner's Manual - Page 300
Vehicle Information Labels ...10-2 W Warning Lights ...5-29 ABS ...5-34 Air bag system ...5-34 Automatic transaxle ...5-35 Brake system ...5-31 Charging system ...5-32 Check engine ...5-33 Door-ajar ...5-35 Engine oil pressure ...5-33 Front seat belt pretensioner system ...5-34 Low fuel ...5-35 Low - 2004 Mazda MAZDA6 | Owner's Manual - Page 301
J56J_8S11-EA-03G_Edition1.book Page 7 Tuesday, June 24, 2003 6:29 PM Index W Windows Power windows ...3-14 Windshield Washer ...5-43 Windshield Wipers ...5-43 Blades replacement ...8-23 Winter Driving ...4-8 11-7 Form No. 8S11-EA-03G - 2004 Mazda MAZDA6 | Owner's Manual - Page 302
J56J_8S11-EA-03G_Edition1.book Page 8 Tuesday, June 24, 2003 6:29 PM 11-8 Form No. 8S11-EA-03G
-
 1
1 -
 2
2 -
 3
3 -
 4
4 -
 5
5 -
 6
6 -
 7
7 -
8
-
9
-
10
-
11
-
12
-
13
-
14
-
15
-
16
-
17
-
18
-
19
-
20
-
21
-
22
-
23
-
24
-
25
-
26
-
27
-
28
-
29
-
30
-
31
-
32
-
33
-
34
-
35
-
36
-
37
-
38
-
39
-
40
-
41
-
42
-
43
-
44
-
45
-
46
-
47
-
48
-
49
-
50
-
51
-
52
-
53
-
54
-
55
-
56
-
57
-
58
-
59
-
60
-
61
-
62
-
63
-
64
-
65
-
66
-
67
-
68
-
69
-
70
-
71
-
72
-
73
-
74
-
75
-
76
-
77
-
78
-
79
-
80
-
81
-
82
-
83
-
84
-
85
-
86
-
87
-
88
-
89
-
90
-
91
-
92
-
93
-
94
-
95
-
96
-
97
-
98
-
99
-
100
-
101
-
102
-
103
-
104
-
105
-
106
-
107
-
108
-
109
-
110
-
111
-
112
-
113
-
114
-
115
-
116
-
117
-
118
-
119
-
120
-
121
-
122
-
123
-
124
-
125
-
126
-
127
-
128
-
129
-
130
-
131
-
132
-
133
-
134
-
135
-
136
-
137
-
138
-
139
-
140
-
141
-
142
-
143
-
144
-
145
-
146
-
147
-
148
-
149
-
150
-
151
-
152
-
153
-
154
-
155
-
156
-
157
-
158
-
159
-
160
-
161
-
162
-
163
-
164
-
165
-
166
-
167
-
168
-
169
-
170
-
171
-
172
-
173
-
174
-
175
-
176
-
177
-
178
-
179
-
180
-
181
-
182
-
183
-
184
-
185
-
186
-
187
-
188
-
189
-
190
-
191
-
192
-
193
-
194
-
195
-
196
-
197
-
198
-
199
-
200
-
201
-
202
-
203
-
204
-
205
-
206
-
207
-
208
-
209
-
210
-
211
-
212
-
213
-
214
-
215
-
216
-
217
-
218
-
219
-
220
-
221
-
222
-
223
-
224
-
225
-
226
-
227
-
228
-
229
-
230
-
231
-
232
-
233
-
234
-
235
-
236
-
237
-
238
-
239
-
240
-
241
-
242
-
243
-
244
-
245
-
246
-
247
-
248
-
249
-
250
-
251
-
252
-
253
-
254
-
255
-
256
-
257
-
258
-
259
-
260
-
261
-
262
-
263
-
264
-
265
-
266
-
267
-
268
-
269
-
270
-
271
-
272
-
273
-
274
-
275
-
276
-
277
-
278
-
279
-
280
-
281
-
282
-
283
-
284
-
285
-
286
-
287
-
288
-
289
-
290
-
291
-
292
-
293
-
294
-
295
-
296
-
297
-
298
-
299
-
300
-
301
-
302
 |
 |

Form No. 8S11-EA-03G
J56J_8S11-EA-03G_Edition1.book
Page 1
Tuesday, June 24, 2003
6:29 PM