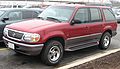
1997 Mercury Mountaineer Owner's Manual
1997 Mercury Mountaineer Manual
1997 Mercury Mountaineer manual content summary:
- 1997 Mercury Mountaineer | Owner's Manual - Page 1
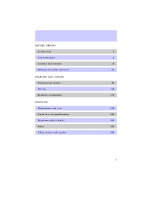
Table of contents BEFORE DRIVING Introduction Instrumentation Controls and features Seating and safety restraints STARTING AND DRIVING Starting your vehicle Driving Roadside emergencies SERVICING Maintenance and care Capacities and specifications Reporting safety defects Index Filling station - 1997 Mercury Mountaineer | Owner's Manual - Page 2
in loss of control or an accident. Be sure to read Special driving instructions for AWD vehicles later in this Owner's Guide and the special supplement included with AWD and 4x4 vehicles entitled Four-Wheeling. Four-Wheeling presents safe driving practices to owners of AWD and 4x4 utility vehicles - 1997 Mercury Mountaineer | Owner's Manual - Page 3
period for brake linings lasts for 1,600 km (1,000 miles) of highway driving or 160 km (100 miles) of city driving. Information about this guide This guide describes equipment and gives specifications for equipment that was in effect when this guide was approved for printing. Mercury may discontinue - 1997 Mercury Mountaineer | Owner's Manual - Page 4
pg. 7) Hazard flasher control (not shown) (pg. 27) Warning lights (pg. 8) Tachometer (pg. 6) Speed control (pg. 23) ON RSM SET ACCEL OFF COAST SRS Headlamp control (pg. 13) Instrument panel dimmer switch (pg. 14) Tilt steering wheel lever (pg. 27) Driver air bag (pg. 78) Charging Turn signal - 1997 Mercury Mountaineer | Owner's Manual - Page 5
Electronic sound system; refer to Audio Guide (premium stereo cassette with CD DJ shown) (pg. 16) Rear wiper/washer Vents control (pg. 15) (pg. 17) Rear window defroster control (pg. 15) VOL - PUSH ON OFF R. WIPE HI AM FM BASS TREB FM 1 ST CLK BAL FADE AUTO SET PUSH SEEK TUNE DISCS SCAN - 1997 Mercury Mountaineer | Owner's Manual - Page 6
Instrumentation INSTRUMENT CLUSTER Instrument cluster gauges 4 H C 2 1 F E 0 3 5 6 40 30 40 50 60 70 o o o o 100 80 60 120 80 140 UNLEADED FUEL ONLY 90 180 H L H 0 0 0 0 0 0 160 20 10 0 100 110 120 20 RPM x 1000 MPH km/h - + P R N D 2 1 L Speedometer 40 30 40 60 50 60 70 o o o - 1997 Mercury Mountaineer | Owner's Manual - Page 7
Instrumentation Engine coolant H C Fuel gauge F E Voltage gauge H + L Oil pressure H L Odometer 50 60 70 40 30 40 60 140 o o o o 100 80 120 80 90 100 110 120 0 0 0 0 0 0 160 20 20 180 10 0 MPH km/h Trip odometer and reset button 40 30 40 60 50 60 70 o o o o 100 80 120 80 140 90 100 - 1997 Mercury Mountaineer | Owner's Manual - Page 8
140 UNLEADED FUEL ONLY 90 180 H L 4X4 4WD LOW + 0 0 0 0 0 0 160 1 F ABS 20 10 0 100 110 200 20 0 BRAKE ! P RPM x 1000 MPH km/h H E P R N D 2 1 L DOOR AJAR illuminates when the ignition key is turned to the ON or START position and a door or liftgate is opened. illuminates when the - 1997 Mercury Mountaineer | Owner's Manual - Page 9
, brake fluid level is low, or break system requires service. illuminates when the headlamp high beams are on. BRAKE ! P ABS illuminates when the anti-lock brake system requires service. ABS illuminates when the ignition key is turned to ON and the safety belt is not buckled. The light will - 1997 Mercury Mountaineer | Owner's Manual - Page 10
as soon as possible. If this condition persists, your transmission may be damaged. CHECK ENGINE illuminates when the emission control system requires service. THEFT (if equipped) illuminates when the anti-theft system is arming and flashes when the anti-theft system is armed. Refer to Interior - 1997 Mercury Mountaineer | Owner's Manual - Page 11
without starting the engine. The warning and indicator lights shown above will illuminate for a brief time. If any of these lights do not illuminate, have your vehicle serviced. Warning chimes Safety belt warning chime Refer to the Seating and safety restraints chapter for information on the safety - 1997 Mercury Mountaineer | Owner's Manual - Page 12
Instrumentation Headlamps on warning chime A warning chime sounds when the headlamps are on (and key is not in the ignition), the ignition is off, and a door is opened. 12 - 1997 Mercury Mountaineer | Owner's Manual - Page 13
100 110 120 20 RPM x 1000 10 0 km/h P R N D 2 1 VOL - PUSH ON AM FM BASS TREB FM 1 ST CLK BAL FADE AUTO SET PUSH OFF ON RSM SEEK EJ DOLBY SYSTEM SET ACC OFF COAST TUNE DISCS SCAN TAPE CD REW 1 FF 2 SIDE 1-2 3 4 COMP 5 SHUFFLE 6 SRS LO OFF *A/C HI * MAX A/C Headlamp switch - 1997 Mercury Mountaineer | Owner's Manual - Page 14
Controls and features Daytime running light (DRL) system (if equipped) The daytime running light (DRL) system turns the high beam lamps on, with a reduced light output, when: • The headlamp knob is in the OFF position. • The engine is running. • The parking brake is released. The daytime running - 1997 Mercury Mountaineer | Owner's Manual - Page 15
180 0 0 0 0 0 0 160 20 10 0 100 110 120 20 RPM x 1000 km/h P R N D 2 1 VOL - PUSH ON AM FM BASS TREB FM 1 ST CLK BAL FADE AUTO SET PUSH OFF ON RSM SEEK SCAN EJ DOLBY SYSTEM TAPE CD SET ACC OFF COAST TUNE DISCS REW 1 FF 2 SIDE 1-2 3 4 COMP 5 SHUFFLE 6 SRS LO OFF HI *A/C *MAX - 1997 Mercury Mountaineer | Owner's Manual - Page 16
- PUSH ON AM FM BASS TREB FM 1 ST CLK BAL FADE AUTO SET PUSH OFF ON RSM SEEK EJ DOLBY SYSTEM SET ACC OFF COAST TUNE DISCS SCAN TAPE CD REW 1 FF 2 SIDE 1-2 3 4 COMP 5 SHUFFLE 6 SRS LO OFF HI *A/C *MAX A/C Audio system Refer to the Audio Guide for instructions on how to operate the - 1997 Mercury Mountaineer | Owner's Manual - Page 17
ON AM FM BASS TREB FM 1 ST CLK BAL FADE AUTO SET PUSH OFF ON RSM SEEK EJ DOLBY SYSTEM SET ACC OFF COAST TUNE DISCS SCAN TAPE CD REW 1 FF 2 SIDE 1-2 3 4 COMP 5 SHUFFLE 6 SRS LO OFF HI *A/C *MAX A/C OFF *A/C *MAX A/C Instrument panel vents There are four vents on the instrument - 1997 Mercury Mountaineer | Owner's Manual - Page 18
Controls and features Operating climate controls • Turn the temperature control to the desired temperature. • Turn the fan speed control to the desired speed. • Turn the mode control to the desired airflow position. OFF A/C MAX A/C 18 - 1997 Mercury Mountaineer | Owner's Manual - Page 19
ON AM FM BASS TREB FM 1 ST CLK BAL FADE AUTO SET PUSH OFF ON RSM SEEK EJ DOLBY SYSTEM SET ACC OFF COAST TUNE DISCS SCAN TAPE CD REW 1 FF 2 SIDE 1-2 3 4 COMP 5 SHUFFLE 6 SRS LO OFF HI *A/C *MAX A/C for air to flow through Select these vents: The position directs outside air to flow - 1997 Mercury Mountaineer | Owner's Manual - Page 20
the instrument panel vents. The MAX A/C mode can be used for air conditioning or heating. This mode is noisier but more economical than A/C mode. The MAX A/C mode only functions if the outside temperature is above 10°C (50°F). Select the OFF position for all climate control functions to cease - 1997 Mercury Mountaineer | Owner's Manual - Page 21
(blue) and set fan speed control to maximum. Ventilating with outside air Set mode control to , turn the temperature control to the desired temperature and turn fan speed control to desired position. Maximum windshield defrosting Set mode control to , turn temperature control to maximum heat (red - 1997 Mercury Mountaineer | Owner's Manual - Page 22
to operate while the engine is not running. LOCK locks the steering wheel and gearshift lever. OFF shuts off the ignition and accessories and allows the gearshift lever and steering wheel to move. ON tests the warning lights. The key remains here when engine is running. START cranks the engine - 1997 Mercury Mountaineer | Owner's Manual - Page 23
speed automatically at or above 48km/h (30 mph) using the control switches. Press ON to turn speed control on. SPEED CONT will illuminate in the instrument cluster. Press OFF to turn speed control off. When turned off, the previously programmed set speed will be erased. 4 H C 2 1 F E 0 3 5 6 50 - 1997 Mercury Mountaineer | Owner's Manual - Page 24
once to increase speed in 1.6 km/h (1 mph) increments. Press COAST to decrease speed. Press RSM to resume speed. Depressing the brake pedal will cancel the speed control. 4 H C 2 1 F E 0 3 5 6 40 30 40 50 60 70 o o o o 100 80 60 120 80 140 UNLEADED FUEL ONLY 90 180 H L 0 0 0 0 0 0 160 20 - 1997 Mercury Mountaineer | Owner's Manual - Page 25
Controls and features Activating high beams Push the lever forward to activate the high beam lamps. Pull the lever towards you to activate the "flash to - 1997 Mercury Mountaineer | Owner's Manual - Page 26
position for the best fuel economy and will remain on until overdrive is deactivated. The overdrive function allows automatic upshifts to 2nd, 3rd, and 4th gear. Deactivating overdrive Press the transmission control switch on the end of the gearshift lever. The transmission control indicator light - 1997 Mercury Mountaineer | Owner's Manual - Page 27
Controls and features Hazard flasher Push the hazard flasher Tilt steering Never adjust the steering column while the vehicle is moving. Pull the tilt steering lever towards you and move the wheel to the desired position. 4 H C 2 1 F E 0 RPM x 1000 5 6 40 30 40 50 60 70 o o o o 100 80 60 120 - 1997 Mercury Mountaineer | Owner's Manual - Page 28
Controls and features OVERHEAD CONTROLS Overhead console (if equipped) The console includes: • compass/temperature display • map lamps • storage compartment • garage door opener actuator • moon roof control (if equipped) OPEN GARAGE LAMP MODE LAMP 28 - 1997 Mercury Mountaineer | Owner's Manual - Page 29
the outside temperature is below 4°C (39°F), the word ICE will flash alternately with the temperature for one minute. Compass accuracy can be affected when driving by large buildings, bridges, power lines, and powerful antennas. Compass accuracy can also be affected by magnetic objects placed in or - 1997 Mercury Mountaineer | Owner's Manual - Page 30
Controls and features Compass zone adjustment 1 2 3 13 4 12 5 6 7 8 9 10 11 15 14 1. Determine which zone of the country you live in by updated. LAMP MODE LAMP 9 VAR Compass calibration adjustment Perform this adjustment in an open area free from steel structures and high voltage lines. 30 - 1997 Mercury Mountaineer | Owner's Manual - Page 31
button until CAL appears in the display (approximately eight seconds); then release. 2. Drive the vehicle slowly (less than 5 km/h/3 mph) in circles until the CAL the OPEN button to open the storage compartment. The door will open slightly and can be moved to full open. OPE N MO LAM P DE - 1997 Mercury Mountaineer | Owner's Manual - Page 32
Controls and features 1. Remove storage clip from door. 2. Place Velcro™ hook onto side of aftermarket transmitter opposite of actuator button. 3. Place transmitter into storage compartment, button down. 4. Place the provided height adapters onto the back side of the GARAGE button as needed. 5. - 1997 Mercury Mountaineer | Owner's Manual - Page 33
Controls and features Moon roof (if equipped) Press and hold bottom portion of moon roof switch turn the key to OFF Setting autolamp 1. Make sure the headlamp switch is in the OFF position. If the headlamp switch is on, you override the autolamp. 2. Turn the ignition key to ON or start your vehicle - 1997 Mercury Mountaineer | Owner's Manual - Page 34
Controls and features 3. Slide the delay slide knob to the center of travel. The further you move the knob to the right, the longer the headlamps stay on after the ignition is turned to the OFF position when bright lights (glare) reach the mirror. When the mirror detects bright light from the front - 1997 Mercury Mountaineer | Owner's Manual - Page 35
and features DOOR MOUNTED CONTROLS Power windows Driver side control Press and hold rocker switch to close driver window. Press and release rocker switch for partial window movement. The driver side power window has a one touch down feature. When the AUTO switch is fully pressed, the driver - 1997 Mercury Mountaineer | Owner's Manual - Page 36
close the rear passenger window(s). Your vehicle has a power window lock feature. When the power window lock feature is enabled, the passenger and the rear seat power windows cannot be operated by passengers. DOOR LOCK U L AUTO WINDOW LOCK Press rocker switch to enable power window lock - 1997 Mercury Mountaineer | Owner's Manual - Page 37
and features Passenger side control Press rocker switch to open window. Press rocker switch to close window. DOOR LOCK L U WINDOW Rear seat passengers Press rocker switch to open right rear window. Press rocker switch to close right rear window. Press rocker switch to open left rear window - 1997 Mercury Mountaineer | Owner's Manual - Page 38
Controls and features Power locks Driver side Press U once to unlock all doors and liftgate. Press L once to lock all doors and liftgate. DOOR LOCK U L AUTO WINDOW LOCK Passenger side Press U once to unlock all doors and liftgate. Press L once to lock all doors and liftgate. DOOR LOCK L U - 1997 Mercury Mountaineer | Owner's Manual - Page 39
Controls and features Rear liftgate Press rocker switch (key graphic) once to unlock all doors and liftgate. Press opposite side to lock all doors and liftgate. DOOR LOCK Childproof locks for rear doors When you set these locks, the rear doors cannot be opened from the inside. The rear doors can - 1997 Mercury Mountaineer | Owner's Manual - Page 40
Controls and features Move lever to LOCK position (up) to set the lock. Move lever to UNLOCK position (down) to disengage the lock. Two-step unlock feature (if equipped) This feature allows you to unlock all vehicle doors with the key. 1. Unlock driver door. 2. Repeat unlock procedure within 4 - 1997 Mercury Mountaineer | Owner's Manual - Page 41
Controls and features liftgate will unlock when the key is returned to the vertical position (position of key before removal). This feature can be activated by all outside locks on vehicles equipped with keyless entry. Illuminated entry Interior lamps illuminate when either outside front door handle - 1997 Mercury Mountaineer | Owner's Manual - Page 42
position. CONSOLE CONTROLS Center console Your vehicle has a center console that is equipped with the following features: • Auxiliary power point • Utility compartment • Ashtray • Cupholders • Tissue tray • Utility compartment with cassette/compact disc storage and coinholder • Compact disc changer - 1997 Mercury Mountaineer | Owner's Manual - Page 43
Controls and features Auxiliary power point This power point is an additional power source for electrical accessories. Do not plug optional electrical accessories into the cigarette lighter. Use the power point. Replacing the tissue box 1. Lift armrest and slide coinholder/tissue box out of console - 1997 Mercury Mountaineer | Owner's Manual - Page 44
Controls and features Rear console (if equipped) Your vehicle is equipped with a rear console that includes the following features: 1. Air vents 2. Audio system controls (refer to Audio Guide) 3. Rear seat climate control direction and fan controls 4. Cupholders 44 - 1997 Mercury Mountaineer | Owner's Manual - Page 45
Controls and features Rear climate controls - VOLUME + BAND SEEK MEMORY Turn the air distribution dial to the desired airflow position. - VOLUME + BAND SEEK MEMORY Turn the fan speed dial to the desired position. - VOLUME + BAND SEEK MEMORY 45 - 1997 Mercury Mountaineer | Owner's Manual - Page 46
and features Controlling airflow Select for air to flow through these vents: - VOLUME + BAND SEEK MEMORY for air to flow through Select these vents: - VOLUME + BAND SEEK MEMORY Cargo area controls Cargo cover (if equipped) Your vehicle is equipped with a cargo shade that covers - 1997 Mercury Mountaineer | Owner's Manual - Page 47
Controls and features Installing shade 1. Position shade in mounting brackets as the cargo shade may lose its spring tension. If this happens, then follow these instructions to rewind the shade. You will need the help of another person. 1. Remove the the vinyl inside the end cap with each wrap. 47 - 1997 Mercury Mountaineer | Owner's Manual - Page 48
is narrower than the left). Check to see if the shade operates properly. Spare tire and jack Your vehicle is equipped with a full-size spare tire located behind the rear bumper. For instructions on how remove and mount the spare tire, refer to the Roadside emergencies section later in this Owner - 1997 Mercury Mountaineer | Owner's Manual - Page 49
Controls and features Keyless entry system (if equipped) With the keyless entry keypad, you can: • lock or unlock the vehicle doors and liftgate without using the key. • arm and disarm the anti-theft system. 1•2 3•4 5•6 7•8 9•0 See also Remote entry system and Anti-theft computer module Programming - 1997 Mercury Mountaineer | Owner's Manual - Page 50
entered, the module will erase the old code in favor of the new code. If you wish to erase your personal code, use the following instructions: Erasing code. Unlocking the doors with the keyless entry system 1. Enter either factory-set code or personal code. Driver door will unlock and interior - 1997 Mercury Mountaineer | Owner's Manual - Page 51
Anti-theft system for more details. Autolock Autolock is a feature of the keyless entry system and is enabled at the factory. Autolock will automatically lock all doors and liftgate when: • all vehicle doors, liftgate, and liftgate window are closed. • ignition switch is in the ON position. • brake - 1997 Mercury Mountaineer | Owner's Manual - Page 52
Controls and features Relock The autolock feature will repeat when: • any door is opened and closed. • the brake pedal is released. Deactivating autolock Before following the activation or deactivation procedures, make sure that the anti-theft system is not armed, ignition is off, and all vehicle - 1997 Mercury Mountaineer | Owner's Manual - Page 53
the horn chirps twice, a door is still ajar and the anti-theft system will not arm. See Anti-theft system for more details. Remote entry personal alarm The remote entry personal alarm feature allows you to activate the alarm. When activated, the horn will honk and the lights will flash. LO CK U LO - 1997 Mercury Mountaineer | Owner's Manual - Page 54
batteries. Replacement batteries can be purchased at most pharmacies or through your Ford or Lincoln-Mercury dealer. The transmitter is powered by two coin type three-volt lithium 2016 batteries. The operating range of the remote entry transmitters can also be affected by adverse weather conditions - 1997 Mercury Mountaineer | Owner's Manual - Page 55
Controls and features When installing new batteries, be sure to place the positive (+) side down as marked. Snap the two halves back together. Replacing Use the following instructions to re-program position the fifth time. Locks will lock/unlock by themselves. 3. Push UNLOCK on first key fob. Doors - 1997 Mercury Mountaineer | Owner's Manual - Page 56
Controls and features Anti-theft system (if equipped) When set, the anti-theft system protects against unauthorized entry into a locked vehicle. The ignition switch must be in the OFF position to arm the anti-theft system. Arming the anti-theft system Use one of the following methods to arm the - 1997 Mercury Mountaineer | Owner's Manual - Page 57
Controls and features • flash the headlamps, park lamps and the THEFT indicator in the instrument cluster. • sound the horn. • disable vehicle starting. The flashing exterior lamps and honking horn will shut off automatically after about 3 minutes. The lights and horn will remain off unless another - 1997 Mercury Mountaineer | Owner's Manual - Page 58
the ignition switch is turned to OFF. If either front door is opened during the 10 minute period the delayed accessory feature is disabled. Battery saver Battery saver is a feature that automatically shuts off power to these lights after 40 minutes: glove box, engine compartment, overhead console - 1997 Mercury Mountaineer | Owner's Manual - Page 59
Seating and safety restraints FRONT BUCKET SEATS Adjusting manual seats Lift to move the seat forward or backward. Pull up to recline the seat. 59 - 1997 Mercury Mountaineer | Owner's Manual - Page 60
Seating and safety restraints Adjusting power seats (if equipped) Pull up to recline the seat. Press to tilt front and rear of seat up or down. 60 - 1997 Mercury Mountaineer | Owner's Manual - Page 61
Seating and safety restraints Press in the desired direction to raise or lower the seat, or to move the seat backward or forward. Push to increase (+) or decrease (-) lumbar support. + - 61 - 1997 Mercury Mountaineer | Owner's Manual - Page 62
your vehicle is equipped with a built-in child seat, the seatback cannot be folded down unless the built-in child seat is fully stowed. 1. Push the lower release handle downward to unlatch seat back. 2. Rotate seatback downward into the load floor position. 3. Push down on the top outboard area of - 1997 Mercury Mountaineer | Owner's Manual - Page 63
you and your passengers in case of a collision. In most states and in Canada the law requires the use of safety belts. To reduce the risk of serious injury in a collision, always drive and ride with your seatback upright and the lap belt snug and low across the hips. Safety belts must be worn by all - 1997 Mercury Mountaineer | Owner's Manual - Page 64
any area of your vehicle that is not equipped with seats and safety belts. Be sure everyone in your vehicle is in a seat and using a safety belt properly. USING THE SAFETY RESTRAINTS PROPERLY Combination lap and shoulder belts 1. To connect the safety belt, insert the tongue into slot in the buckle - 1997 Mercury Mountaineer | Owner's Manual - Page 65
, if the driver brakes suddenly, turns a corner sharply, or the vehicle receives an impact of 8 km/h (5 mph) or more the combination safety belts will lock to help reduce forward movement of the driver and passengers. The front seat belt system can also be made to lock manually by quickly pulling - 1997 Mercury Mountaineer | Owner's Manual - Page 66
still retract to remove any slack in the shoulder belt. The automatic locking mode is not available on the driver safety belt. When to use the automatic locking mode • When a tight lap/shoulder belt fit is desired. • Any time a child safety seat is installed in the vehicle. Refer to Children and - 1997 Mercury Mountaineer | Owner's Manual - Page 67
mode and activate the vehicle sensitive (emergency) locking mode. Front seat safety belt height adjustment Your vehicle has safety belt height adjustments for the driver and passenger seating positions. Adjust the height of the shoulder belt so the belt rests across the middle of your shoulder. 67 - 1997 Mercury Mountaineer | Owner's Manual - Page 68
seating position has a lap belt with retractor. To unfasten the safety belt: 1. Push the release button on the buckle. This allows the tongue to unlatch from the buckle. 2. While the belt retracts, guide the tongue to its stowed position. If you do not guide the tongue, it may strike you or part - 1997 Mercury Mountaineer | Owner's Manual - Page 69
nicks, wear, or cuts. If your vehicle has been involved in an accident, have all the safety belts and child seat anchoring brackets (if equipped) examined by a qualified technician. Then...The safety belt indicator light illuminates for one to two minutes and the warning chime sounds for 4-8 seconds - 1997 Mercury Mountaineer | Owner's Manual - Page 70
. In the event of an accident, the sew pattern may release, and the orange REPLACE BELT label may become visible. If any part of the orange label is exposed, the belt must be replaced. Failure to replace the safety belt assembly under the above conditions could result in severe personal injuries - 1997 Mercury Mountaineer | Owner's Manual - Page 71
for cleaning upholstery or carpets. Do not bleach or dye the belts, because these actions may weaken the belt webbing. AIR BAG PRECAUTIONS Your vehicle is equipped with an air bag supplemental restraint system (SRS) designed to work with safety belts to help protect you and your right front seat 71 - 1997 Mercury Mountaineer | Owner's Manual - Page 72
or mount equipment on or near the air bag cover on the steering wheel or in front seat areas that may come into contact with a deploying air bag. Failure to follow this instruction may increase the risk of personal injury in the event of a collision. Do not attempt to service, repair, or modify the - 1997 Mercury Mountaineer | Owner's Manual - Page 73
SRS LO OFF HI *A/C *MAX A/C The air bag system consists of two parts: • The driver air bag in the middle of the steering wheel and the passenger air bag near the glove compartment. • The electrical system, made up of impact sensors, a diagnostic module, and a backup power supply. The diagnostic - 1997 Mercury Mountaineer | Owner's Manual - Page 74
belts in order for the air bag system to operate effectively. AIR BAG WARNING LIGHT AND CHIME When you turn the ignition key to warning the ON position, the light lb or less]), you must put them in safety seats made especially for children. Check your local and state laws for specific requirements regarding the - 1997 Mercury Mountaineer | Owner's Manual - Page 75
the instructions and warnings that come with any infant or child restraint you might use. If possible, place children in the rear seat of your vehicle. Accident statistics suggest children are safer when properly restrained in rear seating positions than in the front seating positions. CHILDREN - 1997 Mercury Mountaineer | Owner's Manual - Page 76
's instructions included with the safety seat you put in your vehicle. If you do not install and use the safety seat properly, the child may be injured in a sudden stop or collision. When installing a child safety seat: • Use the correct safety belt buckle for that seating position. • Make - 1997 Mercury Mountaineer | Owner's Manual - Page 77
restraints Installing child safety seats in combination lap and shoulder belt seating positions 1. Position the child safety seat in a seat with a combination lap and shoulder belt. If you choose to install a child safety seat in the front passenger seat, move the seat as far back as possible. Rear - 1997 Mercury Mountaineer | Owner's Manual - Page 78
While holding the shoulder and lap belt portions together, route the tongue through the child seat according to the child seat manufacturer's instructions. Be sure the belt webbing is not twisted. 4. Insert the belt tongue into the proper buckle for that seating position until you hear and feel the - 1997 Mercury Mountaineer | Owner's Manual - Page 79
toward the buckle and pull up on the shoulder belt while pushing down on the child seat. 8. Allow the safety belt to retract to remove any slack in the belt. 9. Before placing a child in the seat, forcibly tilt the seat forward and back to make sure the seat is securely held in place. 10. Try to - 1997 Mercury Mountaineer | Owner's Manual - Page 80
tethered safety seats in a rear seating position with the tether strap attached to the tether anchoring bracket as shown in the instructions provided with the tether anchor kit. If a tethered seat must be installed in the front passenger seat: 1. Buckle the safety belt in the seat directly behind - 1997 Mercury Mountaineer | Owner's Manual - Page 81
and safety restraints instruction under Installing child safety seats in combination lap and shoulder belt seating positions in this chapter. 4. Hook the tether strap around the webbing near the center of the shoulder portion of the rear safety belt and tighten. BUILT-IN CHILD SEAT (IF EQUIPPED) The - 1997 Mercury Mountaineer | Owner's Manual - Page 82
follow all of the instructions on the use of this child restraint system can result in your child striking the vehicle's interior during a sudden stop or crash. Never use the built-in child seat as a booster cushion with the adult safety belts. A child using the adult belts could slide forward and - 1997 Mercury Mountaineer | Owner's Manual - Page 83
Seating and safety restraints 2. Pull both Velcro straps to release child seat cushion. 3. Lower child seat cushion. 83 - 1997 Mercury Mountaineer | Owner's Manual - Page 84
4. Unfold cushion protector flap onto adult seat cushion. 5. If connected, disconnect the chest clip and buckles. 6. Place the child in the seat and position the left shoulder belt over the child's left shoulder first, then place the right shoulder belt over the child's right shoulder. 84 - 1997 Mercury Mountaineer | Owner's Manual - Page 85
is green to ensure proper safety belt connections. If both tongues do not latch in the buckle, do not use the child seat. See your dealer for repairs belts in place on the child's chest. The chest clip is designed to easily pull apart in the event of an accident. The clip helps keep the belts - 1997 Mercury Mountaineer | Owner's Manual - Page 86
if the child is sleeping or attempting to get out of the child seat. If not placed in the ALR mode, the child seat shoulder belts are in a vehicle sensitive (emergency locking) mode, adjusting shoulder belt tightness in response to vehicle movement. Activating the automatic locking mode (ALR) on - 1997 Mercury Mountaineer | Owner's Manual - Page 87
helping the child slide his arms out of the belts. 4. Fold the cushion protector flap onto the child seat cushion. Slide the belt tongues up and out of the way of the cushion, then return the child seat cushion to the stowed (upright) position. 5. Slide the Velcro straps through the D-rings on the - 1997 Mercury Mountaineer | Owner's Manual - Page 88
, interlocks, and attaching hardware should be inspected by a qualified dealer technician after any collision. If the child seat was in use during a collision, Ford recommends replacing it. However, if the collision was minor and a qualified technician finds that the child restraints do not show - 1997 Mercury Mountaineer | Owner's Manual - Page 89
the risk of fire or other damage. Do not park, idle, or drive your vehicle in dry grass or other dry ground cover. The emission system instructions. PREPARING TO START YOUR VEHICLE Before starting the vehicle: 1. Make sure all vehicle occupants have buckled their safety belts. Refer to the Seating - 1997 Mercury Mountaineer | Owner's Manual - Page 90
Starting your vehicle 2. Make sure the headlamps and vehicle accessories are off. OFF 3. Make sure the parking brake is set and the gearshift lever is in P (Park). 4 H C 2 1 F E 0 3 5 6 60 40 80 100 120 o o o o 140 0 0 0 0 0 0 UNLEADED FUEL ONLY 160 180 H L 20 RPM x 1000 0 MPH km/h - 1997 Mercury Mountaineer | Owner's Manual - Page 91
SPEED CONT 0 0 0 0 0 0 160 1 F ABS 20 10 0 100 110 120 20 0 BRAKE ! P RPM x 1000 MPH km/h - + E P R N D 2 1 ANTITHEFT L O/D OFF The above lights illuminate briefly. If a light fails to illuminate, have the vehicle serviced. If the driver's safety belt is light does not fastened - 1997 Mercury Mountaineer | Owner's Manual - Page 92
to LOCK and wait approximately 10 seconds. 2. Try starting the engine again. At temperatures above -12°C (10°F), do not hold the key in the START position longer than five seconds. If the engine does not start on the first attempt: 1. Turn the ignition key to LOCK and wait approximately five seconds - 1997 Mercury Mountaineer | Owner's Manual - Page 93
Starting your vehicle 2. Press the accelerator all the way to the floor and hold. 3. Turn the key to START. Release it once the engine starts. 4. Release the accelerator gradually as the engine speeds up. If the engine still does not start, refer to Fuel pump shutoff switch in the Roadside - 1997 Mercury Mountaineer | Owner's Manual - Page 94
fumes inside your vehicle, have your dealer inspect your vehicle immediately. Do not drive if you smell exhaust fumes. Have the exhaust and body ventilation system checked whenever: • The vehicle is raised for service. • The sound of the exhaust system changes. • The vehicle has been damaged in - 1997 Mercury Mountaineer | Owner's Manual - Page 95
is stopped in an open area for long periods of time, open the windows at least 2.5 cm (1 inch). Adjust the heating or air conditioning to bring in fresh air. • Improve vehicle ventilation by keeping all air inlet vents clear of snow, leaves and other debris. DOOR LOCK U L AUTO OFF A/C MAX A/C 95 - 1997 Mercury Mountaineer | Owner's Manual - Page 96
Driving BRAKES The anti-lock brake system (ABS) Anti-lock brake operation differs slightly from standard brake operation. Apply the brakes steadily. DO NOT pump the brakes in a panic stop. The brake system will prevent wheel lockup by automatically releasing and reapplying the brakes. Even with ABS, - 1997 Mercury Mountaineer | Owner's Manual - Page 97
Driving ABS warning light The ABS light in the instrument cluster illuminates and remains illuminated if an ABS fault is detected. Have your vehicle serviced as soon as possible. Normal braking operation is still effective unless the light is also illuminated. Parking brake The parking brake should - 1997 Mercury Mountaineer | Owner's Manual - Page 98
released, but the warning light remains on, have the brakes checked immediately. They may not be working properly. AUTOMATIC TRANSMISSION OPERATION (4R70W) Hold the brake pedal down while you move the gearshift from position to position. If you do not hold the brake pedal down, your vehicle may - 1997 Mercury Mountaineer | Owner's Manual - Page 99
Driving Pull gearshift lever towards you and downward to move the automatic gearshift. P R N D 2 1 P P - Park Always come to a complete stop before shifting into or out of P (Park). Always set the parking brake with the transfer case in the N (Neutral) position. Always set the parking brake fully - 1997 Mercury Mountaineer | Owner's Manual - Page 100
The normal driving position for the best fuel economy. Transmission operates in gears 1-4. D (Overdrive) can be disengaged by pressing the transmission control switch on the gearshift lever. The transmission control indicator light on instrument cluster will remain off. 4 H C 2 1 F E 0 3 5 6 40 - 1997 Mercury Mountaineer | Owner's Manual - Page 101
shift to 2 (Second), and will shift to 1 (Low) after vehicle decelerates to the proper speed. Brake-shift interlock This vehicle is equipped with a brake-shift interlock feature that prevents the gearshift from being moved from P unless the brake pedal is depressed. If you cannot move the gearshift - 1997 Mercury Mountaineer | Owner's Manual - Page 102
) Your vehicle is equipped with a full-time All-Wheel Drive (AWD) transfer case. Power is constantly supplied to all four wheels through a transfer case. The AWD system is full-time and has no external controls. The AWD transfer case utilizes a viscous clutch that distributes torque to the front - 1997 Mercury Mountaineer | Owner's Manual - Page 103
give them higher centers of gravity than ordinary passenger cars. Utility and four-wheel drive vehicles are NOT designed for cornering at speeds as high as passenger cars any more than low-slung sports cars are designed to perform satisfactorily under off-road conditions. Avoid sharp turns - 1997 Mercury Mountaineer | Owner's Manual - Page 104
may stall. Once through water, always try the brakes. Wet brakes do not stop the vehicle as effectively as dry brakes. Drying can be improved by moving your vehicle slowly while applying light pressure on the brake pedal. After driving through mud, clean off residue stuck to rotating driveshafts - 1997 Mercury Mountaineer | Owner's Manual - Page 105
that could damage drive components. If the transmission and transfer case are submerged in water, their fluids should be checked and changed, if necessary. All rear axle lubricants must be replaced every 160,000 km (100,000 miles) or if the axle has been submerged in water. Otherwise, check the - 1997 Mercury Mountaineer | Owner's Manual - Page 106
D (Drive). Driving on snow and ice An AWD vehicle has advantages over two-wheel drive vehicles in braking, apply the brakes as you normally would. In order to allow the anti-lock brake system (ABS) to operate properly, keep steady pressure on the brake pedal. Allow more stopping distance and drive - 1997 Mercury Mountaineer | Owner's Manual - Page 107
area of your vehicle that is not equipped with seats and safety belts. Be sure everyone in your vehicle is in a seat and using a safety belt properly. Before loading a vehicle, familiarize yourself with the following terms: • Base Curb Weight: Weight of the vehicle including any standard equipment - 1997 Mercury Mountaineer | Owner's Manual - Page 108
Driving • Payload: Combined maximum allowable weight of cargo, passengers and optional equipment. The payload equals gross vehicle weight rating (GVWR) minus base curb weight. • GVW (Gross Vehicle Weight): Base 's door pillar. • GAWR (Gross Axle Weight Rating): Carrying capacity for each axle system - 1997 Mercury Mountaineer | Owner's Manual - Page 109
Driving • Maximum Trailer Weight Rating: Maximum weight of a trailer the vehicle is the Safety Compliance Certification Label is exceeded, your vehicle may be damaged or you may lose control and injure someone. To obtain correct weights, try taking your vehicle to a shipping company or an inspection - 1997 Mercury Mountaineer | Owner's Manual - Page 110
Driving Do not use replacement tires with lower weight capacities than the original because they may lower the vehicle's GVWR and GAWR limitations. Replacement tires on your vehicle's engine, transmission, axle, brakes, tires and suspension. Inspect these components carefully before and after any towing operation - 1997 Mercury Mountaineer | Owner's Manual - Page 111
the maximum recommended gross trailer weight exceeds the limits of the vehicle and could result in engine damage, transmission/axle damage, structural damage, loss of control, and personal injury. Calculating the load your vehicle can carry/tow 1. Use the Safety Compliance Certification Label to - 1997 Mercury Mountaineer | Owner's Manual - Page 112
Axle Ratio 3.73 3.73 Maximum GCWR kg (lb)1 Maximum Trailer Weight kg (lb)2 3,039 (6,700) 2,944 (6,500) Maximum Frontal Area of Trailer ft 50 50 2-Wheel Drive bumper or to the axle. Underbody hitches are acceptable if installed properly. The rear bumper has an integral hitch and only requires a ball - 1997 Mercury Mountaineer | Owner's Manual - Page 113
lb. Use electric brakes or manual, automatic, or surge-type hydraulic brakes that meet Federal and local regulations. Install and adjust the brakes according to the manufacturer's instructions. Do not connect a trailer's hydraulic brake system directly to your vehicle's brake system. Your vehicle - 1997 Mercury Mountaineer | Owner's Manual - Page 114
instructions and equipment for hooking up trailer lamps. Do not hook the trailer lamps directly into the vehicle's lighting lights in the instrument cluster may not work properly. Driving while you tow Do not drive faster than 88km/h (55 mph) while towing a trailer. Do not drive brake gradually. 114 - 1997 Mercury Mountaineer | Owner's Manual - Page 115
. Refer to the Service Guide for more information. Trailer towing • Practice turning, stopping and backing in an area before starting on a trip to get the feel of the vehicle/trailer combination. When turning, drive slightly beyond the normal turning point so the trailer wheels will clear curbs and - 1997 Mercury Mountaineer | Owner's Manual - Page 116
wheel backward to unlock crossbar and slide crossbar forward or backward. • Turn adjustment wheel forward to lock crossbar. FUEL CONSUMPTION Fuel economy can be improved by avoiding: • lack of regular, scheduled maintenance • excessive speed • rapid acceleration • driving with the brake pedal - 1997 Mercury Mountaineer | Owner's Manual - Page 117
• sudden stops • extended engine idling • use of speed control in hilly terrain • extended use of the air conditioner, defroster, rear window defroster and other accessories • underinflated tires • heavy loads • aftermarket add-ons such as bike, ski or luggage racks, bug deflectors, etc. 117 - 1997 Mercury Mountaineer | Owner's Manual - Page 118
Roadside emergencies HAZARD SWITCH Use the hazard flashers to warn traffic of vehicle problems. Press button down to activate hazard flashers. Press button again to deactivate hazard flashers. 4 H C 2 1 F E 0 3 5 6 40 out of the vehicle and call the local fire department or a towing service. 118 - 1997 Mercury Mountaineer | Owner's Manual - Page 119
vehicle are not working, a fuse may have blown. Blown fuses are identified by a broken wire. Check the appropriate fuses before replacing any electrical components. Always replace a fuse with one that has the specified amperage rating. Using a fuse with a higher amperage rating can cause severe wire - 1997 Mercury Mountaineer | Owner's Manual - Page 120
40 amp 60 amp fuse link 80 amp fuse link 100 amp fuse link Even after a fuse is replaced, it will continue to blow if the cause of the overload is not identified and corrected. If a to access passenger compartment fuse panel. Color Brown Red Blue Yellow Light Green Pink Green Yellow Black Blue 120 - 1997 Mercury Mountaineer | Owner's Manual - Page 121
Use the fuse puller tool provided on the passenger compartment fuse panel cover to replace fuses. 1 5 9 13 17 21 25 29 31 2 6 10 amp 10 amp 7.5 amp 34 Circuits Protected Power mirror, power antenna High-mount brakelamp Parking lamps Left headlamp Data link connector Air bag system, blower relay 121 - 1997 Mercury Mountaineer | Owner's Manual - Page 122
speed control, GEM system, brake interlock, overhead console Warning lamps Liftgate wiper/washer, front washer Brake on/off switch Anti-lock system Air bag system, instrument cluster Wiper run relay Cigar lighter A/C system Ignition coil, PCM system Radio, power antenna, GEM system, anti-theft Turn - 1997 Mercury Mountaineer | Owner's Manual - Page 123
defroster relay Underhood lamp, map lights, glove box lamp, overhead lamp, visor lamps, accessory delay, dimmer switch illumination GEM system Audio system Not used Rear blower motor relay Heated rear window DRL module, RH and LH headlamp, instrument cluster Luxury audio system Not used Not used - 1997 Mercury Mountaineer | Owner's Manual - Page 124
Roadside emergencies Power distribution box Lift cover towards front of vehicle to access the power distribution box. The high-current fuses in the power distribution box protect your vehicle's main electrical - 1997 Mercury Mountaineer | Owner's Manual - Page 125
20 amp 30 amp 40 amp 50 amp 60 amp Always disconnect the battery before servicing high current fuses. Always replace the cover to the power distribution box before reconnecting the battery or refilling fluid reservoirs. Color Yellow Light green Orange Red Blue Maxi fuses Fuse 1 2 3 4 Amps 30 amp 30 - 1997 Mercury Mountaineer | Owner's Manual - Page 126
Amps 30 amp 50 amp 30 amp Circuits protected Battery saver relay, headlamp relay Blower motor relay, blower motor Power seats, power lumbar, door lock/unlock relays, accessory delay relay Horn relay, Powertrain control module (PCM) Not used Hazard flasher, brake ON/OFF switch, cigar lighter, power - 1997 Mercury Mountaineer | Owner's Manual - Page 127
lamp module Not used Not used HEGO system 9 10 11 20 amp Relays Relays are located in the power distribution box. Relays receive signals from components or systems and transfer these signals to activate or deactivate other components or systems. Mercury recommends that relays be replaced by - 1997 Mercury Mountaineer | Owner's Manual - Page 128
2 CHANGING TIRES Tire change procedure 1. Park on a level surface. 2. Activate the hazard flashers. 3. Set the parking brake. 4. Place the gearshift in P (Park). 5. Block the diagonally opposite wheel. 6. Remove the jack and lug wrench. Circuits connected Wiper run relay Horn relay Wiper HI/LO relay - 1997 Mercury Mountaineer | Owner's Manual - Page 129
Roadside emergencies 7. Remove the jack handle (located underneath rear seat). 8. Assemble the jack handle to the lug wrench. 9. Insert drive section of the jack handle into the actuator hole and turn counterclockwise until the cable is slack enough to allow spare tire to be pulled - 1997 Mercury Mountaineer | Owner's Manual - Page 130
twist off. Not using the tapered end of the lug nut wrench at the pry-off notches may result in damage to the finish of the wheel and ornament. 12. Loosen the wheel lug nuts with the lug wrench about one half turn. 13. Position the jack on the lower suspension arm to raise front - 1997 Mercury Mountaineer | Owner's Manual - Page 131
Position the jack under the rear axle to raise the rear wheel. 14. Turn the jack handle clockwise and raise the vehicle until the tire just clears the ground. 15. Remove the wheel lug nuts and flat tire, and install the spare. 16. Install the lug nuts and tighten until snug. Use of wheel or lug nuts - 1997 Mercury Mountaineer | Owner's Manual - Page 132
lit cigarettes. An explosion could result in injury or vehicle damage. To protect yourself when charging a battery, always shield your face and eyes. Make sure that you can breath fresh air. Batteries contain sulfuric acid which burns skin, eyes and clothing. If the acid touches someone's skin, eyes - 1997 Mercury Mountaineer | Owner's Manual - Page 133
. To avoid damage or injury, follow these directions in the order they are given. If in doubt, call for road service. Before jump starting a vehicle: • Make sure the booster battery vehicle has a 12-volt starting system (a 24-volt power supply will cause vehicle damage). • Park the vehicles close to - 1997 Mercury Mountaineer | Owner's Manual - Page 134
the jumper cables in reverse order. Let the vehicle idle for a few minutes to allow the engine to relearn the proper idle conditions. Avoid using unnecessary electrical accessories for a short while to let the battery fully recharge. A battery charger may need to be used to fully recharge the - 1997 Mercury Mountaineer | Owner's Manual - Page 135
Roadside emergencies WRECKER TOWING It is recommended that your vehicle be towed with wheel lift and dollies or flatbed equipment. Do not tow with slingbelt equipment. Ford Motor Company has not developed or approved a T-hook or slingbelt towing procedure. 135 - 1997 Mercury Mountaineer | Owner's Manual - Page 136
be replaced without tools. • We provide you with a Service Guide that makes tracking routine service of your vehicle easy. If your vehicle requires professional servicing, your dealership can provide the necessary parts and service. Check the Warranty Guide to find out which parts and services are - 1997 Mercury Mountaineer | Owner's Manual - Page 137
the fan. • Never get under a vehicle supported only by a jack. If you must work under a vehicle, use safety stands. • Keep all lit cigarettes and other smoking materials away from the battery and all fuel-related parts. Working with the engine off 1. Set the parking brake and make sure that the - 1997 Mercury Mountaineer | Owner's Manual - Page 138
brake and make sure that the gearshift is securely latched in P (Park). 2. Do not work on a vehicle in an enclosed space with the engine running. 3. Block the wheels the grille near the center front of the vehicle to the left. 3. Lift the hood. After closing the hood, try to lift it to be sure - 1997 Mercury Mountaineer | Owner's Manual - Page 139
1 5.0L V8 6 10 12 11 8 9 7 IDENTIFYING COMPONENTS IN THE ENGINE COMPARTMENT 1 Engine coolant recovery reservoir 2 Windshield washer reservoir 3 Engine oil filler tube 4 Automatic transmission dipstick 5 Brake master cylinder 6 Power distribution box 7 8 9 10 11 12 Battery Radiator cap Power - 1997 Mercury Mountaineer | Owner's Manual - Page 140
care CHECKING AND ADDING ENGINE OIL Use WSS-M2C153-F motor oil CERTIFIED FOR GASOLINE ENGINES by the American Petroleum additives, oil treatments, or engine treatments are never needed and could, under certain conditions, lead to engine damage which is not covered by your Ford warranty. Synthetic - 1997 Mercury Mountaineer | Owner's Manual - Page 141
(like police, taxi, or shuttle service vehicles), or driven at high speeds for parked on level ground. 2. Depress the parking brake. Place the gearshift in P (Park). 3. lines. If the oil level lies between the MIN and MAX lines, there is no need to add. 5. If the oil level is below the MIN line - 1997 Mercury Mountaineer | Owner's Manual - Page 142
MIN line, add engine oil. Add engine oil through the oil filler cap and line on the dipstick. Continuous contact with USED motor oil has caused cancer in laboratory rats. Ford production and aftermarket (Motorcraft) oil filters are designed for added engine protection and long life. If a replacement - 1997 Mercury Mountaineer | Owner's Manual - Page 143
Maintenance and care 1. Clean the reservoir cap before removal to prevent dirt or water from entering the reservoir. 2. Visually inspect the fluid level. 3. If necessary, add brake fluid until the level reaches within 1/8 of the MAX line on the reservoir. • Do not exceed MAX. MAX Use only a DOT 3 - 1997 Mercury Mountaineer | Owner's Manual - Page 144
Maintenance and care CHECKING AND ADDING WASHER FLUID Visually inspect the fluid level in the washer fluid reservoir. If washer fluid needs to be added to the reservoir: 1. Lift the washer fluid reservoir cover. 2. Add enough washer fluid to fill the reservoir. SHER F WA LU ID ONLY 144 - 1997 Mercury Mountaineer | Owner's Manual - Page 145
the tail lamp. Be sure to close the cover after filling and before closing the liftgate. The reservoir must be filled slowly to allow trapped air to escape. Use of a funnel is recommended for easier filling. CHECKING AND ADDING ENGINE COOLANT Check the engine coolant level in the reservoir at least - 1997 Mercury Mountaineer | Owner's Manual - Page 146
°C [11°F]) and 60% (-52°C [-62°F]), depending on your local climate conditions. A coolant concentration below 40% may cause the engine to overheat on a warm local recycling center to find out more about recycling automotive fluids. Adding engine coolant Never remove the coolant recovery cap while the - 1997 Mercury Mountaineer | Owner's Manual - Page 147
removing the recovery cap. Wrap a thick cloth around the cap for safe removal. 2. When the engine is cool, lift the cap. 3. Step back while pressure lines on the engine coolant recovery reservoir. Follow the recommended service interval for changing engine coolant as outlined in the Service Guide - 1997 Mercury Mountaineer | Owner's Manual - Page 148
Maintenance and care Checking the cooling system hoses Before adding or replacing coolant, inspect all cooling system hoses for: • deterioration • leaks • loose clamps CHECKING AND ADDING POWER STEERING FLUID Check the power steering fluid at least twice a - 1997 Mercury Mountaineer | Owner's Manual - Page 149
• As a maintenance precaution, visually inspect the lines and hoses of the power steering system for leaks and damage. • If new fluid is frequently required, consult a qualified service technician. • Use fluid certified to meet Ford Motor Company lubricant specifications. Refer to Refill capacities - 1997 Mercury Mountaineer | Owner's Manual - Page 150
32 km (20 miles) of driving. However, if necessary, you can check the fluid level without driving to obtain a normal operating each gear to change. 3. Latch the gearshift lever in P(Park), set the parking brake and leave the engine running. 4. Remove the dipstick, wiping it clean with a clean, - 1997 Mercury Mountaineer | Owner's Manual - Page 151
be removed by a qualified technician. • Use fluid certified to meet Ford Motor Company lubricant specifications. Refer to Refill capacities and Lubricant specifications later in this these types of fluids. Call your local recycling center to find out more about recycling automotive fluids. 151 - 1997 Mercury Mountaineer | Owner's Manual - Page 152
Remove the filler plug and inspect the fluid level. 3. Fluid level should be at the bottom of the opening. When adding transfer case fluid: • Use fluid certified to meet Ford Motor Company lubricant specifications. Refer to Refill capacities and Lubricant specifications later in this chapter. 152 - 1997 Mercury Mountaineer | Owner's Manual - Page 153
that can burn skin, eyes, and clothing. Applying too much pressure on the ends when lifting a battery could cause acid to spill. Lift the battery with a carrier or with your hands on opposite corners. Servicing your battery The low-maintenance battery has removable vent caps for checking 153 + - - 1997 Mercury Mountaineer | Owner's Manual - Page 154
control conditions are maintained by power from the battery. When the battery is disconnected or a new battery is installed, the computer must "relearn" its idle conditions before your vehicle will drive properly. To begin this process: 1. Put the gearshift in P (Park). 2. Turn off all accessories - 1997 Mercury Mountaineer | Owner's Manual - Page 155
minute. 4. The relearning process will automatically complete as you drive the vehicle. • If you do not allow the engine to battery is reconnected. • Always dispose of used automotive batteries in a responsible manner. Follow your community's standards for disposal. Call your local recycling center - 1997 Mercury Mountaineer | Owner's Manual - Page 156
3. Replace the two halves of the air cleaner and secure the clamp. CHECKING AND CHANGING WIPER BLADES Check the windshield wiper blades at least twice a year or whenever the wipers seem less effective than usual. Substances such as tree sap and some hot wax treatments used by commercial car washes - 1997 Mercury Mountaineer | Owner's Manual - Page 157
position and turn the wipers on. Wait for them to reach a vertical position and turn the ignition to LOCK. Do not move the wipers manually size wiper blade in the correct location. To replace windshield wiper blades: 1. Pull the wiper arm away from the windshield and lock it into the service position - 1997 Mercury Mountaineer | Owner's Manual - Page 158
tab is engaged. To replace liftgate wiper blade: 1. Grades apply to new pneumatic tires for use on passenger cars. They do not apply to deep tread, winter-type tires as defined in Title 49 Code of Federal Regulations Part 575.104(c)(2). U.S. Department of Transportation - Tire quality grades - 1997 Mercury Mountaineer | Owner's Manual - Page 159
ability to stop on wet pavement as measured under controlled conditions on specified government test surfaces of asphalt and concrete. A tire marked C may have poor traction performance. The traction grade assigned to this tire is based on braking (straight ahead) traction tests and does not include - 1997 Mercury Mountaineer | Owner's Manual - Page 160
ability to dissipate heat when tested under controlled conditions on a specified indoor laboratory test wheel. Sustained high temperature can cause the in combination, can cause heat build up and possible tire failure. SERVICING YOUR TIRES Checking the tire pressure Check the tire pressure at least - 1997 Mercury Mountaineer | Owner's Manual - Page 161
driver's door latch pillar. Improperly inflated tires can affect vehicle handling and can fail suddenly, possibly resulting in loss of vehicle control. Rotating your tires Rotate your tires at regular intervals to ensure even wear. Rotation intervals are listed in the Service Guide. Your wheels and - 1997 Mercury Mountaineer | Owner's Manual - Page 162
and care Four tire rotation Five tire rotation Replacing the tires Replace the tires when the wear band is visible through the tire treads. When replacing full size tires, never mix radial bias belted or bias-type tires. Use only the tire sizes that are listed on the tire pressure decal - 1997 Mercury Mountaineer | Owner's Manual - Page 163
to lose control and roll over. IDENTIFYING TIRE TYPES Refer to the Safety Compliance Certification Label to determine the specific size tire and wheel Ford Motor Company recommends for use on this vehicle. All wheel/tire combinations (including spare) must be the same size for AWD equipped vehicles - 1997 Mercury Mountaineer | Owner's Manual - Page 164
care • Drive cautiously. If Do not use tire chains on dry roads. • The suspension insulation and bumpers will help prevent vehicle damage. Do not remove these components from your vehicle . If you do not use a proper fuel cap, the pressure in the fuel tank can damage the fuel system or cause - 1997 Mercury Mountaineer | Owner's Manual - Page 165
care If you replace your fuel cap with an aftermarket fuel filler cap, the customer warranty may be void if any damage to the fuel tank and/or fuel system occurs. If the fuel cap is venting vapor or you hear a hissing sound, wait until it stops before completely removing the cap. Automotive fuels - 1997 Mercury Mountaineer | Owner's Manual - Page 166
air Ford approves the use of gasolines to improve air lightly. However, if it knocks heavily under most driving conditions on the recommended octane fuel, see your dealer or a qualified service problems try a different brand of fuel. If the condition persists, see your dealer or a qualified service - 1997 Mercury Mountaineer | Owner's Manual - Page 167
based additives such as MMT. Additionally, vehicles certified to California emission standards (indicated on the underhood Vehicle Emissions Control will perform adequately on other gasolines, the performance of the emission control devices and systems may be adversely affected. Repair of damage - 1997 Mercury Mountaineer | Owner's Manual - Page 168
road conditions and may not reflect actual road conditions or individual driving styles. The EPA fuel economy estimate is not a guarantee, but a guideline of projected fuel economy. WHAT YOU SHOULD KNOW ABOUT THE EMISSION CONTROL SYSTEM Your vehicle is equipped with a catalytic converter which - 1997 Mercury Mountaineer | Owner's Manual - Page 169
while your vehicle is in motion. • Have the services performed according to the intervals in the Service Guide. When servicing your vehicle, never use a metal exhaust collector. A metal collector may melt or deform plastic parts. Do not park, idle, or drive your vehicle in dry grass or other dry - 1997 Mercury Mountaineer | Owner's Manual - Page 170
not be working properly. Have the vehicle serviced as soon as possible. • Fluid leaks. CHECK • The and ENGINE lights illuminate in the instrument cluster and remain heat or deform plastic parts. Important emission control information By law, anyone who manufactures, repairs, services, sells, leases, - 1997 Mercury Mountaineer | Owner's Manual - Page 171
system or battery has just been serviced, the OBD II system is reset to a not ready for I/M testing condition. To ready driving modes. If the vehicle owner is unable to meet the I/M requirements by using these driving patterns, an authorized service center can perform a detailed OBD II Drive - 1997 Mercury Mountaineer | Owner's Manual - Page 172
Maintenance and care EXTERIOR LAMPS Replacing the exterior bulbs It is a good idea to check the operation of the following lights frequently: • Headlamps • High-mount brakelamp • Tail lamps • Brakelamps • Backup lamps • Hazard flasher 172 - 1997 Mercury Mountaineer | Owner's Manual - Page 173
• Interior overhead lamp Do not remove lamp bulbs unless they will be replaced immediately. If a bulb is removed for an extended period of time, contaminants and keep out of children's reach. Grasp the bulb only by its plastic base and do not touch the glass; the oil from your hand could cause the - 1997 Mercury Mountaineer | Owner's Manual - Page 174
into the rear of the plastic base until you feel it "snap." 9. Replace the bulb assembly into the headlamp. High-mount brakelamp The high-mount brakelamp is located just above the rear liftgate window. For bulb replacement, see your dealer. Rear turn signals/brake/tail lamps/backup lamps The tail - 1997 Mercury Mountaineer | Owner's Manual - Page 175
disengage two lower barbed retainers. 3. 4. 5. 6. 7. Remove socket from lamp. Remove bulb from socket. Install bulb in socket. Install socket to lamp. Replace rear lamp. Hazard flasher For more information on the hazard flasher and hazard switch, refer to Hazard switch in the Roadside emergencies - 1997 Mercury Mountaineer | Owner's Manual - Page 176
For bulb replacement, see your dealer. License plate lamp To change the license plate bulb, follow this procedure: 1. Use a screwdriver to detach the lamp from the bumper. 2. Turn and pull the socket from the lamp and remove the bulb. 3. Replace socket into lamp and press lamp back into bumper. 176 - 1997 Mercury Mountaineer | Owner's Manual - Page 177
care Fog lamps 1. Disconnect the electrical connector from the back of the foglamp by turning it counterclockwise. 2. Remove bulb by lifting retaining clip and pulling the bulb from the assembly. 3. Replace the bulb and insert the bulb assembly back into the foglamp. 4. Lock bulb assembly into place - 1997 Mercury Mountaineer | Owner's Manual - Page 178
, rotate bulb holder counterclockwise 90°. The bulb and bulb holder will drop out. LAMP MODE LAMP 3. Pull bulb from bulb holder. Insert new bulb. 4. To replace the bulb holder, push up and rotate clockwise 90 - 1997 Mercury Mountaineer | Owner's Manual - Page 179
turn signal Front side marker lamp Underhood lamp Fog lamps Rear Lamps - Exterior Rear back-up lamp High-mount brakelamp License plate lamp Rear tail/brake lamp Turn lamp Interior Courtesy Lamps Cargo lamp Dome lamp (low series) Dome lamp (high series) Map lamps Map lamps with overhead console (if - 1997 Mercury Mountaineer | Owner's Manual - Page 180
Instrument cluster Instrument Panel Controls A/C controls Rear window wiper/washer control Headlamp controls Heater controls 1 Number of Bulbs Trade Number 1 1 1 each 1 1 1 1 161 194 194 161 2 1815 161 Replaceable at Lincoln/Mercury and Ford authorized radio service centers. 2 See your dealer - 1997 Mercury Mountaineer | Owner's Manual - Page 181
snow, salt and water. Remove any aftermarket accessories, such as antennas, before entering a car wash. After washing your vehicle, apply the brakes several times to dry them. Wax the the Ford Accessory line. Observe the application instructions on the products. In order to retain the vehicle 181 - 1997 Mercury Mountaineer | Owner's Manual - Page 182
vehicle. Do not use acid based wheel cleaners, steel wool, fuel, or strong detergents. Never use abrasives that will damage the finish of special wheel surfaces. Use a tar and road oil remover to remove grease and tar. Cleaning plastic parts Some of your vehicle's trim parts are plastic. Clean with - 1997 Mercury Mountaineer | Owner's Manual - Page 183
washer to clean the engine. The high pressure fluid could penetrate the sealed parts and cause damage. • In order to avoid cracking the engine block, do not spray with cold water. • The alternator, ignition coil packs, and air intake must be covered to prevent water damage when cleaning the engine - 1997 Mercury Mountaineer | Owner's Manual - Page 184
weaken the safety belt webbing or damage the vinyl parts of the seat. The child seat liner is removable and may be machine-washed and air dried. Cleaning and maintaining the safety belts Clean the safety belts with a mild soap solution recommended for cleaning upholstery or carpets. Do not bleach - 1997 Mercury Mountaineer | Owner's Manual - Page 185
to be replaced, use only spark plugs with the service part number suffix letters "EE" as shown on the engine decal. REFILL CAPACITIES Fluid Brake fluid Engine coolant Component Brake master cylinder Engine coolant recovery reservoir and radiator 5.0 L (302 c.i.d.) 4-door Dana 35 front axle Power - 1997 Mercury Mountaineer | Owner's Manual - Page 186
transfer case Automatic 4R70W (2WD and AWD) Front washer fluid reservoir Liftgate washer fluid reservoir Capacity 1.25 L (2.64 pts.) 13.2 L (13.9 qts.) 2.6 L (2.8 qts.) 3.1 L (3.3 qts.) Fill to 6-15 mm (1/4 to 9/16 ) from the bottom of the filler hole. Includes 1 L (1 qt.) for filter replacement - 1997 Mercury Mountaineer | Owner's Manual - Page 187
washer reservoir Body hinges, latches, door striker plates and rotors, seat tracks, door checks and tracks, hood latch, auxiliary latch, and fuel filler door and spring Steering column, U-joints, clutch linkage pivots, parking brake linkage pivots and clevises and transmission control linkage pivots - 1997 Mercury Mountaineer | Owner's Manual - Page 188
-A ESA-M1C75-B Door weatherstrips Automatic transmission shift linkage and brake pedal shaft Automatic transmission 4R70W Power steering reservoir Parking brake cable Accelerator throttle lever ball stud Ford conventional and Traction-Lok rear axles1 Drive shaft, universal joints and slip spines - 1997 Mercury Mountaineer | Owner's Manual - Page 189
System Fluid Premium Long-Life Grease Motorcraft MERCON ATF 4x4 Gear Oil Ford part number E2FX-19549-AA Ford specification ESE-M97B44-A Transfer case front output slip shaft Transfer case Dana 35 front drive axle 1 XG-1-C or K ESA-M1C75-B XT-2-QDX F1TZ-19580-A MERCON WSL-M2C191-A Add 118 - 1997 Mercury Mountaineer | Owner's Manual - Page 190
Capacities and specifications VEHICLE DIMENSIONS A B C D E Dimensions A = Overall height B = Track front/rear C = Overall width (excluding mirrors) D = Wheelbase E = Overall length 190 1.83 m (67.3 in.) 1.49 m (58.3 in.) 1.87 m (70.2 in.) 2.83 m (111.9 in.) 4.78 m (184.3 in.) - 1997 Mercury Mountaineer | Owner's Manual - Page 191
Capacities and specifications VEHICLE IDENTIFICATION NUMBER (VIN) 191 - 1997 Mercury Mountaineer | Owner's Manual - Page 192
of vehicles, it may order a recall and remedy campaign. However, NHTSA cannot become involved in individual problems between you, your dealer, or Ford Motor Company. To contact NHTSA, you may either call the Auto Safety Hotline toll-free at 1-800-424-9393 (or 366-0123 in the Washington, D.C. area - 1997 Mercury Mountaineer | Owner's Manual - Page 193
82,87 and child safety seats ...74,76,77,82,87 description ...73 indicator light ...74 Air cleaner filter replacing ...156 All Wheel Drive ...102 Anti-theft system ...56 arming the system ...56 disarming a triggered system ..57 disarming an untriggered system ...57 Audio system (see Electronic sound - 1997 Mercury Mountaineer | Owner's Manual - Page 194
...176 Liftgate ...39 Lights, warning and indicator .8,11 air bag ...8 anti-lock brakes (ABS) ...9 anti-theft ...10 brake ...9 charging system ...8 check engine ...10 check gauges ...8 door ajar ...8 fuel reset ...8 high beam ...9 overdrive off ...10 safety belt ...9 speed control ...9 turn signal - 1997 Mercury Mountaineer | Owner's Manual - Page 195
148 Rear climate control system ...45 Refill capacities for fluids ...185 Relays ...127,128 Remote entry system arming and disarming the anti-theft system ...52,54 locking/unlocking doors ...53 panic alarm ...53 replacement/additional transmitters ...55 replacing the batteries ...54 Repairing paint - 1997 Mercury Mountaineer | Owner's Manual - Page 196
Index Windshield defrosting ...21 Windshield washer fluid and wipers checking and replacing wiper blades ...156 operation ...24 196 - 1997 Mercury Mountaineer | Owner's Manual - Page 197
station information Fuel info Fuel tank capacity Engine oil specifications Tire size and pressure Hood release location Fuel filler location Unleaded only - 30 See Safety Compliance Certification Label on inside of driver door Bottom left of driver side instrument panel Left rear of vehicle 200
-
 1
1 -
 2
2 -
 3
3 -
 4
4 -
 5
5 -
 6
6 -
 7
7 -
8
-
9
-
10
-
11
-
12
-
13
-
14
-
15
-
16
-
17
-
18
-
19
-
20
-
21
-
22
-
23
-
24
-
25
-
26
-
27
-
28
-
29
-
30
-
31
-
32
-
33
-
34
-
35
-
36
-
37
-
38
-
39
-
40
-
41
-
42
-
43
-
44
-
45
-
46
-
47
-
48
-
49
-
50
-
51
-
52
-
53
-
54
-
55
-
56
-
57
-
58
-
59
-
60
-
61
-
62
-
63
-
64
-
65
-
66
-
67
-
68
-
69
-
70
-
71
-
72
-
73
-
74
-
75
-
76
-
77
-
78
-
79
-
80
-
81
-
82
-
83
-
84
-
85
-
86
-
87
-
88
-
89
-
90
-
91
-
92
-
93
-
94
-
95
-
96
-
97
-
98
-
99
-
100
-
101
-
102
-
103
-
104
-
105
-
106
-
107
-
108
-
109
-
110
-
111
-
112
-
113
-
114
-
115
-
116
-
117
-
118
-
119
-
120
-
121
-
122
-
123
-
124
-
125
-
126
-
127
-
128
-
129
-
130
-
131
-
132
-
133
-
134
-
135
-
136
-
137
-
138
-
139
-
140
-
141
-
142
-
143
-
144
-
145
-
146
-
147
-
148
-
149
-
150
-
151
-
152
-
153
-
154
-
155
-
156
-
157
-
158
-
159
-
160
-
161
-
162
-
163
-
164
-
165
-
166
-
167
-
168
-
169
-
170
-
171
-
172
-
173
-
174
-
175
-
176
-
177
-
178
-
179
-
180
-
181
-
182
-
183
-
184
-
185
-
186
-
187
-
188
-
189
-
190
-
191
-
192
-
193
-
194
-
195
-
196
-
197
 |
 |

BEFORE DRIVING
Introduction
2
Instrumentation
9
Controls and features
13
Seating and safety restraints
59
STARTING AND DRIVING
Starting your vehicle
89
Driving
96
Roadside emergencies
118
SERVICING
Maintenance and care
136
Capacities and specifications
185
Reporting safety defects
192
Index
193
Filling station information
200
Table of contents
1