1999 Mercury Cougar Owner Guide 1st Printing
1999 Mercury Cougar Manual
1999 Mercury Cougar manual content summary:
- 1999 Mercury Cougar | Owner Guide 1st Printing - Page 1
Contents Before driving Introduction Instrumentation Controls and features Seating and safety restraints Starting and driving Starting Driving Roadside emergencies Servicing Maintenance and care Capacities and specifications Customer assistance Reporting safety defects (U. S. only) Index All rights - 1999 Mercury Cougar | Owner Guide 1st Printing - Page 2
waste, cleaning and lubrication materials are significant steps towards protecting the environment. WARNINGS Provide information which may reduce the risk of personal injury and prevent possible of driving, vary speeds frequently. This is necessary to give the moving parts a chance to break in. 2 - 1999 Mercury Cougar | Owner Guide 1st Printing - Page 3
Introduction If possible, you should avoid full use of the brakes for the first 1 600 km (1 000 miles). INFORMATION ABOUT THIS GUIDE The information found in this guide was in effect at the time of printing. Ford may change the contents without notice and without incurring obligation. 3 - 1999 Mercury Cougar | Owner Guide 1st Printing - Page 4
Page 70 Turn signal/ high beams Page 6 Instrument cluster Page 69 Hazard flasher control Page 71 Windshield wiper/washer control Page 80 Luggage compartment release Page 175 Hood release 4 Page 69 Tilt steering wheel lever Page 72 Speed control * Page 68 Ignition switch Page 100 Air bag system - 1999 Mercury Cougar | Owner Guide 1st Printing - Page 5
computer Page 86 AntiĆtheft system status indicator On various models the appearance and location of some items may differ from those shown here. However, the page references given still apply. Page 10 Traction control system * Page 24 Rear window defroster control Page 25 Climate controls Page 30 - 1999 Mercury Cougar | Owner Guide 1st Printing - Page 6
Instrumentation INSTRUMENT CLUSTER LIGHTS AND CHIMES Check engine Your vehicle is equipped with a computer that monitors the engine's emission control system. This system is commonly known as the On Board Diagnostics System (OBD II). This OBD II system protects the environment by ensuring that your - 1999 Mercury Cougar | Owner Guide 1st Printing - Page 7
Instrumentation The check engine" indicator light illuminates when the ignition is first turned to the ON position to check the bulb. If it comes on after the engine is started, one of the engine's emission control systems may be malfunctioning. The light may illuminate without a driveability - 1999 Mercury Cougar | Owner Guide 1st Printing - Page 8
Instrumentation If the check engine" light remains on, have your vehicle serviced at the first available opportunity. Light is blinking: Engine misfire is occurring which could damage your catalytic converter. You should drive in a moderate fashion (avoid heavy acceleration and deceleration) and - 1999 Mercury Cougar | Owner Guide 1st Printing - Page 9
illuminates when the ignition is turned on. If the light fails to illuminate, continues to flash or remains on, have the system serviced immediately. Foglamps Illuminates when foglamps are switched on. Refer to Foglamp control in the Controls and features chapter for notes on use. Turn signals - 1999 Mercury Cougar | Owner Guide 1st Printing - Page 10
to on after each cycle of the ignition key. The light in the control illuminates when the system is switched off. Safety belt Illuminates when the ignition is switched on as a reminder to fasten the safety belts. For more information, refer to Safety belt warning light and warning chime in the - 1999 Mercury Cougar | Owner Guide 1st Printing - Page 11
not start the engine. See your dealer or a qualified service technician. Brake system warning Extinguishes when the parking brake is released. Illuminates after releasing the parking brake to indicate low brake fluid level or that the Electronic Brake Distribution system (part of the ABS) requires - 1999 Mercury Cougar | Owner Guide 1st Printing - Page 12
is turned on and the engine is off. Illuminates when the engine coolant level is low. If a valid signal is received, the light will remain on until the ignition is cycled. Refer to the Maintenance and care chapter to check the engine coolant level. Anti-lock brake system (ABS) (if equipped) Briefly - 1999 Mercury Cougar | Owner Guide 1st Printing - Page 13
If the flashing persists, have your transaxle serviced by your dealer or a qualified service technician as soon as possible. Automatic transaxle warning (if equipped) Illuminates when driving to indicate a possible malfunction with the transaxle. Have the system checked by your dealer or a qualified - 1999 Mercury Cougar | Owner Guide 1st Printing - Page 14
without starting the engine. The following warning and indicator lights should illuminate: charging system, safety belt (does not illuminate, if the driver's safety belt is fastened), low coolant, engine oil pressure, check engine, air bag readiness, traction control, brake system and ABS. The - 1999 Mercury Cougar | Owner Guide 1st Printing - Page 15
not in the ignition) and the driver's door is open. Key-in-ignition warning chime Sounds when the key is left in the off/lock or accessory position and the driver's door is open. Safety belt warning chime For information on the safety belt warning chime, refer to the Seating and safety restraints - 1999 Mercury Cougar | Owner Guide 1st Printing - Page 16
within the normal area. If it enters the red section, the engine is overheating. Stop the vehicle, switch off the ignition and let the engine cool. Refer to Engine coolant maintenance in the Maintenance and care chapter. Never remove the coolant reservoir cap while the engine is running or hot. 16 - 1999 Mercury Cougar | Owner Guide 1st Printing - Page 17
Instrumentation Tachometer Indicates the engine speed in revolutions per minute (rpm). Trip odometer Registers the distance traveled on individual journeys. Refer to Trip computer in the Controls and features chapter. Speedometer Indicates the current vehicle speed. Odometer Registers the total - 1999 Mercury Cougar | Owner Guide 1st Printing - Page 18
800 miles) or 358 days to indicate that routine service should be performed. Check your maintenance schedule to determine the routine service to be completed. Routine service should be performed by an authorized Ford or Lincoln/Mercury Dealer. The light should be switched off by your Ford or Lincoln - 1999 Mercury Cougar | Owner Guide 1st Printing - Page 19
ignition is cycled. Door ajar Illuminates when the ignition is switched on and any door or liftgate is open. Bulb failure Indicates the failure of an exterior bulb. The light stays illuminated until the brake pedal is depressed after starting the engine. Refer to Bulb Replacement in the Maintenance - 1999 Mercury Cougar | Owner Guide 1st Printing - Page 20
Controls and features INSTRUMENT PANEL CONTROLS Headlamp control Lamps off. Turn one position clockwise: Parking lamps, instrument panel lamps, license plate lamps and tail lamps on. Turn two positions clockwise: Headlamps on. 20 - 1999 Mercury Cougar | Owner Guide 1st Printing - Page 21
) system may not provide adequate lighting output during these conditions. Failure to activate your headlamps under these conditions may result in a collision. Panel dimmer control Adjust the control to vary the intensity of the panel lighting. Operates only when the exterior lights are switched on - 1999 Mercury Cougar | Owner Guide 1st Printing - Page 22
Controls and features Trip computer Press the SELECT button to change between temperature, average speed, tripmeter, distance the RESET button to set the function to zero (if resetable). Temperature Shows the outside air temperature. Average speed Shows the average speed since last reset. 22 - 1999 Mercury Cougar | Owner Guide 1st Printing - Page 23
Controls and features Tripmeter Shows how far you have traveled since last reset. Distance to empty Shows the approximate distance you can drive with the fuel remaining in the tank. Average fuel economy Shows the average fuel economy since last reset. Digital clock Switch the ignition on: The clock - 1999 Mercury Cougar | Owner Guide 1st Printing - Page 24
the rear window defroster. The defroster turns off automatically after 10 minutes or when the ignition is turned to the off position. To manually turn off the defroster, push the control again. The light in the control illuminates when the system is switched on. Front ashtray The ashtray is located - 1999 Mercury Cougar | Owner Guide 1st Printing - Page 25
Your vehicle has one of the following climate control systems: • Manual heating system • Manual heating and air conditioning system In some modes, the two systems function similarly. In modes where the systems do not function similarly, the different functions are noted. Vents Adjust as necessary - 1999 Mercury Cougar | Owner Guide 1st Printing - Page 26
the air conditioner removes considerable moisture from the air during operation, it is normal if clear water drips on the ground under the air conditioner drain while the system is working and even after you have stopped the vehicle. Under normal conditions, your vehicle's climate control system - 1999 Mercury Cougar | Owner Guide 1st Printing - Page 27
the instrument panel registers and the floor ducts. For added customer comfort, the air distributed through the floor ducts will be slightly warmer than the air sent to the instrument panel registers. If temperature is set to cool, the air will not be cooled below the outside temperature because the - 1999 Mercury Cougar | Owner Guide 1st Printing - Page 28
, the air conditioner (if equipped) will automatically dehumidify the air to prevent fogging. Operating Tips • For best cooling performance, select MAX A/C (if equipped) to cool the vehicle quickly. • To prevent humidity buildup inside the vehicle, don't drive with the climate control system in the - 1999 Mercury Cougar | Owner Guide 1st Printing - Page 29
can fall into the defroster outlets and block airflow and possibly damage your climate control system. Cabin air filter Your vehicle is equipped with an air filter that removes pollen and road dust from outside air before it is directed to the interior of the vehicle. Refer to the Maintenance - 1999 Mercury Cougar | Owner Guide 1st Printing - Page 30
Controls and features AUDIO SYSTEM Anti-theft protection panel To deter wouldĆbe thieves, the audio units have a removable front panel without which the unit will not work. Avoid touching the contacts on the back of the panel and do not use excessive force to refit it. Slide the security release - 1999 Mercury Cougar | Owner Guide 1st Printing - Page 31
Controls and features Replacement panels Your dealer will require the following if you need to order a replacement panel: 1. Your name and address. 2. The Vehicle Identification Number (visible on a plate mounted in the engine compartment). 3. The audio unit type (e.g., 4500, 4600). 4. Proof of - 1999 Mercury Cougar | Owner Guide 1st Printing - Page 32
Controls and features Radio reception To gain the best reception, always tune to the strongest station signal available. The following tips will help you gain the best reception from your audio system. AM reception Under most conditions, strong signals provide stable sound quality and little signal - 1999 Mercury Cougar | Owner Guide 1st Printing - Page 33
CD changer. On/ Off Bass control Treble control Balance control Volume control CD control button Waveband/ AutoStore selector Tape control buttons Fade control Station preset buttons AntiĆtheft protection panel release button SEEK tuning control MENU button AntiĆtheft protection panel 33 - 1999 Mercury Cougar | Owner Guide 1st Printing - Page 34
is compatible with a CD changer. On/ Off Bass control Treble control Balance control CD control/ eject Waveband/ AutoStore selector Volume control Fade control Station preset buttons AntiĆtheft protection panel release button SEEK tuning control AntiĆtheft protection panel MENU button 34 - 1999 Mercury Cougar | Owner Guide 1st Printing - Page 35
and features On/off (ON/OFF) This button can also operate the unit for up to one hour with the ignition turned off. The radio automatically switches off after one hour. Volume control (VOLUME) Press and the display indicates the level selected. See also Audio distortion reduction (CLIP). Bass - 1999 Mercury Cougar | Owner Guide 1st Printing - Page 36
for balance (left and right) adjustment. BAL" and the level selected appear in the display. Seek tuning control (SEEK) During radio reception, press or to locate the next station down or up the waveband selected. Waveband selector (AM/FM) • Press repeatedly during radio - 1999 Mercury Cougar | Owner Guide 1st Printing - Page 37
Controls and features AutoStore selector AutoStore selects six strong FM stations can be selected using the other preset buttons. • Alternatively, AutoStore can be used as an additional waveband to store other stations manually (see Station preset buttons). Station preset buttons Select a waveband - 1999 Mercury Cougar | Owner Guide 1st Printing - Page 38
Controls and features Stereo indicator The symbol shows whenever a stereo signal is received. CD changer Refer to the section 2060/2062 CD changer. MENU button (main features) - radio Use the MENU button to access main menu features and the SEEK button for adjustment. Manual tuning Press the MENU - 1999 Mercury Cougar | Owner Guide 1st Printing - Page 39
Controls and features Scan tuning Press the MENU button twice then use the SEEK button to start a scan. The radio tunes to and plays the next station on the waveband. . Pressing SEEK or MENU at any time will end the scan. VID LOCK appears in the radio display; this message should be disregarded. 39 - 1999 Mercury Cougar | Owner Guide 1st Printing - Page 40
SEEK button to turn this function on (AVC +1" to AVC +7") or off (AVC OFF"). • When selected, Automatic Volume Control increases or decreases the audio unit's volume level to compensate for engine and road speed noise. • The SEEK button provides a selection of settings between AVC OFF" and AVC - 1999 Mercury Cougar | Owner Guide 1st Printing - Page 41
has been eliminated. This means that while the display might change numerically, there may be no increase in sound. 4500 Units only Tape control buttons Insert a tape and playback will automatically override the radio or CD. TAPE" and a playback direction arrow appear in the display. 41 - 1999 Mercury Cougar | Owner Guide 1st Printing - Page 42
tape control button. During fast forward and rewind, radio reception is automatically restored (with Automatic Music Search function turned off). Auto reverse If the end of the tape is reached, auto reverse operates with playback resuming at the start - 1999 Mercury Cougar | Owner Guide 1st Printing - Page 43
Controls and features To pause tape playback Press AM/FM to pause tape audio unit is cleaned regularly with a wet cleaning cassette, which is available from your Ford or Lincoln/Mercury Dealer. MENU button (main features) - tape Use the MENU button to access main menu features, and the - 1999 Mercury Cougar | Owner Guide 1st Printing - Page 44
Controls and features Automatic Music Search (AMS) Press the MENU button once then use the SEEK button to turn this function on (AMSĆON") or off (AMSĆOFF"). With - 1999 Mercury Cougar | Owner Guide 1st Printing - Page 45
then use the SEEK button to turn this function on ("AVC ON") or off ("AVC OFF"). • When selected, Automatic Volume Control increases or decreases the audio unit's volume level to compensate for engine and road speed noise. • The SEEK button provides a selection of settings between AVC OFF" and AVC - 1999 Mercury Cougar | Owner Guide 1st Printing - Page 46
Controls and features 4600 units only CD Playback (8 cm and 12 cm CDs can be played) CD playback starts and radio reception is interrupted, when a CD is inserted into the entry slot. CD PLAY" appears in the display. Press CD/EJ to start playback from a CD already in the audio unit. If no disc - 1999 Mercury Cougar | Owner Guide 1st Printing - Page 47
, press CD/EJ twice. When ejected, the disc is held ready for removal. Pressing CD/EJ again will reinsert the ejected disc or, if it is left as it is, the disc will be pulled back inside the audio unit automatically, and retained ready for playback. CD care and maintenance For best possible - 1999 Mercury Cougar | Owner Guide 1st Printing - Page 48
Controls and features CD error codes Codes may be shown in the audio unit display the disc and try again. If error still shows, see your dealer. Ambient temperature too hot - unit will not work until it has cooled down. There is an eject fault, see your dealer. CD Changer Refer to the section 2060/ - 1999 Mercury Cougar | Owner Guide 1st Printing - Page 49
Controls and features Random track playback (SHUF) Press the MENU button once then use the SEEK button to turn this function on (SHUFĆON") or off (SHUFĆOFF"). With the function on, the elapsed time indicator is replaced by SHUF" as a new track is selected. If an optional CD changer is fitted, the - 1999 Mercury Cougar | Owner Guide 1st Printing - Page 50
then use the SEEK button to turn this function on (AVC ON") or off (AVC OFF"). • When selected, Automatic Volume Control increases or decreases the audio unit's volume level to compensate for engine and road speed noise. • The SEEK button provides a selection of settings between AVC OFF" and AVC - 1999 Mercury Cougar | Owner Guide 1st Printing - Page 51
Tape eject button button Automatic CD Audio Volume Compression Control CD shuffle play Waveband/ AutoStore selector CD control button Fade/ balance control Bass/treble control SEEK tuning control Station preset buttons AntiĆtheft protection panel release button AntiĆtheft protection panel MENU - 1999 Mercury Cougar | Owner Guide 1st Printing - Page 52
for up to one hour with the ignition turned off. The radio automatically switches off after one hour. • Rotate the control and the display indicates the volume level selected. See also Audio distortion reduction (CLIP). Bass/treble control (BASS/TREB) Press once for bass or twice for treble and use - 1999 Mercury Cougar | Owner Guide 1st Printing - Page 53
and features Seek tuning control (SEEK) During radio reception, press or to locate the next station down or up the on preset button 1. • Other stored stations can be selected using the other preset buttons. • Alternatively, AutoStore can be used as an additional waveband to store other stations - 1999 Mercury Cougar | Owner Guide 1st Printing - Page 54
and features Automatic Volume Control (AVC) When selected, Automatic Volume Control increases or decreases the audio unit's volume level to compensate for engine and road speed noise. The SEEK button provides a selection of settings between AVC OFF" and AVC +7". The display shows the level - 1999 Mercury Cougar | Owner Guide 1st Printing - Page 55
and features Tape controls • Inserting a tape overrides radio or CD playback and starts tape playback. • TAPE", PLAY" and press the TAPE button to start tape playback. • If TAPE is pressed when a cassette is not inserted, NO TAPE INSERTED" appears in the display. Automatic Music Search (AMS) - 1999 Mercury Cougar | Owner Guide 1st Printing - Page 56
RWD" (tape rewind) appear in the display. Press either side of the SEEK control to end fast forward or rewind and to restore tape playback. During fast forward reception is restored. To pause tape playback Press the CD button to start CD playback or AM/FM to restore radio reception. Tape eject ( - 1999 Mercury Cougar | Owner Guide 1st Printing - Page 57
Controls and features Cassette care and maintenance For best possible sound to access main menu features, and the SEEK button for adjustment. Manual tuning Press the MENU button once then use the SEEK button to make manual tuning adjustments. The FM waveband allows 200 kHz tuning steps and the - 1999 Mercury Cougar | Owner Guide 1st Printing - Page 58
Controls and features Scan tuning Press the MENU button twice then use the SEEK button to start a scan. The radio tunes to or off (CLIPĆOFF"). With the CLIP" feature activated, the audio unit automatically detects sound distortion and reduces the unit's volume level until the distortion has been - 1999 Mercury Cougar | Owner Guide 1st Printing - Page 59
. Loading the disc magazine The CD changer magazine takes up to six discs, numbered 1 to 6 starting from the bottom. To load a disc: • Slide open the CD changer unit door, press the eject button and remove the magazine. • Insert individual discs label side up into each slot until they click into - 1999 Mercury Cougar | Owner Guide 1st Printing - Page 60
Controls and features To eject a disc Pull forward the lever on the side of the magazine, which corresponds with the disc to be ejected. The disc will move forward ready for removal. To insert the magazine An arrow on the magazine shows how to reinsert it into the CD changer. The magazine clicks - 1999 Mercury Cougar | Owner Guide 1st Printing - Page 61
Controls and features OPERATING A CD CHANGER 4500 and 4700 units Press the CD button. CD" appears in the display along with a flashing number to indicate the disc selected. Playback overrides radio or tape playback. During normal operation, CDs and tracks are automatically selected and played - 1999 Mercury Cougar | Owner Guide 1st Printing - Page 62
Controls and features Without a CD in the 4600 unit Press CD/EJ once to operate the CD changer. Disc selection During CD playback, press the preset buttons to select and play a disc from the CD changer. Track selection Press SEEK to return to the start of the track being played. If pressed within - 1999 Mercury Cougar | Owner Guide 1st Printing - Page 63
CD changer playback 4500 units Press the AM/FM button to restore radio reception, or push the cassette controls partially in for tape playback. 4600 units • Press AM/FM to pause CD playback and restore TAPE for tape playback. To resume CD changer playback, press the changer control button. 63 - 1999 Mercury Cougar | Owner Guide 1st Printing - Page 64
Controls and features Disc/magazine missing • If the CD changer is selected but is not fitted, radio the display and the current disc remains selected. • If a selected disc is damaged or upside down, CHECK DISC" and the disc number are displayed. The unit then selects the next available disc. 64 - 1999 Mercury Cougar | Owner Guide 1st Printing - Page 65
Controls and features CD error codes Codes may be shown in the audio unit the disc and try again. If error still shows, see your dealer. Ambient temperature too hot - unit will not work until it has cooled down. MENU button (main features) - CD Use the MENU button to access main menu features, - 1999 Mercury Cougar | Owner Guide 1st Printing - Page 66
Controls and features Random track playback (SHUF) 4500 and 4600 units Press the MENU button once then use the SEEK button to turn this function on (SHUFĆON") or off (SHUFĆOFF"). With the function on, the elapsed time indicator is replaced by SHUF" as a new track is selected. If an optional CD - 1999 Mercury Cougar | Owner Guide 1st Printing - Page 67
then use the SEEK button to turn this function on (AVC ON") or off (AVC OFF"). • When selected, Automatic Volume Control increases or decreases the audio unit's volume level to compensate for engine and road speed noise. • The SEEK button provides a selection of settings between AVC OFF" and AVC - 1999 Mercury Cougar | Owner Guide 1st Printing - Page 68
and features STEERING COLUMN CONTROLS Ignition 1. Ignition off, steering wheel locked. On vehicles with automatic transaxles, the ignition key can return to this position only if the gearshift lever is in P (Park). 2. The accessory position. Steering unlocked, radio operational. Ignition and - 1999 Mercury Cougar | Owner Guide 1st Printing - Page 69
Controls and features 3. Ignition switched on, all electrical circuits operational. Warning and indicator lights illuminate. This key position is for normal driving. 4. Starter motor activated. Release the key as soon as the engine starts. Tilt steering Pull the locking lever on the steering column - 1999 Mercury Cougar | Owner Guide 1st Printing - Page 70
Controls and features Multi-function switch The turn signal functions are available only with the ignition switch on. Right turn signal Move the lever up. Left turn signal Move the lever down. Flash-to-pass Pull the lever toward you and release - 1999 Mercury Cougar | Owner Guide 1st Printing - Page 71
second position. • High: push lever up to the third position. For a single wipe, push the lever downward. Intermittent wiper control Rotate the variable intermittent wiper control to the desired speed. 1 = Short time interval 6 = Extended time interval Washer Pull the lever toward the steering wheel - 1999 Mercury Cougar | Owner Guide 1st Printing - Page 72
(if equipped) Do not use the speed control in heavy traffic or on roads that are winding, slippery, or unpaved. To turn speed control on • Press On. Vehicle speed cannot be controlled until the vehicle is travelling at or above 48 km/h (30 mph). Do not shift the gearshift lever into N (Neutral - 1999 Mercury Cougar | Owner Guide 1st Printing - Page 73
off • Press Off or • turn off the vehicle ignition. Once speed control is switched off, the previously programmed set speed will be erased. To set a speed Press +. For speed control to operate, the speed control must be on and the vehicle speed must be greater than 48 km/h (30 mph). If you drive - 1999 Mercury Cougar | Owner Guide 1st Printing - Page 74
Controls You may accelerate with the accelerator pedal at any time during speed control usage. Releasing the accelerator pedal will return your vehicle speed to speed. To set a lower speed • Press and hold -. Release the control when the desired vehicle speed is reached, or • press and release -. - 1999 Mercury Cougar | Owner Guide 1st Printing - Page 75
Controls and features To disengage speed control • Lightly depress the brake or clutch pedal. Disengaging the speed control will not erase the previously programmed set speed. To return to a set speed • Press =. For = to operate, the vehicle speed must be faster than 48 km/h (30 mph). 75 - 1999 Mercury Cougar | Owner Guide 1st Printing - Page 76
in the desired direction. Door delay Off On Sunroof (if equipped) The electric sunroof can be operated only when the ignition is switched on. On Off 12 SEC To lift the rear of the sunroof With the sunroof closed, press the rear part of the control. Press the front part of the control to lower the - 1999 Mercury Cougar | Owner Guide 1st Printing - Page 77
desired direction. Then turn the control back to the center position. Breakaway mirrors Due to safety reasons your door mirrors are designed to fold back when minor contact occurs. To return the door mirror to its original position, push it back into the mirror support. Heated mirrors (if equipped - 1999 Mercury Cougar | Owner Guide 1st Printing - Page 78
automatically. Momentarily press the down button. The driver's window will open fully. Press the up button to interrupt one touch operation. Power door locks Push to lock or unlock both doors. FLOOR MOUNTED CONTROLS Parking brake For information on the parking brake, refer to Preparing to start - 1999 Mercury Cougar | Owner Guide 1st Printing - Page 79
Controls and features Positive retention floor mat (Driver's side only) Position install. Adjust the floor mat position to allow proper operation of accelerator pedal, brake pedal and clutch pedal (if equipped). To remove, lift the floor mat just forward of the retention post and rotate it rearward - 1999 Mercury Cougar | Owner Guide 1st Printing - Page 80
LUGGAGE COMPARTMENT The luggage compartment lock has one locking position. Remote luggage compartment control Push the control located under the instrument panel by the driver's door to open the luggage compartment. To open the luggage compartment at least one door must be unlocked. Closing the - 1999 Mercury Cougar | Owner Guide 1st Printing - Page 81
Controls and features Cargo cover Do not place objects on the cargo cover. Removing the cargo cover First, detach the lifting straps on the liftgate. Then pull it out horizontally without tilting it. Replacing the cargo cover Insert the cover horizontally, align it and push in as far as the stop. - 1999 Mercury Cougar | Owner Guide 1st Printing - Page 82
system, you can lock and unlock the vehicle doors and open the luggage compartment without using a key. The remote also has a panic alarm feature. The remote entry feature only operates with the ignition in the off position. Locking the doors Press the control. To signal that the doors are locked - 1999 Mercury Cougar | Owner Guide 1st Printing - Page 83
direction indicators will flash for approximately two minutes. To deactivate the alarm, press the control again or turn the ignition key to the on position. Replacing the battery The transmitter is powered by one coinĆtype, threeĆvolt lithium battery. A decrease in operating range can be caused by - 1999 Mercury Cougar | Owner Guide 1st Printing - Page 84
Controls and features To replace the battery: 1. Twist a thin coin between the two halves of the transmitter. Do not take the front part of the transmitter apart. 2. Remove the old battery. 3. Place the positive (+) side of the new battery down. 4. Snap the two halves of the transmitter back - 1999 Mercury Cougar | Owner Guide 1st Printing - Page 85
ANTI-THEFT ALARM SYSTEM (if equipped) The system is available with Remote Keyless Entry. The system acts as a deterrent against unauthorized persons opening the doors, luggage compartment or hood. Activation The system is activated by pressing the control once. The ignition key must be removed - 1999 Mercury Cougar | Owner Guide 1st Printing - Page 86
is an engine immobilization system. It is an additional theft protection feature which prevents the engine from being started unless a coded key is used. Automatic arming The system is armed five seconds after switching off the ignition. The armed status is indicated when the control light flashes - 1999 Mercury Cougar | Owner Guide 1st Printing - Page 87
Functional check When the ignition is switched on, the control light will illuminate for approximately three seconds to indicate that the system is operating correctly. If the control light flashes rapidly for approximately one minute and then repeatedly at irregular intervals, the system did - 1999 Mercury Cougar | Owner Guide 1st Printing - Page 88
back to position 1 and remove from the ignition switch within 5 seconds - the key coding mode is now activated. • If an uncoded key is now inserted in the ignition switch and turned to position 3 within 10 seconds, this key is coded to the system. If coding is not completed correctly, the control - 1999 Mercury Cougar | Owner Guide 1st Printing - Page 89
desired height. Some vehicles are equipped with fourĆway head restraints which can be moved forward or backward as well as up and down. SEATING Manually adjusting the seats Pull the lever located under the front edge of the seat to move the seat forward or backward. Pull the lever on - 1999 Mercury Cougar | Owner Guide 1st Printing - Page 90
the seatback forward. Fold back the seatback until it locks with a distinct `click' and slide the seat backwards until it locks in position. Rock the the seat lock. Never adjust the driver's seat or seatback when the vehicle is moving. Power height adjustment (if equipped) The controls are located - 1999 Mercury Cougar | Owner Guide 1st Printing - Page 91
Height of the entire seat Seatback (3) Seatback inclination Lumbar support (4) Lumbar support Closing the liftgate To avoid injury to rear seat push the seatback upward until it locks in place. Make sure it is firmly latched by pushing forward and back on it. Check to see that the seat and - 1999 Mercury Cougar | Owner Guide 1st Printing - Page 92
of the vehicle, including the driver, should always properly wear their safety belt, even when the air bag SRS is provided. It is extremely dangerous to ride in a cargo area, inside or outside a collision resulting in the deployment of the front air bags, the front safety belts must be replaced. 92 - 1999 Mercury Cougar | Owner Guide 1st Printing - Page 93
in a controlled manner. This feature is designed to help reduce the belt force acting on the occupant's chest. After any vehicle collision, the seat belt system at all outboard seating positions (except driver, which has no automatic locking retractor" feature) must be checked by a qualified - 1999 Mercury Cougar | Owner Guide 1st Printing - Page 94
replaced, or the seat belt assembly automatic locking retractor" feature or any other seat belt function is not operating properly when checked according to the procedures in the Service Manual. Failure to replace and feel it lock. To unfasten, push the release button and remove the tongue from the - 1999 Mercury Cougar | Owner Guide 1st Printing - Page 95
the shoulder belt under the arm. 2. Never swing the lock to help reduce the forward movement of the driver and passengers. Automatic locking mode In this mode, the shoulder belt is automatically prelocked. The belt will still react to remove any slack in the shoulder belt. The automatic locking - 1999 Mercury Cougar | Owner Guide 1st Printing - Page 96
. For information on the proper use of a child safety seat, refer to Safety seats for children later in this chapter. Using automatic locking mode The automatic locking mode must be used when installing a child safety seat in any passenger seat. 1. Buckle the combination lap and shoulder belt until - 1999 Mercury Cougar | Owner Guide 1st Printing - Page 97
belt: 1. Push the release control lever down. 2. Slide the seat belt loop down. To raise the height of the shoulder belt: 1. Slide the seat belt loop upwards. 2. Pull down on the seat belt loop to make sure that it is locked in place. Safety belt warning light and warning chime Illuminates in the - 1999 Mercury Cougar | Owner Guide 1st Printing - Page 98
the belt with a safety belt extension (part number 611C22). Safety belt extensions are available warning light illuminates for one to two minutes and the warning chime sounds for four to eight seconds. The safety belt warning light and warning chime turn off. The safety belt warning light and warning - 1999 Mercury Cougar | Owner Guide 1st Printing - Page 99
systems periodically to make sure they work properly and are not damaged. Inspect the safety belts to make sure there are no nicks, wears or cuts and replace MUST be replaced after any collision causing the deployment of the front air bags. Failure to inspect and, if necessary, replace the safety - 1999 Mercury Cougar | Owner Guide 1st Printing - Page 100
restraint system is designed to work with the safety belt to help protect the driver and right front passenger from certain upper body injuries. Air bags DO NOT inflate slowly or gently and the risk of injury from a deploying air bag is the greatest close to the trim covering and the air bag module - 1999 Mercury Cougar | Owner Guide 1st Printing - Page 101
module. Placing objects on or over the air bag inflation area may cause those objects to be propelled by the air bag into your face and torso causing serious injury. Do not attempt to service, repair, or modify the Air Bag Supplemental Restraint System or its fuses. See your Ford or Lincoln-Mercury - 1999 Mercury Cougar | Owner Guide 1st Printing - Page 102
in this guide. Children must always be properly restrained. Accident statistics suggest that children are safer when properly restrained in the rear seating positions then in the front seating positions. Failure to follow these instructions may increase the risk of injury in a collision. Air bags - 1999 Mercury Cougar | Owner Guide 1st Printing - Page 103
and safety restraints How does the front air bag system work? The air bag SRS is designed to activate when the vehicle sustains sufficient longitudinal deceleration to cause the sensors to close an electrical circuit that initiates air bag inflation. The fact that the air bags did not inflate in - 1999 Mercury Cougar | Owner Guide 1st Printing - Page 104
from the air bag module as possible while maintaining vehicle control. Several air bag system components get hot after inflation. Do not touch them after inflation. If the air bag is inflated, the air bag will not function again and must be replaced immediately. If the air bag is not replaced, the - 1999 Mercury Cougar | Owner Guide 1st Printing - Page 105
Seating and safety restraints The diagnostic module monitors its own internal circuits and the supplemental air bag electrical system warning (including the impact sensors), the system wiring, the air bag system readiness light, the air bag back up power and the air bag ignitors. Determining if the - 1999 Mercury Cougar | Owner Guide 1st Printing - Page 106
of by qualified personal. Side air bag system (if equipped) Do not use accessory seat covers. The use of accessory seat covers may prevent the deployment of the side air bags and increase the risk of injury in an accident. Do not lean your head on the door; the side air bag could injure you as it - 1999 Mercury Cougar | Owner Guide 1st Printing - Page 107
service, repair, or modify the air bag Supplemental Restraint System or its fuses. See your Ford or LincolnĆMercury dealer. All occupants of the vehicle including the driver should always wear their safety belts even when an air bag SRS is provided. How does the side air bag system work? Side air - 1999 Mercury Cougar | Owner Guide 1st Printing - Page 108
air bag system consists of the following: • An inflatable nylon bag (air bag) with a gas generator concealed behind the outboard bolster of the driver and front passenger seatbacks. • The same warning light, electronic control and diagnostic unit as used for the front air bags. • Two crash sensors - 1999 Mercury Cougar | Owner Guide 1st Printing - Page 109
your dealership or by a qualified technician immediately. Unless serviced, the system may not function properly in the event of a collision. Disposal of air bags and air bag equipped vehicles For disposal of air bags or air bag equipped vehicles, see your local dealership or a qualified technician - 1999 Mercury Cougar | Owner Guide 1st Printing - Page 110
in your vehicle. Safety belts and seats can become hot in a vehicle that has been closed up in sunny weather; they could burn a small child. Check seat covers and buckles before you place a child anywhere near them. 110 - 1999 Mercury Cougar | Owner Guide 1st Printing - Page 111
you must put them in safety seats made especially for children. Check your local and state or provincial laws for specific requirements regarding the protect the child from injury in a collision. Always follow the instructions and warnings that come with any infant or child restraint you might use - 1999 Mercury Cougar | Owner Guide 1st Printing - Page 112
belts. Follow all the important safety restraints and air bag precautions that apply to adult passengers in your is labelled as conforming to all federal motor vehicle safety standards. BeltĆpositioning booster short to let the child sit all the way back on the seat cushion when the lower legs hang - 1999 Mercury Cougar | Owner Guide 1st Printing - Page 113
for the size and weight of the child. The best fit can be obtained with a child safety seat that has a base wide enough to span the depression of the rear seat so that it rests on the highest part of the seat cushion. Carefully follow all of the manufacturer's instructions with the safety - 1999 Mercury Cougar | Owner Guide 1st Printing - Page 114
• Put the safety belt in the automatic locking mode. Refer to Using automatic locking mode in this chapter. Ford recommends the forwardĆfacing child seat in the front seat, move the passenger seat as far back from the instrument panel as possible. Never secure rearĆfacing infant seats in the - 1999 Mercury Cougar | Owner Guide 1st Printing - Page 115
tongue through the child seat according to the child seat manufacturer's instructions. Be sure the belt webbing is not twisted. 4. Insert the securely by pulling on it. 5. To put the retractor in the automatic locking mode, grasp the shoulder portion of the belt and pull downward until all of - 1999 Mercury Cougar | Owner Guide 1st Printing - Page 116
to retract to remove any slack in the belt. 9. Before placing the child in the seat, forcibly tilt the seat forward and back to make sure the seat is securely held in place. 10. Try to pull the belt out of the retractor to make sure the retractor is in automatic locking mode (you - 1999 Mercury Cougar | Owner Guide 1st Printing - Page 117
seat backs in your vehicle. For infants, using a convertible accessory. Contact the manufacturer of your child safety seat for information about ordering a tether strap. To install a tethered child safety seat in the rear seat, you will need tether anchor hardware and must take the cargo area cover - 1999 Mercury Cougar | Owner Guide 1st Printing - Page 118
a tethered forwardĆfacing child safety seat in the rear seat, remove the cargo area cover and hook the top tether strap to the anchor in the safety seat reclines at the angle recommended in its instruction. When possible, Ford Motor Company recommends that children be restrained in the rear seats - 1999 Mercury Cougar | Owner Guide 1st Printing - Page 119
around the webbing near the center of the shoulder portion of the lap/shoulder belt. Tighten the tether strap. Tether anchor hardware Tether anchor hardware kits (part number 613D74), including instructions, may be obtained at no charge from any Ford or LincolnĆMercury dealer. All vehicles built - 1999 Mercury Cougar | Owner Guide 1st Printing - Page 120
PRECAUTIONS A computer system controls the engine's idle revolutions per minute (rpm). When the engine starts, the idle rpm runs faster to warm the engine. If the engine idle speed does not slow down automatically, have the vehicle checked by your dealer or a qualified service technician. Do not - 1999 Mercury Cougar | Owner Guide 1st Printing - Page 121
more instructions. IMPORTANT VENTILATION INFORMATION If the engine is idling while the vehicle is stopped in an open area for long periods of time, open the windows at least 2.5 cm (1 inch). Adjust the heating or air conditioning to bring in fresh air. Refer to climate controls in the Controls and - 1999 Mercury Cougar | Owner Guide 1st Printing - Page 122
Starting Improve vehicle ventilation by keeping all air inlet vents clear of snow, leaves and other and could kill you. Have the exhaust and body ventilation system checked whenever: • the vehicle is raised for service. • the sound of the exhaust system changes. • the vehicle has been damaged in - 1999 Mercury Cougar | Owner Guide 1st Printing - Page 123
PREPARING TO START THE VEHICLE Engine starting is controlled by the spark ignition system. This system meets all Canadian InterferenceĆ Causing Equipment standard requirements regulating the impulse electrical field strength of radio noise. When starting a fuelĆinjected engine, avoid pressing - 1999 Mercury Cougar | Owner Guide 1st Printing - Page 124
crank (turn over). • Put the gearshift into neutral. 3. Turn the key to the on position (without turning the key to start). Make sure the following lights illuminate: charging system (if equipped), low coolant, engine oil pressure, check engine, air bag readiness, traction control, brake system, ABS - 1999 Mercury Cougar | Owner Guide 1st Printing - Page 125
the 2.0 l engine: If the engine fails to start, continue to crank with the accelerator depressed about 1/4 of the way down and hold that position until the engine starts. DO NOT crank for more than 30 seconds or you could damage the starter. 4. After idling for a few seconds, apply the brake and - 1999 Mercury Cougar | Owner Guide 1st Printing - Page 126
BLOCK HEATER (IF EQUIPPED) An engine block heater warms the engine coolant, which improves starting, warms up the engine faster and allows the heaterĆdefroster system to respond quickly. It is strongly recommended if you live in a region where temperatures reach -23ºC (-10ºF) or below. For best - 1999 Mercury Cougar | Owner Guide 1st Printing - Page 127
the Scheduled Maintenance Guide" for maintenance intervals. Anti-lock braking system (ABS) (if equipped) On vehicles equipped with an antiĆlock braking system (ABS), a noise from the hydraulic pump motor and pulsation in the pedal may be observed during ABS braking events. Pedal pulsation coupled - 1999 Mercury Cougar | Owner Guide 1st Printing - Page 128
anti-lock braking system The ABS operates by detecting the onset of wheel lock up during brake applications and compensating for this tendency. The wheels are prevented from locking even when the brakes are firmly applied. Two important rules when braking in emergencies with ABS: Braking with ABS - 1999 Mercury Cougar | Owner Guide 1st Printing - Page 129
. 2. Press and hold the release button. 3. Push handle downward to the off position. Always set the parking brake fully and make sure that the gearshift is securely latched in P (Park) (automatic transaxle) or in 1 (first) (manual transaxle). To prevent personal injury, do not release the parking - 1999 Mercury Cougar | Owner Guide 1st Printing - Page 130
on and off, but the feature defaults to on after each cycle of the ignition key. The traction control system controls excessive wheel spin by automatically applying and releasing the brakes in conjunction with engine torque reductions. This can occur when accelerating on a slippery road, a loose - 1999 Mercury Cougar | Owner Guide 1st Printing - Page 131
effort needed to steer your vehicle changes at a constant vehicle speed, have the power steering checked. If the power steering system breaks down (or if the engine is turned off), you can steer the vehicle manually but it takes more effort. Never hold the steering wheel to the extreme right or left - 1999 Mercury Cougar | Owner Guide 1st Printing - Page 132
depressed: 1. Turn the ignition off and remove the ignition key. 2. Apply the parking brake and the brake pedal. 3. Insert a screwdriver or similar item about 5 cm (2 inches) into the square opening to the right of the gearshift at the base of the console. On vehicles without the opening, insert - 1999 Mercury Cougar | Owner Guide 1st Printing - Page 133
repairs completed promptly. The consoleĆmounted gearshift will lock when you turn the key to the lock position. When the gearshift is in any position except P (Park), the ignition key cannot be turned to lock or removed from the steering column. To remove do not hold the brake pedal down, your - 1999 Mercury Cougar | Owner Guide 1st Printing - Page 134
cluster. Drive (Drive) - O/D off illuminated Activate by pressing the transaxle control switch on the side of the gearshift lever. The transaxle operates in gears one through three. D (Drive) provides more engine braking than overdrive and is useful whenever driving conditions (i.e., city traffic - 1999 Mercury Cougar | Owner Guide 1st Printing - Page 135
is shut off and restarted, you must press the transaxle control switch to cancel overdrive operation if driving in overdrive is not desired. 2 (Second) Use 2 (Second) to startĆup on slippery roads or to provide additional engine braking on downgrades. 1 (First) Use 1 (Low) to provide maximum - 1999 Mercury Cougar | Owner Guide 1st Printing - Page 136
have a starter interlock that prevents cranking the engine unless the clutch pedal is fully depressed. Using the clutch When starting a vehicle with a manual transaxle: 1. Hold down the brake pedal. 2. Depress the clutch pedal. 3. Put the gearshift lever in neutral. 4. Start the vehicle. 5. Put the - 1999 Mercury Cougar | Owner Guide 1st Printing - Page 137
Driving Recommended shift speeds 2.0 litre engine 5-speed transaxle shift speed schedules Recommended upshifts: 25 33 48 During cruise*: km/h 19 32 46 64 mph 12 20 29 40 2.5 litre engine 5-speed transaxle shift speed schedules Recommended upshifts: Shift from First to second Second to third Third to - 1999 Mercury Cougar | Owner Guide 1st Printing - Page 138
your vehicle in neutral, it may move unexpectedly and injure someone. Use 1 (First) gear and set the parking brake. Reverse To shift into R (Reverse): 1. Completely stop your vehicle. 2. Depress the clutch pedal to the floor and place the gearshift lever in the neutral position. Do not release the - 1999 Mercury Cougar | Owner Guide 1st Printing - Page 139
not include passengers or aftermarket equipment. Payload Combined maximum allowable weight of passengers, cargo and optional equipment. The payload equals the gross vehicle weight rating minus base curb weight. GVW (Gross Vehicle Weight) Base curb weight plus the payload weight. The GVW is not - 1999 Mercury Cougar | Owner Guide 1st Printing - Page 140
GVWR is specific to each vehicle and is listed on the Safety Compliance Certification Label on the driver's door pillar. GAWR (Gross Axle Weight Rating) Carrying capacity for each axle system (front and rear). The GAWR is specific to each vehicle and is listed on the Safety Compliance Certification - 1999 Mercury Cougar | Owner Guide 1st Printing - Page 141
Driving Payload = GVWR minus Base curb weight To obtain the correct weight for your vehicle, take your vehicle to a shipping company or an inspection station for trucks. Do not use replacement tires with lower weight capacities than the originals because they might lower the vehicle's GVWR and GAWR. - 1999 Mercury Cougar | Owner Guide 1st Printing - Page 142
with a heavy load The total weight of the vehicle plus the total weight of passengers and cargo should never exceed the GVWR. The weight that the vehicle carries over the front and rear axles should never exceed the GAWR for the respective axle. The weight limits of your vehicle's tires affect - 1999 Mercury Cougar | Owner Guide 1st Printing - Page 143
a trailer of up to a maximum of 454 kg (1 000 lbs) gross trailer weight with a maximum tongue load of 45 kg (100 lbs). It should also have available through Ford or Lincoln/Mercury dealers. Trailer towing puts additional loads on your vehicle's engine, transaxle, axle, brakes, tires, and suspension. - 1999 Mercury Cougar | Owner Guide 1st Printing - Page 144
chapter. • Service your vehicle more frequently if you tow a trailer. Refer to the severe duty schedule in the Scheduled Maintenance Guide". • Do not tow a trailer until your vehicle has been driven at least 800 km (500 miles). • Refer to the instructions included with towing accessories for the - 1999 Mercury Cougar | Owner Guide 1st Printing - Page 145
weight. Towing trailers beyond the maximum recommended gross trailer weight could result in engine damage, transaxle damage, structural damage, loss of control . Auxiliary coolers are recommended for the power steering system and automatic transaxle system if you are planning on: • Traveling farther - 1999 Mercury Cougar | Owner Guide 1st Printing - Page 146
. See your local trailer retailer or rental agency for proper instructions and equipment for hooking up trailer lamps. Do not hook the trailer lamps directly into the vehicle's wiring system. If the trailer lamps are not working properly, the warning lights in the instrument cluster may not - 1999 Mercury Cougar | Owner Guide 1st Printing - Page 147
trailer brakes Use electric brakes or manual, automatic or surge type hydraulic brakes that meet federal and local regulations. Install and adjust brakes according to the manufacturer's instructions. Do not connect a trailer's hydraulic brake system directly to your vehicle's brake system. Your - 1999 Mercury Cougar | Owner Guide 1st Printing - Page 148
. Speed control (if equipped) may not work properly while towing on long, steep grades. If driving with an automatic transaxle: • Use D (Drive) or a low gear rather than D (Overdrive) while towing up or down steep inclines. • Anticipate stops and brake gradually. If driving with a manual transaxle - 1999 Mercury Cougar | Owner Guide 1st Printing - Page 149
, • driving with the brake pedal depressed, • sudden stops, • extended engine idling, • use of speed control in hilly terrain, • extended use of the air conditioner, defroster, rear window defroster and other accessories, • underinflated tires, • heavy loads, • aftermarket addĆons such as bike - 1999 Mercury Cougar | Owner Guide 1st Printing - Page 150
HAZARD FLASHER CONTROL Use only in an emergency to warn traffic of vehicle breakdown or approaching danger. Depress to activate. Depress again to switch off. The hazard lights can be operated when the ignition is off. FUEL PUMP SHUT-OFF SWITCH If the engine cranks, but does not start or does - 1999 Mercury Cougar | Owner Guide 1st Printing - Page 151
not reset the switch or try to start your vehicle. Have all the passengers get out of the vehicle and call the local fire department or a towing service. If your engine cranks but does not start after a collision or substantial jolt: 1. Turn the ignition key to the off position. 2. Check under the - 1999 Mercury Cougar | Owner Guide 1st Printing - Page 152
blow, have the vehicle's electrical system checked by your dealer or a qualified service technician. The passenger compartment fuse panel is located on the driver's side under the instrument panel. The power distribution box is located on the driver's side of the engine compartment. They contain the - 1999 Mercury Cougar | Owner Guide 1st Printing - Page 153
emergencies Power distribution box To check or replace a fuse or a relay, remove the cover of the fuse box in the engine compartment by releasing the latch (1) and lifting up. A blown fuse can be identified by a break in the wire. All fuses are a push fit. Reserve fuses with different ampere ratings - 1999 Mercury Cougar | Owner Guide 1st Printing - Page 154
Ignition, starting, headlamp switch Engine management Heater blower Not used Not used Main power supply to vehicle electrical supply (ignition relay) Not used Not used Not used Engine cooling fan Not used ABS, TCS Main power supply to vehicle electrical supply *Have these fuses replaced by your - 1999 Mercury Cougar | Owner Guide 1st Printing - Page 155
black black Description Fuel pump Engine management Air conditioning Low beam High beam Horn Starter High speed engine cooling fan Engine cooling fan Not used Daytime running lights (Canada only) Reverse voltage protection Air conditioning Passenger compartment fuse panel To check or replace a fuse - 1999 Mercury Cougar | Owner Guide 1st Printing - Page 156
a break in the wire. All fuses are a push fit. Relays in the passenger compartment fuse panel (below instrument panel) Relay R12 R13 R14 R15 R16 D2 Color brown green green green black black Description Courtesy lamps Rear window defrost Blower motor Front wiper Ignition Reverse voltage protection - 1999 Mercury Cougar | Owner Guide 1st Printing - Page 157
signal lamps, backup lamps, speed control, bulb outage module, gearshift lever, A/C clutch, blower motor Stop lamp, speed control Alarm system, locking system High beam, low beam Cigar lighter Power seats Rear window defrost Engine management, locking system, instrument cluster Panel dimmer, license - 1999 Mercury Cougar | Owner Guide 1st Printing - Page 158
is on firm, level ground. Secure your vehicle further by blocking the wheels. Activate the hazard lights. Apply the parking brake and engage first or reverse gear or, if the vehicle has an automatic transaxle, select the P (Park) position. If parking on a slope is unavoidable, block the wheels. 158 - 1999 Mercury Cougar | Owner Guide 1st Printing - Page 159
/h (50 mph) and only drive the shortest possible distance. • Do not exceed the permissible gross weight of the vehicle. • Do not install more than one spare wheel on your vehicle at any one time. • Do not use snow chains on this type of wheel. • Do not drive through an automatic car wash. 159 - 1999 Mercury Cougar | Owner Guide 1st Printing - Page 160
Roadside emergencies Spare tire location The spare tire and tools are located under the floor cover in the luggage compartment. Removing the spare tire and tools 1. Raise the rear of the floor cover in the luggage compartment and fold it forward. 2. Completely unscrew the bolt. 3. Lift out the - 1999 Mercury Cougar | Owner Guide 1st Printing - Page 161
procedure Removing a tire 1. Apply the parking brake and 1 (First) gear (manual transaxle) or the P (Park) position (automatic transaxle). beneath the hub cover (if fitted) and push in. Twist off to remove the cover. 6. Loosen the wheel nuts slightly. 7. Place jack with complete support surface on - 1999 Mercury Cougar | Owner Guide 1st Printing - Page 162
the jack by turning the handle counterclockwise. 4. Fully tighten the wheel nuts in a crosswise pattern. 5. Align the hub cover and push firmly into position with the ball of the hand. 6. Stow the jack and damaged tire in the luggage compartment by reversing the spare tire removal instructions. 162 - 1999 Mercury Cougar | Owner Guide 1st Printing - Page 163
or vehicle damage. Do not push start your vehicle. You could damage the catalytic converter. Batteries contain sulfuric acid which burns skin, eyes, and clothing, if contacted. Do not attempt to push start your vehicle. Automatic transaxles do not have pushĆstart capability. Preparing your vehicle - 1999 Mercury Cougar | Owner Guide 1st Printing - Page 164
two vehicles do not touch. Set the parking brake on both vehicles and stay clear of the engine cooling fan and other moving parts. 4. Check all battery terminals and remove any excessive corrosion before you attach the battery cables. Ensure that vent caps are tight and level. 5. Turn the heater fan - 1999 Mercury Cougar | Owner Guide 1st Printing - Page 165
metal part of the stalled vehicle's engine, away from the battery and the carburetor. The preferred locations of an exposed metal part (to ground" the circuit) are the accessible engine mount studs or an engine lifting eye". Do not use fuel lines, engine rocker covers, or the intake manifold - 1999 Mercury Cougar | Owner Guide 1st Printing - Page 166
Roadside emergencies Do not connect the end of the second cable to the negative (-) terminal of the battery to be jump. A spark may cause an explosion of the gases that surround the battery. • 2.0 litre engine • 2.5 litre engine 166 - 1999 Mercury Cougar | Owner Guide 1st Printing - Page 167
5. Be sure that the cables are clear of fan blades, belts and other moving parts of both engines. Jump starting 1. Start the engine of the booster vehicle and run the engine at a moderately increased speed. 2. Start the engine of the disabled vehicle. 3. Once the disabled vehicle has been - 1999 Mercury Cougar | Owner Guide 1st Printing - Page 168
(+) terminal of the booster vehicle's battery. 4. Remove the jumper cable from the positive (+) terminal of the disabled vehicle's battery. After the disabled vehicle has been started and the jumper cables removed, allow it to idle for several minutes so the engine computer can relearn" its idle - 1999 Mercury Cougar | Owner Guide 1st Printing - Page 169
a professional towing service or, if you are a member, your roadside assistance center. Recommended towing options include wheel lift towing or flat bed towing. When calling for a tow truck, tell the operator what kind of vehicle you have. A towing manual is available from Ford Motor Company for all - 1999 Mercury Cougar | Owner Guide 1st Printing - Page 170
brake. • Move the gearshift to N (Neutral). • Turn the key in the ignition to off. • Unlock the steering wheel. Automatic Manual transaxle Do not tow your vehicle at a speed faster than 90 km/h (55 mph). Your maximum towing distance is unlimited. Never use a tow bar that attaches to the bumper - 1999 Mercury Cougar | Owner Guide 1st Printing - Page 171
, your Ford or Lincoln/Mercury dealership can provide necessary parts and service. Check your Warranty Guide to find out which parts and services are covered. Use only recommended fuels, lubricants, fluids and service parts conforming to specifications. Motorcraft parts are designed and built to - 1999 Mercury Cougar | Owner Guide 1st Printing - Page 172
• Do not work on a hot engine. The cooling fan is automatic and may come on at any time. Always disconnect the negative terminal of the battery before working near the fan. • If you must work with the engine running, avoid wearing loose clothing or jewelry that could get caught in moving parts. Take - 1999 Mercury Cougar | Owner Guide 1st Printing - Page 173
and care Working with engine off (automatic transaxle) 1. Set the parking brake fully and ensure the gearshift is securely latched in P (Park). 2. Turn off the engine and remove the key. 3. Block the wheels to prevent the vehicle from moving unexpectedly. Working with engine off (manual transaxle - 1999 Mercury Cougar | Owner Guide 1st Printing - Page 174
to prevent the vehicle from moving unexpectedly. Do not start your engine with the air cleaner removed and do not remove it while the engine is running. Working with engine on (manual transaxle) 1. Set the parking brake, depress the clutch and place the gearshift in neutral. 2. Block the wheels - 1999 Mercury Cougar | Owner Guide 1st Printing - Page 175
, ensuring it is secure. Hold the support at the yellow colored insulation section. To close, replace the support strut in its retaining clip, lower the hood and allow it to drop into the catch for the last 20 - 30 cm (8 - 12 inches). Always check to ensure that the hood lock is fully engaged. 175 - 1999 Mercury Cougar | Owner Guide 1st Printing - Page 176
and care 2.0 litre EFI-engine compartment Power steering reservoir Engine coolant reservoir Automatic transaxle dipstick (if equipped) Brake fluid reservoir Air cleaner Windshield washer fluid reservoir Engine oil dipstick Engine oil filler cap Battery Power distribution box For ease - 1999 Mercury Cougar | Owner Guide 1st Printing - Page 177
and care 2.5 litre EFI-engine compartment Power steering reservoir Engine coolant reservoir Brake Automatic fluid transaxle reservoir dipstick (if equipped) Air cleaner Windshield washer fluid reservoir Engine oil dipstick Engine oil filler cap Battery Power distribution box For ease - 1999 Mercury Cougar | Owner Guide 1st Printing - Page 178
treatments. They are unnecessary and could, under certain conditions, lead to engine damage which is not covered by Ford or Lincoln/Mercury Warranty. Checking the engine oil Check the engine oil each time you fuel your vehicle. To check the oil: 1. Make sure the vehicle is on level ground. If - 1999 Mercury Cougar | Owner Guide 1st Printing - Page 179
oil must be removed from the engine by a service technician. 7. Put the dipstick back in and ensure it is fully seated. Continuous contact with used motor oil has caused cancer in laboratory mice. Adding engine oil 1. Check the engine oil. For instructions, refer to Checking the engine oil in this - 1999 Mercury Cougar | Owner Guide 1st Printing - Page 180
Guide" for additional information. It is recommended you use the appropriate Motorcraft oil filter (or another brand meeting Ford specifications) for your engine recycling center to find out more about recycling automotive fluids. Engine oil filler cap The design of the filler cap varies by engine. - 1999 Mercury Cougar | Owner Guide 1st Printing - Page 181
Maintenance and care Brake/clutch fluid reservoir Brake and clutch fluid systems are supplied from the same reservoir. The level of the fluid must lie between the MIN and MAX marks on the side of the reservoir. If the level falls below the MIN mark, the brake fluid level warning light on the - 1999 Mercury Cougar | Owner Guide 1st Printing - Page 182
requires, contact your local dealer. Adding engine coolant When the engine is cool, add a 50/50 mixture of engine coolant and water to the engine coolant recovery reservoir - DO NOT ADD DIRECTLY TO THE RADIATOR. Add straight water only in an emergency, but you should replace it with a 50/50 mixture - 1999 Mercury Cougar | Owner Guide 1st Printing - Page 183
and care Check the coolant level in the coolant recovery reservoir the next few times you drive the vehicle. If necessary, add enough of a 50/50 mixture of coolant and water to bring the liquid level to the fill mark on the reservoir. Never remove the coolant recovery cap while the engine is running - 1999 Mercury Cougar | Owner Guide 1st Printing - Page 184
Ford Motor Company recommends that Ford and LincolnĆMercury dealers use recycled engine coolant produced by FordĆapproved processes. Not all coolant recycling processes produce coolant which meets Ford specifications ESEĆM97B44ĆD, and use of such coolant may harm the engine and cooling system - 1999 Mercury Cougar | Owner Guide 1st Printing - Page 185
adding power steering fluid Check the power steering fluid twice a year. Switch off the engine. With the steering system at normal operating temperature, the fluid level should come up to the MAX mark. If the fluid level drops below the MIN mark, add the specified fluid. Remove the cap and fill to - 1999 Mercury Cougar | Owner Guide 1st Printing - Page 186
level should be checked if the transaxle is not working properly, i.e., if the transaxle slips or shifts slowly or if you notice some sign of fluid leakage. Transaxle fluid should be checked at normal operating temperatures of 66°C - 77°C (150°F - 170°F) on a level surface while engine is running in - 1999 Mercury Cougar | Owner Guide 1st Printing - Page 187
turned off for about thirty minutes to allow the fluid to cool before checking. 1. Park the vehicle on a level surface and engage the parking brake. 2. With the parking brake engaged and your foot on the brake pedal, start the engine and move the gearshift lever through all of the gear ranges. Allow - 1999 Mercury Cougar | Owner Guide 1st Printing - Page 188
the dipstick, wiping it clean with a clean, dry, lint free rag. 5. Install the dipstick making sure it is fully seated in the filler tube. 6. Remove the dipstick and inspect the fluid level. The fluid level should be in the crosshatched area on the dipstick. 7. If necessary, add fluid in .25 - 1999 Mercury Cougar | Owner Guide 1st Printing - Page 189
its life of service. However, for severe service usage or in high temperature climates, refer to the Scheduled Maintenance Guide" for additional information. Keep the electrolyte in each cell up to the level" indicator. Do not overfill the battery cell. For longer, troubleĆfree operation, keep - 1999 Mercury Cougar | Owner Guide 1st Printing - Page 190
be replaced with a Motorcraft service battery, identical in design technology. Like the original equipment battery, it should not require water addition during its normal life of service; however, for severe service usage or in high temperature climates, refer to the Scheduled Maintenance Guide - 1999 Mercury Cougar | Owner Guide 1st Printing - Page 191
normally produce explosive gases which can cause personal injury. Therefore, do not allow flames, sparks or lighted substances to come near the battery. When working near the battery, always shield your face and protect your eyes. Always provide proper ventilation. Follow these steps to minimize - 1999 Mercury Cougar | Owner Guide 1st Printing - Page 192
before your vehicle can drive properly. To begin this process: 1. Put the automatic transaxle gearshift in P (Park). Put the manual transaxle gearshift in neutral. 2. Turn off all accessories and start the vehicle. 3. Let the engine idle for at least one minute. 4. The relearning" process will - 1999 Mercury Cougar | Owner Guide 1st Printing - Page 193
Cabin air filter replacement In your climate control system, you have a filter that cleans the air before it enters the interior of the vehicle. This filter should be replaced at the intervals in the Scheduled Maintenance Guide". To replace the cabin air filter: 1. Remove both windshield wiper arms - 1999 Mercury Cougar | Owner Guide 1st Printing - Page 194
and remove the grille. 4. The filter is in a housing at the back of the engine compartment, on the left side. Pull off the two clips on the sides of the housing. Slide out the housing and filter. 5. Slide the filter out of the housing, replace with the new filter and slide the housing and cabin air - 1999 Mercury Cougar | Owner Guide 1st Printing - Page 195
set. Tire Quality Grades apply to new pneumatic tires for use on passenger cars. They do not apply to deep tread, winterĆtype snow tires, spaceĆ limited production tires as defined in Title 49 Code of Federal Regulation Part 575.104(c)(2). U.S. Department of TransportationĆTire quality grades: The - 1999 Mercury Cougar | Owner Guide 1st Printing - Page 196
rating based on the wear rate of the tire when tested under controlled conditions on a specified government test course. For example, a tire depart significantly from the norm due to variations in driving habits, service practices, and differences in road characteristics and climate. Traction AA A - 1999 Mercury Cougar | Owner Guide 1st Printing - Page 197
of heat and its ability to dissipate heat when tested under controlled conditions on a specified indoor laboratory test wheel. Sustained high corresponds to a level of performance which all passenger car tires must meet under the Federal Motor Vehicle Safety Standard No. 109. Grades B and - 1999 Mercury Cougar | Owner Guide 1st Printing - Page 198
. To check the tire pressure, insert the tire pressure gauge into the valve. The cold pressure amount is listed on the tire instruction decal located on the passenger's door. Improperly inflated tires can affect vehicle handling and can fail suddenly, possibly resulting in loss of vehicle control - 1999 Mercury Cougar | Owner Guide 1st Printing - Page 199
the wear band is visible through the tire treads. When replacing full size tires, never mix radial, biasĆbelted, or do not follow these precautions, your vehicle may not drive properly and safely. Do not replace your tires with high performance" tires or larger size tires. Failure to follow these - 1999 Mercury Cougar | Owner Guide 1st Printing - Page 200
instruction decal to determine the specific size tire and wheel Ford Motor Company recommends for use on this vehicle. When purchasing replacement tires for your vehicle, consult your dealer or a qualified service on these tire sizes may cause damage to steering, suspension, and body components. 200 - 1999 Mercury Cougar | Owner Guide 1st Printing - Page 201
Maintenance and care Follow these guidelines when using snow tires: • If possible, avoid fully loading your vehicle. • The suspension insulation and bumpers will help prevent vehicle damage. Do not remove these components from your vehicle when using snow tires. 201 - 1999 Mercury Cougar | Owner Guide 1st Printing - Page 202
in the fuel tank can damage the fuel system or cause it to work improperly in a collision. The fuel system may be under pressure. If the fuel cap is venting vapor or if you hear a hissing sound, wait until it stops before completely removing the cap. Automotive fuels can cause serious injury or - 1999 Mercury Cougar | Owner Guide 1st Printing - Page 203
the fuel cap is correctly fitted after fueling. Failure to do so may cause the on board diagnostic system to illuminate the light. • Automotive the skin, promptly remove contaminated clothing and wash skin thoroughly with soap and water. • If fuel is splashed in the eyes, remove contact lenses (if - 1999 Mercury Cougar | Owner Guide 1st Printing - Page 204
law and could damage your vehicle. The damage may not be covered by your warranty. Your vehicle was not designed to use fuel containing your engine will perform adequately on other gasolines, the performance of the emission control devices and systems may be adversely affected. Repair of damage - 1999 Mercury Cougar | Owner Guide 1st Printing - Page 205
areas that are sold with octane ratings of 86 or even less. Do not be concerned if your vehicle sometimes knocks lightly. However, if it knocks heavily under most driving conditions on the recommended octane, see your dealer or a qualified service technician to prevent any engine damage. 205 - 1999 Mercury Cougar | Owner Guide 1st Printing - Page 206
Maintenance and care Fuel quality If you are experiencing starting, rough idle or hesitation problems try a different brand of fuel. If the condition persists, see your dealer or qualified service technician. The American Automobile Manufacturers Association (AAMA) issued a gasoline specification to - 1999 Mercury Cougar | Owner Guide 1st Printing - Page 207
on when you start the engine, the fuel filler cap may not be properly installed. Turn off the engine, remove the fuel filler cap and reinstall it being careful to align the cap properly. If you must replace the fuel filler cap, replace it with an authorized Motorcraft part. The customer warranty may - 1999 Mercury Cougar | Owner Guide 1st Printing - Page 208
Maintenance and care Calculating fuel economy To accurately calculate your vehicle's fuel economy: 1. Fill the tank completely and record the initial odometer reading. 2. Each time you fill the tank, record the amount of fuel added (in litres or gallons). 3. After at least three to five fillĆups, - 1999 Mercury Cougar | Owner Guide 1st Printing - Page 209
EMISSION CONTROL SYSTEM Your vehicle is equipped with various emission control components and a catalytic converter which will enable your vehicle to comply with applicable exhaust emission standards. To make sure that the catalytic converter and other emission control components continue to work - 1999 Mercury Cougar | Owner Guide 1st Printing - Page 210
exhaust system, which can start a fire. Watch for fluid leaks, strange odors, smoke, loss of oil pressure, engine overheating, illumination of the charging system" warning light or the check engine" warning light. These events could indicate that the emission control system is not working properly - 1999 Mercury Cougar | Owner Guide 1st Printing - Page 211
or engine. By law, vehicle owners and anyone who manufactures, repairs, services, sells, leases, trades vehicles, or supervises a fleet of vehicles are not permitted to intentionally remove an emission control device or prevent it from working. Information about your vehicle's emission system is - 1999 Mercury Cougar | Owner Guide 1st Printing - Page 212
(OBDĆII) system. If your check engine" light is on, refer to the description in the Warning Lights and Chimes section of the Instrumentation chapter. Your vehicle may not pass the I/M test with the check engine" light on. If the vehicle's powertrain system or battery has just been serviced, the OB - 1999 Mercury Cougar | Owner Guide 1st Printing - Page 213
beam, turn signals and side lamps are housed in the lamp assembly. To replace a bulb, the complete lamp assembly has to be removed as follows: 1. Switch off the lamps. 2. Open the hood. 3. Remove the grille. 4. Remove the two screws (1) and loosen the screw (2). The screws are not interchangeable - 1999 Mercury Cougar | Owner Guide 1st Printing - Page 214
the bulb holder counterclockwise and pull it out. Pull the bulb out and replace it. Parking lamps Turn the socket counterclockwise and pull it out. Pull the bulb out and replace it. Opening the headlamp assembly Release the wire clip on the rear of the headlamp assembly and remove the cover. 214 - 1999 Mercury Cougar | Owner Guide 1st Printing - Page 215
care Headlamps - low beam Disconnect the electrical connector, turn the bulb holder counterclockwise and replace it. Do not touch the glass part of the bulb and pay attention to the tab guides when replacing. Headlamps - high beam Replacement instructions are the same as for the low beam headlamp - 1999 Mercury Cougar | Owner Guide 1st Printing - Page 216
pull the foglamp assembly out. 3. Disconnect the electrical connector. 4. Remove the cover from the rear of the foglamp assembly. 5. Disconnect the electrical connectors and release the wire clip from the bulb. 6. Install the new bulb in reverse order (do not touch the glass part of the bulb). 216 - 1999 Mercury Cougar | Owner Guide 1st Printing - Page 217
the complete light assembly to the front and pull it out. 2. Remove the glass from the assembly by turning it counterclockwise. 3. Pull the bulb out and replace it. Brake/turn signal/tail/backup lamps 1. From the trunk, remove the carpet cover from the lamp assembly. 2. Remove the three retainer - 1999 Mercury Cougar | Owner Guide 1st Printing - Page 218
the bulb out and replace it. Luggage compartment lamp Pry out the light assembly from the holder with a flat blade screwdriver. Turn the spherical bulb under slight pressure counterclockwise and remove. High mounted brake lamp Remove the push pins and cover from the liftgate. To remove the push - 1999 Mercury Cougar | Owner Guide 1st Printing - Page 219
(if equipped) Open the lamp assembly. The bulbs can be replaced after the contact plate has been hinged back. Bulb specifications Function Front /turn lamp Headlamp (high) Headlamp (low) Foglamp Rear tail/turn/brake lamp Backup lamp HighĆmounted brake lamp License plate lamp Side marker lamp Trade - 1999 Mercury Cougar | Owner Guide 1st Printing - Page 220
checked if: • Oncoming motorists frequently signal you to deactivate your high beams, and your high beams are not activated. • The headlamps do not seem to provide enough light direction shown by the embossed arrow markings on each headlamp body represents a change in aim direction either in the left - 1999 Mercury Cougar | Owner Guide 1st Printing - Page 221
Maintenance and care CAUTION: THE VERTICAL AIM MUST BE ADJUSTED FIRST. You will need a 6 mm Allen wrench or a Phillips screwdriver. If the vehicle has been in an accident, the vehicle's front structure should be properly aligned before aiming the headlamp. Adjusting the vertical aim 1. Park the - 1999 Mercury Cougar | Owner Guide 1st Printing - Page 222
Maintenance and care Adjusting the horizontal aim CAUTION: Do not adjust the horizontal aim until after adjusting the vertical aim. 1. Park the vehicle on a level surface. 2. The horizontal indicator and the adjusting screw are located behind the headlamp assembly. 3. Turn the horizontal adjusting - 1999 Mercury Cougar | Owner Guide 1st Printing - Page 223
CARE Washing your vehicle Only use car washing areas that have environmentally friendly drainage systems. Wash your vehicle regularly with cold or lukewarm water. Never use strong detergents or soap. If your vehicle is particularly dirty, use a quality car wash detergent. Always use a clean sponge - 1999 Mercury Cougar | Owner Guide 1st Printing - Page 224
they also cause damage to the vehicle. Remove or lower any exterior accessories before entering a car wash. Remove particles such as bird droppings, tree sap, insect remains, tar spots, road salt and industrial fallout immediately. After washing, apply the brakes several times to dry them. Waxing - 1999 Mercury Cougar | Owner Guide 1st Printing - Page 225
chips Minor scratches or paint damage from road debris may be repaired with touchĆup paint, paint repair foil or aerosol spray from the Ford accessories line. Observe the application instructions on the products. Cleaning the wheels Wash the wheels with the same detergent you use to clean the body - 1999 Mercury Cougar | Owner Guide 1st Printing - Page 226
high pressure fluid could penetrate the sealed parts and cause damage. • Do not spray with cold water as this may crack the engine block. • Cover the alternator and battery to prevent water damage when cleaning the engine. • Do not spray water directly on the ABS modulator. • Never wash or rinse the - 1999 Mercury Cougar | Owner Guide 1st Printing - Page 227
Use a vinyl cleaner for routine cleaning of plastic. Clean with a tar remover if necessary. Do not clean plastic parts with thinners, solvents or petroleumĆbased cleaners. Cleaning the exterior lamps Wash the exterior lamps with the same detergent you use to wash the exterior - 1999 Mercury Cougar | Owner Guide 1st Printing - Page 228
. Remove fresh spots immediately. Follow the directions that come with the cleaner. Do not saturate the seat cover with upholstery cleaner. Do not use chemical solvents or strong detergents when cleaning the seat mounted side air bag. Such products could contaminate the side air bag system and - 1999 Mercury Cougar | Owner Guide 1st Printing - Page 229
any collision. Safety belt assemblies not in use during a collision should also be inspected and replaced if either damage or improper operation is noted. Cleaning and caring for your vehicle Refer to the Customer Assistance Guide" for a list of FordĆapproved cleaners, polishes and waxes. 229 - 1999 Mercury Cougar | Owner Guide 1st Printing - Page 230
Control Information (VECI) decal for spark plug and gap specifications. ** If a spark plug is removed for examination, it must be reinstalled in the same cylinder. If a spark plug needs to be replaced, use only spark plugs with the service part number suffix letter FE" as shown on the engine - 1999 Mercury Cougar | Owner Guide 1st Printing - Page 231
qts)** 2.5 litre engine 5.5 l (5.8 qts) 5.0 l (5.3 qts) 9.6 l (10.2 qts) 9.5 l (10.0 qts)* 9.7 l (10.2 qts)** Manual transaxle Automatic transaxle Power steering Cooling system with heating Windshield washer fluid Fuel tank Braking system * ** Total capacity with automatic transaxle 2.6 l (2.7 qts - 1999 Mercury Cougar | Owner Guide 1st Printing - Page 232
Item Brake fluid Engine coolant (orange) Engine oil Power steering fluid Transaxle fluid automatic Transaxle fluid 5Ćspeed manual Windshield washer fluid Ford part name or equivalent High performance DOT 3 brake fluid or DOT 4 brake fluid Ford Extended Life Engine Coolant Motorcraft motor oil - 1999 Mercury Cougar | Owner Guide 1st Printing - Page 233
Cubic capacity Power output Max torque Fuel grade Continuous engine speed Max. intermittent engine speed Idle speed (manual transaxle) Mixture preparation Firing order Spark plug gap Ignition system Valve clearance (cold) * Mechanical valve adjuster 2.0 litre engine cm3 kW(HP) at rpm Nm (lbĆft.) at - 1999 Mercury Cougar | Owner Guide 1st Printing - Page 234
Capacities and specifications Dimensions A = Overall length B = Overall width (without mirrors) C = Overall height (curb weight) D = Wheelbase E = Track front rear mm (inches) 4699 (185) 1769 (69.6) 1325 (52.2) 2704 (106.5) 1506 (59.3) 1491 (58.7) 234 - 1999 Mercury Cougar | Owner Guide 1st Printing - Page 235
Capacities and specifications VEHICLE IDENTIFICATION NUMBER The vehicle identification number (VIN) is attached to a metal tag and is located on the front driver's side of the instrument panel. The VIN tag may be seen by looking through the windshield from the outside of the vehicle. 235 - 1999 Mercury Cougar | Owner Guide 1st Printing - Page 236
the Ford Auto Club by contacting your Ford or LincolnĆMercury dealer. Roadside assistance will cover • changing a flat tire • jumpĆstarts • lockĆout assistance • fuel delivery • towing to the nearest Ford of Canada or Ford Motor Company dealership, or towing to your selling dealership if within - 1999 Mercury Cougar | Owner Guide 1st Printing - Page 237
Customer assistance Ford extended service plan You can get more protection for your new car or light truck by purchasing Ford Extended Service Plan (Ford ESP) coverage. Ford ESP is an optional service contract which is backed by Ford Motor Company or Ford Motor Service Company (in the U.S.) and Ford - 1999 Mercury Cougar | Owner Guide 1st Printing - Page 238
vehicle needs service, or if you need more help than the dealership could provide after following the steps described above, contact the Ford Customer Assistance Center to find an authorized dealership to help you in the United States Ford Motor Company Customer Assistance Center 16800 Executive - 1999 Mercury Cougar | Owner Guide 1st Printing - Page 239
pursuing replacement or service without notice and without incurring obligations per applicable state law. What kinds of cases does the Board review? Unresolved warranty repair concerns or vehicle performance as designed concerns on Ford, Mercury and Lincoln cars and Ford, Mercury and Lincoln light - 1999 Mercury Cougar | Owner Guide 1st Printing - Page 240
customer and dealer except those associated with warranty repairs or concerns with the vehicle's performance as designed • a request for reimbursement of consequential expenses unless a service or product concern is being reviewed • items not covered Ford and LincolnĆMercury dealership management, - 1999 Mercury Cougar | Owner Guide 1st Printing - Page 241
license • the date of repair(s) and mileage at the time of occurrence(s) • the current mileage • the name of the dealer(s) who sold or serviced the vehicle • a brief description of your unresolved concern • a brief summary of the action taken by the dealer(s) and Ford Motor Company • the names (if - 1999 Mercury Cougar | Owner Guide 1st Printing - Page 242
: Ford Motor Company Customer Assistance Center 16800 Executive Plaza Drive P.O. Box 6248 Dearborn, Michigan 48121 UTILIZING THE MEDIATION/ARBITRATION PROGRAM (CANADA ONLY) In those cases where you continue to feel that the efforts by Ford and the dealer to resolve a factoryĆrelated vehicle service - 1999 Mercury Cougar | Owner Guide 1st Printing - Page 243
vehicle, contact a district or owner relations/customer assistance office. The use of leaded fuel in your vehicle without proper conversion may damage the effectiveness of your emission control system and may cause engine knocking or serious engine damage. Ford Motor Company/Ford of Canada is not - 1999 Mercury Cougar | Owner Guide 1st Printing - Page 244
is made from high quality materials and meets or exceeds Ford's rigid engineering and safety specifications. Ford accessories are warranted for up to 12 months or 20,000 km (12,000 miles) on all cars and light trucks and 12 months with unlimited distance on medium/heavy duty trucks unless the - 1999 Mercury Cougar | Owner Guide 1st Printing - Page 245
Dash trim Engine block heaters Gear shift knob Luggage presenter (Continental only) Manual sliding rear window Tire step Travel equipment Console Console armrest Daytime running lights Factory luggage rack Factory luggage rack adapters Fog lights Framed luggage covers HeavyĆduty battery Neutral - 1999 Mercury Cougar | Owner Guide 1st Printing - Page 246
and appearance equipment Air bag antiĆtheft locks Bed mat/bedliner tailgate covers Bed mats Bedliners Car/truck covers Cargo liners, interior Carpet floor mats Cleaners, waxes and polishes Flat splash guards Frond end covers (full and mini) Hood deflectors Locking gas cap Lubricants and oils - 1999 Mercury Cougar | Owner Guide 1st Printing - Page 247
Customer assistance • Mobile communications systems may harm the operation of your vehicle, particularly if they are not properly designed for automotive use or are not properly installed. When operated, such systems may cause the engine to stumble or stall. In addition, such systems may be damaged - 1999 Mercury Cougar | Owner Guide 1st Printing - Page 248
safety defect exists in a group of vehicles, it may order a recall and remedy campaign. However, NHTSA cannot become involved in individual problems between you, your dealer or Ford Motor Company. To contact NHTSA, you may either call the Auto Safety Hotline tollĆfree at 1Ć800Ć424Ć9393 (202Ć366Ć0123 - 1999 Mercury Cougar | Owner Guide 1st Printing - Page 249
Air bag system, side ...106 Air conditioning ...27 Air filter ...230 Alarm, activating panic ...83 AntiĆlock brake system (ABS) light ...12 AntiĆlock braking system (ABS) 127 AntiĆtheft system ...86 Antifreeze. See Engine coolant Ashtray ...24 Audio controls ...33, 51 Audio system ...30 Audio system - 1999 Mercury Cougar | Owner Guide 1st Printing - Page 250
...70 Floor mat ...79 Floor mounted controls ...78 Foglamps ...9, 21 Foglamps, replacing bulbs ...216 Frost warning light ...18 Fuel consumption ...149 Fuel filler cap ...206 Fuel filter ...230 Fuel for cleaner air ...206 Fuel gauge ...17 Fuel pump shutĆoff switch . 79, 150 Fuel quality ...206 Fuel - 1999 Mercury Cougar | Owner Guide 1st Printing - Page 251
...13, 134 Overhead controls ...76 Overhead warning lights ...18 Owner's literature ...247 P Panel dimmer control ...21 Panic alarm ...83 Parking brake ...78, 129 Parking lamps, replacing bulbs ...214, 217 Parts ...230 Passenger compartment fuse panel ...155 Passive antiĆtheft system (PATS) ...86 - 1999 Mercury Cougar | Owner Guide 1st Printing - Page 252
, 170 Traction control light ...10 Traction control system 10, 24, 130 Trailer towing ...143 Transaxle ...131 Transaxle, automatic ...231, 232 Transaxle, manual ...231, 232 Trip computer ...22 Trip odometer ...17 Trunk. See Luggage compartment Turn signal, replacing front bulbs ...214 Turn signals - 1999 Mercury Cougar | Owner Guide 1st Printing - Page 253
care ...223 Vehicle Emission Control Information (VECI) ...209, 211 Vehicle identification number (VIN) ...235 Ventilating your vehicle ...121 Vents ...25 Viscosity. See Engine oil W Washer fluid warning light ...19 Washing your vehicle ...223 Waxing your vehicle ...224 Weight limits ...139 Wheels - 1999 Mercury Cougar | Owner Guide 1st Printing - Page 254
254 - 1999 Mercury Cougar | Owner Guide 1st Printing - Page 255
255 - 1999 Mercury Cougar | Owner Guide 1st Printing - Page 256
tank capacity Engine oil Tire size and pressure Hood release location Fuel filler location UNLEADED FUEL ONLY Octane 87 58.5 litres (15.4 gallons) Use Motorcraft 5WĆ30 Formula E Fuel Economy Motor Oil, Ford specification WSSĆM2C153ĆG Refer to the tire instruction decal on the passenger's door Pull
-
 1
1 -
 2
2 -
 3
3 -
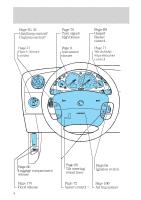 4
4 -
 5
5 -
 6
6 -
 7
7 -
8
-
9
-
10
-
11
-
12
-
13
-
14
-
15
-
16
-
17
-
18
-
19
-
20
-
21
-
22
-
23
-
24
-
25
-
26
-
27
-
28
-
29
-
30
-
31
-
32
-
33
-
34
-
35
-
36
-
37
-
38
-
39
-
40
-
41
-
42
-
43
-
44
-
45
-
46
-
47
-
48
-
49
-
50
-
51
-
52
-
53
-
54
-
55
-
56
-
57
-
58
-
59
-
60
-
61
-
62
-
63
-
64
-
65
-
66
-
67
-
68
-
69
-
70
-
71
-
72
-
73
-
74
-
75
-
76
-
77
-
78
-
79
-
80
-
81
-
82
-
83
-
84
-
85
-
86
-
87
-
88
-
89
-
90
-
91
-
92
-
93
-
94
-
95
-
96
-
97
-
98
-
99
-
100
-
101
-
102
-
103
-
104
-
105
-
106
-
107
-
108
-
109
-
110
-
111
-
112
-
113
-
114
-
115
-
116
-
117
-
118
-
119
-
120
-
121
-
122
-
123
-
124
-
125
-
126
-
127
-
128
-
129
-
130
-
131
-
132
-
133
-
134
-
135
-
136
-
137
-
138
-
139
-
140
-
141
-
142
-
143
-
144
-
145
-
146
-
147
-
148
-
149
-
150
-
151
-
152
-
153
-
154
-
155
-
156
-
157
-
158
-
159
-
160
-
161
-
162
-
163
-
164
-
165
-
166
-
167
-
168
-
169
-
170
-
171
-
172
-
173
-
174
-
175
-
176
-
177
-
178
-
179
-
180
-
181
-
182
-
183
-
184
-
185
-
186
-
187
-
188
-
189
-
190
-
191
-
192
-
193
-
194
-
195
-
196
-
197
-
198
-
199
-
200
-
201
-
202
-
203
-
204
-
205
-
206
-
207
-
208
-
209
-
210
-
211
-
212
-
213
-
214
-
215
-
216
-
217
-
218
-
219
-
220
-
221
-
222
-
223
-
224
-
225
-
226
-
227
-
228
-
229
-
230
-
231
-
232
-
233
-
234
-
235
-
236
-
237
-
238
-
239
-
240
-
241
-
242
-
243
-
244
-
245
-
246
-
247
-
248
-
249
-
250
-
251
-
252
-
253
-
254
-
255
-
256
 |
 |

Introduction
2
Instrumentation
4
Controls and features
20
Seating and safety restraints
89
Starting
120
Driving
127
Roadside
emergencies
150
Maintenance and care
171
Capacities and specifications
230
Customer assistance
236
Reporting safety defects (U. S. only)
248
Index
249
Contents
Before driving
Starting and driving
Servicing
All rights reserved. Reproduction by any means, electronic or mechanical
including photocopying, recording or by any information storage and retrieval
system or translation in whole or part is not permitted without written
authorizationfromFordMotorCompany.
Copyright
E
1999FordMotorCompany