1999 Mercury Villager Owner's Manual - Page 225
1999 Mercury Villager Manual
Page 225 highlights
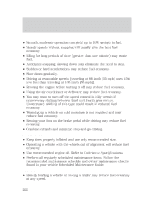
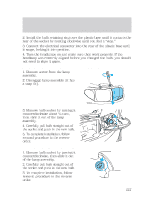
Maintenance and care condition. To ready the on-board diagnostics system for I/M testing, follow the procedure described below: 1. Allow the engine to cool to ambient temperature (the engine coolant temperature gauge indicator will point to C). 2. Start the engine and let it run until it reaches normal operating temperature (the engine coolant temperature gauge indicator will be near the center of the normal area between H and C). 3. Accelerate the vehicle to 88 km/h (55 mph), then quickly release the accelerator pedal completely for at least six seconds. 4. Quickly depress the accelerator pedal for a moment, then drive the vehicle at a speed of 86 to 96 km/h (53 to 60 mph) for at least five minutes. 5. Bring the vehicle to a complete stop. 6. Accelerate the vehicle to 55 km/h (35 mph), and maintain the speed for 20 seconds. 7. Repeat steps five and six at least three times. 8. Accelerate the vehicle to 88 km/h (55 mph), and maintain the speed for at least three minutes. 9. Bring the vehicle to a complete stop and turn the engine off. 10. Repeat steps one through nine at least one more time. If step one through eight are interrupted, repeat the preceding step. Any safe driving mode is acceptable between steps. Once started, do not turn off the engine until step seven is completed. EXTERIOR BULBS Replacing exterior bulbs It is a good idea to check the operation of the following lights frequently: • Headlamps • Turn signals • Cornering lamps • High-mount brakelamp • Tail lamps • Brakelamps • Backup lamps • License plate lamps 225
-
 1
1 -
2
-
3
-
4
-
5
-
6
-
7
-
8
-
9
-
10
-
11
-
12
-
13
-
14
-
15
-
16
-
17
-
18
-
19
-
20
-
21
-
22
-
23
-
24
-
25
-
26
-
27
-
28
-
29
-
30
-
31
-
32
-
33
-
34
-
35
-
36
-
37
-
38
-
39
-
40
-
41
-
42
-
43
-
44
-
45
-
46
-
47
-
48
-
49
-
50
-
51
-
52
-
53
-
54
-
55
-
56
-
57
-
58
-
59
-
60
-
61
-
62
-
63
-
64
-
65
-
66
-
67
-
68
-
69
-
70
-
71
-
72
-
73
-
74
-
75
-
76
-
77
-
78
-
79
-
80
-
81
-
82
-
83
-
84
-
85
-
86
-
87
-
88
-
89
-
90
-
91
-
92
-
93
-
94
-
95
-
96
-
97
-
98
-
99
-
100
-
101
-
102
-
103
-
104
-
105
-
106
-
107
-
108
-
109
-
110
-
111
-
112
-
113
-
114
-
115
-
116
-
117
-
118
-
119
-
120
-
121
-
122
-
123
-
124
-
125
-
126
-
127
-
128
-
129
-
130
-
131
-
132
-
133
-
134
-
135
-
136
-
137
-
138
-
139
-
140
-
141
-
142
-
143
-
144
-
145
-
146
-
147
-
148
-
149
-
150
-
151
-
152
-
153
-
154
-
155
-
156
-
157
-
158
-
159
-
160
-
161
-
162
-
163
-
164
-
165
-
166
-
167
-
168
-
169
-
170
-
171
-
172
-
173
-
174
-
175
-
176
-
177
-
178
-
179
-
180
-
181
-
182
-
183
-
184
-
185
-
186
-
187
-
188
-
189
-
190
-
191
-
192
-
193
-
194
-
195
-
196
-
197
-
198
-
199
-
200
-
201
-
202
-
203
-
204
-
205
-
206
-
207
-
208
-
209
-
210
-
211
-
212
-
213
-
214
-
215
-
216
-
217
-
218
-
219
-
 220
220 -
 221
221 -
 222
222 -
 223
223 -
 224
224 -
 225
225 -
 226
226 -
 227
227 -
 228
228 -
 229
229 -
 230
230 -
231
-
232
-
233
-
234
-
235
-
236
-
237
-
238
-
239
-
240
-
241
-
242
-
243
-
244
-
245
-
246
-
247
-
248
-
249
-
250
-
251
-
252
-
253
-
254
-
255
-
256
-
257
-
258
-
259
-
260
-
261
-
262
-
263
-
264
 |
 |
