2004 Mercury Monterey Owner's Manual - Page 53
2004 Mercury Monterey Manual
Page 53 highlights
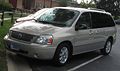
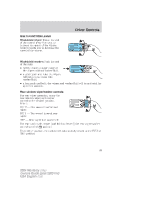
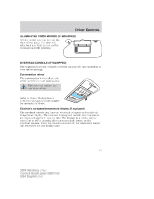
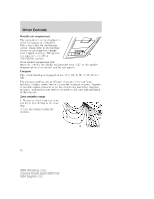
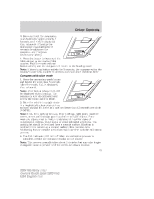
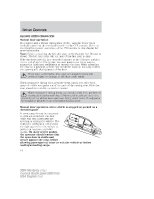
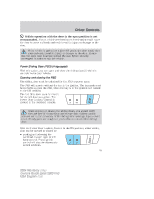
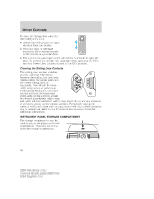
Driver Controls 3. Press and hold the momentary push-button for approximately 4 seconds, until VAR is displayed, then release it. (Pressing the momentary push-button for 8 seconds de-calibrates the compass-see Compass Calibration Mode). 4. Press the button to increment the VAR number to the desired VAR number. Wait 5 seconds without button activity and the compass will return to the heading mode. Note: If there is no button activity for 5 seconds, the compass writes the displayed zone VAR number to memory and exits Zone Variation Mode Compass calibration mode 1. Press the momentary push button and hold it for more than 8 seconds. After 8 seconds, CAL is displayed, then release it. Note: After button release CAL will be displayed with a heading. The compass is now de-calibrated and enters the Initial AutoCal Mode. 2. Drive the vehicle in a tight circle in a magnetically clean area such as an open parking lot. Drive at a rate not faster than 15 seconds per circle (5 MPH). Note: Look for a parking lot away from buildings, light posts, manhole covers, sewer and drainage grates and other metallic objects. Some magnetic objects may be hidden underground. Look for signs of underground utilities, water mains or other industrial structures. The parking lot should be level and have a smooth surface. Blacktop is preferred over cement as a cement surface often contains iron reinforcing bars or metallic mesh that could interfere with the calibration process. • The CAL indication will turn off when the calibration process is complete, leaving the compass heading on the display. Note: This process normally takes about 11⁄2 circles but may take longer if magnetic noise is present or if the circles are driven too fast. 53 2004 Monterey (mty) Owners Guide (post-2002-fmt) USA English (fus)
-
 1
1 -
2
-
3
-
4
-
5
-
6
-
7
-
8
-
9
-
10
-
11
-
12
-
13
-
14
-
15
-
16
-
17
-
18
-
19
-
20
-
21
-
22
-
23
-
24
-
25
-
26
-
27
-
28
-
29
-
30
-
31
-
32
-
33
-
34
-
35
-
36
-
37
-
38
-
39
-
40
-
41
-
42
-
43
-
44
-
45
-
46
-
47
-
 48
48 -
 49
49 -
 50
50 -
 51
51 -
 52
52 -
 53
53 -
 54
54 -
 55
55 -
 56
56 -
 57
57 -
 58
58 -
59
-
60
-
61
-
62
-
63
-
64
-
65
-
66
-
67
-
68
-
69
-
70
-
71
-
72
-
73
-
74
-
75
-
76
-
77
-
78
-
79
-
80
-
81
-
82
-
83
-
84
-
85
-
86
-
87
-
88
-
89
-
90
-
91
-
92
-
93
-
94
-
95
-
96
-
97
-
98
-
99
-
100
-
101
-
102
-
103
-
104
-
105
-
106
-
107
-
108
-
109
-
110
-
111
-
112
-
113
-
114
-
115
-
116
-
117
-
118
-
119
-
120
-
121
-
122
-
123
-
124
-
125
-
126
-
127
-
128
-
129
-
130
-
131
-
132
-
133
-
134
-
135
-
136
-
137
-
138
-
139
-
140
-
141
-
142
-
143
-
144
-
145
-
146
-
147
-
148
-
149
-
150
-
151
-
152
-
153
-
154
-
155
-
156
-
157
-
158
-
159
-
160
-
161
-
162
-
163
-
164
-
165
-
166
-
167
-
168
-
169
-
170
-
171
-
172
-
173
-
174
-
175
-
176
-
177
-
178
-
179
-
180
-
181
-
182
-
183
-
184
-
185
-
186
-
187
-
188
-
189
-
190
-
191
-
192
-
193
-
194
-
195
-
196
-
197
-
198
-
199
-
200
-
201
-
202
-
203
-
204
-
205
-
206
-
207
-
208
-
209
-
210
-
211
-
212
-
213
-
214
-
215
-
216
-
217
-
218
-
219
-
220
-
221
-
222
-
223
-
224
-
225
-
226
-
227
-
228
-
229
-
230
-
231
-
232
-
233
-
234
-
235
-
236
-
237
-
238
-
239
-
240
-
241
-
242
-
243
-
244
-
245
-
246
-
247
-
248
-
249
-
250
-
251
-
252
-
253
-
254
-
255
-
256
-
257
-
258
-
259
-
260
-
261
-
262
-
263
-
264
-
265
-
266
-
267
-
268
-
269
-
270
-
271
-
272
-
273
-
274
-
275
-
276
-
277
-
278
-
279
-
280
 |
 |