2009 Mercury Mariner Owner's Manual
2009 Mercury Mariner Manual
2009 Mercury Mariner manual content summary:
- 2009 Mercury Mariner | Owner's Manual - Page 1
36 36 39 42 Lights Headlamps Turn signal control Bulb replacement 43 43 47 49 Driver Controls Windshield wiper/washer control Steering wheel adjustment Power windows Mirrors Speed control Moon roof Message center 55 55 56 61 63 64 69 70 1 2009 Mariner (mrn) Owners Guide, 2nd Printing USA (fus - 2009 Mercury Mariner | Owner's Manual - Page 2
193 198 201 208 212 Roadside Emergencies Getting roadside assistance Hazard flasher control Fuel pump shut-off switch Fuses and relays Changing tires Wheel lug nut torque Jump starting Wrecker towing 221 221 222 223 223 230 241 242 248 2 2009 Mariner (mrn) Owners Guide, 2nd Printing USA (fus) - 2009 Mercury Mariner | Owner's Manual - Page 3
) 250 256 256 Cleaning Maintenance and Specifications Engine compartment Engine oil Battery Engine coolant Fuel information Air filter(s) Part numbers Maintenance product specifications and capacities Engine data 257 265 267 271 275 277 283 297 299 300 302 Accessories Index 305 307 All rights - 2009 Mercury Mariner | Owner's Manual - Page 4
automatically cut off the fuel supply to the engine. The switch can also be activated through sudden vibration (e.g. collision when parking). To reset the switch, refer to the Fuel pump shut-off switch in the Roadside Emergencies chapter. 4 2009 Mariner (mrn) Owners Guide, 2nd Printing USA (fus - 2009 Mercury Mariner | Owner's Manual - Page 5
vehicle such as airbag modules, seat belt pretensioners, and button cell batteries may contain Perchlorate Material - Special handling may apply for service or vehicle end of life disposal. See www.dtsc.ca.gov/hazardouswaste/perchlorate. 5 2009 Mariner (mrn) Owners Guide, 2nd Printing USA (fus - 2009 Mercury Mariner | Owner's Manual - Page 6
in. Drive your new Guide/Customer Information Guide that is provided to you along with your Owner's Guide. Special instructions modules in the vehicle, such as engine, throttle, steering or brake systems. In order to properly diagnose and service your vehicle, Ford 6 2009 Mariner (mrn) Owners Guide - 2009 Mercury Mariner | Owner's Manual - Page 7
other details about the vehicle or crash to assist 911 operators to provide the most appropriate emergency services. If you do not want to disclose this information, do not activate the feature. See your SYNC supplement for more information. 7 2009 Mariner (mrn) Owners Guide, 2nd Printing USA (fus) - 2009 Mercury Mariner | Owner's Manual - Page 8
when using any device that may take their focus off the road. The driver's primary responsibility is the safe operation of their vehicle. Only use cell phones and other devices not essential to the driving task when it is safe to do so. 8 2009 Mariner (mrn) Owners Guide, 2nd Printing USA (fus) - 2009 Mercury Mariner | Owner's Manual - Page 9
vehicle. This Owner's Guide is written primarily for the U.S. and Canadian Markets. Features or equipment listed as standard may be different on units built for Export. Refer to this Owner's Guide for all other required information and warnings. 9 2009 Mariner (mrn) Owners Guide, 2nd Printing USA - 2009 Mercury Mariner | Owner's Manual - Page 10
Brake System Brake Fluid Non-Petroleum Based Stability Control System Speed Control Master Lighting Switch Hazard Warning Flasher Fog Lamps-Front Fuse Compartment Fuel Pump Reset Windshield Defrost/Demist Windshield Wash/Wipe Rear Window Defrost/Demist 10 2009 Mariner (mrn) Owners Guide - 2009 Mercury Mariner | Owner's Manual - Page 11
, Flames, or Sparks Explosive Gas Battery Acid Fan Warning Maintain Correct Fluid Level Engine Air Filter Jack MAX MIN Power Steering Fluid Service Engine Soon Passenger Compartment Air Filter Check Fuel Cap Low Tire Pressure Warning 11 2009 Mariner (mrn) Owners Guide, 2nd Printing USA (fus - 2009 Mercury Mariner | Owner's Manual - Page 12
chapter. If the light is blinking, engine misfire is occurring which could damage your catalytic converter. Drive in a moderate fashion (avoid heavy acceleration and deceleration) and have your vehicle serviced immediately by your authorized dealer. 12 2009 Mariner (mrn) Owners Guide, 2nd Printing - 2009 Mercury Mariner | Owner's Manual - Page 13
readiness: If this light fails to illuminate when the ignition is turned to on, continues to flash or remains on, have the system serviced immediately by your authorized dealer. A chime will sound when there is a malfunction in the indicator light. 13 2009 Mariner (mrn) Owners Guide, 2nd Printing - 2009 Mercury Mariner | Owner's Manual - Page 14
is working. If the light does not turn on or begins to flash, have the system inspected by your authorized dealer. For more information on this system, refer to Tire pressure monitoring system (TPMS) in the Tires, Wheels and Loading chapter. 14 2009 Mariner (mrn) Owners Guide, 2nd Printing USA - 2009 Mercury Mariner | Owner's Manual - Page 15
flash faster, check for a burned out bulb. High beams: Illuminates when the high beam headlamps are turned on. Key-in-ignition warning chime: Sounds when the key is left in the ignition in the off or accessory position and the driver's door is opened. 15 2009 Mariner (mrn) Owners Guide, 2nd - 2009 Mercury Mariner | Owner's Manual - Page 16
is off (the key is not in the ignition) and the driver's door is opened. Parking brake on chime: Sounds when the parking brake is left on and the engine is overheating. Stop the vehicle as soon as safely possible, switch off the engine and let the engine cool. 16 2009 Mariner (mrn) Owners Guide, - 2009 Mercury Mariner | Owner's Manual - Page 17
the vehicle is in motion or on a grade. The arrow near the fuel pump icon indicates which side of the vehicle the fuel filler door is located. Refer to Filling the tank in the Maintenance and Specifications chapter for more information. 17 2009 Mariner (mrn) Owners Guide, 2nd Printing USA (fus) - 2009 Mercury Mariner | Owner's Manual - Page 18
driver's primary responsibility is the safe operation of their vehicle. Only use cell phones and other devices not essential to the driving task when it is safe to do so. Accessory delay: Your vehicle is equipped with accessory that time. 18 2009 Mariner (mrn) Owners Guide, 2nd Printing USA (fus) - 2009 Mercury Mariner | Owner's Manual - Page 19
to set the strongest local radio stations without losing your original manually set preset stations for AM/FM1/FM2. To activate the autoset feature: Press MENU repeatedly until AUTO SEEK/TRACK to PRESET ON/OFF appears in the display. Use 19 2009 Mariner (mrn) Owners Guide, 2nd Printing USA (fus) - 2009 Mercury Mariner | Owner's Manual - Page 20
in the remaining presets. RDS Radio Available only in FM mode. This CAT. PRESS UP OR DOWN TO CHANGE RDS CATEGORY will appear in the auto load up to six discs- Press and hold LOAD until the display reads AUTOLOAD #. Load the desired disc, label side up. The system 20 2009 Mariner (mrn) Owners Guide - 2009 Mercury Mariner | Owner's Manual - Page 21
load discs for the remaining available slots. Insert the discs, one at a time, label side up, when prompted. Once do not remove the CD, the system will reload the disc. To auto eject all loaded discs- Press and hold EJECT. The system will eject 2009 Mariner (mrn) Owners Guide, 2nd Printing USA (fus) - 2009 Mercury Mariner | Owner's Manual - Page 22
will automatically go to that channel, if available. You may cancel your entry by pressing DIRECT. If an invalid station number is entered, INVALID CHANNEL will appear in the display and the system will continue playing the current station. 22 2009 Mariner (mrn) Owners Guide, 2nd Printing USA (fus) - 2009 Mercury Mariner | Owner's Manual - Page 23
previous/next channels. SCAN: Press SCAN for a brief sampling of all available SIRIUS satellite channels. If a specific category is selected, (Jazz, Rock, News, . Press to scroll through the list of available SIRIUS channel Categories (Pop, 23 2009 Mariner (mrn) Owners Guide, 2nd Printing USA (fus) - 2009 Mercury Mariner | Owner's Manual - Page 24
ALL to seek all available SIRIUS categories and channels listing will display the opposite state. For example, if you have chosen to enable the song alerts, the menu listing will read DISABLE as the alerts are currently on, so your other option is to turn them off. 24 2009 Mariner (mrn) Owners Guide - 2009 Mercury Mariner | Owner's Manual - Page 25
. b. CHANGE PIN: Press OK when CHANGE PIN is front (F) speakers. SPEED COMPENSATED VOLUME (if equipped): With this feature on, radio volume automatically gets louder with increasing vehicle speed to compensate for road and wind noise. The default setting is off. 25 2009 Mariner (mrn) Owners Guide - 2009 Mercury Mariner | Owner's Manual - Page 26
allows the radio volume to automatically change slightly with vehicle speed to compensate for driver's primary responsibility is the safe operation of their vehicle. Only use cell phones and other devices not essential to the driving task when it is safe to do so. 26 2009 Mariner (mrn) Owners Guide - 2009 Mercury Mariner | Owner's Manual - Page 27
vehicle speakers with high fidelity. To achieve optimal performance, please observe the following instructions when attaching your portable music device to the audio system. If your vehicle is portable music player although it may be low. 27 2009 Mariner (mrn) Owners Guide, 2nd Printing USA (fus) - 2009 Mercury Mariner | Owner's Manual - Page 28
or CD controls. Troubleshooting: 1. Do not down. If the problems persists, replace or driver's primary responsibility is the safe operation of their vehicle. Only use cell phones and other devices not essential to the driving task when it is safe to do so. 28 2009 Mariner (mrn) Owners Guide - 2009 Mercury Mariner | Owner's Manual - Page 29
buildings, power lines, electric fences, traffic lights and thunderstorms can interfere with your reception. • Station overload: When you pass a broadcast tower, a stronger signal may overtake a weaker one and play while the weak station frequency is displayed. 29 2009 Mariner (mrn) Owners Guide - 2009 Mercury Mariner | Owner's Manual - Page 30
may not function correctly when used in Ford CD players. Do not use any irregular shaped CDs or discs with a scratch protection film attached. 30 2009 Mariner (mrn) Owners Guide, 2nd Printing USA (fus) - 2009 Mercury Mariner | Owner's Manual - Page 31
information. Audio system warranty and service Refer to the Warranty Guide/Customer Information Guide for audio system warranty information. If service is necessary, see your of folders will help with navigation through the disc files. 31 2009 Mariner (mrn) Owners Guide, 2nd Printing USA (fus) - 2009 Mercury Mariner | Owner's Manual - Page 32
traffic and entertainment satellite radio channels. For more information and a complete list of SIRIUS satellite radio channels, visit www.sirius.com in the United and ice build-up and keep luggage and other material as far away from the antenna as possible. 32 2009 Mariner (mrn) Owners Guide, 2nd - 2009 Mercury Mariner | Owner's Manual - Page 33
, rearrange, add or delete programming including canceling, moving or adding particular channels, and its prices, at any time, with or without notice to you. Ford Motor Company shall not be responsible for any such programming changes. 33 2009 Mariner (mrn) Owners Guide, 2nd Printing USA (fus) - 2009 Mercury Mariner | Owner's Manual - Page 34
information not available at this time on this channel. The system is working properly. SAT FAULT INVALID CHNL Channel no longer available. UNSUBSCRIBED Subscription not available for this channel. Artist information not available. NO TEXT 34 2009 Mariner (mrn) Owners Guide, 2nd Printing - 2009 Mercury Mariner | Owner's Manual - Page 35
Satellite service has Call SIRIUS at been deactivated by 1-888-539-7474 to SIRIUS Satellite Radio. re-activate or resolve subscription issues. Condition Song title information not available. NO Navigation system supplement (if equipped). 35 2009 Mariner (mrn) Owners Guide, 2nd Printing USA (fus) - 2009 Mercury Mariner | Owner's Manual - Page 36
window fogging. Power: Press to activate/deactivate the climate control system. 5. When the system is off, outside air is prevented from entering the vehicle through the vents. 6. : Distributes air through the instrument panel vents. 36 2009 Mariner (mrn) Owners Guide, 2nd Printing USA (fus) - 2009 Mercury Mariner | Owner's Manual - Page 37
): Press to 14. activate/deactivate the driver heated seat. See Heated seats in the Seating and Safety Restraints chapter. Outside temperature (if equipped): The outside temperature will appear in the display and is labeled EXT TEMP. 37 2009 Mariner (mrn) Owners Guide, 2nd Printing USA (fus) - 2009 Mercury Mariner | Owner's Manual - Page 38
humidity build up inside the vehicle, do not drive with the (recirculated air) engaged and A/C off. system off or with • Do not put objects under the front seats that will interfere with the airflow to the back seats. • Remove any snow, ice or leaves from the air intake area at the base of the - 2009 Mercury Mariner | Owner's Manual - Page 39
. The driver side temperature setting air through the windshield defroster vents, demister 4. vents, floor vents and rear seat floor vents. The system will automatically provide outside air to reduce window fogging. Press AUTO to return to full automatic control. 39 2009 Mariner (mrn) Owners Guide - 2009 Mercury Mariner | Owner's Manual - Page 40
vents to cool the vehicle. This re-cooling of the interior air is more economical and efficient. Recirculated air may also help reduce undesirable odors from entering the vehicle. Press the MAX A/C button again for normal A/C operation. 40 2009 Mariner (mrn) Owners Guide, 2nd Printing USA (fus) - 2009 Mercury Mariner | Owner's Manual - Page 41
humidity build up inside the vehicle, do not drive with the (recirculated air) engaged and A/C off. system OFF or with • Do not put objects under the front seats that will interfere with the airflow to the back seats. • Remove any snow, ice or leaves from the air intake area at the base of the - 2009 Mercury Mariner | Owner's Manual - Page 42
Driver Controls chapter. Do not use razor blades or other sharp objects to clean the inside of the rear window or to remove decals from the inside or the rear window. This may cause damage to the heated grid lines and will not be covered by your warranty. 42 2009 Mariner (mrn) Owners Guide - 2009 Mercury Mariner | Owner's Manual - Page 43
system is factory programmed to keep the lights on for 20 seconds after the ignition switch is turned to off. This delay can be programmed, using the procedure listed below, to any value up to the headlamp control in the autolamp position. 43 2009 Mariner (mrn) Owners Guide, 2nd Printing USA (fus) - 2009 Mercury Mariner | Owner's Manual - Page 44
at the factory, but the delay time may be changed by following the steps below (Steps 1 through 6 must be done within 10 seconds): 1. Turn the key to the off position. 2. Rotate the headlamp . The will fog lamp indicator light illuminate. 44 2009 Mariner (mrn) Owners Guide, 2nd Printing USA (fus) - 2009 Mercury Mariner | Owner's Manual - Page 45
visible under all lighting conditions. AIMING THE HEADLAMPS The headlamps on your vehicle are properly aimed at the assembly plant. If your vehicle has been in an accident, the alignment of your headlamps should be checked by your authorized dealer. 45 2009 Mariner (mrn) Owners Guide, 2nd Printing - 2009 Mercury Mariner | Owner's Manual - Page 46
(to adjust up) or counterclockwise (to adjust down) aligning the upper edge of the light pattern to the horizontal line. 6. Move the opaque cloth to cover the right-hand headlamp and repeat Steps 4 and 5 for the left-hand headlamp. 46 2009 Mariner (mrn) Owners Guide, 2nd Printing USA (fus) - 2009 Mercury Mariner | Owner's Manual - Page 47
this position, the lamp will remain illuminated. The map lamp controls (without moon roof) are located on the dome lamp. Press the button on either side of each map lamp to illuminate the lamps. Push the button again to turn off the lamps. 47 2009 Mariner (mrn) Owners Guide, 2nd Printing USA (fus) - 2009 Mercury Mariner | Owner's Manual - Page 48
on whenever the ignition is in either the on or accessory position. Note: The ambient lights will stay on until after the ignition is placed in the off position and either of the front doors are opened or the accessory delay timer expires. 48 2009 Mariner (mrn) Owners Guide, 2nd Printing USA (fus) - 2009 Mercury Mariner | Owner's Manual - Page 49
water leak) are: • Water puddle inside the lamp • Large water droplets, drip marks or streaks present on the interior of the lens Take your vehicle to dealer for service if any of the above conditions of unacceptable moisture are present. 49 2009 Mariner (mrn) Owners Guide, 2nd Printing USA (fus) - 2009 Mercury Mariner | Owner's Manual - Page 50
clear in color except where noted. To replace all instrument panel lights - see your authorized dealer Replacing interior bulbs Check the operation of all bulbs frequently. Replacing exterior bulbs Check the operation of all the bulbs frequently. 50 2009 Mariner (mrn) Owners Guide, 2nd Printing - 2009 Mercury Mariner | Owner's Manual - Page 51
end of the new bulb into the headlamp assembly. When the grooves in the plastic base are aligned, turn the new bulb clockwise to install. Replacing front parking lamp and turn signal bulbs For bulb replacement, see your authorized dealer. 51 2009 Mariner (mrn) Owners Guide, 2nd Printing USA (fus) - 2009 Mercury Mariner | Owner's Manual - Page 52
Lights Replacing sidemarker bulbs 1. Make sure the headlamp switch is turned to the off position. 2. Push the lamp rearward and pull the front edge of the lamp outward to remove it from the fender on the vehicle and secure with two screws. 52 2009 Mariner (mrn) Owners Guide, 2nd Printing USA (fus) - 2009 Mercury Mariner | Owner's Manual - Page 53
Lights Replacing license plate lamp bulbs 1. Make sure the headlamp switch is in press the lamp assembly into liftgate. Replacing high-mount brake lamp bulbs 1. Remove the two screws and move the lamp assembly away from the liftgate. 53 2009 Mariner (mrn) Owners Guide, 2nd Printing USA (fus) - 2009 Mercury Mariner | Owner's Manual - Page 54
Lights 2. Remove the bulb holder from the lamp assembly by depressing the snaps. 3. Pull the bulb straight out of the socket and while squeezing on the upper and lower snap clips at the same time. Install the new bulb in reverse order. 54 2009 Mariner (mrn) Owners Guide, 2nd Printing USA (fus) - 2009 Mercury Mariner | Owner's Manual - Page 55
Driver Controls MULTI-FUNCTION front window to clear any excess washer fluid remaining on the windshield. Note: Do not operate the washer when the washer reservoir is empty. This may cause the washer pump to overheat. Check are turned off. 55 2009 Mariner (mrn) Owners Guide, 2nd Printing USA (fus) - 2009 Mercury Mariner | Owner's Manual - Page 56
Driver Controls Rear window wiper/washer controls wheel up or down until you find the desired location. 3. Push the steering column tilt lever up. This will lock the steering wheel in position. WARNING: Never adjust the steering wheel when the vehicle is moving. 56 2009 Mariner (mrn) Owners Guide - 2009 Mercury Mariner | Owner's Manual - Page 57
Driver center stack display. The compass reading may be affected when you drive near large buildings, bridges, power lines and powerful broadcast antenna. Magnetic or metallic , a manual calibration may be necessary. Refer to Compass calibration adjustment. 57 2009 Mariner (mrn) Owners Guide, 2nd - 2009 Mercury Mariner | Owner's Manual - Page 58
Driver Controls Most geographic areas ( your geographic location by referring to the zone map. 2. Turn ignition to the on position. 3. Start the engine. 3 2 4 5 1 15 14 13 12 6 7 8 9 1011 4. Press the SETUP control zone is now updated. 58 2009 Mariner (mrn) Owners Guide, 2nd Printing USA (fus) - 2009 Mercury Mariner | Owner's Manual - Page 59
, a cell phone holder and CD holders 3. Rear power point 4. Rear cupholders 5. Small storage trays and (if equipped) an ambient light control switch WARNING: Use only soft cups in the cupholders. Hard objects can injure you in a collision. 59 2009 Mariner (mrn) Owners Guide, 2nd Printing USA (fus) - 2009 Mercury Mariner | Owner's Manual - Page 60
Driver on the side or rear of the console for extra storage. AUXILIARY POWER POINT (12VDC) Power outlets are designed for accessory plugs accessory or accessory bracket from the plug. Improper use of the power outlet can cause damage not covered by your warranty. 60 2009 Mariner (mrn) Owners Guide - 2009 Mercury Mariner | Owner's Manual - Page 61
Driver Controls The auxiliary power point is located in the instrument panel. A second auxiliary power point is located on the rear side checking and replacing fuses. To have full capacity usage of your power point, the engine accessories 2009 Mariner (mrn) Owners Guide, 2nd Printing USA (fus) - 2009 Mercury Mariner | Owner's Manual - Page 62
side to restore the window controls. Accessory delay With accessory delay, the window switches, moon roof (if equipped) and audio system may be used for up to 10 minutes after the ignition switch is turned to the off position or until either front door is opened. 62 2009 Mariner (mrn) Owners Guide - 2009 Mercury Mariner | Owner's Manual - Page 63
performance. Do not clean the housing or glass of any mirror with harsh abrasives, fuel or other petroleum-based cleaning products. EXTERIOR MIRRORS Power side view mirrors WARNING: Do not adjust the mirror while the vehicle is in motion. 63 2009 Mariner (mrn) Owners Guide, 2nd Printing USA (fus) - 2009 Mercury Mariner | Owner's Manual - Page 64
petroleum-based cleaning products. SPEED CONTROL With speed control set, you can maintain a set speed without keeping your foot on the accelerator pedal. WARNING: Do not use the speed control in heavy traffic or on roads that are winding, slippery or unpaved. 64 2009 Mariner (mrn) Owners Guide, 2nd - 2009 Mercury Mariner | Owner's Manual - Page 65
: • Tap the brake pedal or clutch pedal (if equipped) Disengaging the speed control will not erase previous set speed. Note: When you use the clutch pedal to disengage the speed control, the engine speed may briefly increase, this is normal. 65 2009 Mariner (mrn) Owners Guide, 2nd Printing USA - 2009 Mercury Mariner | Owner's Manual - Page 66
Driver Controls Resuming a set speed Press the RESUME control and release it. set speed by 1 mph (1.6 km/h). • Depress the brake pedal or the clutch pedal (if equipped) until the desired vehicle speed is reached and press the SET + control. 66 2009 Mariner (mrn) Owners Guide, 2nd Printing USA (fus) - 2009 Mercury Mariner | Owner's Manual - Page 67
CD mode: to listen to the • Press next track on the disc. In Satellite radio mode (if equipped): • Press to advance through preset channels. 67 2009 Mariner (mrn) Owners Guide, 2nd Printing USA (fus) - 2009 Mercury Mariner | Owner's Manual - Page 68
Driver Controls In any mode: • Press VOL + or VOL - to adjust the volume. Navigation system hands free control features (if Press OK to confirm your selection. For further information on the SYNC system, refer to the SYNC supplement. 68 2009 Mariner (mrn) Owners Guide, 2nd Printing USA (fus) - 2009 Mercury Mariner | Owner's Manual - Page 69
Driver Controls Navigation system/SYNC hands free control features (if equipped one-touch, closing feature. Press and release the front portion of the control. To stop motion at any time during the one-touch closing, press the control again. 69 2009 Mariner (mrn) Owners Guide, 2nd Printing USA (fus) - 2009 Mercury Mariner | Owner's Manual - Page 70
is shut. To close the shade, pull it toward the front of the vehicle. Accessory delay: With accessory delay, the window switches, audio system, and moon roof potential vehicle problems with a display of system warnings followed by an indicator chime. 70 2009 Mariner (mrn) Owners Guide, 2nd Printing - 2009 Mercury Mariner | Owner's Manual - Page 71
in your tank under normal driving conditions. Remember to turn the ignition off when refueling your vehicle. Otherwise, the display will not show the addition of fuel for a few miles (kilometers). DTE will vary according to your driving habits. 71 2009 Mariner (mrn) Owners Guide, 2nd Printing - 2009 Mercury Mariner | Owner's Manual - Page 72
graph ranging poor economy to from excellent economy. Your vehicle must be moving to calculate instantaneous fuel economy. , one or no bars When your vehicle is not moving, this function shows illuminated. Instantaneous fuel economy cannot be reset. 72 2009 Mariner (mrn) Owners Guide, 2nd Printing - 2009 Mercury Mariner | Owner's Manual - Page 73
ENGLISH" will be displayed to change back to English. Press the RESET control to change back to English. System check Selecting this function from the the system check report is as follows: 1. Oil life 2. Brake system 3. Liftgate and glass 4. DTE/Fuel level 73 2009 Mariner (mrn) Owners Guide, 2nd - 2009 Mercury Mariner | Owner's Manual - Page 74
Driver Controls Oil life An oil change is required whenever indicated by the message center. USE ONLY RECOMMENDED ENGINE OILS. To reset the oil monitoring system to 100% after each oil change RESET control to change from English to Metric. 74 2009 Mariner (mrn) Owners Guide, 2nd Printing USA (fus) - 2009 Mercury Mariner | Owner's Manual - Page 75
driver's door is opened within 10 minutes of the ignition being turned off. 1. To disable/enable the autounlock feature, select this function from the SETUP control for the current display mode. 2. Press the RESET control switch to turn the autounlock ON or OFF. 75 2009 Mariner (mrn) Owners Guide - 2009 Mercury Mariner | Owner's Manual - Page 76
Driver Controls Language 1. Select this function from in the this chapter. System warnings System warnings alert you to possible problems or malfunctions in your vehicle's operating systems. In the event of off/on cycle has been completed. 76 2009 Mariner (mrn) Owners Guide, 2nd Printing USA (fus) - 2009 Mercury Mariner | Owner's Manual - Page 77
ENGAGED - Displayed when the manual park brake is set, the engine is running and the vehicle is driven more than 3 mph (5 km/h). If the warning stays on after the park brake is released, contact your authorized dealer as soon as possible. 77 2009 Mariner (mrn) Owners Guide, 2nd Printing USA (fus - 2009 Mercury Mariner | Owner's Manual - Page 78
the engine oil life remaining is 10% or less. When oil life left is between 10% and 0%, the XX% OIL LIFE CHANGE SOON message will be displayed. OIL CHANGE REQUIRED - Displayed when the oil life left reaches 0%, the OIL CHANGE REQUIRED message will be displayed. 78 2009 Mariner (mrn) Owners Guide - 2009 Mercury Mariner | Owner's Manual - Page 79
you must drive with the liftgate door or window open, keep the vents open so outside air comes into the vehicle. CARGO AREA FEATURES Cargo shade (if equipped) If your vehicle has a cargo shade, you can use it to cover items in the cargo area of your vehicle. 79 2009 Mariner (mrn) Owners Guide, 2nd - 2009 Mercury Mariner | Owner's Manual - Page 80
Cargo management system (if equipped) The cargo management system consists of two storage compartments located in the floor of the rear cargo area. 1. The larger, rearward, compartment is for customer on the large customer storage bin. 80 2009 Mariner (mrn) Owners Guide, 2nd Printing USA (fus) - 2009 Mercury Mariner | Owner's Manual - Page 81
with a passenger side cargo compartment located in the right rear trim panel which is used to store small items and may have the Easy Fuel™ white plastic funnel attached on the inside of the access door. Make sure the access door is secured so it does not rattle when you drive. LUGGAGE RACK (IF - 2009 Mercury Mariner | Owner's Manual - Page 82
Driver Controls To remove the cross-bar assembly (if equipped) from the roof rack side rails: 1. Loosen the thumbwheel at the tongue in the endcaps on both sides of the cross-bar. 4. Slide the cross-bar assembly off the end of the rail. 82 2009 Mariner (mrn) Owners Guide, 2nd Printing USA (fus) - 2009 Mercury Mariner | Owner's Manual - Page 83
the front of the vehicle. 2. Use a long, flat object to depress the tongue in the endcaps on both sides of the cross-bar. 3. Slide the cross-bar assemblies over the end cap tongue and into the side rails. 4. Tighten thumbwheel at both ends of the cross-bar. 83 2009 Mariner (mrn) Owners Guide, 2nd - 2009 Mercury Mariner | Owner's Manual - Page 84
supplied IKTs, replacement IKTs are available through your authorized dealer. Standard SecuriLock™ keys without remote entry transmitter functionality vehicle key cut information. It is recommended that you keep the label in a safe place for future reference. 84 2009 Mariner (mrn) Owners Guide, 2nd - 2009 Mercury Mariner | Owner's Manual - Page 85
on the center thumb rest of the IKT and forefinger on the logo badge on the opposite side. To gain more leverage when rotating the IKT in the ignition lock cylinder, you can readjust the the IKT control can be adjacent to the utilized. 85 2009 Mariner (mrn) Owners Guide, 2nd Printing USA (fus) - 2009 Mercury Mariner | Owner's Manual - Page 86
doors will remain locked. Locking the doors Turn the key in the door cylinder to lock the driver's door only. Autolock The autolock feature will lock keyless entry keypad (if equipped) procedure, or • Performing the message center (if equipped) procedure. 86 2009 Mariner (mrn) Owners Guide, 2nd - 2009 Mercury Mariner | Owner's Manual - Page 87
the off position. The horn will chirp once to confirm the procedure is complete. Keyless entry keypad procedure 1. Turn the ignition to the off position. 2. Close all doors, the liftgate and honk to indicate the system has been enabled. 87 2009 Mariner (mrn) Owners Guide, 2nd Printing USA (fus) - 2009 Mercury Mariner | Owner's Manual - Page 88
is turned to the off or accessory position; and • the driver door is opened within 10 minutes of the ignition being transitioned to the off or accessory position. Note: The doors will not a minimum of 30 seconds before beginning again. 88 2009 Mariner (mrn) Owners Guide, 2nd Printing USA (fus) - 2009 Mercury Mariner | Owner's Manual - Page 89
procedure is complete. Keyless entry keypad autounlock enable/disable procedure 1. key in any ignition position, the driver's door will automatically unlock if it is locked using the power lock control on the driver's door panel while the driver's door is open. 89 2009 Mariner (mrn) Owners Guide - 2009 Mercury Mariner | Owner's Manual - Page 90
accept any interference received, including interference that may cause undesired operation. Changes or modifications not expressly approved by the party responsible for compliance vehicle, or • other vehicles parked next to your vehicle. 90 2009 Mariner (mrn) Owners Guide, 2nd Printing USA (fus) - 2009 Mercury Mariner | Owner's Manual - Page 91
with the key in the off position. If there are problems with the remote entry system, make sure to take ALL Integrated Keyhead Transmitters with you to the authorized dealer in order to aid in troubleshooting the problem. Two step door unlocking 1. Press and release to unlock the driver's door. Note - 2009 Mercury Mariner | Owner's Manual - Page 92
the liftgate glass (if equipped) Press twice within three seconds to open the liftgate glass. Car finder twice within three seconds. The horn will chirp and the turn Press lamps will flash. volt lithium battery CR2032 or equivalent. 92 2009 Mariner (mrn) Owners Guide, 2nd Printing USA (fus) - 2009 Mercury Mariner | Owner's Manual - Page 93
4. Insert the new battery. Refer to the instructions inside the IKT for the correct orientation of the interior lamps and puddle lamps (if equipped) illuminate when the Integrated Keyhead Transmitter or the keyless entry system keypad is used to unlock the door(s). 93 2009 Mariner (mrn) Owners Guide - 2009 Mercury Mariner | Owner's Manual - Page 94
interior lights if: • the ignition is turned to the on position, or • the Integrated Keyhead Transmitter lock control is pressed, or • the vehicle is locked using the keyless entry keypad by having your vehicle serviced by your authorized dealer. 2009 Mariner (mrn) Owners Guide, 2nd Printing USA (fus) - 2009 Mercury Mariner | Owner's Manual - Page 95
glass, The keypad can be operated with the factory set 5-digit entry code; this code is located on the owner's wallet card in the glove box and is available from your authorized dealer. You can also create your own 5-digit personal entry code. 95 2009 Mariner (mrn) Owners Guide, 2nd Printing - 2009 Mercury Mariner | Owner's Manual - Page 96
This mode disables the keypad for one minute and the keypad lamp will flash. The anti-scan feature will turn off after: • one minute of keypad inactivity, • pressing the control on the remote entry transmitter, • or the ignition position changes. 96 2009 Mariner (mrn) Owners Guide, 2nd Printing USA - 2009 Mercury Mariner | Owner's Manual - Page 97
: The driver's door must be closed. You do not need to enter the keypad code first key chain away from the coded IKT and restart the engine. Note: Do not leave a duplicate coded key in the vehicle. Always take your keys and lock all doors when leaving the vehicle. 97 2009 Mariner (mrn) Owners Guide - 2009 Mercury Mariner | Owner's Manual - Page 98
functionality. If a problem occurs with the keys Note: Your vehicle comes equipped with two Integrated Keyhead Transmitters (IKTs). The IKT functions as both a programmed ignition key that operates all the locks and starts the vehicle, as well as a remote 98 2009 Mariner (mrn) Owners Guide - 2009 Mercury Mariner | Owner's Manual - Page 99
Transmitters (IKTs) or standard SecuriLock™ keys. • You must have two previously programmed coded keys (keys that already operate your vehicle's engine) and the new unprogrammed key(s) readily accessible. • If two previously programmed coded keys are not available, you must take your vehicle to - 2009 Mercury Mariner | Owner's Manual - Page 100
may repeat Steps 1 through 8. If failure repeats, bring your vehicle to your authorized dealer to have the new key(s) programmed. To program additional new unprogrammed key(s), wait 20 seconds and then repeat this procedure from Step 1. 100 2009 Mariner (mrn) Owners Guide, 2nd Printing USA (fus) - 2009 Mercury Mariner | Owner's Manual - Page 101
sure that cargo or any front row outboard head restraints that are vertically adjustable. WARNING: To minimize the risk of neck injury in the event of a crash, the driver guide sleeve adjust/release button (3), • and a guide sleeve unlock/remove button (4). 101 2009 Mariner (mrn) Owners Guide - 2009 Mercury Mariner | Owner's Manual - Page 102
to an upright driving/riding position. 2. Raise the head restraint by pulling up on the head restraint. 3. Lower the head restraint by pressing and holding the guide sleeve adjust/release and properly adjusted when the seat is occupied. 102 2009 Mariner (mrn) Owners Guide, 2nd Printing USA (fus) - 2009 Mercury Mariner | Owner's Manual - Page 103
To reinstall the adjustable head restraint, do the following: 1. Insert the two stems into the guide sleeve collars. 2. Push the head restraint down until it locks. Properly adjust the head restraint restraint to its full up position. 103 2009 Mariner (mrn) Owners Guide, 2nd Printing USA (fus) - 2009 Mercury Mariner | Owner's Manual - Page 104
the manual lumbar support (if equipped) The lumbar support control is located on the inboard side of the driver's seatback. Turn the lumbar support control clockwise to increase firmness. Turn the lumbar support control counterclockwise to increase softness. 104 2009 Mariner (mrn) Owners Guide - 2009 Mercury Mariner | Owner's Manual - Page 105
equipped). Check the "passenger airbag off" or "pass airbag off" indicator lamp for proper airbag status. Refer to Front passenger sensing system section for additional details. Failure to follow these instructions may interfere with the front passenger seat sensing system. 105 2009 Mariner (mrn - 2009 Mercury Mariner | Owner's Manual - Page 106
Seating and Safety Restraints The control is located on the outboard side of the seat cushion. Press to raise or lower the front portion of the seat cushion. Press to raise or lower not do the following: • Place heavy objects on the seat 106 2009 Mariner (mrn) Owners Guide, 2nd Printing USA (fus) - 2009 Mercury Mariner | Owner's Manual - Page 107
to deactivate. The heated seats will activate when the ignition is in the on position and the engine is running. REAR SEATS Head restraints The purpose of these head restraints is to help limit head to lower or remove head restraint. 107 2009 Mariner (mrn) Owners Guide, 2nd Printing USA (fus) - 2009 Mercury Mariner | Owner's Manual - Page 108
rear seats 1. Raise the rear seat head restraint and remove. 2. Place the head restraint under the front seat for storage. 3. Pull the seat release control. Note: Make sure the floor is clear of all objects before folding the seat. 108 2009 Mariner (mrn) Owners Guide, 2nd Printing USA (fus) - 2009 Mercury Mariner | Owner's Manual - Page 109
. 5. To release seatback, pull the seatback release lever (on top of seat) toward the front seat. This is common for both 60% and 40% seatbacks. Note: When the seatback release lever is pulled, slowly lower seatback to the flat position. 109 2009 Mariner (mrn) Owners Guide, 2nd Printing USA (fus) - 2009 Mercury Mariner | Owner's Manual - Page 110
Seating and Safety Restraints 6. Rotate seatback down into load floor position. Returning the rear seats to upright position 1. Pull seatback up and into upright cushion is locked into place and that the safety belt buckles are exposed. 110 2009 Mariner (mrn) Owners Guide, 2nd Printing USA (fus) - 2009 Mercury Mariner | Owner's Manual - Page 111
to its original position, make sure that cargo or any objects are not trapped behind the collision. WARNING: Remove the head restraint stored under the front set and return it to the original position on the seatback side of the vehicle. 111 2009 Mariner (mrn) Owners Guide, 2nd Printing USA (fus) - 2009 Mercury Mariner | Owner's Manual - Page 112
, driver seat position sensor, front passenger sensing system, and indicator lights. How does the Personal Safety System work? The Personal Safety System can adapt the deployment strategy of your vehicle's safety devices according to crash severity and occupant 112 2009 Mariner (mrn) Owners Guide - 2009 Mercury Mariner | Owner's Manual - Page 113
and in side collisions and rollovers. Driver and passenger driver dual-stage airbag based on seat position. The system is designed to help protect smaller drivers sitting close to the driver airbag by providing a lower airbag output level. Front 2009 Mariner (mrn) Owners Guide, 2nd Printing USA (fus) - 2009 Mercury Mariner | Owner's Manual - Page 114
and they move forward during pre-crash braking. The most effective way to front outboard seating positions are designed to tighten the safety belts firmly against the occupant's body during frontal collisions, and in side collisions and rollovers. This helps 114 2009 Mariner (mrn) Owners Guide - 2009 Mercury Mariner | Owner's Manual - Page 115
. Safety restraints precautions WARNING: Always drive and ride with your seatback upright and the lap belt snug and low across the hips. WARNING: To reduce the risk of injury, make sure children sit where they can be properly restrained. 115 2009 Mariner (mrn) Owners Guide, 2nd Printing USA (fus) - 2009 Mercury Mariner | Owner's Manual - Page 116
vehicle, including the driver, should always extremely dangerous to ride in a cargo area, inside or outside of . WARNING: In a rollover crash, an unbelted person is significantly Check seat covers and buckles before you place a child anywhere near them. 116 2009 Mariner (mrn) Owners Guide, 2nd Printing - 2009 Mercury Mariner | Owner's Manual - Page 117
feature at the front and rear outboard seating positions to length adjustment to your movements and locking in response to vehicle movement. For example, if the driver brakes suddenly or turns a corner sharply, or the vehicle receives an impact of approximately 5 mph 117 2009 Mariner (mrn) Owners Guide - 2009 Mercury Mariner | Owner's Manual - Page 118
locking mode is not available on the driver safety belt. This mode should be used any time a child safety seat, except a booster, is installed in passenger front or rear seating positions. belt is now in the automatic locking mode. 118 2009 Mariner (mrn) Owners Guide, 2nd Printing USA (fus) - 2009 Mercury Mariner | Owner's Manual - Page 119
the driver position, which doesn't have this feature) must be checked by safety belt height adjustments at the front outboard seating positions. Adjust the height , squeeze and hold the buttons on the side and slide the height adjuster up or down 2009 Mariner (mrn) Owners Guide, 2nd Printing USA (fus) - 2009 Mercury Mariner | Owner's Manual - Page 120
extensions to change the fit of the shoulder belt across the torso. Safety belt warning light and indicator chime The safety belt warning light illuminates in the instrument cluster and a chime sounds to remind the occupants to fasten their safety belts. 120 2009 Mariner (mrn) Owners Guide, 2nd - 2009 Mercury Mariner | Owner's Manual - Page 121
-Minder feature. Then...The safety belt warning light illuminates 1 minute and the warning chime sounds 6 seconds. The safety belt warning light and warning chime turn off. The safety belt warning light and indicator chime remain off. 121 2009 Mariner (mrn) Owners Guide, 2nd Printing USA (fus) - 2009 Mercury Mariner | Owner's Manual - Page 122
ignition switch has been turned to on...The driver's or front passenger's safety belt is not buckled when light illuminates and the warning chime sounds for 6 seconds every 30 seconds, repeating for approximately 5 minutes or until the safety belts are buckled. 122 2009 Mariner (mrn) Owners Guide - 2009 Mercury Mariner | Owner's Manual - Page 123
in rear and side crashes or rollovers. I'd rather be thrown Not a good idea. People who are ejected are clear 40 times more likely to DIE. Safety belts help prevent ejection, WE CAN'T PICK OUR CRASH . Reasons given...Crashes are rare events 123 2009 Mariner (mrn) Owners Guide, 2nd Printing USA - 2009 Mercury Mariner | Owner's Manual - Page 124
performance of the vehicle's air bag system. One-time disable If at any time the driver/front passenger quickly buckles then unbuckles brake is set • The gearshift is in P (Park) • The ignition switch is in the off position • The driver and front 2009 Mariner (mrn) Owners Guide, 2nd Printing USA (fus) - 2009 Mercury Mariner | Owner's Manual - Page 125
off, then followed by the safety belt warning light flashing four times per second for three seconds again. • After receiving confirmation, the deactivation/activation procedure is complete. AIRBAG SUPPLEMENTAL RESTRAINT SYSTEM (SRS) 4X4 125 2009 Mariner (mrn) Owners Guide, 2nd Printing USA (fus) - 2009 Mercury Mariner | Owner's Manual - Page 126
to help protect the driver and right front passenger from certain upper body injuries. Airbags DO module. Placing objects on or over the airbag inflation area may cause those objects to be propelled by the airbag into your face and torso causing serious injury. 126 2009 Mariner (mrn) Owners Guide - 2009 Mercury Mariner | Owner's Manual - Page 127
in a collision. WARNING: Airbags can kill or injure a child in a child seat. NEVER place a rear-facing child seat in front of an active airbag. If you must use a forward-facing child seat in the front seat, move the seat all the way back. 127 2009 Mariner (mrn) Owners Guide, 2nd Printing USA (fus) - 2009 Mercury Mariner | Owner's Manual - Page 128
. Front airbags are designed to inflate in frontal and near-frontal collisions, not rollover, side-impact module as possible while maintaining vehicle control. The SRS consists of: • driver and passenger airbag modules (which include the inflators and airbags). 128 2009 Mariner (mrn) Owners Guide - 2009 Mercury Mariner | Owner's Manual - Page 129
part of the front passenger's seat and safety belt. The sensors are designed to detect the presence of a properly seated occupant and determine if the front passenger's frontal airbag should be enabled (may inflate) or disabled (will not inflate). 129 2009 Mariner (mrn) Owners Guide, 2nd Printing - 2009 Mercury Mariner | Owner's Manual - Page 130
of time, The front passenger sensing system will turn off the passenger seat side airbag if: • the seat is empty and safety belt is unbuckled. The front passenger sensing system uses the child restraint manufacturer's instructions. 130 2009 Mariner (mrn) Owners Guide, 2nd Printing USA (fus) - 2009 Mercury Mariner | Owner's Manual - Page 131
on the floor. Sitting improperly can increase the chance of injury in a crash event. For example, if an occupant slouches, lies down, turns sideways, sits forward, leans forward or sideways, or puts one or both feet up, the chance of injury during a crash is greatly increased. 131 2009 Mariner (mrn - 2009 Mercury Mariner | Owner's Manual - Page 132
may cause the weight of a properly seated occupant to be incorrectly interpreted by the front passenger sensing system. The person in the front passenger seat may appear heavier or lighter due to the conditions described in the list above. 132 2009 Mariner (mrn) Owners Guide, 2nd Printing USA (fus) - 2009 Mercury Mariner | Owner's Manual - Page 133
. If it is necessary to modify an advanced front airbag system to accommodate a person with disabilities, contact the Ford Customer Relationship Center at the phone number shown in the Customer Assistance chapter of this Owner's Guide. 133 2009 Mariner (mrn) Owners Guide, 2nd Printing USA (fus) - 2009 Mercury Mariner | Owner's Manual - Page 134
The use of accessory seat covers may prevent the deployment of the side airbags and increase the risk of injury in an accident. WARNING: Do not lean your head on the door. The side airbag could injure you as it deploys from the side of the seatback. 134 2009 Mariner (mrn) Owners Guide, 2nd Printing - 2009 Mercury Mariner | Owner's Manual - Page 135
detects an empty seat, the front passenger seat-mounted side airbag will be deactivated. The airbag was designed to inflate between the door panel and occupant to further enhance the protection provided occupants in side impact collisions. 135 2009 Mariner (mrn) Owners Guide, 2nd Printing USA (fus - 2009 Mercury Mariner | Owner's Manual - Page 136
until the problem and/or light are repaired. If any of these things happen, even intermittently, have the SRS serviced at your authorized dealer immediately. Unless serviced, the system may not function properly in the event of a collision. 136 2009 Mariner (mrn) Owners Guide, 2nd Printing - 2009 Mercury Mariner | Owner's Manual - Page 137
these instructions may driver should always wear their safety belts even when an airbag SRS and Safety Canopy system is provided. WARNING: To reduce risk of injury, do not obstruct or place objects in the deployment path of the inflatable Safety Canopy . 137 2009 Mariner (mrn) Owners Guide - 2009 Mercury Mariner | Owner's Manual - Page 138
a gas generator concealed behind the headliner and above the doors (one on each side of vehicle). • A headliner designed to flex open above the side doors to allow Safety Canopy deployment. • The same warning light, electronic control and diagnostic unit as used for the front airbags. • Two crash - 2009 Mercury Mariner | Owner's Manual - Page 139
front airbag system) will either flash or stay lit. • The readiness light will not illuminate immediately after ignition is turned on. • A series of five beeps will be heard. The tone pattern will repeat periodically until the problem and/or light are repaired. 139 2009 Mariner (mrn) Owners Guide - 2009 Mercury Mariner | Owner's Manual - Page 140
airbag (front, side, side curtain or Safety Canopy ) or the safety belt pretensioners. The S.O.S. Post Crash Alert can be turned off when any one of the following actions are taken by the driver or any serious injury or death to your child. 140 2009 Mariner (mrn) Owners Guide, 2nd Printing USA (fus) - 2009 Mercury Mariner | Owner's Manual - Page 141
a height of 4 ft 9 in (1.45 meters) tall, or 80 lb (36 kg). Check your local and state or provincial laws for specific requirements regarding the safety of children in your in the rear seating positions than in a front seating position. 141 2009 Mariner (mrn) Owners Guide, 2nd Printing USA (fus) - 2009 Mercury Mariner | Owner's Manual - Page 142
instructions and warnings provided by the vehicle manufacturer. A safety seat that is improperly installed or utilized, is inappropriate for your child's height, age, or weight or does not properly fit the child may increase the risk of serious injury or death. 142 2009 Mariner (mrn) Owners Guide - 2009 Mercury Mariner | Owner's Manual - Page 143
because it reduces the protection for the upper part of the body and may increase the risk of injury or death in a collision in the correct restraint system. Ford recommends checking with a NHTSA Certified Child Passenger Safety Technician 2009 Mariner (mrn) Owners Guide, 2nd Printing USA (fus) - 2009 Mercury Mariner | Owner's Manual - Page 144
• Review and follow the information presented in the Airbag supplemental restraint system (SRS) section in this chapter. • Carefully follow all of the manufacturer's instructions included restrain the largest child in the front seat. 144 2009 Mariner (mrn) Owners Guide, 2nd Printing USA (fus) - 2009 Mercury Mariner | Owner's Manual - Page 145
using a child seat that utilizes the top tether anchor. Check to make sure the child seat is properly secured before each seating position, properly restrain the largest child in the front seat. When installing a child safety seat with 2009 Mariner (mrn) Owners Guide, 2nd Printing USA (fus) - 2009 Mercury Mariner | Owner's Manual - Page 146
lap belt together. 3. While holding the shoulder and lap belt portions together, route the tongue through the child seat according to the child seat manufacturer's instructions. Be sure the belt webbing is not twisted. 146 2009 Mariner (mrn) Owners Guide, 2nd Printing USA (fus) - 2009 Mercury Mariner | Owner's Manual - Page 147
snugness of the child seat to the vehicle. Sometimes, a slight lean towards the buckle will additionally help to remove remaining slack from the belt. 147 2009 Mariner (mrn) Owners Guide, 2nd Printing USA (fus) - 2009 Mercury Mariner | Owner's Manual - Page 148
to make sure the seat is securely held in place. To check this, grab the seat at the belt path and attempt to move it side to side and forward and back. There should be no more than one for children in this chapter for more information. 148 2009 Mariner (mrn) Owners Guide, 2nd Printing USA (fus) - 2009 Mercury Mariner | Owner's Manual - Page 149
. A child seat with rigid LATCH attachments cannot be installed at the center seating position. LATCH compatible child seats (with attachments on belt webbing) can 149 2009 Mariner (mrn) Owners Guide, 2nd Printing USA (fus) - 2009 Mercury Mariner | Owner's Manual - Page 150
hooks to an anchoring point called the top tether anchor. Tether straps are available as an accessory for many older safety seats. Contact the manufacturer of your child seat for information about ordering a tether strap, or to obtain a 150 2009 Mariner (mrn) Owners Guide, 2nd Printing USA (fus) - 2009 Mercury Mariner | Owner's Manual - Page 151
panel in the cargo area. The front seat for storage, and then route the tether strap over the top of the seatback. 2. Locate the correct anchor for the selected seating position. There are three tether anchors located on the headliner at the rear of the vehicle. 151 2009 Mariner (mrn) Owners Guide - 2009 Mercury Mariner | Owner's Manual - Page 152
points toward the front of the vehicle. the manufacturer's instructions. If the safety crash. To improve the fit of both the lap and shoulder belt on children who have outgrown child safety seats, Ford Motor Company recommends use of a belt-positioning booster. 152 2009 Mariner (mrn) Owners Guide - 2009 Mercury Mariner | Owner's Manual - Page 153
across the hips? • Is the shoulder belt centered on the shoulder and chest? • Can the child stay seated like this for the whole trip? 153 2009 Mariner (mrn) Owners Guide, 2nd Printing USA (fus) - 2009 Mercury Mariner | Owner's Manual - Page 154
booster seats If your backless booster seat has a removable shield, remove the shield. If a vehicle seating position has a low seat back position that adequately supports your child's head, a high back booster seat would be a better choice. 154 2009 Mariner (mrn) Owners Guide, 2nd Printing USA - 2009 Mercury Mariner | Owner's Manual - Page 155
not introduce any item thicker than this under the booster seat. Check with the booster seat manufacturer's instructions. The importance of shoulder belts Using a booster without a shoulder belt with lap/shoulder belts in the back seat. 155 2009 Mariner (mrn) Owners Guide, 2nd Printing USA (fus) - 2009 Mercury Mariner | Owner's Manual - Page 156
, refer to Interior in the Cleaning chapter. WARNING: Failure to inspect and if necessary replace the safety belt assembly or child restraint system under the above conditions could result in severe personal injuries in the event of a collision. 156 2009 Mariner (mrn) Owners Guide, 2nd Printing - 2009 Mercury Mariner | Owner's Manual - Page 157
equipped with AWD or 4WD (when selected) has the ability to use all four wheels to power itself. This increases traction which may enable you to safely drive over terrain and road conditions that a conventional two-wheel drive vehicle cannot. 157 2009 Mariner (mrn) Owners Guide, 2nd Printing - 2009 Mercury Mariner | Owner's Manual - Page 158
inclines and drive over the crest of a hill without getting hung up or damaging underbody components. All other things held equal, a shorter wheelbase may make your vehicle quicker to respond to steering inputs than a vehicle with a longer wheelbase. 158 2009 Mariner (mrn) Owners Guide, 2nd - 2009 Mercury Mariner | Owner's Manual - Page 159
new pneumatic passenger car tires. They do not apply to deep tread, winter-type snow tires, space-saver or temporary use spare tires, light truck or " comparative rating based on the wear rate of the tire when tested under controlled conditions on a specified 159 2009 Mariner (mrn) Owners Guide, 2nd - 2009 Mercury Mariner | Owner's Manual - Page 160
of service, but they must be maintained in order to get the maximum benefit from them. Glossary of tire terminology • Tire label: A label showing the OE (Original Equipment) tire sizes, recommended inflation pressure and the maximum weight the vehicle can carry. 160 2009 Mariner (mrn) Owners Guide - 2009 Mercury Mariner | Owner's Manual - Page 161
Remember that a tire can lose up to half of its air pressure without appearing flat. Every day before you drive, check your tires. If one looks lower than the others, use a tire gauge to check pressure of all tires and adjust if required. 161 2009 Mariner (mrn) Owners Guide, 2nd Printing USA (fus) - 2009 Mercury Mariner | Owner's Manual - Page 162
change. A 10°F (6°C) temperature drop can cause a corresponding drop of 1 psi (7 kPa) in inflation pressure. Check your tire pressures frequently and adjust them to the proper pressure which can be found on the Safety Compliance Certification Label or Tire Label. 162 2009 Mariner (mrn) Owners Guide - 2009 Mercury Mariner | Owner's Manual - Page 163
or excessive wear and remove objects such as stones, nails or glass that may be wedged in the tread grooves. Check for holes or cuts that may permit air leakage from the tire and make necessary repairs. Also inspect the tire sidewalls for 163 2009 Mariner (mrn) Owners Guide, 2nd Printing USA (fus) - 2009 Mercury Mariner | Owner's Manual - Page 164
Tires, Wheels and Loading cracking, cuts, because they are more likely to blow out or fail. Improper or inadequate vehicle maintenance can cause tires to wear abnormally. Inspect all your tires, including the spare, frequently not been used. 164 2009 Mariner (mrn) Owners Guide, 2nd Printing USA (fus) - 2009 Mercury Mariner | Owner's Manual - Page 165
the use of non-recommended tires and wheels could cause steering, suspension, axle or transfer case/power transfer unit failure. If you have questions regarding tire replacement, contact your authorized dealer as soon as possible. 165 2009 Mariner (mrn) Owners Guide, 2nd Printing USA (fus) - 2009 Mercury Mariner | Owner's Manual - Page 166
than the maximum pressure, a Ford Dealer or other tire service professional should do the mounting. Always inflate steel carcass tires with a remote air fill with the person inflating standing at a minimum of of the TPMS may be damaged. 166 2009 Mariner (mrn) Owners Guide, 2nd Printing USA (fus) - 2009 Mercury Mariner | Owner's Manual - Page 167
can cause the front end of your vehicle to become misaligned or cause damage to your tires. If your vehicle seems to pull to one side when you're driving, the wheels may be out of alignment. Have an authorized dealer check the wheel alignment periodically. 167 2009 Mariner (mrn) Owners Guide, 2nd - 2009 Mercury Mariner | Owner's Manual - Page 168
indicated in the scheduled maintenance information that comes with your vehicle) will help your tires wear more evenly, providing better tire performance and longer tire life. • Front Wheel Drive (FWD) vehicles (front tires at top of diagram) 168 2009 Mariner (mrn) Owners Guide, 2nd Printing USA - 2009 Mercury Mariner | Owner's Manual - Page 169
Wheel Drive (4WD)/ All Wheel Drive (AWD) vehicles (front tires at top of diagram) Sometimes irregular tire wear can be corrected by rotating the tires. Note: If your tires show uneven wear ask an authorized dealer to check for and correct any wheel misalignment, tire imbalance or mechanical problem - 2009 Mercury Mariner | Owner's Manual - Page 170
of these items are listed below. (Note that the tire size, load index and speed rating for your vehicle may be different from this example.) 1. P: Indicates a tire, designated by the Tire and Rim Association (T&RA), that may be used for service on cars, SUVs, minivans and light trucks. Note: If your - 2009 Mercury Mariner | Owner's Manual - Page 171
Wheels and Loading Note: You may not find this information on all tires because it is not required by federal law. Letter rating Speed rating for traceability. This information is used to contact customers if a tire defect requires a recall. 9. 2009 Mariner (mrn) Owners Guide, 2nd Printing USA (fus) - 2009 Mercury Mariner | Owner's Manual - Page 172
edge of the driver's door. The cold inflation pressure should never be set lower than the recommended pressure on the vehicle label. The tire suppliers may have additional markings, notes or warnings such as standard load, radial tubeless, etc. 172 2009 Mariner (mrn) Owners Guide, 2nd Printing USA - 2009 Mercury Mariner | Owner's Manual - Page 173
Tires, Wheels and Loading Additional tire, designated by the Tire and Rim Association (T&RA), that is intended for service on light trucks. 2. Load Range/Load Inflation Limits: Indicates the tire's load-carrying capabilities rear axle. 173 2009 Mariner (mrn) Owners Guide, 2nd Printing USA (fus) - 2009 Mercury Mariner | Owner's Manual - Page 174
Association (T&RA), that is intended for temporary service on cars, SUVs, minivans and light trucks. 2. 145: Indicates the nominal width of driver's door. Refer to the payload description and graphic in the Vehicle loading - with and without a trailer section. 174 2009 Mariner (mrn) Owners Guide - 2009 Mercury Mariner | Owner's Manual - Page 175
that the replacement or alternate tires and wheels allow the TPMS to continue to function properly. The Tire Pressure Monitoring System complies with part 15 of the FCC rules and with RSS-210 of Industry Canada. Operation is subject to the 175 2009 Mariner (mrn) Owners Guide, 2nd Printing USA (fus) - 2009 Mercury Mariner | Owner's Manual - Page 176
changing the tire to avoid damaging the sensor. It is recommended that you always have your tires serviced by an authorized dealer. The tire pressure should be checked road wheel/tire needs to be repaired and put back on your vehicle. 176 2009 Mariner (mrn) Owners Guide, 2nd Printing USA (fus) - 2009 Mercury Mariner | Owner's Manual - Page 177
Low Tire Pressure Possible cause Customer Action Required Warning Light Solid Warning Light Tire(s) under1. Check your tire pressure to inflated ensure in use and the light remains ON, contact your authorized dealer as soon as possible. 177 2009 Mariner (mrn) Owners Guide, 2nd Printing USA (fus) - 2009 Mercury Mariner | Owner's Manual - Page 178
, repair as necessary.) Check air pressure in the road tires. If any tire is under-inflated, carefully drive the vehicle to the nearest location where air can be added to the tires. Inflate all the tires to the recommended inflation pressure. 178 2009 Mariner (mrn) Owners Guide, 2nd Printing USA - 2009 Mercury Mariner | Owner's Manual - Page 179
speed rating as those originally provided by Ford. Use of any tire or wheel front axle for either P235/70R16 or P225/65R17 tires . • Install cables securely, verifying that the cables do not touch any wiring, brake lines or fuel lines. • Drive 2009 Mariner (mrn) Owners Guide, 2nd Printing USA (fus) - 2009 Mercury Mariner | Owner's Manual - Page 180
a full tank of fuel and all standard equipment. It does not include passengers, cargo, or optional equipment. Vehicle Curb Weight - is the weight of your new vehicle when you picked it up from your authorized dealer plus any aftermarket equipment. 180 2009 Mariner (mrn) Owners Guide, 2nd Printing - 2009 Mercury Mariner | Owner's Manual - Page 181
carry). Once you have reached the maximum payload of your vehicle, do not add more cargo, even if there is space available. Overloading or improperly loading your vehicle can contribute to loss of vehicle control and vehicle rollover. 181 2009 Mariner (mrn) Owners Guide, 2nd Printing USA (fus) - 2009 Mercury Mariner | Owner's Manual - Page 182
and optional equipment. When towing, trailer tongue load or king pin weight is also part of cargo weight. GAW (Gross Axle Weight) - is the total weight placed on each axle (front and rear) - including vehicle curb weight and all payload. 182 2009 Mariner (mrn) Owners Guide, 2nd Printing USA (fus) - 2009 Mercury Mariner | Owner's Manual - Page 183
the fully loaded vehicle (including all options, equipment, passengers and cargo). The GVWR is shown on the Safety Compliance Certification Label located on the B-Pillar or the edge of the driver's door. The GVW must never exceed the GVWR. 183 2009 Mariner (mrn) Owners Guide, 2nd Printing USA (fus) - 2009 Mercury Mariner | Owner's Manual - Page 184
lb. (5,216 kg) fifth wheel trailer, multiply by 0.15 and 0.25 to obtain a proper king pin load range of 1,725 to 2,875 lb. (782 to 1,304 kg) WARNING: Do not exceed the GVWR or the GAWR specified on the Safety Compliance Certification Label. 184 2009 Mariner (mrn) Owners Guide, 2nd Printing USA (fus - 2009 Mercury Mariner | Owner's Manual - Page 185
Wheels any vehicle weight rating limitation could result in driver and passengers from XXX kg or XXX lb. 4. The resulting figure equals the available amount of cargo Consult this manual to determine how this reduces the available cargo and luggage 2009 Mariner (mrn) Owners Guide, 2nd Printing USA (fus) - 2009 Mercury Mariner | Owner's Manual - Page 186
be taken when driving a heavily loaded vehicle. Your vehicle can haul more cargo and people than most passenger cars. Depending upon the type and placement of the load, hauling cargo and people may raise the center of gravity of the vehicle. 186 2009 Mariner (mrn) Owners Guide, 2nd Printing USA - 2009 Mercury Mariner | Owner's Manual - Page 187
chapter. • Service your vehicle more frequently if you tow a trailer. Refer to the severe duty schedule in the scheduled maintenance guide. • Do not tow a trailer until your vehicle has been driven at least 1,000 miles (1609 km). • Refer to the instructions included with towing accessories for the - 2009 Mercury Mariner | Owner's Manual - Page 188
Wheels and Loading 4x2 GCWR (Gross Combined Weight Rating)/Trailer Weights Engine terms and instructions on calculating your brakes for trailers over a specified weight. The Mariner vehicle electrical system is not equipped to accommodate electric trailer brakes. 188 2009 Mariner (mrn) Owners Guide - 2009 Mercury Mariner | Owner's Manual - Page 189
system directly to your vehicle's brake system. Your vehicle may not have enough braking power and your chances of having a collision greatly increase. The braking system of the tow vehicle is rated for operation at the GVWR not GCWR. 189 2009 Mariner (mrn) Owners Guide, 2nd Printing USA (fus) - 2009 Mercury Mariner | Owner's Manual - Page 190
in the Driving chapter. • Anticipate stops and brake gradually. • Do not exceed the GCWR rating or transmission damage may occur. Servicing after towing If you tow a trailer for long distances, your vehicle will require more frequent service intervals. Refer to your scheduled maintenance information - 2009 Mercury Mariner | Owner's Manual - Page 191
check your hitch, electrical connections and trailer wheel lug nuts. • To aid in engine/ reliability. Replace the rear axle lubricant any time the axle has been submerged in water. Rear axle lubricant quantities are not to be checked or changed 2009 Mariner (mrn) Owners Guide, 2nd Printing USA (fus) - 2009 Mercury Mariner | Owner's Manual - Page 192
the Driving chapter). • Do not exceed 70 mph (113 km/h) with manual transmission vehicles and 65 mph (105 km/h) for automatic transmission vehicles. • Start the engine and allow it to run for five minutes at the beginning of each day and at each fuel stop. 192 2009 Mariner (mrn) Owners Guide, 2nd - 2009 Mercury Mariner | Owner's Manual - Page 193
starting a fuel-injected engine, avoid pressing idle, or drive your vehicle in dry grass or other dry ground cover. The emission system heats up the engine compartment and engine. See Guarding against exhaust fumes in this chapter for more instructions. 193 2009 Mariner (mrn) Owners Guide, 2nd Printing - 2009 Mercury Mariner | Owner's Manual - Page 194
in order to warm the engine. If the engine idle speed does not slow down automatically, have the vehicle checked. Before starting the vehicle: Make sure vehicle accessories are off. • Make sure the parking brake is set. E P RELEAS BRAKE 194 2009 Mariner (mrn) Owners Guide, 2nd Printing USA - 2009 Mercury Mariner | Owner's Manual - Page 195
in P (Park). 3. Turn the key to 3 (on) without turning the key to 4 (start). Some warning lights will briefly illuminate. See Warning lights and chimes in the Instrument Cluster chapter for more information regarding the warning lights. 195 2009 Mariner (mrn) Owners Guide, 2nd Printing USA (fus) - 2009 Mercury Mariner | Owner's Manual - Page 196
Driving Starting the engine 1. Turn the key to 3 (on) without turning the key to 4 (start). If there is difficulty in turning the key, rotate the steering wheel until the key turns freely. This condition may occur when: • the front wheels are turned • a front wheel is against the curb 2. Turn the - 2009 Mercury Mariner | Owner's Manual - Page 197
cord plug /engine block heater cord plug connection is free and clear of water in order to prevent possible shock or fire. • Be sure that areas where the vehicle is parked are clean and clear of all combustibles such as petroleum products, dust, rags, paper and similar items. 197 2009 Mariner (mrn - 2009 Mercury Mariner | Owner's Manual - Page 198
and environmental considerations can lead to more dust than in the past. Brake dust can be cleaned by weekly washing with soapy water and a soft sponge. Heavier deposits can be removed with Motorcraft Wheel and Tire Cleaner (ZC-37-A). 198 2009 Mariner (mrn) Owners Guide, 2nd Printing USA (fus) - 2009 Mercury Mariner | Owner's Manual - Page 199
may need to be serviced. Even when the ABS is disabled, ! P normal braking is still effective. If your BRAKE warning lamp BRAKE illuminates with the parking brake released, have your brake system serviced immediately by an authorized dealer. 199 2009 Mariner (mrn) Owners Guide, 2nd Printing USA - 2009 Mercury Mariner | Owner's Manual - Page 200
fail, the parking brake can be used to stop your vehicle in an emergency. Since the parking brake applies only the rear brakes, the vehicle's stopping distance will increase greatly and the handling of your vehicle will be adversely affected. 200 2009 Mariner (mrn) Owners Guide, 2nd Printing USA - 2009 Mercury Mariner | Owner's Manual - Page 201
the brakes to wear out quickly and reduce fuel economy. ADVANCETRAC WITH ROLL STABILITY CONTROL™ (RSC ) STABILITY ENHANCEMENT SYSTEM WARNING: Vehicle modifications involving braking system, aftermarket roof racks, suspension, steering system, tire construction and/or wheel/tire size may change the - 2009 Mercury Mariner | Owner's Manual - Page 202
is not manually disabled by pressing the AdvanceTrac with RSC Off button located on the center stack of the instrument panel. If the "sliding remains steadily illuminated, have the system serviced by car" icon an authorized dealer immediately. 202 2009 Mariner (mrn) Owners Guide, 2nd Printing - 2009 Mercury Mariner | Owner's Manual - Page 203
this condition and will continue to function during the cool-down period. The Engine Traction Control and Brake Traction Control system may be deactivated in certain situations. See the Switching Off AdvanceTrac with RSC section following. 203 2009 Mariner (mrn) Owners Guide, 2nd Printing USA (fus) - 2009 Mercury Mariner | Owner's Manual - Page 204
will flash. "sliding car" icon Certain adverse driving maneuvers may activate the Roll Stability Control system, which include: • Emergency lane-change • Taking a turn too fast • Quick maneuvering to avoid an accident, pedestrian or obstacle 204 2009 Mariner (mrn) Owners Guide, 2nd Printing USA - 2009 Mercury Mariner | Owner's Manual - Page 205
AdvanceTrac with RSC system to detect and attempt to mitigate trailer sway by applying brake force at individual wheels and, if necessary, by reducing engine power. No driver action is required. 205 Traction Control Enabled Disabled Enabled 2009 Mariner (mrn) Owners Guide, 2nd Printing USA (fus) - 2009 Mercury Mariner | Owner's Manual - Page 206
Driving -trailer over to a safe location to check the trailer weight distribution and tongue load Tires Wheels and Loading chapter of this owner's guide for driver has significant trailer towing experience, and can control trailer sway and maintain safe operation. 206 2009 Mariner (mrn) Owners Guide - 2009 Mercury Mariner | Owner's Manual - Page 207
In a rollover crash, an unbelted person is significantly more likely to die than a person wearing a seat belt. Utility vehicles and trucks have larger tires and increased ground clearance, giving the vehicle a higher center of gravity than a passenger car. 207 2009 Mariner (mrn) Owners Guide, 2nd - 2009 Mercury Mariner | Owner's Manual - Page 208
, such as driving at slower speeds, avoiding abrupt steering changes and allowing for increased stopping distance, when driving a heavily loaded procedure: 1. Apply the parking brake, turn the ignition to off, then remove the key. 208 2009 Mariner (mrn) Owners Guide, 2nd Printing USA (fus) - 2009 Mercury Mariner | Owner's Manual - Page 209
the vehicle and release the parking brake. WARNING: Do not drive your vehicle until you verify that the brakelamps are working. WARNING: Always set the parking brake fully and make sure the gearshift learning process will fully update 209 2009 Mariner (mrn) Owners Guide, 2nd Printing USA (fus) - 2009 Mercury Mariner | Owner's Manual - Page 210
the front wheels from turning. To put your vehicle in gear: • Depress the brake pedal brake pedal down while in this position. D (Drive) with Overdrive The normal driving position for the best fuel economy. Transmission operates in gears one through six. 210 2009 Mariner (mrn) Owners Guide - 2009 Mercury Mariner | Owner's Manual - Page 211
is automatically returned each time the engine is turned off. L (Low) • Provides maximum engine braking. • Will downshift to the lowest available gear for the current vehicle speed; allows for first gear when vehicle reaches slower speeds. 211 2009 Mariner (mrn) Owners Guide, 2nd Printing USA (fus) - 2009 Mercury Mariner | Owner's Manual - Page 212
objects, particularly those close to the ground. WARNING: Certain add-on devices such as large trailer hitches, bike or surfboard racks and any device that may block the normal detection zone of the RSS system may create false beeps. 212 2009 Mariner (mrn) Owners Guide, 2nd Printing USA (fus) - 2009 Mercury Mariner | Owner's Manual - Page 213
rate of the tone increases. When the obstacle is less than 10 inches (25.0 cm) away, the tone will sound continuously. If the RSS detects a stationary or receding object further than 10 inches (25.0 cm) from the side allows the driver to turn 2009 Mariner (mrn) Owners Guide, 2nd Printing USA (fus) - 2009 Mercury Mariner | Owner's Manual - Page 214
vehicle conditions and automatically adjusts the power distribution between the front and rear wheels. It combines transparent all-surface operation with highly capable four-wheel drive. The 4WD system is always active and requires no driver input. It is capable of handling all road conditions - 2009 Mercury Mariner | Owner's Manual - Page 215
and tires may occur or the engine may overheat. WARNING: Always set the parking brake fully and make sure the gearshift is latched in P (Park). Turn the ignition to the off position and remove the key whenever you leave your vehicle. 215 2009 Mariner (mrn) Owners Guide, 2nd Printing USA (fus) - 2009 Mercury Mariner | Owner's Manual - Page 216
over sand, try to keep all four wheels on the most solid area of the trail. Avoid reducing the tire pressures but shift to a lower gear and drive steadily through the terrain. Apply the accelerator slowly and avoid spinning the wheels. 216 2009 Mariner (mrn) Owners Guide, 2nd Printing USA (fus) - 2009 Mercury Mariner | Owner's Manual - Page 217
in our nations wilderness areas. Ford Motor Company joins the U.S. Forest Service and the Bureau of Land Management in encouraging you to help preserve our national forest and other public and private lands by "treading lightly." 217 2009 Mariner (mrn) Owners Guide, 2nd Printing USA (fus) - 2009 Mercury Mariner | Owner's Manual - Page 218
. The front wheels have to be turning in order to steer the vehicle. Rapid pumping of the brake pedal will help you slow the vehicle and still maintain steering control. Since your vehicle has anti-lock brakes, apply the brakes steadily. Do not "pump" the brakes. 218 2009 Mariner (mrn) Owners Guide - 2009 Mercury Mariner | Owner's Manual - Page 219
changes of direction on snow and ice. Apply the accelerator slowly and steadily when starting from a full stop. Avoid sudden braking as well. Although a 4WD vehicle may accelerate better than a two-wheel drive racks or pickup box cover). 219 2009 Mariner (mrn) Owners Guide, 2nd Printing USA (fus) - 2009 Mercury Mariner | Owner's Manual - Page 220
than the bottom of the wheel rims (for cars) or the bottom of the hubs (for trucks). When driving through water, traction or brake capability may be limited. Also, water may enter your engine's air intake and severely damage your engine or your vehicle may stall. Driving through deep water where the - 2009 Mercury Mariner | Owner's Manual - Page 221
the trailer is disabled, but the towing vehicle is operational, the trailer does not qualify for any roadside services. Canadian customers refer to your Customer Information Guide for information on: • coverage period • exact fuel amounts 221 2009 Mariner (mrn) Owners Guide, 2nd Printing USA (fus) - 2009 Mercury Mariner | Owner's Manual - Page 222
and all front and rear direction signals will flash. Press the flasher control again to turn them off. Use it when your vehicle is disabled and is creating a safety hazard for other motorists. Note: With extended use, the flasher may run down your battery. 222 2009 Mariner (mrn) Owners Guide, 2nd - 2009 Mercury Mariner | Owner's Manual - Page 223
fuse. Check the appropriate fuses before replacing any electrical components. 15 Note: Always replace a fuse with one that has the specified amperage rating. Using a fuse with a higher amperage rating can cause severe wire damage and could start a fire. 223 2009 Mariner (mrn) Owners Guide, 2nd - 2009 Mercury Mariner | Owner's Manual - Page 224
compartment fuse panel The fuse panel is located on the right-hand side of the center console, by the instrument panel. Remove the panel cover to access the fuse cover. Press the tabs on the top and bottom of the fuse cover to remove. 224 2009 Mariner (mrn) Owners Guide, 2nd Printing USA (fus) - 2009 Mercury Mariner | Owner's Manual - Page 225
Turn signals, Stop lamps Low beam headlamps (left) Low beam headlamps (right) Interior lights Backlighting Four wheel drive Power mirror switch Not used (spare) FCIM (radio buttons), Satellite radio, Front display module Climate control 225 2009 Mariner (mrn) Owners Guide, 2nd Printing USA (fus) - 2009 Mercury Mariner | Owner's Manual - Page 226
35 Fuse Amp Rating 15A 20A 20A wheel drive, Electric Power Steering Module (EPAS) , Park aid module PATS transceiver Climate control Subwoofer/Amp (Audiophile radio) Radio, Radio Amplifier (Navigation only) Front power point 36 37 38 39 40 5A 10A 20A 20A 20A 226 2009 Mariner (mrn) Owners Guide - 2009 Mercury Mariner | Owner's Manual - Page 227
WARNING: Always disconnect the battery before servicing high current fuses. WARNING: To reduce risk of electrical shock, always replace the cover to the Power Distribution Box before reconnecting the battery or refilling fluid reservoirs. 227 2009 Mariner (mrn) Owners Guide, 2nd Printing USA (fus) - 2009 Mercury Mariner | Owner's Manual - Page 228
Powertrain Control Module (PCM) Keep Alive power, PCM relay, Canister vent Alternator Liftgate latch Trailer tow parking lamps Anti-lock Brake System (ABS) Front wipers Starter Blower motor 6 7 8 9 10 11 12 15A* 15A* 20A* 50A** 30A** 30A** 40A** 228 2009 Mariner (mrn) Owners Guide, 2nd Printing - 2009 Mercury Mariner | Owner's Manual - Page 229
malfunction indicator lamp Powertrain Control Module Cooling fan 1 relay Starter relay Cooling fan main relay Cooling fan 2 relay Reverse lamp relay Not used Trailer tow left turn relay Trailer tow right turn relay Trailer tow park relay 229 2009 Mariner (mrn) Owners Guide, 2nd Printing USA (fus - 2009 Mercury Mariner | Owner's Manual - Page 230
fuse CHANGING A FLAT TIRE If you get a flat tire while driving: • do not brake heavily. • gradually decrease the vehicle's speed. • hold the steering wheel firmly. • slowly move to a safe place on the side of and should not be used. 230 2009 Mariner (mrn) Owners Guide, 2nd Printing USA (fus) - 2009 Mercury Mariner | Owner's Manual - Page 231
load rating listed on the Safety Compliance Label • Tow a trailer • Use snow chains on the end of the vehicle with the dissimilar spare tire • Use more than one dissimilar spare tire at a time • Use commercial car washing equipment • Try to repair the dissimilar spare tire 231 2009 Mariner (mrn - 2009 Mercury Mariner | Owner's Manual - Page 232
be given to: • Towing a trailer • Driving vehicles equipped with a camper body • Driving vehicles with a load on the cargo rack Drive cautiously when using a full-size dissimilar spare tire/wheel and seek service as soon as possible. 232 2009 Mariner (mrn) Owners Guide, 2nd Printing USA (fus) - 2009 Mercury Mariner | Owner's Manual - Page 233
cargo management system, the jack and tools are in the forward compartment under a lid. Unbuckle the strap and remove the jack and tools by pulling the right side up first. Remove the tools from the jack in order to remove the spare tire from under the vehicle. 233 2009 Mariner (mrn) Owners Guide - 2009 Mercury Mariner | Owner's Manual - Page 234
until it can be slid rearward and the cable is slack. 3. Slide the retainer through the center of the wheel. If equipped with a tether, perform the following additional steps: 4. Lift the spare tire on end to access tether attachment (1). 234 2009 Mariner (mrn) Owners Guide, 2nd Printing USA (fus) - 2009 Mercury Mariner | Owner's Manual - Page 235
, raise winch up into the installed position. 7. Use the attached fastener strap (2) to tie the tether end to the winch actuator shaft (if equipped). 235 2009 Mariner (mrn) Owners Guide, 2nd Printing USA (fus) - 2009 Mercury Mariner | Owner's Manual - Page 236
the danger of being hit when operating the jack or changing the wheel. 1. Block the diagonally opposite wheel. 2. Loosen each wheel lug nut one-half turn counterclockwise but do not remove them until the wheel is raised off the ground. 236 2009 Mariner (mrn) Owners Guide, 2nd Printing USA (fus) - 2009 Mercury Mariner | Owner's Manual - Page 237
Roadside Emergencies Before placing the jack under the vehicle, NOTE the jack locations: • Front View shown from rear of front tire. Position the jack directly below the protruding bolt. 237 2009 Mariner (mrn) Owners Guide, 2nd Printing USA (fus) - 2009 Mercury Mariner | Owner's Manual - Page 238
jack according to the guides and turn the jack handle clockwise until the tire is a maximum of 1 inch (25 mm) off the ground. Be sure to place the jack away from the rear edge of the rocker to avoid damaging the rear tire spoiler (pictured). 238 2009 Mariner (mrn) Owners Guide, 2nd Printing USA - 2009 Mercury Mariner | Owner's Manual - Page 239
your body under the vehicle while changing a tire. Do not start the engine when your vehicle is on the jack. The jack is only meant for changing the Wheel lug nut torque specifications later in this chapter 3 4 for the proper lug nut torque specification. 5 2 239 2009 Mariner (mrn) Owners Guide - 2009 Mercury Mariner | Owner's Manual - Page 240
wheel and attach lug nut using lug wrench. 3. Lay the tire on the ground with the valve stem facing down. If your vehicle is equipped with aluminum wheels, remove the wheel ornament. 4. Slide the wheel is in the fully stowed position. The 240 2009 Mariner (mrn) Owners Guide, 2nd Printing USA (fus) - 2009 Mercury Mariner | Owner's Manual - Page 241
surfaces of the wheel. Installing wheels without correct metal-to-metal contact at the wheel mounting surfaces can cause the wheel nuts to loosen and the wheel to come off while the vehicle is in motion, resulting in loss of control. Bolt size 241 2009 Mariner (mrn) Owners Guide, 2nd Printing USA - 2009 Mercury Mariner | Owner's Manual - Page 242
/stud holes or wheel-to-brake surfaces. RUNNING OUT OF FUEL If you have run out of fuel and need to refill the vehicle with a portable fuel container, see Running out of fuel in the Maintenance and Specifications chapter for proper fuel filling method using a portable fuel container and the included - 2009 Mercury Mariner | Owner's Manual - Page 243
all other accessories off. Connecting the jumper cables 1. Connect the positive (+) jumper cable to the positive (+) terminal of the discharged battery. Note: In the illustrations, lightning bolts are used to designate the assisting (boosting) battery. 2009 Mariner (mrn) Owners Guide, 2nd Printing - 2009 Mercury Mariner | Owner's Manual - Page 244
of the positive (+) cable to the positive (+) terminal of the assisting battery. 3. Connect the negative (-) cable to the negative (-) terminal of the assisting battery. 244 2009 Mariner (mrn) Owners Guide, 2nd Printing USA (fus) - - - + + - + + - 2009 Mercury Mariner | Owner's Manual - Page 245
of the negative (-) cable to an exposed metal part of the stalled vehicle's engine, away from the battery and the carburetor/fuel injection system. Do not use fuel lines, engine rocker covers or the intake manifold as grounding points. WARNING: Do not connect the end of the second cable to the - 2009 Mercury Mariner | Owner's Manual - Page 246
jumper cable from the ground metal surface. Note: In the illustrations, lightning bolts are used to designate the assisting (boosting) battery. 2. Remove the jumper cable on the negative (-) connection of the booster vehicle's battery. 246 2009 Mariner (mrn) Owners Guide, 2nd Printing USA (fus - 2009 Mercury Mariner | Owner's Manual - Page 247
the disabled vehicle's battery. After the disabled vehicle has been started and the jumper cables removed, allow it to idle for several minutes so the engine computer can relearn its idle conditions. 2009 Mariner (mrn) Owners Guide, 2nd Printing USA (fus) - - - + + - + + 247 - 2009 Mercury Mariner | Owner's Manual - Page 248
towing procedure. On FWD vehicles, if your vehicle is to be towed from the front, ensure proper wheel lift equipment is used to raise the front wheels off the ground. The rear wheels can be left on the ground when towed in this fashion. 248 2009 Mariner (mrn) Owners Guide, 2nd Printing USA - 2009 Mercury Mariner | Owner's Manual - Page 249
(Neutral). Refer to Brake shift interlock in the Driving chapter for specific instructions if you cannot move the gear shift lever into N (Neutral). • Maximum speed is not to exceed 35 mph (56 km/h). • Maximum distance is 50 miles (80 km). 249 2009 Mariner (mrn) Owners Guide, 2nd Printing USA (fus - 2009 Mercury Mariner | Owner's Manual - Page 250
are available online at www.genuineservice.com. • U.S. dealer locator by Dealer Name, City/State, or Zip Code • Owner Guides • Maintenance Schedules • Recalls • Ford Extended Service Plans • Ford Genuine Accessories • Service specials and promotions. 250 2009 Mariner (mrn) Owners Guide, 2nd - 2009 Mercury Mariner | Owner's Manual - Page 251
the Sales Manager, Service Manager or Customer Relations Manager. 3. If you require assistance or clarification on Ford Motor Company policies, please contact the Ford Customer Relationship Center In order to help you serve you better, please have the following information available when contacting - 2009 Mercury Mariner | Owner's Manual - Page 252
of service for repair Drive Mail Drop 3NE-B Dearborn, MI 48126 THE BETTER BUSINESS BUREAU (BBB) AUTO LINE PROGRAM (U.S. ONLY) Your satisfaction is important to Ford Motor Company and to your dealer. If a warranty concern has not been resolved using the three-step 252 2009 Mariner (mrn) Owners Guide - 2009 Mercury Mariner | Owner's Manual - Page 253
to resolve a factory-related vehicle service concern have been unsatisfactory, Ford of Canada participates in an impartial third party mediation/arbitration program administered by the Canadian Motor Vehicle Arbitration Plan (CAMVAP). 253 2009 Mariner (mrn) Owners Guide, 2nd Printing USA (fus) - 2009 Mercury Mariner | Owner's Manual - Page 254
to a foreign country, contact the appropriate foreign embassy or consulate. These officials can inform you of local vehicle registration regulations and where to find unleaded fuel. 254 2009 Mariner (mrn) Owners Guide, 2nd Printing USA (fus) - 2009 Mercury Mariner | Owner's Manual - Page 255
customer relationship office. The use of leaded fuel in your vehicle without proper conversion may damage the effectiveness of your emission control system and may cause engine knocking or serious engine credit card, check or money order.) 255 2009 Mariner (mrn) Owners Guide, 2nd Printing USA (fus) - 2009 Mercury Mariner | Owner's Manual - Page 256
. REPORTING SAFETY DEFECTS (CANADA ONLY) If you believe that your vehicle has a defect which could cause a crash or could cause injury or death, you should immediately inform Transport Canada, using their toll-free number: 1-800-333-0510. 256 2009 Mariner (mrn) Owners Guide, 2nd Printing USA (fus) - 2009 Mercury Mariner | Owner's Manual - Page 257
, diesel fuel, bird droppings and insect deposits because they can cause damage to the vehicle's paintwork and trim over time. Use Motorcraft Bug and Tar Remover (ZC-42) which is available from your authorized dealer. • Remove any exterior accessories, such as antennas, before entering a car wash - 2009 Mercury Mariner | Owner's Manual - Page 258
. • Do not use hydrofluoric acid-based or high caustic-based wheel cleaners, steel wool, fuels or strong household detergent. • To remove tar and grease, use Motorcraft Bug and Tar Remover (ZC-42), available from your authorized dealer. 258 2009 Mariner (mrn) Owners Guide, 2nd Printing USA (fus) - 2009 Mercury Mariner | Owner's Manual - Page 259
In Canada use Motorcraft Engine Shampoo (CXC-66-A). • Cover the highlighted areas to prevent water damage when cleaning the engine. • Never wash or rinse the engine while it is running; water in the running engine may cause internal damage. 2.5L I4 259 2009 Mariner (mrn) Owners Guide, 2nd Printing - 2009 Mercury Mariner | Owner's Manual - Page 260
. To clean these items, follow these tips: • The windshield, rear windows and side windows may be cleaned with a non-abrasive cleaner such as Motorcraft Ultra-Clear Spray Glass Cleaner (ZC-23), available from your authorized dealer. 260 2009 Mariner (mrn) Owners Guide, 2nd Printing USA (fus) - 2009 Mercury Mariner | Owner's Manual - Page 261
available automated car wash Do not use fuel, kerosene, the driver from interior trim and cluster lens. WARNING: Do not use chemical solvents or strong detergents when cleaning the steering wheel or instrument panel to avoid contamination of the airbag system. 261 2009 Mariner (mrn) Owners Guide - 2009 Mercury Mariner | Owner's Manual - Page 262
INTERIOR For fabric, carpets, cloth seats, safety belts and seats equipped with side airbags: • Remove dust and loose dirt with a vacuum cleaner. • Remove light contaminate the side-airbag system and affect performance of the side airbag in a collision. 262 2009 Mariner (mrn) Owners Guide, 2nd - 2009 Mercury Mariner | Owner's Manual - Page 263
of equivalent quality: Motorcraft Bug and Tar Remover (ZC-42) Motorcraft Car Wash (Canada only) (CXC-83) Motorcraft Custom Bright Metal Cleaner (ZC-15) Motorcraft Custom Clear Coat Polish (ZC-8-A) Motorcraft Custom Vinyl Protectant (ZC-40-A) 263 2009 Mariner (mrn) Owners Guide, 2nd Printing USA - 2009 Mercury Mariner | Owner's Manual - Page 264
(ZC-11-D) Detail Wash (ZC-3-A) Dusting Cloth (ZC-24) Engine Shampoo and Degreaser (U.S. only) (ZC-20) Engine Shampoo (Canada only) (CXC-66-A) Multi-Purpose Cleaner (Canada and Wax (Canada only) (CXC-95) Wheel and Tire Cleaner (ZC-37-A) 264 2009 Mariner (mrn) Owners Guide, 2nd Printing USA (fus) - 2009 Mercury Mariner | Owner's Manual - Page 265
flames and other burning (cigarettes) material away from the battery and all fuel related parts. Working with the engine off 1. Set the parking brake and shift to P (Park). 2. Turn off the engine and remove the key. 3. Block the wheels. 265 2009 Mariner (mrn) Owners Guide, 2nd Printing USA (fus) - 2009 Mercury Mariner | Owner's Manual - Page 266
handle located under the bottom of the instrument panel. 2. At the front of the vehicle, lift up on the auxiliary latch handle located in the center between the hood and the grille. 3. Lift the hood open and secure it with the prop rod. 266 2009 Mariner (mrn) Owners Guide, 2nd Printing USA (fus) - 2009 Mercury Mariner | Owner's Manual - Page 267
2.5L I4 engine 1. Engine coolant reservoir 2. Engine oil filler cap 3. Automatic transmission dipstick 4. Brake fluid reservoir 5. Air filter assembly 6. Power distribution box 7. Battery 8. Engine coolant bleed valve 9. Engine oil dipstick 10. Windshield washer fluid reservoir 267 2009 Mariner - 2009 Mercury Mariner | Owner's Manual - Page 268
1. Engine coolant reservoir 2. Air filter assembly 3. Brake fluid reservoir 4. Automatic transmission fluid dipstick 5. Power distribution box 6. Battery 7. Coolant bleed valve 8. Engine oil dipstick 9. Engine oil filler cap 10. Windshield washer fluid reservoir 268 2009 Mariner (mrn) Owners Guide - 2009 Mercury Mariner | Owner's Manual - Page 269
type fluid or bug wash. They may cause squeaking, chatter noise, streaking and smearing. Refer to the Maintenance product specifications the engine coolant reservoir. Washer fluid placed in the cooling system may harm engine and cooling system components. 269 2009 Mariner (mrn) Owners Guide, 2nd - 2009 Mercury Mariner | Owner's Manual - Page 270
Maintenance and Specifications Checking and adding washer fluid for the liftgate Washer fluid for the liftgate is supplied by the same reservoir as the windshield. CHANGING THE WIPER BLADES 1. Pull the edge of the wiper rubber element. 270 2009 Mariner (mrn) Owners Guide, 2nd Printing USA (fus) - 2009 Mercury Mariner | Owner's Manual - Page 271
for the oil to drain into the oil pan. 3. Set the parking brake and ensure the gearshift is securely latched in P (Park). 4. Open the hood. Protect yourself from engine heat. 5. Locate and carefully remove the engine oil level dipstick. 271 2009 Mariner (mrn) Owners Guide, 2nd Printing USA (fus) - 2009 Mercury Mariner | Owner's Manual - Page 272
Maintenance and Specifications • 2.5L I4 engine • 3.0L DOHC V6 Duratec engine 6. Wipe the dipstick clean. Insert lower hole or lower mark, engine oil must be added to raise the level within the normal operating range. • 2.5L I4 engine 272 2009 Mariner (mrn) Owners Guide, 2nd Printing USA (fus) - 2009 Mercury Mariner | Owner's Manual - Page 273
5. Fully install the engine oil filler cap by turning the filler cap clockwise 1/4 of a turn until it is seated. To avoid possible oil loss, DO NOT operate the vehicle with the engine oil level dipstick and/or the engine oil filler cap removed. 273 2009 Mariner (mrn) Owners Guide, 2nd Printing USA - 2009 Mercury Mariner | Owner's Manual - Page 274
damage that is not covered by Ford warranty. Change your engine oil and filter according to the appropriate schedule listed in the scheduled maintenance information. Ford production and Motorcraft replacement oil filters are designed for added engine protection and long life. If a replacement oil - 2009 Mercury Mariner | Owner's Manual - Page 275
maintenance-free battery which normally does not require additional water during its life of service. If your battery has a cover/shield, make sure it is reinstalled after the battery has been cleaned or replaced. For longer, trouble accessories 2009 Mariner (mrn) Owners Guide, 2nd Printing USA (fus) - 2009 Mercury Mariner | Owner's Manual - Page 276
fuel trim strategy for optimum driveability and performance. To begin this process: 1. With the vehicle at a complete stop, set the parking brake. 2. Put the gearshift in P (Park), turn off all accessories and start the engine. 3. Run the engine 2009 Mariner (mrn) Owners Guide, 2nd Printing USA (fus) - 2009 Mercury Mariner | Owner's Manual - Page 277
and level of engine coolant should be checked at the intervals listed in scheduled maintenance information. The coolant concentration should be maintained at 50/50 coolant and distilled water, which equates to a freeze point of -34°F (-36°C). Coolant concentration testing is possible with - 2009 Mercury Mariner | Owner's Manual - Page 278
FILL RANGE" as listed on the engine coolant reservoir (depending upon application). • Refer to scheduled maintenance information for service interval schedules. • Be sure to read and understand Precautions when servicing your vehicle in this chapter. If the engine coolant has not been checked at the - 2009 Mercury Mariner | Owner's Manual - Page 279
turn the engine off and let it cool. 2. When the engine is cool, wrap a thick cloth around the coolant pressure relief cap on the coolant reservoir (an opaque plastic bottle). Slowly turn cap counterclockwise (left) until pressure begins to release. 279 2009 Mariner (mrn) Owners Guide, 2nd Printing - 2009 Mercury Mariner | Owner's Manual - Page 280
coolant since a Ford-approved recycling process is not yet available. Used engine coolant should be disposed of in an appropriate manner. Follow your community's regulations and standards for recycling and disposing of automotive fluids. 280 2009 Mariner (mrn) Owners Guide, 2nd Printing USA (fus) - 2009 Mercury Mariner | Owner's Manual - Page 281
(2.5L I4 engine only) If the engine coolant supply is depleted, this feature allows the vehicle to be driven temporarily before incremental component damage is incurred. The "fail-safe" distance depends on ambient temperatures, vehicle load and terrain. 281 2009 Mariner (mrn) Owners Guide, 2nd - 2009 Mercury Mariner | Owner's Manual - Page 282
the chance of engine damage. Take your vehicle to an authorized dealer as soon as possible. FUEL FILTER Your vehicle is equipped with a lifetime fuel filter that is integrated with the fuel tank. Regular maintenance or replacement is not needed. 282 2009 Mariner (mrn) Owners Guide, 2nd Printing USA - 2009 Mercury Mariner | Owner's Manual - Page 283
and seek medical attention. Failure to seek proper medical attention could lead to permanent injury. • Fuels can also be harmful if absorbed through the skin. If fuel is splashed on the skin and/or clothing, promptly remove contaminated 283 2009 Mariner (mrn) Owners Guide, 2nd Printing USA (fus) - 2009 Mercury Mariner | Owner's Manual - Page 284
build-up when filling an ungrounded fuel container: • Place approved fuel container on the ground. • DO NOT fill a fuel container while it is in the vehicle (including the cargo area). • Keep the fuel pump nozzle in contact with the fuel container while filling. 284 2009 Mariner (mrn) Owners Guide - 2009 Mercury Mariner | Owner's Manual - Page 285
-up (after four or more hours with the engine off) followed by city/highway driving. Continuing to drive with the Check Fuel Fill Inlet lamp or Check Fuel Fill Inlet message on may cause the Service Engine Soon lamp to turn on as well. 285 2009 Mariner (mrn) Owners Guide, 2nd Printing USA (fus) - 2009 Mercury Mariner | Owner's Manual - Page 286
products to your fuel tank. It should not be necessary to add any aftermarket products to your fuel tank if you continue to use high quality fuel of the recommended octane rating. These products have not been approved for your engine and 286 2009 Mariner (mrn) Owners Guide, 2nd Printing USA - 2009 Mercury Mariner | Owner's Manual - Page 287
of portable fuel containers or aftermarket funnels into the Easy Fuel™ system. This could damage the fuel system and its seal, and may cause fuel to run onto the ground instead of filling the tank, which could result in serious personal injury. 287 2009 Mariner (mrn) Owners Guide, 2nd Printing - 2009 Mercury Mariner | Owner's Manual - Page 288
OF GOOD FUEL ECONOMY Measuring techniques Your best source of information about actual fuel economy is you, the driver. You must gather information as accurately and consistently as possible. Fuel expense, frequency of fill-ups or fuel gauge readings are 288 2009 Mariner (mrn) Owners Guide, 2nd - 2009 Mercury Mariner | Owner's Manual - Page 289
of driving (engine break-in period). You will get a more accurate measurement after 2,000 miles-3,000 miles (3,000 km-5,000 km). Filling the tank The advertised fuel capacity of the fuel tank on your vehicle is equal to the rated refill capacity of the fuel tank as listed in the Maintenance product - 2009 Mercury Mariner | Owner's Manual - Page 290
how temperature impacts fuel economy. In general, lower temperatures give lower fuel economy. Driving style - good driving and fuel economy habits Give consideration to the lists that follow and you may be able to change a number of variables and improve your fuel economy. Habits • Smooth, moderate - 2009 Mercury Mariner | Owner's Manual - Page 291
with the wheels out of alignment will reduce fuel economy. • Use recommended engine oil. Refer to Maintenance product specifications and capacities in this chapter. • Perform all regularly scheduled maintenance items. Follow the recommended maintenance schedule and owner maintenance checks found in - 2009 Mercury Mariner | Owner's Manual - Page 292
changes to your vehicle or engine. By law, vehicle owners and anyone who manufactures, repairs, services, sells, leases, trades vehicles, or supervises a fleet of vehicles are not permitted to intentionally remove an emission control device or prevent 292 2009 Mariner (mrn) Owners Guide - 2009 Mercury Mariner | Owner's Manual - Page 293
-II may not have symptoms that are apparent, indicator on can continued driving with the service engine soon result in increased emissions, lower fuel economy, reduced engine and transmission smoothness, and lead to more costly repairs. 293 2009 Mariner (mrn) Owners Guide, 2nd Printing USA (fus) - 2009 Mercury Mariner | Owner's Manual - Page 294
driving cycle. The engine must warm up to its normal operating temperature. Once started, do not turn off the engine until the above driving cycle is complete. If the vehicle is still not ready for I/M testing, the above driving cycle will have to be repeated. 294 2009 Mariner (mrn) Owners Guide - 2009 Mercury Mariner | Owner's Manual - Page 295
could be compromised; seek service from your authorized dealer immediately. TRANSMISSION FLUID Checking automatic transmission fluid Refer to your scheduled maintenance information for scheduled intervals for fluid checks and changes. Your transmission does not consume fluid. However, the fluid - 2009 Mercury Mariner | Owner's Manual - Page 296
not drive the vehicle if the fluid level is at the bottom of the dipstick and the outside temperatures are above 50°F (10°C). Correct fluid level The transmission fluid should be checked at can be caused by an overheating condition. 296 2009 Mariner (mrn) Owners Guide, 2nd Printing USA (fus) - 2009 Mercury Mariner | Owner's Manual - Page 297
the air filter element listed. Refer to Motorcraft part numbers in this chapter. WARNING: To reduce the risk of vehicle damage and/or personal burn injuries do not start your engine with the air cleaner removed and do not remove it while the engine is running. 297 2009 Mariner (mrn) Owners Guide - 2009 Mercury Mariner | Owner's Manual - Page 298
Replace the air filter housing cover and secure the clamps. Note: Failure to use the correct air filter element may result in severe engine damage. The customer warranty may be void for any damage to the engine if the correct air filter element is not used. 298 2009 Mariner (mrn) Owners Guide, 2nd - 2009 Mercury Mariner | Owner's Manual - Page 299
the correct air filter element may result in severe engine damage. The customer warranty may be void for any damage to the engine if the correct air filter element is not used. 2 The PCV valve is a critical emission component. It is one of the items listed in scheduled maintenance information and - 2009 Mercury Mariner | Owner's Manual - Page 300
or XL-5 / ESB-M1C93-B 2009 Mariner (mrn) Owners Guide, 2nd Printing USA (fus) 7.4 quarts (7.0L) 9.5 quarts (9.0L) - 5.3 quarts (5.0 L) 6.0 quarts (5.7L) 9.0 quarts (8.5L)3 Maintenance and Specifications Body hinges, latches, door striker plates and rollers, seat tracks, fuel filler door hinge and - 2009 Mercury Mariner | Owner's Manual - Page 301
2009 Mariner (mrn) Owners Guide, 2nd Printing USA (fus) Item Capacity Maintenance Washer WSB-M8B16-A2 Concentrate 16.5 gallons Fuel tank - - (62.5L) 1 Add the scheduled maintenance information to determine the correct service levels are not to be checked or changed unless a leak is suspected - 2009 Mercury Mariner | Owner's Manual - Page 302
drivebelt routing 2.5L I4 engine 152 87 octane 1-3-4-2 Coil on plug 0.049-0.053 inch (1.25-1.35mm) 9.7:1 3.0L DOHC V6 Duratec engine 183 87 octane 1-4-2-5-3-6 Coil on plug 0.045-0.049 inch (1.15-1.25mm) 10.3:1 • 2.5L I4 Engine • 3.0L V6 Engine 302 2009 Mariner (mrn) Owners Guide, 2nd Printing USA - 2009 Mercury Mariner | Owner's Manual - Page 303
Maintenance and Specifications IDENTIFYING YOUR VEHICLE Safety Compliance Certification Label The National on the driver side instrument panel. Please note that in the graphic, XXXX is representative of your vehicle identification number. XXXXXXXXXXXXXXXXX 303 2009 Mariner (mrn) Owners Guide, 2nd - 2009 Mercury Mariner | Owner's Manual - Page 304
Maintenance and Specifications The Vehicle Identification Number (VIN) contains the following information: 1. World manufacturer identifier 2. Brake system / Gross Vehicle Weight Rating (GVWR) / Restraint System 3. Vehicle line, series, body type 4. Engine type 5. Check digit 6. Model year 7. - 2009 Mercury Mariner | Owner's Manual - Page 305
our online store at: www.mercuryaccessories.com. Exterior style Bug shields Deflectors Step bars Splash guards Interior style Cargo Logic / Cargo management Electrochromatic compass/temperature interior mirrors Floor mats Security shade 305 2009 Mariner (mrn) Owners Guide, 2nd Printing USA (fus) - 2009 Mercury Mariner | Owner's Manual - Page 306
Radio Antennas in the area of the driver's side hood. • Electrical or electronic accessories or components that are added to the vehicle by the authorized dealer or the owner may adversely affect battery performance and durability. 306 2009 Mariner (mrn) Owners Guide, 2nd Printing USA (fus) - 2009 Mercury Mariner | Owner's Manual - Page 307
, 135, 138 passenger airbag ...128, 135, 138 side airbag ...134 All Wheel Drive (AWD), driving off road ...214 Ambient mood/lighting ...48 Ambulance packages ...8 AM/FM ...18 Antifreeze (see Engine coolant) ...277 Anti-lock brake system (see Brakes) ...199 Anti-theft system ...97 Audio system (see - 2009 Mercury Mariner | Owner's Manual - Page 308
system ...292 Engine ...302 cleaning ...259 coolant ...277 fail-safe cooling ...281 idle speed control ...275 lubrication specifications ...300 refill capacities ...300 service points ...267-268 starting after a collision ...223 Engine block heater ...196 2009 Mariner (mrn) Owners Guide, 2nd - 2009 Mercury Mariner | Owner's Manual - Page 309
manual heating and air conditioning system ...36 Hood ...266 I Ignition ...193, 302 Illuminated visor mirror ...57 Infant seats (see Safety seats) ...144 Inspection/maintenance (I/M) testing ...294 Instrument panel cleaning ...261 cluster ...12 lighting up panel and interior ...45 309 2009 Mariner - 2009 Mercury Mariner | Owner's Manual - Page 310
P Parking brake ...200 Parts (see Motorcraft parts) ...299 Passenger Occupant Classification Sensor ...113 Power distribution box (see Fuses) ...227 Power door locks ...86 Power mirrors ...63 Power point ...60 Power steering ...207 fluid, refill capacity ...300 2009 Mariner (mrn) Owners Guide, 2nd - 2009 Mercury Mariner | Owner's Manual - Page 311
61 Preparing to drive your vehicle ... 140 Occupant Classification Sensor ...113 warning light and chime ...120-121 Safety passive anti-theft system ...97 Servicing your vehicle ...265 Setting the wheel controls ...67 tilting ...56 Stereo CD-MP3 ...18 SYNC ...35 311 2009 Mariner (mrn) Owners Guide - 2009 Mercury Mariner | Owner's Manual - Page 312
lights (see Lights) ...12 Washer fluid ...269 Water, Driving through ...220 Windows power ...61 rear wiper/washer ...56 Windshield washer fluid and wipers ...55 checking and adding fluid ...269 liftgate reservoir ...270 replacing wiper blades ...270-271 Wrecker towing ...248 312 2009 Mariner
-
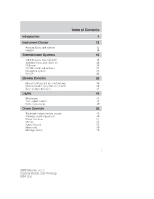 1
1 -
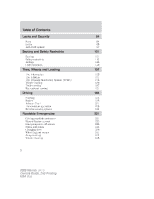 2
2 -
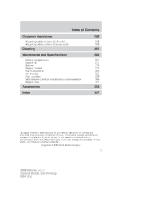 3
3 -
 4
4 -
 5
5 -
 6
6 -
 7
7 -
8
-
9
-
10
-
11
-
12
-
13
-
14
-
15
-
16
-
17
-
18
-
19
-
20
-
21
-
22
-
23
-
24
-
25
-
26
-
27
-
28
-
29
-
30
-
31
-
32
-
33
-
34
-
35
-
36
-
37
-
38
-
39
-
40
-
41
-
42
-
43
-
44
-
45
-
46
-
47
-
48
-
49
-
50
-
51
-
52
-
53
-
54
-
55
-
56
-
57
-
58
-
59
-
60
-
61
-
62
-
63
-
64
-
65
-
66
-
67
-
68
-
69
-
70
-
71
-
72
-
73
-
74
-
75
-
76
-
77
-
78
-
79
-
80
-
81
-
82
-
83
-
84
-
85
-
86
-
87
-
88
-
89
-
90
-
91
-
92
-
93
-
94
-
95
-
96
-
97
-
98
-
99
-
100
-
101
-
102
-
103
-
104
-
105
-
106
-
107
-
108
-
109
-
110
-
111
-
112
-
113
-
114
-
115
-
116
-
117
-
118
-
119
-
120
-
121
-
122
-
123
-
124
-
125
-
126
-
127
-
128
-
129
-
130
-
131
-
132
-
133
-
134
-
135
-
136
-
137
-
138
-
139
-
140
-
141
-
142
-
143
-
144
-
145
-
146
-
147
-
148
-
149
-
150
-
151
-
152
-
153
-
154
-
155
-
156
-
157
-
158
-
159
-
160
-
161
-
162
-
163
-
164
-
165
-
166
-
167
-
168
-
169
-
170
-
171
-
172
-
173
-
174
-
175
-
176
-
177
-
178
-
179
-
180
-
181
-
182
-
183
-
184
-
185
-
186
-
187
-
188
-
189
-
190
-
191
-
192
-
193
-
194
-
195
-
196
-
197
-
198
-
199
-
200
-
201
-
202
-
203
-
204
-
205
-
206
-
207
-
208
-
209
-
210
-
211
-
212
-
213
-
214
-
215
-
216
-
217
-
218
-
219
-
220
-
221
-
222
-
223
-
224
-
225
-
226
-
227
-
228
-
229
-
230
-
231
-
232
-
233
-
234
-
235
-
236
-
237
-
238
-
239
-
240
-
241
-
242
-
243
-
244
-
245
-
246
-
247
-
248
-
249
-
250
-
251
-
252
-
253
-
254
-
255
-
256
-
257
-
258
-
259
-
260
-
261
-
262
-
263
-
264
-
265
-
266
-
267
-
268
-
269
-
270
-
271
-
272
-
273
-
274
-
275
-
276
-
277
-
278
-
279
-
280
-
281
-
282
-
283
-
284
-
285
-
286
-
287
-
288
-
289
-
290
-
291
-
292
-
293
-
294
-
295
-
296
-
297
-
298
-
299
-
300
-
301
-
302
-
303
-
304
-
305
-
306
-
307
-
308
-
309
-
310
-
311
-
312
 |
 |

Introduction
4
Instrument Cluster
12
Warning lights and chimes
12
Gauges
16
Entertainment Systems
18
AM/FM stereo with CD/MP3
18
Auxiliary input jack (Line in)
26
USB port
28
Satellite radio information
32
Navigation system
35
SYNC
°
35
Climate Controls
36
Manual heating and air conditioning
36
Dual automatic temperature control
39
Rear window defroster
42
Lights
43
Headlamps
43
Turn signal control
47
Bulb replacement
49
Driver Controls
55
Windshield wiper/washer control
55
Steering wheel adjustment
56
Power windows
61
Mirrors
63
Speed control
64
Moon roof
69
Message center
70
Table of Contents
1
2009 Mariner
(mrn)
Owners Guide, 2nd Printing
USA
(fus)