2000 Nissan Xterra Owner's Manual - Page 149
2000 Nissan Xterra Manual
Page 149 highlights
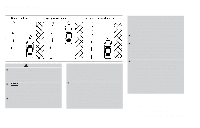
POWER STEERING SYSTEM verse) position. When parking on an uphill grade, place the gearshift lever in the 1st position. Automatic transmission models: Move the gearshift lever to the P (Park) position. 3. To help prevent the vehicle from rolling into the street when parked on an incline, it is a good practice to turn the wheels as illustrated. HEADED DOWNHILL WITH CURB: 1 Turn the wheels into the curb and move the vehicle forward until the curb side wheel gently touches the curb. HEADED UPHILL WITH CURB: 2 Turn the wheels away from the curb and move the vehicle back until the curb side wheel gently touches the curb. HEADED UPHILL OR DOWNHILL, NO CURB: 3 Turn the wheels toward the side of the road so the vehicle will move away from the center of the road if it moves. 4. Turn the ignition key to the LOCK position and remove the key. The power assisted steering is designed to use a hydraulic pump, driven by the engine, to assist steering. If the engine stops or drive belt breaks, you will still have control of the vehicle. However, much greater steering effort is needed, especially in sharp turns and at low speeds. WARNING If the engine is not running or is turned off while driving, the power assist for the steering will not work. Steering will be much harder to operate. BRAKE SYSTEM The brake system has two separate hydraulic circuits. If one circuit develops a problem, you will still have braking at two wheels. Vacuum assisted brakes The brake booster aids braking by using engine vacuum. If the engine stops, you can stop the vehicle by depressing the brake pedal. However, greater foot pressure on the brake pedal will be required to stop the vehicle and stopping distance will be longer. Wet brakes When the vehicle is washed or driven through water, the brakes may get wet. As a result, your braking distance will be longer and the vehicle may pull to one side during braking. To dry the brakes, drive the vehicle at a safe speed while lightly pressing the brake pedal to heat the brakes. Do this until the brakes return to normal. Avoid driving the vehicle at high speeds until the brakes function correctly. 5-24 Starting and driving
-
 1
1 -
2
-
3
-
4
-
5
-
6
-
7
-
8
-
9
-
10
-
11
-
12
-
13
-
14
-
15
-
16
-
17
-
18
-
19
-
20
-
21
-
22
-
23
-
24
-
25
-
26
-
27
-
28
-
29
-
30
-
31
-
32
-
33
-
34
-
35
-
36
-
37
-
38
-
39
-
40
-
41
-
42
-
43
-
44
-
45
-
46
-
47
-
48
-
49
-
50
-
51
-
52
-
53
-
54
-
55
-
56
-
57
-
58
-
59
-
60
-
61
-
62
-
63
-
64
-
65
-
66
-
67
-
68
-
69
-
70
-
71
-
72
-
73
-
74
-
75
-
76
-
77
-
78
-
79
-
80
-
81
-
82
-
83
-
84
-
85
-
86
-
87
-
88
-
89
-
90
-
91
-
92
-
93
-
94
-
95
-
96
-
97
-
98
-
99
-
100
-
101
-
102
-
103
-
104
-
105
-
106
-
107
-
108
-
109
-
110
-
111
-
112
-
113
-
114
-
115
-
116
-
117
-
118
-
119
-
120
-
121
-
122
-
123
-
124
-
125
-
126
-
127
-
128
-
129
-
130
-
131
-
132
-
133
-
134
-
135
-
136
-
137
-
138
-
139
-
140
-
141
-
142
-
143
-
 144
144 -
 145
145 -
 146
146 -
 147
147 -
 148
148 -
 149
149 -
 150
150 -
 151
151 -
 152
152 -
 153
153 -
 154
154 -
155
-
156
-
157
-
158
-
159
-
160
-
161
-
162
-
163
-
164
-
165
-
166
-
167
-
168
-
169
-
170
-
171
-
172
-
173
-
174
-
175
-
176
-
177
-
178
-
179
-
180
-
181
-
182
-
183
-
184
-
185
-
186
-
187
-
188
-
189
-
190
-
191
-
192
-
193
-
194
-
195
-
196
-
197
-
198
-
199
-
200
-
201
-
202
-
203
-
204
-
205
-
206
-
207
-
208
-
209
-
210
-
211
-
212
-
213
-
214
-
215
-
216
-
217
-
218
-
219
-
220
-
221
-
222
-
223
-
224
-
225
-
226
-
227
-
228
-
229
-
230
-
231
-
232
-
233
-
234
-
235
-
236
-
237
-
238
-
239
-
240
-
241
-
242
-
243
-
244
-
245
-
246
-
247
-
248
-
249
-
250
-
251
-
252
-
253
-
254
-
255
-
256
-
257
-
258
-
259
-
260
-
261
-
262
-
263
 |
 |