1995 Oldsmobile Aurora Owner's Manual - Page 144
1995 Oldsmobile Aurora Manual

Page 144 highlights
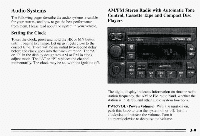
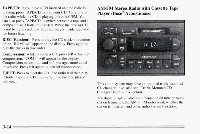
To Play a Cassette Tape With the ignition on, insert the tape and it will begin playing. The audio systemwill turn on automatically. Your tape player is designed to work best with tapes that are 30 to 45 minutes long on each side. Longer tapes may not work as well. Note that when a tape is inserted, "TP' will be displayed. When the tape is playing, a box will appear around "TP" in the display along with an arrow to show whether the top or bottom of the tape is playing. Any time a tape is inserted, the top side will play first. If a high-bias metal or CrO2 tape is played, "HI-BIAS" will appear in the display and the equalization will be adjusted automatically. If you select a tone setting for your tape, it will be activated each time you play a tape. If "Cln" (Clean) appears on the display when you insert your cassette tape, your cassette player needs to be cleaned. It will still play cassette tapes, but it should be cleaned to prevent damage to your cassette tapes and the cassette tape player. See "Careof Your Cassette Tape Player" later in this section. After you have cleaned the cassette tape player, press and hold EJECT for five seconds to reset the Cln indicator. The radio will display "---" to show that the clean feature has been reset. If "Err" or "E' and a number appear on the display at any time, an error has occurred. See "Cassette Tape and CD Errors" later in this section. NR (Noise Reduction): This radio has Dolby'B Noise Reduction to reduce background noise on Dolby@B encoded tapes. When playing a cassette tape, press this button to reduce background noise on your tape. The Dolby symbol 00 will appear in the display. Dolby@ Noise Reduction is manufactured under license from Dolby Laboratories Licensing Corporation. Dolby@and the 00 symbol are trademarks of Dolby Laboratories Licensing Corporation. SEEK A/V: When you press SEEK while playing a tape, it will search for the next higher or lower selection and stop. There must be at least a four-second gap between selections on the tape. When you press SCAN while playing a tape, you'll hear the first few seconds of each selection. Press SCAN again to stop on a selection. The tape will be muted while scanning and "SCAN" will appear on the display. FWD (Fast Forward):Press to advance a cassette tape rapidly; press again to play the tape. REV (Reverse): Press to reverse a cassette tape rapidly; press again to play the tape. 3-12
-
 1
1 -
2
-
3
-
4
-
5
-
6
-
7
-
8
-
9
-
10
-
11
-
12
-
13
-
14
-
15
-
16
-
17
-
18
-
19
-
20
-
21
-
22
-
23
-
24
-
25
-
26
-
27
-
28
-
29
-
30
-
31
-
32
-
33
-
34
-
35
-
36
-
37
-
38
-
39
-
40
-
41
-
42
-
43
-
44
-
45
-
46
-
47
-
48
-
49
-
50
-
51
-
52
-
53
-
54
-
55
-
56
-
57
-
58
-
59
-
60
-
61
-
62
-
63
-
64
-
65
-
66
-
67
-
68
-
69
-
70
-
71
-
72
-
73
-
74
-
75
-
76
-
77
-
78
-
79
-
80
-
81
-
82
-
83
-
84
-
85
-
86
-
87
-
88
-
89
-
90
-
91
-
92
-
93
-
94
-
95
-
96
-
97
-
98
-
99
-
100
-
101
-
102
-
103
-
104
-
105
-
106
-
107
-
108
-
109
-
110
-
111
-
112
-
113
-
114
-
115
-
116
-
117
-
118
-
119
-
120
-
121
-
122
-
123
-
124
-
125
-
126
-
127
-
128
-
129
-
130
-
131
-
132
-
133
-
134
-
135
-
136
-
137
-
138
-
 139
139 -
 140
140 -
 141
141 -
 142
142 -
 143
143 -
 144
144 -
 145
145 -
 146
146 -
 147
147 -
 148
148 -
 149
149 -
150
-
151
-
152
-
153
-
154
-
155
-
156
-
157
-
158
-
159
-
160
-
161
-
162
-
163
-
164
-
165
-
166
-
167
-
168
-
169
-
170
-
171
-
172
-
173
-
174
-
175
-
176
-
177
-
178
-
179
-
180
-
181
-
182
-
183
-
184
-
185
-
186
-
187
-
188
-
189
-
190
-
191
-
192
-
193
-
194
-
195
-
196
-
197
-
198
-
199
-
200
-
201
-
202
-
203
-
204
-
205
-
206
-
207
-
208
-
209
-
210
-
211
-
212
-
213
-
214
-
215
-
216
-
217
-
218
-
219
-
220
-
221
-
222
-
223
-
224
-
225
-
226
-
227
-
228
-
229
-
230
-
231
-
232
-
233
-
234
-
235
-
236
-
237
-
238
-
239
-
240
-
241
-
242
-
243
-
244
-
245
-
246
-
247
-
248
-
249
-
250
-
251
-
252
-
253
-
254
-
255
-
256
-
257
-
258
-
259
-
260
-
261
-
262
-
263
-
264
-
265
-
266
-
267
-
268
-
269
-
270
-
271
-
272
-
273
-
274
-
275
-
276
-
277
-
278
-
279
-
280
-
281
-
282
-
283
-
284
-
285
-
286
-
287
-
288
-
289
-
290
-
291
-
292
-
293
-
294
-
295
-
296
-
297
-
298
-
299
-
300
-
301
-
302
-
303
-
304
-
305
-
306
-
307
-
308
-
309
-
310
-
311
-
312
-
313
-
314
-
315
-
316
-
317
-
318
-
319
-
320
-
321
-
322
-
323
-
324
-
325
-
326
-
327
-
328
-
329
-
330
-
331
-
332
-
333
-
334
-
335
-
336
-
337
-
338
-
339
-
340
-
341
-
342
-
343
-
344
-
345
-
346
-
347
-
348
-
349
-
350
-
351
-
352
-
353
-
354
-
355
-
356
-
357
-
358
-
359
-
360
-
361
-
362
-
363
-
364
-
365
-
366
-
367
-
368
-
369
-
370
-
371
-
372
 |
 |