2003 Oldsmobile Alero Owner's Manual - Page 160
2003 Oldsmobile Alero Manual

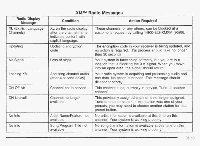
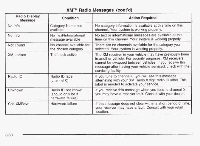
Page 160 highlights
< SCAN > : Press and hold either arrow for two seconds until SC appears on the display and you hear a beep. The radio will go to a station, play for a few seconds, then go on to the next station. Press either SCAN arrow again to stop scanning. To scan preset stations, press and hold either SCAN arrow for more than four seconds. PRESET SCAN will appear on the display. You will hear a double beep and the P will blink with the preset number. The radio will go to the first preset station stored on your pushbuttons, play for a few seconds, then go on to the next preset station. Press either SCAN arrow again to stop scanning presets. The radio will scan only to stations that are in the selected band and only to those with a strong signal. 3. Tune in the desired station. 4. Press AUTO EQ to select the equalization. 5. Press and hold one of the six numbered pushbuttons until you hear a beep. Whenever you press that numbered pushbutton, the station you set will return and the equalization that you selected will also be automatically selected for that pushbutton. 6. Repeat the steps for each pushbutton. Setting the Tone (Bassmreble) AUDIO: Press and release the AUDIO button until BASS, MID or TREB appears on the display. Press the knob above the AUDIO button to extend it, then turn the knob to increase or to decrease. If a station is weak or noisy, you may want to decrease the treble. Pressing and holding the AUDIO button for at least two seconds will return all tone settings, including ljaiar 1c;e ar~dfade io iiai. Setting Preset Stations The six numbered pushbuttons let you return to your favorite stations. You can set up to 30 stations (six AM, six FMI and six FM2, six XMI and six XM2 (USA m1\/, if \/fly r d i ~ ql_lir"p& ).!"lit.c! ?$ATM ss:c!!$e Radio Service) or DAB1 and DAB2 (Canada only, if your radio is equipped with DAB), by performing the following steps: 1. Turn the radio on. 2. Press BAND to select AM, FMI or FM2, or XMl, XM2, or DABI, DAB2. AUTO EQ (Automatic Equalizer): Press this button to choose bass, midrange and treble equalization settings designed for country, jazz, talk, pop, rock, and classical program types. 3-55
-
 1
1 -
2
-
3
-
4
-
5
-
6
-
7
-
8
-
9
-
10
-
11
-
12
-
13
-
14
-
15
-
16
-
17
-
18
-
19
-
20
-
21
-
22
-
23
-
24
-
25
-
26
-
27
-
28
-
29
-
30
-
31
-
32
-
33
-
34
-
35
-
36
-
37
-
38
-
39
-
40
-
41
-
42
-
43
-
44
-
45
-
46
-
47
-
48
-
49
-
50
-
51
-
52
-
53
-
54
-
55
-
56
-
57
-
58
-
59
-
60
-
61
-
62
-
63
-
64
-
65
-
66
-
67
-
68
-
69
-
70
-
71
-
72
-
73
-
74
-
75
-
76
-
77
-
78
-
79
-
80
-
81
-
82
-
83
-
84
-
85
-
86
-
87
-
88
-
89
-
90
-
91
-
92
-
93
-
94
-
95
-
96
-
97
-
98
-
99
-
100
-
101
-
102
-
103
-
104
-
105
-
106
-
107
-
108
-
109
-
110
-
111
-
112
-
113
-
114
-
115
-
116
-
117
-
118
-
119
-
120
-
121
-
122
-
123
-
124
-
125
-
126
-
127
-
128
-
129
-
130
-
131
-
132
-
133
-
134
-
135
-
136
-
137
-
138
-
139
-
140
-
141
-
142
-
143
-
144
-
145
-
146
-
147
-
148
-
149
-
150
-
151
-
152
-
153
-
154
-
 155
155 -
 156
156 -
 157
157 -
 158
158 -
 159
159 -
 160
160 -
 161
161 -
 162
162 -
 163
163 -
 164
164 -
 165
165 -
166
-
167
-
168
-
169
-
170
-
171
-
172
-
173
-
174
-
175
-
176
-
177
-
178
-
179
-
180
-
181
-
182
-
183
-
184
-
185
-
186
-
187
-
188
-
189
-
190
-
191
-
192
-
193
-
194
-
195
-
196
-
197
-
198
-
199
-
200
-
201
-
202
-
203
-
204
-
205
-
206
-
207
-
208
-
209
-
210
-
211
-
212
-
213
-
214
-
215
-
216
-
217
-
218
-
219
-
220
-
221
-
222
-
223
-
224
-
225
-
226
-
227
-
228
-
229
-
230
-
231
-
232
-
233
-
234
-
235
-
236
-
237
-
238
-
239
-
240
-
241
-
242
-
243
-
244
-
245
-
246
-
247
-
248
-
249
-
250
-
251
-
252
-
253
-
254
-
255
-
256
-
257
-
258
-
259
-
260
-
261
-
262
-
263
-
264
-
265
-
266
-
267
-
268
-
269
-
270
-
271
-
272
-
273
-
274
-
275
-
276
-
277
-
278
-
279
-
280
-
281
-
282
-
283
-
284
-
285
-
286
-
287
-
288
-
289
-
290
-
291
-
292
-
293
-
294
-
295
-
296
-
297
-
298
-
299
-
300
-
301
-
302
-
303
-
304
-
305
-
306
-
307
-
308
-
309
-
310
-
311
-
312
-
313
-
314
-
315
-
316
-
317
-
318
-
319
-
320
-
321
-
322
-
323
-
324
-
325
-
326
-
327
-
328
-
329
-
330
-
331
-
332
-
333
-
334
-
335
-
336
-
337
-
338
-
339
-
340
-
341
-
342
-
343
-
344
-
345
-
346
-
347
-
348
-
349
-
350
-
351
-
352
-
353
-
354
 |
 |