2002 Pontiac Aztek Owner's Manual - Page 221
2002 Pontiac Aztek Manual

Page 221 highlights
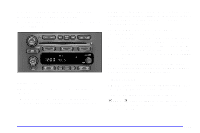
SCAN : Press and hold one of the SCAN arrows for more than two seconds until SCAN appears on the display and you hear a beep. The tape will go to the next selection, play for a few seconds, then go on to the next selection. Press this button again to stop scanning. The sound will mute and SCAN will appear on the display while scanning. The tape will scan in forward only. BAND: Press this button to listen to the radio when a tape is playing. The tape will stop but remain in the player. The inactive tape or CD will remain safely inside the radio for future listening. CD TAPE: Press this button to switch between playing a cassette tape and a compact disc, if both are loaded, when listening to the radio. The display will show tape and CD icons. (Eject): Press this button, located next to the cassette tape slot, to eject a tape. Eject may be activated with either the ignition or radio off. Cassettes may be loaded with the radio and ignition off if this button is pressed first. Cassette Tape Messages If an error occurs while trying to play a cassette tape, it could be for one of the following reasons: TIGHT TAPE: This message is displayed when the tape is tight and the player can't turn the tape hubs. Remove the tape. Hold the tape with the open end down and try to turn the right hub counterclockwise with a pencil. Turn the tape over and repeat. If the hubs do not turn easily, your tape may be damaged and should not be used in the player. Try a new tape to make sure your player is working properly. BROKEN TAPE: This message is displayed when the tape is broken. Try a new tape. WRAPPED TAPE: This message is displayed when the tape is wrapped around the tape head. Attempt to get the cassette out. Try a new tape. CLEAN PLAYER: If this message appears on the display, the cassette tape player needs to be cleaned. It will still play tapes, but you should clean it as soon as possible to prevent damage to the tapes and player. See "Care of Your Cassette Tape Player" in the Index. If any error occurs repeatedly or if an error can't be corrected, contact your dealer. If your radio displays an error message, write it down and provide it to your dealer when reporting the problem. 3-26
-
 1
1 -
2
-
3
-
4
-
5
-
6
-
7
-
8
-
9
-
10
-
11
-
12
-
13
-
14
-
15
-
16
-
17
-
18
-
19
-
20
-
21
-
22
-
23
-
24
-
25
-
26
-
27
-
28
-
29
-
30
-
31
-
32
-
33
-
34
-
35
-
36
-
37
-
38
-
39
-
40
-
41
-
42
-
43
-
44
-
45
-
46
-
47
-
48
-
49
-
50
-
51
-
52
-
53
-
54
-
55
-
56
-
57
-
58
-
59
-
60
-
61
-
62
-
63
-
64
-
65
-
66
-
67
-
68
-
69
-
70
-
71
-
72
-
73
-
74
-
75
-
76
-
77
-
78
-
79
-
80
-
81
-
82
-
83
-
84
-
85
-
86
-
87
-
88
-
89
-
90
-
91
-
92
-
93
-
94
-
95
-
96
-
97
-
98
-
99
-
100
-
101
-
102
-
103
-
104
-
105
-
106
-
107
-
108
-
109
-
110
-
111
-
112
-
113
-
114
-
115
-
116
-
117
-
118
-
119
-
120
-
121
-
122
-
123
-
124
-
125
-
126
-
127
-
128
-
129
-
130
-
131
-
132
-
133
-
134
-
135
-
136
-
137
-
138
-
139
-
140
-
141
-
142
-
143
-
144
-
145
-
146
-
147
-
148
-
149
-
150
-
151
-
152
-
153
-
154
-
155
-
156
-
157
-
158
-
159
-
160
-
161
-
162
-
163
-
164
-
165
-
166
-
167
-
168
-
169
-
170
-
171
-
172
-
173
-
174
-
175
-
176
-
177
-
178
-
179
-
180
-
181
-
182
-
183
-
184
-
185
-
186
-
187
-
188
-
189
-
190
-
191
-
192
-
193
-
194
-
195
-
196
-
197
-
198
-
199
-
200
-
201
-
202
-
203
-
204
-
205
-
206
-
207
-
208
-
209
-
210
-
211
-
212
-
213
-
214
-
215
-
 216
216 -
 217
217 -
 218
218 -
 219
219 -
 220
220 -
 221
221 -
 222
222 -
 223
223 -
 224
224 -
 225
225 -
 226
226 -
227
-
228
-
229
-
230
-
231
-
232
-
233
-
234
-
235
-
236
-
237
-
238
-
239
-
240
-
241
-
242
-
243
-
244
-
245
-
246
-
247
-
248
-
249
-
250
-
251
-
252
-
253
-
254
-
255
-
256
-
257
-
258
-
259
-
260
-
261
-
262
-
263
-
264
-
265
-
266
-
267
-
268
-
269
-
270
-
271
-
272
-
273
-
274
-
275
-
276
-
277
-
278
-
279
-
280
-
281
-
282
-
283
-
284
-
285
-
286
-
287
-
288
-
289
-
290
-
291
-
292
-
293
-
294
-
295
-
296
-
297
-
298
-
299
-
300
-
301
-
302
-
303
-
304
-
305
-
306
-
307
-
308
-
309
-
310
-
311
-
312
-
313
-
314
-
315
-
316
-
317
-
318
-
319
-
320
-
321
-
322
-
323
-
324
-
325
-
326
-
327
-
328
-
329
-
330
-
331
-
332
-
333
-
334
-
335
-
336
-
337
-
338
-
339
-
340
-
341
-
342
-
343
-
344
-
345
-
346
-
347
-
348
-
349
-
350
-
351
-
352
-
353
-
354
-
355
-
356
-
357
-
358
-
359
-
360
-
361
-
362
-
363
-
364
-
365
-
366
-
367
-
368
-
369
-
370
-
371
-
372
-
373
-
374
-
375
-
376
-
377
-
378
-
379
-
380
-
381
-
382
-
383
-
384
-
385
-
386
-
387
-
388
-
389
-
390
-
391
-
392
-
393
-
394
-
395
-
396
-
397
-
398
-
399
-
400
-
401
-
402
-
403
-
404
-
405
-
406
-
407
-
408
-
409
-
410
-
411
-
412
-
413
-
414
-
415
-
416
-
417
-
418
-
419
-
420
-
421
-
422
-
423
-
424
-
425
-
426
-
427
-
428
-
429
-
430
-
431
-
432
-
433
-
434
-
435
-
436
-
437
-
438
-
439
 |
 |