2005 Saab 9-3 Owner's Manual - Page 197
2005 Saab 9-3 Manual
Page 197 highlights
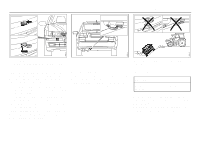
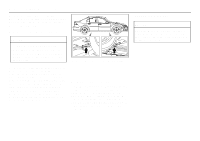
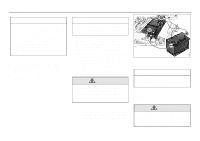
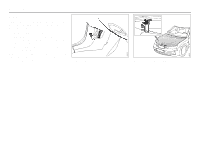
Starting and driving WARNING Using a match or flame of any kind near a battery can cause battery gas to explode. You can suffer burns or be blinded. Use a flashlight if you need more light. Be sure the electrolyte in the battery is not frozen. Discharged batteries will freeze. When connecting jumper cables to a frozen battery, gas from the chemical reaction inside the battery can build up under the ice and cause an explosion. Battery fluid contains acid that can burn you. Do not get it on you. If you accidentally get it in your eyes or on your skin, flush the area with water and get medical help immediately. 5 Check that the jumper cables do not have loose or missing insulation. If they do, you could get a shock and also the vehicles could be damaged. Before you connect the cables, here are some basic things you should know. Positive (+) will go to positive (+) and negative (-) will go to negative (-). Do not connect (+) to (-) or you will get a short that could injure you or would damage the battery and maybe other parts as well. 6 Connect the red positive (+) cable to the positive (+) terminal of the vehicle with the discharged battery. 7 Do not let the other end touch metal. Connect it to the positive (+) terminal of the good battery. Use a remote positive (+) terminal if the vehicle has one. 8 Now connect the negative (-) cable to the good battery's negative terminal. 9 Attach the cable to the discharged battery's negative terminal. 10 Start the vehicle with the good battery and run the engine for a while. 11 Try to start the vehicle with the discharged battery. If it does not start after a few tries, it probably needs service. Note. If the current in the low battery is too low it might be necessary to wait several minutes with the cables connected before you can start the engine with the low battery. 12 Remove the cables in reverse order to prevent electrical shorting. Take care that they do not touch each other or any other metal. 195 Using a battery charger/starter unit To avoid damaging the car's electrical system and electronics, the following rules must be followed when charging the battery or jump starting the car. • If the charger or starter unit can be set to different voltages (6V/12V/18V/24V), 12V must be selected. • Follow the manufacturer's instructions supplied with the charger or starter unit. • No other apparatus that are grounded or connected to the mains must be connected to the car during charging or jump starting. • The charger or starter unit must under no conditions produce a voltage greater than: • 16V continuous • 18V for 60 min. If you are unsure about the charge rating of the unit, disconnect the battery clamp from the positive terminal before connecting the unit to the battery.
-
 1
1 -
2
-
3
-
4
-
5
-
6
-
7
-
8
-
9
-
10
-
11
-
12
-
13
-
14
-
15
-
16
-
17
-
18
-
19
-
20
-
21
-
22
-
23
-
24
-
25
-
26
-
27
-
28
-
29
-
30
-
31
-
32
-
33
-
34
-
35
-
36
-
37
-
38
-
39
-
40
-
41
-
42
-
43
-
44
-
45
-
46
-
47
-
48
-
49
-
50
-
51
-
52
-
53
-
54
-
55
-
56
-
57
-
58
-
59
-
60
-
61
-
62
-
63
-
64
-
65
-
66
-
67
-
68
-
69
-
70
-
71
-
72
-
73
-
74
-
75
-
76
-
77
-
78
-
79
-
80
-
81
-
82
-
83
-
84
-
85
-
86
-
87
-
88
-
89
-
90
-
91
-
92
-
93
-
94
-
95
-
96
-
97
-
98
-
99
-
100
-
101
-
102
-
103
-
104
-
105
-
106
-
107
-
108
-
109
-
110
-
111
-
112
-
113
-
114
-
115
-
116
-
117
-
118
-
119
-
120
-
121
-
122
-
123
-
124
-
125
-
126
-
127
-
128
-
129
-
130
-
131
-
132
-
133
-
134
-
135
-
136
-
137
-
138
-
139
-
140
-
141
-
142
-
143
-
144
-
145
-
146
-
147
-
148
-
149
-
150
-
151
-
152
-
153
-
154
-
155
-
156
-
157
-
158
-
159
-
160
-
161
-
162
-
163
-
164
-
165
-
166
-
167
-
168
-
169
-
170
-
171
-
172
-
173
-
174
-
175
-
176
-
177
-
178
-
179
-
180
-
181
-
182
-
183
-
184
-
185
-
186
-
187
-
188
-
189
-
190
-
191
-
 192
192 -
 193
193 -
 194
194 -
 195
195 -
 196
196 -
 197
197 -
 198
198 -
 199
199 -
 200
200 -
 201
201 -
 202
202 -
203
-
204
-
205
-
206
-
207
-
208
-
209
-
210
-
211
-
212
-
213
-
214
-
215
-
216
-
217
-
218
-
219
-
220
-
221
-
222
-
223
-
224
-
225
-
226
-
227
-
228
-
229
-
230
-
231
-
232
-
233
-
234
-
235
-
236
-
237
-
238
-
239
-
240
-
241
-
242
-
243
-
244
-
245
-
246
-
247
-
248
-
249
-
250
-
251
-
252
-
253
-
254
-
255
-
256
-
257
-
258
-
259
-
260
-
261
-
262
-
263
-
264
-
265
-
266
-
267
-
268
-
269
-
270
-
271
-
272
-
273
-
274
-
275
-
276
-
277
-
278
-
279
-
280
-
281
-
282
-
283
-
284
-
285
-
286
-
287
-
288
-
289
-
290
-
291
-
292
 |
 |