2006 Subaru Forester Owner's Manual - Page 240
2006 Subaru Forester Manual

Page 240 highlights
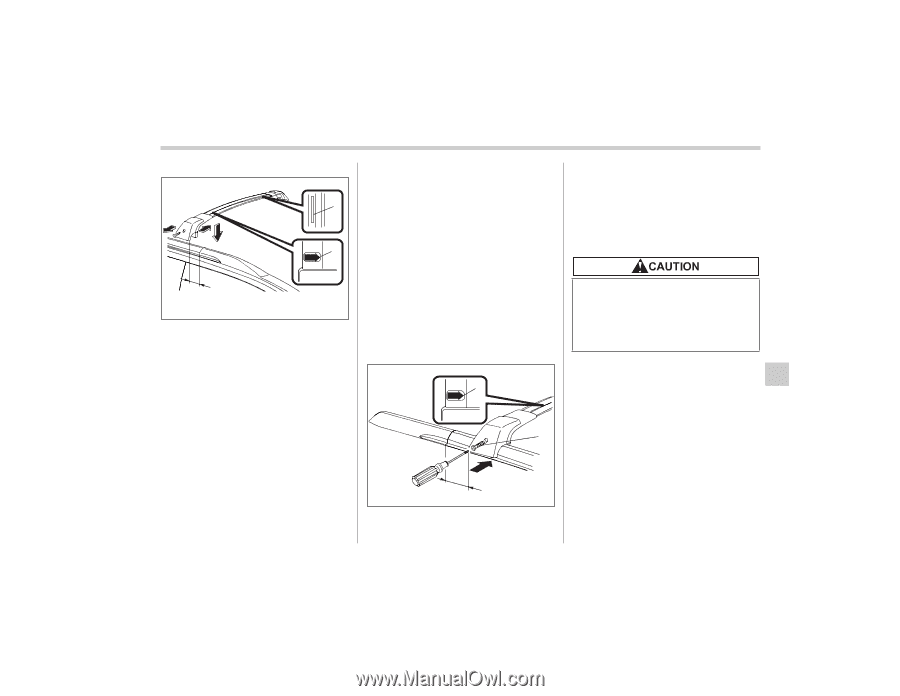
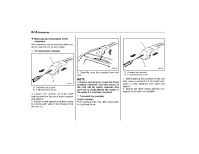
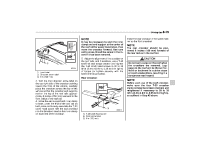
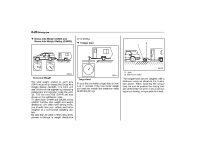
Driving tips 8-15 NOTE 1 2 It may be necessary to start the inner clamp and end support at the center of the roof rail for easier installation, then move the crossbar forward. Use care not to cross-thread the screw in the insert if it has been removed. 5. Adjust the alignment of the crossbar on the roof rails, and if available, use a T-30 torx® bit and torque wrench and tighten the T-30 torx® head screws to 30 to 35 lbf·in (3.4 to 4.0 N·m, 0.35 to 0.41 kgf·m) of torque (or tighten securely with the torx® wrench provided). Rear crossbar: 2 FRONT Install the rear crossbar in the same manner as the front crossbar. 3 800224 1) Load label 2) Direction arrow label 3) 6 in (150 mm) 3. With the front direction arrow label on the top right side of the crossbar pointing toward the front of the vehicle, carefully place the crossbar across the top of the vehicle so that the crossbar end supports rest on the top of the roof rails approximately 6 inches (150 mm) rearward in the front radius of the roof rail. 4. Move the end support and inner clamp to hook under the end of the roof rail on both sides and loosely assemble the T-30 torx® head screw with the tool provided into the threaded insert in the inner clamp on each end of the crossbar. FRONT MAXIMUM LOAD 100 LBS. EVENLY DISTRIBUTED NOTE The rear crossbar should be positioned 6 inches (150 mm) forward of the rear radius in the roof rail. Do not carry cargo on the roof when the crossbars are removed. Luggage on the roof will be thrown forward or backward in sudden stops or rapid accelerations, resulting in a dangerous road hazard. NOTE Before each use of the roof crossbar, make sure the four T-30 crossbar clamp screws have been checked, and retightened if necessary to 30 to 35 lbf·in (3.4 to 4.0 N·m, 0.35 to 0.41 kgf·m), as outlined in Step #5 above. 1 3 1) T-30 torx® head screw 2) Front arrow label 3) 6 in (150 mm) 800225
-
 1
1 -
2
-
3
-
4
-
5
-
6
-
7
-
8
-
9
-
10
-
11
-
12
-
13
-
14
-
15
-
16
-
17
-
18
-
19
-
20
-
21
-
22
-
23
-
24
-
25
-
26
-
27
-
28
-
29
-
30
-
31
-
32
-
33
-
34
-
35
-
36
-
37
-
38
-
39
-
40
-
41
-
42
-
43
-
44
-
45
-
46
-
47
-
48
-
49
-
50
-
51
-
52
-
53
-
54
-
55
-
56
-
57
-
58
-
59
-
60
-
61
-
62
-
63
-
64
-
65
-
66
-
67
-
68
-
69
-
70
-
71
-
72
-
73
-
74
-
75
-
76
-
77
-
78
-
79
-
80
-
81
-
82
-
83
-
84
-
85
-
86
-
87
-
88
-
89
-
90
-
91
-
92
-
93
-
94
-
95
-
96
-
97
-
98
-
99
-
100
-
101
-
102
-
103
-
104
-
105
-
106
-
107
-
108
-
109
-
110
-
111
-
112
-
113
-
114
-
115
-
116
-
117
-
118
-
119
-
120
-
121
-
122
-
123
-
124
-
125
-
126
-
127
-
128
-
129
-
130
-
131
-
132
-
133
-
134
-
135
-
136
-
137
-
138
-
139
-
140
-
141
-
142
-
143
-
144
-
145
-
146
-
147
-
148
-
149
-
150
-
151
-
152
-
153
-
154
-
155
-
156
-
157
-
158
-
159
-
160
-
161
-
162
-
163
-
164
-
165
-
166
-
167
-
168
-
169
-
170
-
171
-
172
-
173
-
174
-
175
-
176
-
177
-
178
-
179
-
180
-
181
-
182
-
183
-
184
-
185
-
186
-
187
-
188
-
189
-
190
-
191
-
192
-
193
-
194
-
195
-
196
-
197
-
198
-
199
-
200
-
201
-
202
-
203
-
204
-
205
-
206
-
207
-
208
-
209
-
210
-
211
-
212
-
213
-
214
-
215
-
216
-
217
-
218
-
219
-
220
-
221
-
222
-
223
-
224
-
225
-
226
-
227
-
228
-
229
-
230
-
231
-
232
-
233
-
234
-
 235
235 -
 236
236 -
 237
237 -
 238
238 -
 239
239 -
 240
240 -
 241
241 -
 242
242 -
 243
243 -
 244
244 -
 245
245 -
246
-
247
-
248
-
249
-
250
-
251
-
252
-
253
-
254
-
255
-
256
-
257
-
258
-
259
-
260
-
261
-
262
-
263
-
264
-
265
-
266
-
267
-
268
-
269
-
270
-
271
-
272
-
273
-
274
-
275
-
276
-
277
-
278
-
279
-
280
-
281
-
282
-
283
-
284
-
285
-
286
-
287
-
288
-
289
-
290
-
291
-
292
-
293
-
294
-
295
-
296
-
297
-
298
-
299
-
300
-
301
-
302
-
303
-
304
-
305
-
306
-
307
-
308
-
309
-
310
-
311
-
312
-
313
-
314
-
315
-
316
-
317
-
318
-
319
-
320
-
321
-
322
-
323
-
324
-
325
-
326
-
327
-
328
-
329
-
330
-
331
-
332
-
333
-
334
-
335
-
336
-
337
-
338
-
339
-
340
-
341
-
342
-
343
-
344
-
345
-
346
-
347
-
348
-
349
-
350
-
351
-
352
-
353
-
354
-
355
 |
 |