2006 Subaru Outback Owner's Manual
2006 Subaru Outback Manual
2006 Subaru Outback manual content summary:
- 2006 Subaru Outback | Owner's Manual - Page 1
prior notice and without incurring any obligation to make the same or similar changes on vehicles previously sold. This Owner's Manual applies to all models and covers all equipment, including factory installed options. Some explanations, therefore may be for equipment not installed in your vehicle - 2006 Subaru Outback | Owner's Manual - Page 2
This manual describes the following types of the Legacy series. 1 2 3 4 000138 1) 2) 3) 4) Legacy Sedan Legacy Station wagon OUTBACK Sedan OUTBACK Station wagon - 2006 Subaru Outback | Owner's Manual - Page 3
- 2006 Subaru Outback | Owner's Manual - Page 4
of America, Inc. and sold at retail by an authorized SUBARU dealer in the United States come with the following warranties: SUBARU Limited Warranty Emission Control Systems Warranty Emissions Performance Warranty All warranty information, including details of coverage and exclusions, is in the - 2006 Subaru Outback | Owner's Manual - Page 5
problem while driving, such as a flat tire or engine service This chapter informs you when you need to take your SUBARU to the dealer for scheduled maintenance and informs you how to keep your SUBARU running properly. Chapter 12: Specifications This chapter informs you about dimension and capacities - 2006 Subaru Outback | Owner's Manual - Page 6
Wiper intermittent Fuel Front fog lights Parking lights Hazard warning flasher Cigarette lighter Seat heater Child restraint lower anchorages Rear window wiper and washer Lights Parking lights, tail lights, license plate lights and instrument panel illumination Head lights Turn signal Illumination - 2006 Subaru Outback | Owner's Manual - Page 7
control and the front passenger should move the seat as far back as possible and sit upright and well back in the seat. Carefully read the sections "Seat, seatbelt and SRS airbags" in chapter 1 of this owner's manual for instructions and precautions concerning the seatbelt system and SRS airbag - 2006 Subaru Outback | Owner's Manual - Page 8
, height and weight. If a child is too big for a child restraint system, the child should sit in the REAR seat and be restrained using the seatbelts. According to accident statistics, children are safer when properly restrained in the rear seating positions than in the front seating positions. Never - 2006 Subaru Outback | Owner's Manual - Page 9
to force fresh air into the vehicle. Always keep the front ventilator inlet grille free from snow, leaves or other obstructions to ensure that the ventilation system always works properly. If at any time you suspect that exhaust fumes are entering the vehicle, have the problem checked and corrected - 2006 Subaru Outback | Owner's Manual - Page 10
involved in a serious or fatal accident. If you are taking any drugs, check with your doctor or pharmacist or read the literature that accompanies the medication to , damage or performance problems resulting from modification may not be covered under warranties. Driving with pets Unrestrained - 2006 Subaru Outback | Owner's Manual - Page 11
. Never restrain pets or pet carriers in the front passenger's seat. For further information, consult your adjust the tire pressures to the values shown on the tire placard. Refer to the "Tires and wheels to an accident. Check and, if necessary, adjust the pres- Engine exhaust, some of its - 2006 Subaru Outback | Owner's Manual - Page 12
Table of contents Seat, seatbelt and SRS airbags Keys and doors Instruments and controls Climate control Audio Interior equipment Starting and operating Driving tips In case of emergency Appearance care Maintenance and service Specifications Consumer information and Reporting safety defects Index 1 - 2006 Subaru Outback | Owner's Manual - Page 13
11) 12) 13) Engine hood lock release (page 11-4) Headlight switch (page 3-31) Bulb replacement (page 11-49) Wiper switch (page 3-35) Moonroof (page 2-25) Roof rail (page 8-14) Door locks (page 2-4) Tire pressure (page 11-35) Flat tires (page 9-4) Tire chains (page 8-11) Fog light switch (page 3-34 - 2006 Subaru Outback | Owner's Manual - Page 14
1 2 3 Rear window defogger button (page 3-38) Fuel filler lid and cap (page 7-4) Child safety locks (page 2-18) Tie-down hooks (page 9-13) Towing hook (page 9-13) Trunk lid (page 2-21) Rear gate (page 2-24) Bulb replacement (page 11-51) Rear wiper blade assembly and rubber replacement (page 3-37 - 2006 Subaru Outback | Owner's Manual - Page 15
12 Interior Passenger compartment area 1 2 1) 2) 3) 4) 5) Lower anchorages for child restraint system (page 1-32) Seatbelt (page 1-11) Center console (page 6-5) Front seat (page 1-2) Rear seat (page 1-7) 5 4 3 000073 - 2006 Subaru Outback | Owner's Manual - Page 16
13 1 2 3 4 1 5 1 1) 2) 3) 4) 5) 6) Top tether anchorages (page 1-36) Dome lights (page 6-2) Sun visors (page 6-3) Cargo area light (page 6-2) Rear center seatbelt (page 1-17) Cargo area cover (page 6-12) 6 000177 - CONTINUED - - 2006 Subaru Outback | Owner's Manual - Page 17
3-25) Dashboard storage compartment (page 6-4) Navigation system (if equipped) (See navigation system instruction manual.) Glove box (page 6-4) Hazard warning flasher switch (page 3-5) Audio (page 5-1) Climate control (page 4-1) Ashtray (page 6-9) Accessory power outlet (page 6-8) Tilt steering(page - 2006 Subaru Outback | Owner's Manual - Page 18
deicer (page 3-38) Vehicle Dynamics Control OFF switch (page 7-32) Light control lever (page 3-31) Combination meter (page 3-5/page 3-10) Wiper control lever (page 3-34) Cruise control (page 7-36) Horn (page 3-43) SRS airbag (page 1-38) Fuse box (page 11-45) Hood lock release knob (page 11-4) Power - 2006 Subaru Outback | Owner's Manual - Page 19
washer (page 3-35) Rear window wiper and washer switch (page 3-37) 6) Wiper control lever (page 3-35) 7) Light control lever (page 3-31) 8) Fog light switch (page 3-34) 9) Headlight ON/OFF (page 3-31) 10) Headlight flasher High/Low beam change (page 3-31) 11) Turn signal (page 3-32) 7 6 000074 - 2006 Subaru Outback | Owner's Manual - Page 20
17 Combination meter U.S.-spec. vehicles 1) 2) 3) 4) 5) Temperature gauge (page 3-9/page 3-13) Tachometer (page 3-8/page 3-12) Speedometer (page 3-6/page 3-10) Fuel gauge (page 3-8/page 3-12) Trip meter A/B selection and trip meter reset knob (page 3-7/page 311) Trip meter and odometer (page 3-7/ - 2006 Subaru Outback | Owner's Manual - Page 21
18 Canada-spec. vehicles 1 2 3 4 1) 2) 3) 4) 5) 6) 7) 8) Temperature gauge (page 3-9/page 3-13) Tachometer (page 3-8/page 3-12) Speedometer (page 3-6/page 3-10) Fuel gauge (page 3-8/page 3-12) Trip meter A/B selection and trip meter reset knob (page 3-7/page 311) Trip meter and odometer (page - 2006 Subaru Outback | Owner's Manual - Page 22
warning light CHECK ENGINE warning light/Malfunction indicator lamp Charge warning light Oil pressure warning light AT OIL temperature warning light (if equipped) or ABS warning light Brake system warning light Door open warning light Page 3-14 3-14 3-16 Mark Name Low fuel warning light All-Wheel - 2006 Subaru Outback | Owner's Manual - Page 23
20 Trunk/cargo area 1) 2) 3) Jack handle (page 9-18) Jack (page 9-18) Spare tire (page 9-2) 1 2 3 1 3 2 000147 - 2006 Subaru Outback | Owner's Manual - Page 24
0 second / 30 seconds doors) Impact sensor operation (only vehicles with shock sensors (dealer option)) Passive arming Remote keyless entry system Hazard warning flasher Audible signal Key lock-in prevention Rear window defogger Windshield wiper deicer (if equipped) Dome light Key lock-in prevention - 2006 Subaru Outback | Owner's Manual - Page 25
- 2006 Subaru Outback | Owner's Manual - Page 26
Seat, seatbelt and SRS airbags Front seats ...Manual seat ...Power seat (if equipped) ...Reclining the seatback ...Head restraint adjustment ...Active head restraint ...Lumbar support (if equipped) ... 1-2 1-3 1-4 1-4 1-5 1-6 1-6 Installing child restraint systems with A/ELR seatbelt ...Installing - 2006 Subaru Outback | Owner's Manual - Page 27
space for deployment, the driver should always sit upright and well back in the seat as far from the steering wheel as practical while still maintaining full vehicle control and the front appropriate for the child's age, height and weight. Secure ALL types of child restraint devices (including forward facing - 2006 Subaru Outback | Owner's Manual - Page 28
BY PLACING THE CHILD'S HEAD TOO CLOSE TO THE SRS AIRBAG. According to accident statistics, children are safer when properly restrained in the rear seating positions than in the front seating positions. For instructions and precautions concerning child restraint systems, see the "Child restraint - 2006 Subaru Outback | Owner's Manual - Page 29
the reclining lever to return the seatback, hold it lightly so that it may be raised back gradually. Seat cushion height adjustment (driver's seat) Power seat (if equipped) Fore and aft adjustment Reclining the seatback 100085 100247 To adjust the seat forward or backward, move the control - 2006 Subaru Outback | Owner's Manual - Page 30
the release button on the top of the seatback. The head restraint should be adjusted so that the center of the head restraint is closest to the top of the occupant's ears. 100248 Never drive the vehicle with the head restraints removed because they are designed to reduce the risk of serious neck - 2006 Subaru Outback | Owner's Manual - Page 31
when its height is properly adjusted and the driver/ passenger sits in the correct position on the seat. If your vehicle is involved in a rear-end collision, have an authorized SUBARU dealer inspect the active head restraints. 100089 Lumbar support (if equipped) The front seats of your vehicle are - 2006 Subaru Outback | Owner's Manual - Page 32
the " " mark on the adjustment knob in the furthest-forward position. An indicator light on the adjustment knob for each seat heater comes on Use of the seat heater for a long period of time while the engine is not running can cause battery discharge. Seatbelts provide maximum restraint when the - 2006 Subaru Outback | Owner's Manual - Page 33
Never allow passengers to ride on the folded rear seatback or in the cargo area. Doing so may result in serious injury or death. Secure skis sure that it is securely locked. Head restraint adjustment Never drive the vehicle with the head restraints removed because they are designed to reduce the - 2006 Subaru Outback | Owner's Manual - Page 34
on your sitting height. Station wagon 200290 Sedan To raise the head restraint, pull it up. To lower it, push the head restraint down while pressing the release button on the top of the seatback. The head restraint should be adjusted so that the center of the head restraint is closest to the top - 2006 Subaru Outback | Owner's Manual - Page 35
to sit on the center armrest while the vehicle is in motion. Loading long objects (Sedan) 200291 Sedan 200292 200286 Station wagon Folding down the armrest and opening the seatback panel affords a loading space for long objects. To open the seatback panel, pull the panel down while pressing - 2006 Subaru Outback | Owner's Manual - Page 36
support only one person. Never use a single belt for two or more persons - even children. Otherwise, in an accident, serious injury or death could result. Replace all seatbelt assemblies whichever is appropriate for the child's height and weight. Secure ALL types of child restraint devices (including - 2006 Subaru Outback | Owner's Manual - Page 37
BY PLACING THE CHILD'S HEAD TOO CLOSE TO THE SRS AIRBAG. According to accident statistics, children are safer when properly restrained in the rear seating positions than in the front seating positions. For instructions and precautions concerning the child restraint system, see the "Child restraint - 2006 Subaru Outback | Owner's Manual - Page 38
must be changed over to the Automatic Locking Retractor (ALR) mode. When the child restraint system is removed, make sure that the retractor is restored to the Emergency Locking Retractor (ELR) function by allowing the seatbelt to retract fully. For instructions on how to convert the retractor - 2006 Subaru Outback | Owner's Manual - Page 39
-second intervals, and the chime will sound while the warning light(s) is/are flashing. Alternate flashing and steady illumination of the warning lights and sounding of the chime will continue until both driver and front passenger fasten their seatbelts. warning after turning ON the ignition switch - 2006 Subaru Outback | Owner's Manual - Page 40
the seatback to the upright position. Move the seatback as far from the steering wheel as practical while still maintaining full vehicle control. Front passenger's seat: Adjust the seatback to the upright position. Move the seat as far back as possible. 2. Sit well back in the seat. 3. Pick up - 2006 Subaru Outback | Owner's Manual - Page 41
in neck injury during sudden braking or in a collision. 100102 Unfastening the seatbelt 100258 4. Insert the tongue plate into the buckle until you hear a click. The shoulder belt anchor height should be adjusted to the position best suited for the driver/front passenger. To lower the anchor - 2006 Subaru Outback | Owner's Manual - Page 42
, then pull it out slowly again. 100103 Push the button on the buckle. Before closing the door, make sure that the belts are retracted properly to avoid catching the belt webbing in the door. Rear center seatbelt on Station wagon model 1 4 2 4. To make the lap part tight, pull up on the shoulder - 2006 Subaru Outback | Owner's Manual - Page 43
connector's tongue plate into the mating buckle (on right-hand side), always check that the webbing is not twisted. Be sure to fasten both tongue plates in serious injury or death. 1. Remove the connector (tongue) plate from the slot located at the front of the recess by pulling the connector - 2006 Subaru Outback | Owner's Manual - Page 44
it out slowly again. 100735 100114 2. Pull out the seatbelt slowly from the overhead retractor. 5. Insert the center seatbelt tongue plate in the center seatbelt buckle marked "CENTER" on the left-hand side until it clicks. 200298 4. After fastening the seatbelt, make sure that the " " mark - 2006 Subaru Outback | Owner's Manual - Page 45
Unfastening the seatbelt 0 100381 200300 100116 Push the release button of the center seatbelt buckle (on the left-hand side) to unfasten the seatbelt. ceiling and then insert the connector (tongue) plate into the slot located at the front of the recess. 100382 1. Insert a key or other hard - 2006 Subaru Outback | Owner's Manual - Page 46
bolts or worn areas. Replace the seatbelts even if only minor damage is found. Front seatbelt pretensioners 100736 100121 oils, chemicals and particularly battery acid. Never attempt to make modifications or changes that will prevent the seatbelt from operating properly. The driver's and front - 2006 Subaru Outback | Owner's Manual - Page 47
Do not modify, remove or strike the front seatbelt retractor assemblies or surrounding area. This could result in accidental activation of the seatbelt pretensioners or could make the system inoperative, possibly resulting in serious injury. Seatbelt pretensioners have no user-serviceable parts. For - 2006 Subaru Outback | Owner's Manual - Page 48
detection system weight sensor Front passenger's occupant detection control module Front passenger's frontal airbag ON and OFF indicator All related wiring Continuous illumination of the warning light Illumination of the warning light while driving System servicing If the warning light exhibits - 2006 Subaru Outback | Owner's Manual - Page 49
consult your SUBARU dealer if you want to install any accessory parts to your vehicle. The front sub sensors are located in both front fenders and the airbag control module including the impact sensors is located under the center console. If you need service or repair in those areas or near the - 2006 Subaru Outback | Owner's Manual - Page 50
child restraint system, carefully follow the manufacturer's instructions. According systems are designed to be secured in vehicle seats by lap belts or the lap belt portion of a lap/shoulder belt (except those covered under the section in this manual, entitled "Installation of child restraint systems - 2006 Subaru Outback | Owner's Manual - Page 51
that fits snugly against the contours of the seat cushion and can be securely retained using the seatbelt. C: Rear seat, center seating position Installing a child restraint system is not recommended, although the A/ELR seatbelt and an upper anchorage (tether anchorage) are provided in this position - 2006 Subaru Outback | Owner's Manual - Page 52
REARWARD FACING CHILD SAFETY SEAT IN THE FRONT PASSENGER'S SEAT. DOING SO RISKS SERIOUS INJURY OR DEATH TO THE CHILD BY PLACING THE CHILD'S HEAD TOO CLOSE TO THE SRS AIRBAG. Choose a child restraint system that is appropriate for the child's age and size (weight and height) in order to provide the - 2006 Subaru Outback | Owner's Manual - Page 53
you install a child restraint system, follow the manufacturer's instructions supplied with it. After installing the child restraint system, check to ensure that it belt. 5. Pull out the seatbelt fully from the retractor to change the retractor over from the Emergency Locking Retractor (ELR) to the - 2006 Subaru Outback | Owner's Manual - Page 54
FRONT PASSENGER'S SEAT. DOING SO RISKS SERIOUS INJURY OR DEATH TO THE CHILD BY PLACING THE CHILD'S HEAD TOO CLOSE TO THE SRS AIRBAG. 1. Place the child restraint system in the seating position. 2. Run the lap and shoulder belt through or around the child restraint system following the instructions - 2006 Subaru Outback | Owner's Manual - Page 55
Pull out the seatbelt fully from the retractor to change the retractor over from the Emergency Locking Retractor ( in the child restraint system, move it back and forth and right and left to check if it is firmly Sedan 100263 Station wagon 8. If the child restraint system requires a top tether, - 2006 Subaru Outback | Owner's Manual - Page 56
instructions. Installing a booster seat When you install a child restraint system, follow the manufacturer's instructions supplied with it. After installing the child restraint system, check to the child. 100140 9. To remove the child restraint system, press the release button on the seatbelt - 2006 Subaru Outback | Owner's Manual - Page 57
death. Make sure the shoulder belt is positioned across the center of child's shoulder. Placing the shoulder belt over the neck may result in neck injury during sudden braking or in a collision. Installation of child restraint systems by use of lower and tether anchorages (LATCH) Child restraint - 2006 Subaru Outback | Owner's Manual - Page 58
restraint system, follow the manufacturer's instructions supplied with it. After installing the child restraint system, check to anchorages are provided. Each lower anchorage is located where the seat cushion meets the seatback such child restraint systems. Sedan 100268 100311 The lower anchorages - 2006 Subaru Outback | Owner's Manual - Page 59
Sedan The tether anchorages (upper anchorages) are provided for all the seating positions (middle and both window-side ones) of the rear seat. When you install a child restraint system, follow the manufacturer's instructions supplied with it. After installing the child restraint system, check - 2006 Subaru Outback | Owner's Manual - Page 60
want to install the child restraint system. 100520 100656 100655 Station wagon: Remove the two covers from the selected side of the rear seatback to expose the anchorages (bars) to be used for installation of the child restraint system. 2. While following the instructions supplied by the child - 2006 Subaru Outback | Owner's Manual - Page 61
required or available. Tether anchorage location Sedan 100657 Station wagon TOP TETHER 5. Before seating a child in the child restraint system, try to move seat back ones for the right, center and left positions, are already installed on the rear edge of the roof. Open the cover flap to use each - 2006 Subaru Outback | Owner's Manual - Page 62
SRS airbags 1-37 To hook the top tether Sedan TOP TETHER 200309 200290 2. Open the cover flaps to use the anchorages. Do not route the top tether over the head restraint. It may happen that the top tether cannot be fastened tightly. When the child restraint system is to be secured using the top - 2006 Subaru Outback | Owner's Manual - Page 63
are as follows: Driver's and front passenger's frontal airbags Driver's and front passenger's side airbags Curtain airbags (for driver, front pas- 2. Open the cover flaps to use the anchorages. Always remove the head restraint when mounting a child restraint system with a top tether. Otherwise, it - 2006 Subaru Outback | Owner's Manual - Page 64
the seatbelt. The system also controls front seatbelt pretensioners. For operation instructions and precautions concerning the seatbelt pretensioner, see the "Front seatbelt pretensioners" section in this chapter. For instructions and precautions concerning the seatbelt system, see the "Seatbelts - 2006 Subaru Outback | Owner's Manual - Page 65
and weight. 100082 Never allow a child to stand up, or to kneel on the front passenger problems for people with a history of asthma or other breathing trouble. If you or your passengers have breathing problems after SRS airbag deploys, get fresh air promptly. A deploying SRS airbag releases hot gas - 2006 Subaru Outback | Owner's Manual - Page 66
(front passenger's side) 13)Curtain airbag sensor (rear wheel house right-hand side) 14)Curtain airbag sensor (rear wheel house Front passenger's seatbelt tension sensor 21)Front passenger's occupant detection system weight sensor 22)Front passenger's occupant detection control module 23)Front - 2006 Subaru Outback | Owner's Manual - Page 67
Driver's seat position sensor 20)Front passenger's seatbelt tension sensor 21)Front passenger's occupant detection system weight sensor 22)Front passenger's occupant detection control module 23)Front passenger's frontal airbag ON and OFF indicator 24)SRS airbag system warning light 21 22 10 7 20 12 - 2006 Subaru Outback | Owner's Manual - Page 68
with a seatbelt. All occupants should wear a seatbelt or be seated in an appropriate child restraint system. The driver's SRS frontal airbag is stowed in the center portion of the steering wheel. The front passenger's SRS frontal airbag is stowed near the top of the dashboard under an "SRS AIRBAG - 2006 Subaru Outback | Owner's Manual - Page 69
such as one thrown toward the front of the vehicle during preaccident braking. 100125 100155 Never hold a space for deployment, the driver should always sit upright and well back in the seat as far from the steering wheel as practical while still maintaining full vehicle control and the front - 2006 Subaru Outback | Owner's Manual - Page 70
adjustment of the driver's seat position even when the warning light is on, have the system inspected by your SUBARU dealer immediately if the SRS airbag system warning light detection system weight sensor under the seat. The system has another sensor that monitors the tension of the front passenger - 2006 Subaru Outback | Owner's Manual - Page 71
a genuine SUBARU accessory under the front passenger's seat. Do not place anything (shoes, umbrella, etc.) under the front passenger's seat. The front passenger's seat must not be used with the head restraint removed. Do not leave any article including a child restraint system on the front passenger - 2006 Subaru Outback | Owner's Manual - Page 72
switch to the "OFF" position if the front passenger's frontal airbag ON indicator illuminates and the OFF indicator extinguishes even when an infant or a small child is in a child restraint system (including booster seat). Remove the child restraint system from the seat. By referring to the child - 2006 Subaru Outback | Owner's Manual - Page 73
immediately contact your SUBARU dealer for an inspection. Even if the system has passed the dealer inspection, it is recommended that on subsequent trips . Do not squeeze any article between the front passenger's seat and side trim/pillar, door or center console box. This may lift the seat cushion - 2006 Subaru Outback | Owner's Manual - Page 74
may have on Subaru advanced frontal airbag system operation (U.S. only) Changing or moving any parts of the front seats, seat belts, front bumper, front side frame, instrument panel, combination meter, steering wheel, steering column, tire, suspension or floor panel can affect the operation of the - 2006 Subaru Outback | Owner's Manual - Page 75
is designed to determine the activation or deactivation condition of the front passenger's SRS frontal airbag depending on the total load on the front passenger's seat monitored by the front passenger's occupant detection system weight sensor. For this reason, only the driver's SRS frontal airbag - 2006 Subaru Outback | Owner's Manual - Page 76
vehicle itself. Do not touch the SRS airbag system components around the steering wheel and dashboard with bare hands right after deployment. is possible that the driver's/driver's and front passenger's SRS frontal airbag(s) will deploy. 200312 A head-on collision against a thick concrete wall at - 2006 Subaru Outback | Owner's Manual - Page 77
ditch, is severely impacted or knocked hard against an obstacle on the road such as a curb). Examples of the types of accidents in which deployment of the driver's/ driver's and front passenger's SRS frontal airbag(s) is unlikely to deploy. might not necessarily require deployment of driver's/driver - 2006 Subaru Outback | Owner's Manual - Page 78
airbag on the impacted side of the vehicle deploys between the occupant and the door panel and supplements the seatbelt by reducing the impact on the occupant's chest and waist. The SRS side airbag operates only for front seat occupants. The SRS curtain airbag on each side of the cabin is stored - 2006 Subaru Outback | Owner's Manual - Page 79
of an eye) in the event of a side impact. However, the force of its deployment may cause injuries if your head is too close to it. 100165 Do not rest your arm on either front door or its internal trim. It could be injured in the event of SRS side airbag deployment. 100164 - 2006 Subaru Outback | Owner's Manual - Page 80
to kneel on the front and rear passenger's seat facing the side window. In the event of an accident, the force of the SRS curtain airbag deployment could injure the child seriously because his/her head is close to the SRS curtain airbag. 100168 Do not attach accessories to the door trim or near - 2006 Subaru Outback | Owner's Manual - Page 81
hands-free microphone or any other accessory to a front pillar, a center pillar, a rear pillar, the windshield front passenger's SRS frontal airbags in the steering wheel and instrument panel. An impact sensor is located in each of the left and right center pillars and rear wheel houses. If a center - 2006 Subaru Outback | Owner's Manual - Page 82
regardless of whether the rear wheel house impact sensor on the same side senses an impact. If it is a rear wheel house impact sensor alone that senses After deployment, do not touch any part of the SRS curtain airbag system (from the front pillar to the part of the roof side over the rear seat). - 2006 Subaru Outback | Owner's Manual - Page 83
1-58 Seat, seatbelt and SRS airbags Examples of the types of accidents in which the SRS side airbag and SRS curtain airbag are unlikely to deploy. 1) 2) 1 2 3) 4) 5) The vehicle is involved in an oblique side-on impact. The vehicle is involved in a side-on impact in an area outside the vicinity of - 2006 Subaru Outback | Owner's Manual - Page 84
continually monitors the readiness of the SRS airbag system (including front seatbelt pretensioners) while the vehicle is being driven. The SRS airbag system warning light "AIRBAG" will show normal system operation by lighting for approximately 6 seconds when the ignition switch is turned to the - 2006 Subaru Outback | Owner's Manual - Page 85
passenger's seatbelt tension sensor Front passenger's occupant detection system weight sensor Front passenger's occupant detection control module Front passenger's frontal airbag ON and OFF indicator All related wiring SRS airbag system servicing If the warning light exhibits any of the following - 2006 Subaru Outback | Owner's Manual - Page 86
seat and nearby area Inside each center pillar In each roof side (from the front pillar to a point over the rear seat) Between the rear seat cushion and rear wheel house on each side In the event that the SRS airbag is deployed, replacement of the system should be performed only by an authorized - 2006 Subaru Outback | Owner's Manual - Page 87
tires specified on the vehicle placard attached to the driver's door pillar or specified for individual vehicle models in this Owner's Manual. Attachment of any equipment (side steps or side sill protectors, etc.) other than genuine SUBARU accessory parts to the side body. Always consult your SUBARU - 2006 Subaru Outback | Owner's Manual - Page 88
Key number ... 2-2 2-2 Immobilizer ...Security ID plate ...Security indicator light ...Key replacement ... 2-3 2-3 2-4 2-4 Valet mode ...Passive arming ...Tripped sensor identification ...Shock sensors (dealer option) ... 2-16 2-17 2-18 2-18 2 Door locks ...Locking and unlocking from the outside - 2006 Subaru Outback | Owner's Manual - Page 89
ACC or OFF position, thereby stopping the engine. 200700 number plate attached to the key For information on making replacement keys for vehicles with the immobilizer system, refer to the " all locks on your vehicle. Ignition switch Driver's door Glove box Trunk lid release lever The valet key - 2006 Subaru Outback | Owner's Manual - Page 90
the "ON" position, the transponder transmits the key's ID code to the immobilizer system's receiver. If the transmitted ID code matches the ID code registered in the immobilizer system, the system allows the engine to be started. Since the ID code is transmitted and acted upon almost instantly, the - 2006 Subaru Outback | Owner's Manual - Page 91
2-4 Keys and doors Security indicator light NOTE Even if the security indicator light flashes irregularly or its fuse blows (the light does not flash if its fuse is blown), the immobilizer system will function normally. Door locks Locking and unlocking from the outside Key replacement Your key - 2006 Subaru Outback | Owner's Manual - Page 92
chance of being thrown out of the vehicle in an accident. It also helps prevent passengers from falling out if a door is accidentally opened, and intruders from unexpectedly opening doors and entering your vehicle. NOTE Make sure that you do not leave the key inside the vehicle before locking the - 2006 Subaru Outback | Owner's Manual - Page 93
changed by a SUBARU dealer. Contact the nearest SUBARU dealer if you would like to change the setting. Power door locking switches NOTE 200385 To unlock the door door or the rear gate (Station wagon) is not completely closed and the dome light, ignition switch light, and door 200839 Front - 2006 Subaru Outback | Owner's Manual - Page 94
be locked and unlocked by the power door locking switches located at the driver's side and the front passenger's side doors. To lock all doors (including the rear gate of a Station wagon), push the switch to the front ("LOCK") position. To unlock all doors (including the rear gate of a Station wagon - 2006 Subaru Outback | Owner's Manual - Page 95
Unlock/disarm button : Lock/arm button A: Panic button 1) Front 2) Back 200899 Press the " " button to lock all doors and rear gate (Station wagon). An electronic chirp will sound once and the turn signal lights will flash once. If any of the doors (or the rear gate/trunk lid) is not fully closed - 2006 Subaru Outback | Owner's Manual - Page 96
and its turn signal lights to flash three times. If the interval between the first and second presses of the " " button (for unlocking of all of the doors and the rear gate) is extremely short, the system may not respond. NOTE Illuminated entry The interior (dome) light will illuminate when the - 2006 Subaru Outback | Owner's Manual - Page 97
4. Open and close the driver's door once within 10 seconds after Step 3. 5. The turn signal lights flash 3 times to indicate completion of the setting. You may have the above settings done by your SUBARU dealer. To replace the battery: 200714 200902 A "PANIC" button is located on the back of the - 2006 Subaru Outback | Owner's Manual - Page 98
half of the transmitter case. After the battery is replaced, the transmitter must be synchronized with the keyless entry system's control unit. Press either the " " or " " button six times to synchronize the unit. Replacing lost transmitters If you lose a transmitter or want to purchase additional - 2006 Subaru Outback | Owner's Manual - Page 99
steps again beginning with part 3 of the procedure. 5. Before the electronic tone stops sounding, press the power door lock knob to the "LOCK" side the same number of times as the leftmost digit of the transmitter code. For example, press the lock knob eight times if the leftmost digit of the - 2006 Subaru Outback | Owner's Manual - Page 100
the necessary transmitter codes into the system, remove the key from the ignition switch. 11.Test every registered transmitter to confirm correct operation. Deleting old transmitter codes The control unit of the keyless entry system has four memory locations to store transmitter codes, giving it the - 2006 Subaru Outback | Owner's Manual - Page 101
their transmitter code will be programmed into your system, allowing them unauthorized access to your vehicle. System alarm operation The alarm system will give the following alarms when triggered: The vehicle's horn will sound and the turn signal lights will flash for 30 seconds. If any door (or - 2006 Subaru Outback | Owner's Manual - Page 102
turn signal lights flash five times to alert you that the doors (or the rear gate) are not properly closed. When you close the door, the system will automatically arm and doors will automatically lock. To arm the system using power door locking switches 1. Close all windows. 2. Remove the key from - 2006 Subaru Outback | Owner's Manual - Page 103
5 seconds. 6. Push the front side ("LOCK" side) of the power door locking switch to set the door locks. 7. Close the door. An electronic chirp will sound once, the turn signal lights will flash once and the indicator lights will start flashing rapidly. After rapid flashing for 30 seconds (standby - 2006 Subaru Outback | Owner's Manual - Page 104
the doors and rear gate (Station wagon) and panic activation. To enter the valet mode, change the setting of your vehicle's alarm system for deactivation mode. (Refer to "Activating and deactivating the alarm system" in this section.) The security indicator light will continue to flash once - 2006 Subaru Outback | Owner's Manual - Page 105
accidentally opened the door and fell out. Shock sensors (dealer option) The shock sensors trigger the alarm system when they sense impacts applied to the vehicle and when any of their electric wires is cut. The alarm system causes the horn to sound and the turn signal lights to The shock sensors - 2006 Subaru Outback | Owner's Manual - Page 106
For driver's window For front passenger's window For rear left passenger's window For rear right passenger's window 1) Open 2) Automatically open All door windows can be controlled by the power window switch cluster at the driver side door. To open: Push the switch down lightly and hold it. The - 2006 Subaru Outback | Owner's Manual - Page 107
2-20 Keys and doors To open the passengers' windows, push the appropriate switch down and hold it until the window reaches the desired position. Locking the passengers' windows 200845 To close: Pull the switch up lightly and hold it. The window will close as long as the switch is held. Operating - 2006 Subaru Outback | Owner's Manual - Page 108
Sedan) To prevent dangerous exhaust gas children. 200849 200848 Front passenger's window switch power window switch cluster, located on the driver's side door, is in the "LOCK system. Refer to "Remote keyless entry system" section in this chapter. To close the trunk lid, lightly press the - - 2006 Subaru Outback | Owner's Manual - Page 109
the trunk lid. Then, push up the lid. The handle is made of material that remains luminescent for approximately an hour in the dark trunk space after it is exposed to ambient light even for a short time. - 2006 Subaru Outback | Owner's Manual - Page 110
doors following steps at least twice a year to check the release handle for correct operation. 1. Open and the trunk lid may open. That may cause cargo to fall out of the trunk, which could create the screwdriver blade from the slit aperture of the lock assembly fully to the end until you hear a click. - 2006 Subaru Outback | Owner's Manual - Page 111
gas from entering the vehicle, always keep the rear gate closed while driving. Do not attempt to shut the rear gate while holding the recessed grip. Also avoid closing the rear gate by pulling on the recessed grip from inside the cargo space. There is a danger of your hand being caught and injured - 2006 Subaru Outback | Owner's Manual - Page 112
Never try to check the anti-entrapment function by deliberately placing part of your body in the moonroof. NOTE Should the rear gate be unable to be unlocked due to a discharged battery, a fault in the door locking/unlocking system or other causes, you can unlock it by manually operating the rear - 2006 Subaru Outback | Owner's Manual - Page 113
2-26 Keys and doors Tilting/sliding moonroof (Sedan) Tilt function NOTE One-touch operation does not take is fully closed. Push the rear side of the "Tilt" switch to raise the moonroof. Push the front side of the "Tilt" switch to lower the moonroof. Release the switch after the moonroof has been - 2006 Subaru Outback | Owner's Manual - Page 114
Keys and doors 2-27 NOTE Tilting moonroof Sliding moonroof For the sake of safety, it is "OPEN" side or push it to the "CLOSE" side. To fully open the rear moonroof, tilt up the front moonroof then pull the switch to the "OPEN" side and quickly release it. The rear moonroof will stop at - 2006 Subaru Outback | Owner's Manual - Page 115
doors switch to the "CLOSE" side then quickly release it. The rear moonroof will stop at a position approximately 5.9 in (15 cm) before its fully closed position. After confirming safety, pull the switch to the "CLOSE" side again and quickly release it. The rear moonroof will fully close. The front - 2006 Subaru Outback | Owner's Manual - Page 116
...CHECK ENGINE warning light/Malfunction indicator lamp ...Charge warning light ...Oil pressure warning light ...AT OIL TEMPerature warning light (AT vehicles) ...Low tire pressure warning light (if equipped) ...ABS warning light ...Brake system warning light ...Low fuel warning light ...Door open - 2006 Subaru Outback | Owner's Manual - Page 117
and controls Cruise control set indicator light ...Headlight indicator light ...Front fog light indicator light ... 3-25 3-25 3-25 Outside mirrors ... 3-41 Clock ...Information display (Vehicle without Navigation System) ...Outside temperature indicator ...Current fuel consumption ...Average - 2006 Subaru Outback | Owner's Manual - Page 118
wheel when you remove the key. If turning the key is difficult, turn the steering wheel slightly to the right and left as you turn the key. Automatic transmission vehicles 300259 NOTE Keep the ignition switch in the "LOCK" position when the engine is not running. Using electrical accessories - 2006 Subaru Outback | Owner's Manual - Page 119
engine has started), the key automatically returns to the "ON" position. If your registered key fails to start the engine, pull out the key once (the security indicator light this position the electrical accessories (radio, accessory power outlet, etc.) can be used. NOTE The engine may not start - 2006 Subaru Outback | Owner's Manual - Page 120
door opens and the key is in the "LOCK" or "ACC" positions. The chime stops when the key is removed light comes on when any of the doors are opened. The light remains on for a several seconds and gradually goes out after all doors hazard warning button on the instrument panel. To turn off the flasher, - 2006 Subaru Outback | Owner's Manual - Page 121
, turn the ignition switch to the "ON" position, or open and close the driver's door during the setting procedure, the new setting will be canceled. Also, if you do not when the ignition switch is turned to the "ON" position. To change the current setting, press the trip knob for at least two - 2006 Subaru Outback | Owner's Manual - Page 122
trip meter will light up. It driver's door within 10 change the function of the indicator during driving, as an accident could result. A trip meter NOTE B trip meter If the connection between the combination meter and battery is broken for any reason such as vehicle maintenance or fuse replacement - 2006 Subaru Outback | Owner's Manual - Page 123
trip meter shows " ", immediately contact the nearest SUBARU dealer and have the vehicle communication system inspected. The gauge may move slightly during braking, turning or acceleration due to fuel level movement in the tank. If you press the trip knob while the ignition switch is in the "LOCK - 2006 Subaru Outback | Owner's Manual - Page 124
. Temperature gauge 200253 You will see the " " sign in the fuel gauge. This indicates that the fuel filler door (lid) is located on the right side of the vehicle. Low fuel warning light The low fuel warning light comes on when the tank is nearly empty [Approximately 2.6 US gal (10 liters, 2.2 lmp - 2006 Subaru Outback | Owner's Manual - Page 125
the "ON" position, or open and close the driver's door during the setting procedure, the new setting will be canceled. the following sequence: 1. Combination meter dials light up. 2. Meter needles and gauge needles the meter needles and gauge needles. To change the current setting, press the trip knob - 2006 Subaru Outback | Owner's Manual - Page 126
trip meter will light up. It driver's door within change the function of the indicator during driving, as an accident could result. A trip meter NOTE B trip meter If the connection between the combination meter and battery is broken for any reason such as vehicle maintenance or fuse replacement - 2006 Subaru Outback | Owner's Manual - Page 127
in the "ACC" or "LOCK" position. The gauge may move slightly during braking, turning or acceleration due to fuel level movement in the tank. If you press the trip knob while the ignition switch is in the "LOCK" position, the fuel gauge's dial will light up and the needle will indicate the amount of - 2006 Subaru Outback | Owner's Manual - Page 128
in chapter 9. 1 200253 You will see the " " sign in the fuel gauge. This indicates that the fuel filler door (lid) is located on the right side of the vehicle. Low fuel warning light The low fuel warning light comes on when the tank is nearly empty [Approximately 2.6 US gal (10 liters, 2.2 lmp gal - 2006 Subaru Outback | Owner's Manual - Page 129
when the front seat passenger fastens the seatbelt.) : SRS airbag system warning light : CHECK ENGINE warning light / Malfunction indicator lamp : Charge warning light : Oil pressure warning light : AT OIL temperature warning light (AT vehicles) / : ABS warning light equipped) : Cruise control set - 2006 Subaru Outback | Owner's Manual - Page 130
chime will sound while the warning light(s) is/are flashing. Alternate flashing and steady illumination of the warning lights and sounding of the chime will continue until both driver and front passenger fasten their seatbelts. The warning light(s) for unfastened seatbelt(s) will alternate between - 2006 Subaru Outback | Owner's Manual - Page 131
an inspection. If the warning light exhibits any of the following conditions, there may be a malfunction in the seatbelt pretensioners and/or SRS airbag system. Immediately take your vehicle to your nearest SUBARU dealer to have the system checked. Unless checked and properly repaired, the seatbelt - 2006 Subaru Outback | Owner's Manual - Page 132
having the emission control system checked and repaired as necessary could cause serious damage, which may not be covered by your vehicle's warranty. If this light comes on steadily or blinks while the engine is running, it may indicate that there is a problem or potential problem somewhere in - 2006 Subaru Outback | Owner's Manual - Page 133
tightened until it clicks. If you have recently refueled your vehicle, the cause of the CHECK ENGINE warning light/malfunction indicator lamp coming on could be a loose or missing fuel filler cap. Remove the cap and retighten it until it clicks. Make sure nothing is interfering with the sealing of - 2006 Subaru Outback | Owner's Manual - Page 134
sensor replacement and/or system resetting. If the light flashes, promptly contact a SUBARU dealer to have the system inspected. If this light does not come on briefly after the ignition switch is turned ON or the light is flashing, you should have your Tire Pressure Monitoring System checked at - 2006 Subaru Outback | Owner's Manual - Page 135
any change to tire pressure(s), the tire pressure monitoring system will not re-check tire inflation pressures until the vehicle is first driven more than 20 mph (32 km/h). Be sure to install the specified size for the front and rear tires. ABS warning light (U.S.) (Canada) The ABS warning light - 2006 Subaru Outback | Owner's Manual - Page 136
to the nearest SUBARU dealer and have the system inspected. 4. If both warning lights come on again and stay illuminated after the engine has been restarted, shut down the engine again, apply the parking brake, and check the brake fluid level. 5. If the brake fluid level is not below the "MIN" mark - 2006 Subaru Outback | Owner's Manual - Page 137
(Turbo model only) Promptly put fuel in the tank whenever the low fuel warning light comes on. Engine misfires as a result of an empty tank could cause damage to the engine. Door open warning light When any of the doors or the rear gate (Station wagon) or trunk lid (Sedan) is not fully closed, it - 2006 Subaru Outback | Owner's Manual - Page 138
of the brake system are still available. You will be safe while driving with this condition, but have your vehicle checked at a SUBARU dealer as soon as possible. NOTE should go out as soon as the engine has warmed up. The indicator light comes on when the engine has developed a problem and the - 2006 Subaru Outback | Owner's Manual - Page 139
system warning If the light flashes after the engine starts, it may indicate that the automatic transmission control system is not working properly. Contact your nearest SUBARU dealer for service immediately. 300192 300266 This indicator shows the position of the selector lever. When the manual - 2006 Subaru Outback | Owner's Manual - Page 140
is turned to the " " position (to turn on the parking lights) or to the " " position (to turn on the headlights). Front fog light indicator light This indicator light is on while the front fog lights are on. 400257 NOTE If you move the cruise control lever or press the main switch button while - 2006 Subaru Outback | Owner's Manual - Page 141
) NOTE If your vehicle is equipped with a navigation system, refer to the separate "Operating Instructions for Monitor System". 300599 300600 To adjust the time shown by the clock, press the "+" button or the "-" button. The indicated time will change in one-minute increments. If you keep the - 2006 Subaru Outback | Owner's Manual - Page 142
fuel consumption Average fuel consumption Road surface freeze warning indication Driving range on remaining fuel Outside temperature indicator 300267 Canada-spec low speeds in a traffic jam; when the engine is restarted immediately following a shutdown. When the actual outside temperature falls - 2006 Subaru Outback | Owner's Manual - Page 143
indication and flashes for five seconds fuel consumption 300270 U.S.-spec. vehicles U.S.-spec. vehicles 300272 NOTE The outside temperature indication may differ from the actual outside temperature. The road surface freeze warning indication should be treated only as a guide. Be sure to check - 2006 Subaru Outback | Owner's Manual - Page 144
remaining in the tank and the average rate of fuel consumption. When the low fuel warning light comes on, the driving range indication flashes for five seconds. (The display first switches to the driving range indication if it was originally giving some other indication.) U.S.-spec. vehicles NOTE - 2006 Subaru Outback | Owner's Manual - Page 145
range on remaining fuel is only a guide. The indicated value may differ from the actual driving range on remaining fuel, so you must immediately fill the tank when the low fuel warning light comes on. 300275 Journey time 400267 U.S.-spec. vehicles The journey time indication flashes each time - 2006 Subaru Outback | Owner's Manual - Page 146
the turn signal lever. first position Parking lights, instrument panel illumination, tail lights and license plate light are on. second position Headlights, parking lights, instrument panel illumination, tail lights, and license plate light are on. 300507 To change from low beam to high beam, push - 2006 Subaru Outback | Owner's Manual - Page 147
on by the daytime running light system. The light switch must always be turned to the " " position when it is dark outside. The low beam headlights will automatically come on at reduced brightness when the engine has started, under the following conditions: The parking brake is fully released. The - 2006 Subaru Outback | Owner's Manual - Page 148
switch 300178 300510 The brightness of clock display, audio, air conditioner, information display and instrument panel illumination dims when the light switch is in the " " or " " positions. You can adjust brightness of the instrument panel illumination for better visibility. In turbo models, you - 2006 Subaru Outback | Owner's Manual - Page 149
off the front fog lights, turn the switch back down to the "OFF" position. Do not operate the washer continuously for more than ten seconds, or when the washer fluid tank is empty. This may cause overheating of the washer motor. Check the washer fluid level frequently, such as at fuel stops. Do - 2006 Subaru Outback | Owner's Manual - Page 150
or benzene. This will cause deterioration of the wiper blades. NOTE The front wiper motor is protected against overloads by a circuit breaker. If the procedure, replace the wiper blades with new ones. Refer to the "Replacement of wiper blades" section (chapter 11) for replacement instructions. - 2006 Subaru Outback | Owner's Manual - Page 151
return the lever to the "OFF" position. When the wiper switch is in the " " position, turn the dial to adjust the operating interval of the wiper. The operating interval can be adjusted continuously from the shortest interval to the longest. Two click stop positions of the dial may help you to aim - 2006 Subaru Outback | Owner's Manual - Page 152
Instruments and controls 3-37 Washer Rear window wiper and washer switch (Station wagon) speed is low; shorter when the vehicle speed is high). When you subsequently move the selector lever of the automatic transmission to the "R" position, the rear wiper will switch to continuous operation. When - 2006 Subaru Outback | Owner's Manual - Page 153
on the windshield wiper deicer, remove any snow from the windshield. To turn on the windshield wiper deicer, push the button. The indicator light located on the button lights up while the windshield wiper deicer when the ignition switch is turned to the Vehicle with manual climate control system - 2006 Subaru Outback | Owner's Manual - Page 154
control system NOTE The rear window defogger operates only when the ignition switch is in the "ON" position. The rear window defogger button is located on the climate control panel. To turn on the defogger, push the button. To turn it off, push the button again. The indicator light located on - 2006 Subaru Outback | Owner's Manual - Page 155
Always check that the inside and outside mirrors are properly adjusted before light (green) located to the right of the button will illuminate. By pressing and releasing the right but- 300518 The mirror has a photosensor attached on both the front and back sides. If the glare from the headlights - 2006 Subaru Outback | Owner's Manual - Page 156
electrical accessories (rear window defogger, heater/air conditioning system, spotlight, etc.) and ensure all doors Compass zone adjustment 1. The zone manual to verify that the compass zone setting is correct for your geographical location of vehicles behind you when changing lanes. Use the inside - 2006 Subaru Outback | Owner's Manual - Page 157
be adjusted manually. Outside mirror defogger (if equipped) 300598 position. If defrosting or defogging is desired when you restart your vehicle, you have to push the button to turn it on again. NOTE Vehicle with automatic climate control system light located on the button lights - 2006 Subaru Outback | Owner's Manual - Page 158
control and result in personal injury. 300296 To sound the horn, push the horn pad. 300295 1. Adjust the seat position. Refer to the "Front seats" section (chapter 1). 2. Pull the tilt lock lever down. 3. Move the steering wheel to the desired level. 4. Push the lever up to lock the steering - 2006 Subaru Outback | Owner's Manual - Page 159
- 2006 Subaru Outback | Owner's Manual - Page 160
) ...Control panel ...Temperature sensors ... 4 4-7 4-8 4-11 Operating tips for heater and air conditioner .. Cleaning ventilator grille ...Efficient cooling after parking in direct sunlight ...Lubrication oil circulation in the refrigerant circuit ...Checking air conditioning system before summer - 2006 Subaru Outback | Owner's Manual - Page 161
4-2 Climate control Ventilator Air flow selection Climate control 400341 - 2006 Subaru Outback | Owner's Manual - Page 162
Climate control 4-3 Center and side ventilators Center ventilators Side ventilators Manual climate control system (if equipped) Control panel 1 5 2 6 3 1 2 400578 400343 Move the tab up and down or right and left to adjust the flow direction. 1) Open 2) Close 4 400579 Move the tab up and - 2006 Subaru Outback | Owner's Manual - Page 163
control dial 400348 This dial has the following five positions: : Air flows through the instrument panel outlets. : Air flows through the instrument panel outlets and the foot outlets. : Air flows through the instrument panel outlets, the foot outlets, and some through the windshield defroster - 2006 Subaru Outback | Owner's Manual - Page 164
operation in the ON position may fog up the windows. Switch to the OFF position as soon as the outside dusty condition clears. Heater operation Defrosting or defogging the windshield To direct warm air to the windshield and front door windows: 1. Set the air inlet selection button to the OFF - 2006 Subaru Outback | Owner's Manual - Page 165
also comes out from the right and left air outlets. To stop warm air flow from these outlets, turn the corresponding wheel to the " " position. Heating To direct warm air toward the floor: 1. Set the air inlet selection button to the OFF position. 2. Set the air flow control dial to the " " position - 2006 Subaru Outback | Owner's Manual - Page 166
conditioner compressor automatically and the "A/C" indicator light on the control panel comes on. The automatic climate control system automatically controls outlet air temperature, fan speed, air flow distribution air-inlet control, and air conditioner compressor operation. It activates when the - 2006 Subaru Outback | Owner's Manual - Page 167
" button and temperature control dial during automatic mode operation, the indicator light "AUTO" on the control panel will go out. You can then manually control the system as desired using the button you operated. To change the system back to the AUTO mode, press the "AUTO" button. The Automatic - 2006 Subaru Outback | Owner's Manual - Page 168
the system automatically adjusts the temperature of air air conditioner compressor turns on, air flow is directed towards the windshield and front door windows, and the indicator light on the button comes on. After eliminating the fogging from the windshield, return the climate control system - 2006 Subaru Outback | Owner's Manual - Page 169
button "A/C" to defog and dehumidify. When this button is pushed, the air conditioner compressor turns on and the indicator light "A/C" on the display comes on. After eliminating the fogging from the windshield, set the system back to the AUTO mode by pushing the "AUTO" button. Select the - 2006 Subaru Outback | Owner's Manual - Page 170
selected.) When the outside air mode is selected, a " " indicator light appears on the display. Temperature sensors side of the driver-side part of the center panel - Outside temperature sensor: behind front grille. 1 Continued operation in the " " position may fog up the windows. Switch - 2006 Subaru Outback | Owner's Manual - Page 171
method of adding, changing or checking the refrigerant is different from the method for CFC12 (freon). Consult your SUBARU dealer for service. Repairs needed as a result of using the wrong refrigerant are not covered under warranty. Always keep the front ventilator inlet grille free of snow, leaves - 2006 Subaru Outback | Owner's Manual - Page 172
air filtration system, replace the filter element according to the replacement schedule shown in the following. This schedule should be followed to maintain the filter's dust collection ability. Under extremely dusty conditions, the filter should be replaced more frequently. Have your filter checked - 2006 Subaru Outback | Owner's Manual - Page 173
- 2006 Subaru Outback | Owner's Manual - Page 174
Audio Antenna system ...Printed antenna ...FM reception ... 5-2 5-2 5-2 Installation of accessories ...Audio set ...Type A audio set ...Type B audio ...Creating MP3 files ...Saving MP3 files on a disc ...Supported file systems ...Compression format ...Numbers of folders and files ...Copyright issues - 2006 Subaru Outback | Owner's Manual - Page 175
Installation of accessories Always consult your SUBARU dealer before installing a citizen band radio or other transmitting device in your vehicle. Such devices may cause the electronic control system to . If reception continues to be unsatisfactory, switch to a stronger station. 500035 Sedan - 2006 Subaru Outback | Owner's Manual - Page 176
Audio 5-3 Audio set Your SUBARU may be equipped with one of the following audio sets. See the pages indicated in this section for operating details. Type B audio set Type C audio set 6 CD CHANGER P-203UH MP3 LOAD 6 CD CHANGER P-203UE LOAD PUSH POWER-VOL CD CD AM FM RDM AM PUSH POWER-VOL - 2006 Subaru Outback | Owner's Manual - Page 177
5-4 Audio Type A audio set (if equipped) P-201UN PUSH POWER-VOL CD FM AM AUDIO SEEK SCAN BAL RPT RDM 1 2 3 4 5 6 TUNE TRACK 500227 The audio set will operate only when the ignition switch is in the "ACC" or "ON" position. - 2006 Subaru Outback | Owner's Manual - Page 178
the dial. The dial can also be used for tone and balance adjustment. The volume control dial normally functions as a volume control. This dial becomes approximately 5 seconds. Each brief press of the "AUDIO" button changes control modes in the following sequence starting from volume control mode. - 2006 Subaru Outback | Owner's Manual - Page 179
Turn clockwise For more bass sound For more midrange sound For more treble sound For more volume 500230 Each brief press of the "BAL" button changes control modes in the following sequence starting from volume control mode. (When the radio is first turned on, the control mode is in the volume - 2006 Subaru Outback | Owner's Manual - Page 180
CD FM AM 500009 Turn counterclockwise Fader control (R9 to F9) Turn clockwise 500231 To increase rear speaker volume To increase front speaker volume and decrease front speaker vol- and decrease rear speaker volume ume To increase left speaker volume and decrease right speaker volume For less - 2006 Subaru Outback | Owner's Manual - Page 181
5-8 Audio Tuning Manual tuning NOTE Automatic tuning (SCAN) While you are holding down either side of the TUNE/TRACK button, the tuning frequency will not stop changing even if the frequency of a receivable station is reached. Seek tuning TUNE TRACK SEEK SCAN 500049 SEEK SCAN 500232 Press - 2006 Subaru Outback | Owner's Manual - Page 182
the radio and battery is broken for any reason such as vehicle maintenance or radio removal, all stations stored in the preset buttons are cleared. If this occurs, it is CD is not in the player Hold a disc with a finger in the center hole while gripping the edge of the disc, then insert it in to the - 2006 Subaru Outback | Owner's Manual - Page 183
5-10 Audio NOTE Backward direction Fast-forwarding and fast-reversing Fast-forwarding After the last song finishes, the player will automatically return to track 1 (the first song on the disc). To stop playback of a CD When the "POWER-VOL" button is pressed during playback of a CD, the CD stops - 2006 Subaru Outback | Owner's Manual - Page 184
Audio 5-11 Fast-reversing Repeat playback equipment. Turn the ignition switch to the "OFF" position. Random playback TUNE TRACK RPT RDM 500057 500235 Press the " " side of the TUNE/TRACK button continuously to fast-reverse the disc. Release the button to stop fast-reversing. NOTE If you fast - 2006 Subaru Outback | Owner's Manual - Page 185
5-12 Audio Press the "RPT" button Press the " " or " " side of the SEEK/SCAN button Press the " " button Select the radio mode Turn off the power of the audio equipment. Turn the ignition switch to the "OFF" position. Scan ward beginning with the track preceding the currently selected one. After all - 2006 Subaru Outback | Owner's Manual - Page 186
Audio 5-13 Type B audio set (if equipped) 6 CD CHANGER P-203UH LOAD PUSH POWER-VOL CD FM AM AUDIO SEEK SCAN BAL RPT RDM 1 2 3 4 5 6 TUNE TRACK 500238 The radio will operate only when the ignition switch is in the "ACC" or "ON" position. - CONTINUED - - 2006 Subaru Outback | Owner's Manual - Page 187
turning the volume control dial. The control function returns to volume control mode after approximately 5 seconds. To change tone control modes: Each brief press of the "AUDIO" button changes control modes in the following sequence starting from volume control mode. (When the radio is first turned - 2006 Subaru Outback | Owner's Manual - Page 188
Turn clockwise For more bass sound For more midrange sound For more treble sound For more volume 500230 Each brief press of the "BAL" button changes control modes in the following sequence starting from volume control mode. (When the radio is turned on, the control mode is in the volume control - 2006 Subaru Outback | Owner's Manual - Page 189
CD FM AM 500009 Turn counterclockwise Fader control (R9 to F9) Turn clockwise 500231 To increase rear speaker volume To increase front speaker volume and decrease front speaker vol- and decrease rear speaker volume ume To increase left speaker volume and decrease right speaker volume For less - 2006 Subaru Outback | Owner's Manual - Page 190
Audio 5-17 Tuning Manual tuning NOTE Automatic tuning (SCAN) While you are holding down either side of the TUNE/TRACK button, the tuning frequency will not stop changing even if the frequency of a receivable station is reached. Seek tuning TUNE TRACK SEEK SCAN 500049 SEEK SCAN 500232 Push - 2006 Subaru Outback | Owner's Manual - Page 191
any reason such as vehicle maintenance or radio removal, all stations stored in the preset buttons " " side of the button or tune the radio manually until the desired station frequency is displayed. Built-in CD magazine. 2. When the "LOAD" indicator flashes, insert the disc. Once you have inserted - 2006 Subaru Outback | Owner's Manual - Page 192
blink. The positions in the magazine the indicator of which steadily lights up are already loaded with discs. ton, the player will begin the position where you want to insert a disc. 3. When the "LOAD" indicator flashes, insert the disc. Once you have inserted the disc, the "LOAD" indicator will - 2006 Subaru Outback | Owner's Manual - Page 193
from its beginning Forward direction 1 2 3 4 5 6 TUNE TRACK Press a desired one of the "Disc select" buttons the disc number indicator of which steadily lights up. The player will then start playback of the selected CD, beginning with the first track. If you have inserted a disc that the - 2006 Subaru Outback | Owner's Manual - Page 194
Audio 5-21 Backward direction Fast-forwarding and fast-reversing Fast-forwarding Fast-reversing TUNE TRACK TUNE TRACK TUNE TRACK 500057 500057 500056 Briefly press the " " side of the TUNE/ TRACK button to skip to the beginning of the current track. Each time the button is pressed, the - 2006 Subaru Outback | Owner's Manual - Page 195
playback mode will be resumed. NOTE NOTE Each time you press the button, the mode will change to the next one in the following sequence. Each time you briefly press the button, the mode will change to the next one in the following sequence. RPT D-RPT CANCEL RPT D-RPT CANCEL If you - 2006 Subaru Outback | Owner's Manual - Page 196
Audio 5-23 and cancel the disc-repeat-play mode, press it again to reselect the disc-repeat-play mode. The disc-repeat-play mode will be cancelled if you perform any of the following steps: Press the " " or " " side of the SEEK/SCAN button Press the "RPT" button. Press the "RDM" button Press the " - 2006 Subaru Outback | Owner's Manual - Page 197
disc to be ejected. 500237 500237 2. Briefly press the " " button. The selected disc will be ejected. The disc number indicator will flash at this time. When you remove the ejected disc, the disc 1. If you continue to press the " " button, the player will produce beep sound and will enter the - 2006 Subaru Outback | Owner's Manual - Page 198
Audio 5-25 sticking out, because vibration might make it fall out. If you press the " " button while the player is in all disc ejection mode, the mode will be cancelled following ejection of the disc that is currently being ejected. If you press the "CD" button while the player is in all disc - 2006 Subaru Outback | Owner's Manual - Page 199
5-26 Audio Type C audio set (if equipped) MP3 6 CD CHANGER P-203UE LOAD PUSH POWER-VOL CD FM RDM AUDIO FOLDER SEEK SCAN BAL RPT TEXT AM 1 2 3 4 5 6 TUNE TRACK 500240 The audio set will operate only when the ignition switch is in the "ACC" or "ON" positions. - 2006 Subaru Outback | Owner's Manual - Page 200
the dial. The dial can also be used for tone and balance adjustment. The volume control dial normally functions as a volume control. This dial becomes approximately 5 seconds. Each brief press of the "AUDIO" button changes control modes in the following sequence starting from volume control mode. - 2006 Subaru Outback | Owner's Manual - Page 201
Turn clockwise For more bass sound For more midrange sound For more treble sound For more volume 500230 Each brief press of the "BAL" button changes control modes in the following sequence starting from volume control mode. (When the radio is first turned on, the control mode is in the volume - 2006 Subaru Outback | Owner's Manual - Page 202
CD FM AM 500009 Turn counterclockwise Fader control (R9 to F9) Turn clockwise 500231 To increase rear speaker volume To increase front speaker volume and decrease front speaker vol- and decrease rear speaker volume ume To increase left speaker volume and decrease right speaker volume For less - 2006 Subaru Outback | Owner's Manual - Page 203
5-30 Audio Tuning Manual tuning NOTE Scan tuning (SCAN) While you are holding down either side of the TUNE/TRACK button, the tuning frequency will not stop changing even if the frequency of a receivable station is reached. Seek tuning (SEEK) TUNE TRACK SEEK SCAN 500049 SEEK SCAN 500232 - 2006 Subaru Outback | Owner's Manual - Page 204
reason such as vehicle maintenance or radio removal, all stations stored in the preset CDs (i.e., 8 cm/3 inch CDs) are not supported, and if inserted, they will be immediately ejected. " side of the button or tune the radio manually until the desired station frequency is displayed. 3. Press - 2006 Subaru Outback | Owner's Manual - Page 205
track of the last disc you have inserted. The disc indicator steadily lights up if a disc is already inserted in the corresponding position of the position where you want to insert a disc. 3. When the "LOAD" indicator flashes, insert the disc. Once you have inserted the disc, the "LOAD" indicator - 2006 Subaru Outback | Owner's Manual - Page 206
When there are CDs loaded: buttons the disc number indicator of which steadily lights up. The player will then start playback of the selected CD, beginning with 2. When the disc number indicator and "ALL LOAD" indicator start flashing, insert a disc within 15 seconds. If a disc is successfully - 2006 Subaru Outback | Owner's Manual - Page 207
5-34 Audio the first track/file (track) in the folder. Backward direction Fast-forwarding and fast-reversing Fast-forwarding Fast-reversing TUNE TRACK TUNE TRACK TUNE TRACK 500057 500057 500056 Briefly press the " " side of the TUNE/ TRACK button to skip to the beginning of the current track/ - 2006 Subaru Outback | Owner's Manual - Page 208
"D-RPT" indication will go off, and the normal playback mode will be resumed. NOTE NOTE Each time you briefly press the button, the mode will change to the next one in the following sequence. Each time you briefly press the button, the mode will - 2006 Subaru Outback | Owner's Manual - Page 209
5-36 Audio If you accidentally press the button and cancel the disc/folder repeat-play mode, press it again to reselect the disc/folder repeat-play mode. The disc/folder repeat-play mode will be cancelled if you perform any of the following steps: Press the "RPT" button Press the " " button Press - 2006 Subaru Outback | Owner's Manual - Page 210
each time you press one of the buttons. NOTE NOTE If you press the "TEXT" button for 0.5 second or longer during playback, the indication will change to the next one in the following sequence. The display is designed to show titles for up to eight pages (64 characters in total). However - 2006 Subaru Outback | Owner's Manual - Page 211
player will produce beep sound and will enter the all disc ejection mode. At this time, the disc number indicator and "ALL EJECT" indicator will flash. 2. Remove the disc that has been ejected. The other discs loaded will then be ejected one after another. If you do not - 2006 Subaru Outback | Owner's Manual - Page 212
control buttons (if equipped) These buttons are located on the spokes of the steering wheel. They allow the driver to control audio functions without taking used to select the desired audio mode. Each time it is pressed, the mode changes to the next one in the following sequence: FM* AM* CD With CD mode - 2006 Subaru Outback | Owner's Manual - Page 213
5-40 Audio Volume control buttons MUTE button Precautions to observe when handling a compact disc Use only compact discs (CDs, CD-Rs and CD-RWs) that have the mark shown in the following. Also, some compact discs cannot be played. 400218 400219 Press the "+" button to increase the volume. Press - 2006 Subaru Outback | Owner's Manual - Page 214
when the vehicle is driven on a rough surface). To remove a disc from the case, press the center of the case and hold both edges of the disc. that has a non-standard shape (for example, a heart shape). Malfunctions or problems might result. A disc is vulnerable to heat. Never keep it either in places - 2006 Subaru Outback | Owner's Manual - Page 215
tailed information can be found in the user's manuals for encoder software and writing software. A fixed system supports multi-session recording, so disc-at-once recording is recommended. The system does not support packet writing software. The system does not have a playlist function. The system - 2006 Subaru Outback | Owner's Manual - Page 216
of folders: 255 (including root folder) Maximum number of files: 999 (maximum number in one folder: 255) Maximum number of layers: 8 Supported file systems The audio system supports the following file systems: ISO 9660 Level 1/Level 2 Apple Extension to ISO 9660 Joliet Romeo NOTE NOTE The audio - 2006 Subaru Outback | Owner's Manual - Page 217
- 2006 Subaru Outback | Owner's Manual - Page 218
passenger's cup holder ... 6-7 6-7 6-7 Accessory power outlets ...Ashtray ...Front ashtray ... 6-8 6-9 6-9 Coat hook ...Rear passenger area ... 6-10 6-10 Shopping bag hook ...Floor mat ...Cargo area cover (Station wagon) ...Using the cover ...To remove the cover housing ...To remove the rear gate - 2006 Subaru Outback | Owner's Manual - Page 219
for details. : The light stays off. Map light Dome light Cargo area light (Station wagon) 600494 Vehicle with moonroof (Sedan) 400254 The light switch has three positions: : The light stays on continuously. Middle position: The light comes on when any door is opened. The light remains on for - 2006 Subaru Outback | Owner's Manual - Page 220
turn on the map light, push the switch. To turn it off, push the switch again. When leaving the vehicle, make sure the light is turned off to visor extension plate to prevent glare through the gap between the sun visor and center pillar. To use the extension plate, pull it toward the rear of the - 2006 Subaru Outback | Owner's Manual - Page 221
liquids or any other dangerous items in the storage compartment. To use the vanity mirror, swing down the sun visor and open the vanity mirror cover. The light beside the vanity mirror comes on when the ignition switch is either in the "ACC" or "ON" position and the mirror - 2006 Subaru Outback | Owner's Manual - Page 222
again as cupholders: Center console box Center console box (front) 600206 Slide the sliding lid (near the parking brake lever) toward the rear. 600500 600502 If you remove the divider plate from the dual cupholders, you can use the center console box as a storage space. Insert the protrusion - 2006 Subaru Outback | Owner's Manual - Page 223
the lock release knob at the bottom of the front edge of the lid. To open the center panel compartment, pull up the edge of the bottom of the panel lid. 400233 Center panel compartment (if equipped) To open the console, push on the lid lightly and it will automatically open. When your vehicle - 2006 Subaru Outback | Owner's Manual - Page 224
600505 The dual cup holder is built into the center console near the parking brake lever. 600506 600206 To access the cup holder, pull the lid toward the rear. The rear passenger's cup holder is located on the lower side of the back of the center console. To use the cup holder, open the lid by - 2006 Subaru Outback | Owner's Manual - Page 225
by them must not exceed 120W. 600507 600509 Outlet in cargo area Outlet beside front ashtray 600209 Outlet in center console Accessory power outlets are provided beside the front ashtray, in the center console and in the cargo area. Electrical power (12V DC) from the battery is available at - 2006 Subaru Outback | Owner's Manual - Page 226
smoke. 600508 Front ashtray NOTE When the lid of the center console is closed, a gap remains between the center console and the lid to allow the power outlet in the center console to be used. Pass the electrical appliance's cord through this gap. 400220 To open the ashtray, push lightly on the - 2006 Subaru Outback | Owner's Manual - Page 227
are no pointed objects in the pockets. Hang clothing directly on the coat hooks without using hangers. 600512 To remove the ashtray for cleaning, hold the right and left sides of the ashtray and pull it out. 600516 Never hang anything on the coat hook that might obstruct the driver's view or - 2006 Subaru Outback | Owner's Manual - Page 228
the shopping bag hook that weigh 11 lbs (5 kg) or more. For Sedan models 400249 The coat hook is attached to each rear passenger's hand grip. 600215 A shopping bag hook is attached to each side of the cargo area. To use the hook, push the upper portion and the shopping bag hook - 2006 Subaru Outback | Owner's Manual - Page 229
to make room for additional cargo. Using the cover 600514 600513 A retaining pin is located on the driver's side of the vehicle next to the fuel filler door release. Fit the grommet in the carpet onto the pin to prevent the carpet from moving. Make sure the driver's floor mat is placed back in - 2006 Subaru Outback | Owner's Manual - Page 230
and rear gate board can be stowed in under the cargo floor. To remove the cover housing 1. Rewind the cover. 400240 1. Remove the top of the rear gate board from the groove in the rear gate panel. 600214 1. To open the lid, pull the handle up. 400239 2. Hold down the button on the right-hand - 2006 Subaru Outback | Owner's Manual - Page 231
hook (provided on the back of the lid) on the rear edge of the roof. 3. Remove the left and right parts of the cargo floor lid. 400242 400336 To install the cover housing, insert both ends of the cover housing into the retainers. Insert (tipped at an angle) the hooks on the rear gate board - 2006 Subaru Outback | Owner's Manual - Page 232
are designed only for securing light cargo. Never try to secure cargo that exceeds the capacity of the hooks. The maximum load capacity is 44 lbs (20 kg) per hook. 400243 Fit the top of the rear gate board into the groove in the rear gate panel. 600216 A stowage box is located on each side of the - 2006 Subaru Outback | Owner's Manual - Page 233
6-16 Interior equipment ing recesses. Under-floor storage compartment The subfloor storage compartment is located under the floor of the trunk or cargo area and can be used to store small items. To open the lid, pull the tab or handle up. Sedan NOTE When storing a flat tire, put the subfloor - 2006 Subaru Outback | Owner's Manual - Page 234
. The HomeLink® Wireless Control System, located on the driver's sun visor, is a handy way to operate, from inside of your vehicle, up to three remote-controlled indoor and outdoor devices, such as garage door openers, entrance gates, door locks, home lighting, and security systems. There are three - 2006 Subaru Outback | Owner's Manual - Page 235
frequency signal.) 6. Press and hold the programmed button and check the HomeLink® indicator light. If the indicator light stays on continuously, your garage door should activate and the programming is completed. If the indicator light flashes rapidly for two seconds and then stays on continuously, - 2006 Subaru Outback | Owner's Manual - Page 236
location and color of the button may vary by brand of garage door opener. If it is difficult to locate the training button, refer to your garage door opener's instruction manual. 2. Press the training button on the garage door opener motor head unit (which activates the "training light" on the unit - 2006 Subaru Outback | Owner's Manual - Page 237
or garage door opener from the outlet. Programming other devices To program other devices such as door locks, home lighting and security systems, contact HomeLink and hold the two outside buttons until the HomeLink® indicator light begins to flash (after 20 seconds). Release both buttons. NOTE If - 2006 Subaru Outback | Owner's Manual - Page 238
is recommended that upon the sale of the vehicle, the memory of all programmed HomeLink® buttons be erased for security purposes. 1. Press and hold the two outside buttons until the indicator light begins to flash (after 20 seconds). 2. Release both buttons. In case a problem occurs If you cannot - 2006 Subaru Outback | Owner's Manual - Page 239
- 2006 Subaru Outback | Owner's Manual - Page 240
24 Power steering ...7-25 Braking ...7-25 Braking tips ...Brake system ...Disc brake pad wear warning indicators ...7-25 7-25 7-26 ABS (Anti-lock Brake System) ...ABS system self-check ...ABS warning light ... 7-26 7-26 7-27 Stopping the engine ...Manual transmission ...Shifting speeds ...Driving - 2006 Subaru Outback | Owner's Manual - Page 241
catalytic converter and may produce a sulfur exhaust odor or smell. SUBARU recommends that you try a different brand of unleaded gasoline having lower sulfur to determine if the problem is fuel related before returning your vehicle to an authorized dealer for service. The CHECK ENGINE warning light - 2006 Subaru Outback | Owner's Manual - Page 242
may cause paint damage, which is not covered under the SUBARU Limited Warranty. Your use of gasoline with detergent additives will help prevent deposits from forming in your engine and fuel system. This helps keep your engine in tune and your emission control system working properly, and is a way of - 2006 Subaru Outback | Owner's Manual - Page 243
7-4 Starting and operating Fuel filler lid and cap Refueling 0 700343 1. To open the fuel filler lid, pull the lid release lever. The lever is on the floor at the left of the driver's seat. 200255 2. Open the fuel filler lid. 700342 - 2006 Subaru Outback | Owner's Manual - Page 244
first stop the engine and make sure that there are no lighted cigarettes, open flames or electrical sparks in the adjacent area. 200253 Never add any cleaning agents to the fuel tank. The addition of a cleaning agent may cause damage to the fuel system. Make sure that the cap is tightened until - 2006 Subaru Outback | Owner's Manual - Page 245
Starting and operating Always use a genuine SUBARU fuel filler cap. If you use the wrong cap, it may not fit or have proper venting, and your fuel tank and emission control system might be damaged. State emission testing (U.S. only) Testing of an All-Wheel Drive vehicle must NEVER be performed on - 2006 Subaru Outback | Owner's Manual - Page 246
the warning and indicator lights when the ignition switch is turned to the "ON" position. 9. Check the gauges, indicator and warning lights after starting the engine. NOTE Engine oil, engine coolant, brake fluid, washer fluid and other fluid levels should be checked daily, weekly or at fuel stops. - 2006 Subaru Outback | Owner's Manual - Page 247
wait for at least 10 sec- Manual transmission vehicle 1. Apply the parking brake. 2. Turn off unnecessary lights and accessories. 3. Press the clutch pedal to the floor and shift the shift lever into neutral. Hold the clutch pedal to the floor while starting the engine. The starter motor will only - 2006 Subaru Outback | Owner's Manual - Page 248
lights have gone out after the engine has started. The fuel injection system automatically lowers the idle speed as the engine warms up. While the engine is warming up, make sure that the selector lever is at the "P" or "N" position and that the parking brake is applied. Stopping the engine Manual - 2006 Subaru Outback | Owner's Manual - Page 249
engine wear and poor fuel economy. Non-turbo models mph (km/h) Gear Except OUTBACK 30 (48) 50 (81) 71 (116) OUTBACK engine over-revving and this in turn can result in engine damage. In addition, sudden application of engine brakes when the vehicle is travelling on a slippery surface can lead to wheel - 2006 Subaru Outback | Owner's Manual - Page 250
and provides 4 forward speeds and 1 reverse speed. Also, it has a manual mode and a SPORT mode. Do not shift from the "P" or "N" not race the engine for more than five seconds in any position except the "N" or "P" position when the brake is set or when chocks are used in the wheels. This may cause - 2006 Subaru Outback | Owner's Manual - Page 251
Neutral) This position is for restarting a stalled engine. In this position the wheels and transmission are not locked. In this brake or foot brake is on. Avoid coasting with the transmission neutral. During coasting, there is no engine braking effect. Selector lever NOTE When the engine coolant - 2006 Subaru Outback | Owner's Manual - Page 252
. ver from this position into the manual gate. To use the manual mode, move the lever from this position into the manual gate then move it toward the "+" hard you depress the brake pedal. Do not drive the vehicle with the selector lever in the "N" (neutral) position. Engine braking has no effect in - 2006 Subaru Outback | Owner's Manual - Page 253
lever in the "N" position, proceed as follows. By referring to the "Shift lock release" section in this chapter, remove the shift lock release cover. Then, with the When the manual mode is selected, the gear position indicator and upshift indicator and/or downshift indicator in the tachometer come - 2006 Subaru Outback | Owner's Manual - Page 254
manual mode. Perform gearshifts in accordance with road conditions so that the tachometer needle does not enter the red zone. If the engine speed reaches a predetermined level, a fuel transmission fluid becomes too high, the "AT OIL TEMP" warning light will come on and upshifts to 4th gear will - 2006 Subaru Outback | Owner's Manual - Page 255
covered road), you can pull away from a standstill (safely and easily) by first selecting the 2nd gear of the manual mode. Always apply the foot or parking brake position. Use the brake instead. The engine may, on rare manual gate. When selected, the SPORT mode indicator light on the instrument panel - 2006 Subaru Outback | Owner's Manual - Page 256
brake and stop the engine. 2. Take out the screwdriver from the tool bucket. Automatic transmission - 5speed The automatic transmission is electronically controlled and provides 5 forward speeds and 1 reverse speed. Also, it has a manual mode and a SPORT mode. 700347 700346 3. Remove the cover - 2006 Subaru Outback | Owner's Manual - Page 257
restarting a stalled engine. In this position the wheels and transmission are not locked. In this position, the : Shift possible with brake pedal depressed : Shift possible with brake pedal not depressed The selector lever has four positions, "P", "R", "N", "D" and also has manual gate for using - 2006 Subaru Outback | Owner's Manual - Page 258
the lever from this position into the manual gate. To use the manual mode, move the lever from this position into the manual gate then move it toward the "+" you depress the brake pedal. Do not drive the vehicle with the selector lever in the "N" (neutral) position. Engine braking has no effect - 2006 Subaru Outback | Owner's Manual - Page 259
"P" position at this time. Selector lever release button Selection of manual mode 700345 700109 If you inadvertently have turned the ignition switch to to the "Shift lock release" section in this chapter, remove the shift lock release cover. Then, with the screwdriver inserted into the hole, move - 2006 Subaru Outback | Owner's Manual - Page 260
can be performed using the selector lever or the shift switch on the steering wheel (turbo model only). 2 3 700308 300106 1) Upshift indicator 2) Downshift indicator 3) Gear position indicator 700111 When the manual mode is selected, the gear position indicator and upshift indicator and/or - 2006 Subaru Outback | Owner's Manual - Page 261
"AT OIL TEMP" warning light will come manual mode to protect the automatic transmission from damage. When the temperature of the engine oil engine damage. In addition, sudden application of engine braking caused by down shifting when the vehicle is travelling on a slippery surface can lead to wheel - 2006 Subaru Outback | Owner's Manual - Page 262
covered road), you can pull away from a standstill safely and easily by first selecting the 2nd gear of the manual mode. Always apply the foot or parking brake position. Use the brake instead. The engine may, on rare manual gate. When selected, the SPORT mode indicator light on the instrument panel - 2006 Subaru Outback | Owner's Manual - Page 263
3. Remove the cover by prying on the edge with a flat-head screwdriver. 4. Insert the screwdriver into the hole. 5. Push down on the screwdriver and move the selector lever from the "P" to the "N" position. 6. Remove the screwdriver from the hole. Depress the brake pedal and start the engine. Take - 2006 Subaru Outback | Owner's Manual - Page 264
Starting and operating 7-25 Power steering Braking Braking tips Do not hold the steering wheel at the fully locked position left or right for more than five seconds. This may damage the power steering pump. The power steering system operates only when the engine is running. If you lose power - 2006 Subaru Outback | Owner's Manual - Page 265
under these conditions, therefore, reduce your speed and leave ample distance from other vehicles. ABS system self-check You may feel a slight shock in the brake pedal and hear the operating sound of ABS from the engine compartment just after the vehicle is started. This is caused by an automatic - 2006 Subaru Outback | Owner's Manual - Page 266
When the warning light is on, the ABS function shuts down; however, the conventional brake system continues to operate normally. If the warning light behavior is as described in the following, the ABS system may be considered normal. The warning light comes on right after the engine is started but - 2006 Subaru Outback | Owner's Manual - Page 267
to the nearest SUBARU dealer and have the system inspected. 4. If both warning lights come on again and stay illuminated after the engine has been restarted, shut down the engine again, apply the parking brake, and check the brake fluid level. 5. If the brake fluid level is not below the "MIN" mark - 2006 Subaru Outback | Owner's Manual - Page 268
and operating 7-29 Driving with the brake system warning light on is dangerous. This indicates your brake system may not be working properly. If the light remains on, have the brakes inspected by a SUBARU dealer immediately. If at all in doubt about whether the brakes are operating properly, do not - 2006 Subaru Outback | Owner's Manual - Page 269
attached to the driver's side door pillar. In the event of wheelspin and/or skidding on a slippery road surface and/or during cornering and/or an evasive maneuver, the Vehicle Dynamics Control system adjusts the engine's output and the wheels' respective braking forces to help maintain traction and - 2006 Subaru Outback | Owner's Manual - Page 270
has occurred in the Vehicle Dynamics Control electrical system, only the warning light will turn on. In such an event, the ABS will still be operating normally. The warning light will also turn on when a problem occurs with the ABS or Vehicle Dynamics Control electronic control sys- CONTINUED - 2006 Subaru Outback | Owner's Manual - Page 271
Control system controls each brake through the ABS, whenever the ABS stops operating due to a malfunction in that electrical system, the Vehicle Dynamics Control will also become unable to control all four brakes. Thus Vehicle Dynamics Control system operation halts and the warning light turns - 2006 Subaru Outback | Owner's Manual - Page 272
next time the ignition switch is turned to the OFF position and the engine is restarted. If the switch is held down for 10 seconds or longer, the indicator light goes off, the Vehicle Dynamics Control system is activated, and the system ignores any further pressing of the switch. To make the switch - 2006 Subaru Outback | Owner's Manual - Page 273
sensor/transmitter being transferred, the low tire pressure warning light will flash. This indicates the TPMS is unable to monitor all four road wheels. Contact your SUBARU dealer as soon as possible for tire and sensor replacement and/or system resetting. Do not inject any tire liquid or aerosol - 2006 Subaru Outback | Owner's Manual - Page 274
operation. Changes or exhaust system parts. Be sure to stop the engine if you take a nap in the vehicle. If engine exhaust gas enters the passenger compartment, occupants in the vehicle could die from carbon monoxide (CO) contained in the exhaust gas. 700116 To release the parking brake - 2006 Subaru Outback | Owner's Manual - Page 275
downhill, the front wheels should be turned into the curb. If you move the cruise control lever or press the main switch button while turning the ignition switch "ON", the cruise control function is deactivated and the "CRUISE" indicator light flashes. To reactivate the cruise control function - 2006 Subaru Outback | Owner's Manual - Page 276
increased while driving with the cruise control activated. Simply depress cruise control temporarily: 1. Push the main switch button. 3. Push the control lever downward in the "SET/COAST" direction and release it. Then release the accelerator pedal. 300210 700161 300212 The " " indicator light - 2006 Subaru Outback | Owner's Manual - Page 277
manual transmission vehicles only). The " " indicator light in the combination meter goes off when the cruise control is cancelled. To resume the cruise cruising speed automatically. The " " indicator light in the combination meter will automatically come on at this time. To change the cruising - 2006 Subaru Outback | Owner's Manual - Page 278
control lever) To decrease the speed (by brake pedal) 1. Depress the brake pedal to release cruise control temporarily. 2. When the speed decreases switch "ON", the cruise control function is deactivated and the "CRUISE" indicator light flashes. To reactivate the cruise control function, turn the - 2006 Subaru Outback | Owner's Manual - Page 279
- 2006 Subaru Outback | Owner's Manual - Page 280
miles (1,600 km) ...Fuel economy hints ...Engine exhaust gas (Carbon monoxide) ...Catalytic converter ...Periodic inspections ...Driving 8-26 8 Loading your vehicle ...Vehicle capacity weight ...GVWR and GAWR (Gross Vehicle Weight Rating and Gross Axle Weight Rating) ...Roof rail and crossbar (if - 2006 Subaru Outback | Owner's Manual - Page 281
driver's side. Low pressure will increase tire wear and fuel consumption. Use the air conditioner only when necessary. Keep the front and rear wheels in proper alignment. Avoid carrying unnecessary luggage or cargo. Engine exhaust gas (Carbon monoxide) The performance and long life of your vehicle - 2006 Subaru Outback | Owner's Manual - Page 282
the problem checked and corrected as soon as possible. If you must drive under these conditions, drive only with all windows fully open. Keep the trunk lid (Sedan) or rear gate (Station wagon) closed while driving to prevent exhaust gas from entering the vehicle. Catalytic converter Avoid fire - 2006 Subaru Outback | Owner's Manual - Page 283
of catalytic converter and the exhaust system. Periodic inspections To keep your vehicle in the best condition at all times, always have the recommended maintenance services listed in the maintenance schedule in the "Warranty and Maintenance Booklet" performed at the specified time or mileage - 2006 Subaru Outback | Owner's Manual - Page 284
, braking, speedometer/odometer calibration, and clearance between check the cold tire pressure before starting to drive. The recommended tire pressure is provided on the tire placard, which is located under the door latch on the driver's side. Tire chains should always be placed on the front wheels - 2006 Subaru Outback | Owner's Manual - Page 285
puddles, or roads flooded with water. Water entering the engine air intake or the exhaust pipe or water splashing onto electrical parts may damage your vehicle and may cause it to stall. OUTBACK Because of the AWD feature and higher ground clearance, your SUBARU can be driven on ordinary roads or - 2006 Subaru Outback | Owner's Manual - Page 286
driving conditions such as rough roads or off roads will necessitate more frequent replacement of engine oil, brake fluid and transmission oil than that specified in the maintenance schedule described in the "Warranty and Maintenance Booklet". Remember that damage done to your SUBARU while operating - 2006 Subaru Outback | Owner's Manual - Page 287
develop on the brake system, which could cause poor braking action. Check for snow or ice In order to prevent freezing of washer fluid, check the freezing temperatures in the table above when adjusting the fluid concentration to the outside temperature. If you fill the reservoir tank with a fluid - 2006 Subaru Outback | Owner's Manual - Page 288
for an extended period, it is best to have the fuel tank filled to capacity. Avoid prolonged continuous driving in snowstorms. Snow will enter the engine's intake system and may hinder the air flow, which could result in engine shutdown or even breakdown. To prevent skidding and slipping, avoid - 2006 Subaru Outback | Owner's Manual - Page 289
except OUTBACK Do and braking replacing original tires with winter (snow) tires, make sure you use only the same size, construction and load range as the original tires listed on the tire placard. Using other sizes and construction may affect speedometer/odometer calibration and clearance - 2006 Subaru Outback | Owner's Manual - Page 290
OUTBACK models only When replacing original tires with winter (snow) tires, make sure you use only the same size and construction as recommended. Using other sizes or construction may affect speedometer/odometer calibration and clearance ride, handling, braking and speedometer/odometer calibration - 2006 Subaru Outback | Owner's Manual - Page 291
a front wheel, replace the temporary spare tire with engine. For the best possible traction, avoid spinning the wheels cargo higher than the top of the seatback because it could tumble forward and injure passengers in the event of a sudden stop or accident. Keep luggage or cargo low, as close to the floor - 2006 Subaru Outback | Owner's Manual - Page 292
For better fuel economy, do not carry unneeded cargo. Vehicle capacity weight B00128 The load capacity of your vehicle is determined by weight, not by available cargo space. The maximum load you can carry in your vehicle is shown on the vehicle placard attached to the driver's side door pillar - 2006 Subaru Outback | Owner's Manual - Page 293
the combined total of weight of the vehicle, fuel, driver, all passengers, luggage, any optional equipment and trailer tongue load. Therefore, the GVW changes depending on the situation. In addition, the total weight applied to each axle (GAW) must never exceed the For cargo carrying purposes, the - 2006 Subaru Outback | Owner's Manual - Page 294
's instructions. When you carry cargo on the roof using the roof crossbar kit and a carrying attachment, never exceed the maximum load limit explained in the following. You should also be careful that your vehicle does not exceed the Gross Vehicle Weight Rating (GVWR) and front and rear Gross Axle - 2006 Subaru Outback | Owner's Manual - Page 295
roof rails and the front roof rail supports. 1) T-25 torx® head screw 1. Make sure that the T-25 torx® head screw on the back of each crossbar end support is tightened correctly. 2. Before placing the crossbar on the roof rails, make sure that the T-30 torx® head screw is removed from the top of - 2006 Subaru Outback | Owner's Manual - Page 296
squeeze the lower clamp and the end support together to compress the pads and gain a better alignment of the pieces while trying to start the screw. Use care not to crossthread the screw in the insert. Do not carry cargo on the roof when the crossbars are removed. Luggage on the roof will be - 2006 Subaru Outback | Owner's Manual - Page 297
could cause an accident resulting in serious personal injuries. Permissible trailer weight changes depending on the situation. Refer to the next section "Trailer towing" for possible recommendations and limitations. Trailer brakes are required when the towing load exceeds 1,000 lbs (453 kg). Be - 2006 Subaru Outback | Owner's Manual - Page 298
Driving tips 8-19 Connecting a trailer 1. Remove the receiver cover from the hitch receiver tube. Then insert that will hold the trailer's maximum gross weight. The chains should cross under the trailer tongue to prevent the tongue from dropping onto the ground in case it should disconnect from the - 2006 Subaru Outback | Owner's Manual - Page 299
hooks. Remove the ball mount from the hitch receiver tube and insert the receiver cover onto the hitch receiver tube. Place the dust cap over the additional loads on your vehicle's engine, drivetrain, brakes, tires and suspension and has an adverse effect on fuel economy. If you do decide to tow - 2006 Subaru Outback | Owner's Manual - Page 300
be towed with a new vehicle or a vehicle with any new powertrain component (engine, transmission, differential, wheel bearings, etc.) for the first 1,000 miles (1,600 km) of driving. Before towing a trailer, check the trailer total weight, GVW, GAWs and tongue load. Make sure the load and its - 2006 Subaru Outback | Owner's Manual - Page 301
and any other optional equipment installed on your vehicle. Therefore, the GVW changes depending on the situation. Determine the GVW each time before going on a trip by putting your vehicle and trailer on a vehicle scale. GVWR is shown on the certification label located on the driver's door of your - 2006 Subaru Outback | Owner's Manual - Page 302
cargo is firmly secured to prevent a change in weight distribution while driving. If the trailer is loaded with more weight in the back of trailer's axle than in the front, the load is taken off the rear axle of the towing vehicle. This may cause the rear wheels to skid, especially during braking - 2006 Subaru Outback | Owner's Manual - Page 303
the left and right sides. Be sure that all cargo is firmly secured to prevent a change in weight distribution while driving. Never drill the frame or under-body of your vehicle to install a commercial trailer hitch. If you do, dangerous exhaust gas, water or mud may enter the passenger compartment - 2006 Subaru Outback | Owner's Manual - Page 304
. If your trailer's total weight (trailer weight plus its cargo weight) exceeds 1,000 lbs (453 kg), the trailer is required to be equipped with its own brake system. Electric brakes or surge brakes are recommended, and must be installed properly. Check that your trailer's brakes conform with Federal - 2006 Subaru Outback | Owner's Manual - Page 305
vehicle's electrical system requires modifications to the vehicle's lighting circuit to increase its capacity and accommodate wiring changes. To ensure the trailer lights are connected properly, please consult your SUBARU dealer. Check for proper operation of the turn signals, the brake lights and - 2006 Subaru Outback | Owner's Manual - Page 306
mounting are in good condition. If any problems are apparent, do not tow the trailer. Check that the vehicle sits horizontally with the trailer attached. If the vehicle is tipped sharply up at the front and down at the rear, check the total trailer weight, GVW, GAWs and tongue load again, then - 2006 Subaru Outback | Owner's Manual - Page 307
brakes. Do not make sudden downshifts. When driving uphill in hot weather, the air conditioner may turn off automatically to protect the engine from overheating. When driving uphill in hot weather, pay attention to the water temperature gauge pointer (for all vehicles) and AT OIL TEMP warning light - 2006 Subaru Outback | Owner's Manual - Page 308
overheating ...If steam is coming from the engine compartment ...If no steam is coming from the engine compartment ... 9-12 9-12 9-12 Towing ...Towing and tie-down hooks ...Using a flat-bed truck ...Towing with all wheels on the ground ... 9-13 9-13 9-16 9-16 Rear gate (Station wagon) - if the - 2006 Subaru Outback | Owner's Manual - Page 309
is best to safely pull off the road if a problem occurs. The hazard warning flasher can be activated regardless wheel rim is replaced without the original pressure sensor/transmitter being transferred, the low tire pressure warning light will flash. This indicates the tire pressure monitoring system - 2006 Subaru Outback | Owner's Manual - Page 310
spare tire, put a spare fuse inside the FWD connector located in the engine compartment and confirm that the " " warning light comes on. The All-Wheel-Drive capability of the vehicle has now been deactivated. After re-installing the conventional tire, remove the spare fuse from the FWD connector in - 2006 Subaru Outback | Owner's Manual - Page 311
supplied with the vehicle is designed only for changing a tire. Never get under the vehicle while supporting the vehicle with this jack. 2 Sedan 1) Jack handle 2) Spare tire 3) Jack and tool bucket 3 900242 600122 4. Put wheel blocks at the front and rear of the tire diagonally opposite the - 2006 Subaru Outback | Owner's Manual - Page 312
jack are stored under the floor of the trunk or cargo area. To remove the spare tire and jack, proceed as follows: Sedan: 2 900245 600115 2. Remove the jack handle from the back of the floor cover. 3. Take out the storage tray. 1) Wheel nut wrench 2) Jack 5. Take the wheel nut wrench and jack out - 2006 Subaru Outback | Owner's Manual - Page 313
the attaching bolt counterclockwise, then take the spare tire out. Station wagon: 2. Remove the left-hand part of the lid and take out the jack handle. 4. Take out the jack and tool bucket. 1 2 900245 600111 600110 1) Wheel nut wrench 2) Jack 1. Open the lid and hang the hook provided on - 2006 Subaru Outback | Owner's Manual - Page 314
the wheel nuts using the wheel nut wrench but do not remove the nuts. Turn the jackscrew by hand until the jack head engages firmly into the jack-up point. NOTE Make sure the jack is well lubricated before using it. 600123 600198 8. Place the jack under the side sill at the front or rear - 2006 Subaru Outback | Owner's Manual - Page 315
specified torque. Have the wheel nut torque checked at the nearest automotive service facility. Do not use oil or grease on the wheel studs or nuts when the the wheel and hub with a cloth. 12.Put on the spare tire. Replace the 14.Use the wheel nut wrench to securely tighten the wheel nuts locations. - 2006 Subaru Outback | Owner's Manual - Page 316
sensor/transmitter being transferred, the low tire pressure warning light will flash. This indicates the TPMS is unable to monitor all four road wheels. Contact your SUBARU dealer as soon as possible for tire and sensor replacement and/or system resetting. Do not inject any tire liquid or aerosol - 2006 Subaru Outback | Owner's Manual - Page 317
any other moving engine parts. Removing rings, watches and grounded. 2. If the booster battery is in another vehicle, do not let the two vehicles touch. 3. Turn off all unnecessary lights and accessories gas generated by a battery explodes if a flame or spark is brought near it. Do not smoke or light - 2006 Subaru Outback | Owner's Manual - Page 318
In case of emergency 9-11 (4) (3) (2) (1) 1) Connect one jumper cable to the positive (+) terminal on the discharged battery. 2) Connect the other end of the jumper cable to the positive (+) terminal of the booster battery. 3) Connect one end of the other cable to the negative (-) terminal of the - 2006 Subaru Outback | Owner's Manual - Page 319
off the engine. 4. After the engine has fully cooled down, check the coolant level in the reserve tank. If the coolant level is below the "MIN" mark, add coolant up to the "MAX" mark. 5. If there is no coolant in the reserve tank, add coolant to the reserve tank. Then remove the radiator cap and - 2006 Subaru Outback | Owner's Manual - Page 320
hook, screwdriver and wheel nut wrench from the on board tool bucket. 900246 2. Wrap a flat-head screwdriver in a vinyl tape or cloth, insert it into the gap between the cover and the front bumper, and use it to lever the cover open. 3. Pull the entire front fog light cover toward you. 900030 - 2006 Subaru Outback | Owner's Manual - Page 321
on the bumper. Front towing hook (except OUTBACK models): 1. Take out the towing hook, screwdriver and wheel nut wrench from the on board tool bag. 2. Wrap a flat-head screwdriver with cloth or vinyl. Then, insert the screwdriver into the gap between the front fog light cover and the bumper, and - 2006 Subaru Outback | Owner's Manual - Page 322
hook securely using a wheel nut wrench. After towing, remove the towing hook from the vehicle and stow it in the tool bag. Fit the fog light cover and towing hook cover on the bumper. 600150 The front tie-down hooks are located between each of the front tires and the front bumper. Rear tie-down - 2006 Subaru Outback | Owner's Manual - Page 323
so tightly that the suspension bottoms out. Remember that the brake booster and power steering do not function when the engine is not running. Because the engine is turned off, it will take greater effort to operate the brake pedal and steering wheel. Use the rear tie-down hooks only for downward - 2006 Subaru Outback | Owner's Manual - Page 324
inside the cargo area. 0 200262 3. Unlock the rear gate by pressing the lever inside the trim downward. 4. Open the rear gate from outside by raising the rear gate handle. 200261 1. Remove the access cover at the bottom-center of the rear gate trim using flathead screwdriver. 2. Locate the rear - 2006 Subaru Outback | Owner's Manual - Page 325
tire located in the trunk or in the cargo area. 900257 900258 Station wagon: To take out the jack and maintenance tools, open the center lid and remove the bucket from the center of the spare tire. Then, take the jack out of the bucket. 900244 Sedan: Open the floor cover and remove the jack - 2006 Subaru Outback | Owner's Manual - Page 326
In case of emergency 9-19 For how to use the jack, refer to "Flat tires". Other maintenance tools In addition to a jack and a jack handle, the tool bucket on your vehicle contains the following maintenance tools. 900259 Screwdriver Towing hook Wheel nut wrench - 2006 Subaru Outback | Owner's Manual - Page 327
- 2006 Subaru Outback | Owner's Manual - Page 328
wheels ... 10-2 10-2 10-3 10-3 Corrosion protection ...Most common causes of corrosion ...To help prevent corrosion ... 10-4 10-4 10-4 Cleaning the interior ...Seat fabric ...Leather seat materials ...Synthetic leather upholstery ...Climate control panel, audio panel, instrument panel, console - 2006 Subaru Outback | Owner's Manual - Page 329
lightly pressing the brake pedal to heat up the brakes. Do not wash the engine compartment and areas adjacent to it. If water enters the engine air intake, electrical parts or the power steering fluid reservoir, it will cause engine trouble exhaust system, fuel and brake lines, brake cables, floor - 2006 Subaru Outback | Owner's Manual - Page 330
brake tone cannot be restored, lightly polish the surface with will result in removing the paint layer and wheels with a stiff brush or expose them to a high-speed washing device. Clean the vehicle (including the aluminum wheels them according to the manufacturer's instructions. Wax or polish when - 2006 Subaru Outback | Owner's Manual - Page 331
that the underbody be given a very thorough washing. Before the beginning of winter, check the condition of underbody components, such as the exhaust system, fuel and brake lines, brake cables, suspension, steering system, floor pan, and fenders. If any of them are found to be rusted, they should - 2006 Subaru Outback | Owner's Manual - Page 332
panel, audio equipment, instrument panel, center console, combination meter panel, and switches. (Do not use organic solvents.) Seat fabric Remove the cleaner according to its instructions. NOTE quality natural product which that the seats and headrests be covered, or the windows shaded, to - 2006 Subaru Outback | Owner's Manual - Page 333
- 2006 Subaru Outback | Owner's Manual - Page 334
oil and oil filter ...11-10 Recommended grade and viscosity ...11-12 Recommended grade and viscosity under severe driving conditions ...11-13 Brake fluid ...11-28 Checking the fluid level ...11-28 Recommended brake fluid ...11-28 Cooling system ...11-13 Hose and connections ...11-14 Engine coolant - 2006 Subaru Outback | Owner's Manual - Page 335
blade rubber ...Rear window wiper blade assembly ...Rear window wiper blade rubber ...11-41 11-42 11-42 11-43 Battery ...Fuses ...Main fuse ...Installation of accessories ...Replacing bulbs ...Headlight ...Parking light ...Front turn signal light ...Front fog light (if equipped) ... 11-44 11-45 - 2006 Subaru Outback | Owner's Manual - Page 336
stands to support the vehicle. Never keep the engine running in a poorly ventilated area, such as a garage or other closed areas. Do not smoke or allow open flames around the fuel or battery. This will cause a fire. Because the fuel system is under pressure, replacement of the fuel filter should be - 2006 Subaru Outback | Owner's Manual - Page 337
is running and remain hot for some time after the engine is stopped. Do not spill engine oil, engine coolant, brake fluid or any other fluid on hot engine components. This may cause a fire. Always remove the key from the ignition switch. When the ignition switch is in the "ON" position, the cooling - 2006 Subaru Outback | Owner's Manual - Page 338
Maintenance and service 11-5 hood prop into the slot in the hood. To close the hood: 1. Lift the hood slightly and remove the the hood is securely locked. 200258 3. Release the secondary hood release located under the front grille by moving the lever toward the left. If this does not close the - 2006 Subaru Outback | Owner's Manual - Page 339
gauge (page 11-22) Brake fluid reservoir (page 11-28) Fuse box (page 11-45) Battery (page 11-44) Windshield washer tank (page 11-39) Engine oil filler cap (page 11-9) Engine coolant reservoir (page 1114) Radiator cap (page 11-14) Engine oil level gauge (page 11-9) Air cleaner element (page 11-17 - 2006 Subaru Outback | Owner's Manual - Page 340
transmission fluid level gauge (page 11-22) Fuse box (page 11-45) Battery (page 11-44) Windshield washer tank (page 11-39) Engine oil filler cap (page 11-9) Engine coolant reservoir (page 1114) Engine oil level gauge (page 11-9) Radiator cap (page 11-14) Air cleaner element (page 11-17) 13 12 - 2006 Subaru Outback | Owner's Manual - Page 341
-22) 4) Brake fluid reservoir (page 11-28) 5) Fuse box (page 11-45) 6) Battery (page 11-44) 7) Windshield washer tank (page 11-39) 8) Engine oil filler cap (page 11-9) 9) Engine coolant reservoir (page 1114) 10) Radiator cap (page 11-14) 11) Engine oil level gauge (page 11-9) 12) Air cleaner element - 2006 Subaru Outback | Owner's Manual - Page 342
Maintenance and service 11-9 Engine oil Checking the oil level Check the engine oil level at each fuel stop. 1. Park the vehicle on a level surface and stop the engine. 1 2 1 3 2 B00418 B00417 2.5-liter models 1) Notch 2) Upper level 3) Lower level 3.0-liter models 1) Upper level 2) Lower level - 2006 Subaru Outback | Owner's Manual - Page 343
between the upper level and the notch mark. This is caused by thermal expansion of the engine oil. 3. Remove the oil filler cap. the drain plug while the engine is still warm. The used oil should be drained into an appropriate container and disposed of properly. Be careful not to burn yourself - 2006 Subaru Outback | Owner's Manual - Page 344
an oil leak. Thoroughly wipe off any engine oil that has spilled over the exhaust pipe and/or under-cover. If left unremoved, the oil could catch fire. 11.Reinstall the cover under the oil filter. 12.Pour engine oil through the filler neck. - CONTINUED - 7. Remove the oil filter with an oil filter - 2006 Subaru Outback | Owner's Manual - Page 345
that will add to fuel economy. The following table lists the recommended viscosities and applicable temperatures. When adding oil, different brands may be used together as long as they are the same API classification and SAE viscosity as those recommended by SUBARU. EN Use only engine oil with the - 2006 Subaru Outback | Owner's Manual - Page 346
a spray of boiling hot coolant when the cap is removed. SAE viscosity number and applicable temperature *: 5W-30 is preferred. Engine oil viscosity (thickness) affects fuel economy. Oils of lower viscosity provide better fuel economy. However, in hot weather, oil of higher viscosity is required - 2006 Subaru Outback | Owner's Manual - Page 347
, remove the radiator cap and refill as required. 3. After refilling the reserve tank and the radiator, reinstall the caps and check that the rubber gaskets inside the radiator cap are in the proper position. Be careful not to spill engine coolant when adding it. If coolant touches the exhaust - 2006 Subaru Outback | Owner's Manual - Page 348
and service 11-15 Changing the coolant Always add genuine Subaru cooling system conditioner whenever the coolant is replaced. Change the engine coolant and add genuine Subaru cooling system conditioner using the following procedures according to the maintenance schedule in the "Warranty and - 2006 Subaru Outback | Owner's Manual - Page 349
to the reservoir tank's "FULL" level mark. Be careful not to spill engine coolant when adding it. If coolant touches the exhaust pipe, it may cause a bad smell, smoke, and/or a fire. If engine coolant gets on the exhaust pipe, be sure to wipe it off. 7. Put the radiator cap back on and tighten - 2006 Subaru Outback | Owner's Manual - Page 350
and service 11-17 Air cleaner element Non-turbo models 0 Do not operate the engine with the air cleaner element removed. The air cleaner element not only filters intake air but also stops flames if the engine backfires. If the air cleaner element is not installed when the engine backfires - 2006 Subaru Outback | Owner's Manual - Page 351
from the clamp that runs next to the case cover. B00116 1. Use a screwdriver to undo the clips on the air intake duct, then remove the air intake duct. B00207 3. Use a screwdriver to remove the duct that is connected to the air cleaner case cover. B00114 5. Open the air cleaner case cover and - 2006 Subaru Outback | Owner's Manual - Page 352
the two clamps on the air cleaner case cover. B00027 It may be difficult to replace the spark plugs. It is recommended that you have the spark plugs replaced by your SUBARU dealer. The spark plugs should be replaced according to the maintenance schedule in the "Warranty and Maintenance Booklet". - 2006 Subaru Outback | Owner's Manual - Page 353
1) Yellow handle It is unnecessary to check belt tension periodically because your engine is equipped with an automatic belt tension adjuster. However, replacement of the belt should be done according to the maintenance schedule in the "Warranty and Maintenance Booklet". Consult your SUBARU dealer - 2006 Subaru Outback | Owner's Manual - Page 354
the dipstick again and check the oil level on it. If it is below the lower level, add oil through the dipstick hole to bring the level up to the upper level. 85W 80W 75W/90 B00032 Be careful not to spill manual transmission oil when adding it. If oil touches the exhaust pipe, it may cause - 2006 Subaru Outback | Owner's Manual - Page 355
°C) is normal. 2. Park the vehicle on a level surface and set the parking brake. 3. First shift the selector lever in each position. Then shift it in the "P" position, and run the engine at idling speed. B00428 1 3 4 1 3 2 4 B00370 4-speed automatic transmission 1) Yellow handle 1) 2) 3) 4) HOT - 2006 Subaru Outback | Owner's Manual - Page 356
it may cause a bad smell, smoke, and/or a fire. If automatic transmission fluid gets on the exhaust pipe, be sure to wipe it off. Front differential gear oil (AT vehicles) Checking the oil level 1 1 2 B00372 Recommended fluid Use one of the following types of automatic transmission fluid. Genuine - 2006 Subaru Outback | Owner's Manual - Page 357
be equipped with a rear differential protector. The differential protector provides protection to the rear differential assembly during off-road use. Removal of the rear differential protector is not required when checking the oil level. 1 3 1 -30 -20 -10 -20 0 20 0 40 10 60 20 30 80 40 100 - 2006 Subaru Outback | Owner's Manual - Page 358
Maintenance and service 11-25 1 1 1 3 2 B00433 2 B00320 2 Others 1) Filler plug 2) Drain plug B00373 2.5-liter turbo and 3.0-liter models (AT) 1) Filler plug 2) Drain plug 2.5-liter turbo and 3.0-liter models (AT) 1) Filler hole 2) Drain hole 3) Oil level - CONTINUED - - 2006 Subaru Outback | Owner's Manual - Page 359
gear oil gets on the exhaust pipe, be sure to wipe it off. If the vehicle requires frequent refilling, there may be an oil leak. If you suspect a problem, have the vehicle checked at your SUBARU dealer. -20 0 20 85W 80W 75W/90 B00032 SAE viscosity No. and applicable temperature Remove the - 2006 Subaru Outback | Owner's Manual - Page 360
the vehicle on a level surface, and stop the engine. 2. Check the fluid level of the reservoir tank. When the fluid is hot after the vehicle has been run: Check that the oil level is between "HOT MIN" and "HOT MAX" on the surface of the reservoir tank. When the fluid is cool before the vehicle is - 2006 Subaru Outback | Owner's Manual - Page 361
, wearing eye protection is advisable. Brake fluid absorbs moisture from the air. Any absorbed moisture can cause a dangerous loss of braking performance. If the vehicle requires frequent refilling, there may be a leak. If you suspect a problem, have the vehicle checked at your SUBARU dealer. Never - 2006 Subaru Outback | Owner's Manual - Page 362
DOT 3 and DOT 4 brake fluids even if they are of the same brand. Clutch fluid absorbs moisture from the air. Any absorbed moisture can cause improper clutch operation. If the vehicle requires frequent refilling, there may be a leak. If you suspect a problem, have the vehicle checked at your SUBARU - 2006 Subaru Outback | Owner's Manual - Page 363
the "Warranty and Maintenance Booklet". Checking the brake pedal reserve distance Checking the brake pedal free play 1 B00324 1) More than 2.56 in (65 mm) 1 B00323 1) 0.02 - 0.08 in (0.5 - 2.0 mm) Stop the engine and firmly depress the brake pedal several times. Lightly pull the brake pedal - 2006 Subaru Outback | Owner's Manual - Page 364
Maintenance and service 11-31 Clutch pedal (Manual transmission vehicles) Check the clutch pedal free play and reserve distance according to the maintenance schedule in the "Warranty and Maintenance Booklet". Checking the clutch pedal free play Replacement of brake pad and lining Checking the - 2006 Subaru Outback | Owner's Manual - Page 365
wheels to lock. To avoid this, be certain to pull the lever up slowly and gently. 1. Drive the vehicle at a speed of approx- Check the parking brake stroke according to the maintenance schedule in the "Warranty and Maintenance Booklet". When the parking brake is properly adjusted, braking power - 2006 Subaru Outback | Owner's Manual - Page 366
the tire pressures in a warm garage and will then drive the vehicle in cold outside air, the resulting drop in tire pressures may cause the low tire pressure warning light to come on. To avoid this problem when adjusting the tire pressures in a warm garage, inflate the tires to pressures higher than - 2006 Subaru Outback | Owner's Manual - Page 367
, the TPMS will not fully function and the warning light in the instrument panel will flash. When a tire is replaced, adjustments are necessary to ensure continued normal operation of the tire pressure monitoring system. As with wheel replacement, therefore, you should have the work performed by - 2006 Subaru Outback | Owner's Manual - Page 368
or has been driven less than one mile (1.6 km). B00128 Check the tire pressures when the tires are cold. Use a pressure gauge to adjust the tire pressures to the values shown on the tire placard. The tire placard is located on the door pillar on the driver's side. Driving even a short distance - 2006 Subaru Outback | Owner's Manual - Page 369
worn at shoulders) Abnormally high tire pressure (tread worn in center) B00050 B00051 B00052 Roadholding is good, and steering is responsive. Rolling resistance is low, so fuel consumption is also lower. Rolling resistance is high, so fuel consumption is also higher. Ride comfort is poor. Also - 2006 Subaru Outback | Owner's Manual - Page 370
-line stability. It can also cause steering and suspension system problems and abnormal tire wear. If you suspect that the wheels are not correctly balanced, have them checked and adjusted by your SUBARU dealer. Also have them adjusted after tire repairs and after tire rotation. Wear indicators - 2006 Subaru Outback | Owner's Manual - Page 371
accuracy. It also creates incorrect body-to-tire clearances and inappropriately changes the vehicle's ground clearance. All four tires must be the same in terms of manufacturer, brand (tread pattern), construction, and size. You are advised to replace the tires with new ones that are identical to - 2006 Subaru Outback | Owner's Manual - Page 372
the tire, otherwise the chains may scratch the wheel. When wheel nuts, balance weights, or the center cap is replaced, be sure to replace them with genuine SUBARU parts designed for aluminum wheels. Windshield washer fluid Never use engine coolant as washer fluid because it could cause paint - 2006 Subaru Outback | Owner's Manual - Page 373
300173 Remove the washer tank filler cap, then check the fluid level indicated by the level gauge (attached to the inside of the cap). If the level is near the "Low" mark, add flu- In order to prevent freezing of washer fluid, check the freezing temperatures in the table above when adjusting the - 2006 Subaru Outback | Owner's Manual - Page 374
wiper assembly and driver-side wiper assembly will touch each other, possibly resulting in scratches. 3. Remove the wiper blade assembly by holding blade assembly to the wiper arm. Make sure that it locks in place. 5. Lower the windshield wiper arm on the passenger's side slowly while supporting it - 2006 Subaru Outback | Owner's Manual - Page 375
11-42 Maintenance and service Windshield wiper blade rubber 1 3. Align the claws of the metal support with the grooves in the rubber and slide the blade rubber assembly into the metal support until it locks. 1 B00504 1) Metal spines B00330 1) Metal support 1. Grasp the locked end of the blade - 2006 Subaru Outback | Owner's Manual - Page 376
counterclockwise. 700017 1. Pull out the end of the blade rubber assembly to unlock it from the plastic support. 1) Metal spines 3. If the new blade rubber is not provided with two metal spines, remove the metal spines from the old blade rubber and install them in the new blade rubber. 700064 - 2006 Subaru Outback | Owner's Manual - Page 377
service ends. If the rubber is not retained properly, the wiper may scratch the rear window glass. 5. Install the wiper blade assembly electric sparks. Batteries give off a gas Align the claws of the plastic support with the grooves in the blade rubber assembly, then slide the blade rubber assembly - 2006 Subaru Outback | Owner's Manual - Page 378
and service 11-45 To lessen the risk of sparks, remove rings, check the The fuses are designed to melt during an overload to prevent damage to the wiring harness and electrical equipment. The fuses are located in two fuse boxes. One is located under the instrument panel behind the fuse box cover - 2006 Subaru Outback | Owner's Manual - Page 379
and service 1 2 B00131 B00198 B00338 Open the lid that is located above the hood release knob and pull it toward you to remove it. The spare fuses are stored in the main fuse box cover in the engine compartment. 1) Good 2) Blown 600120 600159 If any lights, accessories or other electrical - 2006 Subaru Outback | Owner's Manual - Page 380
fog lights or any other electrical equipment in your vehicle. Such accessories may cause the electronic system to malfunction if they are incorrectly installed or if they are not suited for the vehicle. 600160 4. Pull out the fuse with the fuse puller. 5. Inspect the fuse. If it has blown, replace - 2006 Subaru Outback | Owner's Manual - Page 381
11-48 Maintenance and service Replacing bulbs 8 9 10 1 2 3 4 5 13 14 18 11 12 7 6 17 18 17 16 15 B00435 - 2006 Subaru Outback | Owner's Manual - Page 382
headlight Front turn signal/Parking and front side marker light Map light Dome light Door step light Front fog light Except OUTBACK OUTBACK Trunk room light (Sedan) High mount stop light (Sedan) Rear turn signal light (Sedan) Backup light (Sedan) Brake/tail and rear side marker light (Sedan) Cargo - 2006 Subaru Outback | Owner's Manual - Page 383
and service Low beam light bulbs 4. Replace the bulb, then set the retainer spring securely. 5. Reconnect the electrical connector. 6. Install the bulb cover. High beam light bulbs Parking light It may be difficult to replace the bulbs. Have your SUBARU dealer replace the bulbs if necessary. Front - 2006 Subaru Outback | Owner's Manual - Page 384
1) Rear turn signal light 2) Backup light 3) Brake/tail and rear side marker light B00134 1. Push the knobs of the cover to open the cover. 1. Using a Phillips screwdriver, remove the upper and lower screws. 3 1 2. Remove the bulb holder from the rear combination light assembly by turning it - 2006 Subaru Outback | Owner's Manual - Page 385
a new one. 6. Set the bulb holder into the rear combination light assembly and turn it clockwise until it locks. 7. Close the cover and latch the lock. 8. Reinstall the rear combination light assembly and its side cover. 1. Use a flat-head screwdriver to remove the light cover from the top of the - 2006 Subaru Outback | Owner's Manual - Page 386
service 11-53 and remove it. Station wagon 0 new bulb. 4. Reinstall the lens and cover. 5. Tighten the mounting screws. Dome light 700075 700076 3. Pull the bulb out of the bulb socket and replace it with a new one. 4. Install the bulb socket by turning it clockwise. Install the light cover - 2006 Subaru Outback | Owner's Manual - Page 387
and service Map light 0 bulb straight downward to remove it. 3. Install a new bulb. 4. Reinstall the lens. Door step light 700084 2. Turn the bulb until the flat surfaces at its ends are aligned vertically. Pull the bulb straight downward to remove it. Install a new bulb. 3. Reinstall - 2006 Subaru Outback | Owner's Manual - Page 388
service 11-55 Cargo area light (Station wagon) 700082 700079 2. Pull the bulb out of the socket. Install a new bulb. 3. Reinstall the lens. 700078 1. Remove the cargo area light assembly by prying the edge of the light with a flathead screwdriver. 2. Remove the lens from the cargo area light - 2006 Subaru Outback | Owner's Manual - Page 389
11-56 Maintenance and service 1. Remove the cover by pulling it out. 2. Pull the bulb out of the socket. Install a new bulb. 3. Reinstall the cover. High mount stop light (Sedan) It may be difficult to replace the bulbs. Have your SUBARU dealer replace the bulbs if necessary. - 2006 Subaru Outback | Owner's Manual - Page 390
Specifications ...Dimensions ...Engine ...Electrical system ...Capacities ...Tires ...Wheel alignment ... 12-2 12-2 12-3 12-3 12-4 12-5 12-5 Fuses and circuits ...Fuse panel located in the passenger compartment ...Fuse panel located in the engine compartment ... 12-6 12-6 12-8 Bulb chart - 2006 Subaru Outback | Owner's Manual - Page 391
change without notice. Specifications Dimensions in (mm) Item Sedan Legacy Station wagon Nonturbo 2.5-liter Turbo 3.0-liter 2.5-liter Nonturbo Overall length Overall width Overall height Wheel base Tread Front Rear Ground clearance .7 (1,490) 8.7 (220) 8.5 (215) 3.0-liter Sedan OUTBACK Station wagon - 2006 Subaru Outback | Owner's Manual - Page 392
51 × 3.15 (89.2 × 80.0) 10.7 : 1 1-6-3-2-5-4 8.2 : 1 Horizontally opposed, liquid cooled 4 cylinder, 4 stroke gasoline engine 150 (2,457) 3.92 × 3.11 (99.5 × 79.0) Electrical system Battery type and capacity (5HR) 2.5-liter models 3.0-liter models Alternator Spark plugs 2.5-liter non-turbo models - 2006 Subaru Outback | Owner's Manual - Page 393
12-4 Specifications Capacities Fuel tank Engine oil Transmission oil (MT) Transmission fluid (AT) AT differential gear oil Rear differential gear oil Power steering fluid Engine coolant 2.5-liter non-turbo models 2.5-liter turbo models 3.0-liter models MT AT MT AT 2.5-liter non-turbo models 2.5- - 2006 Subaru Outback | Owner's Manual - Page 394
, 2.3 kgf/cm2) 32 psi (220 kPa, 2.2 kgf/cm2) 30 psi (210 kPa, 2.1 kgf/cm2) 32 psi (220 kPa, 2.2 kgf/cm2) T155/70D17 P225/55R17 95V Wheel alignment Item Sedan Toe Camber Front Rear Front Rear -0°40' -0°15' -0°30' Legacy Station wagon 0 in (0 mm) 0 in (0 mm) 0°40' -0°10' Sedan OUTBACK Station wagon - 2006 Subaru Outback | Owner's Manual - Page 395
Fuses and circuits Fuse panel located in the passenger compartment Fuse panel 1 2 3 4 Fuse rating 20A Empty 15A 15A 15A 7.5A Door locking Front wiper deicer relay Moonroof Combination meter Remote control rear view mirrors Seat heater relay Vanity mirror light Combination meter Integrated unit - 2006 Subaru Outback | Owner's Manual - Page 396
12-7 Fuse panel 13 14 Fuse rating 20A 15A Circuit Cargo socket Position light Tail light Rear combination light Fuse panel 28 29 30 31 Fuse rating 15A 15A 30A 7.5A 7.5A 7.5A Blower fan Fog light Circuit Front wiper Front wiper washer Auto air conditioner unit Integrated unit Headlight left - 2006 Subaru Outback | Owner's Manual - Page 397
20A 7.5A Circuit ABS unit Vehicle dynamics control unit Main fan (3.0-liter models) Sub fan (Except 3.0-liter models) Main fan Audio Headlight (right side) Headlight (left side) Backup light Horn Rear window defogger Fuel pump Automatic transmission control unit Engine control unit Turn and hazard - 2006 Subaru Outback | Owner's Manual - Page 398
Specifications 12-9 Bulb chart Description Headlight Low beam High beam Front fog light Except OUTBACK OUTBACK Front turn signal/parking and front side marker Rear combination light Rear turn signal light (Sedan) Brake/tail and rear side marker (Sedan) Brake/tail (Station wagon) Rear side marker ( - 2006 Subaru Outback | Owner's Manual - Page 399
12-10 Specifications Vehicle identification 2 1 1) 2) 3) 4) 5) 6) 7) Emission control label Vehicle identification number Certification and bar code label Tire inflation pressure label Vehicle identification number plate Model number plate Fuel label 3 4 6 5 7 C00104 - 2006 Subaru Outback | Owner's Manual - Page 400
Tire care - maintenance and safety practices ...13-7 Vehicle load limit - how to determine ...13-8 Determining compatibility of tire and vehicle load capacities ...13-10 Adverse safety consequences of overloading on handling and stopping and on tires ...13-11 Steps for Determining Correct Load Limit - 2006 Subaru Outback | Owner's Manual - Page 401
For U.S.A. The following information has been compiled according to Code of Federal Regulations "Title 49, Part 575". Consumer brief review of the tire sizing system with a breakdown of its individual elements. P Metric With the P-Metric system, Section Width is measured in millimeters. To convert - 2006 Subaru Outback | Owner's Manual - Page 402
Speed Rating: An alphabetical system describing a tire's review of the TIN with a breakdown of its individual elements. (1) Manufacturer's Identification Mark (2) Tire Size (3) Tire Type Code rating The load rating at the maximum permissible weight load for this tire. For example, "MAX. - 2006 Subaru Outback | Owner's Manual - Page 403
13-4 Consumer information and Reporting safety defects Maximum load rating applies only to the tire, not to the vehicle. Putting a load rated tire on any vehicle does not mean the vehicle can be loaded up to the tire's rated load. Construction type Applicable construction of this tire. For example, - 2006 Subaru Outback | Owner's Manual - Page 404
tire inflation pressure Recommended cold tire inflation pressure Recommended cold tire inflation pressure for your vehicle's tires is as follows, Tire size Wheel size Pressure Front Rear Rear at trailer towing Temporary spare tire Size Pressure T135/80R16 P205/50R17 88V 215/45ZR17 17 × 7 JJ 33 psi - 2006 Subaru Outback | Owner's Manual - Page 405
to an accident. Measuring and adjusting air pressure to achieve proper inflation Check and, if necessary, adjust the pressure of each tire (including TIRE AND LOADING INFORMATION SEATING CAPACITY TOTAL 5 FRONT 2 REAR 3 The combined weight of occupants and cargo should never exceed 385kg or 850lbs - 2006 Subaru Outback | Owner's Manual - Page 406
may be replaced) of floor mats, leather seats and cross bars to the extent that these items are available as factory-installed equipment (whether installed or not). Curb weight The weight of a motor vehicle with standard equipment including the maximum capacity of fuel, oil, and coolant and air - 2006 Subaru Outback | Owner's Manual - Page 407
equipment such as a trailer hitch, roof rack or bike carrier, etc., and the tongue load of a trailer. Therefore cargo capacity can be calculated by the following method. Cargo capacity = Load limit - (total weight of occupants + total weight of optional equipment + tongue load of a trailer (if - 2006 Subaru Outback | Owner's Manual - Page 408
safety defects 13-9 Example 1B 2. Calculate the available load capacity. Available Load Capacity = 800 lbs (363 kg) (Vehicle capacity weight) = 81 lbs ( 37 kg) 3. The total weight now exceeds the capacity weight by 81 lbs (37 kg), so the cargo weight must be reduced by 81 lbs (37 kg) or more - 2006 Subaru Outback | Owner's Manual - Page 409
is referred to Gross Vehicle Weight Rating (GVWR). And each axle's maximum loaded capacity is referred to Gross Axle Weight Rating (GAWR). The GVWR and each axle's GAWR are shown on the vehicle certification label affixed to the driver's door. The GVWR and front and rear GAWRs are determined by - 2006 Subaru Outback | Owner's Manual - Page 410
of luggage and cargo being loaded on the vehicle. That weight may not safely exceed the available cargo and luggage load capacity calculated in Step 4. 6. If your vehicle will be towing a trailer, load from your trailer will be trans- ferred to your vehicle. Consult this manual to determine how - 2006 Subaru Outback | Owner's Manual - Page 411
norm due to variations in driving habits, service practices and differences in road characteristics and this tire is based on straightahead braking traction tests, and does not controlled conditions on a specified indoor laboratory test wheel. Sustained high temperature can cause the material of - 2006 Subaru Outback | Owner's Manual - Page 412
finds that a safety defect exists in a group of vehicles, it may order a recall and remedy campaign. However, NHTSA cannot become involved in individual problems between you, your dealer, or Subaru of America, Inc. To contact NHTSA, you may either call the Auto Safety Hotline tollfree at 1-800-424 - 2006 Subaru Outback | Owner's Manual - Page 413
- 2006 Subaru Outback | Owner's Manual - Page 414
Index 14 - 2006 Subaru Outback | Owner's Manual - Page 415
distance ...11-30 Brake system ...7-25 Warning light ...3-20 Braking ...7-25 Tips ...7-25 Breaking Breaking-in of new brake pads and linings ...11-32 Bulb Chart ...12-9 Replacing ...11-48 C Capacities ...12-4 Cargo area Cover ...6-12 Light ...6-2 Tie-down hooks ...6-15 Catalytic converter ...8-3 - 2006 Subaru Outback | Owner's Manual - Page 416
running light system ...3-32 Differential gear oil Front ...11-23 Rear ...11-24 Dimensions ...12-2 Disarming the system ...2-16 Disc brake pad wear warning indicators ...7-26 Dome light ...6-2, 11-53 Door locks ...2-4 Door open warning light ...3-22 Drive belts ...11-20 Driving All-Wheel Drive - 2006 Subaru Outback | Owner's Manual - Page 417
27 Fog light switch ...3-34 Front Differential gear oil ...11-23 Fog light ...11-50 Seatbelt pretensioners ...1-21 Seats ...1-2 Fuel ...7-2 Economy hints ...8-2 Filler lid and cap ...7-4 Gauge ...3-8, 3-12 Requirements ...7-2 Fuses ...11-45 Fuses and circuits ...12-6 G GAWR (Gross Axle Weight Rating - 2006 Subaru Outback | Owner's Manual - Page 418
Index 14-5 Illuminated entry ...2-9 Illumination brightness control ...3-33 Immobilizer system ...2-3 Indicator light ...3-23 Indicator light Cruise control ...3-25 Cruise control set ...3-25 Front fog ...3-25 Headlight ...3-25 High beam ...3-25 Selector lever position ...3-24 Turn signal ...3-24 - 2006 Subaru Outback | Owner's Manual - Page 419
Brake pad and lining ...11-31 Wiper blades ...11-41 Replacing Air cleaner element ...11-17 Battery (remote keyless entry system) ...2-7 Lost transmitters (keyless entry system) ...2-11 Replacing bulbs ...11-48 Cargo area light ...11-55 Dome light ...11-53 Door step light ...11-54 Front fog light - 2006 Subaru Outback | Owner's Manual - Page 420
airbag ...1-53 SRS airbag (Supplemental Restraint System airbag) ...4, 1-38 SRS airbag system warning light ...3-16 Starting the engine ...7-8 State emission testing (U.S. only) ...7-6 Steering wheel Power ...7-25 Tilt ...3-43 Stopping the engine ...7-9 Storage compartment ...6-4 Sun shades ...2-27 - 2006 Subaru Outback | Owner's Manual - Page 421
light ...3-22 System ...7-29 Warning light ...3-22 Ventilator ...4-2 W Warning and indicator lights ...3-14 Warning lights ABS ...3-20 All-Wheel Drive ...3-22 Anti-lock Brake System ...3-20 AT OIL TEMPerature ...3-18 Brake system ...3-20 Charge ...3-18 CHECK ENGINE ...3-17 Door open ...3-22 Low fuel - 2006 Subaru Outback | Owner's Manual - Page 422
Index 14-9 Replacement ...11-38 Windows ...2-19 Windshield Washer fluid ...11-39 Wiper and washer switches ...3-35 Wiper deicer ...3-38 Winter driving ...8-7 Wiper and washer ...3-34 - 2006 Subaru Outback | Owner's Manual - Page 423
- 2006 Subaru Outback | Owner's Manual - Page 424
3 13 12 11 4 5 9 10 6 7 8 000134 - 2006 Subaru Outback | Owner's Manual - Page 425
GAS STATION REFERENCE Fuel: 2.5- Engine oil capacity: 2.5-liter models: 4.2 US qt (4.0 liters, 3.5 Imp qt) 3.0-liter models: 5.8 US qt (5.5 liters, 4.8 Imp qt) Fuel octane rating This octane rating is the average of the Research Octane and Mo- Cold tire pressure: Tire size Wheel size Pressure Front
-
 1
1 -
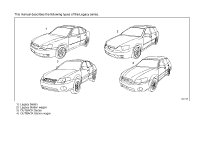 2
2 -
 3
3 -
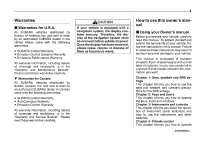 4
4 -
 5
5 -
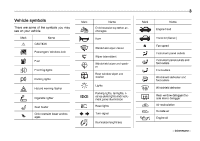 6
6 -
 7
7 -
8
-
9
-
10
-
11
-
12
-
13
-
14
-
15
-
16
-
17
-
18
-
19
-
20
-
21
-
22
-
23
-
24
-
25
-
26
-
27
-
28
-
29
-
30
-
31
-
32
-
33
-
34
-
35
-
36
-
37
-
38
-
39
-
40
-
41
-
42
-
43
-
44
-
45
-
46
-
47
-
48
-
49
-
50
-
51
-
52
-
53
-
54
-
55
-
56
-
57
-
58
-
59
-
60
-
61
-
62
-
63
-
64
-
65
-
66
-
67
-
68
-
69
-
70
-
71
-
72
-
73
-
74
-
75
-
76
-
77
-
78
-
79
-
80
-
81
-
82
-
83
-
84
-
85
-
86
-
87
-
88
-
89
-
90
-
91
-
92
-
93
-
94
-
95
-
96
-
97
-
98
-
99
-
100
-
101
-
102
-
103
-
104
-
105
-
106
-
107
-
108
-
109
-
110
-
111
-
112
-
113
-
114
-
115
-
116
-
117
-
118
-
119
-
120
-
121
-
122
-
123
-
124
-
125
-
126
-
127
-
128
-
129
-
130
-
131
-
132
-
133
-
134
-
135
-
136
-
137
-
138
-
139
-
140
-
141
-
142
-
143
-
144
-
145
-
146
-
147
-
148
-
149
-
150
-
151
-
152
-
153
-
154
-
155
-
156
-
157
-
158
-
159
-
160
-
161
-
162
-
163
-
164
-
165
-
166
-
167
-
168
-
169
-
170
-
171
-
172
-
173
-
174
-
175
-
176
-
177
-
178
-
179
-
180
-
181
-
182
-
183
-
184
-
185
-
186
-
187
-
188
-
189
-
190
-
191
-
192
-
193
-
194
-
195
-
196
-
197
-
198
-
199
-
200
-
201
-
202
-
203
-
204
-
205
-
206
-
207
-
208
-
209
-
210
-
211
-
212
-
213
-
214
-
215
-
216
-
217
-
218
-
219
-
220
-
221
-
222
-
223
-
224
-
225
-
226
-
227
-
228
-
229
-
230
-
231
-
232
-
233
-
234
-
235
-
236
-
237
-
238
-
239
-
240
-
241
-
242
-
243
-
244
-
245
-
246
-
247
-
248
-
249
-
250
-
251
-
252
-
253
-
254
-
255
-
256
-
257
-
258
-
259
-
260
-
261
-
262
-
263
-
264
-
265
-
266
-
267
-
268
-
269
-
270
-
271
-
272
-
273
-
274
-
275
-
276
-
277
-
278
-
279
-
280
-
281
-
282
-
283
-
284
-
285
-
286
-
287
-
288
-
289
-
290
-
291
-
292
-
293
-
294
-
295
-
296
-
297
-
298
-
299
-
300
-
301
-
302
-
303
-
304
-
305
-
306
-
307
-
308
-
309
-
310
-
311
-
312
-
313
-
314
-
315
-
316
-
317
-
318
-
319
-
320
-
321
-
322
-
323
-
324
-
325
-
326
-
327
-
328
-
329
-
330
-
331
-
332
-
333
-
334
-
335
-
336
-
337
-
338
-
339
-
340
-
341
-
342
-
343
-
344
-
345
-
346
-
347
-
348
-
349
-
350
-
351
-
352
-
353
-
354
-
355
-
356
-
357
-
358
-
359
-
360
-
361
-
362
-
363
-
364
-
365
-
366
-
367
-
368
-
369
-
370
-
371
-
372
-
373
-
374
-
375
-
376
-
377
-
378
-
379
-
380
-
381
-
382
-
383
-
384
-
385
-
386
-
387
-
388
-
389
-
390
-
391
-
392
-
393
-
394
-
395
-
396
-
397
-
398
-
399
-
400
-
401
-
402
-
403
-
404
-
405
-
406
-
407
-
408
-
409
-
410
-
411
-
412
-
413
-
414
-
415
-
416
-
417
-
418
-
419
-
420
-
421
-
422
-
423
-
424
-
425
 |
 |
Foreword
Congratulations on choosing a SUBARU vehicle. This Owner’s
Manual has all the information necessary to keep your SUBARU in
excellent condition and to properly maintain the emission control
system for minimizing emission pollutants. We urge you to read
this manual carefully so that you may understand your vehicle and
its operation. For information not found in this Owner’s Manual,
such as details concerning repairs or adjustments, please contact
the dealer from whom you purchased your SUBARU or the nearest
SUBARU dealer.
The information, specifications and illustrations found in this man-
ual are those in effect at the time of printing. FUJI HEAVY INDUS-
TRIES LTD. reserves the right to change specifications and de-
signs at any time without prior notice and without incurring any ob-
ligation to make the same or similar changes on vehicles previous-
ly sold. This Owner’s Manual applies to all models and covers all
equipment, including factory installed options. Some explanations,
therefore may be for equipment not installed in your vehicle.
Please leave this manual in the vehicle at the time of resale. The
next owner will need the information found herein.
FUJI HEAVY INDUSTRIES LTD., TOKYO, JAPAN
is a registered trademark of FUJI HEAVY INDUSTRIES LTD.
© copyright 2005 FUJI HEAVY INDUSTRIES LTD.