| Section |
Page |
| Seat, seatbelt and SRS airbags |
25 |
| Front seats |
26 |
| Fore and aft adjustment |
27 |
| Reclining the seatback |
27 |
| Seat cushion height adjustment (Driver’s seat) |
28 |
| Head restraint adjustment |
28 |
| Active head restraint |
28 |
| Seat heater |
29 |
| Rear seats |
30 |
| Armrest |
30 |
| Head restraint adjustment |
31 |
| Folding down the rear seatback |
32 |
| Seatbelts |
33 |
| Seatbelt safety tips |
33 |
| Emergency Locking Retractor (ELR) |
34 |
| Automatic/Emergency Locking Retractor (A/ELR) |
34 |
| Seatbelt warning light and chime |
35 |
| Fastening the seatbelt |
36 |
| Seatbelt maintenance |
43 |
| Front seatbelt pretensioners |
43 |
| System monitors |
44 |
| System servicing |
45 |
| Precautions against vehicle modification |
46 |
| Child restraint systems |
46 |
| Where to place a child restraint system |
47 |
| Choosing a child restraint system |
49 |
| Installing child restraint systems with A/ELR seatbelt |
49 |
| Installing a booster seat |
52 |
| Installation of child restraint systems by use of lower and tether anchorages (LATCH) |
53 |
| Top tether anchorages |
56 |
| *SRS airbag (Supplemental Restraint System airbag) |
59 |
| Vehicle with SRS airbags and lap/shoulder restraints for driver, front passenger, and window-side rear passengers |
59 |
| Subaru advanced frontal airbag system |
63 |
| SRS side airbag and SRS curtain airbag |
75 |
| SRS airbag system monitors |
81 |
| SRS airbag system servicing |
83 |
| Precautions against vehicle modification |
83 |
| Keys and doors |
85 |
| Keys |
86 |
| Key number plate |
86 |
| Immobilizer |
86 |
| Security ID plate |
87 |
| Security indicator light |
87 |
| Key replacement |
88 |
| Door locks |
88 |
| Locking and unlocking from the outside |
88 |
| Locking and unlocking from the inside |
89 |
| Battery drainage prevention function |
89 |
| Power door locking switches |
90 |
| Key lock-in prevention function |
90 |
| Remote keyless entry system |
91 |
| Locking the doors |
92 |
| Unlocking the doors |
92 |
| Unlocking the trunk lid/rear gate |
93 |
| Illuminated entry |
93 |
| Vehicle finder function |
93 |
| Sounding a panic alarm |
93 |
| Selecting audible signal operation |
93 |
| Replacing the battery |
94 |
| Replacing lost transmitters |
94 |
| Alarm system |
98 |
| System operation |
98 |
| Activating and deactivating the alarm system |
98 |
| If you have accidentally triggered the alarm system |
98 |
| Arming the system |
99 |
| Disarming the system |
100 |
| Valet mode |
100 |
| Passive arming |
101 |
| Tripped sensor identification |
102 |
| Shock sensors (dealer option) |
102 |
| Child safety locks |
103 |
| Windows |
103 |
| Power windows |
103 |
| Trunk lid (4-door) |
105 |
| To open and close the trunk lid from outside |
105 |
| To open the trunk lid from inside |
105 |
| To lock and unlock the trunk lid release lever |
106 |
| Internal trunk lid release handle |
106 |
| Rear gate (5-door) |
107 |
| Instruments and controls |
109 |
| Ignition switch |
111 |
| LOCK |
111 |
| Acc |
112 |
| ON |
112 |
| START |
112 |
| Key reminder chime |
113 |
| Ignition switch light |
113 |
| Hazard warning flasher |
113 |
| Meters and gauges (Turbo models) |
113 |
| Combination meter illumination |
113 |
| Canceling the function for meter/gauge needle movement upon turning on the ignition switch |
114 |
| Speedometer |
114 |
| Odometer/Trip meter |
114 |
| Tachometer |
115 |
| Fuel gauge |
116 |
| Temperature gauge |
117 |
| Meters and gauges (Non-turbo models) |
117 |
| Combination meter illumination |
117 |
| Canceling the function for meter/gauge needle movement upon turning on the ignition switch |
118 |
| Speedometer |
118 |
| Odometer/Trip meter |
118 |
| Tachometer |
119 |
| Fuel gauge |
120 |
| Warning and indicator lights |
121 |
| Seatbelt warning light and chime |
121 |
| SRS airbag system warning light |
123 |
| Front passenger’s frontal airbag ON and OFF indicators |
123 |
| CHECK ENGINE warning light/Malfunction indicator lamp |
124 |
| Coolant temperature low indicator light (Non-turbo models)/Coolant temperature high warning light (Non-turbo models) |
125 |
| Charge warning light |
125 |
| Oil pressure warning light |
125 |
| AT OIL TEMPerature warning light (AT vehicles) |
126 |
| Low tire pressure warning light (U.S.-spec. models) |
126 |
| ABS warning light |
127 |
| Brake system warning light |
128 |
| Low fuel warning light |
129 |
| Hill start assist warning light |
129 |
| Door open warning light |
129 |
| All-Wheel Drive warning light (AT vehicles) |
129 |
| Vehicle Dynamics Control operation indicator light |
130 |
| Vehicle Dynamics Control warning light (if equipped)/Vehicle Dynamics Control OFF indicator light |
130 |
| Security indicator light |
131 |
| SPORT mode indicator light (AT vehicles) |
132 |
| Selector lever and gear position indicator (AT models) |
132 |
| Turn signal indicator lights |
132 |
| High beam indicator light |
132 |
| Cruise control indicator light |
132 |
| Cruise control set indicator light |
133 |
| Front fog light indicator light |
133 |
| Headlight indicator light |
133 |
| Clock |
133 |
| Information display |
134 |
| Outside temperature indicator |
134 |
| Average fuel consumption |
135 |
| Light control switch |
135 |
| Headlights |
136 |
| High/low beam change (dimmer) |
136 |
| Headlight flasher |
136 |
| Daytime running light system |
137 |
| Turn signal lever |
137 |
| Illumination brightness control |
137 |
| Front fog light switch |
138 |
| Wiper and washer |
139 |
| Windshield wiper and washer switches |
140 |
| Rear window wiper and washer switch – 5-door |
141 |
| Rear window defogger button |
142 |
| Windshield wiper deicer |
143 |
| Mirrors |
144 |
| Inside mirror |
144 |
| Outside mirrors |
146 |
| Tilt steering wheel |
147 |
| Tilt/telescopic steering wheel |
148 |
| Horn |
149 |
| Climate control |
151 |
| Ventilator |
152 |
| Air flow selection |
152 |
| Center and side ventilators |
153 |
| Manual climate control system |
153 |
| Control panel |
153 |
| Heater operation |
155 |
| Air conditioner operation |
157 |
| Automatic climate control system |
158 |
| Control panel |
158 |
| To use as full-automatic climate control system |
158 |
| To use as semi-automatic climate control system |
158 |
| Fan speed control dial |
159 |
| Temperature control dial |
159 |
| Air flow control dial |
159 |
| Air inlet selection button |
160 |
| Air conditioner button |
160 |
| Temperature sensors |
161 |
| Operating tips for heater and air conditioner |
162 |
| Cleaning ventilation grille |
162 |
| Efficient cooling after parking in direct sunlight |
162 |
| Lubrication oil circulation in the refrigerant circuit |
162 |
| Checking air conditioning system before summer season |
162 |
| Cooling and dehumidifying in high humidity and low temperature weather conditions |
162 |
| Air conditioner compressor shut-off when engine is heavily loaded |
162 |
| Refrigerant for your climate control system |
162 |
| Air filtration system |
163 |
| Replacing an air filter |
163 |
| Audio |
167 |
| Antenna system |
168 |
| Roof antenna |
168 |
| FM reception |
168 |
| XMTM satellite radio reception |
168 |
| Installation of accessories |
170 |
| Audio set |
171 |
| Type A audio set |
171 |
| Type B audio set |
172 |
| Power and sound controls |
173 |
| Power switch and volume control |
173 |
| Sound control |
173 |
| Adjustable level of each mode |
175 |
| FM/AM radio operation |
176 |
| FM/AM selection |
176 |
| Tuning |
176 |
| Displaying radio PS (Program Service Name) and RT (Radio Text) |
178 |
| Station preset |
178 |
| Satellite radio operation |
179 |
| XMTM satellite radio |
179 |
| Sirius satellite radio |
179 |
| Satellite radio reception |
179 |
| Displaying satellite radio ID of tuner |
179 |
| Band selection |
180 |
| Channel and category selection |
180 |
| Channel preset |
181 |
| Display selection |
182 |
| CD player operation |
182 |
| How to insert a CD (type A) |
183 |
| How to insert a CD(s) (type B) |
183 |
| How to play back a CD |
184 |
| To select a track from its beginning |
185 |
| Fast-forwarding and fast-reversing |
186 |
| Repeating |
186 |
| Random playback |
187 |
| Scan |
188 |
| Display selection |
188 |
| Folder selection |
189 |
| How to eject a CD from the player (type A) |
189 |
| How to eject CDs from the player (type B) |
189 |
| When the following messages are displayed |
190 |
| AUX unit operation |
191 |
| AUX jack |
191 |
| AUX inputs selection button |
191 |
| Audio control buttons |
192 |
| MODE button |
192 |
| Precautions to observe when handling a compact disc |
193 |
| Interior equipment |
197 |
| Interior lights |
198 |
| Dome light |
198 |
| Cargo area light (5–door models) |
198 |
| Map light |
199 |
| Sun visors |
199 |
| Vanity mirror |
199 |
| Storage compartment |
200 |
| Glove box |
200 |
| Center console |
200 |
| Coin tray |
200 |
| Cup holders |
201 |
| Front passenger’s cup holder |
201 |
| Rear passenger’s cup holder |
201 |
| Bottle holders |
202 |
| Accessory power outlets |
202 |
| Use with a cigarette lighter (Canada only, if equipped) |
203 |
| Ashtray |
204 |
| Floor mat |
205 |
| Shopping bag hook |
205 |
| Cargo area cover (5-door – if equipped) |
206 |
| Using the cover |
206 |
| To remove the cover |
207 |
| To install the cover housing |
207 |
| Cargo tie-down hooks (5-door – if equipped) |
207 |
| Under-floor storage compartment |
208 |
| Starting and operating |
209 |
| Fuel |
211 |
| Fuel requirements |
211 |
| Fuel filler lid and cap |
212 |
| State emission testing (U.S. only) |
215 |
| Preparing to drive |
216 |
| Starting the engine |
216 |
| Manual transmission vehicle |
216 |
| Automatic transmission vehicle |
217 |
| Stopping the engine |
218 |
| Remote engine start system (dealer option) |
218 |
| Starting your vehicle |
219 |
| Remote start safety features |
219 |
| Entering the vehicle while it is running via remote start |
219 |
| Entering the vehicle following remote engine start shutdown |
219 |
| Pre-heating or pre-cooling the interior of the vehicle |
220 |
| Service mode |
220 |
| Remote transmitter programming and programmable feature option |
220 |
| System maintenance |
221 |
| Manual transmission |
222 |
| Shifting speeds |
223 |
| Driving tips |
223 |
| Automatic transmission |
224 |
| Selector lever |
225 |
| Selector lever reverse inhibiting function |
226 |
| Selection of manual mode |
227 |
| Maximum speeds |
228 |
| Driving tips |
229 |
| SPORT mode |
229 |
| Shift lock release |
230 |
| Power steering |
231 |
| Braking |
231 |
| Braking tips |
231 |
| Brake system |
231 |
| Disc brake pad wear warning indicators |
232 |
| ABS (Anti-lock Brake System) |
232 |
| ABS system self-check |
233 |
| ABS warning light |
233 |
| Electronic Brake Force Distribution (EBD) system |
234 |
| Steps to take if EBD system fails |
234 |
| Vehicle Dynamics Control system |
235 |
| Vehicle Dynamics Control system monitor |
237 |
| Vehicle Dynamics Control OFF switch |
239 |
| Tire pressure monitoring system (TPMS) (U.S.-spec. models) |
240 |
| Parking your vehicle |
242 |
| Parking brake |
242 |
| Parking tips |
242 |
| Hill start assist system (Manual transmission – if equipped) |
243 |
| Cruise control |
244 |
| To set cruise control |
245 |
| To temporarily cancel the cruise control |
246 |
| To turn off the cruise control |
246 |
| To change the cruising speed |
246 |
| Cruise control indicator light |
248 |
| Cruise control set indicator light |
248 |
| Driving tips |
251 |
| New vehicle break-in driving – the first 1,000 miles (1,600 km) |
252 |
| Fuel economy hints |
252 |
| Engine exhaust gas (Carbon monoxide) |
252 |
| Catalytic converter |
253 |
| Periodic inspections |
254 |
| Driving in foreign countries |
254 |
| Driving tips for AWD vehicles |
255 |
| Off road driving |
256 |
| All AWD models except OUTBACK |
256 |
| OUTBACK |
256 |
| Winter driving |
258 |
| Operation during cold weather |
258 |
| Driving on snowy and icy roads |
259 |
| Corrosion protection |
260 |
| Snow tires |
260 |
| Tire chains |
261 |
| Rocking the vehicle |
261 |
| Loading your vehicle |
261 |
| Vehicle capacity weight |
262 |
| GVWR and GAWR (Gross Vehicle Weight Rating and Gross Axle Weight Rating) |
263 |
| Roof molding and crossbar |
263 |
| Trailer towing |
265 |
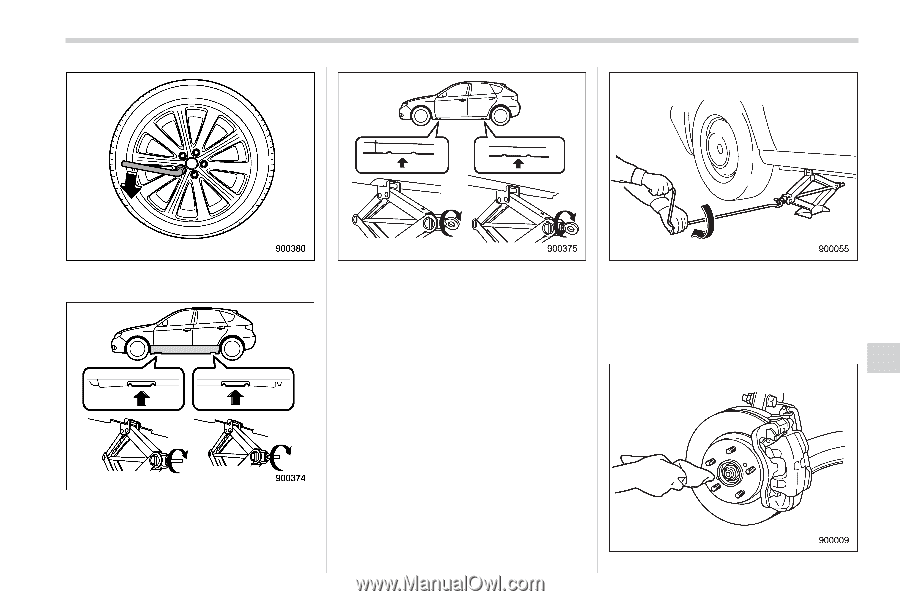
| In case of emergency |
267 |
| If you park your vehicle in case of an emergency |
268 |
| Temporary spare tire |
268 |
| Precautions for AWD vehicles with automatic transmission |
269 |
| Flat tires |
270 |
| Changing a flat tire |
270 |
| Tire pressure monitoring system (TPMS) (U.S.-spec. models) |
275 |
| Jump starting |
276 |
| How to jump start |
277 |
| Engine overheating |
279 |
| If steam is coming from the engine compartment |
279 |
| If no steam is coming from the engine compartment |
279 |
| Towing |
279 |
| Towing and tie-down hooks |
280 |
| Using a flat-bed truck |
282 |
| Towing with all wheels on the ground |
282 |
| Rear gate – if the rear gate cannot be unlocked |
283 |
| Maintenance tools |
284 |
| Jack handle |
284 |
| Jack and other maintenance tools |
285 |
| Appearance care |
287 |
| Exterior care |
288 |
| Washing |
288 |
| Waxing and polishing |
289 |
| Cleaning aluminum wheels |
289 |
| Corrosion protection |
290 |
| Most common causes of corrosion |
290 |
| To help prevent corrosion |
290 |
| Cleaning the interior |
291 |
| Seat fabric |
291 |
| Leather seat materials |
291 |
| Synthetic leather upholstery |
291 |
| Climate control panel, audio panel, instrument panel, console panel, and switches |
291 |
| Maintenance and service |
293 |
| Maintenance schedule |
295 |
| Maintenance precautions |
295 |
| Before checking or servicing in the engine compartment |
296 |
| When you do checking or servicing in the engine compartment while the engine is running |
296 |
| Engine hood |
297 |
| Engine compartment overview |
298 |
| Non-turbo models |
298 |
| Turbo models |
299 |
| Engine oil |
300 |
| Checking the oil level |
300 |
| Changing the oil and oil filter |
301 |
| Recommended grade and viscosity |
303 |
| Recommended grade and viscosity under severe driving conditions |
304 |
| Synthetic oil |
304 |
| Cooling system |
304 |
| Cooling fan, hose and connections |
304 |
| Engine coolant |
305 |
| Air cleaner element |
307 |
| Replacing the air cleaner element |
308 |
| Spark plugs |
310 |
| Recommended spark plugs |
310 |
| Drive belts |
310 |
| Manual transmission oil |
311 |
| Checking the oil level |
311 |
| Recommended grade and viscosity |
312 |
| Automatic transmission fluid |
312 |
| Checking the fluid level |
312 |
| Recommended fluid |
313 |
| Front differential gear oil (AT vehicles) |
313 |
| Checking the oil level |
313 |
| Recommended grade and viscosity |
314 |
| Rear differential gear oil |
314 |
| Checking the gear oil level |
314 |
| Recommended grade and viscosity |
315 |
| Power steering fluid |
316 |
| Checking the fluid level |
316 |
| Recommended fluid |
317 |
| Brake fluid |
317 |
| Checking the fluid level |
317 |
| Recommended brake fluid |
318 |
| Clutch fluid (MT vehicles) |
318 |
| Checking the fluid level |
318 |
| Recommended clutch fluid |
319 |
| Brake booster |
319 |
| Brake pedal |
320 |
| Checking the brake pedal free play |
320 |
| Checking the brake pedal reserve distance |
320 |
| Clutch pedal (MT vehicles) |
320 |
| Checking the clutch function |
320 |
| Checking the clutch pedal free play |
321 |
| Hill start assist system (MT vehicles – if equipped) |
321 |
| Replacement of brake pad and lining |
321 |
| Breaking-in of new brake pads and linings |
322 |
| Parking brake stroke |
322 |
| Tires and wheels |
323 |
| Types of tires |
323 |
| Tire pressure monitoring system (TPMS) |
323 |
| Tire inspection |
324 |
| Tire pressures and wear |
325 |
| Wheel balance |
327 |
| Wear indicators |
327 |
| Tire rotation direction mark |
327 |
| Tire rotation |
328 |
| Tire replacement |
328 |
| Wheel replacement |
329 |
| Aluminum wheels |
329 |
| Windshield washer fluid |
330 |
| Replacement of wiper blades |
331 |
| Windshield wiper blade assembly |
331 |
| Windshield wiper blade rubber |
332 |
| Rear window wiper blade assembly |
333 |
| Rear window wiper blade rubber |
333 |
| Battery |
334 |
| Fuses |
335 |
| Main fuse |
337 |
| Installation of accessories |
337 |
| Replacing bulbs |
338 |
| Headlight |
339 |
| Front turn signal light and parking light |
342 |
| Front fog light |
342 |
| Rear combination lights |
342 |
| Back-up light (5-door) |
343 |
| License plate light |
344 |
| Dome light, map light and cargo area light |
344 |
| Trunk light |
345 |
| High mount stop light |
345 |
| Other bulbs |
345 |
| Specifications |
347 |
| Specifications |
348 |
| Dimensions |
348 |
| Engine |
349 |
| Electrical system |
349 |
| Capacities |
350 |
| Tires |
351 |
| Wheel alignment |
351 |
| Fuses and circuits |
352 |
| Fuse panel located in the passenger compartment |
352 |
| Fuse panel located in the engine compartment |
354 |
| Bulb chart |
355 |
| Vehicle identification |
356 |
| Consumer information and Reporting safety defects |
357 |
| For U.S.A. |
358 |
| Tire information |
358 |
| Tire labeling |
358 |
| Recommended tire inflation pressure |
361 |
| Glossary of tire terminology |
362 |
| Tire care – maintenance and safety practices |
363 |
| Vehicle load limit – how to determine |
364 |
| Determining compatibility of tire and vehicle load capacities |
367 |
| Adverse safety consequences of overloading on handling and stopping and on tires |
367 |
| Steps for Determining Correct Load Limit |
368 |
| Uniform tire quality grading standards |
368 |
| Treadwear |
369 |
| Traction AA, A, B, C |
369 |
| Temperature A, B, C |
369 |
| Reporting safety defects (U.S.A.) |
370 |
 1
1 268
268 269
269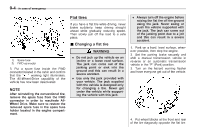 270
270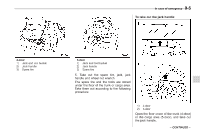 271
271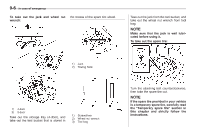 272
272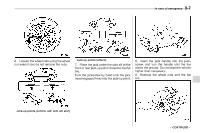 273
273 274
274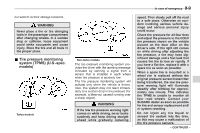 275
275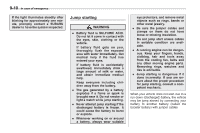 276
276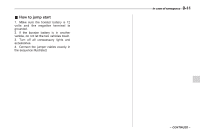 277
277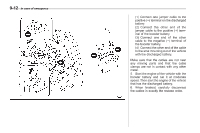 278
278