2007 Suzuki Reno Owner's Manual - Page 110
2007 Suzuki Reno Manual

Page 110 highlights
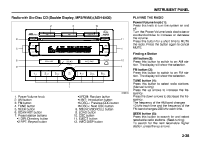
INSTRUMENT PANEL tion such as: Song Title, Album Title, Artist, and Bit rate may appear. When information is not available, "No Info" will appear on the display. Press and hold this button to change the display mode. Scroll: Press and hold the sound button [in MP3/ WMA mode] The song title or other information of a song will scroll on/off. The default mode is scroll on. Scroll mode can be changed only when you press and hold the sound button. CD Messages CHECK CD: If this message appears on the display and/or the CD comes out, it could be for one of the following reasons: • It is very hot. When the temperature returns to normal, the CD will play. • You are driving on a very rough road. When the road becomes smoother, the CD will play. • The CD is dirty, scratched, wet, or upside down. • The air is very humid. If so, wait about an hour and try again. • The format of the CD may not be compatible. See "MP3/WMA Format" earlier in this section. • There may have been a problem while burning the CD. • The label may be caught in the CD player. If the CD is not playing correctly, for any other reason, try a known good CD. If any error occurs repeatedly or if an error cannot be corrected, contact your SUZUKI dealer. If the radio displays an error message, write it down and provide it to your SUZUKI dealer when reporting the problem. AUX Mode Press this button to listen to the audio contents from other devices; Walkman, Portable CD Player, Portable MP3 Player, i-pod, XM receiver, etc. 1) Connect the output port of the device to the aux jack of the head unit with an aux connector. 2) Turn the device on. 3) Press this button. If you want to control the volume level, use the volume buttons of the head unit or the device. Using the Auxiliary Input Jack Your radio system has an auxiliary input jack located on the lower right side of the faceplate. This is not an audio output; do not plug a headphone set into the front auxiliary input jack. You can however, connect an external audio device such as an iPod, laptop computer, MP3 player, CD changer, or cassette tape player, etc. to the auxiliary input jack for use as another source for audio listening. The auxiliary input jack will also accept cell phone connectors. Plug the cell phone connector into the auxiliary input jack to hear the other side of a cell phone's conversation through the vehicle sound system. Drivers are encouraged to set up their portable audio player while the vehicle is parked. See Defensive Driving for more information on driver distraction. To use a portable audio player, connect a 3.5 mm (1/8 inch) cable to the radio's front auxiliary input jack. When a device is connected, press the radio CD/AUX button as needed to begin playing audio from the device over the car speakers. CD/AUX (CD/Auxiliary) button (9): Press this button once to play a CD while a portable audio device is playing. Press this button a second time and the system will begin playing audio from the connected portable audio player. Once in this mode, "Auxinput" will appear on the display. If the auxiliary jack does not detect the presence of an output jack, the aux mode will be prevented from coming up. Power/Volume knob (1): Turn this knob clockwise or counterclockwise to increase or decrease the volume of 3-36
-
 1
1 -
2
-
3
-
4
-
5
-
6
-
7
-
8
-
9
-
10
-
11
-
12
-
13
-
14
-
15
-
16
-
17
-
18
-
19
-
20
-
21
-
22
-
23
-
24
-
25
-
26
-
27
-
28
-
29
-
30
-
31
-
32
-
33
-
34
-
35
-
36
-
37
-
38
-
39
-
40
-
41
-
42
-
43
-
44
-
45
-
46
-
47
-
48
-
49
-
50
-
51
-
52
-
53
-
54
-
55
-
56
-
57
-
58
-
59
-
60
-
61
-
62
-
63
-
64
-
65
-
66
-
67
-
68
-
69
-
70
-
71
-
72
-
73
-
74
-
75
-
76
-
77
-
78
-
79
-
80
-
81
-
82
-
83
-
84
-
85
-
86
-
87
-
88
-
89
-
90
-
91
-
92
-
93
-
94
-
95
-
96
-
97
-
98
-
99
-
100
-
101
-
102
-
103
-
104
-
 105
105 -
 106
106 -
 107
107 -
 108
108 -
 109
109 -
 110
110 -
 111
111 -
 112
112 -
 113
113 -
 114
114 -
 115
115 -
116
-
117
-
118
-
119
-
120
-
121
-
122
-
123
-
124
-
125
-
126
-
127
-
128
-
129
-
130
-
131
-
132
-
133
-
134
-
135
-
136
-
137
-
138
-
139
-
140
-
141
-
142
-
143
-
144
-
145
-
146
-
147
-
148
-
149
-
150
-
151
-
152
-
153
-
154
-
155
-
156
-
157
-
158
-
159
-
160
-
161
-
162
-
163
-
164
-
165
-
166
-
167
-
168
-
169
-
170
-
171
-
172
-
173
-
174
-
175
-
176
-
177
-
178
-
179
-
180
-
181
-
182
-
183
-
184
-
185
-
186
-
187
-
188
-
189
-
190
-
191
-
192
-
193
-
194
-
195
-
196
-
197
-
198
-
199
-
200
-
201
-
202
-
203
-
204
-
205
-
206
-
207
-
208
-
209
-
210
-
211
-
212
-
213
-
214
-
215
-
216
-
217
-
218
-
219
-
220
-
221
-
222
-
223
-
224
-
225
-
226
 |
 |