2007 Suzuki Reno Owner's Manual - Page 113
2007 Suzuki Reno Manual

Page 113 highlights
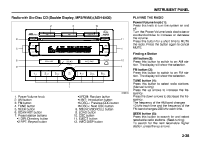
INSTRUMENT PANEL To search for the previous receivable lower station, press the down arrows. SCAN/AST button (6): Press this button to scan radio stations. (Scan tuning) Scan The radio will go to a station, play for a few seconds, and then go on to the next station. Press this button again to stop scanning. The radio will only scan stations with a strong signal that are in the selected band. Automatic Store Press and hold this button to use Auto Store. FM1's 6 preset stations with the strongest signal in the region can be automatically stored. The display will show "AUTO SCANNING", and "SCANNING" will flash on display. Stored stations will flash for a short time on display in sequence. Once the stations are stored, the radio will switch to FM-A and the first preset station will begin to play. FM-A will appear on the display when listening to the automatically stored stations. Press the AM or FM button to stop automatic store. Preset station buttons (7): Setting Preset Stations Up to 36 stations (six FM1, six FM2, six FM-A and six AM1, six AM2, six AM-A), can be programmed on the six numbered preset buttons, by performing the following steps: 1) Turn the radio on. 2) Press the AM or FM button to select FM1, FM2, FM-A, AM1, AM2 or AM-A. 3) Tune in the desired station. 4) Press and hold one of the six numbered preset buttons. The preset button number (Display: CH#1 ~ CH#6) will flash on the display when the station has been set. Whenever that numbered preset button is pressed, the memorized station will return. 5) Repeat the previous four steps for each preset button. ORDER OF SOUND FUNCTIONS SOUND button (8): Setting the Tone (Bass/Mid/Treble) Press this button until "BAS" appears on the display. Turn the volume knob to increase or to decrease the bass. The display will show the bass level. When finished making the selection, press this button again to select the bass level. Press this button until "MID" appears on the display. Turn the volume knob to increase or to decrease the mid. The display will show the mid level. When finished making the selection, press this button again to select the mid level. Press this button until "TRE" appears on the display. Turn the volume knob to increase or to decrease the treble. The display will show the treble level. When finished making the selection, press this button again to select the treble level. If a station is weak or noisy, decrease the treble. Adjusting the Speakers (Balance/Fade) To adjust the balance between the right and the left speakers, press this button until "BAL" appears on the display. Turn the volume knob to change the balance. The display will show the balance level. When finished making the selection, press this button again to select the balance level. To adjust the fade between the front and rear speakers, press this button until "FAD" appears on the display. Turn the volume BASS VOL EQ OFF MID TRE FAD BAL 84Z023 3-39
-
 1
1 -
2
-
3
-
4
-
5
-
6
-
7
-
8
-
9
-
10
-
11
-
12
-
13
-
14
-
15
-
16
-
17
-
18
-
19
-
20
-
21
-
22
-
23
-
24
-
25
-
26
-
27
-
28
-
29
-
30
-
31
-
32
-
33
-
34
-
35
-
36
-
37
-
38
-
39
-
40
-
41
-
42
-
43
-
44
-
45
-
46
-
47
-
48
-
49
-
50
-
51
-
52
-
53
-
54
-
55
-
56
-
57
-
58
-
59
-
60
-
61
-
62
-
63
-
64
-
65
-
66
-
67
-
68
-
69
-
70
-
71
-
72
-
73
-
74
-
75
-
76
-
77
-
78
-
79
-
80
-
81
-
82
-
83
-
84
-
85
-
86
-
87
-
88
-
89
-
90
-
91
-
92
-
93
-
94
-
95
-
96
-
97
-
98
-
99
-
100
-
101
-
102
-
103
-
104
-
105
-
106
-
107
-
 108
108 -
 109
109 -
 110
110 -
 111
111 -
 112
112 -
 113
113 -
 114
114 -
 115
115 -
 116
116 -
 117
117 -
 118
118 -
119
-
120
-
121
-
122
-
123
-
124
-
125
-
126
-
127
-
128
-
129
-
130
-
131
-
132
-
133
-
134
-
135
-
136
-
137
-
138
-
139
-
140
-
141
-
142
-
143
-
144
-
145
-
146
-
147
-
148
-
149
-
150
-
151
-
152
-
153
-
154
-
155
-
156
-
157
-
158
-
159
-
160
-
161
-
162
-
163
-
164
-
165
-
166
-
167
-
168
-
169
-
170
-
171
-
172
-
173
-
174
-
175
-
176
-
177
-
178
-
179
-
180
-
181
-
182
-
183
-
184
-
185
-
186
-
187
-
188
-
189
-
190
-
191
-
192
-
193
-
194
-
195
-
196
-
197
-
198
-
199
-
200
-
201
-
202
-
203
-
204
-
205
-
206
-
207
-
208
-
209
-
210
-
211
-
212
-
213
-
214
-
215
-
216
-
217
-
218
-
219
-
220
-
221
-
222
-
223
-
224
-
225
-
226
 |
 |