2008 Suzuki Forenza Owner's Manual - Page 109
2008 Suzuki Forenza Manual
Page 109 highlights
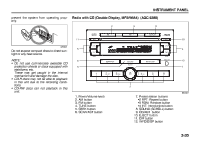
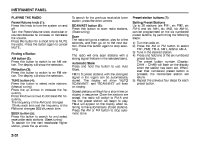
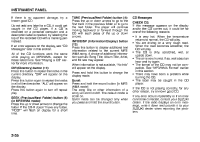
INSTRUMENT PANEL music that has been recorded, and the way the CD-R has been handled. There may be an increase in skipping, difficulty in finding tracks, and/or difficulty in loading and ejecting. If these problems occur, check the bottom surface of the CD. If the surface of the CD is damaged, such as cracked, broken, or scratched, the CD will not play properly. If there is no apparent damage, try a known good CD. Do not add any label to a CD, it could get caught in the CD player. If a CD is recorded on a personal computer and a description label is needed, try labeling the top of the recorded CD with a marking pen instead. If an error appears on the display, see "CD Messages" later in this section. RPT (Repeat) button (7): Press this button to repeat the current track. RPT will appear on the display. Press this button again to turn off repeat play. RDM (Random) button (7): Press this button to hear the tracks in random, rather than sequential, order. "RDM" will appear on the display. Press this button again to turn off random play. INT (Scan) button (7): Press this button to listen to the first few seconds of each track on each loaded CD. "INTRO" will appear on the display. To stop scanning, press this button again. The current track will begin to play. TUNE (Previous/Next Track) button (4): Press the down arrows to go to the start of the current track or press the up arrows to go to the next track. The track number will appear on the display. The player will continue moving backward or forward through the CD with each press of the up or down arrows. AM button (2): Press this button to listen to the radio when a CD is playing. The inactive CD will remain safely inside the radio for future listening. FM button (3): Press this button to listen to the radio when a CD is playing. The inactive CD will remain safely inside the radio for future listening. CD/AUX button (9): Press this button to play a CD when listening to the radio. "CDP" will appear on the display when the CD player has been selected. The CD symbol will appear on the display when a CD is loaded. Press this button while a CD is playing to pause the CD. "PAUSE" will flash on the display. Press this button again to resume playing the CD. Press this button to play a CD when listening to the audio contents from other device (AUX mode). "CDP" will appear on the display when the CD player has been selected. The CD symbol will appear on the display when a CD is loaded. EJECT button (10): Press this button to eject a CD. The only way a CD can be ejected from the player is by pressing the eject button. The CD will not eject when the ignition or the radio is turned off. Using an MP3/WMA CD MP3/WMA Format If you burn your own MP3/WMA disc on a personal computer: • Make sure the MP3/WMA files are recorded on a CD-R disc. • Make sure to finalize the disc when burning an MP3/WMA disc, using multiple sessions. It is usually better to burn the disc all at once. • Files can be recorded with a variety of fixed or variable bit rates. Song title, artist name, and album will be available for display by the radio when recorded using ID3 tags version 1 and 2. • Do not mix standard audio and MP3/ WMA files on one disc. • Make sure each MP3/WMA file has a ".mp3" or ".wma" extension, other file extensions may not work. The player will be able to read and play a maximum of 50 folders, 5 sessions, and 999 files. Long file names and folder names may use more disc memory space 3-33
-
 1
1 -
2
-
3
-
4
-
5
-
6
-
7
-
8
-
9
-
10
-
11
-
12
-
13
-
14
-
15
-
16
-
17
-
18
-
19
-
20
-
21
-
22
-
23
-
24
-
25
-
26
-
27
-
28
-
29
-
30
-
31
-
32
-
33
-
34
-
35
-
36
-
37
-
38
-
39
-
40
-
41
-
42
-
43
-
44
-
45
-
46
-
47
-
48
-
49
-
50
-
51
-
52
-
53
-
54
-
55
-
56
-
57
-
58
-
59
-
60
-
61
-
62
-
63
-
64
-
65
-
66
-
67
-
68
-
69
-
70
-
71
-
72
-
73
-
74
-
75
-
76
-
77
-
78
-
79
-
80
-
81
-
82
-
83
-
84
-
85
-
86
-
87
-
88
-
89
-
90
-
91
-
92
-
93
-
94
-
95
-
96
-
97
-
98
-
99
-
100
-
101
-
102
-
103
-
 104
104 -
 105
105 -
 106
106 -
 107
107 -
 108
108 -
 109
109 -
 110
110 -
 111
111 -
 112
112 -
 113
113 -
 114
114 -
115
-
116
-
117
-
118
-
119
-
120
-
121
-
122
-
123
-
124
-
125
-
126
-
127
-
128
-
129
-
130
-
131
-
132
-
133
-
134
-
135
-
136
-
137
-
138
-
139
-
140
-
141
-
142
-
143
-
144
-
145
-
146
-
147
-
148
-
149
-
150
-
151
-
152
-
153
-
154
-
155
-
156
-
157
-
158
-
159
-
160
-
161
-
162
-
163
-
164
-
165
-
166
-
167
-
168
-
169
-
170
-
171
-
172
-
173
-
174
-
175
-
176
-
177
-
178
-
179
-
180
-
181
-
182
-
183
-
184
-
185
-
186
-
187
-
188
-
189
-
190
-
191
-
192
-
193
-
194
-
195
-
196
-
197
-
198
-
199
-
200
-
201
-
202
-
203
-
204
-
205
-
206
-
207
-
208
-
209
-
210
-
211
-
212
-
213
-
214
-
215
-
216
-
217
-
218
-
219
-
220
-
221
-
222
-
223
-
224
-
225
-
226
 |
 |