2008 Suzuki XL7 Owner's Manual - Page 209
2008 Suzuki XL7 Manual

Page 209 highlights
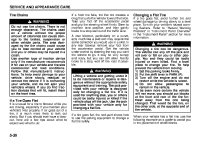
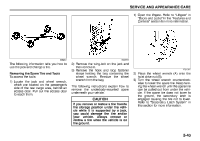
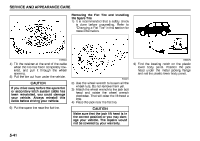
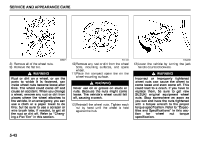
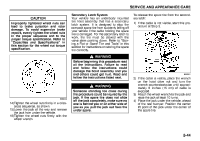
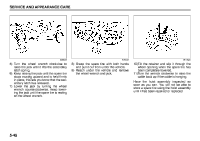
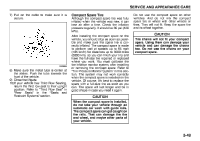
SERVICE AND APPEARANCE CARE CAUTION Improperly tightened wheel nuts can lead to brake pulsation and rotor damage. To avoid expensive brake repairs, evenly tighten the wheel nuts in the proper sequence and to the proper torque specification. Refer to "Capacities and Specifications" in this section for the wheel nut torque specification. Secondary Latch System Your vehicle has an underbody mounted tire hoist assembly that has a secondary latch system. It is designed to stop the compact spare tire from suddenly falling off your vehicle if the cable holding the spare tire is damaged. For the secondary latch to work, the tire must be stowed with the valve stem pointing down. Refer to "Storing a Flat or Spare Tire and Tools" in this section for instructions on storing the spare tire correctly. To release the spare tire from the secondary latch: 1) If the cable is not visible, start this procedure at Step 3. WARNING Before beginning this procedure read all the instructions. Failure to read and follow the instructions could damage the hoist assembly and you and others could get hurt. Read and follow the instructions listed next. 806961 WARNING Someone standing too close during the procedure could be injured by the jack. If the spare tire does not slide off the jack completely, make sure no one is behind you or on either side of you as you pull the jack out from the under spare. 808642 14)Tighten the wheel nuts firmly in a crisscross sequence, as shown. 15)Lower the jack all the way and remove the jack from under the vehicle. 16)Tighten the wheel nuts firmly with the wheel wrench. 2) If the cable is visible, place the wrench on the hoist drive nut and turn the wrench counterclockwise until approximately 6 inches (15 cm) of cable is exposed. 3) Attach the wheel wrench to the jack and raise the jack at least 10 turns. 4) Place the jack under the vehicle, ahead of the rear bumper. Position the center lift point of the jack under the center of the spare tire. 5-44
-
 1
1 -
2
-
3
-
4
-
5
-
6
-
7
-
8
-
9
-
10
-
11
-
12
-
13
-
14
-
15
-
16
-
17
-
18
-
19
-
20
-
21
-
22
-
23
-
24
-
25
-
26
-
27
-
28
-
29
-
30
-
31
-
32
-
33
-
34
-
35
-
36
-
37
-
38
-
39
-
40
-
41
-
42
-
43
-
44
-
45
-
46
-
47
-
48
-
49
-
50
-
51
-
52
-
53
-
54
-
55
-
56
-
57
-
58
-
59
-
60
-
61
-
62
-
63
-
64
-
65
-
66
-
67
-
68
-
69
-
70
-
71
-
72
-
73
-
74
-
75
-
76
-
77
-
78
-
79
-
80
-
81
-
82
-
83
-
84
-
85
-
86
-
87
-
88
-
89
-
90
-
91
-
92
-
93
-
94
-
95
-
96
-
97
-
98
-
99
-
100
-
101
-
102
-
103
-
104
-
105
-
106
-
107
-
108
-
109
-
110
-
111
-
112
-
113
-
114
-
115
-
116
-
117
-
118
-
119
-
120
-
121
-
122
-
123
-
124
-
125
-
126
-
127
-
128
-
129
-
130
-
131
-
132
-
133
-
134
-
135
-
136
-
137
-
138
-
139
-
140
-
141
-
142
-
143
-
144
-
145
-
146
-
147
-
148
-
149
-
150
-
151
-
152
-
153
-
154
-
155
-
156
-
157
-
158
-
159
-
160
-
161
-
162
-
163
-
164
-
165
-
166
-
167
-
168
-
169
-
170
-
171
-
172
-
173
-
174
-
175
-
176
-
177
-
178
-
179
-
180
-
181
-
182
-
183
-
184
-
185
-
186
-
187
-
188
-
189
-
190
-
191
-
192
-
193
-
194
-
195
-
196
-
197
-
198
-
199
-
200
-
201
-
202
-
203
-
 204
204 -
 205
205 -
 206
206 -
 207
207 -
 208
208 -
 209
209 -
 210
210 -
 211
211 -
 212
212 -
 213
213 -
 214
214 -
215
-
216
-
217
-
218
-
219
-
220
-
221
-
222
-
223
-
224
-
225
-
226
-
227
-
228
-
229
-
230
-
231
-
232
-
233
-
234
-
235
-
236
-
237
-
238
-
239
-
240
-
241
-
242
-
243
-
244
-
245
-
246
-
247
-
248
-
249
-
250
-
251
-
252
-
253
-
254
-
255
-
256
-
257
-
258
 |
 |
