2008 Suzuki XL7 Owner's Manual - Page 213
2008 Suzuki XL7 Manual

Page 213 highlights
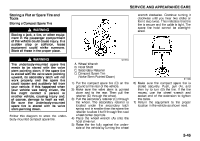
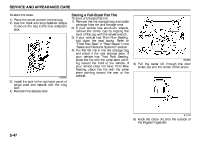
SERVICE AND APPEARANCE CARE 7) Pull on the cable to make sure it is secure. Compact Spare Tire Although the compact spare tire was fully inflated when the vehicle was new, it can lose air after a time. Check the inflation pressure regularly. It should be 60 psi (420 kPa). After installing the compact spare on the vehicle, you should stop as soon as possible and make sure the spare tire is correctly inflated. The compact spare is made to perform well at speeds up to 65 mph (105 km/h) for distances up to 3000 miles (5000 km), so you can finish your trip and have the full-size tire repaired or replaced where you want. You must calibrate the tire inflation monitor system, after installing or removing the compact spare. Refer to "Tire Pressure Monitor System" in this section. The system may not work correctly when the compact spare is installed on the vehicle. Of course, it's best to replace the spare with a full-size tire as soon as you can. The spare will last longer and be in good shape in case you need it again. Do not use the compact spare on other vehicles. And do not mix the compact spare tire or wheel with other wheels or tires. They will not fit. Keep the spare tire and its wheel together. CAUTION Tire chains will not fit your compact spare. Using them can damage your vehicle and can damage the chains too. Do not use tire chains on your compact spare. 1829968 8) Make sure the metal tube is center at the striker. Push the tube towards the front of the vehicle. 9) Close the liftgate. 10)If your vehicle has Third Row Seating, return the third row seat to their upright position. Refer to "Third Row Seat" in "Rear Seats" in the "Seats and Restraint Systems" section. CAUTION When the compact spare is installed, do not take your vehicle through an automatic car wash with guide rails. The compact spare can get caught on the rails. That can damage the tire and wheel, and maybe other parts of your vehicle. 5-48
-
 1
1 -
2
-
3
-
4
-
5
-
6
-
7
-
8
-
9
-
10
-
11
-
12
-
13
-
14
-
15
-
16
-
17
-
18
-
19
-
20
-
21
-
22
-
23
-
24
-
25
-
26
-
27
-
28
-
29
-
30
-
31
-
32
-
33
-
34
-
35
-
36
-
37
-
38
-
39
-
40
-
41
-
42
-
43
-
44
-
45
-
46
-
47
-
48
-
49
-
50
-
51
-
52
-
53
-
54
-
55
-
56
-
57
-
58
-
59
-
60
-
61
-
62
-
63
-
64
-
65
-
66
-
67
-
68
-
69
-
70
-
71
-
72
-
73
-
74
-
75
-
76
-
77
-
78
-
79
-
80
-
81
-
82
-
83
-
84
-
85
-
86
-
87
-
88
-
89
-
90
-
91
-
92
-
93
-
94
-
95
-
96
-
97
-
98
-
99
-
100
-
101
-
102
-
103
-
104
-
105
-
106
-
107
-
108
-
109
-
110
-
111
-
112
-
113
-
114
-
115
-
116
-
117
-
118
-
119
-
120
-
121
-
122
-
123
-
124
-
125
-
126
-
127
-
128
-
129
-
130
-
131
-
132
-
133
-
134
-
135
-
136
-
137
-
138
-
139
-
140
-
141
-
142
-
143
-
144
-
145
-
146
-
147
-
148
-
149
-
150
-
151
-
152
-
153
-
154
-
155
-
156
-
157
-
158
-
159
-
160
-
161
-
162
-
163
-
164
-
165
-
166
-
167
-
168
-
169
-
170
-
171
-
172
-
173
-
174
-
175
-
176
-
177
-
178
-
179
-
180
-
181
-
182
-
183
-
184
-
185
-
186
-
187
-
188
-
189
-
190
-
191
-
192
-
193
-
194
-
195
-
196
-
197
-
198
-
199
-
200
-
201
-
202
-
203
-
204
-
205
-
206
-
207
-
 208
208 -
 209
209 -
 210
210 -
 211
211 -
 212
212 -
 213
213 -
 214
214 -
 215
215 -
 216
216 -
 217
217 -
 218
218 -
219
-
220
-
221
-
222
-
223
-
224
-
225
-
226
-
227
-
228
-
229
-
230
-
231
-
232
-
233
-
234
-
235
-
236
-
237
-
238
-
239
-
240
-
241
-
242
-
243
-
244
-
245
-
246
-
247
-
248
-
249
-
250
-
251
-
252
-
253
-
254
-
255
-
256
-
257
-
258
 |
 |
