2007 Suzuki Grand Vitara Owner's Manual - Page 75
2007 Suzuki Grand Vitara Manual
Page 75 highlights
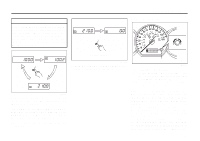
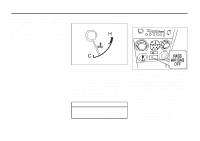
INSTRUMENT PANEL Brightness Control CAUTION Keep track of your odometer reading and check the maintenance schedule regularly for required services. Increased wear or damage to certain parts can result from failure to perform required services at the proper mileage intervals. EXAMPLE (3) (4) (5) (A) (B) About 2 seconds 64J205 (3) 66J213 (3) Hold in the selector knob for about 2 seconds to reset the trip meter to zero. (C) (3) Brightness control knob (4) In this position, the meter lights are the dimmest and the other instrument panel lights are turned off. (5) In this position, the instrument panel lights are the brightest. Your vehicle has a system to automatically dim the instrument panel lights when the ignition switch is in the "ON" position and the lighting switch is either (a) turned to the second or third position, or (b) turned to the "AUTO" position and it is dark around the light sensor. The level of brightness depends on the position of the brightness control knob (3). To reduce the brightness and activate the automatic dimming feature, turn the knob (3) counterclockwise. When the knob (3) is turned counterclockwise to position (4), the 64J049 When the ignition switch is turned to the "ON" position, the display shows the odometer or trip meter. The display shows three types of indication; odometer, trip meter A and trip meter B. Push the selector knob (3) quickly to switch the indication among the three. You can use the two trip meters (A and B) independently. 4-12
-
 1
1 -
2
-
3
-
4
-
5
-
6
-
7
-
8
-
9
-
10
-
11
-
12
-
13
-
14
-
15
-
16
-
17
-
18
-
19
-
20
-
21
-
22
-
23
-
24
-
25
-
26
-
27
-
28
-
29
-
30
-
31
-
32
-
33
-
34
-
35
-
36
-
37
-
38
-
39
-
40
-
41
-
42
-
43
-
44
-
45
-
46
-
47
-
48
-
49
-
50
-
51
-
52
-
53
-
54
-
55
-
56
-
57
-
58
-
59
-
60
-
61
-
62
-
63
-
64
-
65
-
66
-
67
-
68
-
69
-
 70
70 -
 71
71 -
 72
72 -
 73
73 -
 74
74 -
 75
75 -
 76
76 -
 77
77 -
 78
78 -
 79
79 -
 80
80 -
81
-
82
-
83
-
84
-
85
-
86
-
87
-
88
-
89
-
90
-
91
-
92
-
93
-
94
-
95
-
96
-
97
-
98
-
99
-
100
-
101
-
102
-
103
-
104
-
105
-
106
-
107
-
108
-
109
-
110
-
111
-
112
-
113
-
114
-
115
-
116
-
117
-
118
-
119
-
120
-
121
-
122
-
123
-
124
-
125
-
126
-
127
-
128
-
129
-
130
-
131
-
132
-
133
-
134
-
135
-
136
-
137
-
138
-
139
-
140
-
141
-
142
-
143
-
144
-
145
-
146
-
147
-
148
-
149
-
150
-
151
-
152
-
153
-
154
-
155
-
156
-
157
-
158
-
159
-
160
-
161
-
162
-
163
-
164
-
165
-
166
-
167
-
168
-
169
-
170
-
171
-
172
-
173
-
174
-
175
-
176
-
177
-
178
-
179
-
180
-
181
-
182
-
183
-
184
-
185
-
186
-
187
-
188
-
189
-
190
-
191
-
192
-
193
-
194
-
195
-
196
-
197
-
198
-
199
-
200
-
201
-
202
-
203
-
204
-
205
-
206
-
207
-
208
-
209
-
210
-
211
-
212
-
213
-
214
-
215
-
216
 |
 |