3Com 3CNJ220-CRM User Manual
3Com 3CNJ220-CRM Manual
 |
View all 3Com 3CNJ220-CRM manuals
Add to My Manuals
Save this manual to your list of manuals |
3Com 3CNJ220-CRM manual content summary:
- 3Com 3CNJ220-CRM | User Manual - Page 1
3Com® IntelliJack® Switch NJ220 User Guide 3CNJ220 www.3Com.com Part No. 10016226 Rev. AA Published June 2007 - 3Com 3CNJ220-CRM | User Manual - Page 2
adaptation) without written permission from 3Com Corporation. 3Com Corporation reserves the right to revise this documentation in 3Com's standard commercial license for the Software. documentation contained in, or delivered to you in conjunction with, this User Guide. Unless otherwise indicated, 3Com - 3Com 3CNJ220-CRM | User Manual - Page 3
Configuration Managers 15 Installing the Web Configuration Manager on a Windows 2000 machine 21 USING THE LOCAL CONFIGURATION MANAGER Initializing the NJ220 IntelliJack 25 Setting Location Information Setting the Group Name Setting the IP Address Setting Advanced Options 27 Changing the Password - 3Com 3CNJ220-CRM | User Manual - Page 4
Computers Connected to IntelliJacks 59 Upgrading the NJ220 Firmware 60 Viewing Log Files 63 Viewing and Canceling Scheduled Firmware Upgrades 64 TROUBLESHOOTING THE NJ220 Troubleshooting Matrix 65 TECHNICAL SUPPORT Where To Go For Help 67 Contact Us 68 PRODUCT SPECIFICATIONS WARRANTY AND - 3Com 3CNJ220-CRM | User Manual - Page 5
. The NJ220 can also be powered by some switches which are not 802.3af-compatible. Consult the 3Com web site for more information. You can manage the NJ220 IntelliJack using the included Central Configuration Manager or Web Configuration Manager. You can also use a supported SNMP management console - 3Com 3CNJ220-CRM | User Manual - Page 6
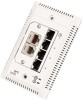
2 CHAPTER 1: INSTALLING THE NJ220 INTELLIJACK About the IntelliJack • MAC filtering • 802.1x port security • User-configured VLAN IDs for management packets • Port-based "calendar" function The following diagram shows the front view of the IntelliJack: 1 Switched ports with LEDs Allow up to four - 3Com 3CNJ220-CRM | User Manual - Page 7
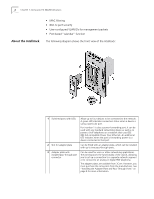
power supply (available for purchase from 3Com); required if your network does not support Power Over Ethernet. The following diagram shows the back view of the IntelliJack: 1 Ethernet uplink port (RJ-45 female) Connects the IntelliJack to the network. Make sure the port on the network switch - 3Com 3CNJ220-CRM | User Manual - Page 8
the network to the IntelliJack (required only if your network cable is terminated with a female RJ-45 connector). Additionally, the following items are shipped with the single pack: • Compact disc with User Guide and Configuration Manager software. • Adapter plates for installing connectors to use - 3Com 3CNJ220-CRM | User Manual - Page 9
screw holes for standard mounting. 3C Number(s) 3CNJPSL 3CNJVOIPMOD-NBX 3CNJVOIPMOD-20 3CNJVOIP-CPOD 3CNJVOIP-CPOD-20 3CNJEXTRING Installing the IntelliJack consists of the following steps: 1 Set up the power supply (page 6). 2 Install the adapter plate and pass-through ports (page 8). 3 Plan the - 3Com 3CNJ220-CRM | User Manual - Page 10
a female RJ-45 connector. Detailed installation instructions are included in the sections that follow. Setting up the Power Supply Power to the IntelliJack can be supplied one of the following ways: • Over the network via an integrated switch that supports Power Over Ethernet. • Over the network - 3Com 3CNJ220-CRM | User Manual - Page 11
network hub or switch and to the IntelliJack, as shown in the following illustration. See "Obtaining Optional Components" on page 4 for ordering information. For complete installation instructions, see the single-port Ethernet power supply documentation. Using the 3Com Local Power Supply To use the - 3Com 3CNJ220-CRM | User Manual - Page 12
separately with the 20-pack). For a list of connectors that are supported with the IntelliJack adapter plates, as well as any corresponding installation instructions, go to the IntelliJack section on www.3com.com. NOTE: If you are not planning on installing the adapter plate and pass-through - 3Com 3CNJ220-CRM | User Manual - Page 13
opening is at least 1.5 inches (3 inches is recommended). NOTE: Some cubicle openings have a depth of 1.2 inches. In this case, install the IntelliJack using the extension ring (available for purchase separately; see "Obtaining Optional Components" on page 4) to obtain the minimum 1.5-inch depth. If - 3Com 3CNJ220-CRM | User Manual - Page 14
10 CHAPTER 1: INSTALLING THE NJ220 INTELLIJACK Setting up the Network The network cabling at your site (from the wiring closet to the wall or cubicle Cabling at Your Site opening) may already be installed. If it is not, install the cabling following these general guidelines. CAUTION: It is - 3Com 3CNJ220-CRM | User Manual - Page 15
than 1.5 inches, does not support the NEMA-WD6 standard, or does not have pre-drilled screw holes, mount the IntelliJack using the extension ring, as shown IntelliJack. CAUTION: Make sure the vents along the edges of the IntelliJack faceplate are clear of any obstructions. If necessary, install - 3Com 3CNJ220-CRM | User Manual - Page 16
12 CHAPTER 1: INSTALLING THE NJ220 INTELLIJACK Connecting the Local Power Supply (Optional) If your network does not support Power Over Ethernet, or if you are not using a single-port or multi-port Ethernet power supply, you must purchase a local power supply from 3Com (see "Obtaining Optional - 3Com 3CNJ220-CRM | User Manual - Page 17
the local power supply into the power source. WARNING: Use the local power supply available from 3Com. Failure to do so may result in damage to the IntelliJack, or may result in a hazardous situation. Connecting Devices to the IntelliJack After the IntelliJack is installed and mounted, connect - 3Com 3CNJ220-CRM | User Manual - Page 18
14 CHAPTER 1: INSTALLING THE NJ220 INTELLIJACK - 3Com 3CNJ220-CRM | User Manual - Page 19
usually easiest if you load this software on a laptop and use it to configure IntelliJacks as you install them. The NJ220 Central Configuration Manager is used for advanced configuration and management of one or more NJ220s on your network. This software should be installed on the machine you plan - 3Com 3CNJ220-CRM | User Manual - Page 20
16 CHAPTER 2: INSTALLING THE CONFIGURATION MANAGERS 2 If your computer is configured to Auto-Play CDs, the installation will start automatically. If not, double-click the setup.exe icon on the CD, and you will see this window: 3 Click Next to continue. - 3Com 3CNJ220-CRM | User Manual - Page 21
the Local and Central Configuration Managers 17 4 Carefully read the license agreement. If you agree, click "Yes, I accept" and Next to continue. 5 The installation will present Readme Information. This is also found in the Readme.txt file on the installation CD. Please read the information - 3Com 3CNJ220-CRM | User Manual - Page 22
18 CHAPTER 2: INSTALLING THE CONFIGURATION MANAGERS 6 Enter your user and organization names. You can also specify whether you want the management programs to be available to just you or to anyone that may use the computer you're installing these applications on. Select the option you prefer and - 3Com 3CNJ220-CRM | User Manual - Page 23
Installing the Local and Central Configuration Managers 19 7 The program files will be installed in the directory C:\Program Files\3Com\IntelliJack. If you want to change the location of the installation, click Change. Otherwise click Next to accept the default location and continue. - 3Com 3CNJ220-CRM | User Manual - Page 24
or custom setup and click Next. The Typical installation will install both the Local Configuration Manager and the Central Configuration Manager on your system. The Custom installation option lets you install just one of the programs if you wish. 9 Review the settings you selected and click the - 3Com 3CNJ220-CRM | User Manual - Page 25
. The program group folder is labeled 3Com IntelliJack and can be found under the Programs menu. NJ220 IntelliJacks are capable of being discovered and managed through a standard web browser. The Web Configuration Manager lets you access and control IntelliJacks from any Web-enabled computer on your - 3Com 3CNJ220-CRM | User Manual - Page 26
3Com IJ/NJ Web Configuration Manager on a Windows 2000 computer, follow these steps: 1 If your machine does not have the Java Development Kit (JDK) installed, download the installation program from Sun's Web site and install JDK v1.4. You can find JDK 1.4 at the following URL: http://java.sun.com - 3Com 3CNJ220-CRM | User Manual - Page 27
the 'bin' subdirectory under the Tomcat installation directory, type 'startup', and hit Enter. A new command window will open. At this point, your server should be configured and running. Now that your server is configured, you can use the Web Configuration Manager from any Web-enabled machine. To - 3Com 3CNJ220-CRM | User Manual - Page 28
24 CHAPTER 2: INSTALLING THE CONFIGURATION MANAGERS - 3Com 3CNJ220-CRM | User Manual - Page 29
3 USING THE LOCAL CONFIGURATION MANAGER Initializing the NJ220 IntelliJack Once you have installed the NJ220 hardware on your network and the Local Configuration Manager software on your computer, you need to perform an initial configuration of the IntelliJack. 1 The first step is to connect - 3Com 3CNJ220-CRM | User Manual - Page 30
IntelliJack, make sure you configure your DHCP server so it won't distribute that address to other devices. 9 Click the Configure button and the Local Configuration Manager will ask you to enter the password for the device. If you haven't changed the password, you should enter the default password - 3Com 3CNJ220-CRM | User Manual - Page 31
If you want to change the default password of the NJ220 or change SNMP community strings, you can configure these settings from either the Local Configuration Manager or the Central Configuration Manager (covered in the next chapter). In the Local Configuration Manager, both settings are found under - 3Com 3CNJ220-CRM | User Manual - Page 32
28 CHAPTER 3: USING THE LOCAL CONFIGURATION MANAGER - 3Com 3CNJ220-CRM | User Manual - Page 33
Devices on Your Network You should use the Local Configuration Manager to initialize each of the NJ220 IntelliJacks installed on your network. Once you have completed that step, you can manage all of them with the Central Configuration Manager. Install this program on any computer on your network - 3Com 3CNJ220-CRM | User Manual - Page 34
Central Configuration Manager by double-clicking on the IJ NJ Cent Config Mgr desktop icon. When it launches, you will see a window similar to this one: 2 Select Discovery from the Devices menu or click the Discover button on the toolbar. The following window will appear: NOTE: The default subnets - 3Com 3CNJ220-CRM | User Manual - Page 35
name • Location information • Firmware version You can sort this information in ascending or descending order. NOTE: Discovered devices are automatically added to the default database. This default database will open automatically when you launch the Central Configuration Manager. If you like, you - 3Com 3CNJ220-CRM | User Manual - Page 36
the devices. This view is particularly useful if you want to select only the devices with an old firmware version so you can perform an upgrade. When you select Group Name from the drop down list, the Central Configuration Manager will present a list of the different group names you have specified. - 3Com 3CNJ220-CRM | User Manual - Page 37
Viewing Device Properties Viewing Device Properties 33 Once the database is populated with NJ220 IntelliJacks on your network, you can begin to manage those devices. The main window of the Central Configuration Manager shows a list of devices in the current database with the information retrieved - 3Com 3CNJ220-CRM | User Manual - Page 38
34 CHAPTER 4: USING THE CENTRAL CONFIGURATION MANAGER 2 Select Property from the Devices menu or from the IP address, subnet mask, default gateway, and whether it uses a static IP address or gets its address from a DHCP server. You can also view and edit the IntelliJack's Group Name and Location. 4 - 3Com 3CNJ220-CRM | User Manual - Page 39
on any of the ports to find out more information or configure that particular port. Click OK to save your changes or Cancel to discard them. Product Information 6 Under the Product Information box, you can see the current firmware version of the IntelliJack, the Product Name, and the Serial Number. - 3Com 3CNJ220-CRM | User Manual - Page 40
THE CENTRAL CONFIGURATION MANAGER Hardware Settings 7 Click on the Hardware Settings tab to view status information about the switch. Several fields Mode, and Power Forwarding. NOTE: For help determining the best configuration options for your system, see the Changing Device Configuration section. 8 - 3Com 3CNJ220-CRM | User Manual - Page 41
the NJ220 IntelliJack. By default, the ATU table allows a total of 512 entries and an aging time is 304 seconds for each entry. The NJ220 IntelliJack lets you manage its ATU All of these configurations are handled through the Properties page, since an ATU table is related to a specific IntelliJack. - 3Com 3CNJ220-CRM | User Manual - Page 42
38 CHAPTER 4: USING THE CENTRAL CONFIGURATION MANAGER 10 The NJ220 IntelliJack also lets you manage its VLAN table. To access the VLAN table, click on the Manage VLAN Table button. The screen you see allows you to display all the VIDs that have been assigned to that IntelliJack. You can refresh the - 3Com 3CNJ220-CRM | User Manual - Page 43
on how you have configured the Counter Mode setting (see step 7 on page 36). The bottom half of the window shows Remote MONitoring (RMON) counters for the LAN port and each of the four PAN ports on the IntelliJack. RMON counters are extensions to the Simple Network Management Protocol (SNMP) that - 3Com 3CNJ220-CRM | User Manual - Page 44
40 CHAPTER 4: USING THE CENTRAL CONFIGURATION MANAGER You can reset all counters to zero by clicking Clear. To , the IntelliJack has unexpectedly rebooted, the event will be recorded in the device log. 3Com Customer Support can use information in the device log to help with troubleshooting. We - 3Com 3CNJ220-CRM | User Manual - Page 45
build a Trap Destination Table via a Management Information Database (MIB) browser. Advanced Settings 16 Click on the Advanced Settings tab to see the following window: 17 You can view the Event Alert Level and 802.1X Settings configured for this particular NJ220. 802.1X is a security protocol for - 3Com 3CNJ220-CRM | User Manual - Page 46
4: USING THE CENTRAL CONFIGURATION MANAGER Different Alert Levels notify you of specific events happening with the IntelliJack. Each level above 0 Power Failure/Reboot Abnormal Reboot IP Address Change Device Power Failure/Reboot Abnormal Reboot IP Address Change Unauthorized Access Device Power - 3Com 3CNJ220-CRM | User Manual - Page 47
, or right click on a device and select Configuration from the pop-up menu. NOTE: To make configuration changes to a IntelliJack from the Central Configuration Manager, the NJ220 must be part of the device database. See the section on Discovering NJ220 Devices on Your Network for information about - 3Com 3CNJ220-CRM | User Manual - Page 48
when you want to restrict access to your LAN at the location where the IntelliJack is installed. This might be an appropriate option in a public use area such as a not to a specific port, but to the IntelliJack as a whole. By default, the Central Configuration Manager will display a count of good - 3Com 3CNJ220-CRM | User Manual - Page 49
. The IntelliJack's Power over Ethernet capability also lets you forward power to a standards-compliant device plugged into Port 1 of the NJ220. The default setting of the NJ220 is auto-detect. We recommend that you keep this setting as part of your configuration to ensure that power will only - 3Com 3CNJ220-CRM | User Manual - Page 50
46 CHAPTER 4: USING THE CENTRAL CONFIGURATION MANAGER Priority & VLAN Configuration 11 Click the Priority & VLAN Configuration tab along the top of the Device Configuration window to view these settings: Port Based Settings 12 To change the Port Based Settings, first select the Port's tab you want - 3Com 3CNJ220-CRM | User Manual - Page 51
Configuration 47 14 The default setting for the Default Priority Level is 802.1p Priority 0 or 1. You can change this setting to Priority 2 or 3, Priority 4 or 5, or Priority 6 or 7. The IntelliJack according to default switching rules (i.e., based on the destination MAC address). Management packets - 3Com 3CNJ220-CRM | User Manual - Page 52
CONFIGURATION MANAGER switch is sending a tagged packet but the device connected to one of the IntelliJack ports does not need the tag information, you can remove the tag. 20 It is common practice to set the VLAN ID (VID) of the management port to VID 1, and this is the default value. The management - 3Com 3CNJ220-CRM | User Manual - Page 53
the security options of the NJ220 IntelliJack. Password 22 You can change the device password (the default password is "password"), and either enable or disable local configuration. NOTE: You should change the password to ensure that no one else can re-configure your system. Make sure you remember - 3Com 3CNJ220-CRM | User Manual - Page 54
50 CHAPTER 4: USING THE CENTRAL CONFIGURATION MANAGER RADIUS clients. The authenticator controls port access for the network client devices connected to the switch. When the option is set to Disable 802.1X, all packets are processed as a normal Ethernet switch; no 802.1X control applies. With - 3Com 3CNJ220-CRM | User Manual - Page 55
supplicant settings let you configure the IntelliJack as a supplicant to an 802.1X-enabled upstream switch. To enable this option, select the box next to Supplicant. When you do, the other fields on the screen will become active. You can enter a Supplicant User Name and Password as well as an EAP - 3Com 3CNJ220-CRM | User Manual - Page 56
USING THE CENTRAL CONFIGURATION MANAGER SNMP Configuration 27 Click the SNMP Configuration tab to change the SNMP settings of the NJ220. 28 You can either Enable or Disable the "Set" operation of the IntelliJack. 29 Configure the "Get" and "Set" Community Strings for SNMP management operations. 30 - 3Com 3CNJ220-CRM | User Manual - Page 57
name in the SNMP transmission. • Vendor Specific Traps indicate 802.1X User Login, 802.1X User Logout, and 802.1X Login Failure when the IntelliJack is configured for 802.1X. 31 You can Set Trap Destination by entering the IP address of your SNMP management console. This eliminates the need to build - 3Com 3CNJ220-CRM | User Manual - Page 58
sends a message to the upstream switch the IntelliJack is connected to, telling it to slow down the rate at which it forwards traffic. This will slow down the network. 37 The IntelliJack has the ability to configure AutoMDI[X]. Manual MDI configuration (the default value) assumes that the patch - 3Com 3CNJ220-CRM | User Manual - Page 59
Changing Device Configuration 55 With Data Rate Control settings, you can reduce the network traffic speed on the IntelliJack to as little for LAN Port (ingress) Power Forward Local Configuration SNMP SET SNMP Traps Event Alert ATU Table VTU Table All RADIUS settings Default Value 1518 or 1522 if - 3Com 3CNJ220-CRM | User Manual - Page 60
56 CHAPTER 4: USING THE CENTRAL CONFIGURATION MANAGER Global Setting 802.1X Supplicant Status 802.1X Supplicant User Name and Password Default Value Disabled Blank Port Setting State Link Flow Control MDI[X] Multicast Limit Priority Lookup Port Priority VLAN ID 802.1Q VLAN Mode Data Rate Limit - 3Com 3CNJ220-CRM | User Manual - Page 61
Configuration Summary, you will see a summary of all the changes you have made. Enter your password and click Start. As the IntelliJacks are configured, a regular basis. NOTE: If a NJ220 IntelliJack that was once discovered by the Central Configuration Manager is no longer connected to your network - 3Com 3CNJ220-CRM | User Manual - Page 62
58 CHAPTER 4: USING THE CENTRAL CONFIGURATION MANAGER The Restore operation lets you recover configurations you saved with Backup. When you initiate a Restore, you will be asked for the Secret Key you established with the Backup operation. - 3Com 3CNJ220-CRM | User Manual - Page 63
the many situations where the Location Information field of the NJ220 can be very useful. If you know the IP address or MAC address of the computer or networked device, you can use the Central Configuration Manager to find the right IntelliJack. 1 Select Find Location from the Tools menu. You will - 3Com 3CNJ220-CRM | User Manual - Page 64
60 CHAPTER 4: USING THE CENTRAL CONFIGURATION MANAGER Upgrading the NJ220 Firmware You can upgrade the firmware on your NJ220s over the network from the Central Configuration Manager. To do so, follow these steps: 1 Select one or more IntelliJacks you want to upgrade. You can select groups of - 3Com 3CNJ220-CRM | User Manual - Page 65
specific time and date to send the file. You may, for example, want to perform an upgrade during off hours such as a weekend. 6 Click Next and a window like this will appear: 7 Review the list of IntelliJacks you want to upgrade. If you want to modify this list, click Cancel and restart the firmware - 3Com 3CNJ220-CRM | User Manual - Page 66
62 CHAPTER 4: USING THE CENTRAL CONFIGURATION MANAGER 8 Type your password in the Password field, then click Finish. The Upgrade Progress dialog box will appear. - 3Com 3CNJ220-CRM | User Manual - Page 67
The Central Configuration Manager creates a log file with details of the firmware upgrades, configuration operations, and alert messages from the IntelliJack. This file is in the Central Configurator\Log subdirectory under the directory where you installed the IntelliJack configuration software. You - 3Com 3CNJ220-CRM | User Manual - Page 68
64 CHAPTER 4: USING THE CENTRAL CONFIGURATION MANAGER Viewing and Canceling You can select a time and date to send an upgraded firmware image to the Scheduled Firmware IntelliJacks in your network. To view and make changes to the firmware upgrades Upgrades you have scheduled, follow these steps: 1 - 3Com 3CNJ220-CRM | User Manual - Page 69
length and cabling specifications for your network. I The IntelliJack is configured for manual MDI. Be sure to use a straight-through cable. If you want to use a cross-connect cable, you must change settings in the Configuration Manager software. Troubleshooting Matrix Event/Message Power LED is - 3Com 3CNJ220-CRM | User Manual - Page 70
connection to IntelliJack Power is not being forwarded to network device Unit has detected a problem. Traffic can pass through, but management will not work. Wrong password has been entered Device did not respond within a specified period of time Unexpected configuration parameters Something other - 3Com 3CNJ220-CRM | User Manual - Page 71
B OBTAINING SUPPORT FOR YOUR 3COM PRODUCTS 3Com offers product registration, case management, and repair services through eSupport.3com.com. You must have a user name and password to access these services, which are described in this appendix. Register Your Product to Gain Service Benefits To - 3Com 3CNJ220-CRM | User Manual - Page 72
product. Separately orderable software releases and licenses are listed in the 3Com Price List and are available for purchase from your 3Com reseller. Contact Us 3Com offers telephone, internet, and e-mail access to technical support and repair services. To access these services for your region - 3Com 3CNJ220-CRM | User Manual - Page 73
users must apply for a user name and password. Telephone numbers are correct at the time of publication. Find a current directory of 3Com resources by region at: http://csoweb4.3com.com/contactus/ Country Telephone Number Country Telephone Number Asia, Pacific Rim - Telephone Technical Support - 3Com 3CNJ220-CRM | User Manual - Page 74
http://emea.3com.com/support/email.html You can also obtain non-urgent support in this region at these email addresses: Technical support and general requests: [email protected] Return material authorization: [email protected] Contract requests: [email protected] Latin America - 3Com 3CNJ220-CRM | User Manual - Page 75
mode (full or half) can be determined through auto-negotiation with the attached devices. The IntelliJack attempts to negotiate the fastest connection possible (100 Mbps full-duplex). The communication speed and duplex mode can also be controlled using the configuration management software. 71 - 3Com 3CNJ220-CRM | User Manual - Page 76
Process and IEEE 802.3af) Power forwarding (IEEE802.3af; 7 watts, 48 volts) Features Power Over Ethernet Compatible with IEEE 802.3af and Capacitive Power Discovery Process Local power supply Required for networks that do not support Power Over Ethernet Voice Over IP (VoIP) Compatible - 3Com 3CNJ220-CRM | User Manual - Page 77
forwarding Port number 1 can be used with any standard networking device as well as to power a device such as a VoIP telephone on a network that uses IEEE 802.3af-compatible Power Over Ethernet. Total valid frames received with a unicast Destination Address. A valid frame has a good FCS and its - 3Com 3CNJ220-CRM | User Manual - Page 78
Product Specifications InDiscards InFiltered OutUnicasts OutBroadcasts OutPause OutMulticasts OutFCSErr OutGoodOctets Out64Octets Out127Octets Out255Octets Out511Octets Out1023Octets OutMaxOctets Collisions Late Excessive Multiple Total valid frames received that are discarded - 3Com 3CNJ220-CRM | User Manual - Page 79
Single Deferred Total number of successfully transmitted frames that experienced exactly one collision. Total number of successfully transmitted frames that are delayed because the medium is busy during the first attempt. 75 - 3Com 3CNJ220-CRM | User Manual - Page 80
Product Specifications 76 - 3Com 3CNJ220-CRM | User Manual - Page 81
radiate radio frequency energy and, if not installed and used in accordance with the instructions, may cause harmful interference to radio user will be required to correct the interference at the user's own expense. Changes or modifications not expressly approved by 3Com could void the user - 3Com 3CNJ220-CRM | User Manual - Page 82
Control Council for Interference by Information Technology Equipment (VCCI). If this equipment is used in a domestic environment, radio disturbance may occur, in which case, the user may be required to take corrective actions.
-
 1
1 -
 2
2 -
 3
3 -
 4
4 -
 5
5 -
 6
6 -
 7
7 -
8
-
9
-
10
-
11
-
12
-
13
-
14
-
15
-
16
-
17
-
18
-
19
-
20
-
21
-
22
-
23
-
24
-
25
-
26
-
27
-
28
-
29
-
30
-
31
-
32
-
33
-
34
-
35
-
36
-
37
-
38
-
39
-
40
-
41
-
42
-
43
-
44
-
45
-
46
-
47
-
48
-
49
-
50
-
51
-
52
-
53
-
54
-
55
-
56
-
57
-
58
-
59
-
60
-
61
-
62
-
63
-
64
-
65
-
66
-
67
-
68
-
69
-
70
-
71
-
72
-
73
-
74
-
75
-
76
-
77
-
78
-
79
-
80
-
81
-
82
 |
 |

3Com
®
IntelliJack
®
Switch NJ220
User Guide
3CNJ220
www.3Com.com
Part No. 10016
226
Rev. AA
Published June 2007