3Com 3CRWE554G72 User Guide
3Com 3CRWE554G72 - OfficeConnect Wireless 11g Cable/DSL Gateway Router Manual
 |
UPC - 662705468846
View all 3Com 3CRWE554G72 manuals
Add to My Manuals
Save this manual to your list of manuals |
3Com 3CRWE554G72 manual content summary:
- 3Com 3CRWE554G72 | User Guide - Page 1
OfficeConnect® Wireless 11g Cable/DSL Gateway User Guide 3CRWE554G72 http://www.3com.com/ Part No. DUA0055-4AAA01 Rev. 01 Published July 2003 - 3Com 3CRWE554G72 | User Guide - Page 2
(s) described in this documentation at any time. If there is any software on removable media described in this documentation, it is furnished under a or delivered to you in conjunction with, this User Guide. Unless otherwise indicated, 3Com registered trademarks are registered in the United States - 3Com 3CRWE554G72 | User Guide - Page 3
Naming Convention 7 Conventions 8 Feedback about this User Guide 8 Related Documentation 9 Product Registration 9 1 INTRODUCING THE GATEWAY OfficeConnect Wireless the Gateway 22 3 SETTING UP YOUR COMPUTERS Obtaining an IP Address Automatically 25 Windows 2000 25 Windows XP 27 Windows 95/98/ME 27 - 3Com 3CRWE554G72 | User Guide - Page 4
PPPoE and PPTP Client Software 28 Disabling Web Proxy 28 4 RUNNING THE SETUP WIZARD Accessing the Wizard 29 Password 32 Time Zone 32 WAN Settings 33 LAN Settings 38 DHCP 38 Wireless Settings 39 Summary 40 5 GATEWAY CONFIGURATION Navigating Through the Gateway Configuration Pages 41 Main Menu - 3Com 3CRWE554G72 | User Guide - Page 5
Zone 76 Configuration 77 Upgrade 78 Status and Logs 78 Status 79 Usage 79 Logs 80 Support/Feedback 80 Support 81 Feedback 81 6 TROUBLESHOOTING Basic Connection Checks 83 Browsing to the Gateway Configuration Screens 83 Connecting to the Internet 84 Forgotten Password and Reset to Factory Defaults 85 - 3Com 3CRWE554G72 | User Guide - Page 6
How does a Device Obtain an IP Address and Subnet Mask? 97 DHCP Addressing 97 Static Addressing 97 Auto-IP Addressing 97 C TECHNICAL SPECIFICATIONS Standards 100 D SAFETY INFORMATION E END USER SOFTWARE LICENSE AGREEMENT F ISP INFORMATION GLOSSARY INDEX REGULATORY NOTICES FOR THE WIRELESS 11G CABLE/ - 3Com 3CRWE554G72 | User Guide - Page 7
the information in the release note. Most user guides and release notes are available in Adobe Acrobat Reader Portable Document Format (PDF) on the 3Com World Wide Web site: http://www.3com.com Naming Convention Throughout this guide, the OfficeConnect Wireless 11g Cable/DSL Gateway is referred - 3Com 3CRWE554G72 | User Guide - Page 8
software button names. Examples: From the Help menu, select Contents. Click OK. Feedback about this Your suggestions are very important to us. They will help make our User Guide documentation more useful to you. Please e-mail comments about this document to 3Com at: [email protected] - 3Com 3CRWE554G72 | User Guide - Page 9
Support and Safety Information sheet. Related In addition to this guide, each Gateway document set includes one Documentation Installation Guide. This guide contains the instructions you need to install and configure your Gateway. Product Registration You can now register your Gateway on the 3Com - 3Com 3CRWE554G72 | User Guide - Page 10
10 ABOUT THIS GUIDE - 3Com 3CRWE554G72 | User Guide - Page 11
fastest modes of communication but, until recently, only large businesses could afford the networking advantage. The OfficeConnect® product range from 3Com files or damaging your computers. The Gateway can also prevent your users from accessing Web sites which you find unsuitable. Figure 1 shows an - 3Com 3CRWE554G72 | User Guide - Page 12
12 CHAPTER 1: INTRODUCING THE GATEWAY Figure 1 Example Network Without a Gateway When you use the Gateway in your network (Figure 2), it becomes your connection to the Internet. Connections can be made directly to the Gateway, or to an OfficeConnect Switch or Hub, expanding the number of computers - 3Com 3CRWE554G72 | User Guide - Page 13
setup and configuration ■ Provides centralization of all network address settings (DHCP) ■ Acts as a Virtual server to enable remote access to Web, FTP, and other services the Gateway Discovery program and this User Guide ■ Installation Guide ■ One Support and Safety Information Sheet ■ One - 3Com 3CRWE554G72 | User Guide - Page 14
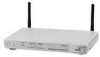
configured with at least the following: ■ A computer with an operating system that supports TCP/IP 45 connector). ■ An active Internet access account. ■ A Web browser that supports JavaScript, such as Netscape 4.7 or WLAN LAN Status Cable/DSL 3CRWE554G72 Alert Enabled OfficeConnect Wireless 11g - 3Com 3CRWE554G72 | User Guide - Page 15
Reset to Factory Defaults command, or ■ The system software is in the process of being upgraded reset the unit to Factory Defaults, follow steps 5 to 7 in "Forgotten Password and Reset to Factory Defaults the Gateway, or there is a problem. Refer to Chapter 6 "Troubleshooting". 4 Four LAN Status LEDs - 3Com 3CRWE554G72 | User Guide - Page 16
data is being transmitted or received. If the LED is off, nothing is connected, the modem is switched off or there is a problem (refer to Chapter 6 "Troubleshooting"). The rear panel (Figure 4) of the Gateway contains four LAN ports, one Ethernet Cable/DSL port, a power adapter OK LED, and a power - 3Com 3CRWE554G72 | User Guide - Page 17
Rear Panel 17 depending on the device to which they are connected and the type of cable used. 10 Four 10/100 LAN ports Using suitable RJ-45 cable, you can connect your Gateway to a computer, or to any other piece of equipment that has an Ethernet connection (for example, a hub or a switch). The LAN - 3Com 3CRWE554G72 | User Guide - Page 18
18 CHAPTER 1: INTRODUCING THE GATEWAY - 3Com 3CRWE554G72 | User Guide - Page 19
2 HARDWARE INSTALLATION Introduction This chapter will guide you through a basic installation of the Gateway, including: ■ Connecting the Gateway to the Internet. ■ , if desired. ■ allows easy viewing of the front panel LED indicator lights, and access to the rear panel connectors, if necessary. - 3Com 3CRWE554G72 | User Guide - Page 20
cannot enter the case of the unit. ■ Air flow around the unit and through the vents in the side of the case is not restricted. 3Com recommends you provide a minimum of 25 mm (1 in.) clearance. Using the Rubber Feet Use the four self-adhesive rubber feet to prevent your Gateway from - 3Com 3CRWE554G72 | User Guide - Page 21
If you have a DSL connection and your ISP allocates IP information dynamically over PPTP, you need a User Name, Password and PPTP Server Address: PPTP User Name PPTP Password PPTP Server Address You only need a PPPoE Service Name if your ISP requires one. Do not enter anything - 3Com 3CRWE554G72 | User Guide - Page 22
it to a computer in order to be able to access the Internet. See Figure 5: Figure 5 Connecting the Gateway Power Supply Unit 3Com OfficeConnect Wireless 11g Cable/DSL Gateway Your existing Cable/DSL Modem Internet Your PC Wireless Users To use your Gateway to connect to the Internet through - 3Com 3CRWE554G72 | User Guide - Page 23
If you configure the Gateway from a wireless computer, note that you may lose contact with the Gateway if you change the wireless configuration. To communicate wirelessly with your Gateway, your wireless NIC should be set as follows: ■ Encryption - none ■ Service Area Name/SSID - 3Com ■ Channel - 11 - 3Com 3CRWE554G72 | User Guide - Page 24
24 CHAPTER 2: HARDWARE INSTALLATION - 3Com 3CRWE554G72 | User Guide - Page 25
, using DHCP. However, your computers need to be configured correctly for this to take place. To change the configuration of your computers to allow this, follow the instructions in this chapter. If your computers are configured with fixed or static addresses and you do not wish to change this, then - 3Com 3CRWE554G72 | User Guide - Page 26
SETTING UP YOUR COMPUTERS Figure 6 Local Area Properties Screen 6 Ensure that the options Obtain an IP Address automatically, and Obtain DNS server address automatically are both selected as shown in Figure 7. Click OK. Figure 7 Internet Protocol (TCP/IP) Properties Screen 7 Restart your computer. - 3Com 3CRWE554G72 | User Guide - Page 27
select Settings > Control Panel. 2 Double click on Network. Select the TCP/IP item for your network card and click on Properties. 3 In the TCP/IP dialog, select the IP Address tab, and ensure that Obtain IP address automatically is selected. Click OK. Macintosh If you are using a Macintosh computer - 3Com 3CRWE554G72 | User Guide - Page 28
8 should be displayed. 4 Select the Never Dial a Connection option. Figure 8 Internet Properties Screen Disabling Web Proxy You may wish to remove the PPPoE client software from your computer to free resources, as it is not required for use with the Gateway. Ensure that you do not have a web proxy - 3Com 3CRWE554G72 | User Guide - Page 29
URL in the location or address field of your browser: http://192.168.1.1 (Figure 9). The Login screen displays. Figure 9 Web Browser Location Field (Factory Default) 4 To log in as an administrator, enter the password (the default setting is admin) in the System Password field and click Log in - 3Com 3CRWE554G72 | User Guide - Page 30
30 CHAPTER 4: RUNNING THE SETUP WIZARD Figure 10 Gateway Login Screen 5 If the password is correct, the Country Selection screen will appear. Select the country you wish to configure the Gateway for, then click Apply. (Figure 11) Figure 11 Country Selection Screen 6 When you have selected a country - 3Com 3CRWE554G72 | User Guide - Page 31
Accessing the Wizard 31 ■ If your Gateway has not been configured before, the Wizard will launch automatically (refer to Figure 13). 7 Click Next. 8 You will be guided step by step through a basic setup procedure. Figure 12 Welcome Screen Figure 13 Wizard Screen - 3Com 3CRWE554G72 | User Guide - Page 32
, type the Old Password, then a new password in both the New Password and Confirm Password boxes. 3Com recommends entering a new password when setting up the Gateway for the first time. The Gateway is shipped from the factory with a default password, admin. 1. Password is case sensitive. 2. Write - 3Com 3CRWE554G72 | User Guide - Page 33
setting information from your ISP ready. Select an Internet Addressing mode from the following: ■ PPPoE is required (typically DSL users only) see page 34 ■ ISP provides configuration dynamically (via DHCP) see page 35 ■ ISP has provided a static IP address see page 36 ■ PPTP is required (some DSL - 3Com 3CRWE554G72 | User Guide - Page 34
Screen To setup the gateway for use with a PPP over Ethernet (PPPoE) connection, use the following procedure: 1 Enter your PPP over Ethernet user name in the PPPoE User Name text box. 2 Enter your PPP over Ethernet password in the PPPoE Password text box. 3 Enter your PPP over Ethernet service name - 3Com 3CRWE554G72 | User Guide - Page 35
Accessing the Wizard 35 Dynamic IP Address Mode To setup the Gateway for use with a dynamic IP address connection: 1 Select the ISP provides configuration dynamically (via DHCP) and then click Next. See Figure 16. Figure 18 Hostname Screen 2 Some ISPs require a host name. If your ISP has this - 3Com 3CRWE554G72 | User Guide - Page 36
SETUP WIZARD Static IP Mode To setup the Gateway for use with a static IP address connection, use the following procedure: 1 Select ISP has provided a static IP address, (see Figure 16) and then click Next. Figure 20 displays. Figure 20 Static IP Mode Screen 2 Enter your IP Address in the IP Address - 3Com 3CRWE554G72 | User Guide - Page 37
Mode Screen Accessing the Wizard 37 To setup the gateway for use with a PPTP connection, use the following procedure: 1 Enter your PPTP server address in the PPTP Server Address text box. 2 Enter your PPTP user name in the PPTP User Name text box. 3 Enter your PPTP password in the PPTP Password - 3Com 3CRWE554G72 | User Guide - Page 38
. It also allows you to change the IP address and subnet mask. DHCP The Gateway contains a Dynamic Host Configuration (DHCP) server that can automatically configure the TCP/IP settings of every computer on your network. Figure 24 DHCP Server Setup Screen To activate the DHCP Server option, select - 3Com 3CRWE554G72 | User Guide - Page 39
when first powered on. The Service Area Name default for 3Com products is "3Com". Up to 32 (case sensitive) characters can be entered for the Service Area Name. 3Com strongly recommends that you change the SSID to something other than the default. If you are configuring the Gateway from a wireless - 3Com 3CRWE554G72 | User Guide - Page 40
channel you select as this may be useful if you experience problems with your clients. Summary Figure 26 Configuration Summary Screen When you complete the Setup Wizard, a configuration summary will display. Verify the configuration information of the Gateway and then click Finish to save your - 3Com 3CRWE554G72 | User Guide - Page 41
URL is http://192.168.1.1 but if you changed the Gateway LAN IP address during initial configuration, use the new IP address instead. When you have browsed to the Gateway, log in using your system password (default admin). Main Menu At the left side of all screens is a main menu, as shown in - 3Com 3CRWE554G72 | User Guide - Page 42
Support/Feedback - contains a comprehensive online help system and allows you to provide 3Com with feedback on your Gateway. Option Tabs Each corresponding menu page may also provide sub-sections which are accessed Password. You can also gain access to the Configuration Wizard. (See "Accessing the - 3Com 3CRWE554G72 | User Guide - Page 43
the new password in the New Password field 3 Enter the new password again in the Confirm Password field 4 Click Apply to save the new password The password is case sensitive. If you have forgotten your password you need to reset the Gateway. See "Forgotten Password and Reset to Factory Defaults" on - 3Com 3CRWE554G72 | User Guide - Page 44
5: GATEWAY CONFIGURATION Wizard Figure 29 Wizard Screen Click WIZARD... to launch the configuration wizard. Refer to Chapter 4 for information on how to run the wizard. LAN Settings The LAN Settings menu provides the following options: Unit Configuration Figure 30 Unit Configuration Screen - 3Com 3CRWE554G72 | User Guide - Page 45
45 The LAN Settings screen is used to specify the LAN IP address of your Gateway, and to configure the DHCP server. 1 Select Unit Configuration and then specify the Gateway IP Address and Subnet Mask in the LAN Settings field. The default IP address of the Gateway is 192.168.1.1. 2 If you want to - 3Com 3CRWE554G72 | User Guide - Page 46
remove the fixed association. As you connect more devices, the client list will grow to a maximum number of 253 clients. The release button allows the lease time for the IP address that has been issued to a device to be cleared. The lease time is set at 12 hours. If a PC has been switched - 3Com 3CRWE554G72 | User Guide - Page 47
3Com recommends that you: 1. Change the SSID from its default value - see page 48 2. Enable Encryption - see page 49 3. Enable Connection Control - see page 53 Configuration Figure 32 Configuration will transmit and receive on. If another access point or gateway nearby is using the same Channel - 3Com 3CRWE554G72 | User Guide - Page 48
computers must be configured with exactly the same name or you will not establish a connection. The Service Area Name may also be referred to as "ESSID" depending on your networking vendor. By default the Gateway uses the name "3Com". 3Com recommends that you change the default name. In order - 3Com 3CRWE554G72 | User Guide - Page 49
is a 64 bit or 128 bit encryption method with user configurable fixed keys. WPA provides a higher level of security, provided by its longer key and dynamic changes made to the key over time. 3Com recommends that you use WPA with any clients which support it. If you enable encryption on the Gateway - 3Com 3CRWE554G72 | User Guide - Page 50
Keys Screen showing WPA configuration To enter the pre-shared key as hexadecimal digits: 1 Select Enabled - Manual Pre-shared Key from to generate a 256 bit key. 3 Click Apply to generate the key. Configuring WEP There are two levels of WEP encryption available, 64 bit (sometimes Encryption - 3Com 3CRWE554G72 | User Guide - Page 51
Keys Screen showing WEP configuration A Key is a hexadecimal manually enter hex keys. Virtually all manufacturers support this scheme. Enter a two digit hexadecimal number in every box. Hexadecimal numbers are formed from 0-9 and A-F. ■ 3Com Encryption String - This method is supported by 3Com - 3Com 3CRWE554G72 | User Guide - Page 52
5: GATEWAY CONFIGURATION WEP and 13 characters for 128 bit WEP. You must enter a separate string for each of the 4 Keys. You can leave a string blank provided this Key is not selected as the Active Transmit Key. ■ Passphrase - This is another common method and similar to the 3Com Encryption string - 3Com 3CRWE554G72 | User Guide - Page 53
computers can connect to the Gateway. By default, any wireless computer that has the same Service Area Name/SSID, channel and encryption settings as the Gateway can connect to it. Select Only Authorized Wireless PCs can connect to the Gateway to enable and configure this feature. If you enable this - 3Com 3CRWE554G72 | User Guide - Page 54
54 CHAPTER 5: GATEWAY CONFIGURATION To create a list of Wireless computers that can access the Gateway: 1 Press New. The screen shown in Figure 36 opens. 2 Select the MAC addresses of the Wireless PCs for which you want to allow access. To select multiple MAC addresses, hold down the Ctrl key while - 3Com 3CRWE554G72 | User Guide - Page 55
the Wireless LAN. The list is only created when Wireless Networking is enabled. For each device that is connected to the Wireless LAN, the MAC address and Connection Speed of that device is displayed. As you connect more devices to the Wireless LAN, the client list will grow to a maximum of - 3Com 3CRWE554G72 | User Guide - Page 56
Network Adapter configuration software. To set up a profile (once the Service Area Name/SSID and Encryption settings have been configured in the into the 3Com Wireless Network Adapter. For instructions on how to import a profile, refer to the User Guide that accompanies your 3Com Wireless Network - 3Com 3CRWE554G72 | User Guide - Page 57
by some European providers. If the installation instructions that accompany your modem ask you to setup a dialup connection using a PPTP VPN tunnel then select this option. To configure the Gateway you will need to know the following: ■ Username ■ Password ■ VPN Server address (usually your modem) - 3Com 3CRWE554G72 | User Guide - Page 58
58 CHAPTER 5: GATEWAY CONFIGURATION When you install the Gateway, you will not need to use the dialup VPN on your PC anymore an IP Allocation Mode from the drop down box. Select an IP Allocation Mode from the following: ■ Static IP address (to be specified manually) see page 59 ■ Dynamic IP address ( - 3Com 3CRWE554G72 | User Guide - Page 59
Figure 41 Connection Parameters Screen - Static IP To setup the Gateway for use with a Static IP address connection: 1 Select Static IP Address (to be specified manually) in the IP Allocation Mode field (Figure 41). 2 Enter your IP Address in the IP Address text box. This information, along with - 3Com 3CRWE554G72 | User Guide - Page 60
60 CHAPTER 5: GATEWAY CONFIGURATION Dynamic IP Address Figure 42 Connection Parameters Screen - Dynamic IP If this mode is selected, your IP Address, Subnet Mask, and DNS Address will be obtained automatically from your ISP. They are not displayed on this screen, but may be viewed on the Status - 3Com 3CRWE554G72 | User Guide - Page 61
. PPP over Ethernet Figure 43 PPPoE Setup Screen To setup the Gateway for use with a PPP over Ethernet connection, use the following procedure: 1 Select PPP over Ethernet in the IP Allocation Mode field. (Figure 43) 2 Enter your Primary DNS Address and Secondary DNS address. Your ISP may provide you - 3Com 3CRWE554G72 | User Guide - Page 62
client software on your computer to access the Internet. PPTP Figure 44 PPTP Setup Screen To setup the Gateway for use with a PPTP connection, use the following procedure: 1 Select PPTP (used by some European providers) in the IP Allocation Mode field. (Figure 44) 2 Enter your PPTP server address in - 3Com 3CRWE554G72 | User Guide - Page 63
. Alternatively, if the PPTP server is located in your DSL modem, click Suggest to select an IP address on the same subnet as the PPTP server. Firewall On the main frame of the Firewall setup screen is a menu with five tabs: Virtual Servers, Special Applications, PCs Privileges, URL Filter, and - 3Com 3CRWE554G72 | User Guide - Page 64
Virtual Server or Special Applications options do not provide the level of access needed for certain applications. To configure one of your computers as a DMZ host, enter the last digit(s) of the IP address of the computer in the IP Address of DMZ Host text box, and then click Apply. Virtual Server - 3Com 3CRWE554G72 | User Guide - Page 65
specify a suitable name for the service and then enter the port numbers required for that service. (Figure 47) Figure 47 Custom Setup Screen 4 Click Add to save tab to display Authorized Application setup screen. (Figure 48) Some software applications require special or multiple connections - 3Com 3CRWE554G72 | User Guide - Page 66
ports. Each defined Special Application only supports a single computer user, and up to 10 Special Applications can be defined. Any incoming ports opened by a Special Application trigger will be closed after five minutes of inactivity. To configure special applications: 1 Click New. 2 Select the - 3Com 3CRWE554G72 | User Guide - Page 67
PC Privileges to display the PC Privilege setup screen (Figure 51). Access from the local network to the Internet can be controlled on a computer-by-computer basis. In the default configuration the Gateway will allow all connected computers unlimited access to the Internet. PC Privileges allows you - 3Com 3CRWE554G72 | User Guide - Page 68
68 CHAPTER 5: GATEWAY CONFIGURATION To use access control for all computers: 1 Click PCs access authorized services only. 2 Select All PCs to setup the access rights for all computers connected to the Gateway. 3 Select authorized services by clicking in the appropriate check box(es) (Figure 52). - 3Com 3CRWE554G72 | User Guide - Page 69
access authorized services only. 2 Click New to display the PC Privileges setting screen. 3 Enter the last digit(s) of the IP address of the computer in the PC's IP Address text box. 4 Select authorized services Deny List" on page 70. ■ Allow List - Users are unable to browse any Web sites except of - 3Com 3CRWE554G72 | User Guide - Page 70
70 CHAPTER 5: GATEWAY CONFIGURATION Deny List To allow users access to all Web sites except for those users from browsing a site called www.badsite.com, enter www.badsite.com or badsite.com in one of the fields. If badsite.com has multiple sub-domains, such as this.badsite.com and that.badsite.com - 3Com 3CRWE554G72 | User Guide - Page 71
.sussex.com ■ www.thisexample.com You can filter up to 30 keywords and URLs. Computers that should not be subject to URL filtering can be excluded by ticking the Bypass URL Filter checkbox in the PC Privileges setup screen. See "PC Privileges" on page 67. Allow List To stop users from accessing any - 3Com 3CRWE554G72 | User Guide - Page 72
CONFIGURATION ■ Allow them individually by entering this.goodsite.com in one field and that.goodsite.com in another. or ■ Allow them by entering the keyword goodsite.com into one of the fields. This will allow all URLs containing the string goodsite.com . If need to access an external mail server - 3Com 3CRWE554G72 | User Guide - Page 73
reduces the configuration required but lessens your control of the Gateway's firewall. 3Com recommends that you leave this feature disabled for maximum security. Allow PING from the Internet PING is a utility, which is used to determine whether a device is active at the specified IP address. PING is - 3Com 3CRWE554G72 | User Guide - Page 74
5: GATEWAY CONFIGURATION This feature is enabled by clicking on the check box so that a tick can be seen and then select Apply. 3Com recommends that set as default. 2 Enable administration from a single Internet Host - Only the specified IP address can manage the Gateway. Any other users will be - 3Com 3CRWE554G72 | User Guide - Page 75
Restart, Time Zone, Configuration, and Upgrade (Figure 57). configuration information will be lost but the log files will be erased. This function may be of use if you are experiencing problems and you wish to re-establish your Internet connection. Any network users who are currently accessing - 3Com 3CRWE554G72 | User Guide - Page 76
76 CHAPTER 5: GATEWAY CONFIGURATION Time Zone Figure 58 Time Zone Screen Choose the time zone that is closest to your actual location. The Daylight Savings option merely advances the system clock by one hour. It does not cause the system clock to be updated for daylight savings time automatically. - 3Com 3CRWE554G72 | User Guide - Page 77
into the Gateway's memory. The password will remain unchanged. Reset to Factory Default If you want to reset the settings on your Gateway to those that were loaded at the factory, click RESET. You will lose all your configuration changes. The Gateway LAN IP address will revert to 192.168.1.1, and - 3Com 3CRWE554G72 | User Guide - Page 78
5: GATEWAY CONFIGURATION Upgrade Figure 60 Upgrade Screen Status and Logs The Upgrade facility allows you to install on the Gateway any new releases of system software that 3Com may make available. To install new software, you first need to download the software from the 3Com support web site - 3Com 3CRWE554G72 | User Guide - Page 79
your network and Internet connection. (Figure 61) Figure 61 Status Screen Usage Usage displays an approximate count of the traffic since the Gateway was last reset. (Figure 62) The counts are approximate and should be used as a guide only. Contact your ISP for accurate logging information. - 3Com 3CRWE554G72 | User Guide - Page 80
CONFIGURATION Figure 62 Usage Screen Logs Logs will allow you to view both the normal events, and security threats logged by the Gateway. Figure 63 Logs Screen You may be asked to refer to the information on the Status and Logs screens if you contact your supplier for technical support. Support - 3Com 3CRWE554G72 | User Guide - Page 81
Support Figure 64 Support Screen Support/Feedback 81 Selecting the Support option on the main menu displays the support links screen, which contains a list of Internet links that provide information and support concerning the Gateway (Figure 64). Feedback Figure 65 Feedback Screen - 3Com 3CRWE554G72 | User Guide - Page 82
82 CHAPTER 5: GATEWAY CONFIGURATION Selecting the Feedback option displays the Feedback screen and allows you to provide feedback to 3Com on the operation of your Gateway (Figure 65). This screen should not be used to obtain technical support. - 3Com 3CRWE554G72 | User Guide - Page 83
TROUBLESHOOTING that can give you this information. ■ Ensure that you have configured your computer as described in Chapter 3, Setting Up Your Computers. the Gateway to ensure that your computer receives an IP address. ■ When entering the address of the Gateway into your web browser, ensure that - 3Com 3CRWE554G72 | User Guide - Page 84
have entered the correct information into the Gateway configuration screens as required by your Internet Service Provider. Use the "Internet Settings" screen to verify this. ■ For DSL users, check that the PPPoE or PPTP user name, password and service name are correct, if these are required. Only - 3Com 3CRWE554G72 | User Guide - Page 85
Forgotten Password and Reset to Factory Defaults 85 Forgotten Password and Reset to Factory Defaults If you can browse to the Gateway configuration screen but cannot log on because you do not know or have forgotten the password, follow the steps below to reset the Gateway to it's factory default - 3Com 3CRWE554G72 | User Guide - Page 86
Gateway to establish whether this problem exists. ■ Most wireless computer Adapters will scan the channels for the wireless Gateway. If a wireless computer has not located the Gateway then try initiating a search manually if the client software supports this feature or manually set the channel on - 3Com 3CRWE554G72 | User Guide - Page 87
" below. ■ If the Power Adapter OK LED is lit but the Power LED is unlit then there may be a fault with your unit. Contact 3Com Technical Support. ■ Check that you are using the correct power adapter for your Gateway. You should only use the power adapter supplied with your Gateway. Replacement - 3Com 3CRWE554G72 | User Guide - Page 88
on the accompanying CD-ROM or 3Com web site (http://www.3com.com) and upload it to the Gateway to see if this clears the fault (refer to "Recovering from Corrupted Software" below). If this does not fix the problem, contact your supplier for further advice. ■ During normal operation, you may - 3Com 3CRWE554G72 | User Guide - Page 89
on 3Com's Web site at: www.3com.com. 1 Remove power from the Gateway and disconnect the Cable/DSL modem and all your computers, except for the one computer with the software image. 2 You will need to reconfigure this computer with the following static IP address information: ■ IP address: 192 - 3Com 3CRWE554G72 | User Guide - Page 90
VPN hosts on your LAN that clients elsewhere on the Internet can connect to, but this is not a recommended configuration. Where can I download software updates for the Gateway? Updates to the Gateway software are posted on the 3Com support web site, accessible by visiting: http://www.3com.com What - 3Com 3CRWE554G72 | User Guide - Page 91
Frequently Asked Questions 91 is a database of technical information covering all 3Com products. It is updated daily with information from 3Com technical support services, and it is available 24 hours a day, 7 days a week. - 3Com 3CRWE554G72 | User Guide - Page 92
92 CHAPTER 6: TROUBLESHOOTING - 3Com 3CRWE554G72 | User Guide - Page 93
A USING DISCOVERY Running the Discovery Application 3Com provides a user friendly Discovery application for detecting the Gateway on the network. Windows Installation (95/98/2000/Me/NT) 1 Insert the Gateway CD-ROM in the CD- - 3Com 3CRWE554G72 | User Guide - Page 94
94 APPENDIX A: USING DISCOVERY Figure 67 Discovered Gateway Screen 3 Figure 68 shows an example Discovered Devices screen. Highlight the Wireless Cable/DSL Gateway by clicking on it, and press Next. Figure 68 Discovery Finish Screen 4 Click on Finish to launch a web browser and display the login - 3Com 3CRWE554G72 | User Guide - Page 95
the network, the Gateway must be correctly configured with the following IP information: ■ An IP address ■ A Subnet Mask IP Addresses and Subnet Masks Each device on your network must have a unique IP address to operate correctly. An IP address identifies the address of the device to which data is - 3Com 3CRWE554G72 | User Guide - Page 96
mask of '255.255.255.0'. See Table 4 for an example about how a network with three computers and a Gateway might be configured. Table 4 IP Addressing and Subnet Masking Device PC 1 PC 2 PC 3 Gateway IP Address 192.168.100.8 192.168.100.33 192.168.100.188 192.168.100.72 Subnet Mask 255.255.255 - 3Com 3CRWE554G72 | User Guide - Page 97
large numbers of users on them. Static Addressing You must enter an IP Address and the subnet mask manually on every device. Using a static IP and subnet mask means the address is permanently fixed. Auto-IP Addressing Network devices use automatic IP addressing if they are configured to acquire an - 3Com 3CRWE554G72 | User Guide - Page 98
subnet of 169.254.x.x (with a subnet mask of 255.255.0.0). If two devices allocate themselves the same address, the conflict is detected and one of the devices allocates itself a new address. Automatic IP addressing support was introduced by Microsoft in the Windows 98 operating system and is also - 3Com 3CRWE554G72 | User Guide - Page 99
Spectrum (DSSS) Transmission rate: 54Mbps, automatic fallback to 48, 36, 24, 18, 12, or 6 Mbps Maximum channels: 14 Range up to 304.8m (1000ft) Frequency: (US/Canada/Europe) 2.400-2.4835 GHz Sensitivity: 6, 12, 18, 24, 36, 48 Mbps: -85 dBm; 54 Mbps -66 dBm typical Modulation: CCK, BPSK, QPSK, OFDM - 3Com 3CRWE554G72 | User Guide - Page 100
100 APPENDIX C: TECHNICAL SPECIFICATIONS Encryption: 40/64 bit WEP, 128 bit WEP, WPA Maximum clients: 128 O/P Power 18dBm Operating Temperature 0 °C to 40 °C (32 °F to 105 °F) Power 7VA, 23.9 BThU/hr Humidity 0 % to 90 % (non-condensing) humidity Dimensions ■ Width = 220 mm (8.7 in.) ■ Depth = 135 - 3Com 3CRWE554G72 | User Guide - Page 101
: EN 60068 (IEC 68) *See "FCC Statement" on page 121 for conditions of operation. System Requirements Operating Systems The Gateway will support the following Operating Systems: ■ Windows 95/98 ■ Windows NT 4.0 ■ Windows ME ■ Windows 2000 ■ Windows XP ■ Mac OS 8.5 or higher ■ Unix Ethernet - 3Com 3CRWE554G72 | User Guide - Page 102
102 APPENDIX C: TECHNICAL SPECIFICATIONS - 3Com 3CRWE554G72 | User Guide - Page 103
the equipment to which it is connected also operates under SELV conditions. WARNING: There are no user-replaceable fuses or user-serviceable parts inside the Gateway. If you have a physical problem with the unit that cannot be solved with problem solving actions in this guide, contact your supplier. - 3Com 3CRWE554G72 | User Guide - Page 104
nicht gestattet. Erkundigen Sie sich bei den zuständigen Stellen, ob die Verwendung von Funkfrequenz in dem Bereich, in dem der Bluetooth Access Point eingesetzt werden soll, erlaubt ist. VORSICHT: Bei der Installation und beim Ausbau des Geräts ist mit höchster Vorsicht vorzugehen. VORTSICHT - 3Com 3CRWE554G72 | User Guide - Page 105
importantes de sécurité VORSICHT: Es sind keine von dem Benutzer zu ersetzende oder zu wartende Teile in dem Gerät vorhanden. Wenn Sie ein Problem mit dem Gateway haben, das nicht mittels der Fehleranalyse in dieser Anleitung behoben werden kann, setzen Sie sich mit Ihrem Lieferanten in Verbindung - 3Com 3CRWE554G72 | User Guide - Page 106
problème physique avec le moyeu qui ne peut pas être résolu avec les actions de la résolution des problèmes dans ce guide, contacter votre fournisseur. AVERTISSEMENT: Débranchez l'adaptateur électrique avant de retirer cet appareil. AVERTISSEMENT: Ports RJ-45. Il s'agit de prises femelles blindées - 3Com 3CRWE554G72 | User Guide - Page 107
E END USER SOFTWARE LICENSE AGREEMENT 3Com Corporation END USER SOFTWARE LICENSE AGREEMENT YOU SHOULD CAREFULLY READ THE FOLLOWING TERMS AND CONDITIONS BEFORE DOWNLOADING, INSTALLING AND USING THIS PRODUCT, THE USE OF WHICH IS LICENSED BY 3COM CORPORATION ("3COM") TO ITS CUSTOMERS FOR THEIR USE - 3Com 3CRWE554G72 | User Guide - Page 108
rights as are provided in this Agreement, which is 3Com's standard commercial license for the Software. Technical data is provided with limited rights only as Software are as stated on the Limited Warranty Card or in the product manual, whether in paper or electronic form, accompanying the Software - 3Com 3CRWE554G72 | User Guide - Page 109
Dynamic IP (Clone MAC) Dynamic IP (Hostname) Cable modem ISP, non-hostname based. Need to clone the MAC address in software built in and you can remove it from your PC. You will need to enter the user name and password that your ISP provided to you in the PPPoE page of the Gateway. Leave the service - 3Com 3CRWE554G72 | User Guide - Page 110
IP information from ISP in the Static IP address section of the Internet Settings page. CableSpeed, Cnet, Direct Link, Drizzle, DSL Extreme, Earthlink Wireless, Fast Point assigns specific IP information which needs to be entered on the "Fixed IP" page of the Gateway. Cox Cable, Sprint, US Cable, - 3Com 3CRWE554G72 | User Guide - Page 111
messages to the Ethernet LAN. Ad Hoc mode Ad Hoc mode is a configuration supported by most wireless clients. It is used to connect a peer to peer network together without the use of an access point. It offers lower performance than infrastructure mode, which is the mode the gateway uses. (see also - 3Com 3CRWE554G72 | User Guide - Page 112
is connected to your network. DHCP Dynamic Host Configuration Protocol. This protocol automatically assigns an IP address for every computer on your network. Windows 95, Windows 98 and Windows NT 4.0 contain software that assigns IP addresses to workstations on a network. These assignments are - 3Com 3CRWE554G72 | User Guide - Page 113
IP addresses, so that when a domain name is requested (as in typing "3com.com" into your Internet browser), the user is sent to the proper IP address. The DNS server address powerful level of encryption than 40/64 bit. ESSID Extended Service Set Identifier. The ESSID is a unique identifier for your - 3Com 3CRWE554G72 | User Guide - Page 114
mode Infrastructure mode is the wireless configuration supported by the Gateway. You will need to ensure all of your clients are set up to use infrastructure mode in order for them to communicate with the Access Point built into your Gateway. (see also Ad Hoc mode) IP Internet Protocol. IP - 3Com 3CRWE554G72 | User Guide - Page 115
IP address. The NAT capability of the Gateway allows you to access the Internet from any computer on your home network without having to purchase more IP addresses , sequencing and error control. PPPoE Point-to-Point Protocol over Ethernet. Point-to-Point Protocol is a method of data transmission - 3Com 3CRWE554G72 | User Guide - Page 116
mask, which may be a part of the TCP/IP information provided by your ISP, is a set of four numbers configured like an IP address. It is used to create IP address numbers used only within a particular network (as opposed to valid IP address numbers recognized by the Internet, which must assigned by - 3Com 3CRWE554G72 | User Guide - Page 117
that is wirelessly connected to your wireless network Wireless LAN Service Another term for ESSID (Extended Service Set Identifier) Area Wizard A Windows application that automates a procedure such as installation or configuration. WLAN Wireless Local Area Network. A WLAN is a group of computers - 3Com 3CRWE554G72 | User Guide - Page 118
118 GLOSSARY - 3Com 3CRWE554G72 | User Guide - Page 119
INDEX A Access Rights 69 Addresses IP 95 Administration Password 32, 43 Automatic Addressing 97 C Cable Specifications 101 Channels 121 Clone MAC address 60 Configuration backup 77 restore 77 Conventions notice icons, About This Guide 8 text, About This Guide 8 Country Selection 30 D DHCP 35, 38, 45 - 3Com 3CRWE554G72 | User Guide - Page 120
74 Reset to Factory Defaults 77, 85 Restart 75 S Safety Information 19 Security 73 Setup Wizard 29, 44 Special Applications 65 Specifications technical 99 Static Addressing 97 Static IP Address 57, 59 Status 79 Subnet Mask 36, 38, 95 Summary 40 Support Information 80 Support Links 81 T TCP/IP 25 - 3Com 3CRWE554G72 | User Guide - Page 121
REGULATORY NOTICES FOR THE WIRELESS 11G CABLE/DSL GATEWAY Channels FCC Statement Use of the Wireless Cable/DSL Gateway is only authorized for the channels approved by each country. For proper installation, login to the management interface and select your country from the drop down list. Table 5 - 3Com 3CRWE554G72 | User Guide - Page 122
instructions, may cause harmful interference to radio communications. However, there is no guarantee that interference will not occur in a particular installation. Information to the User Resolve Radio-TV Interference Problems This booklet is available : Description: 3CRWE554G72 Wireless 11g Cable - 3Com 3CRWE554G72 | User Guide - Page 123
Exposure to Radio Frequency Radiation: The radiated output power of the 3Com OfficeConnect Wireless Cable/DSL Gateway is far below the FCC radio during normal operation is minimized. The distance between the antennas and the user should not be less than 20 cm. This product complies with the European - 3Com 3CRWE554G72 | User Guide - Page 124
In order to comply with the FCC RF exposure requirements, the 3Com OfficeConnect Wireless Cable/DSL Gateway must only be installed with approved antennas any nearby persons. CAUTION: To prevent radio interference to the licensed service, this device is intended to be operated indoors and away from - 3Com 3CRWE554G72 | User Guide - Page 125
- 3Com 3CRWE554G72 | User Guide - Page 126
, Santa Clara, CA 95052-8145, USA. To learn more about 3Com products and services, visit our World Wide Web site at www.3com.com Copyright © 2003 3Com Corporation. All rights reserved. 3Com and OfficeConnect are registered trademarks of 3Com Corporation. All other company and product names may be
-
 1
1 -
 2
2 -
 3
3 -
 4
4 -
 5
5 -
 6
6 -
 7
7 -
8
-
9
-
10
-
11
-
12
-
13
-
14
-
15
-
16
-
17
-
18
-
19
-
20
-
21
-
22
-
23
-
24
-
25
-
26
-
27
-
28
-
29
-
30
-
31
-
32
-
33
-
34
-
35
-
36
-
37
-
38
-
39
-
40
-
41
-
42
-
43
-
44
-
45
-
46
-
47
-
48
-
49
-
50
-
51
-
52
-
53
-
54
-
55
-
56
-
57
-
58
-
59
-
60
-
61
-
62
-
63
-
64
-
65
-
66
-
67
-
68
-
69
-
70
-
71
-
72
-
73
-
74
-
75
-
76
-
77
-
78
-
79
-
80
-
81
-
82
-
83
-
84
-
85
-
86
-
87
-
88
-
89
-
90
-
91
-
92
-
93
-
94
-
95
-
96
-
97
-
98
-
99
-
100
-
101
-
102
-
103
-
104
-
105
-
106
-
107
-
108
-
109
-
110
-
111
-
112
-
113
-
114
-
115
-
116
-
117
-
118
-
119
-
120
-
121
-
122
-
123
-
124
-
125
-
126
 |
 |

Part No. DUA0055-4AAA01
Rev. 01
Published July 2003
OfficeConnect
®
Wireless 11g Cable/DSL Gateway
User Guide
3CRWE554G72