3Ware 9550SXU-16ML User Guide - Page 113
Remove Unit, Computer Management > Disk Management. In the Computer
 |
UPC - 693494971606
View all 3Ware 9550SXU-16ML manuals
Add to My Manuals
Save this manual to your list of manuals |
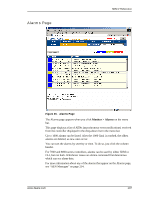
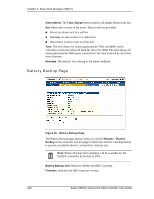
Page 113 highlights
3DM 2 Reference After you have specified changes to the unit, the Unit Maintenance screen reflects your changes and shows the percentage of migration completed. While the unit is migrating, you can still access the unit as normal but the performance will be lower. You can adjust the I/O rate with the radio buttons on the Controller Settings page. For more information, see "About Migration" on page 174. Remove Unit. Removes a selected unit and allows you to unplug the drives and move the unit to another controller. the data on the unit remain intact. Caution: Before you click Remove Unit, make sure the unit you are removing is unmounted and no I/Os are being issued. (For example, make sure you are not copying files to the unit, and make sure that there are no applications with open files on that unit.) If a unit is not unmounted and you remove it, it is the equivalent of physically yanking a hard drive out from under the operating system. Resulting behavior depends on which operating system you are using and what kind of I/O is being done, however you will typically see really bad results, bad errors, and most likely a reset of the controller or a system hang. To unmount a unit under windows, use Administrative Tools > Computer Management > Disk Management. In the Computer Management window, right-click on the partition and Remove the logical drive letter associated with the unit. To unmount a unit under Linux, unmount the mount point to where the RAID unit is mounted. For example, if you want to remove unit 0 and you know that 0 corresponds to /dev/sdb, you should unmount all partitions for sdbx (where x is the number of the partition). umount /dev/sdbx For FreeBSD, the command would be umount /dev/twedx When you click Remove Unit, you will be asked to confirm that you want to proceed. When you confirm the removal, the unit number and information will be removed from 3DM. (Units created in the future can reclaim this unit number.) The operating system is notified that the unit was removed. In Linux the device node associated with this unit is removed. In Windows the Device Manager will reflect the changes under the disk drives icon. Information about the unit remains intact on the drives. This allows the drive or drives to be reassembled into a unit again on this controller, or if moved to another controller. www.3ware.com 103
-
 1
1 -
2
-
3
-
4
-
5
-
6
-
7
-
8
-
9
-
10
-
11
-
12
-
13
-
14
-
15
-
16
-
17
-
18
-
19
-
20
-
21
-
22
-
23
-
24
-
25
-
26
-
27
-
28
-
29
-
30
-
31
-
32
-
33
-
34
-
35
-
36
-
37
-
38
-
39
-
40
-
41
-
42
-
43
-
44
-
45
-
46
-
47
-
48
-
49
-
50
-
51
-
52
-
53
-
54
-
55
-
56
-
57
-
58
-
59
-
60
-
61
-
62
-
63
-
64
-
65
-
66
-
67
-
68
-
69
-
70
-
71
-
72
-
73
-
74
-
75
-
76
-
77
-
78
-
79
-
80
-
81
-
82
-
83
-
84
-
85
-
86
-
87
-
88
-
89
-
90
-
91
-
92
-
93
-
94
-
95
-
96
-
97
-
98
-
99
-
100
-
101
-
102
-
103
-
104
-
105
-
106
-
107
-
 108
108 -
 109
109 -
 110
110 -
 111
111 -
 112
112 -
 113
113 -
 114
114 -
 115
115 -
 116
116 -
 117
117 -
 118
118 -
119
-
120
-
121
-
122
-
123
-
124
-
125
-
126
-
127
-
128
-
129
-
130
-
131
-
132
-
133
-
134
-
135
-
136
-
137
-
138
-
139
-
140
-
141
-
142
-
143
-
144
-
145
-
146
-
147
-
148
-
149
-
150
-
151
-
152
-
153
-
154
-
155
-
156
-
157
-
158
-
159
-
160
-
161
-
162
-
163
-
164
-
165
-
166
-
167
-
168
-
169
-
170
-
171
-
172
-
173
-
174
-
175
-
176
-
177
-
178
-
179
-
180
-
181
-
182
-
183
-
184
-
185
-
186
-
187
-
188
-
189
-
190
-
191
-
192
-
193
-
194
-
195
-
196
-
197
-
198
-
199
-
200
-
201
-
202
-
203
-
204
-
205
-
206
-
207
-
208
-
209
-
210
-
211
-
212
-
213
-
214
-
215
-
216
-
217
-
218
-
219
-
220
-
221
-
222
-
223
-
224
-
225
-
226
-
227
-
228
-
229
-
230
-
231
-
232
-
233
-
234
-
235
-
236
-
237
-
238
-
239
-
240
-
241
-
242
-
243
-
244
-
245
-
246
-
247
-
248
-
249
-
250
-
251
-
252
-
253
-
254
-
255
-
256
-
257
-
258
-
259
-
260
 |
 |