3Ware 9550SXU-16ML User Guide - Page 145
Creating a Hot Spare, Specifying a Hot Spare through 3DM
 |
UPC - 693494971606
View all 3Ware 9550SXU-16ML manuals
Add to My Manuals
Save this manual to your list of manuals |
Page 145 highlights
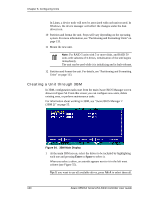
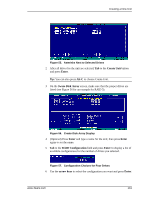
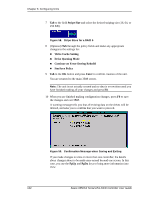
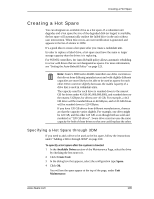
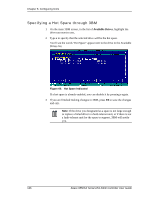
Creating a Hot Spare Creating a Hot Spare You can designate an available drive as a hot spare. If a redundant unit degrades and a hot spare the size of the degraded disk (or larger) is available, the hot spare will automatically replace the failed drive in the unit without user intervention. When this occurs, an event notification is generated and appears in the list of alarms in 3DM. It's a good idea to create a hot spare after you create a redundant unit. In order to replace a failed drive, a hot spare must have the same or larger storage capacity than the drives it is replacing. For 9550SX controllers, the Auto-Rebuild policy allows automatic rebuilding to occur with drives that are not designated as spares. For more information, see "Setting the Auto-Rebuild Policy" on page 123. Note: 3ware's 9000 series RAID controllers use drive coercion so that drives from differing manufacturers and with slightly different capacities are more likely to be able to be used as spares for each other. Drive coercion slightly decreases the usable capacity of a drive that is used in redundant units. The capacity used for each drive is rounded down to the nearest GB for drives under 45 GB (45,000,000,000), and rounded down to the nearest 5 GBytes for drives over 45 GB. For example, a 44.3 GB drive will be rounded down to 44 GBytes, and a 123 GB drives will be rounded down to 120 GBytes. If you have 120 GB drives from different manufacturers, chances are that the capacity varies slightly. For example, one drive might be 122 GB, and the other 123 GB, even though both are sold and marketed as "120 GB drives". 3ware drive coercion uses the same capacity for both of these drives so that one could replace the other. Specifying a Hot Spare through 3DM If you need to add a drive to be used as the hot spare, follow the instructions under "Adding a Drive through 3DM" on page 160. To specify a hot spare after the system is booted 1 In the Available Drives section of the Maintenance Page, select the drive by checking the box next to it. 2 Click Create Unit. 3 In the dialog box that appears, select the configuration type Spare. 4 Click Ok. You will see the spare appear at the top of the page, under Unit Maintenance. www.3ware.com 135
-
 1
1 -
2
-
3
-
4
-
5
-
6
-
7
-
8
-
9
-
10
-
11
-
12
-
13
-
14
-
15
-
16
-
17
-
18
-
19
-
20
-
21
-
22
-
23
-
24
-
25
-
26
-
27
-
28
-
29
-
30
-
31
-
32
-
33
-
34
-
35
-
36
-
37
-
38
-
39
-
40
-
41
-
42
-
43
-
44
-
45
-
46
-
47
-
48
-
49
-
50
-
51
-
52
-
53
-
54
-
55
-
56
-
57
-
58
-
59
-
60
-
61
-
62
-
63
-
64
-
65
-
66
-
67
-
68
-
69
-
70
-
71
-
72
-
73
-
74
-
75
-
76
-
77
-
78
-
79
-
80
-
81
-
82
-
83
-
84
-
85
-
86
-
87
-
88
-
89
-
90
-
91
-
92
-
93
-
94
-
95
-
96
-
97
-
98
-
99
-
100
-
101
-
102
-
103
-
104
-
105
-
106
-
107
-
108
-
109
-
110
-
111
-
112
-
113
-
114
-
115
-
116
-
117
-
118
-
119
-
120
-
121
-
122
-
123
-
124
-
125
-
126
-
127
-
128
-
129
-
130
-
131
-
132
-
133
-
134
-
135
-
136
-
137
-
138
-
139
-
 140
140 -
 141
141 -
 142
142 -
 143
143 -
 144
144 -
 145
145 -
 146
146 -
 147
147 -
 148
148 -
 149
149 -
 150
150 -
151
-
152
-
153
-
154
-
155
-
156
-
157
-
158
-
159
-
160
-
161
-
162
-
163
-
164
-
165
-
166
-
167
-
168
-
169
-
170
-
171
-
172
-
173
-
174
-
175
-
176
-
177
-
178
-
179
-
180
-
181
-
182
-
183
-
184
-
185
-
186
-
187
-
188
-
189
-
190
-
191
-
192
-
193
-
194
-
195
-
196
-
197
-
198
-
199
-
200
-
201
-
202
-
203
-
204
-
205
-
206
-
207
-
208
-
209
-
210
-
211
-
212
-
213
-
214
-
215
-
216
-
217
-
218
-
219
-
220
-
221
-
222
-
223
-
224
-
225
-
226
-
227
-
228
-
229
-
230
-
231
-
232
-
233
-
234
-
235
-
236
-
237
-
238
-
239
-
240
-
241
-
242
-
243
-
244
-
245
-
246
-
247
-
248
-
249
-
250
-
251
-
252
-
253
-
254
-
255
-
256
-
257
-
258
-
259
-
260
 |
 |