3Ware 9550SXU-16ML User Guide - Page 194
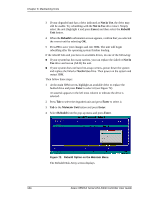
Not in Use, Enter, Rebuild, Not In, Maintain Unit, The Rebuild Disk Array screen displays.
 |
UPC - 693494971606
View all 3Ware 9550SXU-16ML manuals
Add to My Manuals
Save this manual to your list of manuals |
Page 194 highlights
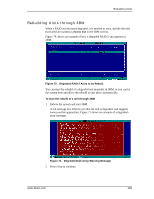
Chapter 9. Maintaining Units 3 If your degraded unit has a drive indicated as Not in Use, the drive may still be usable. Try rebuilding with the Not in Use drive intact. Simply select the unit (highlight it and press Enter) and then select the Rebuild Unit button. 4 When the Rebuild confirmation screen appears, confirm that you selected the correct unit by selecting OK. 5 Press F8 to save your changes and exit 3BM. The unit will begin rebuilding after the operating system finishes loading. If the rebuild fails and you have no available drives, do one of the following: „ If your system has hot-swap carriers, you can replace the failed or Not In Use drive and rescan (Alt-R) the unit. „ If your system does not have hot-swap carriers, power down the system and replace the failed or Not In Use drive. Then power on the system and restart 3BM. Then follow these steps: 1 At the main 3BM screen, highlight an available drive to replace the faulted drive and press Enter to select it (see Figure 72). An asterisk appears in the left most column to indicate the drive is selected. 2 Press Tab to select the degraded unit and press Enter to select it. 3 Tab to the Maintain Unit button and press Enter. 4 Select Rebuild from the pop-up menu and press Enter. Figure 72. Rebuild Option on the Maintain Menu The Rebuild Disk Array screen displays. 184 3ware 9550SX Serial ATA RAID Controller User Guide
-
 1
1 -
2
-
3
-
4
-
5
-
6
-
7
-
8
-
9
-
10
-
11
-
12
-
13
-
14
-
15
-
16
-
17
-
18
-
19
-
20
-
21
-
22
-
23
-
24
-
25
-
26
-
27
-
28
-
29
-
30
-
31
-
32
-
33
-
34
-
35
-
36
-
37
-
38
-
39
-
40
-
41
-
42
-
43
-
44
-
45
-
46
-
47
-
48
-
49
-
50
-
51
-
52
-
53
-
54
-
55
-
56
-
57
-
58
-
59
-
60
-
61
-
62
-
63
-
64
-
65
-
66
-
67
-
68
-
69
-
70
-
71
-
72
-
73
-
74
-
75
-
76
-
77
-
78
-
79
-
80
-
81
-
82
-
83
-
84
-
85
-
86
-
87
-
88
-
89
-
90
-
91
-
92
-
93
-
94
-
95
-
96
-
97
-
98
-
99
-
100
-
101
-
102
-
103
-
104
-
105
-
106
-
107
-
108
-
109
-
110
-
111
-
112
-
113
-
114
-
115
-
116
-
117
-
118
-
119
-
120
-
121
-
122
-
123
-
124
-
125
-
126
-
127
-
128
-
129
-
130
-
131
-
132
-
133
-
134
-
135
-
136
-
137
-
138
-
139
-
140
-
141
-
142
-
143
-
144
-
145
-
146
-
147
-
148
-
149
-
150
-
151
-
152
-
153
-
154
-
155
-
156
-
157
-
158
-
159
-
160
-
161
-
162
-
163
-
164
-
165
-
166
-
167
-
168
-
169
-
170
-
171
-
172
-
173
-
174
-
175
-
176
-
177
-
178
-
179
-
180
-
181
-
182
-
183
-
184
-
185
-
186
-
187
-
188
-
 189
189 -
 190
190 -
 191
191 -
 192
192 -
 193
193 -
 194
194 -
 195
195 -
 196
196 -
 197
197 -
 198
198 -
 199
199 -
200
-
201
-
202
-
203
-
204
-
205
-
206
-
207
-
208
-
209
-
210
-
211
-
212
-
213
-
214
-
215
-
216
-
217
-
218
-
219
-
220
-
221
-
222
-
223
-
224
-
225
-
226
-
227
-
228
-
229
-
230
-
231
-
232
-
233
-
234
-
235
-
236
-
237
-
238
-
239
-
240
-
241
-
242
-
243
-
244
-
245
-
246
-
247
-
248
-
249
-
250
-
251
-
252
-
253
-
254
-
255
-
256
-
257
-
258
-
259
-
260
 |
 |
