3Ware 9550SXU-16ML User Guide - Page 36
Leaving Individual Drives as JBODs, Checking the Motherboard Boot Sequence
 |
UPC - 693494971606
View all 3Ware 9550SXU-16ML manuals
Add to My Manuals
Save this manual to your list of manuals |
Page 36 highlights
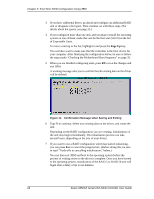
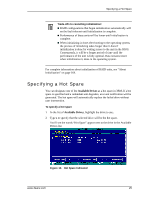
Chapter 3. First-Time RAID Configuration Using 3BM If a hot spare is already enabled, you can disable it by following the same process. Note: In order to replace a failed drive in a degraded unit, a hot spare drive must have the same or larger storage capacity than the failed drive. Leaving Individual Drives as JBODs By default, if you leave individual drives unconfigured (JBODs), they will not be available to the operating system. If you want to be able to use individual drives, configure them as single-disk units. If you have JBODs attached to an 8000 controller that you want to use with the 9000 controller, see "Moving Units from an 8000 Controller to a 9000 Controller" on page 157. Checking the Motherboard Boot Sequence Using your computer's Setup utility, ensure that it shows the appropriate boot device. After installing the 3ware 9000 controller in your system, go into the BIOS for your computer system to check and change the boot order. This is necessary because most systems automatically change the boot order when they detect a newly installed controller and device. Refer to the documentation for your system for information about starting the system BIOS. „ If the OS is already installed on a unit connected to the system, be sure that device precedes the 3ware RAID controller in the boot sequence. If you have other disks installed on the motherboard, the 3ware RAID controller should precede them in boot order. „ If you will install your OS on a disk or unit attached to the 3ware RAID controller, specify the controller as the boot device. (Note that if you configured more than one unit, the drive(s) specified as Unit 0 will be treated as the boot disk.) 26 3ware 9550SX Serial ATA RAID Controller User Guide
-
 1
1 -
2
-
3
-
4
-
5
-
6
-
7
-
8
-
9
-
10
-
11
-
12
-
13
-
14
-
15
-
16
-
17
-
18
-
19
-
20
-
21
-
22
-
23
-
24
-
25
-
26
-
27
-
28
-
29
-
30
-
 31
31 -
 32
32 -
 33
33 -
 34
34 -
 35
35 -
 36
36 -
 37
37 -
 38
38 -
 39
39 -
 40
40 -
 41
41 -
42
-
43
-
44
-
45
-
46
-
47
-
48
-
49
-
50
-
51
-
52
-
53
-
54
-
55
-
56
-
57
-
58
-
59
-
60
-
61
-
62
-
63
-
64
-
65
-
66
-
67
-
68
-
69
-
70
-
71
-
72
-
73
-
74
-
75
-
76
-
77
-
78
-
79
-
80
-
81
-
82
-
83
-
84
-
85
-
86
-
87
-
88
-
89
-
90
-
91
-
92
-
93
-
94
-
95
-
96
-
97
-
98
-
99
-
100
-
101
-
102
-
103
-
104
-
105
-
106
-
107
-
108
-
109
-
110
-
111
-
112
-
113
-
114
-
115
-
116
-
117
-
118
-
119
-
120
-
121
-
122
-
123
-
124
-
125
-
126
-
127
-
128
-
129
-
130
-
131
-
132
-
133
-
134
-
135
-
136
-
137
-
138
-
139
-
140
-
141
-
142
-
143
-
144
-
145
-
146
-
147
-
148
-
149
-
150
-
151
-
152
-
153
-
154
-
155
-
156
-
157
-
158
-
159
-
160
-
161
-
162
-
163
-
164
-
165
-
166
-
167
-
168
-
169
-
170
-
171
-
172
-
173
-
174
-
175
-
176
-
177
-
178
-
179
-
180
-
181
-
182
-
183
-
184
-
185
-
186
-
187
-
188
-
189
-
190
-
191
-
192
-
193
-
194
-
195
-
196
-
197
-
198
-
199
-
200
-
201
-
202
-
203
-
204
-
205
-
206
-
207
-
208
-
209
-
210
-
211
-
212
-
213
-
214
-
215
-
216
-
217
-
218
-
219
-
220
-
221
-
222
-
223
-
224
-
225
-
226
-
227
-
228
-
229
-
230
-
231
-
232
-
233
-
234
-
235
-
236
-
237
-
238
-
239
-
240
-
241
-
242
-
243
-
244
-
245
-
246
-
247
-
248
-
249
-
250
-
251
-
252
-
253
-
254
-
255
-
256
-
257
-
258
-
259
-
260
 |
 |