AIWA CX-NMT50 Operating Instructions
AIWA CX-NMT50 Manual
 |
View all AIWA CX-NMT50 manuals
Add to My Manuals
Save this manual to your list of manuals |
AIWA CX-NMT50 manual content summary:
- AIWA CX-NMT50 | Operating Instructions - Page 1
87-NFT-910-01 970327 BKY-U-0 f For assistance and information call toll free I-800-BUY-AIWA (United States and Puerto Rico) \ > ) ili?i!i DIGITAL AUDIO - AIWA CX-NMT50 | Operating Instructions - Page 2
uses, and can radiate radio frequency energy and, if not installed and used in accordance with the instructions . 7 Condensation - Moisture may form on the CD pickup lens when: - The unit is moved from a outlet, please call a qualified service technician to service or replace the outlet. To avoid - AIWA CX-NMT50 | Operating Instructions - Page 3
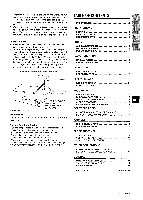
l PREPARATIONS SETTING UP 3 REMOTE CONTROL m.......5 BEFORE OPERATION 6I SOUND AUDIO ADJUSTMENTS GRAPHIC EQUALIZER m m DSP SURROUND SYSTEM 7 RADIO RECEPTION MANUAL TUNING s 8 PRESETTING STATIONS 8I CD PLAYING BASIC OPERATIONS 9 PROGRAMMED PLAY ICI TAPE PLAYBACK BASIC OPERATIONS - AIWA CX-NMT50 | Operating Instructions - Page 4
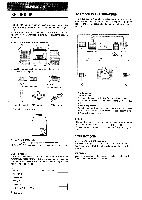
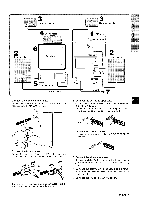
CX-NMT50 Compact disc stereo cassette receiver @ SX-NA54 Front speakers I TS-~35 (NSX-MT55only) 1 6) SX-R21O Surround speakers SX-C400 Center speaker Remote control AM antenna Operating Instructions . Please refer to them when you contact your Aiwa dealer in case of difficulty. q No sound - AIWA CX-NMT50 | Operating Instructions - Page 5
the audio output jack of the video equipment with an optional audio connecting cord, 6 Connect the Television to the video equipment. Refer to the Operating Instructions of the connected equipment for details. 7 Connect the AC cord to an AC outlet. ENGLISH 4 - AIWA CX-NMT50 | Operating Instructions - Page 6
rails. q Do not bring the AM antenna near other optional equipment, the stereo system itself, the AC cord or speaker cords, since noise will be picked new ones. Using the remote control The instructions in this manual refer mainly to the buttons on the main unit. Buttons on the remote control with - AIWA CX-NMT50 | Operating Instructions - Page 7
the DEMO button again. Illumination guides Whenewr the AC cord is volume level is automatically set to 16 when the power is turned off with the volume level set to 17 or more. To change the Ieftiright balance Press the MANUAL SELECT button on the remote used for a disc or tape in which low frequency - AIWA CX-NMT50 | Operating Instructions - Page 8
the selected button again. SUR OFF is displayed. While SURROUND mode is off, no sound is heard from the surround speakers. To adjust the volume of the surround speakers Press the MANUAL SELECT button twice on the remote control. "SUR is displayed for 2 seconds. Press the - DOWN or UP ~ button on the - AIWA CX-NMT50 | Operating Instructions - Page 9
manually, press the M DOWN or M U13button, q The Auto Search may not stop at stations with very weak signals. When am FM stereo broadcast contains noise Press the MONO TUNER button on the remote have already been stored. PRESET NUMBER TUNING Use the remote control to select the preset number directly - AIWA CX-NMT50 | Operating Instructions - Page 10
DIRECT PLAY buttons. The selected disc is played once. To play with the remote control Press the DISC DIRECT PLAY button, then press one of the numbered buttons power is also turned on. To check the remaining time Press the CD EDIT/CHECK button during play. The amount of time remaining until all - AIWA CX-NMT50 | Operating Instructions - Page 11
repeatedly until c& appears on the display. During programmed play, you cannot perform random play, check the remaining time, and select a disc or track. Use the remote control 1 Press the PRGM button twice in stop mode. The PRGM indicator lights up on the display. PRGM * When the PRGM button is - AIWA CX-NMT50 | Operating Instructions - Page 12
mode to play back one or both sides. q Use Type I (normal), Type 11(high/CrOz) or Type IV (metal) tapes for playback. 7 Press the TAPE button and press the 4 EJECT mark to open the cassette holder. When tapes are loaded in both decks Press the TAPE button first to select a deck. The selected deck - AIWA CX-NMT50 | Operating Instructions - Page 13
of the next track starts. Music sensor function may not be cassette tapes q To prevent accidental erasure, break off the plastic tabs on the cassette tape tape with a pencil or similar tool before use. Slack tape may break or jam in the mechanism, "1 - u After playback on one deck finishes, the tape - AIWA CX-NMT50 | Operating Instructions - Page 14
BASIC RECORDING This section explains how to record from the tuner, CD player, or external equipment. INSERTING BLANK SPACES Insertion of 4-second blank spaces enables you to activate the Music Sensor function. (Applicable when the source is TUNER, VIDEO/AUX or MD.) 1 Press the . REC/REC MUTE - AIWA CX-NMT50 | Operating Instructions - Page 15
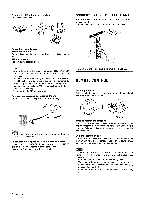
DUBIBING A TAPE MANUALLY DUBBING THE WHOLE TAPE 1,,3 s 2 CGo A c - /-.:.:. amoca ,~D- .' '% '. j? ..'-. ( .. I., ;&&;A?. j - .. ,.,/ .--_-. Q -,..' .. 2 m q Set the tape to the point where recording will start, q The raverse mode is automatically set to =. Note ihat recording will be - AIWA CX-NMT50 | Operating Instructions - Page 16
tape. q The numbered buttons on the remote control are also available to designate the tape length. Example: When using a 60-minute tape, press the 6 and O buttons, Tape length Tape order of the programmed track numbers Before recording, press the CD EDIT/CHECK button to select side A or B, and - AIWA CX-NMT50 | Operating Instructions - Page 17
and program the tracks for side B. After confirming B on the display, repeat step 5. Tape side B (reverse side) 1 Programmed edit function enables CD recording while checking the remaining time on each side of the tape as the tracks are programmed. The programmed edit recording will not start from - AIWA CX-NMT50 | Operating Instructions - Page 18
q Make sure the laser disc, video tape, etc., support no Immv s.mcmm. ADJUSTING SPEAKER LEVEL apparent loudness from each channel. Use the remote control. 1 Press the UP M button to adjust the volume of the center or surround speakers to MANUAL SELECT (TEST) button again to stop the noise signal. - AIWA CX-NMT50 | Operating Instructions - Page 19
right speakers create the stereo effect. The center press the MANUAL SELECT (TEST) button on the remote control repeatedly or UP FM button on the remote control to adjust the volume. a! ADDITIONAL DOLBY PRO LOGIC MODES vvhen using software without DO~OOL~ SURROUNDI mark. In this case, use the - AIWA CX-NMT50 | Operating Instructions - Page 20
along to music sources. Use microphones with volume and the echo volume are set to off. Recommended microphones The use of unidirectional type microphones is recommended to prevent howling. Contact your local Aiwa dealer for details. VOCAL FADEFUMULTIPLEX FUNCTIONS This unit can use discs or tapes - AIWA CX-NMT50 | Operating Instructions - Page 21
may not operate correctly with the following kinds of CDs or tapes. - Those with monaural sound - Those recorded with Before or during CD play, you can reserve up to 15 tracks to be played after the current track. Each reservation is cleared when it finishes playing. Use ths remote control. 1 Press - AIWA CX-NMT50 | Operating Instructions - Page 22
. The unit can be turned on at a specified time every day with the built-in timer. Preparation Make sure the clock is set correctly. Use the remote control 1 Press the TIMER button repeatedly until @ appears on the display, and press the II SET button within 4 seconds. @ is displayed, and the hour - AIWA CX-NMT50 | Operating Instructions - Page 23
CD, load the disc to be played first on tray 1. 1 i To listen to a tape, insert the tape volume level is automatically set to 16 when the power is turned off with the volume tape to be recorded into deck 2 after step 5. The unit can be turned off automatically at a specified time, Use the remote - AIWA CX-NMT50 | Operating Instructions - Page 24
with RCA phono plugs to connect audio equipment (turntables, LD piayers, MD players, VCRs, TV, etc.). Connect the red plug to the R jack, and Ihe white plug to the L jack. When connecting a turntable Use an Aiwa turntable equipped with a built-in equalizer amplifier. LINE OUT JACKS This unit can - AIWA CX-NMT50 | Operating Instructions - Page 25
page 24) * Is a metal tape being used? High frequency sound is not emitted. q Is the recording/playback head dirty? (+ page 24) CD PLAYER SECTION The CD player does not play. c Is the disc correctly inserted? (+ page 9) q Is the disc dirty? (+ page 24) q Is the lens affected by condensation? + Wait - AIWA CX-NMT50 | Operating Instructions - Page 26
Main unit CX-NMT50 FM tuner section Cassette deck section Track format Frequency response Recording system Heads 4 tracks, 2 channels stereo CrOz tape: 50 Hz - 16000 Hz Normal tape: 50 Hz - 15000 Hz AC bias Deck 1: Plavback head x 1 Deck 2: Re;ording/playback/ erase head x 1 Compact disc player - AIWA CX-NMT50 | Operating Instructions - Page 27
- AIWA CX-NMT50 | Operating Instructions - Page 28
"CAUTION:TO REDUCE THE RISK OF ELECTRIC SHOCK, DO NOT REMOVE COVER (OR BACK). NO USER-SERVICEABLE PARTS INSIDE. REFER SERVICING TO QUALIFIED SERVICE PERSONNEL." 1 ESPAfiOL PRECAUCIONES Lea cuidadosa y completamente el manual de instrucciones antes de utilizar la unidad. Asegurese de guardar el - AIWA CX-NMT50 | Operating Instructions - Page 29
DE ELECTRODO DE puEsTA A TIERRA DEL SERVICIO ELECTRICO (NEC, ARTICULO 250, PARTE H) Mantenirniento Limpie la unidad solo como se recomienda en el manual de instrucciones. Daiios aue necesitan ser reparados Haga clue un tecnico en reparaciones cualificado Ie repare Ias unidades si: - El cable de - AIWA CX-NMT50 | Operating Instructions - Page 30
NMT50 l"--' 1 @l - L. '-----"1 TS~35 (NSX-MT5s5olamente) 1 c SX-R21 OAltavoces de sonido ambiental SX-C400 Altavoz central Control remoto Antena de AM Antena de FM Manual su concesionario Aiwa en caso de tener dificultades. [ N.o de modelo 1 N.o de serie (N.o de Iote) ] CX-NMT50 I I - AIWA CX-NMT50 | Operating Instructions - Page 31
de salida de audio del equipo de video empleando un cable de conexion de audio optional. 6 Conecte el televisor al equipo de vfdeo. Consulte el manual de instrucciones del equipo conectaldo para tener mas detalles. 7 Conecte cd cable de alimentacion de CA a una toma de CA. 4 ESPAfiiOL. - AIWA CX-NMT50 | Operating Instructions - Page 32
el NSXMT55) Conecte la toma SUPER WOOFER de la unidad principal a la toma INPUT del TS-W35 con el cable de conexion suministrado. Consulte el manual de instrucciones para tener mas detalles. R6('AA) Cuando reemplazar Ias pilas La distancia maxima de operation entre el control remoto y el sensor de - AIWA CX-NMT50 | Operating Instructions - Page 33
ANTES DE LA OPERACION AJUSTES DE AUDIO ! , ,W!. LU \- ~---BBE t ---& - ----- T-BASS MANUAL SELECT M DO\rVN, m UP VOLUME Para encender la unidad Pulse uno de Ios botones de funcion (TAPE, TUNER, VIDEO/ AUX, (CD, MD). La reproduccidm de la cinta o dei disco insertado empezara o se recibira la - AIWA CX-NMT50 | Operating Instructions - Page 34
no se oira sonido por Ios altavoces de aonido ambiental. Para ajustar ei volumen de Ios altavoces de sonido ambiental Pulse dos veces el boton MANUAL SELECT del control remoto. "SUR se visualizara durante 2 segundos. Pulse el boton ~ DOWN o UP M del control remoto antes de que pasen estos 2 segundos - AIWA CX-NMT50 | Operating Instructions - Page 35
SINTONIZACION MANUAL MONO TUNER PREAJUSTE DE EMISORAS 1 2 s CLEAR 0-9,+10 1 Pulse repetidamente el boton TUNER/BAND para seleccionar la banda deseada, ~FM-AM-/ I I Cuarrdo se pulse el boton - AIWA CX-NMT50 | Operating Instructions - Page 36
pulse el boton 4 OPEN/CLOSE. Para iniciar la reproduction cuando la alimentacion este desconectada (funcion de reproduction directs) Pulse el boton CD. La alimentacion se conectara y la reproduction del(de Ios) disco(s) introducido(s) empezara. La alimentaci6n se conectara tambien cuando se pulse el - AIWA CX-NMT50 | Operating Instructions - Page 37
o de todos Ios discos se reproduciran aleatoriamente. Repetici6n de reproduction Un SOICdIisco o todos eilos podran reproducirse repetidamente. Pulse cd boton RANDOM/REPEAT. Cada vez que 10 pulse, la funcion podra ser seleccionada ciclicarnente. Reproduction aleatoria - RANDOM se enciende - AIWA CX-NMT50 | Operating Instructions - Page 38
el bot6n I para detener la cinta. Para iniciar la reproduction cuando la alimentacion este desconectada (funcion de reproduction directs) Pulse el boton TAPE. La alimentacion se conectara y la reproduction de la cinta insertada empezara. Para poner el contador de cinta a 0000 Pulse el boton s CLEAR - AIWA CX-NMT50 | Operating Instructions - Page 39
a reproducirse la siguiente cancion. La funci6n del sensor musical tal vez no pueda detectar Ias canciones bajo Ias condiciones cinta tipo 11 Lengueta para la cara A awl Para volver a grabar en una cinta, tape Ias aberturas con cinta adhesiva, etc. (En cintas tipo II, tenga cuidado para no - AIWA CX-NMT50 | Operating Instructions - Page 40
segundos permite la activation de la funcion del sensor musical. (Podra aplicarse cuando la fuente de sonido sea grabar de un disco compacto, pulse el boton CD e introduzca el(los) disco(s). Para grabar una a borrar en la platina 2 y pulse el boton TAPE/DECK 1/2 para visualizer "TP 2". 2 Ponga la - AIWA CX-NMT50 | Operating Instructions - Page 41
COPIADO MANUAL DE UNA CINTA COPIADO DE TODA LA CINTA m q Ponga la cinta en el punto donde vaya a empezar la grabacion. q El modo de inversion se ajusta automaticamente a Z. Tenga en cuenta clue la grabacion se hara en una cara de la cinta solamente. 1 Pulse el boton TAPE. 2 Inserte la cinta - AIWA CX-NMT50 | Operating Instructions - Page 42
despues del paso .5, usted podra aiiadir canciones de otros discos que se encuentren en el com~artimiento de Ios discos comoactos. 1 Pulse el boton CD EDIT/CHECK para seleccionar la cara A o B. 2 Pulse uno de Ios botones DISC DIRECT PLAY para seleccionar un disco. 3 Pulse Ios botones numerados del - AIWA CX-NMT50 | Operating Instructions - Page 43
repetidamente el boton + o W. Numero de programa Numero de cancion Numeros de canciones programadas Para cambiar el programa de cada cara Pulse el boton CD EDIT/CHECK para seleccionar la cara Ao B, y pulse el boton 9 CLEAR para borrar el programa de la cara seleccionada. Luego vuelva a programar - AIWA CX-NMT50 | Operating Instructions - Page 44
en rojo. Si PHANTOM o 3CH - LOGIC se enciende en rojo, puke repetidamente el boton DOLBY PRO LOGIC hasta seleccionar NORMAL. 2 Pulse el boton MANUAL SELECT (TEST) y mantengalo pulsado durante unos cuatro segundos hasta que parpadee "L". Se envfa una sehal de ruido a cada canal en el orden siguiente - AIWA CX-NMT50 | Operating Instructions - Page 45
Ios altavoces delanteros, El retardo esta ajustado inicialmente a 21 ms (milisegundos). Para cambiar este tiempo de retardo estandar, pulse repetidamente el boton MANUAL SELECT (TEST) del control remoto hasta que se visualice "TIME. Luego, pulse el boton DOWN M o UP ~. Cadavez que se pulse el boton - AIWA CX-NMT50 | Operating Instructions - Page 46
y el tono de la fuente de sortido. 4 Pulse el boton MIC y gire el control VOLUME antes de que pasen 4 segundos para ajustar el volumen del microfono. El volumen del microfono se evitar el aullido. Pongase en contacto con su concesionario Aiwa para que Ie de Ios detalles. FUNCIONES DE DESVANECIMIENTO - AIWA CX-NMT50 | Operating Instructions - Page 47
cancion que esta reproduciendose parpadea Para afiadir una reserva durante la reproduction Repita el paso 2. Para comprobar Ias canciones reservadas Pulse repetidamente el boton CD EDIT/CHECK. Cada vez que 10 pulse, el numero del disco y el ntimero de la cancion se visualizaran en el orden en que - AIWA CX-NMT50 | Operating Instructions - Page 48
PUESTA EN HORA DEL RELOJ AJUSTE DEL TEMPORIZADOR 2,3 1,2,3 1 1 2,4 3 1,2 6 1 Pulse el boton CLOCK del control remoto, y Iuego pulse el boton II SET antes de aue pasen 4 seaundos. 2 Pulse el boton ++ DOWN o * UP para designar la hors, y Iuego pulse el boton II SET. La hors deja de - AIWA CX-NMT50 | Operating Instructions - Page 49
4 Antes de aue ~asen 4 seaundos, seleccione la duration del periodo de reproduction activado por temporizador con el boton W DOWN 0- UP. AJUSTE DEL TEMPORIZADOR PARA DORMIR La duration del periodo de reproduction activado por ternporizador podra ajustarse entre 5 y 240 minutes en pasos de 5 - AIWA CX-NMT50 | Operating Instructions - Page 50
manual de instrucciones del equipo conectado para tener mas detalles. e Los cables de conexion no han sido suministrados. Obtenga Ios cables de conexion necesarios. * Consulte con su concesionario AIWA forma, se produciran ruidos y ave rias. TOMA CD DIGITAL OUT (OPTICAL) Esta unidad puede dar salida - AIWA CX-NMT50 | Operating Instructions - Page 51
estacionado bajo la Iuz directs del sol. GUIA PARA LA SOLUCION DE PROBLEMAS Si la unidad no funciona como se describe en este manual de instrucciones, compruebe la guia siguiente: GENERALIDADES No hay sonido. q LEst~ bien conectado el cable de alimentacirjn de CA7 q LHay alguna conexion mal - AIWA CX-NMT50 | Operating Instructions - Page 52
ESPECIFICACIONES Unidad principal CX-NMT50 Seccion del sintonizador de FM Gama de sintonizaci6n 87,5 MHz a 108 MHz Sensibilidad util (IHF) 13,2 dBf Terminals de antena 75 ohmios (desequiiibrada) Seccion del - AIWA CX-NMT50 | Operating Instructions - Page 53
- AIWA CX-NMT50 | Operating Instructions - Page 54
a ce que aucun corps etranger ou Iiquide ne penetre clans I'appareil pas Ies orifices de ventilation. 6 Chariot et support - Si I'appareil est pose ou monte sur un support ou un chariot, deplacer ce dernier avec precaution. Les arr&s brusques, une force excessive et Ies surfaces inegales - AIWA CX-NMT50 | Operating Instructions - Page 55
sujet de la mise a la terre du mat, de la structure de support et du conducteur arrivant a I'unite de d6charge d'antenne et au sujet des MANUELLE D'UNE CASSETTE ...........14 DUPLICATION DE LA TOTALITE D'UNE CASSETTE ....14 PROBLEME 24 SPECIFICATIONS 25 NOMENCLATURE Couverture du dos 2 FRAN~AIS - AIWA CX-NMT50 | Operating Instructions - Page 56
) 1 c @ CX-NtVfT50 Radio magnetocassette compacts stereo @ SX-NA54 Enceintes on corltacte un distributeur Aiwa en cas de difficult. r N" de modele N" de serie (N9 de lot) kCX-NMT50 SX-NA54 SX-C400 service, q L'enceinte centrale ne fonctionne que Iorsque Ie systeme Dolby Pro Logic est en service - AIWA CX-NMT50 | Operating Instructions - Page 57
4_Enceinte central I 2 Enceinte avant I k Televiseur I I ) u-r+r-!-T7 L- 5_~ Appareil video Cordon d'enceinte Antenne FM 1 l'? QAntenne AM Appareil principal 2 Enceinte avant 11I1 +7 Ill J Cordon secteur L! f connecterIes a~tennesfournies. Connecter I'antenne FM aux bornes FM 75 Q et I' - AIWA CX-NMT50 | Operating Instructions - Page 58
AM pres d'un appareil optionnel, de la cha~ne stereo proprement dite, du cordon secteur ou des cordons d'enceinte en place. E- Quand Ie systeme SURROUND est hors service, aucun son ne sort par Ies enceintes surround. Pour Utilisation de la telecommande Les instructions donnees clans ce manuel - AIWA CX-NMT50 | Operating Instructions - Page 59
TAPE, TUNER, VIDEO/AUX, CD, MD). La lecture du disque ou de la cassette appuyer de nouveau sur la touche DEMO, [ Guides par eclairage Chac~uefois qu'on branche Ie volume est regle a 17 ou plus, ce niveau est automatiquement regle a 16, Pour changer la balance gaucheldroite Appuyer sur la touche MANUAL - AIWA CX-NMT50 | Operating Instructions - Page 60
volume de sortie et la tonalite (BBE excepte) des enceintes ou du casque saris affecter Ie niveau de I'enregistrement. ~ Lors de la lecture d'une cassette enregistree avec BBE, il est conseille de mettre Ie systeme BBE hors service LIVE pour obtenir un effet stereo simule. Quand DISCO ou HALL - AIWA CX-NMT50 | Operating Instructions - Page 61
®PI UP, appuyer " La recherche automatique risque de ne pas s'arreter sur Ies stations presentant des signaux tres faibles. Wand une emission FM stereo presente des parasites Appuyer sur la touche MONO TUNER de la telecommande de mani&e que "MONO" apparaisse sur I'affichage. Les parasites sent - AIWA CX-NMT50 | Operating Instructions - Page 62
demarre. Quand on appuie sur la touche A OPEN/CLOSE, I'appareil est aussi mis sous tension. Pour verifier Ie temps restant Appuyer sur la touche CD EDIT/CHECK pendant la lecture. Le temps restant jusqu'a ce que toutes Ies plages soient Iues est affiche. Pour retablir I'affichage du temps de lecture - AIWA CX-NMT50 | Operating Instructions - Page 63
LECWRE ALEATOIRE/REPETEE Utiliser la telecommande. Lf?CtLlt'(? al&ItOiK? Toutes Ies plages du disque selectionne ou de tous Ies disques peuwnt @tre Iues clans un ordre aleatoire. Lecture repetee Un seul disque ou tous Ies disques reprises. peuvent ~tre Ius a plusieurs Appuyer sur la touche - AIWA CX-NMT50 | Operating Instructions - Page 64
er Ie defilement. Pour demarrer la lecture quand I'alimentation est toupee (fonction de lecture directe) Appuyer sur la touche TAPE. !-'appareil est mis sous tension et la lecture de la cassette en place commence. Pour mettre Ie compteur a 0000 Appuyer sur la touche s CLEAR clans Ie mode arr6t. Le - AIWA CX-NMT50 | Operating Instructions - Page 65
Une fois que la lecture sur une platine est terminee, la lecture de la cassette de I'autre platine demarre saris interruption. 1 Inw%er des cassettes clans Ies platines 1 et 2. 2 Appuyer sur la touche TAPE/DECK 1/2 pour sekctionner la platine a utiliser en premier. 3 Appuyer sur la touche REV MODE - AIWA CX-NMT50 | Operating Instructions - Page 66
enregistrer. Pour enregistrer a partir d'un disque compact, appuyer sur la touche CD et mettre Ie(s) disque(s) en place. Pour enregistrer une emission de radio sur la touche TAPEIDECK 1[2 pour afficher '(TP 2, 2 Bobiner la cassette jusqu'a I'endroit ou on veut demarrer I'effacement. 3 Regler Ie mode - AIWA CX-NMT50 | Operating Instructions - Page 67
Remarquer que I'enregistrement ne sera fait que sur une face de la cassette. 1 Appuyer sur la touche TAPE. 2 Inw%er la cassette originale clans la platine 1 et la cassette a enregistrer clans la platine 2. Insbrer chaque cassette avec la face a Iire ou a enregistrer ori(?ntee vers I'exterieur de - AIWA CX-NMT50 | Operating Instructions - Page 68
doit 6tre enregistree a partir du debut d'une de ses faces. 1 Inserer la cassette clans la platine 2. Inserer la cassette avec la face a enregistrer orientee vers I'exterieur de I'appareil. en premier 2 Appuyer sur la touche CD et mettre Ie(s) disque(s) en place. 3 Appuyer une fois sur la touche - AIWA CX-NMT50 | Operating Instructions - Page 69
fois sur la touche CHECK. "EDIT" et "PRGM" s'allument sur I'affichage. CD EDIT/ PRGM EDIT Qui~nd "AI" est affiche, appuyer de nouveau sur la touche CD EDIT/CHECK. 4 Appuyer sur la touche ~< ou > pour specifier la duree de la cassette. On peut specifier une duree de 10 a 99 minutes, Duree de la - AIWA CX-NMT50 | Operating Instructions - Page 70
de disques laser ou de supports video qui ont ete enregistres q S'assurer que Ie disque laser, la cassette video, etc. sent compatibles uDI- SURROUND . 2 Appuyer sur la touche MANUAL SELECT (TEST) et la tenir DOWN M ou UP M pour regler Ie volume de I'enceinte centrale ou des enceintes surround et - AIWA CX-NMT50 | Operating Instructions - Page 71
, un effet surround risque de ne pas ~tre obtenu m6me quand Ie systeme DOLBY PRO LOGIC est en service. q Un effet DOLBY PRO LOGIC total ne peut pas @tre obltenu quand on utilise un support ne portant pas la marque DO IDOLBV SURRO.NDI Dans w cas, utiliser Ie systeme SU RROUND H a la - AIWA CX-NMT50 | Operating Instructions - Page 72
Aiwa local. FONCTIONS VOCAL FADEFUMULTIPLEX Cet appareil permet I'emploi de disques ou de cassettes touche ECHO enfoncee tandis que I'echo est en service. Les reglages "L" (Long) et "M" (Moyen mixage. Quand on n'utilise pas Ies microphones Regler Ie volume de microphone et Ie niveau d'echo sur OFF et - AIWA CX-NMT50 | Operating Instructions - Page 73
cassettes suivants. - Disques ou cassettes a enregistrement mono - Disques ou cassettes enregistres avec de forts ethos - Disques ou cassettes avec la partie vocale enregistree sur la droite ou la gauche du spectre sonore c Quand la fonction Karaoke est en service sur la touche CD EDIT/CHECK a - AIWA CX-NMT50 | Operating Instructions - Page 74
REGLAGEDEL'HORLOGE REGLAGE DE LA MINUTERIE 1 1 'u 1 Appuyer sur la touche CLOCK de la telecommande, puis appuyer sur la touche I I SET clans Ies guatre secondes aui suivent. 2 Appuyer sur la touche + DOWN ou - UP pour specifier Ies heures, puis appuyer sur la touche II SET pour Ies regler. Les - AIWA CX-NMT50 | Operating Instructions - Page 75
Ie disque a Iire en premier en place clans Ie plateau 1. Pour ecouter une cassette, la mettre en place clans la platine 1 OU 2. Pour ecouter la radio, I'accorder sur une station. 6 Aplr&s avoir regle Ie volume et la tonalite, appuyer sur la touche POWER pour mettre I'appareil hors tension. @ reste - AIWA CX-NMT50 | Operating Instructions - Page 76
la prise L. Pour connecter un tourne-disque Utiliser un tourne-disque Aiwa muni d'un amplificateur integre. a egaliseur PRISES LINE OUT Cet appareil . Cela genererait des parasites et provoquerait une panne. PRISE CD DIGITAL OUT (OPTICAL) Cet appareil peut sortir Ies signaux sonores - AIWA CX-NMT50 | Operating Instructions - Page 77
PROBLEME Un entt'etien et des soins reguliers de I'appareil et des disques et cassettes pas comme decrit clans ce mode d'emploi, contrbler Ie guide suivant. GENERALITIES II n'y a pas de son. q Le Le son sorti n'est pas stereo. q La fonction Karaoke n'est-elle pas en service? (-+ page 19) Un - AIWA CX-NMT50 | Operating Instructions - Page 78
SPECIFICATIONS Appareil principal CX-NMT50 Partie tuner FM Plage d'accord SPEAKER: accepte une enceinte de 8 ohms Ou plus PHONES (prise stereo): accepte un casque de 32 ohms Ou plus Partie magnetocassette Format radio ou de cassettes clans Ie pays d'utilisation de I'appareil. 25 FRAN~AIS - AIWA CX-NMT50 | Operating Instructions - Page 79
- AIWA CX-NMT50 | Operating Instructions - Page 80
Instructions about each part on the main unit or remote DOWN 8, 9, 11 ECHO 19 EDIT/CHECK (CD EDIT/CHECK 9, 15, 16 GEQ 7 KARAOKE 19 MANUAL SELECT (TEST 7, 19 MD 23 MIC DUB 14 TAPE/DECK l/2 11, 13 T-BASS 6 TIMER 2l TUNER/BAND 8 M, M UP 8, 9, 11 VIDEO/AUX 23 voLuME 6 O-9,
-
 1
1 -
 2
2 -
 3
3 -
 4
4 -
 5
5 -
 6
6 -
 7
7 -
8
-
9
-
10
-
11
-
12
-
13
-
14
-
15
-
16
-
17
-
18
-
19
-
20
-
21
-
22
-
23
-
24
-
25
-
26
-
27
-
28
-
29
-
30
-
31
-
32
-
33
-
34
-
35
-
36
-
37
-
38
-
39
-
40
-
41
-
42
-
43
-
44
-
45
-
46
-
47
-
48
-
49
-
50
-
51
-
52
-
53
-
54
-
55
-
56
-
57
-
58
-
59
-
60
-
61
-
62
-
63
-
64
-
65
-
66
-
67
-
68
-
69
-
70
-
71
-
72
-
73
-
74
-
75
-
76
-
77
-
78
-
79
-
80
 |
 |
87-NFT-910-01
970327 BKY-U-0
f
>
For assistance
and information
call toll free I-800-BUY-AIWA
(United
States and Puerto Rico)
\
)
ili?i!i
DIGITAL
AUDIO