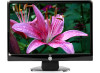
AOC 2217V 2217V Manual
AOC 2217V Manual
 |
View all AOC 2217V manuals
Add to My Manuals
Save this manual to your list of manuals |
AOC 2217V manual content summary:
- AOC 2217V | 2217V Manual - Page 1
an overview of how to use the monitor. Drivers: provides driver installation instructions for Windows. Technical Support : provides tips and solutions for common problems. Product Information: lists the technical specifications of the monitor. Warranty Statement: Warranty Statement used in - AOC 2217V | 2217V Manual - Page 2
in accordance with the instructions, may cause harmful interference the equipment off and on, the user is encouraged to try to correct the office, your household waste disposal service or the shop where you purchased using your computer monitor: PRECAUTIONS Do not use the monitor near water, e.g. - AOC 2217V | 2217V Manual - Page 3
or sold with the monitor. If you mount the monitor on a wall or shelf, use a mounting kit approved by the manufacturer and follow the kit instructions. Slots and . Please refer all servicing to qualified service personnel. To ensure satisfactory operation, use the monitor only with UL listed - AOC 2217V | 2217V Manual - Page 4
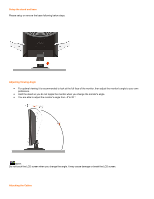
at the full face of the monitor, then adjust the monitor's angle to your own preference. Hold the stand so you do not topple the monitor when you change the monitor's angle. You are able to adjust the monitor's angle from -5°to 20 °. NOTE: Do not touch the LCD screen when you change the angle - AOC 2217V | 2217V Manual - Page 5
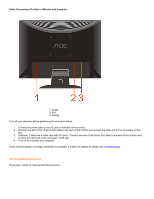
to the back of the monitor and connect the other end to the computer¡¯s DVI port. 4. Turn on your monitor and computer. If your monitor displays an image, installation is complete. If it does not display an image, see Troubleshooting. Attaching Wall Mounting Arm Preparing to Install An Optional - AOC 2217V | 2217V Manual - Page 6
with the holes in the back of the monitor. 4. Insert the 4 screws into the holes and tighten. 5. Reconnect the cables. Refer to the user's manual that came with the optional wall mounting arm for instructions on attaching it to the wall. Noted : VESA mounting screw holes are not available for all - AOC 2217V | 2217V Manual - Page 7
repeat steps 1-2. To exit OSD windows, select "exit" icon on main OSD, then press the Menu (Power) button . OSD Lock Function: To lock the OSD, press and hold the Left button while the monitor is off and then press power button to turn the monitor on. To un-lock the OSD - press and hold the Left - AOC 2217V | 2217V Manual - Page 8
button to change to the source selected. Auto configure hot key: When the OSD is closed, press Auto/Source button continuously about 2 second to do auto configure Press the Power button continuously about 2 second to turn off the monitor. DCB Adjustment What is DCB? Dynamic Color Boost (DCB) is an - AOC 2217V | 2217V Manual - Page 9
Full Enhance: When "Full Enhance" is turned on, the color saturation of the entire screen is fully enriched, thus all colors become more vibrant. Nature Skin: When "Natural Skin" is turned on, the red and yellow colors are enriched automatically, thus presents human skin with more natural and truer - AOC 2217V | 2217V Manual - Page 10
, every pigment will be detected and self-adjusted to render a lively picture. Demo: Screen divided into two for demonstration purposes. 2) How to use Picture Boost? Users can change the color settings of a self-selected zone on the screen. The size and position of the selected zone can also be - AOC 2217V | 2217V Manual - Page 11
aftereffects are subject to the resolution and quality of the display adjusts the brightness of the screen so users can see the darker areas of the to the original CR values of the LCD module. The higher the original CR, to Use DCR? Go to the first OSD icon labeled "Luminance", turn on or off - AOC 2217V | 2217V Manual - Page 12
will be disabled. DCR Demos: Disclaimer: DCR aftereffects are subject to the resolution and quality of the display content, hence may look different than the above illustrations. Function Control Illustration Luminance Brightness Contrast Eco mode Adjust Range 0-100 0- - AOC 2217V | 2217V Manual - Page 13
Gamma DCR Image Setup Clock Phase H.Position V.Position Color Temp. Warm Normal Cool sRGB User Color Boost Full Enhance Nature Skin Green Field Sky-blue AutoDetect Demo Picture Boost Frame Size Brightness Contrast Hue Saturation Position Bright Frame Game Movie - AOC 2217V | 2217V Manual - Page 14
i-menu software Installation Welcome to use "i-menu" software by AOC. i-menu makes it easy to adjust your monitor display setting by menus on the screen instead of OSD button on the monitor. Please click here to setup the software. To complete installation , please follow the installation guide . - AOC 2217V | 2217V Manual - Page 15
Using "i-menu" 1. Luminance Luminance Contrast Brightness Adjust Range 0-100 0-100 Standard Text Eco mode Internet Game Movie Gamma DCR Sports Gamma1 Gamma2 Gamma3 Off On Description Contrast from Digital-register. Backlight Adjustment Standard Mode Text Mode Internet Mode Game Mode - AOC 2217V | 2217V Manual - Page 16
Reset Reset the current page Remarks: 1) If DCR is set to "on", the other 4 items of Luminance cannot be adjusted. 2) If anyone of DCR, Color Boost and Bright Frame of Picture Boost is set to "on", the others are set to "off" automatically. 3) The Brightness and Contrast can be adjusted only when - AOC 2217V | 2217V Manual - Page 17
Gain from Digital-register Green Gain Digital-register. Blue Gain from Digital-register Reset the menu to default Remarks: 1) When "User" is chosen, you can change the monitor color to your desired color by setting the value of R-G-B. 2) When "sRGB" is chosen, the Brightness, Contrast and Gamma can - AOC 2217V | 2217V Manual - Page 18
4. Color Boost Color Boost Full Enhance Nature Skin Green Field Sky-blue AutoDetect Demo Reset Adjust Range on or off on or off on or off on or off on or off Description Disable or Enable Full Enhance Mode Disable or Enable Nature Skin Mode Disable or Enable Green Field Mode Disable or - AOC 2217V | 2217V Manual - Page 19
5. Picture Boost Picture Boost Bright Frame Frame Size Brightness Contrast H. position V.position Reset Adjust Range on or off 14-100 0-100 0-100 0-100 0-100 Description Disable or Enable Bright Frame Adjust Frame Size Adjust Frame Brightness Adjust Frame Contrast Adjust Frame horizontal Position - AOC 2217V | 2217V Manual - Page 20
6. Setting 7. Extra - AOC 2217V | 2217V Manual - Page 21
Help On this page, you can find the information of the monitor . Welcome to link our website and send email to us if you have any problem. Compatibility : i-menu supports major graphic cards of ATI, Nvidia, Intel, VIA(S3). Please contact with us if your graphic card was not supported imenu software. - AOC 2217V | 2217V Manual - Page 22
Specifications LCD Panel Resolution Physical Characteristics Environmental Model number 2217V Driving system TFT Color LCD mm Width 505.8 mm Depth 210 mm Weight (monitor only) 4.8 kg Weight (with packaging) 6.4 As an ENERGY STAR® Partner, AOC International (Europe) GmbH has determined that - AOC 2217V | 2217V Manual - Page 23
Mac-mode XGA Mac-mode XGA IBM-mode XGA Mac-mode IBM-mode XGA XGA XGA VESA-Mode SXGA SXGA WXGA WXGA WSXGA Pin Assignments RESOLUTION 640¡Á400 @70Hz 640¡Á480 @60Hz 640¡Á480 @67Hz 640¡Á480 @72Hz 640¡Á480 @75Hz 720¡Á400 @70Hz 800¡Á600 @56Hz 800¡Á600 @60Hz 800 - AOC 2217V | 2217V Manual - Page 24
Data 4+ 13 TMDS Data 3+ 21 TMDS Data 5+ 6 DDC Clock 14 +5V Power 22 TMDS Clock Shield 7 DDC Data 15 Ground(for+5V) 23 TMDS Clock + 8 N.C. TMDS Clock - This monitor is equipped with VESA DDC2B capabilities according to the VESA DDC STANDARD. It allows the monitor to inform the host
-
 1
1 -
 2
2 -
 3
3 -
 4
4 -
 5
5 -
 6
6 -
 7
7 -
8
-
9
-
10
-
11
-
12
-
13
-
14
-
15
-
16
-
17
-
18
-
19
-
20
-
21
-
22
-
23
-
24
 |
 |
2217V User’s Manual
About This Guide
This guide describes the monitor's features, setup, and operation.
lnformation in this document is subject to change without
notice.
The sections are as follows:
Safety Instructions
: lists safety information.
Setup
: describes the initial setup process.
Using the Monitor
: gives an overview of how to use the monitor.
Drivers
: provides driver installation instructions for Windows.
Technical Support
: provides tips and solutions for common problems.
Product Information
: lists the technical specifications of the monitor.
Warranty Statement
: Warranty Statement used in Europe.
National Conventions
The following subsections describe notational conventions used in this document.
Notes, Cautions, and Warnings
Throughout this guide, blocks of text may be accompanied by an icon and printed in bold type or in italic type. These blocks are notes,
cautions, and warnings, and they are used as follows:
NOTE: A NOTE indicates important information that helps you make better use of your computer system.
CAUTION: A CAUTION indicates either potential damage to hardware or loss of data and tells you how to avoid the
problem.
WARNING: A WARNING indicates the potential for bodily harm and tells you how to avoid the problem.
Some warnings may appear in alternate formats and may be unaccompanied by an icon. In such cases, the specific presentation of the
warning is mandated by regulatory authority.
Product Registration
Please link
www.aoc.com
, select your country or region, log in Product Registration to register .