ASRock 4Core1333-FullHD Quick Installation Guide
ASRock 4Core1333-FullHD Manual
 |
View all ASRock 4Core1333-FullHD manuals
Add to My Manuals
Save this manual to your list of manuals |
ASRock 4Core1333-FullHD manual content summary:
- ASRock 4Core1333-FullHD | Quick Installation Guide - Page 1
for backup purpose, without written consent of ASRock Inc. Products and corporate names appearing in this guide may or may not be registered trademarks or ASRock Website: http://www.asrock.com Published June 2007 Copyright©2007 ASRock INC. All rights reserved. 1 ASRock 4Core1333-FullHD Motherboard - ASRock 4Core1333-FullHD | Quick Installation Guide - Page 2
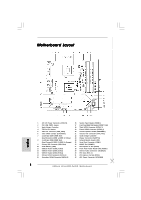
Motherboard Layout English 1 ATX 12V Power Connector (ATX12V1) 2 PS2_USB_PWR1 Jumper 3 North Bridge Controller 4 775-Pin CPU Socket 5 CPU Fan Connector (CPU_FAN1) 6 Clear CMOS Jumper (CLRCMOS1) 7 2 x Express x16 Slot (PCIE1) 32 ATX Power Connector (ATXPWR1) 2 ASRock 4Core1333-FullHD Motherboard - ASRock 4Core1333-FullHD | Quick Installation Guide - Page 3
ASRock DVI_1394 I/O 1 PS/2 Mouse Port (Green) 2 Parallel Port 3 IEEE 1394 Port 4 RJ-45 Port 5 Side Speaker (Gray) 6 Rear Speaker (Black) 7 Central , Central/Bass, and Front Speaker, or select "Realtek HDA Audio 2nd output" to use front panel audio. 3 ASRock 4Core1333-FullHD Motherboard English - ASRock 4Core1333-FullHD | Quick Installation Guide - Page 4
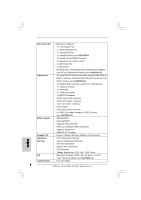
of this manual occur, the updated version will be available on ASRock website without further notice. You may find the latest VGA cards and CPU support lists on ASRock website as well. ASRock website http://www.asrock.com 1.1 Package Contents 1 x ASRock 4Core1333-FullHD Motherboard (Micro ATX - ASRock 4Core1333-FullHD | Quick Installation Guide - Page 5
1080p Blu-ray (BD) / HD-DVD playback with DVI-D port (see CAUTION 8) - 7.1 CH Windows® VistaTM Premium Level HD Audio (ALC888 Audio Codec) - Chipset embedded HDMI Audio - PCIE x1 Gigabit LAN 10/100/1000 Mb/s - Realtek RTL8111B - Supports Wake-On-LAN English 5 ASRock 4Core1333-FullHD Motherboard - ASRock 4Core1333-FullHD | Quick Installation Guide - Page 6
- Chassis Temperature Sensing - CPU Fan Tachometer - Chassis Fan Tachometer - CPU Quiet Fan - Voltage Monitoring: +12V, +5V, +3.3V, Vcore - Microsoft® Windows® 2000 / XP / XP 64-bit / VistaTM / VistaTM 64-bit compliant (see CAUTION 13) - FCC, CE, WHQL English 6 ASRock 4Core1333-FullHD Motherboard - ASRock 4Core1333-FullHD | Quick Installation Guide - Page 7
connection. 11. Before installing SATAII hard disk to SATAII connector, please read the "SATAII Hard Disk Setup Guide" on page 26 to adjust your SATAII hard disk drive to SATAII mode. You can also connect SATA hard disk to SATAII connector directly. 7 ASRock 4Core1333-FullHD Motherboard English - ASRock 4Core1333-FullHD | Quick Installation Guide - Page 8
must also support HDCP function to qualify for Windows® VistaTM Premium 2007 logo. * After June 1, 2007, all Windows® VistaTM systems are required to meet above minimum hardware requirements in order to qualify for Windows® VistaTM Premium 2007 logo. English 8 ASRock 4Core1333-FullHD Motherboard - ASRock 4Core1333-FullHD | Quick Installation Guide - Page 9
this item. E. Click "OK" to save the change. * If you use this motherboard to playback 1080p Blu-ray (BD) / HD-DVD under Windows® 2000 / XP / XP 64-bit OS, the film may pause sometimes. For Windows® VistaTM / VistaTM 64-bit OS, there is no this issue. English 9 ASRock 4Core1333-FullHD Motherboard - ASRock 4Core1333-FullHD | Quick Installation Guide - Page 10
Memory OS Playback Software DVD Player Configurations Intel® FSB1333 CPU (e.g. Intel® E6550) Onboard VGA with DVI-D port Dual Channel DDRII667, 1GB x 2 Windows® VistaTM CyberLink PowerDVD Ultra Pioneer BDR-101A / LG GBW-H10N (BD) HP HD100 (HD-DVD) English 10 ASRock 4Core1333-FullHD Motherboard - ASRock 4Core1333-FullHD | Quick Installation Guide - Page 11
you insert the 775-LAND CPU into the socket, please check if the CPU surface is unclean or if there is any bent pin on the socket. Do not force to insert the CPU into the socket if above situation is found. Otherwise, the CPU will be seriously damaged. 11 ASRock 4Core1333-FullHD Motherboard English - ASRock 4Core1333-FullHD | Quick Installation Guide - Page 12
100 degrees. Step 2. Insert the 775-LAND CPU: Step 2-1. Hold the CPU by the edges where are marked with support the load plate edge, engage PnP cap with right hand thumb and peel the cap from the socket while pressing on center of PnP cap to assist in removal. 12 ASRock 4Core1333-FullHD Motherboard - ASRock 4Core1333-FullHD | Quick Installation Guide - Page 13
, the heatsink cannot be secured on the motherboard. Step 5. Connect fan header with the CPU fan connector on the motherboard. Step 6. Secure excess cable with tie-wrap to ensure cable does not interfere with fan operation or contact other components. 13 ASRock 4Core1333-FullHD Motherboard English - ASRock 4Core1333-FullHD | Quick Installation Guide - Page 14
of Memory Modules (DIMM) 4Core1333-FullHD motherboard provides four 240-pin DDRII (Double Data Rate II) DIMM slots, and supports Dual Channel Memory Technology. For memory module into DDRII slot; otherwise, this motherboard and DIMM may be damaged. English 14 ASRock 4Core1333-FullHD Motherboard - ASRock 4Core1333-FullHD | Quick Installation Guide - Page 15
permanent damage to the motherboard and the DIMM if you force the DIMM into the slot at incorrect orientation. Step 3. Firmly insert the DIMM into the slot until the retaining clips at both ends fully snap back in place and the DIMM is properly seated. 15 ASRock 4Core1333-FullHD Motherboard English - ASRock 4Core1333-FullHD | Quick Installation Guide - Page 16
PCI Express Slots) There are 2 PCI slots, 1 HDMR slot and 2 PCI Express slots on this motherboard. PCI slots: PCI slots are used to install expansion cards that have the 32-bit PCI interface. HDMR . Step 4. Fasten the card to the chassis with screws. 16 ASRock 4Core1333-FullHD Motherboard English - ASRock 4Core1333-FullHD | Quick Installation Guide - Page 17
use dual monitor function provided by VGA/DVI-D and VGA/D-Sub ports with this motherboard. When you playback HDCP-protected video from Blu-ray (BD) or HD-DVD disc, the content will be displayed only in one of the two monitors instead of both monitors. 17 ASRock 4Core1333-FullHD Motherboard English - ASRock 4Core1333-FullHD | Quick Installation Guide - Page 18
this motherboard. 3. Boot your system. Press to enter BIOS setup. Set the item "Primary Graphics Adapter" to [Onboard]. And set the item "Surround View Function" to [Enabled]. 4. Install the onboard VGA driver items from one monitor to another. 18 ASRock 4Core1333-FullHD Motherboard English - ASRock 4Core1333-FullHD | Quick Installation Guide - Page 19
motherboard, you need to adopt the monitor that supports HDCP function as well. Therefore, you can enjoy the superior display quantity with high-definition HDCP encryption contents. Please refer to below instruction monitor you purchase is compatible. 19 ASRock 4Core1333-FullHD Motherboard English - ASRock 4Core1333-FullHD | Quick Installation Guide - Page 20
sometimes. For Windows® XP / XP 64-bit OS Step 1:Set up BIOS. A. Enter BIOS SETUP UTILITY Advanced screen Chipset Configuration. B. Set the option "OnBoard HDMI HD Audio" to [Auto]. Step 2: Install HDMI audio driver to your system. Install "Onboard HDMI HD Audio Driver" from ASRock Support CD to - ASRock 4Core1333-FullHD | Quick Installation Guide - Page 21
for 5 seconds. However, please do not clear the CMOS right after you update the BIOS. If you need to clear the CMOS when you just finish updating the BIOS, you must boot up the system first, and then shut it down before you do the clear-CMOS action. English 21 ASRock 4Core1333-FullHD Motherboard - ASRock 4Core1333-FullHD | Quick Installation Guide - Page 22
to the power connector on each drive. Then connect the white end of SATA power cable to the power connector of the power supply. 22 ASRock 4Core1333-FullHD Motherboard English - ASRock 4Core1333-FullHD | Quick Installation Guide - Page 23
No. 29) Front Panel Audio Header (9-pin HD_AUDIO1) (see p.2, No. 28) This header supports an optional wireless transmitting and receiving infrared module. This connector allows you to receive stereo audio input connection and control of audio devices. English 23 ASRock 4Core1333-FullHD Motherboard - ASRock 4Core1333-FullHD | Quick Installation Guide - Page 24
support HDA to function correctly. Please follow the instruction in our manual and chassis manual CPU Fan Connector (4-pin CPU_FAN1) (see p.2, No. 5) Please connect the CPU fan 4 3 cable to this connector and 2 1 match the black wire to the ground pin. 24 ASRock 4Core1333-FullHD Motherboard - ASRock 4Core1333-FullHD | Quick Installation Guide - Page 25
RXTPBM_0 +12V GND 1 +12V RXTPBP_0 GND RXTPAP_0 Besides one default IEEE 1394 port on the I/O panel, there is one IEEE 1394 header (FRONT_1394) on this motherboard. This IEEE 1394 header can support one IEEE 1394 port. English 25 ASRock 4Core1333-FullHD Motherboard - ASRock 4Core1333-FullHD | Quick Installation Guide - Page 26
hitachigst.com/hdd/support/download.htm The above examples are just for your reference. For different SATAII hard disk products of different vendors, the jumper pin setting methods may not be the same. Please visit the vendors' website for the updates. 26 ASRock 4Core1333-FullHD Motherboard English - ASRock 4Core1333-FullHD | Quick Installation Guide - Page 27
". After that, you can find the empty SATA / SATAII HDDs information in "Disk Management" and start to use it. (WebPAM is an utility for ATITM Windows RAID. Please refer to RAID Installation Guide in our support CD for detailed operation procedures.) 27 ASRock 4Core1333-FullHD Motherboard English - ASRock 4Core1333-FullHD | Quick Installation Guide - Page 28
into the SATA / SATAII HDD. What is Hot Swap Function? If SATA / SATAII HDDs are built as RAID 1 then it is called "Hot Swap" for the action to insert and remove the SATA / SATAII HDDs while the system is still power-on and in working condition. 28 ASRock 4Core1333-FullHD Motherboard English - ASRock 4Core1333-FullHD | Quick Installation Guide - Page 29
2.14.1 Installing Windows® 2000 / XP / XP 64-bit With RAID Functions If you want to install Windows® 2000, Windows® XP or Windows® XP 64-bit on a RAID disk composed of 2 or more SATA / SATAII HDDs with RAID functions, please follow below steps. 29 ASRock 4Core1333-FullHD Motherboard English - ASRock 4Core1333-FullHD | Quick Installation Guide - Page 30
RAID installation guide in the following path in the Support CD: .. \ RAID Installation Guide NOTE2. If your operating system is Windows® 2000, please install the graphics card driver before you install "SATA2 Utility" from our support CD to your system. 30 ASRock 4Core1333-FullHD Motherboard - ASRock 4Core1333-FullHD | Quick Installation Guide - Page 31
on SATA / SATAII HDDs, you still need to set up "SATA Operation Mode" to [RAID] in BIOS first. Then, please set the RAID configuration by using the Windows RAID installation guide in the following path in the Support CD: .. \ RAID Installation Guide English 31 ASRock 4Core1333-FullHD Motherboard - ASRock 4Core1333-FullHD | Quick Installation Guide - Page 32
(FastBuild Utility) to create JBOD on SATA / SATAII HDD. For the proper operating procedures of creating JBOD, please refer to the BIOS RAID installation guide part of the document in the following path in the Support CD: .. \ RAID Installation Guide 32 ASRock 4Core1333-FullHD Motherboard - ASRock 4Core1333-FullHD | Quick Installation Guide - Page 33
drive to boot your system, and follow the instruction to install Windows® VistaTM / Windows® VistaTM 64-bit OS on your system. When you see "Where do you want to install Windows?" page, please insert the ASRock Support CD into your optical drive, 33 ASRock 4Core1333-FullHD Motherboard English - ASRock 4Core1333-FullHD | Quick Installation Guide - Page 34
overclocking, but PCI / PCIE buses are in the fixed mode so that FSB can operate under a more stable overclocking environment. Please refer to the warning on page 7 for the possible overclocking risk before you apply Untied Overclocking Technology. English 34 ASRock 4Core1333-FullHD Motherboard - ASRock 4Core1333-FullHD | Quick Installation Guide - Page 35
your computer. If the Main Menu does not appear automatically, locate and double-click on the file "ASSETUP. EXE" from the BIN folder in the Support CD to display the menus. 35 ASRock 4Core1333-FullHD Motherboard English - ASRock 4Core1333-FullHD | Quick Installation Guide - Page 36
auf der ASRock-Website aufgelistet. ASRock-Website: http://www.asrock.com 1.1 Kartoninhalt 1 x ASRock 4Core1333-FullHD Motherboard (Micro ATX-Formfaktor: 24.4 cm x 24.4 cm; 9.6 Zoll x 9.6 Zoll) 1 x ASRock 4Core1333-FullHD Schnellinstallationsanleitung 2 x ASRock 4Core1333-FullHD Support-CD 1 x 80 - ASRock 4Core1333-FullHD | Quick Installation Guide - Page 37
(BD) / HD-DVD Playback (siehe VORSICHT 8) Audio - 7.1 CH Windows® VistaTM Premium Level HD Audio (ALC888 Audio Codec) - Chipsatz eingebettetes HDMI Audio LAN - PCIE x1 Gigabit LAN 10/100/1000 Mb/s - Realtek RTL8111B - Unterstützt Wake-On-LAN 37 ASRock 4Core1333-FullHD Motherboard Deutsch - ASRock 4Core1333-FullHD | Quick Installation Guide - Page 38
(Probeversion) Hardware Monitor - Überwachung der CPU-Temperatur - Motherboardtemperaturerkennung - Drehzahlmessung für CPU-Lüfter - Drehzahlmessung für Gehäuselüfter - CPU-Lüftergeräuschdämpfung - Spannungsüberwachung: +12V, +5V, +3.3V, Vcore Deutsch 38 ASRock 4Core1333-FullHD Motherboard - ASRock 4Core1333-FullHD | Quick Installation Guide - Page 39
-ray (BD)/HD-DVD Filme in unserem Laborversuch. 9. Dieser DVI-D Port für den Chipsatz, der auf dieser Hauptplatine angenommen wird, kann DVI/HDCP und HDMI Format Signal unterstützen. Sie können das DVI zu HDMI Adapter verwenden, um diesen DVI-D Port zu 39 ASRock 4Core1333-FullHD Motherboard Deutsch - ASRock 4Core1333-FullHD | Quick Installation Guide - Page 40
mit einer Gesamtsystemspeichergröße von 512MB verwenden und das Windows® VistaTM Premium oder Basic Logo vorlegen möchten, dann stellen Sie bitte die Größe des dem integrierten VGA-Chip freizugebenden Arbeitsspeichers auf 128MB oder noch mehr ein. 40 ASRock 4Core1333-FullHD Motherboard Deutsch - ASRock 4Core1333-FullHD | Quick Installation Guide - Page 41
Deutsch 775-Pin Sockel Übersicht Bevor Sie die 775-Pin CPU in den Sockel sitzen, prüfen Sie bitte, ob die CPU-Oberfläche sauber ist und keine der Kontakte verbogen sind. Setzen Sie die CPU nicht mit Gewalt in den Sockel, dies kann die CPU schwer beschädigen. 41 ASRock 4Core1333-FullHD Motherboard - ASRock 4Core1333-FullHD | Quick Installation Guide - Page 42
775-Pin Sockel 775-Pin CPU Um die CPU ordnungsgemäß einsetzen zu können, richten Sie die zwei Orientierungskerben der CPU mit den beiden Markierungen des Sockels aus. Schritt 2-3. Drücken Sie die CPU vorsichtig in vertikaler Richtung in den Sockel. 42 ASRock 4Core1333-FullHD Motherboard - ASRock 4Core1333-FullHD | Quick Installation Guide - Page 43
Schritt 2-4. Prüfen Sie, dass die CPU ordnungsgemäß im Sockel sitzt und die Orientierungskerben einwandfrei in den entsprechenden Auskerbungen sitzen. Sie den Ladehebel. Schritt 4-3. Sichern Sie Ladehebel und Ladeplatte mithilfe des Hebelverschlusses. 43 ASRock 4Core1333-FullHD Motherboard Deutsch - ASRock 4Core1333-FullHD | Quick Installation Guide - Page 44
ordnungsgemäß am Motherboard befestigt. Schritt 5. Schließen Sie den Lüfter an den CPULüfteranschluss des Motherboards. Schritt 6. Befestigen Sie überschüssiges Kabel mit Band, um eine Störung des Lüfters oder Kontakt mit anderen Teilen zu vermeiden. Deutsch 44 ASRock 4Core1333-FullHD Motherboard - ASRock 4Core1333-FullHD | Quick Installation Guide - Page 45
2.3 Installation der Speichermodule (DIMM) Die Motherboards 4Core1333-FullHD bieten vier 240-pol. DDRII (Double Data Rate II) DIMM- zulässig, DDR in einen DDRII Steckplatz zu installieren; andernfalls könnten Motherboard und DIMMs beschädigt werden. Deutsch 45 ASRock 4Core1333-FullHD Motherboard - ASRock 4Core1333-FullHD | Quick Installation Guide - Page 46
zu zwingen, führt dies zu dauerhaften Schäden am Mainboard und am DIMM-Modul. Schritt 3: Drücken Sie die DIMM-Module fest in die Steckplätze, so dass die Halteklammern an beiden Enden des Moduls einschnappen und das DIMM-Modul fest an Ort und Stelle sitzt. 46 ASRock 4Core1333-FullHD Motherboard - ASRock 4Core1333-FullHD | Quick Installation Guide - Page 47
Steckplätze) Es stehen 2 PCI-, 1 HDMR- und 2 PCI Express-Slot auf dem 4Core1333-FullHD Motherboard zur Verfügung. PCI-Slots: PCI-Slots werden zur Installation von Erweiterungskarten mit dem 32bit Befestigen Sie die Karte mit der Schraube aus Schritt 2. 47 ASRock 4Core1333-FullHD Motherboard Deutsch - ASRock 4Core1333-FullHD | Quick Installation Guide - Page 48
-Funktion der beiden Ports VGA/DVI-D und VGA/D-Sub auf dem Motherboard benutzen. Als Sie HDCP-schützten Video von Blu-ray (BD) oder HD-DVD Platte abspielen, wird der Inhalt nur in einem der zwei Monitoren anstelle in beiden Monitoren angezeigt. 48 ASRock 4Core1333-FullHD Motherboard Deutsch - ASRock 4Core1333-FullHD | Quick Installation Guide - Page 49
im I/O-Bereich auf dem Motherboard anschließen. 3. Booten Sie Ihr System. Rufen Sie das BIOS-Setup mit auf 2 gekennzeichnet ist. D. Klicken Sie auf " Extend my Windows desktop onto this monitor (WindowsDesktop auf diesen Monitor erweitern)". äte. 49 ASRock 4Core1333-FullHD Motherboard Deutsch - ASRock 4Core1333-FullHD | Quick Installation Guide - Page 50
DVI-D-Port in HDMI Schnittstelle umzuwandeln. Bitte folgen Sie folgender Schritte, um HDMI Audiofunktion entsprechend dem Betriebssystem, das Sie installiert haben, zu ermöglichen. 50 ASRock 4Core1333-FullHD Motherboard Deutsch - ASRock 4Core1333-FullHD | Quick Installation Guide - Page 51
BIOS einstellen. A. BIOS-SETUP-DIENSTPROGRAMM eintragen fortgeschritten Schirm Konfiguration des Chipsets B. Die Option „On-Board HDMI-HD Audio" auf [Automatisch] einstellen. Schritt 2: Windows haben, ist die HDMI Audiofunktion vorhanden. Deutsch 51 ASRock 4Core1333-FullHD Motherboard - ASRock 4Core1333-FullHD | Quick Installation Guide - Page 52
nicht, den Jumper wieder zu entfernen, nachdem das CMOS gelöscht wurde. Wenn Sie den CMOSInhalt gleich nach dem Aktualisieren des BIOS löschen müssen, müssen Sie zuerst das System starten und dann wieder ausschalten, bevor Sie den CMOS-Inhalt löschen. Deutsch 52 ASRock 4Core1333-FullHD Motherboard - ASRock 4Core1333-FullHD | Quick Installation Guide - Page 53
Nr. 9) SATAII_4 SATAII_3 SATAII_2 SATAII_1 Deutsch Blauer Anschluss Schwarzer Anschluss zum Motherboard zur Festplatte 80-adriges ATA 66/100/133 Kabel Hinweis: Details entnehmen SATA / SATAIIFestplatte oder dem SATAII-Anschluss am Mainboard verbinden. 53 ASRock 4Core1333-FullHD Motherboard - ASRock 4Core1333-FullHD | Quick Installation Guide - Page 54
zu den vier üblichen USB 2.0-Ports an den I/O-Anschlüssen befinden sich drei USB 2.0-Anschlussleisten am Motherboard. Pro USB 2.0Anschlussleiste werden zwei USB 2.0-Ports unterstützt. (9-pol. USB4_5) (siehe S.2 - Nr öglichkeit und Kontrolle über Audio-Geräte. 54 ASRock 4Core1333-FullHD Motherboard - ASRock 4Core1333-FullHD | Quick Installation Guide - Page 55
den HD-Audioanschluss gedacht. Diese Anschlüsse müssen nicht an die AC'97-Audioleiste angeschlossen werden. E. Rufen Sie das BIOS-Setup-Dienstprogramm der Taskleiste unten rechts, um den Realtek HD Audio-Manager aufzurufen. Für Windows® 2000 / XP / XP 64-Bit . 55 ASRock 4Core1333-FullHD Motherboard - ASRock 4Core1333-FullHD | Quick Installation Guide - Page 56
werden; auch ohne Geschwindigkeitsregulierung. Wenn Sie einen dreipoligen CPU-Lüfter an den CPU-Lüferanschluss dieses Motherboards anschließen möchten, verbinden Sie ihn bitte mit IEEE-1394 Header kann einen IEEE-1394 Port unterstützen. 56 ASRock 4Core1333-FullHD Motherboard Deutsch - ASRock 4Core1333-FullHD | Quick Installation Guide - Page 57
von HITACHI finden Sie entsprechende Details: http://www.hitachigst.com/hdd/support/download.htm Die Beispiele oben dienen lediglich Ihrer Referenz. Die Steckbrü und ergänzende Informationen finden Sie auf der Internetseite des Herstellers. 57 ASRock 4Core1333-FullHD Motherboard Deutsch - ASRock 4Core1333-FullHD | Quick Installation Guide - Page 58
der leeren SATA / SATAII- Festplatte im "Disk Management" (Dateimanager) und Sie können sie jetzt verwenden. (WebPAM ist ein Hilfsprogramm für ATITM Windows RAID. Details zur Bedienung finden Sie auf unserer CD in den RAID Installationsanweisungen.) Deutsch 58 ASRock 4Core1333-FullHD Motherboard - ASRock 4Core1333-FullHD | Quick Installation Guide - Page 59
NICHT für RAID-Konfiguration Motherboard ein. Achten Sie bitte darauf, dass die HDMR-Karte komplett in den Steckplatz eingeschoben ist. 2. Installieren Sie die HDMR-Kartentreiber von der Unterstützungs-CD in Ihrem System. 3. Starten Sie Ihren Computer neu. 59 ASRock 4Core1333-FullHD Motherboard - ASRock 4Core1333-FullHD | Quick Installation Guide - Page 60
zur Auswahl des Boot-Laufwerkes (Startlaufwerk) erscheint. Bitte wählen Sie das CD-ROM-Laufwerk als Boot-Laufwerk. C. Die Meldung „Generate Serial ATA driver diskette [Y/N]?" [Serial ATA-Treiberdiskette erstellen [Y/N]?] bestätigen Sie mit . 60 ASRock 4Core1333-FullHD Motherboard Deutsch - ASRock 4Core1333-FullHD | Quick Installation Guide - Page 61
vorzunehmen: .. \ RAID Installation Guide HINWEIS 2: Handelt es sich bei Ihrem Betriebssystem um Windows® 2000, installieren Sie den Treiber der Grafikkarte bitte noch vor Installation der "SATA2 Utility" von Ihrer SupportCD auf Ihr System. Deutsch 61 ASRock 4Core1333-FullHD Motherboard - ASRock 4Core1333-FullHD | Quick Installation Guide - Page 62
Sie dennoch zunächst den "SATA Operation Mode" (SATA-Betriebsmodus) auf [RAID] einstellen. Bitte lesen Sie Windows RAID-Installationsanleitung in dem folgenden Pfad auf der Support-CD, um die RAID-Konfiguration vorzunehmen: .. \ RAID Installation Guide 62 ASRock 4Core1333-FullHD Motherboard Deutsch - ASRock 4Core1333-FullHD | Quick Installation Guide - Page 63
Setzen Sie die Option "SATA Operation Mode" (SATA-Betriebsmodus) auf [RAID]. SCHRITT 2: Erstellen Sie eine SATA / SATAII-Treiberdiskette. Erstellen Sie, wie auf Seite 60 in Kapitel 2.14.1 Schritt 2 beschrieben, eine SATA / SATAII-Treiberdiskette. 63 ASRock 4Core1333-FullHD Motherboard Deutsch - ASRock 4Core1333-FullHD | Quick Installation Guide - Page 64
den Bildschirm „Erweitert" und „IDE-Konfiguration" auf. B. Setzen Sie die Option "SATA Operation Mode" (SATA-Betriebsmodus) auf [non-RAID]. SCHRITT 2: Installieren Sie Windows® 2000 / Windows® XP / Windows® XP 64-Bit in Ihrem System. Deutsch 64 ASRock 4Core1333-FullHD Motherboard - ASRock 4Core1333-FullHD | Quick Installation Guide - Page 65
A. Rufen Sie im BIOS-DIENSTPROGRAMM den Bildschirm „Erweitert" und „IDE-Konfiguration" auf. B. Setzen Sie die Option "SATA Operation Mode" (SATA-Betriebsmodus) auf [non-RAID]. SCHRITT 2: Installieren Sie Windows® VistaTM / VistaTM 64-Bit in Ihrem System. 65 ASRock 4Core1333-FullHD Motherboard - ASRock 4Core1333-FullHD | Quick Installation Guide - Page 66
der Support-CD, um die Menüs aufzurufen. Das Setup-Programm soll es Ihnen so leicht wie möglich machen. Es ist menügesteuert, d.h. Sie können in den verschiedenen Untermenüs Ihre Auswahl treffen und die Programme werden dann automatisch installiert. 66 ASRock 4Core1333-FullHD Motherboard Deutsch - ASRock 4Core1333-FullHD | Quick Installation Guide - Page 67
ruban pour un lecteur de disquettes 3,5 pouces 1 x câble de données Serial ATA (SATA) (en option) 1 x cordon d'alimentation DD série ATA (SATA) (en option) 1 x écran ASRock DVI_1394 I/O 1 x support pour port COM 67 ASRock 4Core1333-FullHD Motherboard Français - ASRock 4Core1333-FullHD | Quick Installation Guide - Page 68
Blu-ray(BD)/ lecteur de HD-DVD (voir ATTENTION 8) Audio - 7.1 Son haute définition de première qualité CH Windows® VistaTM (codec audio ALC888) - HDMI Audio avec Chipset enclave LAN - PCIE x1 Gigabit LAN 10/100/1000 Mb/s - Realtek RTL8111B 68 ASRock 4Core1333-FullHD Motherboard Français - ASRock 4Core1333-FullHD | Quick Installation Guide - Page 69
1.1 - Gestion jumperless - Support SMBIOS 2.3.1 - Pilotes, utilitaires, logiciel anti-virus (Version d'essai) - Contrôle de la température CPU - Mesure de température de la carte mère - Tachéomètre ventilateur CPU - Tachéomètre ventilateur châssis Français 69 ASRock 4Core1333-FullHD Motherboard - ASRock 4Core1333-FullHD | Quick Installation Guide - Page 70
page 9 et 10 pour la demande du materiel minimum et les films passes HDDVD/1080p Blu-ray (BD) dans notre lab de test. 9. Ce port DVI-D avec le chipset adopte sur cette carte mere peut supporter le signal de formatage de DVI/HDCP et HDMI. Vous pouvez 70 ASRock 4Core1333-FullHD Motherboard Français - ASRock 4Core1333-FullHD | Quick Installation Guide - Page 71
HDCP fonction pour qualifier pour Windows® VistaTM Premium 2007 logo. * Apres Juin 1,2007, tous les Windows® VistaTM systems sont demandes de mettre au dessus de exigence du hardware minimum pour qualifier pour Windows® VistaTM Premium 2007 logo. 71 ASRock 4Core1333-FullHD Motherboard Français - ASRock 4Core1333-FullHD | Quick Installation Guide - Page 72
, placez-le sur un support antistatique ou dans son sachet d'origine. 5. Lorsque vous placez les vis dans les orifices pour vis pour fixer la carte mère sur le châssis, ne serrez pas trop les vis ! Vous risquez sinon d'endommager la carte mère. 72 ASRock 4Core1333-FullHD Motherboard Français - ASRock 4Core1333-FullHD | Quick Installation Guide - Page 73
le processeur 775 broches : Etape 2-1. Tenez le processeur par ses bords là où se trouvent des lignes noires Etape 2-2. Orientez le paquet avec le dissipateur thermique intégré (IHS) vers le haut. Repérez la broche 1 et les deux encoches d'orientation. 73 ASRock 4Core1333-FullHD Motherboard Ligne - ASRock 4Core1333-FullHD | Quick Installation Guide - Page 74
775 broches Socket 775 broches Pour une insertion correcte, veuillez vérifier que vous faites bien correspondre les deux encoches d'orientation sur le processeur avec les deux détrompeurs du socket renvoyez la carte mère pour service après vente. Etape 4. ASRock 4Core1333-FullHD Motherboard - ASRock 4Core1333-FullHD | Quick Installation Guide - Page 75
reporter aux manuels d'instructions de votre ventilateur du dissipateur thermique pour un processeur 775 broches. (Appliquez le matériau mère) Etape 2. Placez le dissipateur thermique sur le socket. Vérifiez que les câbles du ventilateur sont orient ASRock 4Core1333-FullHD Motherboard Français - ASRock 4Core1333-FullHD | Quick Installation Guide - Page 76
m émoire [DIMM] La carte mère 4Core1333-FullHD dispose de quatre emplacements DIMM DDRII (Double Data Rate II) de 240-broches, et supporte la Technologie de Mémoire à Canal Double. Pour le slot DDRII; la carte mère et les DIMM pourraient être endommagés. 76 ASRock 4Core1333-FullHD Motherboard - ASRock 4Core1333-FullHD | Quick Installation Guide - Page 77
jusqu'à ce que les clips de maintien situés aux deux extrémités se ferment complètement et que le module DIMM soit inséré correctement. 77 ASRock 4Core1333-FullHD Motherboard - ASRock 4Core1333-FullHD | Quick Installation Guide - Page 78
et appuyez fermement jusqu'à l'insertion complète de la carte dans son emplacement. Etape 4. Fixez la carte sur le châssis à l'aide d'une vis. 78 ASRock 4Core1333-FullHD Motherboard Français - ASRock 4Core1333-FullHD | Quick Installation Guide - Page 79
VGA intégré, installez le pilote VGA intégré de notre CD de support sur votre ordinateur et redémarrez votre ordinateur. Vous pourrez alors utiliser la )ou HD-DVD disque, le contenu sera display juste sur un de deux moniteurs au lieu de deux moniteurs. 79 ASRock 4Core1333-FullHD Motherboard Français - ASRock 4Core1333-FullHD | Quick Installation Guide - Page 80
re supporte la ème. Appuyez sur pour entrer dans le setup du BIOS. Réglez l'élément "Adaptateur graphique primaire" sur [Intégré]. Et décrites cidessous sont pour Windows® XP. Si vous utilisez une autre version de Windows®, les noms des éléments 80 ASRock 4Core1333-FullHD Motherboard Français - ASRock 4Core1333-FullHD | Quick Installation Guide - Page 81
moniteur qui supporte aussi HDCP foncion. Certe, vous pouvez admirer l'ecran superieur de bonne qualite avec le contenu de la hign-definition HDCP encryption. Veuillez se referer a l'instruction suivante LCD moniteur que vous achetez est compatible. 81 ASRock 4Core1333-FullHD Motherboard Français - ASRock 4Core1333-FullHD | Quick Installation Guide - Page 82
Pour Windows® XP / XP 64-bit OS Procede 1: Regler BIOS A. Entrer BIOS SETUP UTILITY Ecran advance Configuration de chipset B. Regler l'option" Onboard HDMI HD Audio"sur [Auto]. Procede 2: Installer le lecteur audio HDMI sur votre systeme. Installer "Onboard HDMI HD Audio Driver" du ASRock Support CD - ASRock 4Core1333-FullHD | Quick Installation Guide - Page 83
après avoir mis le BIOS à jour. Si vous avez besoin d'effacer la CMOS lorsque vous avez fini de mettre le BIOS à jour, vous devez d'abord initialiser le système, puis le mettre hors tension avant de procéder à l'opération d'effacement de la CMOS. Français 83 ASRock 4Core1333-FullHD Motherboard - ASRock 4Core1333-FullHD | Quick Installation Guide - Page 84
mère vers le disque dur Câble ATA 66/100/133 80 conducteurs Note: Veuillez vous reporter aux instructions du fabricant de votre IDE périphérique pour les détails. Connecteurs Série ATAII (SATAII_1: voir au connecteur SATAII sur la carte mère. Français 84 ASRock 4Core1333-FullHD Motherboard - ASRock 4Core1333-FullHD | Quick Installation Guide - Page 85
la détection de fiche, mais le fil de panneau sur le châssis doit prendre en charge le HDA pour fonctionner correctement. Veuillez suivre les instructions dans notre manuel et le manuel de châssis afin installer votre système. 85 ASRock 4Core1333-FullHD Motherboard Français - ASRock 4Core1333-FullHD | Quick Installation Guide - Page 86
BIOS. Saisir les Paramètres avancés puis sélectionner Configuration du jeu de puces. Définir l'option panneau de commande de [Auto] à [Activé]. F. Entrer dans le système Windows pour entrer dans le Gestionnaire audio Realtek HD. Pour Windows® 2000 / XP / XP 64-bit ASRock 4Core1333-FullHD Motherboard - ASRock 4Core1333-FullHD | Quick Installation Guide - Page 87
ventilateur. Si vous prévoyez de connecter le ventilateur de CPU à 3 broches au connecteur du ventilateur de CPU sur cette carte mère, veuillez le connecter aux broches 1-3. carte mere. Le header de IEEE 1394 peut supporter un port de IEEE 1394. Français 87 ASRock 4Core1333-FullHD Motherboard - ASRock 4Core1333-FullHD | Quick Installation Guide - Page 88
lire attentivement le présent guide d'installation du disque dur SATAII fonction SATAII, veuillez suivre les instructions ci-dessous avec les différents de détails. http://www.hitachigst.com/hdd/support/download.htm Les exemples donnés précédemment ne ASRock 4Core1333-FullHD Motherboard Français - ASRock 4Core1333-FullHD | Quick Installation Guide - Page 89
"Disk Management" « Gestionnaire de disque » et commencer à l'utiliser. (WebPAM est un utilitaire pour ATITM Windows RAID. Veuillez vous référer au guide d'installation de RAID dans notre CD d'assistance pour connaître les détails de la procédure) Français 89 ASRock 4Core1333-FullHD Motherboard - ASRock 4Core1333-FullHD | Quick Installation Guide - Page 90
Si les disques durs SATA / SATAII ne sont pas en configuration RAID, l'action d'insérer et de retirer des disques SATA / SATAII et en fonctionnement s'appelle le "Hot Swap". 2.12 Guide d'installation des pilotes Pour installer les pilotes sur votre syst ASRock 4Core1333-FullHD Motherboard Français - ASRock 4Core1333-FullHD | Quick Installation Guide - Page 91
. Veuillez sélectionner le CD-ROM comme périphérique de démarrage. C. Lorsque vous voyez s'afficher sur l'écran le message "Generate Serial ATA driver diskette [Y/N]?" (Voulez-vous générer une disquette de pilotage Série ATA [Y/N]?), appuyez sur . 91 ASRock 4Core1333-FullHD Motherboard Français - ASRock 4Core1333-FullHD | Quick Installation Guide - Page 92
du CD Support: .. \ RAID Installation Guide REMARQUE2: Si votre système d'exploitation est Windows® 2000, veuillez installer le pilote de la carte graphique avant d'installer l'« Utilitaire SATA2 » depuis notre CD d'assistance sur votre système. 92 ASRock 4Core1333-FullHD Motherboard Français - ASRock 4Core1333-FullHD | Quick Installation Guide - Page 93
avez encore besoin de configurer "Mode d'opération SATA" à [RAID] tout d'abord. Veuillez ensuite configurer le RAID à l'aide de la partie Guide d'installation RAID Windows du document sous le chemin suivant du CD Support: .. \ RAID Installation Guide 93 ASRock 4Core1333-FullHD Motherboard Français - ASRock 4Core1333-FullHD | Quick Installation Guide - Page 94
é Configuration IDE. B. Réglez l'option "SATA Operation Mode"« Mode de fonctionnement SATA » sur [RAID]. ETAP 2: Créez une disquette pilotes SATA / SATAII. Faites une disquette du pilote SATA / SATAII en suivant l'étape 2, section 2.14.1, page 91. 94 ASRock 4Core1333-FullHD Motherboard Français - ASRock 4Core1333-FullHD | Quick Installation Guide - Page 95
64-bit sans fonctions RAID Si vous souhaitez installer le SE Windows® VistaTM ou Windows® VistaTM 64-bit sur vos disques durs SATA / SATAII sans les fonctions RAID, veuillez suivre les procédures ci-dessous en fonction du SE que vous installez. Français 95 ASRock 4Core1333-FullHD Motherboard - ASRock 4Core1333-FullHD | Quick Installation Guide - Page 96
UTILITAIRE DE CONFIGURATION BIOS écran Avancé Configuration IDE. B. Réglez l'option "SATA Operation Mode"« Mode de fonctionnement SATA » sur [non-RAID]. ETAPE 2: Installer le système d'exploitation Windows® VistaTM / VistaTM 64-bit sur votre système. 96 ASRock 4Core1333-FullHD Motherboard Français - ASRock 4Core1333-FullHD | Quick Installation Guide - Page 97
Mode de surcadençage" de la configuration du BIOS pour établir la sélection de [Auto] à [CPU, PCIE, Async.]. Par conséquent, le CPU FSB n'est pas lié durant le surcadençage liés à l'overclocking avant d'appliquer la technologie Untied Overclocking. 97 ASRock 4Core1333-FullHD Motherboard Français - ASRock 4Core1333-FullHD | Quick Installation Guide - Page 98
le BIOS, veuillez consulter le Guide de l'utilisateur (fichier PDF) dans le CD technique. 4. Informations sur le CD de support Cette carte mère supporte divers systèmes d'exploitation Microsoft® Windows®: double-cliquez dessus pour afficher les menus. 98 ASRock 4Core1333-FullHD Motherboard Français - ASRock 4Core1333-FullHD | Quick Installation Guide - Page 99
ASRock 4Core1333-FullHD 1 x cavo IDE 80-pin Ultra ATA 66/100/133 1 x cavo per floppy drive a 1,44 Mb 1 x cavo dati Serial ATA (SATA) (Opzionale) 1 x cavo alimentatore HDD Serial ATA (SATA) (Opzionale) 1 x ASRock DVI_1394 I/O Shield 1 x Porta COM 99 ASRock 4Core1333-FullHD Motherboard Italiano - ASRock 4Core1333-FullHD | Quick Installation Guide - Page 100
ray (BD) / HD-DVD riproduzione (vedi ATTENZIONE 8) Audio - 7.1 Audio HD CH Windows® VistaTM Premium Level (ALC888 Audio Codec) - Chipset HDMI Audio incorporato LAN - PCIE x1 Gigabit LAN 10/100/1000 Mb/s - Realtek RTL8111B - Supporta Wake-On-LAN ASRock 4Core1333-FullHD Motherboard Italiano - ASRock 4Core1333-FullHD | Quick Installation Guide - Page 101
AMI BIOS - Suppor AMI legal BIOS - Supporta "Plug and Play" - Compatibile con ACPI 1.1 wake up events - Supporta jumperfree - Supporta SMBIOS 2.3.1 - Driver, la ventola di raffreddamento - Ventola CPU silenziosa - Voltaggio: +12V, +5V, +3.3V, Vcore Italiano ASRock 4Core1333-FullHD Motherboard 101 - ASRock 4Core1333-FullHD | Quick Installation Guide - Page 102
Windows® XP e Windows® VistaTM. Per Windows® XP 64-bit e Windows® VistaTM 64-bit con CPU 64-bit, non c'è tale limitazione. 6. Anche se questa motherboard offre il controllo stepless, non si consiglia di effettuare l'overclocking ulteriori informazioni. ASRock 4Core1333-FullHD Motherboard Italiano - ASRock 4Core1333-FullHD | Quick Installation Guide - Page 103
inoltre la funzione HDCP per qualificare il logo Windows® VistaTM Premium 2007. * Dopo il 1 Giugno 2007, tutti i sistemi Windows® VistaTM vengono richiesti di essere in accordo ai requisiti minimi del sistema per Windows® VistaTM Premium 2007 logo. Italiano ASRock 4Core1333-FullHD Motherboard 103 - ASRock 4Core1333-FullHD | Quick Installation Guide - Page 104
. 5. Nell'usare i giraviti per fissare la scheda madre al telaio non serrare eccessivamente le viti! Altrimenti si rischia di danneggiare la scheda madre. Italiano 104 ASRock 4Core1333-FullHD Motherboard - ASRock 4Core1333-FullHD | Quick Installation Guide - Page 105
la leva di carico per aprirla completamente. Fase 1-3. Ruotare di circa 100 gradi la piastra di carico per aprirla completamente. Fase 2. Inserire la CPU 775-Pin: Fase 2-1. Tenere la CPU dai bordi segnati con linee nere. Linea nera Linea nera Italiano ASRock 4Core1333-FullHD Motherboard 105 - ASRock 4Core1333-FullHD | Quick Installation Guide - Page 106
di orientamento Pin1 Dente di Tacca di allineamento orientamento Tacca di allineamento CPU da 775-Pin Socket da 775-Pin Per il corretto inserimento, verificare di far combaciare i due denti di carico mentre si preme leggermente sulla piastra di carico. 106 ASRock 4Core1333-FullHD Motherboard - ASRock 4Core1333-FullHD | Quick Installation Guide - Page 107
alimentazione della ventola al connettore ventola della CPU sulla scheda madre. fissare il cavo in eccesso con fascette per assicurare che il cavo non interferisca con il funzionamento della ventola o che venga a contatto con gli altri componenti. ASRock 4Core1333-FullHD Motherboard 107 Italiano - ASRock 4Core1333-FullHD | Quick Installation Guide - Page 108
2.3 Installazione dei moduli di memoria (DIMM) La scheda madre 4Core1333-FullHD fornisce quattro alloggiamenti DIMM DDRII (Double Data Rate II) a 240 pin, e supporta la slot DDRII, altrimenti si possono danneggiare questa scheda madre e la DIMM. Italiano 108 ASRock 4Core1333-FullHD Motherboard - ASRock 4Core1333-FullHD | Quick Installation Guide - Page 109
la DIMM nello slot fino a far scattare completamente in posizione i fermagli di ritegno alle due estremità e fino ad installare correttamente la DIMM nella sua sede. ASRock 4Core1333-FullHD Motherboard 109 - ASRock 4Core1333-FullHD | Quick Installation Guide - Page 110
Esistono 2 slot PCI, 1 slot HDMR e 2 slot PCI Express su entrambe le schede madri 4Core1333-FullHD. Slot PCI: Sono utilizzati per installare schede di espansione con Interfaccia PCI a 32-bit. Slot HDMR Agganciare la scheda allo chassis con le viti. Italiano 110 ASRock 4Core1333-FullHD Motherboard - ASRock 4Core1333-FullHD | Quick Installation Guide - Page 111
/DVI-D porta VGA/D-Sub 2. Se si è già installato nel sistema il driver VGA integrato dal CD di supporto, con questa scheda madre si può utilizzare oppure HD-DVD, il contenuto verra' visualizzato solamente su uno dei due monitor invece che su entrambi. ASRock 4Core1333-FullHD Motherboard 111 - ASRock 4Core1333-FullHD | Quick Installation Guide - Page 112
del display indicata con il numero 2. D. Fare clic su "Extend my Windows desktop onto this monitor (Estendi desktop su questo schermo)". E. Fare clic con il tasto destro sull'icona del display e selezionare "Attached (Allegato)", se necessario. Italiano 112 ASRock 4Core1333-FullHD Motherboard - ASRock 4Core1333-FullHD | Quick Installation Guide - Page 113
PC, richiedono una connessione sicura allo schermo relativo. Dato che il produttore produce apparecchi HDCP, raccomandiamo di acquistare unita' compatibili con l'HDTV o LCD monitor. Italiano ASRock 4Core1333-FullHD Motherboard 113 - ASRock 4Core1333-FullHD | Quick Installation Guide - Page 114
BIOS. A. Entrare in BIOS SETUP UTILITY Advanced Screen Chipset Configuration. B. Regolare l'opzione "Onboard HDMI HD Audio" a [Auto]. Punto 2: Installare il driver dell'audio HDMI al vostro sistema. Installare "Onboard HDMI HD Audio Driver" da ASRock Support 114 ASRock 4Core1333-FullHD Motherboard - ASRock 4Core1333-FullHD | Quick Installation Guide - Page 115
Non cancellare la CMOS subito dopo aver aggiornato il BIOS. Se è necessario cancellare la CMOS una volta completato l'aggiornamento del BIOS, è necessario riavviare prima il sistema, e poi spegnerlo prima di procedere alla cancellazione della CMOS. Italiano ASRock 4Core1333-FullHD Motherboard 115 - ASRock 4Core1333-FullHD | Quick Installation Guide - Page 116
SATAII_1 Questi quattro connettori Serial ATA (SATAII) supportano le periferiche di archiviazione HD SATA o SATAII per le funzioni di archiviazione interna. ATAII (SATAII) supportano 'hard disk SATA / SATAII o al connettore SATAII sulla scheda madre. ASRock 4Core1333-FullHD Motherboard Italiano - ASRock 4Core1333-FullHD | Quick Installation Guide - Page 117
come CD-ROM, DVD-ROM,TV tuner, o schede MPEG. È un'interfaccia per il cavo del pannello audio. Che consente connessione facile e controllo dei dispositivi audio. ASRock 4Core1333-FullHD Motherboard 117 - ASRock 4Core1333-FullHD | Quick Installation Guide - Page 118
Attenersi alle istruzioni del nostro manuale e del manuale del telaio per installare il HD. Non è necessario collegarli per il pannello audio AC'97. E. Entrare nel programma di impostazione BIOS per entrare su Realtek HD Audio Manager. Per Windows® 2000 / XP / ASRock 4Core1333-FullHD Motherboard - ASRock 4Core1333-FullHD | Quick Installation Guide - Page 119
terra. Sebbene la presente scheda madre disponga di un supporto per ventola CPU a 4 piedini (ventola silenziosa), la ventola CPU a 3 piedini è in grado di funzionare anche senza la funzione di intestazione IEEE 1394 puo' supportare una porta IEEE 1394. ASRock 4Core1333-FullHD Motherboard 119 - ASRock 4Core1333-FullHD | Quick Installation Guide - Page 120
di diversi produttori, i metodi di impostazione dei pin del jumper possono non essere gli stessi. Visitare i siti web dei produttori per gli aggiornamenti. Italiano 120 ASRock 4Core1333-FullHD Motherboard - ASRock 4Core1333-FullHD | Quick Installation Guide - Page 121
dischi rigidi SATA / SATAII vuoti su "Disk Management" (Gestione disco) ed è possibile utilizzarlo. (WebPAM è una utility di ATITM Windows RAID. Per ulteriori procedure dettagliate, consultare la guida all'installazione RAID sul CD in dotazione.) Italiano ASRock 4Core1333-FullHD Motherboard 121 - ASRock 4Core1333-FullHD | Quick Installation Guide - Page 122
/ SATAII La scheda madre 4Core1333-FullHD supporta le funzioni Hot Plug ed Hot Swap per periferiche SATA / SATAII in modo RAID / AHCI. Il chipset . 2. Installare il driver della scheda HDMR nel sistema dal CD in dotazione. 3. Riavviare il sistema. Italiano 122 ASRock 4Core1333-FullHD Motherboard - ASRock 4Core1333-FullHD | Quick Installation Guide - Page 123
sullo schermo compare il messaggio: "Generate Serial ATA driver diskette [Y/N]?" (Vuoi creare un dischetto di driver Serial ATA [Y/N]?), premere . D. Di seguito ci sarà questo messaggio: Please insert a blank formatted diskette into floppy ASRock 4Core1333-FullHD Motherboard 123 Italiano - ASRock 4Core1333-FullHD | Quick Installation Guide - Page 124
2.14.2 Installazione di Windows® VistaTM / VistaTM 64 bit con funzioni RAID Se si desidera installare Windows® VistaTM o Windows® VistaTM a 64 bit su un disco RAID dotato di 2 o più dischi rigidi SATA / SATAII con funzioni RAID, agire come segue. Italiano 124 ASRock 4Core1333-FullHD Motherboard - ASRock 4Core1333-FullHD | Quick Installation Guide - Page 125
funzioni RAID Se si desidera installare Windows® 2000, Windows® XP, Windows® XP 64 bit, Windows® VistaTM o Windows® VistaTM 64 bit sui dischi rigidi SATA / SATAII privi di funzioni RAID, osservare le procedure di seguito in base al sistema operativo installato. ASRock 4Core1333-FullHD Motherboard - ASRock 4Core1333-FullHD | Quick Installation Guide - Page 126
per la creazione di JBOD, consultare il seguente percorso del CD in dotazione della guida all'installazione BIOS RAID: .. \ RAID Installation Guide La funzione JBOD di questa scheda madre è supportata solo con singoli dischi rigidi SATA / SATAII. Italiano 126 ASRock 4Core1333-FullHD Motherboard - ASRock 4Core1333-FullHD | Quick Installation Guide - Page 127
il sistema, poi seguire le istruzioni per installare il sistema operativo Windows® VistaTM / VistaTM 64-bit sul sistema. Quando si vede la pagina "Where do you want to install Windows?" (Dove si vuole eseguire l'istallazione di Windows), inserire il ASRock 4Core1333-FullHD Motherboard 127 Italiano - ASRock 4Core1333-FullHD | Quick Installation Guide - Page 128
modalità fissata in modo tale che l'FSB posa operare sotto un più stabile ambiente di overclocking. Fare riferimento all'avviso di pagina 102 per i possibili rischi dell'overclocking prima di applicare la tecnologia Untied Overclocking Technology. Italiano 128 ASRock 4Core1333-FullHD Motherboard - ASRock 4Core1333-FullHD | Quick Installation Guide - Page 129
BIOS, fare riferimento al Manuale dell'Utente (PDF file) contenuto nel cd di supporto. 4. Software di supporto e informazioni su CD Questa scheda madre supporta vari sistemi operativi Microsoft® Windows e cliccare due volte per visualizzare i menù. Italiano ASRock 4Core1333-FullHD Motherboard 129 - ASRock 4Core1333-FullHD | Quick Installation Guide - Page 130
manual, la versión actualizada estará disponible en el website de ASRock sin previo aviso. También encontrará las listas de las últimas tarjetas VGA y CPU soportadas en la página web de ASRock. Website de ASRock http://www.asrock.com 1.1 Contenido de la caja 1 x Placa base ASRock 4Core1333-FullHD - ASRock 4Core1333-FullHD | Quick Installation Guide - Page 131
x 9,6" - LGA 775 para Intel® CoreTM CPU HD-DVD (vea ATENCIÓN 8) - Sonido HD de Nivel Superior 7.1 Canales Windows® VistaTM (Códec de sonido ALC888) - Chipset encajado en HDMI Audio - PCIE x1 Gigabit LAN 10/100/1000 Mb/s - Realtek RTL8111B - Soporta Wake-On-LAN ASRock 4Core1333-FullHD Motherboard - ASRock 4Core1333-FullHD | Quick Installation Guide - Page 132
prueba) - Sensibilidad a la temperatura del procesador - Sensibilidad a la temperatura de la placa madre - Taquímetros de los ventiladores del procesador y del procesador Español 132 ASRock 4Core1333-FullHD Motherboard - ASRock 4Core1333-FullHD | Quick Installation Guide - Page 133
(BD) / HD-DVD en esta placa base requiere la configuración de hardware apropiada. Por favor refieren a la página 9 y 10 para el requisito mínimo de hardware y las películas de Blu-rayo de 1080p (BD) / HD-DVD pasado en nuestra prueba del laboratorio. ASRock 4Core1333-FullHD Motherboard 133 Español - ASRock 4Core1333-FullHD | Quick Installation Guide - Page 134
de Windows® VistaTM Premium o Basic, ajuste el tamaño de la memoria compartida de la tarjeta VGA a 128 MB como mínimo. * Si piensa utilizar una tarjeta gráfica externa en esta placa base, consulte los requisitos en Premium Discrete en http://www.asrock.com ASRock 4Core1333-FullHD Motherboard Espa - ASRock 4Core1333-FullHD | Quick Installation Guide - Page 135
de Windows® VistaTM Premium 2007. * Después del 1 de Junio de 2007, todos los sistemas de Windows® CPU Intel de (Placa de carga) 775 agujas, siga los siguientes pasos. (Matriz de contacto) (Cuerpo del socket) Español Introducción al socket de 775 agujas ASRock 4Core1333-FullHD Motherboard - ASRock 4Core1333-FullHD | Quick Installation Guide - Page 136
ón Muesca de orientación aguja 1 Tecla de alineación Tecla de alineación CPU de 775 agujas Socket de 775 agujas Para insertarla correctamente, asegúrese de que las dos muescas de orientación de la CPU coinciden con las teclas de alineación del socket. 136 ASRock 4Core1333-FullHD Motherboard - ASRock 4Core1333-FullHD | Quick Installation Guide - Page 137
de la CPU. A continuación se ofrece un ejemplo para ilustrar la instalación del disipador para la CPU de 775 agujas. (Aplique el material termal de interfaz) Paso 1. Aplique el material termal de interfaz en el centro del IHS de la superficie del socket. ASRock 4Core1333-FullHD Motherboard 137 - ASRock 4Core1333-FullHD | Quick Installation Guide - Page 138
del ventilador con el conector del ventilador de la CPU en la placa madre. Fije el cable que sobre con un lazo para asegurarse de que el cable no interfiere en el funcionamiento del ventilador y tampoco entra en contacto con otros componentes. Español 138 ASRock 4Core1333-FullHD Motherboard - ASRock 4Core1333-FullHD | Quick Installation Guide - Page 139
2.3 Instalación de Memoria La placa 4Core1333-FullHD ofrece cuatro ranuras DIMM DDRII de 240 pines, y soporta Tecnología de Memoria de Doble Canal. Para la la ranura DDRII; si lo hace, esta placa base y los módulos DIMM pueden resultar dañados. Español ASRock 4Core1333-FullHD Motherboard 139 - ASRock 4Core1333-FullHD | Quick Installation Guide - Page 140
de la ranura hasta que los clips de sujeción de ambos lados queden completamente introducidos en su sitio y la DIMM se haya asentado apropiadamente. 140 ASRock 4Core1333-FullHD Motherboard - ASRock 4Core1333-FullHD | Quick Installation Guide - Page 141
) Hay 2 ranuras PCI, 1 ranura HDMR y 2 ranura PCI Express sobre las placas mardres 4Core1333-FullHD. Ranuras PCI: Para instalar tarjetas de expansión que tienen 32-bit Interface PCI. Ranura HDMR: la ranura. Paso 4. Asegure la tarjeta con tornillos. Español ASRock 4Core1333-FullHD Motherboard 141 - ASRock 4Core1333-FullHD | Quick Installation Guide - Page 142
los puertos VGA/DVI-D VGA/D-Sub con esta placa base. Cuando reproduce el vídeo de HDCP-protegido desde el disco de Blu-rayo (BD) o de HD-DVD, el contenido será exhibido solamente en uno de los dos monitores en vez de los ambos monitores. 142 ASRock 4Core1333-FullHD Motherboard Español - ASRock 4Core1333-FullHD | Quick Installation Guide - Page 143
placa base. 3. Reinicie su sistema. Pulse para acceder al sistema BIOS. Configure el parámetro "Adaptador gráfico primario" como [En placa]. paso se basan en el entorno Windows® XP. Si instala otro sistema operativo Windows® OS, los nombres de las ol ASRock 4Core1333-FullHD Motherboard 143 - ASRock 4Core1333-FullHD | Quick Installation Guide - Page 144
de los fabricantes que emplean HDCP en su equipo, Es recomendado altamente que el HDTV o monitor del LCD que compra es compatible. Español 144 ASRock 4Core1333-FullHD Motherboard - ASRock 4Core1333-FullHD | Quick Installation Guide - Page 145
el BIOS. A. Incorpore la UTILIDAD de DISPOSICIÓN del BIOS Pantalla avanzada Configuración del Chipset. B. Ajuste la opción de "Audio de HDMI HD Sobre la placa base" a [Auto]. Paso 2: Entre Windows® reanuda el sistema, la función audio de HDMI está disponible. ASRock 4Core1333-FullHD Motherboard 145 - ASRock 4Core1333-FullHD | Quick Installation Guide - Page 146
érdase de quitar el jumper cap después de limpiar el COMS. Si necesita borrar la CMOS cuando acabe de finalizar la actualización de la BIOS, debe arrancar primero el sistema y, a continuación, apagarlo antes de realizar la acción de borrado de CMOS. Español 146 ASRock 4Core1333-FullHD Motherboard - ASRock 4Core1333-FullHD | Quick Installation Guide - Page 147
(SATA) (Opcional) Ambos extremos del cable pueden conectarse al disco duro SATA / SATAII o la conexión de la placa base. SATAII_4 SATAII_3 SATAII_2 SATAII_1 Español ASRock 4Core1333-FullHD Motherboard 147 - ASRock 4Core1333-FullHD | Quick Installation Guide - Page 148
la detección de conector, pero el cable de panel en el chasis debe soportar HDA para operar correctamente. Por favor, siga las instrucciones en nuestro manual y en el manual de chasis para instalar su sistema. ASRock 4Core1333-FullHD Motherboard Español - ASRock 4Core1333-FullHD | Quick Installation Guide - Page 149
HD. No necesitará conectarlos al panel de sonido AC'97. E. Entre en la Utilidad de configuración del BIOS el Administrador de audio HD Realtek. Para Windows® 2000 / XP / CPU a este conector y 3 2 haga coincidir el cable negro 1 con el conector de tierra. ASRock 4Core1333-FullHD Motherboard 149 - ASRock 4Core1333-FullHD | Quick Installation Guide - Page 150
un jefe de IEEE 1394 (FRONT_1394) en esta placa base. Este jefe de IEEE 1394 puede apoyar un puerto de IEEE 1394. Español 150 ASRock 4Core1333-FullHD Motherboard - ASRock 4Core1333-FullHD | Quick Installation Guide - Page 151
Por favor visite el sitio Web de Hitachi para detalles. http://www.hitachigst.com/hdd/support/download.htm Los ejemplos anteriores son sólo para referencia. Para diferentes productos de disco duro de los proveedores para obtener las actualizaciones. Español ASRock 4Core1333-FullHD Motherboard 151 - ASRock 4Core1333-FullHD | Quick Installation Guide - Page 152
á el disco duro SATA / SATAII vacío en la ficha "Disk Management" (Gestión de discos) y podrá comenzar a usarlo. (WebPAM es una utilidad para RAID ATITM de Windows. Consulte la Guía de Instalación RAID en nuestro CD de soporte para más información). Español 152 ASRock 4Core1333-FullHD Motherboard - ASRock 4Core1333-FullHD | Quick Installation Guide - Page 153
la función de conexión en caliente? Si los HDDs SATA / SATAII no están fijados para su configuración RAID, se llama "Conexión en caliente" a la acción de insertar y quitar los HDDs SATA / SATAII mientras soporte) en el sistema. 3. Reinicie el equipo. Español ASRock 4Core1333-FullHD Motherboard 153 - ASRock 4Core1333-FullHD | Quick Installation Guide - Page 154
el CD-ROM como unidad de inicio. C. Cuando vea en pantalla el mensaje: "Generate Serial ATA driver diskette [Y/ N]? (¿Desea generar un disquete de controlador de serie ATA?)", pulse . D. A continuación podrá ver los siguientes mensajes: Español 154 ASRock 4Core1333-FullHD Motherboard - ASRock 4Core1333-FullHD | Quick Installation Guide - Page 155
encuentra en la siguiente ruta del CD de soporte: .. \ RAID Installation Guide NOTA2. Si su sistema operativo es Windows® 2000, instale el controlador de la tarjeta gráfica antes de instalar la "Utilidad SATA2" desde el CD de soporte en su sistema. Español ASRock 4Core1333-FullHD Motherboard 155 - ASRock 4Core1333-FullHD | Quick Installation Guide - Page 156
el "Modo de Operación SATA" a [RAID]. A continuación, establezca la configuración RAID mediante la parte de la guía de instalación Windows RAID del documento que se encuentra en la siguiente ruta del CD de soporte: .. \ RAID Installation Guide Español 156 ASRock 4Core1333-FullHD Motherboard - ASRock 4Core1333-FullHD | Quick Installation Guide - Page 157
la utilidad RAID BIOS (Utilidad FastBuild) para crear un JBOD en discos duros SATA / SATAII. Reinicie su sistema. Pulse para entrar en la utilidad BIOS RAID (Utilidad FastBuild) y cree un JBOD en el disco duro SATA / SATAII. Para conocer el ASRock 4Core1333-FullHD Motherboard 157 Espa - ASRock 4Core1333-FullHD | Quick Installation Guide - Page 158
ón de Windows® VistaTM / VistaTM 64 bits sin Funciones RAID Si desea instalar Windows® VistaTM o Windows® VistaTM 64 bits en su disco duro SATA / SATAII sin funciones RAID, siga los procedimientos siguientes según el sistema operativo que instale. Español 158 ASRock 4Core1333-FullHD Motherboard - ASRock 4Core1333-FullHD | Quick Installation Guide - Page 159
de configuración de BIOS pantalla de Avanzada Configuración IDE. B. Establezca la opción "SATA Operation Mode"(Modo de funcionamiento SATA) en [non-RAID]. PASO 2: Instale el sistema operativo Windows® VistaTM / VistaTM 64 bits en su sistema. Español ASRock 4Core1333-FullHD Motherboard 159 - ASRock 4Core1333-FullHD | Quick Installation Guide - Page 160
la BIOS, por favor refiérase al Manual del Usuario (archivo PDF) contenido en el CD. 4.Información de Software Support CD Esta placa-base soporta diversos tipos de sistema operativo Windows®: 2000 "ASSETUP.EXE" para iniciar la instalación. Español 160 ASRock 4Core1333-FullHD Motherboard
-
 1
1 -
 2
2 -
 3
3 -
 4
4 -
 5
5 -
 6
6 -
 7
7 -
8
-
9
-
10
-
11
-
12
-
13
-
14
-
15
-
16
-
17
-
18
-
19
-
20
-
21
-
22
-
23
-
24
-
25
-
26
-
27
-
28
-
29
-
30
-
31
-
32
-
33
-
34
-
35
-
36
-
37
-
38
-
39
-
40
-
41
-
42
-
43
-
44
-
45
-
46
-
47
-
48
-
49
-
50
-
51
-
52
-
53
-
54
-
55
-
56
-
57
-
58
-
59
-
60
-
61
-
62
-
63
-
64
-
65
-
66
-
67
-
68
-
69
-
70
-
71
-
72
-
73
-
74
-
75
-
76
-
77
-
78
-
79
-
80
-
81
-
82
-
83
-
84
-
85
-
86
-
87
-
88
-
89
-
90
-
91
-
92
-
93
-
94
-
95
-
96
-
97
-
98
-
99
-
100
-
101
-
102
-
103
-
104
-
105
-
106
-
107
-
108
-
109
-
110
-
111
-
112
-
113
-
114
-
115
-
116
-
117
-
118
-
119
-
120
-
121
-
122
-
123
-
124
-
125
-
126
-
127
-
128
-
129
-
130
-
131
-
132
-
133
-
134
-
135
-
136
-
137
-
138
-
139
-
140
-
141
-
142
-
143
-
144
-
145
-
146
-
147
-
148
-
149
-
150
-
151
-
152
-
153
-
154
-
155
-
156
-
157
-
158
-
159
-
160
 |
 |

1
ASRock
4Core1333-FullHD
Motherboard
Copyright Notice:
Copyright Notice:
Copyright Notice:
Copyright Notice:
Copyright Notice:
No part of this installation guide may be reproduced, transcribed, transmitted, or trans-
lated in any language, in any form or by any means, except duplication of documen-
tation by the purchaser for backup purpose, without written consent of ASRock Inc.
Products and corporate names appearing in this guide may or may not be registered
trademarks or copyrights of their respective companies, and are used only for identifica-
tion or explanation and to the owners’ benefit, without intent to infringe.
Disclaimer:
Disclaimer:
Disclaimer:
Disclaimer:
Disclaimer:
Specifications and information contained in this guide are furnished for informational
use only and subject to change without notice, and should not be constructed as a
commitment by ASRock. ASRock assumes no responsibility for any errors or omissions
that may appear in this guide.
With respect to the contents of this guide, ASRock does not provide warranty of any kind,
either expressed or implied, including but not limited to the implied warranties or
conditions of merchantability or fitness for a particular purpose. In no event shall
ASRock, its directors, officers, employees, or agents be liable for any indirect, special,
incidental, or consequential damages (including damages for loss of profits, loss of
business, loss of data, interruption of business and the like), even if ASRock has been
advised of the possibility of such damages arising from any defect or error in the guide
or product.
This device complies with Part 15 of the FCC Rules. Operation is subject to the
following two conditions:
(1)
this device may not cause harmful interference, and
(2)
this device must accept any interference received, including interference that
may cause undesired operation.
CALIFORNIA, USA ONLY
The Lithium battery adopted on this motherboard contains Perchlorate, a toxic
substance controlled in Perchlorate Best Management Practices (BMP) regulations
passed by the California Legislature. When you discard the Lithium battery in
California, USA, please follow the related regulations in advance.
“Perchlorate Material-special handling may apply, see
www
.dtsc.ca.gov/hazardouswa
ste/perchlorate”
ASRock Website: http://www.asrock.com
English
English
English
English
English
Published June 2007
Copyright
©
2007 ASRock INC. All rights reserved.