ASRock 4Core1600-D800 Quick Installation Guide
ASRock 4Core1600-D800 Manual
 |
View all ASRock 4Core1600-D800 manuals
Add to My Manuals
Save this manual to your list of manuals |
ASRock 4Core1600-D800 manual content summary:
- ASRock 4Core1600-D800 | Quick Installation Guide - Page 1
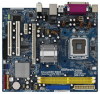
for backup purpose, without written consent of ASRock Inc. Products and corporate names appearing in this guide may or may not be registered trademarks or ASRock Website: http://www.asrock.com Published April 2008 Copyright©2008 ASRock INC. All rights reserved. 1 ASRock 4Core1600-D800 Motherboard - ASRock 4Core1600-D800 | Quick Installation Guide - Page 2
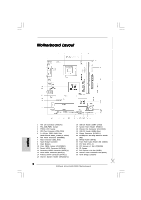
Detection Header (IR1) 22 WiFi/E Header (WIFI/E) 23 Front Panel Audio Header (HD_AUDIO1) 24 PCI Slots (PCI1 - 2) 25 PCI Express x1 Slot (PCIE2/DE) 26 FD Jumper 27 PCI Express x16 Slot (PCIE1) 28 Internal Audio Connector: CD1 (Black) 29 North Bridge Controller 2 ASRock 4Core1600-D800 Motherboard - ASRock 4Core1600-D800 | Quick Installation Guide - Page 3
Audio 2nd output" to use front panel audio. Then reboot your system. For Windows® VistaTM: After restarting your computer, please double-click "Realtek HD Audio two different audio streams simultaneously", and click "ok". Then reboot your system. 3 ASRock 4Core1600-D800 Motherboard English - ASRock 4Core1600-D800 | Quick Installation Guide - Page 4
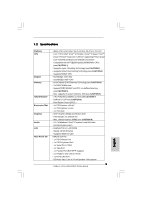
about the model you are using. www.asrock.com/support/index.asp 1.1 Package Contents ASRock 4Core1600-D800 Motherboard (Micro ATX Form Factor: 9.6-in x 8.4-in, 24.4 cm x 21.3 cm) ASRock 4Core1600-D800 Quick Installation Guide ASRock 4Core1600-D800 Support CD One 80-conductor Ultra ATA 66/100 - ASRock 4Core1600-D800 | Quick Installation Guide - Page 5
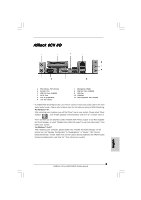
-On-LAN ASRock 6CH I/O - 1 x PS/2 Mouse Port - 1 x PS/2 Keyboard Port - 1 x Serial Port: COM1 - 1 x VGA Port - 1 x Parallel Port (ECP/EPP Support) - 4 x Ready-to-Use USB 2.0 Ports - 1 x RJ-45 LAN Port - HD Audio Jack: Line in / Front Speaker / Microphone 5 ASRock 4Core1600-D800 Motherboard English - ASRock 4Core1600-D800 | Quick Installation Guide - Page 6
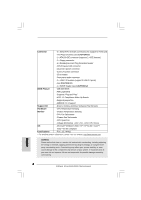
overclocking tools. Overclocking may affect your system stability, or even cause damage to the components and devices of your system. It should be done at your own risk and expense. We are not responsible for possible damage caused by overclocking. English 6 ASRock 4Core1600-D800 Motherboard - ASRock 4Core1600-D800 | Quick Installation Guide - Page 7
disk drive to SATAII mode. You can also connect SATA hard disk to SATAII connector directly. 11. Power Management for USB 2.0 works fine under Microsoft® Windows® VistaTM 64-bit / VistaTM / XP 64-bit / XP SP1 or SP2 / 2000 SP4. English 7 ASRock 4Core1600-D800 Motherboard - ASRock 4Core1600-D800 | Quick Installation Guide - Page 8
motherboard, please refer to Premium Discrete requirement at http://www.asrock.com * After June 1, 2007, all Windows® VistaTM systems are required to meet above minimum hardware requirements in order to qualify for Windows® VistaTM Premium 2007 logo. English 8 ASRock 4Core1600-D800 Motherboard - ASRock 4Core1600-D800 | Quick Installation Guide - Page 9
you insert the 775-LAND CPU into the socket, please check if the CPU surface is unclean or if there is any bent pin on the socket. Do not force to insert the CPU into the socket if above situation is found. Otherwise, the CPU will be seriously damaged. 9 ASRock 4Core1600-D800 Motherboard English - ASRock 4Core1600-D800 | Quick Installation Guide - Page 10
orient keys. Step 3. Remove PnP Cap (Pick and Place Cap): Use your left hand index finger and thumb to support the load plate edge, engage PnP cap with right hand thumb and peel the cap from the socket while pressing on center of PnP cap to assist in removal. 10 ASRock 4Core1600-D800 Motherboard - ASRock 4Core1600-D800 | Quick Installation Guide - Page 11
, the heatsink cannot be secured on the motherboard. Step 5. Step 6. Connect fan header with the CPU fan connector on the motherboard. Secure excess cable with tie-wrap to ensure cable does not interfere with fan operation or contact other components. 11 ASRock 4Core1600-D800 Motherboard English - ASRock 4Core1600-D800 | Quick Installation Guide - Page 12
will cause permanent damage to the motherboard and the DIMM if you force the DIMM into the slot at incorrect orientation. Step 3. Firmly insert the DIMM into the slot until the retaining clips at both ends fully snap back in place and the DIMM is properly seated. 12 ASRock 4Core1600-D800 Motherboard - ASRock 4Core1600-D800 | Quick Installation Guide - Page 13
" BIOS option to [Enabled], the onboard VGA will be enabled, and the primary screen will be onboard VGA. 2. If you want to use ASRock DeskExpress function on this motherboard, please install ASRock PCIE_DE 4. Fasten the card to the chassis with screws. 13 ASRock 4Core1600-D800 Motherboard English - ASRock 4Core1600-D800 | Quick Installation Guide - Page 14
Note2: If you want to overclock the FSB800-CPU you adopt to FSB1066 on this motherboard, you need to adjust the jumpers. Please short pin2, pin3 for FD jumper. Otherwise, the CPU may not work properly on this motherboard. Please refer to below jumper settings. 14 ASRock 4Core1600-D800 Motherboard - ASRock 4Core1600-D800 | Quick Installation Guide - Page 15
the motherboard connect the black end to the IDE devices 80-conductor ATA 66/100 cable Note: Please refer to the instruction of SATAII_4 SATAII_2 These four Serial ATAII (SATAII) connectors support SATA data cables for internal storage devices. The ASRock 4Core1600-D800 Motherboard English - ASRock 4Core1600-D800 | Quick Installation Guide - Page 16
This connector allows you to receive stereo audio input CD1 from sound sources such as a CD-ROM, DVD-ROM, TV tuner card, or MPEG card. This is an interface for front panel audio cable that allows convenient connection and control of audio devices. English 16 ASRock 4Core1600-D800 Motherboard - ASRock 4Core1600-D800 | Quick Installation Guide - Page 17
the chassis speaker to this header. Please connect a chassis fan cable to this connector and match the black wire to the ground pin. Please connect a CPU fan cable to this connector and match the black wire to the ground pin. 17 ASRock 4Core1600-D800 Motherboard - ASRock 4Core1600-D800 | Quick Installation Guide - Page 18
motherboard provides 4-Pin CPU fan (Quiet Fan) support, the 3-Pin CPU fan still can work successfully even without the fan speed control function. If you plan to connect the 3-Pin CPU fan to the CPU fan connector on this motherboard to this connector. English 18 ASRock 4Core1600-D800 Motherboard - ASRock 4Core1600-D800 | Quick Installation Guide - Page 19
.hitachigst.com/hdd/support/download.htm The above examples are just for your reference. For different SATAII hard disk products of different vendors, the jumper pin setting methods may not be the same. Please visit the vendors' website for the updates. English 19 ASRock 4Core1600-D800 Motherboard - ASRock 4Core1600-D800 | Quick Installation Guide - Page 20
overclocking, but PCI / PCIE buses are in the fixed mode so that FSB can operate under a more stable overclocking environment. Please refer to the warning on page 6 for the possible overclocking risk before you apply Untied Overclocking Technology. 20 ASRock 4Core1600-D800 Motherboard English - ASRock 4Core1600-D800 | Quick Installation Guide - Page 21
your computer. If the Main Menu does not appear automatically, locate and double-click on the file "ASSETUP. EXE" from the BIN folder in the Support CD to display the menus. 21 ASRock 4Core1600-D800 Motherboard English - ASRock 4Core1600-D800 | Quick Installation Guide - Page 22
22 ASRock 4Core1600-D800 Motherboard - ASRock 4Core1600-D800 | Quick Installation Guide - Page 23
® ® ® ® ® ® ® 23 ASRock 4Core1600-D800 Motherboard - ASRock 4Core1600-D800 | Quick Installation Guide - Page 24
® 24 ASRock 4Core1600-D800 Motherboard - ASRock 4Core1600-D800 | Quick Installation Guide - Page 25
" " ® ® ® ® ® " 25 ASRock 4Core1600-D800 Motherboard - ASRock 4Core1600-D800 | Quick Installation Guide - Page 26
® ® ® " " ® ® 26 ASRock 4Core1600-D800 Motherboard - ASRock 4Core1600-D800 | Quick Installation Guide - Page 27
27 ASRock 4Core1600-D800 Motherboard - ASRock 4Core1600-D800 | Quick Installation Guide - Page 28
Pin1 Pin1 28 ASRock 4Core1600-D800 Motherboard - ASRock 4Core1600-D800 | Quick Installation Guide - Page 29
29 ASRock 4Core1600-D800 Motherboard - ASRock 4Core1600-D800 | Quick Installation Guide - Page 30
30 ASRock 4Core1600-D800 Motherboard - ASRock 4Core1600-D800 | Quick Installation Guide - Page 31
" " 31 ASRock 4Core1600-D800 Motherboard - ASRock 4Core1600-D800 | Quick Installation Guide - Page 32
"" "" "" "" 32 ASRock 4Core1600-D800 Motherboard - ASRock 4Core1600-D800 | Quick Installation Guide - Page 33
SATAII_3 SATAII_4 SATAII_1 SATAII_2 33 ASRock 4Core1600-D800 Motherboard - ASRock 4Core1600-D800 | Quick Installation Guide - Page 34
CD1 34 ASRock 4Core1600-D800 Motherboard - ASRock 4Core1600-D800 | Quick Installation Guide - Page 35
® ® ® 35 ASRock 4Core1600-D800 Motherboard - ASRock 4Core1600-D800 | Quick Installation Guide - Page 36
1 2 3 4 12 24 1 13 12 24 1 13 36 ASRock 4Core1600-D800 Motherboard - ASRock 4Core1600-D800 | Quick Installation Guide - Page 37
12 24 1 13 37 ASRock 4Core1600-D800 Motherboard - ASRock 4Core1600-D800 | Quick Installation Guide - Page 38
® " " 38 ASRock 4Core1600-D800 Motherboard - ASRock 4Core1600-D800 | Quick Installation Guide - Page 39
" " " " \\ 39 ASRock 4Core1600-D800 Motherboard - ASRock 4Core1600-D800 | Quick Installation Guide - Page 40
40 ASRock 4Core1600-D800 Motherboard - ASRock 4Core1600-D800 | Quick Installation Guide - Page 41
® ® ® ® ® ® ® 41 ASRock 4Core1600-D800 Motherboard - ASRock 4Core1600-D800 | Quick Installation Guide - Page 42
® ® 42 ASRock 4Core1600-D800 Motherboard - ASRock 4Core1600-D800 | Quick Installation Guide - Page 43
® ® ® ® ® ® 43 ASRock 4Core1600-D800 Motherboard - ASRock 4Core1600-D800 | Quick Installation Guide - Page 44
® ® ® ® ® 44 ASRock 4Core1600-D800 Motherboard - ASRock 4Core1600-D800 | Quick Installation Guide - Page 45
45 ASRock 4Core1600-D800 Motherboard - ASRock 4Core1600-D800 | Quick Installation Guide - Page 46
46 ASRock 4Core1600-D800 Motherboard - ASRock 4Core1600-D800 | Quick Installation Guide - Page 47
47 ASRock 4Core1600-D800 Motherboard - ASRock 4Core1600-D800 | Quick Installation Guide - Page 48
48 ASRock 4Core1600-D800 Motherboard - ASRock 4Core1600-D800 | Quick Installation Guide - Page 49
49 ASRock 4Core1600-D800 Motherboard - ASRock 4Core1600-D800 | Quick Installation Guide - Page 50
50 ASRock 4Core1600-D800 Motherboard - ASRock 4Core1600-D800 | Quick Installation Guide - Page 51
SATAII_3 SATAII_4 SATAII_1 SATAII_2 51 ASRock 4Core1600-D800 Motherboard - ASRock 4Core1600-D800 | Quick Installation Guide - Page 52
CD1 52 ASRock 4Core1600-D800 Motherboard - ASRock 4Core1600-D800 | Quick Installation Guide - Page 53
® ® 1 2 3 4 53 ASRock 4Core1600-D800 Motherboard - ASRock 4Core1600-D800 | Quick Installation Guide - Page 54
12 24 1 13 12 24 1 13 54 ASRock 4Core1600-D800 Motherboard - ASRock 4Core1600-D800 | Quick Installation Guide - Page 55
12 24 1 13 55 ASRock 4Core1600-D800 Motherboard - ASRock 4Core1600-D800 | Quick Installation Guide - Page 56
® 56 ASRock 4Core1600-D800 Motherboard - ASRock 4Core1600-D800 | Quick Installation Guide - Page 57
® ® 57 ASRock 4Core1600-D800 Motherboard - ASRock 4Core1600-D800 | Quick Installation Guide - Page 58
X O O O X O O O O: X: O O O O 58 ASRock 4Core1600-D800 Motherboard - ASRock 4Core1600-D800 | Quick Installation Guide - Page 59
O O 59 ASRock 4Core1600-D800 Motherboard - ASRock 4Core1600-D800 | Quick Installation Guide - Page 60
® ® ® ® ® ® ® 60 ASRock 4Core1600-D800 Motherboard - ASRock 4Core1600-D800 | Quick Installation Guide - Page 61
® ® ® 61 ASRock 4Core1600-D800 Motherboard - ASRock 4Core1600-D800 | Quick Installation Guide - Page 62
" " ® ® ® ® 62 ASRock 4Core1600-D800 Motherboard - ASRock 4Core1600-D800 | Quick Installation Guide - Page 63
® TM ® ® TM ® TM ® TM ® ® ® 63 ASRock 4Core1600-D800 Motherboard - ASRock 4Core1600-D800 | Quick Installation Guide - Page 64
64 ASRock 4Core1600-D800 Motherboard - ASRock 4Core1600-D800 | Quick Installation Guide - Page 65
65 ASRock 4Core1600-D800 Motherboard - ASRock 4Core1600-D800 | Quick Installation Guide - Page 66
66 ASRock 4Core1600-D800 Motherboard - ASRock 4Core1600-D800 | Quick Installation Guide - Page 67
67 ASRock 4Core1600-D800 Motherboard - ASRock 4Core1600-D800 | Quick Installation Guide - Page 68
68 ASRock 4Core1600-D800 Motherboard - ASRock 4Core1600-D800 | Quick Installation Guide - Page 69
69 ASRock 4Core1600-D800 Motherboard - ASRock 4Core1600-D800 | Quick Installation Guide - Page 70
SATAII_3 SATAII_4 SATAII_1 SATAII_2 70 ASRock 4Core1600-D800 Motherboard - ASRock 4Core1600-D800 | Quick Installation Guide - Page 71
CD1 71 ASRock 4Core1600-D800 Motherboard - ASRock 4Core1600-D800 | Quick Installation Guide - Page 72
® ® ® 72 ASRock 4Core1600-D800 Motherboard - ASRock 4Core1600-D800 | Quick Installation Guide - Page 73
1 2 3 4 12 24 1 13 12 24 1 13 73 ASRock 4Core1600-D800 Motherboard - ASRock 4Core1600-D800 | Quick Installation Guide - Page 74
74 ASRock 4Core1600-D800 Motherboard - ASRock 4Core1600-D800 | Quick Installation Guide - Page 75
® 75 ASRock 4Core1600-D800 Motherboard - ASRock 4Core1600-D800 | Quick Installation Guide - Page 76
® ® TM TM 76 ASRock 4Core1600-D800 Motherboard - ASRock 4Core1600-D800 | Quick Installation Guide - Page 77
77 ASRock 4Core1600-D800 Motherboard - ASRock 4Core1600-D800 | Quick Installation Guide - Page 78
- ASRock 4Core1600-D800 | Quick Installation Guide - Page 79
- ASRock 4Core1600-D800 | Quick Installation Guide - Page 80
-
 1
1 -
 2
2 -
 3
3 -
 4
4 -
 5
5 -
 6
6 -
 7
7 -
8
-
9
-
10
-
11
-
12
-
13
-
14
-
15
-
16
-
17
-
18
-
19
-
20
-
21
-
22
-
23
-
24
-
25
-
26
-
27
-
28
-
29
-
30
-
31
-
32
-
33
-
34
-
35
-
36
-
37
-
38
-
39
-
40
-
41
-
42
-
43
-
44
-
45
-
46
-
47
-
48
-
49
-
50
-
51
-
52
-
53
-
54
-
55
-
56
-
57
-
58
-
59
-
60
-
61
-
62
-
63
-
64
-
65
-
66
-
67
-
68
-
69
-
70
-
71
-
72
-
73
-
74
-
75
-
76
-
77
-
78
-
79
-
80
 |
 |
1
ASRock
4Core1600-D800
Motherboard
English
English
English
English
English
Copyright Notice:
Copyright Notice:
Copyright Notice:
Copyright Notice:
Copyright Notice:
No part of this installation guide may be reproduced, transcribed, transmitted, or trans-
lated in any language, in any form or by any means, except duplication of documen-
tation by the purchaser for backup purpose, without written consent of ASRock Inc.
Products and corporate names appearing in this guide may or may not be registered
trademarks or copyrights of their respective companies, and are used only for identifica-
tion or explanation and to the owners’ benefit, without intent to infringe.
Disclaimer:
Disclaimer:
Disclaimer:
Disclaimer:
Disclaimer:
Specifications and information contained in this guide are furnished for informational
use only and subject to change without notice, and should not be constructed as a
commitment by ASRock. ASRock assumes no responsibility for any errors or omissions
that may appear in this guide.
With respect to the contents of this guide, ASRock does not provide warranty of any kind,
either expressed or implied, including but not limited to the implied warranties or
conditions of merchantability or fitness for a particular purpose. In no event shall
ASRock, its directors, officers, employees, or agents be liable for any indirect, special,
incidental, or consequential damages (including damages for loss of profits, loss of
business, loss of data, interruption of business and the like), even if ASRock has been
advised of the possibility of such damages arising from any defect or error in the guide
or product.
This device complies with Part 15 of the FCC Rules. Operation is subject to the
following two conditions:
(1)
this device may not cause harmful interference, and
(2)
this device must accept any interference received, including interference that
may cause undesired operation.
CALIFORNIA, USA ONLY
The Lithium battery adopted on this motherboard contains Perchlorate, a toxic
substance controlled in Perchlorate Best Management Practices (BMP) regulations
passed by the California Legislature. When you discard the Lithium battery in
California, USA, please follow the related regulations in advance.
“Perchlorate Material-special handling may apply, see
www
.dtsc.ca.gov/hazardouswa
ste/perchlorate”
ASRock Website: http://www.asrock.com
Published April 2008
Copyright
©
2008 ASRock INC. All rights reserved.