ASRock 4Core1600P35-WiFi Quick Installation Guide
ASRock 4Core1600P35-WiFi Manual
 |
View all ASRock 4Core1600P35-WiFi manuals
Add to My Manuals
Save this manual to your list of manuals |
ASRock 4Core1600P35-WiFi manual content summary:
- ASRock 4Core1600P35-WiFi | Quick Installation Guide - Page 1
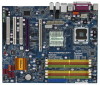
purpose, without written consent of ASRock Inc. Products and corporate names appearing in this guide may or may not be registered ASRock Website: http://www.asrock.com Published January 2008 Copyright©2008 ASRock INC. All rights reserved. 1 ASRock 4Core1600P35-WiFi+ / 4Core1600P35-WiFi Motherboard - ASRock 4Core1600P35-WiFi | Quick Installation Guide - Page 2
) 17 SATAII Connector (SATAII_3 (Port2), Red) 37 SLI / XFIRE Power Connector 18 SATAII Connector (SATAII_4 (Port3), Red) 38 ATX Power Connector (ATXPWR1) 19 SATAII Connector (SATAII_6 (Port5), Orange) 39 eSATAII Connector (eSATAII) 2 ASRock 4Core1600P35-WiFi+ / 4Core1600P35-WiFi Motherboard - ASRock 4Core1600P35-WiFi | Quick Installation Guide - Page 3
16 System Panel Header (PANEL1) 37 ATX Power Connector (ATXPWR1) 17 SATAII Connector (SATAII_3 (Port2), Red) 38 eSATAII Connector (eSATAII) 18 SATAII Connector (SATAII_4 (Port3), Red) 19 SATAII Connector (SATAII_6 (Port5), Orange) 3 ASRock 4Core1600P35-WiFi+ / 4Core1600P35-WiFi Motherboard - ASRock 4Core1600P35-WiFi | Quick Installation Guide - Page 4
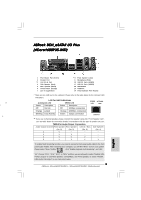
ASRock 1394_eSATAII I/O Plus (4Core1600P35-WiFi+) 1 PS/2 Mouse Port (Green) 2 Parallel Port 3 IEEE 1394 Port * 4 LAN RJ-45 Port 5 Side Speaker (Gray) 6 Speaker, or select "Realtek HDA Audio 2nd output" to use front panel audio. 4 ASRock 4Core1600P35-WiFi+ / 4Core1600P35-WiFi Motherboard English - ASRock 4Core1600P35-WiFi | Quick Installation Guide - Page 5
A E L ASRock 8CH_eSATAII I/O Plus (4Core1600P35-WiFi) 1 PS/2 Mouse Port (Green) 2 Parallel Port * 3 LAN RJ-45 Port 4 Side Speaker (Gray) 5 Rear Speaker (Black) 6 or select "Realtek HDA Audio 2nd output" to use front panel audio. 5 ASRock 4Core1600P35-WiFi+ / 4Core1600P35-WiFi Motherboard English - ASRock 4Core1600P35-WiFi | Quick Installation Guide - Page 6
"ASRock WiFi-802.11g Module Operation Guide" in the package for the detailed introduction and operation procedures. You can also read the document in the following path of ASRock motherboard support CD: ..\ ASRock WiFi-802.11g \ Vista64_Vista_XP64_XP 6 ASRock 4Core1600P35-WiFi+ / 4Core1600P35-WiFi - ASRock 4Core1600P35-WiFi | Quick Installation Guide - Page 7
ASRock 4Core1600P35-WiFi+ / 4Core1600P35-WiFi Motherboard (ATX Form Factor: 12.0-in x 9.6-in, 30.5 cm x 24.4 cm) ASRock 4Core1600P35-WiFi+ / 4Core1600P35-WiFi Quick Installation Guide ASRock 4Core1600P35-WiFi+ / 4Core1600P35-WiFi Support CD ASRock WiFi-802.11g Module Operation Guide Motherboard - ASRock 4Core1600P35-WiFi | Quick Installation Guide - Page 8
Expansion Slot Audio LAN - ATX Form Factor: 12.0-in x 9.6-in, 30.5 cm x 24.4 cm - All Solid Capacitor design - LGA 775 for Intel® CoreTM 2 Extreme / CoreTM 2 Quad / CoreTM 2 Duo / Pentium® Dual Core / Celeron®, supporting Penryn Quad Core Yorkfield and Dual Core Wolfdale processors - Compatible - ASRock 4Core1600P35-WiFi | Quick Installation Guide - Page 9
(see CAUTION 10) - 1 x ATA133 IDE connector (supports 2 x IDE devices) - 1 x Floppy connector - 1 x DeskExpress Hot Plug Detection header - 1 x HDMI_SPDIF header - 1 x IEEE 1394 header (4Core1600P35-WiFi+) - CPU/Chassis FAN connector 9 ASRock 4Core1600P35-WiFi+ / 4Core1600P35-WiFi Motherboard - ASRock 4Core1600P35-WiFi | Quick Installation Guide - Page 10
devices of your system. It should be done at your own risk and expense. We are not responsible for possible damage caused by overclocking. 10 ASRock 4Core1600P35-WiFi+ / 4Core1600P35-WiFi Motherboard - ASRock 4Core1600P35-WiFi | Quick Installation Guide - Page 11
input, this motherboard supports both stereo and mono modes. For audio output, this motherboard supports 2-channel, 4- channel, 6-channel, and 8-channel modes. Please check the table on page 4 and 5 for proper connection. 11 ASRock 4Core1600P35-WiFi+ / 4Core1600P35-WiFi Motherboard English - ASRock 4Core1600P35-WiFi | Quick Installation Guide - Page 12
Driver with 128bit VGA memory (Premium) with 64bit VGA memory (Basic) * After June 1, 2008, all Windows® VistaTM systems are required to meet above minimum hardware requirements in order to qualify for Windows® VistaTM Premium 2008 logo. 12 ASRock 4Core1600P35-WiFi+ / 4Core1600P35-WiFi Motherboard - ASRock 4Core1600P35-WiFi | Quick Installation Guide - Page 13
775-LAND CPU into the socket, please check if the CPU surface is unclean or if there is any bent pin on the socket. Do not force to insert the CPU into the socket if above situation is found. Otherwise, the CPU will be seriously damaged. 13 ASRock 4Core1600P35-WiFi+ / 4Core1600P35-WiFi Motherboard - ASRock 4Core1600P35-WiFi | Quick Installation Guide - Page 14
Pin1 alignment key alignment key 775-LAND CPU 775-Pin Socket For proper support the load plate edge, engage PnP cap with right hand thumb and peel the cap from the socket while pressing on center of PnP cap to assist in removal. 14 ASRock 4Core1600P35-WiFi+ / 4Core1600P35-WiFi Motherboard - ASRock 4Core1600P35-WiFi | Quick Installation Guide - Page 15
secured on the motherboard. Step 5. Step 6. Connect fan header with the CPU fan connector on the motherboard. Secure excess cable with tie-wrap to ensure cable does not interfere with fan operation or contact other components. 15 ASRock 4Core1600P35-WiFi+ / 4Core1600P35-WiFi Motherboard English - ASRock 4Core1600P35-WiFi | Quick Installation Guide - Page 16
SS X X DS X SS X SS DS X DS SS SS SS DS DS DS Dual Channel DDR3 Memory Configurations (DS: Double Side, SS: Single Side) DDR3_A1 (Green Slot) 2 memory modules SS 2 memory modules DS DDR3_B1 (Green Slot) SS DS English 16 ASRock 4Core1600P35-WiFi+ / 4Core1600P35-WiFi Motherboard - ASRock 4Core1600P35-WiFi | Quick Installation Guide - Page 17
a DDR3 memory module into DDR2 slot or install a DDR2 memory module into DDR3 slot; otherwise, this motherboard and DIMM may be damaged. 5. DDR2 and DDR3 memory modules cannot be installed on this motherboard at the same time. 17 ASRock 4Core1600P35-WiFi+ / 4Core1600P35-WiFi Motherboard English - ASRock 4Core1600P35-WiFi | Quick Installation Guide - Page 18
motherboard and the DIMM if you force the DIMM into the slot at incorrect orientation. Step 3. Firmly insert the DIMM into the slot until the retaining clips at both ends fully snap back in place and the DIMM is properly seated. English 18 ASRock 4Core1600P35-WiFi+ / 4Core1600P35-WiFi Motherboard - ASRock 4Core1600P35-WiFi | Quick Installation Guide - Page 19
screws. 2.5 CrossFireTM Operation Guide This motherboard supports CrossFireTM feature. CrossFireTM technology supported with Windows® XP with Service Pack 2 and VistaTM OS. Please check AMD website for ATITM CrossFireTM driver updates. 19 ASRock 4Core1600P35-WiFi+ / 4Core1600P35-WiFi Motherboard - ASRock 4Core1600P35-WiFi | Quick Installation Guide - Page 20
installation guide. Step 1. Connect to the system power supply. Please connect a hard disk power connector to SLI/XFIRE Power connector on this motherboard. It is recommended to use 500-Watt power supply or greater to perform the benefit of CrossFireTM feature. English 20 ASRock 4Core1600P35-WiFi - ASRock 4Core1600P35-WiFi | Quick Installation Guide - Page 21
CrossFireTM Bridge is provided with the graphics card you purchase, not bundled with this motherboard. Please refer to your graphics card vendor for details.) CrossFireTM Bridge Step 5. cable to the DVI to D-Sub adapter.) English 21 ASRock 4Core1600P35-WiFi+ / 4Core1600P35-WiFi Motherboard - ASRock 4Core1600P35-WiFi | Quick Installation Guide - Page 22
driver updates. Step 8. Install the required drivers to your system. For Windows® XP OS: A. ATITM recommends Windows® XP Service Pack 2 or higher to be installed (If you have Windows® XP Service CrossFireTM Enable CrossFireTM English 22 ASRock 4Core1600P35-WiFi+ / 4Core1600P35-WiFi Motherboard - ASRock 4Core1600P35-WiFi | Quick Installation Guide - Page 23
VGA card, you can easily enjoy the benefits of Surround Display feature. For the detailed instruction, please refer to the document at the following path in the Support CD: ..\ Surround Display Information English ble CrossFireTM 23 ASRock 4Core1600P35-WiFi+ / 4Core1600P35-WiFi Motherboard - ASRock 4Core1600P35-WiFi | Quick Installation Guide - Page 24
, please do not clear the CMOS right after you update the BIOS. If you need to clear the CMOS when you just finish updating the BIOS, you must boot up the system first, and then shut it down before you do the clearCMOS action. English 24 ASRock 4Core1600P35-WiFi+ / 4Core1600P35-WiFi Motherboard - ASRock 4Core1600P35-WiFi | Quick Installation Guide - Page 25
on this motherboard, you need to adjust the jumpers. Please short pin2, pin3 for FSB3. Otherwise, the CPU and memory module may not work properly on this motherboard. Please refer to below jumper settings. FSB1066 / DDR2 1066 English 25 ASRock 4Core1600P35-WiFi+ / 4Core1600P35-WiFi Motherboard - ASRock 4Core1600P35-WiFi | Quick Installation Guide - Page 26
can be used for internal storage device or be connected to eSATAII connector to support eSATAII device. Please read "eSATAII Interface Introduction" on page 33 for details about eSATAII and eSATAII installation procedures. 26 ASRock 4Core1600P35-WiFi+ / 4Core1600P35-WiFi Motherboard English - ASRock 4Core1600P35-WiFi | Quick Installation Guide - Page 27
) (9-pin USB6_7) (see p.2/3 No. 20) Besides four default USB 2.0 ports on the I/O panel, there are three USB 2.0 headers on this motherboard. Each USB 2.0 header can support two USB 2.0 ports. (9-pin USB4_5) (see p.2/3 No. 21) English 27 ASRock 4Core1600P35-WiFi+ / 4Core1600P35-WiFi Motherboard - ASRock 4Core1600P35-WiFi | Quick Installation Guide - Page 28
are for HD audio panel only. You don't need to connect them for AC'97 audio panel. E. Enter BIOS Setup Utility. Enter Advanced Settings, and then select Chipset Configuration. Set the Front Panel Control option from [Auto] to [Enabled]. 28 ASRock 4Core1600P35-WiFi+ / 4Core1600P35-WiFi Motherboard - ASRock 4Core1600P35-WiFi | Quick Installation Guide - Page 29
) support, the 3-Pin CPU fan still can work successfully even without the fan speed control function. If you plan to connect the 3-Pin CPU fan to the CPU fan connector on this motherboard, please connect it to Pin 1-3. Pin 1-3 Connected 3-Pin Fan Installation English 29 ASRock 4Core1600P35-WiFi - ASRock 4Core1600P35-WiFi | Quick Installation Guide - Page 30
1394 Header (9-pin FRONT_1394) (see p.2 No. 25) Besides one default IEEE 1394 port on the I/O panel, there is one IEEE 1394 header (FRONT_1394) on this motherboard. This IEEE 1394 header can support one IEEE 1394 port. English 30 ASRock 4Core1600P35-WiFi+ / 4Core1600P35-WiFi Motherboard - ASRock 4Core1600P35-WiFi | Quick Installation Guide - Page 31
(A) of HDMI_SPDIF cable to the HDMI_SPDIF header on the motherboard. Then connect the white end (B or C) of HDMI_SPDIF cable to the HDMI_SPDIF connector of HDMI VGA card. A. black end B. white end (2-pin) C. white end (3-pin) English 31 ASRock 4Core1600P35-WiFi+ / 4Core1600P35-WiFi Motherboard - ASRock 4Core1600P35-WiFi | Quick Installation Guide - Page 32
on this motherboard. For the proper installation of HDMI VGA card, please refer to the installation guide on manual of HDTV and HDMI VGA card vendor for detailed connection procedures. Step 5. Install HDMI VGA card driver to your system. 32 ASRock 4Core1600P35-WiFi+ / 4Core1600P35-WiFi Motherboard - ASRock 4Core1600P35-WiFi | Quick Installation Guide - Page 33
condition. 2. If you set "Configure SATAII as" option in BIOS setup to IDE mode, Hot Plug function is not supported with eSATAII devices. If you still want to use eSATAII function in connector SATAII_6 (Port5) eSATAII connector (eSATAII) 33 ASRock 4Core1600P35-WiFi+ / 4Core1600P35-WiFi Motherboard - ASRock 4Core1600P35-WiFi | Quick Installation Guide - Page 34
of the eSATAII device cable to eSATAII device Connect the other end of the eSATAII device cable to eSATAII port of the I/O shield English 34 ASRock 4Core1600P35-WiFi+ / 4Core1600P35-WiFi Motherboard - ASRock 4Core1600P35-WiFi | Quick Installation Guide - Page 35
Comparison between eSATAII and other devices IEEE 1394 USB 2.0 SATA eSATAII/SATAII 400Mb/s 480Mb/s 1.5Gb/s (1500Mb/s) 3.0Gb/s (3000Mb/s) English 35 ASRock 4Core1600P35-WiFi+ / 4Core1600P35-WiFi Motherboard - ASRock 4Core1600P35-WiFi | Quick Installation Guide - Page 36
/hdd/support/download.htm The above examples are just for your reference. For different SATAII hard disk products of different vendors, the jumper pin setting methods may not be the same. Please visit the vendors' website for the updates. 36 ASRock 4Core1600P35-WiFi+ / 4Core1600P35-WiFi Motherboard - ASRock 4Core1600P35-WiFi | Quick Installation Guide - Page 37
3 SATA / SATAII hard disks. 2. It is not recommended to switch the "Configure SATAII as" setting between AHCI, RAID and IDE mode after OS installation. 37 ASRock 4Core1600P35-WiFi+ / 4Core1600P35-WiFi Motherboard English - ASRock 4Core1600P35-WiFi | Quick Installation Guide - Page 38
Devices This motherboard supports Hot Plug and Hot Swap functions for SATA / SATAII / eSATAII Devices in RAID / AHCI mode. Intel® ICH9R south bridge chipset provides hardware support for chassis to exchange your SATAII hard disk. 38 ASRock 4Core1600P35-WiFi+ / 4Core1600P35-WiFi Motherboard English - ASRock 4Core1600P35-WiFi | Quick Installation Guide - Page 39
files [YN]? Please insert a floppy diskette into the floppy drive, and press . E. The system will start to format the floppy diskette and copy SATA / SATAII drivers into the floppy diskette. 39 ASRock 4Core1600P35-WiFi+ / 4Core1600P35-WiFi Motherboard English - ASRock 4Core1600P35-WiFi | Quick Installation Guide - Page 40
beginning of Windows® setup, press F6 to install a third-party RAID driver. When prompted, insert the SATA / SATAII driver diskette containing the Intel® RAID driver. After reading the floppy disk, the driver will be presented. 40 ASRock 4Core1600P35-WiFi+ / 4Core1600P35-WiFi Motherboard English - ASRock 4Core1600P35-WiFi | Quick Installation Guide - Page 41
from within Windows® in order to partition and format the empty space created when the two hard drive capacities are combined. You may also use third-party software to extend any existing partitions within the RAID volume. 41 ASRock 4Core1600P35-WiFi+ / 4Core1600P35-WiFi Motherboard English - ASRock 4Core1600P35-WiFi | Quick Installation Guide - Page 42
Information If you want to use "Intel Matrix Storage Manager" in Windows® environment, please install SATA / SATAII drivers from the Support CD again so that "Intel Matrix Storage Manager" will be installed to your system as well. 42 ASRock 4Core1600P35-WiFi+ / 4Core1600P35-WiFi Motherboard English - ASRock 4Core1600P35-WiFi | Quick Installation Guide - Page 43
Advanced screen IDE Configuration. B. Set "SATAII Configuration" to [Enhanced], and then in the option "Configure SATAII as", please set the option to [IDE]. STEP 2: Install Windows® 2000 / XP / XP 64-bit OS on your system. 43 ASRock 4Core1600P35-WiFi+ / 4Core1600P35-WiFi Motherboard English - ASRock 4Core1600P35-WiFi | Quick Installation Guide - Page 44
the instruction to install Windows® VistaTM / VistaTM 64-bit OS on your system. When you see "Where do you want to install Windows?" page, please insert the ASRock Support CD into your optical drive, and click the "Load Driver" button on the left on the bottom to load the Intel® AHCI drivers. Intel - ASRock 4Core1600P35-WiFi | Quick Installation Guide - Page 45
2.17 DTS Operation Guide DTS (Digital Theater Systems Install the drivers to your system from ASRock support CD. 2. Reboot your system. 3. You will find the icon (Realtek HD Audio Manager) on the Windows® task Settings) to English 45 ASRock 4Core1600P35-WiFi+ / 4Core1600P35-WiFi Motherboard - ASRock 4Core1600P35-WiFi | Quick Installation Guide - Page 46
stereo television shows and all programs encoded in DTS Surround. The result is enhanced soundfield directionality that approaches the quality of discrete 7.1-channel sound. 46 ASRock 4Core1600P35-WiFi+ / 4Core1600P35-WiFi Motherboard English - ASRock 4Core1600P35-WiFi | Quick Installation Guide - Page 47
your computer. If the Main Menu does not appear automatically, locate and double-click on the file "ASSETUP. EXE" from the BIN folder in the Support CD to display the menus. 47 ASRock 4Core1600P35-WiFi+ / 4Core1600P35-WiFi Motherboard English - ASRock 4Core1600P35-WiFi | Quick Installation Guide - Page 48
.asp 1.1 Kartoninhalt ASRock 4Core1600P35-WiFi+ / 4Core1600P35-WiFi Motherboard (ATX-Formfaktor: 30.5 cm x 24.4 cm; 12.0 Zoll x 9.6 Zoll) ASRock 4Core1600P35-WiFi+ / 4Core1600P35-WiFi Schnellinstallationsanleitung ASRock 4Core1600P35-WiFi+ / 4Core1600P35-WiFi Support-CD ASRock WiFi-802.11g Modul - ASRock 4Core1600P35-WiFi | Quick Installation Guide - Page 49
Spezifikationen Plattform - ATX-Formfaktor: 30.5 cm x 24.4 cm; 12.0 Zoll x 9.6 Zoll - Alle Feste Kondensatordesign CPU - LGA 775 für Intel® CoreTM 2 Extreme / CoreTM 2 Quad / CoreTM 2 Duo / Pentium® Dual Core / Celeron® unterstützt Penryn Quad Core Yorkfield und Dual Core Wolfdale Prozessoren - ASRock 4Core1600P35-WiFi | Quick Installation Guide - Page 50
üsse, unterstützen RAID- Deutsch (RAID 0, RAID 1, RAID 10, RAID 5 und Intel Matrix Storage), NCQ, AHCI und "Hot Plug" Funktionen (siehe VORSICHT 9) - 1 x - 1 x DeskExpress heißer Stecker Detektionskopf - 1 x HDMI_SPDIF-Anschluss 50 ASRock 4Core1600P35-WiFi+ / 4Core1600P35-WiFi Motherboard - ASRock 4Core1600P35-WiFi | Quick Installation Guide - Page 51
tzt Microsoft® Windows® 2000 / XP / XP 64-Bit / VistaTM / VistaTM 64-Bit (siehe VORSICHT 16) Zertifizierungen - FCC, CE, WHQL * Für die ausführliche Produktinformation, besuchen Sie bitte unsere Website: http://www.asrock.com Deutsch 51 ASRock 4Core1600P35-WiFi+ / 4Core1600P35-WiFi Motherboard - ASRock 4Core1600P35-WiFi | Quick Installation Guide - Page 52
Speichermodul adoptieren. Wenn Sie eine FSB1600- Zentraleinheit auf dieser Hauptplatine verwenden, wird sie an DDR3 960 laufen, wenn Sie einen DDR3 1066 Speichermodul adoptieren. Wenn Sie eine FSB1600-Zentraleinheit auf dieser 52 ASRock 4Core1600P35-WiFi+ / 4Core1600P35-WiFi Motherboard Deutsch - ASRock 4Core1600P35-WiFi | Quick Installation Guide - Page 53
dieses Motherboard stufenlose Steuerung bietet, wird Overclocking nicht empfohlen. Frequenzen, die über den für den jeweiligen Prozessor vorgesehenen liegen, können das System instabil werden lassen oder die CPU beschädigen. 53 ASRock 4Core1600P35-WiFi+ / 4Core1600P35-WiFi Motherboard Deutsch - ASRock 4Core1600P35-WiFi | Quick Installation Guide - Page 54
-VGA-Speicher (Basic) * Nach dem ersten Juni, 2008 sind , all Windows® VistaTM Systems dafür erforderlich, mit der Minimalforderung der obengenannte Hardware übereinzustimmen, um Windows® VistaTM Premium 2008 logo.zu befähigen. Deutsch 54 ASRock 4Core1600P35-WiFi+ / 4Core1600P35-WiFi Motherboard - ASRock 4Core1600P35-WiFi | Quick Installation Guide - Page 55
Bevor Sie die 775-Pin CPU in den Sockel sitzen, prüfen Sie bitte, ob die CPU-Oberfläche sauber ist und keine der Kontakte verbogen sind. Setzen Sie die CPU nicht mit Gewalt in den Sockel, dies kann die CPU schwer beschädigen. Deutsch 55 ASRock 4Core1600P35-WiFi+ / 4Core1600P35-WiFi Motherboard - ASRock 4Core1600P35-WiFi | Quick Installation Guide - Page 56
775-Pin CPU Um die CPU ordnungsgemäß einsetzen zu können, richten Sie die zwei Orientierungskerben der CPU mit den beiden Markierungen des Sockels aus. Schritt 2-3. Drücken Sie die CPU vorsichtig in vertikaler Richtung in den Sockel. 56 ASRock 4Core1600P35-WiFi+ / 4Core1600P35-WiFi Motherboard - ASRock 4Core1600P35-WiFi | Quick Installation Guide - Page 57
ßen der PnP-Kappe. 2. Diese Kappe muss angebracht werden, falls Sie das Motherboard zur Reparatur bringen. Schritt 4. Sockel schließen: Schritt 4-1. Drehen Sie die Ladeplatte Ladehebel und Ladeplatte mithilfe des Hebelverschlusses. 57 ASRock 4Core1600P35-WiFi+ / 4Core1600P35-WiFi Motherboard Deutsch - ASRock 4Core1600P35-WiFi | Quick Installation Guide - Page 58
den 775- Motherboard befestigt. Schritt 5. Schließen Sie den Lüfter an den CPULüfteranschluss des Motherboards. Schritt 6. Befestigen Sie überschüssiges Kabel mit Band, um eine Störung des Lüfters oder Kontakt mit anderen Teilen zu vermeiden. Deutsch 58 ASRock 4Core1600P35-WiFi+ / 4Core1600P35-WiFi - ASRock 4Core1600P35-WiFi | Quick Installation Guide - Page 59
öße und gleicher Chiptyp) DDR2/DDR3 DIMM-Paare in den DDR3 Speicherkonfigurationen (DS: Doppelseitig, SS: Einseitig) 2 Speichermodule 2 Speichermodule DDR3_A1 DDR3_A2 (grün Steckplätze) (grün Steckplätze) SS SS DS DS Deutsch 59 ASRock 4Core1600P35-WiFi+ / 4Core1600P35-WiFi Motherboard - ASRock 4Core1600P35-WiFi | Quick Installation Guide - Page 60
aktivieren. 4. Es wird nicht erlaubt, ein DDR3 Speichermodul in DDR2 Steckplatz zu installieren oder ein DDR2 Speichermodul ins DDR3 Steckplatz zu installieren; sonst können diese Modul mit der Kerbe in den Slot passt. Deutsch 60 ASRock 4Core1600P35-WiFi+ / 4Core1600P35-WiFi Motherboard - ASRock 4Core1600P35-WiFi | Quick Installation Guide - Page 61
PCI Express- und 1 AGI Express-Slot (PCI Express x4) auf dem 4Core1600P35-WiFi+ / 4Core1600P35-WiFi Motherboard zur Verfügung. PCI-Slots: PCI-Slots werden zur Installation von Erweiterungskarten mit mit der Schraube aus Schritt 2. Deutsch 61 ASRock 4Core1600P35-WiFi+ / 4Core1600P35-WiFi Motherboard - ASRock 4Core1600P35-WiFi | Quick Installation Guide - Page 62
zu entfernen, nachdem das CMOS gelöscht wurde. Wenn Sie den CMOS-Inhalt gleich nach dem Aktualisieren des BIOS löschen müssen, müssen Sie zuerst das System starten und dann wieder ausschalten, bevor Sie den CMOS-Inhalt löschen. Deutsch 62 ASRock 4Core1600P35-WiFi+ / 4Core1600P35-WiFi Motherboard - ASRock 4Core1600P35-WiFi | Quick Installation Guide - Page 63
an. FSB1600 Hinweis 2: Wenn Sie eine FSB1333-Zentraleinheit verwenden und einen DDR2 1066 Speichermodul auf dieser Hauptplatine adoptieren, müssen Sie die Steckbrücke Beziehen Sie sich bitte auf folgende Steckbrücke-Einstellungen. 63 ASRock 4Core1600P35-WiFi+ / 4Core1600P35-WiFi Motherboard - ASRock 4Core1600P35-WiFi | Quick Installation Guide - Page 64
DDR2 1066 2.7 Integrierte Header und Anschlüsse Integrierte Header und Anschlüsse sind KEINE Jumper. Setzen Sie KEINE Jumperkappen auf diese Header und Anschlüsse. Wenn Sie Jumperkappen auf Header und Anschlüsse setzen, wird das Motherboard ASRock 4Core1600P35-WiFi+ / 4Core1600P35-WiFi Motherboard - ASRock 4Core1600P35-WiFi | Quick Installation Guide - Page 65
. USB8_9) (siehe S.2/3 - No. 22) Zusätzlich zu den vier üblichen USB 2.0-Ports an den I/OAnschlüssen befinden sich drei USB 2.0-Anschlussleisten am Motherboard. Pro USB 2.0Anschlussleiste werden zwei USB 2.0-Ports unterstützt. 65 ASRock 4Core1600P35-WiFi+ / 4Core1600P35-WiFi Motherboard Deutsch - ASRock 4Core1600P35-WiFi | Quick Installation Guide - Page 66
S.2 - No. 30 oder S.3 - No. 29) Dieser Sockel unterstützt WiFi+AP Funktion mit ASRock WiFi-802.11g oder WiFi-802.11n Modul, einem einfach zu bedienenden Wireless Local Area Network (WLAN) Adapter und Kontrolle über Audio-Geräte. 66 ASRock 4Core1600P35-WiFi+ / 4Core1600P35-WiFi Motherboard Deutsch - ASRock 4Core1600P35-WiFi | Quick Installation Guide - Page 67
97-Audioleiste angeschlossen werden. E. Rufen Sie das BIOS-Setup-Dienstprogramm auf. Wechseln Sie zu Erweiterte Einstellungen von [Automatisch] auf [Aktiviert]. F. Rufen Sie das Windows-System auf. Klicken Sie auf das Symbol in der an. 67 ASRock 4Core1600P35-WiFi+ / 4Core1600P35-WiFi Motherboard - ASRock 4Core1600P35-WiFi | Quick Installation Guide - Page 68
arbeiten, wenn Sie einen traditionellen 4-Pin ATX 12V Energieversorgung adoptieren. Um die 4-Pin ATX Energieversorgung zu verwenden, stecken 4 8 Sie am SLI/XFIRE_POWER1 Motherboard angeschlossen sind, verbinden Sie diesen 68 ASRock 4Core1600P35-WiFi+ / 4Core1600P35-WiFi Motherboard Deutsch - ASRock 4Core1600P35-WiFi | Quick Installation Guide - Page 69
HDMI_SPDIF-Anschluss am Motherboard. Schließen Sie dann das weiße Ende (B oder C) des HDMI_SPDIF-Kabels an den HDMI_SPDIF-Anschluss der HDMI-VGA-Karte an. A. Schwarzes Ende B. Weißes Ende (zweipolig) C. Weißes Ende (dreipolig) 69 ASRock 4Core1600P35-WiFi+ / 4Core1600P35-WiFi Motherboard Deutsch - ASRock 4Core1600P35-WiFi | Quick Installation Guide - Page 70
Anschluss der HDMI-VGA-Karte oder gar an eine andere VGA-Karte an. Dadurch können Motherboard und VGA-Karte schwer beschädigt werden. In der Abbildung sehen Sie ein Beispiel für einen Vorfeld über die richtige Nutzung der Anschlüsse. 70 ASRock 4Core1600P35-WiFi+ / 4Core1600P35-WiFi Motherboard - ASRock 4Core1600P35-WiFi | Quick Installation Guide - Page 71
identisch komfortabler Handhabung bietet. HINWEIS: 1. Wenn Sie die Option "Configure SATAII as" im BIOS-Setup auf den AHCI- oder den RAID-Modus setzen, wird die Hot Plug-Funktion auf sind auf den Seiten 75 zu 77 angegeben. 71 ASRock 4Core1600P35-WiFi+ / 4Core1600P35-WiFi Motherboard Deutsch - ASRock 4Core1600P35-WiFi | Quick Installation Guide - Page 72
des eSATAII-Gerätekabels an das eSATAII-Gerät an Verbinden Sie das andere Ende des eSATAIIGerätekabels mit dem eSATAII-Anschluss am Ein-/Ausgabefeld 72 ASRock 4Core1600P35-WiFi+ / 4Core1600P35-WiFi Motherboard Deutsch - ASRock 4Core1600P35-WiFi | Quick Installation Guide - Page 73
von HITACHI finden Sie entsprechende Details: http://www.hitachigst.com/hdd/support/download.htm Die Beispiele oben dienen lediglich Ihrer Referenz. Die änzende Informationen finden Sie auf der Internetseite des Herstellers. 73 ASRock 4Core1600P35-WiFi+ / 4Core1600P35-WiFi Motherboard Deutsch - ASRock 4Core1600P35-WiFi | Quick Installation Guide - Page 74
SATAII-Festplatte an. 1. Wenn Sie RAID 0, RAID 1, RAID 10 oder die Intel Matrix StorageFunktionalität verwenden möchten, müssen Sie mindestens zwei SATA- / SATAII-Festplatten System in Betrieb ist und einwandfrei läuft. 74 ASRock 4Core1600P35-WiFi+ / 4Core1600P35-WiFi Motherboard Deutsch - ASRock 4Core1600P35-WiFi | Quick Installation Guide - Page 75
CD finden: ..\ RAID Installation Guide 2.15 Windows® 2000 / XP / XP 64-Bit / VistaTM / VistaTM 64-Bit ohne RAID-Funktionalität installieren Wenn Sie Windows® 2000 / XP / stellen Sie danach "SATAII konfigureren als" auf [AHCI] ein. 75 ASRock 4Core1600P35-WiFi+ / 4Core1600P35-WiFi Motherboard Deutsch - ASRock 4Core1600P35-WiFi | Quick Installation Guide - Page 76
Configuration" (IDE-Konfiguration). B. Stellen Sie "SATAII-Konfiguration" auf [Erweitert] ein, stellen Sie danach "SATAII konfigureren als" auf [IDE] ein. SCHRITT 2: Installieren Sie Windows® 2000 / XP / XP 64-Bit in Ihrem System. 76 ASRock 4Core1600P35-WiFi+ / 4Core1600P35-WiFi Motherboard Deutsch - ASRock 4Core1600P35-WiFi | Quick Installation Guide - Page 77
Intel® AHCI-Treiber zu installieren. Die Intel® AHCI-Treiber befinden sich in dem folgenden Verzeichnis auf der Support CD: .. \ I386 (Für Windows® VistaTM-Benutzer) .. \ AMD64 (Für Windows Windows® VistaTM / VistaTM 64-Bit in Ihrem System. 77 ASRock 4Core1600P35-WiFi+ / 4Core1600P35-WiFi Motherboard - ASRock 4Core1600P35-WiFi | Quick Installation Guide - Page 78
neu. 3. Sie werden das Ikon (Realtek HD Audio Kontrolleur) auf der Taskleiste des Windows® finden. 4. Klicken Sie auf dieses Ikon doppelt, um Realtek HD Audio Kontrolleur zu , um auf fortgeschrittene Steuerungen zuzugreifen. Deutsch 78 ASRock 4Core1600P35-WiFi+ / 4Core1600P35-WiFi Motherboard - ASRock 4Core1600P35-WiFi | Quick Installation Guide - Page 79
und allen Programmen verschlüsselt in DTS Umgebung. Das Ergebnis ist verbesserte Klangfeld Richtungsabhängigkeit, die sich der Qualität des getrennten 7.1Kanäe-Tons nähert. 79 ASRock 4Core1600P35-WiFi+ / 4Core1600P35-WiFi Motherboard Deutsch - ASRock 4Core1600P35-WiFi | Quick Installation Guide - Page 80
BIOS-Setup, siehe bitte das Benutzerhandbuch (PDF Datei) auf der Support CD. 4. Software Support CD information Dieses Motherboard unterstützt eine Reiche von Microsoft® Windows die Programme werden dann automatisch installiert. 80 ASRock 4Core1600P35-WiFi+ / 4Core1600P35-WiFi Motherboard Deutsch - ASRock 4Core1600P35-WiFi | Quick Installation Guide - Page 81
/support/index.asp 1.1 Contenu du paquet Carte mère ASRock 4Core1600P35-WiFi+ / 4Core1600P35-WiFi (Facteur de forme ATX: 12.0 pouces x 9.6 pouces, 30.5 cm x 24.4 cm) Guide d'installation rapide ASRock 4Core1600P35-WiFi+ / 4Core1600P35-WiFi CD de soutien ASRock 4Core1600P35-WiFi+ / 4Core1600P35-WiFi - ASRock 4Core1600P35-WiFi | Quick Installation Guide - Page 82
Codec) - Supporter DTS (Système de Théâtre Digital) (voir ATTENTION 7) 4Core1600P35-WiFi - 7,1 CH Windows® VistaTM Premium niveau HD Audio avec protection de contenu - DAC avec une gamme dynamique 110dB (ALC890 Audio Codec) 82 ASRock 4Core1600P35-WiFi+ / 4Core1600P35-WiFi Motherboard Français - ASRock 4Core1600P35-WiFi | Quick Installation Guide - Page 83
et Mode Ad-hoc) 4Core1600P35-WiFi+ ASRock 1394_eSATAII I/O Plus - 1 x port souris PS/2 - 1 x port clavier PS/2 - 1 x port série: COM 1 - 1 x port parallèle: Support ECP/EPP - 4 x avec 1 connecteur SATAII) (voir ATTENTION 10) Français 83 ASRock 4Core1600P35-WiFi+ / 4Core1600P35-WiFi Motherboard - ASRock 4Core1600P35-WiFi | Quick Installation Guide - Page 84
Windows® 2000 / XP / XP 64-bit / VistaTM / VistaTM 64-bit (voir ATTENTION 16) Certifications - FCC, CE, WHQL * Pour de plus amples informations sur les produits, s'il vous plaît visitez notre site web: http://www.asrock.com Français 84 ASRock 4Core1600P35-WiFi+ / 4Core1600P35-WiFi Motherboard - ASRock 4Core1600P35-WiFi | Quick Installation Guide - Page 85
mère, elle se déroulera au DDR3 960, si vous adopter un module de mémoire DDR3 1066. Lorsque vous utilisez un FSB1600-CPU sur cette carte mère, elle se déroulera à la DDR3 1280 si vous adopter un module de mémoire DDR3 1333. 85 ASRock 4Core1600P35-WiFi+ / 4Core1600P35-WiFi Motherboard Français - ASRock 4Core1600P35-WiFi | Quick Installation Guide - Page 86
DDR2 érieure à 4 Go sous Windows® XP et Windows® VistaTM. Avec Windows® XP 64 bits et Windows® VistaTM 64 bits avec CPU Guide» à la page 110 pour plus de détails,S'il vous plaît. 8. Pour l'entrée microphone, cette carte mère supporte ASRock 4Core1600P35-WiFi+ / 4Core1600P35-WiFi Motherboard Français - ASRock 4Core1600P35-WiFi | Quick Installation Guide - Page 87
-le sur un support antistatique ou dans son sachet d'origine. 5. Lorsque vous placez les vis dans les orifices pour vis pour fixer la carte mère sur le châssis, ne serrez pas trop les vis ! Vous risquez sinon d'endommager la carte mère. 87 ASRock 4Core1600P35-WiFi+ / 4Core1600P35-WiFi Motherboard - ASRock 4Core1600P35-WiFi | Quick Installation Guide - Page 88
775 broches : Etape 2-1. Tenez le processeur par ses bords là où se trouvent des lignes noires. Etape 2-2. Orientez le paquet avec le dissipateur thermique intégré (IHS) vers le haut. Repérez la broche 1 et les deux encoches d'orientation. 88 ASRock 4Core1600P35-WiFi+ / 4Core1600P35-WiFi Motherboard - ASRock 4Core1600P35-WiFi | Quick Installation Guide - Page 89
1 Détrompeur Détrompeur Processeur 775 broches Socket 775 broches Pour une insertion correcte, capuchon doit être mis en place si vous renvoyez la carte mère pour service après vente. Français Etape 4. Refermez le socle : Etape 4-1. ASRock 4Core1600P35-WiFi+ / 4Core1600P35-WiFi Motherboard - ASRock 4Core1600P35-WiFi | Quick Installation Guide - Page 90
, veuillez vous reporter aux manuels d'instructions de votre ventilateur de processeur et dessous illustre l'installation du dissipateur thermique pour un processeur 775 broches. (Appliquez le matériau d'interface thermique) ASRock 4Core1600P35-WiFi+ / 4Core1600P35-WiFi Motherboard Français - ASRock 4Core1600P35-WiFi | Quick Installation Guide - Page 91
) X X SS DS SS DS Configurations de Mémoire de double Chaînes DDR3 (DS: Double Side (double face), SS: Single Side (simple face)) DDR3_A1 (Slot Vert) 2 modules de mémoire SS 2 modules de mémoire DS DDR3_B1 (Slot Vert) SS DS Français 91 ASRock 4Core1600P35-WiFi+ / 4Core1600P35-WiFi Motherboard - ASRock 4Core1600P35-WiFi | Quick Installation Guide - Page 92
installer un module de mémoire DDR3 en DDR2 slot ou d'installer un module de mémoire DDR2 en DDR3 slot, sinon, cette carte mère et DIMM peuvent être endommagé. 5. DDR2 et DDR3 modules de mémoire ne peuvent trous du connecteur. Français 92 ASRock 4Core1600P35-WiFi+ / 4Core1600P35-WiFi Motherboard - ASRock 4Core1600P35-WiFi | Quick Installation Guide - Page 93
1 slot PCI Express et 1 slot AGI Express (PCI Express x4) sur les cartes mères 4Core1600P35-WiFi+ / 4Core1600P35-WiFi. Slots PCI: Les slots PCI sont utilisés pour installer des cartes d'extension dotées d'une à l'aide d'une vis. Français 93 ASRock 4Core1600P35-WiFi+ / 4Core1600P35-WiFi Motherboard - ASRock 4Core1600P35-WiFi | Quick Installation Guide - Page 94
le BIOS à jour. Si vous avez besoin d'effacer la CMOS lorsque vous avez fini de mettre le BIOS à jour, vous devez d'abord initialiser le système, puis le mettre hors tension avant de procéder à l'opération d'effacement de la CMOS. 94 ASRock 4Core1600P35-WiFi+ / 4Core1600P35-WiFi Motherboard Fran - ASRock 4Core1600P35-WiFi | Quick Installation Guide - Page 95
-dessous. FSB1600 Remarque 2: Si vous utilisez un FSB1333-CPU et adopter un module de mémoire DDR2 1066 sur cette carte mère, vous devez ajuster les cavaliers. S'il vous plaît,court-circuiter rer au dessous paramétrages de cavaliers. 95 ASRock 4Core1600P35-WiFi+ / 4Core1600P35-WiFi Motherboard - ASRock 4Core1600P35-WiFi | Quick Installation Guide - Page 96
/ DDR2 1066 Câble ATA 66/100/133 80 conducteurs Note: Veuillez vous reporter aux instructions du fabricant de votre IDE périphérique pour les détails. Connecteurs 11) (SATAII_6 (Port5): SATAII_4 (Port3) voir p.2/3 No. 19) 96 ASRock 4Core1600P35-WiFi+ / 4Core1600P35-WiFi Motherboard Français - ASRock 4Core1600P35-WiFi | Quick Installation Guide - Page 97
Câble de données Série ATA (SATA) (en option) eSATAII Le connecteur eSATAII supporte le cable de data SATA pour la fonction externe SATAII. L'interface present eSATAII permet d' 2.0 peut prendre en charge 2 ports USB 2.0. 97 ASRock 4Core1600P35-WiFi+ / 4Core1600P35-WiFi Motherboard Français - ASRock 4Core1600P35-WiFi | Quick Installation Guide - Page 98
No. 29) Cet en-tête supporte les fonctions WiFi+AP avec le module ASRock WiFi-802.11g ou WiFi-802.11n, c'est un adaptateur HDA pour fonctionner correctement. Veuillez suivre les instructions dans notre manuel et le manuel de ch ). 98 ASRock 4Core1600P35-WiFi+ / 4Core1600P35-WiFi Motherboard Français - ASRock 4Core1600P35-WiFi | Quick Installation Guide - Page 99
AC'97. E. Entrer dans l'utilitaire de configuration du BIOS. Saisir les Paramètres avancés puis sélectionner Configuration inférieur droite pour entrer dans le Gestionnaire audio Realtek HD. Pour Windows® 2000 / XP / XP 64-bit OS: Cliquer sur « ASRock 4Core1600P35-WiFi+ / 4Core1600P35-WiFi Motherboard - ASRock 4Core1600P35-WiFi | Quick Installation Guide - Page 100
que cette carte mère offre un support de (Ventilateur silencieux) ventilateur de courant ATX 24 broches, elle peut encore fonctionner si vous adopter une alimentation traditionnelle ATX 20 broches. Pour utiliser une alimentation ATX 20 100 ASRock 4Core1600P35-WiFi+ / 4Core1600P35-WiFi Motherboard - ASRock 4Core1600P35-WiFi | Quick Installation Guide - Page 101
s ctées 12 24 ATX 1 13 4 8 12V 1 (FRONT_1394) sur cette carte mere. Le header de IEEE 1394 peut supporter un port de IEEE 1394. Connecteur HDMI_SPDIF, fournissant une sortie audio SPDIF extrémité blanche (3 briches) ASRock 4Core1600P35-WiFi+ / 4Core1600P35-WiFi Motherboard 101 Français - ASRock 4Core1600P35-WiFi | Quick Installation Guide - Page 102
Pour une bonne installation de la carte VGA HDMI, veuillez vous reporter à la page 93 du guide d'installation. Etape 2. Connectez l'extrémité noire (A) du câble HDMI_SPDIF au collecteur HDMI_SPDIF ( VGA pour l'utilisation du connecteur. ASRock 4Core1600P35-WiFi+ / 4Core1600P35-WiFi Motherboard - ASRock 4Core1600P35-WiFi | Quick Installation Guide - Page 103
tat de fonctionnement. 2. Si vous réglez l'option «Configure SATAII as» dans les paramètres du BIOS sur le mode IDE, la fonction de connexion à chaud n'est pas prise en charge avec les es sur les modes RAID, IDE et AHCI. Français ASRock 4Core1600P35-WiFi+ / 4Core1600P35-WiFi Motherboard 103 - ASRock 4Core1600P35-WiFi | Quick Installation Guide - Page 104
périphérique SATAII au périphérique eSATAII. Connectez l'autre extrémité du câble de périphérique SATAII au port eSATAII du blindage entrée/sortie. 104 ASRock 4Core1600P35-WiFi+ / 4Core1600P35-WiFi Motherboard Français - ASRock 4Core1600P35-WiFi | Quick Installation Guide - Page 105
lire attentivement le présent guide d'installation du disque dur SATAII, veuillez suivre les instructions ci-dessous avec les diff détails. http://www.hitachigst.com/hdd/support/download.htm Les exemples donnés précédemment ASRock 4Core1600P35-WiFi+ / 4Core1600P35-WiFi Motherboard 105 Français - ASRock 4Core1600P35-WiFi | Quick Installation Guide - Page 106
4Core1600P35-WiFi+ / 4Core1600P35-WiFi gère les fonctions Hot Plug et Hot Swap pour les périphériques SATA / SATAII / eSATAII en mode RAID / AHCI. Le jeu de puces de pont sud Intel® ICH9R offre un support appelle le "Hot Plug". Français 106 ASRock 4Core1600P35-WiFi+ / 4Core1600P35-WiFi Motherboard - ASRock 4Core1600P35-WiFi | Quick Installation Guide - Page 107
lecteur de disque dur SATAII. 2.13 Guide d'installation des pilotes Pour installer les Windows® 2000 RAID / AHCI pilote n'est pas fourni par le fabricant de puces, les functions RAID / AHCI ne sont pas supportées sous Windows® 2000. Français ASRock 4Core1600P35-WiFi+ / 4Core1600P35-WiFi Motherboard - ASRock 4Core1600P35-WiFi | Quick Installation Guide - Page 108
ATA driver diskette Windows®, appuyez sur F6 pour installer un lecteur AHCI tiers. Lorsque vous y êtes invité, insérez une disquette contenant le lecteur Intel® AHCI. Après lecture de la disquette, le lecteur est présenté. Français 108 ASRock 4Core1600P35-WiFi+ / 4Core1600P35-WiFi Motherboard - ASRock 4Core1600P35-WiFi | Quick Installation Guide - Page 109
de Windows® VistaTM) .. \ AMD64 (Pour les utilisateurs de Windows® VistaTM 64-bits) Ensuite, veuillez insérer le disque optique de Windows® VistaTM / VistaTM 64-bits dans le lecteur optique de nouveau pour continuer l'installation. ASRock 4Core1600P35-WiFi+ / 4Core1600P35-WiFi Motherboard 109 - ASRock 4Core1600P35-WiFi | Quick Installation Guide - Page 110
contient 2 éléments: DTS Neo: PC et DTS Interactive. Cliquez sur le bouton pour le activer ou désactiver. DTS Neo: PC DTS Interactive Français 110 ASRock 4Core1600P35-WiFi+ / 4Core1600P35-WiFi Motherboard - ASRock 4Core1600P35-WiFi | Quick Installation Guide - Page 111
DTS Neo: PC. Vous pouvez cliquer sur l'icône Paramètres) pour accéder aux contrôles. (Détail Français Mode Musique Mode Cinéma ASRock 4Core1600P35-WiFi+ / 4Core1600P35-WiFi Motherboard 111 - ASRock 4Core1600P35-WiFi | Quick Installation Guide - Page 112
volée, veuillez entrer l'option "Mode de surcadençage" de la configuration du BIOS pour établir la sélection de [Auto] à [Manual]. Par conséquent, le CPU FSB n'est pas lié durant le surcaden la technologie Untied Overclocking. Français 112 ASRock 4Core1600P35-WiFi+ / 4Core1600P35-WiFi Motherboard - ASRock 4Core1600P35-WiFi | Quick Installation Guide - Page 113
BIOS, veuillez consulter le Guide de l'utilisateur (fichier PDF) dans le CD technique. 4. Informations sur le CD de support Cette carte mère supporte divers systèmes d'exploitation Microsoft® Windows®: pour afficher les menus. Français ASRock 4Core1600P35-WiFi+ / 4Core1600P35-WiFi Motherboard 113 - ASRock 4Core1600P35-WiFi | Quick Installation Guide - Page 114
support/index.asp 1.1 Contenuto della confezione Scheda madre ASRock 4Core1600P35-WiFi+ / 4Core1600P35-WiFi (ATX Form Factor: 12.0-in x 9.6-in, 30.5 cm x 24.4 cm) Guida di installazione rapida ASRock 4Core1600P35-WiFi+ / 4Core1600P35-WiFi CD di supporto ASRock 4Core1600P35-WiFi+ / 4Core1600P35-WiFi - ASRock 4Core1600P35-WiFi | Quick Installation Guide - Page 115
Audio LAN - ATX Form Factor: 12.0-in x 9.6-in, 30.5 cm x 24.4 cm - Design condensatore compatto - LGA 775 per Intel® CoreTM 2 Extreme / CoreTM 2 Quad / CoreTM 2 Duo / Pentium® Dual Core / Celeron® in grado di supportare processori Penryn Quad Core Yorkfield e Dual Core Wolfdale - Compatibile - ASRock 4Core1600P35-WiFi | Quick Installation Guide - Page 116
0Go/s, sopporta RAID (RAID 0, RAID 1, RAID 10, RAID 5 ed Intel Matrix Storage), NCQ, AHCI e "Collegamento a caldo" (vedi ATTENZIONE HDMI_SPDIF - 1 x connettore IEEE 1394 (4Core1600P35-WiFi+) - Connettore ventolina CPU/telaio 116 ASRock 4Core1600P35-WiFi+ / 4Core1600P35-WiFi Motherboard - ASRock 4Core1600P35-WiFi | Quick Installation Guide - Page 117
alle periferiche del sistema. La procedura è eseguita a proprio rischio ed a proprie spese. Noi non possiamo essere ritenuti responsabili per possibili danni provocati dall'overclocking. Italiano ASRock 4Core1600P35-WiFi+ / 4Core1600P35-WiFi Motherboard 117 - ASRock 4Core1600P35-WiFi | Quick Installation Guide - Page 118
effettive della memoria possono essere inferiori a 4GB per l'accantonamento riservato all'uso del sistema sotto Windows® XP e Windows® VistaTM. Per Windows® XP 64-bit e Windows® VistaTM 64-bit con CPU 64-bit, non c'è tale limitazione. ASRock 4Core1600P35-WiFi+ / 4Core1600P35-WiFi Motherboard - ASRock 4Core1600P35-WiFi | Quick Installation Guide - Page 119
/ AHCI non sono supportate da Windows® 2000 OS. In Windows® 2000 si consiglia l'uso della modalità IDE. Consultare pagina 62 del "Manuale utente" nel CD in dotazione per avere informazioni dettagliate sulla configurazione. Italiano ASRock 4Core1600P35-WiFi+ / 4Core1600P35-WiFi Motherboard 119 - ASRock 4Core1600P35-WiFi | Quick Installation Guide - Page 120
canale (Basic) DX10 con driver WDDM Con memoria VGA 128bit (Premium) Con memoria VGA 64bit (Basic) * Dopo il 1 Giugno 2008, tutti i sistemi Windows® VistaTM vengono richiesti di essere rischia di danneggiare la scheda madre. Italiano 120 ASRock 4Core1600P35-WiFi+ / 4Core1600P35-WiFi Motherboard - ASRock 4Core1600P35-WiFi | Quick Installation Guide - Page 121
installare la CPU Intel 775-Pin. (Disposizione comandi) (Corpo socket) Vista del socket 775-Pin Prima da inserire la CPU da 775-Pin nel 775-Pin: Fase 2-1. Tenere la CPU dai bordi segnati con linee nere. Linea nera Linea nera Italiano ASRock 4Core1600P35-WiFi+ / 4Core1600P35-WiFi Motherboard - ASRock 4Core1600P35-WiFi | Quick Installation Guide - Page 122
Pin1 Dente di Tacca di allineamento orientamento Tacca di allineamento CPU da 775-Pin Socket da 775-Pin Per il corretto inserimento, verificare di far combaciare i due denti mentre si preme leggermente sulla piastra di carico. 122 ASRock 4Core1600P35-WiFi+ / 4Core1600P35-WiFi Motherboard - ASRock 4Core1600P35-WiFi | Quick Installation Guide - Page 123
viene presentato un esempio che mostra l'installazione del dissipatore per la CPU da 775-Pin. Fase1. (Applicare il materiale dell'interfaccia termica) Applicare il materiale di che venga a contatto con gli altri componenti. ASRock 4Core1600P35-WiFi+ / 4Core1600P35-WiFi Motherboard 123 Italiano - ASRock 4Core1600P35-WiFi | Quick Installation Guide - Page 124
DS X DS SS SS SS DS DS DS Dual Channel DDR3 Memory Configurations (DS: Double Side, SS: Single Side) DDR3_A1 (alloggiamento verde) 2 moduli di memoria SS 2 moduli di memoria DS DDR3_B1 (alloggiamento verde) SS DS Italiano 124 ASRock 4Core1600P35-WiFi+ / 4Core1600P35-WiFi Motherboard - ASRock 4Core1600P35-WiFi | Quick Installation Guide - Page 125
L'installazione del modulo di memoria DDR3 non puo' effettuata nella presa DDR2 oppure l'installazione del modulo di memoria DDR2 nella presa DDR3; altrimenti questa schedamare ed il DIMM combaci con la sua sede sullo slot. Italiano ASRock 4Core1600P35-WiFi+ / 4Core1600P35-WiFi Motherboard 125 - ASRock 4Core1600P35-WiFi | Quick Installation Guide - Page 126
Express e 1 slot AGI Express (PCI Express x4) su entrambe le schede madri 4Core1600P35-WiFi+ / 4Core1600P35-WiFi. Slot PCI: Sono utilizzati per installare schede di espansione con Interfaccia PCI a 32 allo chassis con le viti. Italiano 126 ASRock 4Core1600P35-WiFi+ / 4Core1600P35-WiFi Motherboard - ASRock 4Core1600P35-WiFi | Quick Installation Guide - Page 127
subito dopo aver aggiornato il BIOS. Se è necessario cancellare la CMOS una volta completato l'aggiornamento del BIOS, è necessario riavviare prima il sistema, e poi spegnerlo prima di procedere alla cancellazione della CMOS. ASRock 4Core1600P35-WiFi+ / 4Core1600P35-WiFi Motherboard 127 Italiano - ASRock 4Core1600P35-WiFi | Quick Installation Guide - Page 128
. FSB1600 Nota 2: Se si desidera usare un FSB1333-CPU ed un modulo di memoria DDR2 1066 su questa schedamadre, e' necessario regolare I jumper. Prego impostare pin4, pin5 per FSB2 riferimento alle impostazioni del jumper. Italiano 128 ASRock 4Core1600P35-WiFi+ / 4Core1600P35-WiFi Motherboard - ASRock 4Core1600P35-WiFi | Quick Installation Guide - Page 129
1600 333 / DDR2 1066 FSB1066 / DDR2 1066 2.7 Collettori e Connettori su Scheda I collettori ed i connettori su scheda NON sono interni. L'interfaccia SATAII attuale permette velocità di trasferimento dati fino a 3.0 Gb/s. ASRock 4Core1600P35-WiFi+ / 4Core1600P35-WiFi Motherboard 129 Italiano - ASRock 4Core1600P35-WiFi | Quick Installation Guide - Page 130
. Oltre alle quattro porte USB 2.0 predefinite nel pannello I/O, la scheda madre dispone di tre intestazioni USB 2.0. Ciascuna intestazione USB 2.0 supporta due porte USB 2.0. Italiano 130 ASRock 4Core1600P35-WiFi+ / 4Core1600P35-WiFi Motherboard - ASRock 4Core1600P35-WiFi | Quick Installation Guide - Page 131
che questa operi in modo corretto. Attenersi alle istruzioni del nostro manuale e del manuale del telaio per installare il sistema. 2. Se si utilizza un pannello HD. Non è necessario collegarli per il pannello audio AC'97. ASRock 4Core1600P35-WiFi+ / 4Core1600P35-WiFi Motherboard 131 Italiano - ASRock 4Core1600P35-WiFi | Quick Installation Guide - Page 132
BIOS. Entrare su Impostazioni avanzate, quindi selezionare Configurazione chipset. Impostare l'opzione Comando pannello anteriore da [Auto] a [Attivato]. F. Entrare nel sistema di Windows Installazione della ventola a 3 piedini 132 ASRock 4Core1600P35-WiFi+ / 4Core1600P35-WiFi Motherboard Italiano - ASRock 4Core1600P35-WiFi | Quick Installation Guide - Page 133
un connettore 12 24 elettrico ATX a 24 pin, ma può funzionare lo stesso se si adotta un alimentatore ATX a 20 pin. Per usare l'alimentatore ATX a 20 pin, collegare l'alimentatore puo' supportare una porta IEEE 1394. ASRock 4Core1600P35-WiFi+ / 4Core1600P35-WiFi Motherboard 133 Italiano - ASRock 4Core1600P35-WiFi | Quick Installation Guide - Page 134
madre. Quindi collegare l'estremità bianca (B o C) del cavo HDMI_SPDIF al connettore HDMI_SPDIF della scheda HDMI VGA. A. estremità nera B. estremità bianca (2 pin) C. estremità bianca (3 pin) Italiano 134 ASRock 4Core1600P35-WiFi+ / 4Core1600P35-WiFi Motherboard - ASRock 4Core1600P35-WiFi | Quick Installation Guide - Page 135
il connettore di uscita HDMI al dispositivo HDMI, ad esempio HDTV. Consultare il manuale dell'utente di HDTV e della scheda HDMI VGA per il collegamento dettagliato. Punto 5. Installare il driver della scheda HDMI VGA nel sistema. ASRock 4Core1600P35-WiFi+ / 4Core1600P35-WiFi Motherboard 135 - ASRock 4Core1600P35-WiFi | Quick Installation Guide - Page 136
in condizioni operative. 2. Se si imposta l'opzione "Configure SATAII as" del BIOS sulla modalità IDE, non è supportata la funzione Hot Plug (Collegamento a Italiano 136 connettore SATAII SATAII_6 (Port5) connettore eSATAII (eSATAII) ASRock 4Core1600P35-WiFi+ / 4Core1600P35-WiFi Motherboard - ASRock 4Core1600P35-WiFi | Quick Installation Guide - Page 137
una estremità del cavo della periferica eSATAII alla periferica eSATAII Collegare un'altra estremità del cavo della periferica eSATAII alla porta eSATAII dello schermo I/O Italiano ASRock 4Core1600P35-WiFi+ / 4Core1600P35-WiFi Motherboard 137 - ASRock 4Core1600P35-WiFi | Quick Installation Guide - Page 138
di diversi produttori, i metodi di impostazione dei pin del jumper possono non essere gli stessi. Visitare i siti web dei produttori per gli aggiornamenti. Italiano 138 ASRock 4Core1600P35-WiFi+ / 4Core1600P35-WiFi Motherboard - ASRock 4Core1600P35-WiFi | Quick Installation Guide - Page 139
. 1. Se si desidera utilizzare RAID 0, RAID 1, RAID 10 o la funzione Intel Matrix Storage, è necessario installare almeno 2 dischi rigidi SATA / SATAII. Se si mentre il sistema è ancora acceso ed in condizione di funzionamento. ASRock 4Core1600P35-WiFi+ / 4Core1600P35-WiFi Motherboard 139 Italiano - ASRock 4Core1600P35-WiFi | Quick Installation Guide - Page 140
SATA / SATAII e dei dispositivi eSATAII con funzioni NCQ Passo 1: Configurare il BIOS. A. Entrare in BIOS SETUP UTILITY (UTILITÀ DI CONFIGURAZIONE DEL BIOS) Advanced screen (Avanzate) IDE Configuration (Configurazione IDE). Italiano 140 ASRock 4Core1600P35-WiFi+ / 4Core1600P35-WiFi Motherboard - ASRock 4Core1600P35-WiFi | Quick Installation Guide - Page 141
BIOS, è possibile procedere all'installazione di Windows® XP / Windows® XP 64 bit sul sistema. All'inizio dell'impostazione di Windows®, premere F6 per installare un driver AHCI di terzi. Al termine, inserire un floppy con il driver Intel ASRock 4Core1600P35-WiFi+ / 4Core1600P35-WiFi Motherboard 141 - ASRock 4Core1600P35-WiFi | Quick Installation Guide - Page 142
" (Configurazione SATAII) su [Enhanced] (Migliorata) e poi, nell'opzione"Configure SATAII as" (Configura SATAII come), impostare l'opzione su [IDE]. Passo 2: Installazione di Windows® VistaTM / VistaTM 64-bit sul sistema. Italiano 142 ASRock 4Core1600P35-WiFi+ / 4Core1600P35-WiFi Motherboard - ASRock 4Core1600P35-WiFi | Quick Installation Guide - Page 143
DTS: 1. Installare I driver sul sistema partendo dal CD di supporto ASRock. 2. Riattivare il sistema. 3. Sulla barra d'applicazione di Windows® verra' visualizzata la ) per aver accesso ai controlli avanzati. (dettagli Italiano ASRock 4Core1600P35-WiFi+ / 4Core1600P35-WiFi Motherboard 143 - ASRock 4Core1600P35-WiFi | Quick Installation Guide - Page 144
' Cinema viene utilizzata per visualizzazione televisione stereo e tutti I programmi codificati in DTS Surrounf. Il risultato viene migliorato direzionalmente in qualita' di canale sonoro 7.1. Italiano 144 ASRock 4Core1600P35-WiFi+ / 4Core1600P35-WiFi Motherboard - ASRock 4Core1600P35-WiFi | Quick Installation Guide - Page 145
. Se il Menù principale non appare automaticamente, posizionarsi sul file "ASSETUP.EXE" nel CESTINO del CD di supporto e cliccare due volte per visualizzare i menù. Italiano ASRock 4Core1600P35-WiFi+ / 4Core1600P35-WiFi Motherboard 145 - ASRock 4Core1600P35-WiFi | Quick Installation Guide - Page 146
.com/support/index.asp 1.1 Contenido de la caja Placa base ASRock 4Core1600P35-WiFi+ / 4Core1600P35-WiFi (Factor forma ATX: 30,5 cm x 24,4 cm, 12,0" x 9,6") Guía de instalación rápida de ASRock 4Core1600P35-WiFi+ / 4Core1600P35-WiFi CD de soporte de ASRock 4Core1600P35-WiFi+ / 4Core1600P35-WiFi Gu - ASRock 4Core1600P35-WiFi | Quick Installation Guide - Page 147
-WiFi - 7.1 CH Windows® VistaTM Premium Level HD Audio con Protección de Contenido - DAC con rango dinámico de 110dB (ALC890 Audio Codec) LAN - PCIE x1 Gigabit LAN 10/100/1000 Mb/s - Realtek RTL8111B / RTL8111C - Soporta Wake-On-LAN ASRock 4Core1600P35-WiFi+ / 4Core1600P35-WiFi Motherboard - ASRock 4Core1600P35-WiFi | Quick Installation Guide - Page 148
caliente" (vea ATENCIÓN 9) - 1 x conectador del eSATAII 3.0Gb/s (compartido con 1 conectador de SATAII) (vea ATENCIÓN 10) - 1 x ATA133 conexiones IDE (admite hasta 2 dispositivos IDE) - 1 x puerto Floppy 148 ASRock 4Core1600P35-WiFi+ / 4Core1600P35-WiFi Motherboard - ASRock 4Core1600P35-WiFi | Quick Installation Guide - Page 149
Microsoft® Windows® 2000 / XP / XP 64 bits / VistaTM / VistaTM 64 bits (vea ATENCIÓN 16) Certificaciones - FCC, CE, WHQL * Para más información sobre los productos, por favor visite nuestro sitio web: http://www.asrock.com Español ASRock 4Core1600P35-WiFi+ / 4Core1600P35-WiFi Motherboard 149 - ASRock 4Core1600P35-WiFi | Quick Installation Guide - Page 150
un FSB1600 - CPU en esta placa base, se ejecutará en DDR3 960 si adopta un módulo de memoria de DDR3 1066. Cuando utiliza un FSB1600 - CPU en esta placa base, se ejecutará en DDR3 1280 si adopta un módulo de memoria de DDR3 1333. ASRock 4Core1600P35-WiFi+ / 4Core1600P35-WiFi Motherboard Español - ASRock 4Core1600P35-WiFi | Quick Installation Guide - Page 151
un módulo de memoria de DDR2 1066 y adopta un FSB1333-CPU 4GB para que el sistema pueda funcionar bajo Windows® XP y Windows® VistaTM. Para equipos con Windows® XP 64bit y Windows® VistaTM 64-bit con CPU de 64-bit, funciona ASRock 4Core1600P35-WiFi+ / 4Core1600P35-WiFi Motherboard 151 Español - ASRock 4Core1600P35-WiFi | Quick Installation Guide - Page 152
VGA de 64 bit (Basic) * Después del 1 de Junio de 2008, todos los sistemas de Windows® VistaTM son requieridos para satisfacer los requisitos del hardware mínimos para calificar el logo de Windows® VistaTM Premium 2008. Español 152 ASRock 4Core1600P35-WiFi+ / 4Core1600P35-WiFi Motherboard - ASRock 4Core1600P35-WiFi | Quick Installation Guide - Page 153
la placa madre. 2.1 Instalación de Procesador Para la instalación de la CPU Intel de (Placa de carga) 775 agujas, siga los siguientes pasos. (Matriz de contacto) (Cuerpo del socket) Español puede producir daños graves en la CPU. ASRock 4Core1600P35-WiFi+ / 4Core1600P35-WiFi Motherboard 153 - ASRock 4Core1600P35-WiFi | Quick Installation Guide - Page 154
carga hasta la posición de apertura completa, aproximadamente 100 grados. Paso 2. Inserte la CPU de 775 agujas: Paso 2-1. Sostenga la CPU por los bordes marcados con líneas negras. Línea negra ón coincide con la indicada por las muescas. ASRock 4Core1600P35-WiFi+ / 4Core1600P35-WiFi Motherboard - ASRock 4Core1600P35-WiFi | Quick Installation Guide - Page 155
una correcta instalación, consulte los manuales de instrucciones del ventilador y 775 agujas. (Aplique el material termal de interfaz) Paso 1. Aplique el material termal de interfaz en el centro del IHS de la superficie del socket. Español ASRock 4Core1600P35-WiFi+ / 4Core1600P35-WiFi Motherboard - ASRock 4Core1600P35-WiFi | Quick Installation Guide - Page 156
un lazo para asegurarse de que el cable no interfiere en el funcionamiento del ventilador y tampoco entra en contacto con otros componentes. Español 156 ASRock 4Core1600P35-WiFi+ / 4Core1600P35-WiFi Motherboard - ASRock 4Core1600P35-WiFi | Quick Installation Guide - Page 157
a continuación. Configuraciones de Memoria de Dual Canal DDR2 (DS: Doble cara, SS: Una cara) DDR3 (DS: Doble cara, SS: Una cara) DDR3_A1 (Ranura Verde) 2 módulos de memoria SS 2 módulos de memoria DS DDR3_B1 (Ranura Verde) SS DS Español ASRock 4Core1600P35-WiFi+ / 4Core1600P35-WiFi Motherboard - ASRock 4Core1600P35-WiFi | Quick Installation Guide - Page 158
. 4. No se permite a instalar un módulo de memoria de DDR3 en la ranura de DDR2 o instalar un módulo de memoria de DDR2 en la ranura de DDR3, de lo contrario, esta placa base y DIMM pueden ser dañ os permanentes en la placa base y en la DIMM. ASRock 4Core1600P35-WiFi+ / 4Core1600P35-WiFi Motherboard - ASRock 4Core1600P35-WiFi | Quick Installation Guide - Page 159
Express y 1 ranura AGI Express (PCI Express x4) sobre las placas mardres 4Core1600P35-WiFi+ / 4Core1600P35-WiFi. Ranuras PCI: Para instalar tarjetas de expansión que tienen 32-bit Interface PCI Asegure la tarjeta con tornillos. Español ASRock 4Core1600P35-WiFi+ / 4Core1600P35-WiFi Motherboard 159 - ASRock 4Core1600P35-WiFi | Quick Installation Guide - Page 160
cap después de limpiar el COMS. Si necesita borrar la CMOS cuando acabe de finalizar la actualización de la BIOS, debe arrancar primero el sistema y, a continuación, apagarlo antes de realizar la acción de borrado de CMOS. 160 ASRock 4Core1600P35-WiFi+ / 4Core1600P35-WiFi Motherboard Español - ASRock 4Core1600P35-WiFi | Quick Installation Guide - Page 161
. FSB1600 Nota 2: Si utiliza un FSB1333-CPU y adopta un módulo de memoria de DDR2 1066 en esta placa base, lo que necesita a ajustar los jumpers. Por favor corta pin4 configuración del jumper como el siguientes. FSB1066 / DDR2 1066 ASRock 4Core1600P35-WiFi+ / 4Core1600P35-WiFi Motherboard 161 - ASRock 4Core1600P35-WiFi | Quick Installation Guide - Page 162
. Por favor lea "Introducción del interfaz de SATAII" en la página 169 para los detalles sobre eSATAII y los procedimientos de la instalación del eSATAII. 162 ASRock 4Core1600P35-WiFi+ / 4Core1600P35-WiFi Motherboard Español - ASRock 4Core1600P35-WiFi | Quick Installation Guide - Page 163
bases de conexiones USB 2.0 en esta placa base. Cada una de estas bases de conexiones admite dos puertos USB 2.0. Español (9-pin USB4_5) (ver p.2/3, N. 21) ASRock 4Core1600P35-WiFi+ / 4Core1600P35-WiFi Motherboard 163 - ASRock 4Core1600P35-WiFi | Quick Installation Guide - Page 164
HDA para operar correctamente. Por favor, siga las instrucciones en nuestro manual y en el manual de chasis para instalar su sistema. 2. Si utiliza el panel de ]. F. Entre en el sistema Windows. Haga clic en el icono de la barra de tareas ASRock 4Core1600P35-WiFi+ / 4Core1600P35-WiFi Motherboard - ASRock 4Core1600P35-WiFi | Quick Installation Guide - Page 165
ón del conector del panel frontal" y guarde el cambio haciendo clic en "Aceptar". Para Windows® VistaTM / VistaTM 64-bit OS: Haga el clic el icono de la "Carpeta" 1-3 conectado Instalación del ventilador de 3 contactos Español ASRock 4Core1600P35-WiFi+ / 4Core1600P35-WiFi Motherboard 165 - ASRock 4Core1600P35-WiFi | Quick Installation Guide - Page 166
de alimentación usando los Pins 1 y 13. Instalación de una Fuente de Alimentación ATX de 20 Pins 1 13 Conector de ATX 12V power (8-pin ATX12V1) (vea p.2/3, N. 2) 4 8 1 5 Tenga en puede apoyar un puerto de IEEE 1394. 166 ASRock 4Core1600P35-WiFi+ / 4Core1600P35-WiFi Motherboard Español - ASRock 4Core1600P35-WiFi | Quick Installation Guide - Page 167
és el extremo blanco (B o C) del cable HDMI_SPDIF en el conector HDMI_SPDIF de la tarjeta VGA HDMI. A. Extremo negro B. Extremo blanco (2 patillas) C. Extremo blanco (3 patillas) Español ASRock 4Core1600P35-WiFi+ / 4Core1600P35-WiFi Motherboard 167 - ASRock 4Core1600P35-WiFi | Quick Installation Guide - Page 168
de salida HDMI a un dispositivo HDMI, como un HDTV. Consulte el manual del usuario del HDTV y la tarjeta VGA HDMI para conocer el procedimiento detallado de conexión. Paso 5. Instale el controlador de la tarjeta VGA HDMI en su sistema. 168 ASRock 4Core1600P35-WiFi+ / 4Core1600P35-WiFi Motherboard - ASRock 4Core1600P35-WiFi | Quick Installation Guide - Page 169
NOTA: 1. Si activa la función "Configure SATAII as" en la configuración de BIOS con la opción AHCI o RAID, los dispositivos eSATAII admitirán conexión en caliente. Por del SATAII SATAII_6 (Port5) conectador del eSATAII (eSATAII) ASRock 4Core1600P35-WiFi+ / 4Core1600P35-WiFi Motherboard 169 - ASRock 4Core1600P35-WiFi | Quick Installation Guide - Page 170
cable de dispositivo eSATAII al dispositivo eSATAII Conecte el otro extremo del cable de dispositivo eSATAII al puerto eSATAII del escudo de E/S Español 170 ASRock 4Core1600P35-WiFi+ / 4Core1600P35-WiFi Motherboard - ASRock 4Core1600P35-WiFi | Quick Installation Guide - Page 171
visite el sitio Web de Hitachi para detalles. http://www.hitachigst.com/hdd/support/download.htm Los ejemplos anteriores son sólo para referencia. Para diferentes productos de los proveedores para obtener las actualizaciones. ASRock 4Core1600P35-WiFi+ / 4Core1600P35-WiFi Motherboard 171 Español - ASRock 4Core1600P35-WiFi | Quick Installation Guide - Page 172
duro SATA / SATAII. 1. Si piensa utilizar RAID 0, RAID 1, RAID 10 o la función Intel Matrix Storage, necesitará instalar al menos 2 discos duros SATA / SATAII. Si piensa utilizar la conectado y en condiciones de funcionamiento. Español 172 ASRock 4Core1600P35-WiFi+ / 4Core1600P35-WiFi Motherboard - ASRock 4Core1600P35-WiFi | Quick Installation Guide - Page 173
con Windows® 2000. 2.15.1 Instalación de Windows® 2000 / XP / XP 64 bits sin funciones RAID Si desea instalar Windows® 2000 / XP / 64 bits en sus discos duros SATA / SATAII sin funciones RAID, por favor siga los pasos siguientes. ASRock 4Core1600P35-WiFi+ / 4Core1600P35-WiFi Motherboard 173 - ASRock 4Core1600P35-WiFi | Quick Installation Guide - Page 174
Serial ATA driver diskette [Y/N]? Windows XP)" o "Intel(R) ICH9 SATA AHCI Controller (Desktop - Windows XP64)". Español Uso de dispositivos SATA / SATAII y eSATAII sin funciones NCQ PASO 1: Configuración de la BIOS. A. Entre en BIOS ASRock 4Core1600P35-WiFi+ / 4Core1600P35-WiFi Motherboard - ASRock 4Core1600P35-WiFi | Quick Installation Guide - Page 175
" ("Configuración SATAII") a [Enhanced] (Optimizada), y luego configure la opción que aparece en "Configure SATAII as" ("Configurar SATAII como") a [IDE]. PASO 2: Instale Windows® VistaTM / VistaTM 64 bits en su sistema. Español ASRock 4Core1600P35-WiFi+ / 4Core1600P35-WiFi Motherboard 175 - ASRock 4Core1600P35-WiFi | Quick Installation Guide - Page 176
a través del CD de apoyo de ASRock. 2. Reinicie su sistema. 3. Usted encontrará el icono (Realtek HD Audio Manager) en la barra de tareas de Windows®. 4. Haga doble clic en este icono para acceder a los controles avanzados. Español 176 ASRock 4Core1600P35-WiFi+ / 4Core1600P35-WiFi Motherboard - ASRock 4Core1600P35-WiFi | Quick Installation Guide - Page 177
Envolvente de DTS. El resultado es incrementado la direccionalidad del campo de sonido que enfoque de la calidad del sonido discreto de 7.1-canal. Español ASRock 4Core1600P35-WiFi+ / 4Core1600P35-WiFi Motherboard 177 - ASRock 4Core1600P35-WiFi | Quick Installation Guide - Page 178
la BIOS, por favor refiérase al Manual del Usuario (archivo PDF) contenido en el CD. 4.Información de Software Support CD Esta placa-base soporta diversos tipos de sistema operativo Windows®: .EXE" para iniciar la instalación. Español 178 ASRock 4Core1600P35-WiFi+ / 4Core1600P35-WiFi Motherboard - ASRock 4Core1600P35-WiFi | Quick Installation Guide - Page 179
242 ASRock 4Core1600P35-WiFi+ / 4Core1600P35-WiFi Motherboard - ASRock 4Core1600P35-WiFi | Quick Installation Guide - Page 180
® ® ® ® ® ® ® ASRock 4Core1600P35-WiFi+ / 4Core1600P35-WiFi Motherboard 243 - ASRock 4Core1600P35-WiFi | Quick Installation Guide - Page 181
244 ASRock 4Core1600P35-WiFi+ / 4Core1600P35-WiFi Motherboard - ASRock 4Core1600P35-WiFi | Quick Installation Guide - Page 182
® ® ASRock 4Core1600P35-WiFi+ / 4Core1600P35-WiFi Motherboard 245 - ASRock 4Core1600P35-WiFi | Quick Installation Guide - Page 183
® ® ® ® 246 ASRock 4Core1600P35-WiFi+ / 4Core1600P35-WiFi Motherboard - ASRock 4Core1600P35-WiFi | Quick Installation Guide - Page 184
® ® ® ® ® ® ® ® ASRock 4Core1600P35-WiFi+ / 4Core1600P35-WiFi Motherboard 247 - ASRock 4Core1600P35-WiFi | Quick Installation Guide - Page 185
248 ASRock 4Core1600P35-WiFi+ / 4Core1600P35-WiFi Motherboard - ASRock 4Core1600P35-WiFi | Quick Installation Guide - Page 186
ASRock 4Core1600P35-WiFi+ / 4Core1600P35-WiFi Motherboard 249 - ASRock 4Core1600P35-WiFi | Quick Installation Guide - Page 187
250 ASRock 4Core1600P35-WiFi+ / 4Core1600P35-WiFi Motherboard - ASRock 4Core1600P35-WiFi | Quick Installation Guide - Page 188
DDRII_1 ( ) SS DS X X SS DS DDRII_2 ( ) X X SS DS SS DS DDRII_3 ( ) SS DS X X SS DS DDRII_4 ( ) X X SS DS SS DS DDR3_A1 ( ) SS DS DDR3_B1 ( ) SS DS ASRock 4Core1600P35-WiFi+ / 4Core1600P35-WiFi Motherboard 251 - ASRock 4Core1600P35-WiFi | Quick Installation Guide - Page 189
252 ASRock 4Core1600P35-WiFi+ / 4Core1600P35-WiFi Motherboard - ASRock 4Core1600P35-WiFi | Quick Installation Guide - Page 190
ASRock 4Core1600P35-WiFi+ / 4Core1600P35-WiFi Motherboard 253 - ASRock 4Core1600P35-WiFi | Quick Installation Guide - Page 191
254 ASRock 4Core1600P35-WiFi+ / 4Core1600P35-WiFi Motherboard - ASRock 4Core1600P35-WiFi | Quick Installation Guide - Page 192
ASRock 4Core1600P35-WiFi+ / 4Core1600P35-WiFi Motherboard 255 - ASRock 4Core1600P35-WiFi | Quick Installation Guide - Page 193
SATAII_5 (Port4) SATAII_1 (Port0) SATAII_6 (Port5) SATAII_2 (Port1) SATAII_3 (Port2) SATAII_4 (Port3) 256 eSATAII ASRock 4Core1600P35-WiFi+ / 4Core1600P35-WiFi Motherboard - ASRock 4Core1600P35-WiFi | Quick Installation Guide - Page 194
ASRock 4Core1600P35-WiFi+ / 4Core1600P35-WiFi Motherboard 257 - ASRock 4Core1600P35-WiFi | Quick Installation Guide - Page 195
CD1 ® ® 258 ASRock 4Core1600P35-WiFi+ / 4Core1600P35-WiFi Motherboard - ASRock 4Core1600P35-WiFi | Quick Installation Guide - Page 196
4 3 2 1 12 24 1 13 4 8 1 5 12 24 1 13 4 8 1 5 SLI/XFIRE_POWER1 ASRock 4Core1600P35-WiFi+ / 4Core1600P35-WiFi Motherboard 259 - ASRock 4Core1600P35-WiFi | Quick Installation Guide - Page 197
C B A 260 ASRock 4Core1600P35-WiFi+ / 4Core1600P35-WiFi Motherboard - ASRock 4Core1600P35-WiFi | Quick Installation Guide - Page 198
ASRock 4Core1600P35-WiFi+ / 4Core1600P35-WiFi Motherboard 261 - ASRock 4Core1600P35-WiFi | Quick Installation Guide - Page 199
262 ASRock 4Core1600P35-WiFi+ / 4Core1600P35-WiFi Motherboard - ASRock 4Core1600P35-WiFi | Quick Installation Guide - Page 200
ASRock 4Core1600P35-WiFi+ / 4Core1600P35-WiFi Motherboard 263 - ASRock 4Core1600P35-WiFi | Quick Installation Guide - Page 201
264 ASRock 4Core1600P35-WiFi+ / 4Core1600P35-WiFi Motherboard - ASRock 4Core1600P35-WiFi | Quick Installation Guide - Page 202
® ® ASRock 4Core1600P35-WiFi+ / 4Core1600P35-WiFi Motherboard 265 - ASRock 4Core1600P35-WiFi | Quick Installation Guide - Page 203
® ® ® ® ® ® ® ® ® ® ® ® ® ® ® ® ® 266 ASRock 4Core1600P35-WiFi+ / 4Core1600P35-WiFi Motherboard - ASRock 4Core1600P35-WiFi | Quick Installation Guide - Page 204
® ® ® ® ® ® ® ® ® ® ® ® ® ® ® ASRock 4Core1600P35-WiFi+ / 4Core1600P35-WiFi Motherboard 267 - ASRock 4Core1600P35-WiFi | Quick Installation Guide - Page 205
® ® ® ® ® ® ® 268 ASRock 4Core1600P35-WiFi+ / 4Core1600P35-WiFi Motherboard - ASRock 4Core1600P35-WiFi | Quick Installation Guide - Page 206
® ASRock 4Core1600P35-WiFi+ / 4Core1600P35-WiFi Motherboard 269 - ASRock 4Core1600P35-WiFi | Quick Installation Guide - Page 207
270 ASRock 4Core1600P35-WiFi+ / 4Core1600P35-WiFi Motherboard - ASRock 4Core1600P35-WiFi | Quick Installation Guide - Page 208
® ® ASRock 4Core1600P35-WiFi+ / 4Core1600P35-WiFi Motherboard 271 - ASRock 4Core1600P35-WiFi | Quick Installation Guide - Page 209
X O O O X O O O O: X: O O O O 272 ASRock 4Core1600P35-WiFi+ / 4Core1600P35-WiFi Motherboard
-
 1
1 -
 2
2 -
 3
3 -
 4
4 -
 5
5 -
 6
6 -
 7
7 -
8
-
9
-
10
-
11
-
12
-
13
-
14
-
15
-
16
-
17
-
18
-
19
-
20
-
21
-
22
-
23
-
24
-
25
-
26
-
27
-
28
-
29
-
30
-
31
-
32
-
33
-
34
-
35
-
36
-
37
-
38
-
39
-
40
-
41
-
42
-
43
-
44
-
45
-
46
-
47
-
48
-
49
-
50
-
51
-
52
-
53
-
54
-
55
-
56
-
57
-
58
-
59
-
60
-
61
-
62
-
63
-
64
-
65
-
66
-
67
-
68
-
69
-
70
-
71
-
72
-
73
-
74
-
75
-
76
-
77
-
78
-
79
-
80
-
81
-
82
-
83
-
84
-
85
-
86
-
87
-
88
-
89
-
90
-
91
-
92
-
93
-
94
-
95
-
96
-
97
-
98
-
99
-
100
-
101
-
102
-
103
-
104
-
105
-
106
-
107
-
108
-
109
-
110
-
111
-
112
-
113
-
114
-
115
-
116
-
117
-
118
-
119
-
120
-
121
-
122
-
123
-
124
-
125
-
126
-
127
-
128
-
129
-
130
-
131
-
132
-
133
-
134
-
135
-
136
-
137
-
138
-
139
-
140
-
141
-
142
-
143
-
144
-
145
-
146
-
147
-
148
-
149
-
150
-
151
-
152
-
153
-
154
-
155
-
156
-
157
-
158
-
159
-
160
-
161
-
162
-
163
-
164
-
165
-
166
-
167
-
168
-
169
-
170
-
171
-
172
-
173
-
174
-
175
-
176
-
177
-
178
-
179
-
180
-
181
-
182
-
183
-
184
-
185
-
186
-
187
-
188
-
189
-
190
-
191
-
192
-
193
-
194
-
195
-
196
-
197
-
198
-
199
-
200
-
201
-
202
-
203
-
204
-
205
-
206
-
207
-
208
-
209
 |
 |

1
ASRock
4Core1600P35-WiFi+ / 4Core1600P35-WiFi
Motherboard
English
English
English
English
English
Copyright Notice:
Copyright Notice:
Copyright Notice:
Copyright Notice:
Copyright Notice:
No part of this installation guide may be reproduced, transcribed, transmitted, or trans-
lated in any language, in any form or by any means, except duplication of documen-
tation by the purchaser for backup purpose, without written consent of ASRock Inc.
Products and corporate names appearing in this guide may or may not be registered
trademarks or copyrights of their respective companies, and are used only for identifica-
tion or explanation and to the owners’ benefit, without intent to infringe.
Disclaimer:
Disclaimer:
Disclaimer:
Disclaimer:
Disclaimer:
Specifications and information contained in this guide are furnished for informational
use only and subject to change without notice, and should not be constructed as a
commitment by ASRock. ASRock assumes no responsibility for any errors or omissions
that may appear in this guide.
With respect to the contents of this guide, ASRock does not provide warranty of any kind,
either expressed or implied, including but not limited to the implied warranties or
conditions of merchantability or fitness for a particular purpose. In no event shall
ASRock, its directors, officers, employees, or agents be liable for any indirect, special,
incidental, or consequential damages (including damages for loss of profits, loss of
business, loss of data, interruption of business and the like), even if ASRock has been
advised of the possibility of such damages arising from any defect or error in the guide
or product.
This device complies with Part 15 of the FCC Rules. Operation is subject to the
following two conditions:
(1)
this device may not cause harmful interference, and
(2)
this device must accept any interference received, including interference that
may cause undesired operation.
CALIFORNIA, USA ONLY
The Lithium battery adopted on this motherboard contains Perchlorate, a toxic
substance controlled in Perchlorate Best Management Practices (BMP) regulations
passed by the California Legislature. When you discard the Lithium battery in
California, USA, please follow the related regulations in advance.
“Perchlorate Material-special handling may apply, see
www
.dtsc.ca.gov/hazardouswa
ste/perchlorate”
ASRock Website: http://www.asrock.com
Published
January
200
8
Copyright
©
200
8
ASRock INC. All rights reserved.