ASRock 4CoreDX90-VSTA R2.0 Quick Installation Guide
ASRock 4CoreDX90-VSTA R2.0 Manual
 |
View all ASRock 4CoreDX90-VSTA R2.0 manuals
Add to My Manuals
Save this manual to your list of manuals |
ASRock 4CoreDX90-VSTA R2.0 manual content summary:
- ASRock 4CoreDX90-VSTA R2.0 | Quick Installation Guide - Page 1
purchaser for backup purpose, without written consent of ASRock Inc. Products and corporate names appearing in this guide may or may not be registered trademarks or ASRock Website: http://www.asrock.com Published April 2007 Copyright©2007 ASRock INC. All rights reserved. 1 ASRock 4CoreDX90-VSTA - ASRock 4CoreDX90-VSTA R2.0 | Quick Installation Guide - Page 2
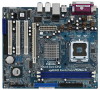
Connector (CHA_FAN1) 17 Clear CMOS Jumper (CLRCMOS1) 5 North Bridge Controller 18 Floppy Connector (FLOPPY1) 6 775-Pin CPU Socket 19 HDMR Slot (HDMR1) 7 2 x 184-pin DDR DIMM Slots (DDR1, DDR2 Serial ATA Connector (SATA1) 26 CPU Fan Connector (CPU_FAN1) 2 ASRock 4CoreDX90-VSTA Motherboard - ASRock 4CoreDX90-VSTA R2.0 | Quick Installation Guide - Page 3
ASRock 8CH I/O Plus 1 PS/2 Mouse Port (Green) 2 Parallel Port 3 USB 2.0 Ports (USB23) 4 RJ-45 Port 5 Side Speaker (Gray) 6 Rear Speaker (Black) 7 Speaker, Central/Bass, and Front Speaker, or select "Realtek HDA Audio 2nd output" to use front panel audio. 3 ASRock 4CoreDX90-VSTA Motherboard English - ASRock 4CoreDX90-VSTA R2.0 | Quick Installation Guide - Page 4
VGA cards and CPU support lists on ASRock website as well. ASRock website http://www.asrock.com 1.1 Package Contents ASRock 4CoreDX90-VSTA Motherboard (Micro ATX Form Factor: 9.6-in x 8.2-in, 24.4 cm x 20.8 cm) ASRock 4CoreDX90-VSTA Quick Installation Guide ASRock 4CoreDX90-VSTA Support CD One 80 - ASRock 4CoreDX90-VSTA R2.0 | Quick Installation Guide - Page 5
x PS/2 Keyboard Port - 1 x Serial Port: COM1 - 1 x VGA Port - 1 x Parallel Port (ECP/EPP Support) - 4 x Ready-to-Use USB 2.0 Ports - 1 x RJ-45 Port - HD Audio Jack: Side Speaker/Rear Speaker/Central Bass/ Line in/Front Speaker/Microphone (see CAUTION 5) English 5 ASRock 4CoreDX90-VSTA Motherboard - ASRock 4CoreDX90-VSTA R2.0 | Quick Installation Guide - Page 6
- 4Mb AMI BIOS - AMI Legal BIOS - Supports "Plug and Play" - ACPI 1.1 Compliance Wake Up Events - Supports jumperfree - SMBIOS 2.3.1 Support - Drivers, Utilities, AntiVirus Software (Trial Version) responsible for possible damage caused by overclocking. English 6 ASRock 4CoreDX90-VSTA Motherboard - ASRock 4CoreDX90-VSTA R2.0 | Quick Installation Guide - Page 7
Technology", please check page 33 of "User Manual" in the support CD. 2. This motherboard supports Untied Overclocking Technology. Please read "Untied Overclocking VistaTM 64-bit driver and related information. ASRock website http://www.asrock.com 7 ASRock 4CoreDX90-VSTA Motherboard English - ASRock 4CoreDX90-VSTA R2.0 | Quick Installation Guide - Page 8
size above 512MB and plan to submit Windows® VistaTM Basic logo, please adjust the shared memory size of onboard VGA to 128MB or above. English 8 ASRock 4CoreDX90-VSTA Motherboard - ASRock 4CoreDX90-VSTA R2.0 | Quick Installation Guide - Page 9
you insert the 775-LAND CPU into the socket, please check if the CPU surface is unclean or if there is any bent pin on the socket. Do not force to insert the CPU into the socket if above situation is found. Otherwise, the CPU will be seriously damaged. 9 ASRock 4CoreDX90-VSTA Motherboard English - ASRock 4CoreDX90-VSTA R2.0 | Quick Installation Guide - Page 10
key notch Pin1 alignment key alignment key 775-LAND CPU 775-Pin Socket For proper inserting, please ensure support the load plate edge, engage PnP cap with right hand thumb and peel the cap from the socket while pressing on center of PnP cap to assist in removal. 10 ASRock 4CoreDX90-VSTA - ASRock 4CoreDX90-VSTA R2.0 | Quick Installation Guide - Page 11
2. This cap must be placed if returning the motherboard for after service. Step 4. Close the socket: Step 4-1. Rotate the load plate instruction manuals of your CPU fan and heatsink. Below is an example to illustrate the installation of the heatsink for 775 ASRock 4CoreDX90-VSTA Motherboard English - ASRock 4CoreDX90-VSTA R2.0 | Quick Installation Guide - Page 12
insert the DIMM into the slot until the retaining clips at both ends fully snap back in place and the DIMM is properly seated. 12 ASRock 4CoreDX90-VSTA Motherboard English - ASRock 4CoreDX90-VSTA R2.0 | Quick Installation Guide - Page 13
with the slot and press firmly until the card is completely seated on the slot. Step 4. Fasten the card to the chassis with screws. 13 ASRock 4CoreDX90-VSTA Motherboard English - ASRock 4CoreDX90-VSTA R2.0 | Quick Installation Guide - Page 14
unplug the power cord from the power supply. After waiting for 15 seconds, use a jumper cap to short 2 pins on CLRCMOS1 for 5 seconds. English 14 ASRock 4CoreDX90-VSTA Motherboard - ASRock 4CoreDX90-VSTA R2.0 | Quick Installation Guide - Page 15
the IDE device as "Master". Please refer to the instruction of your IDE device vendor for the details. Besides, No. 12) SATA2 SATA1 These two Serial ATA (SATA) connectors support SATA data cables for internal storage devices. The current SATA interface ASRock 4CoreDX90-VSTA Motherboard English - ASRock 4CoreDX90-VSTA R2.0 | Quick Installation Guide - Page 16
connection and control of audio devices. 1. High Definition Audio supports Jack Sensing, but the panel wire on the chassis must support HDA to function correctly. Please follow the instruction in our manual and chassis manual to install your system. 16 ASRock 4CoreDX90-VSTA Motherboard English - ASRock 4CoreDX90-VSTA R2.0 | Quick Installation Guide - Page 17
Fan) support, the 3-Pin CPU fan still can work successfully even without the fan speed control function. If you plan to connect the 3-Pin CPU fan to the CPU fan connector on this motherboard, please connect it to Pin 1-3. Pin 1-3 Connected 3-Pin Fan Installation 17 ASRock 4CoreDX90-VSTA Motherboard - ASRock 4CoreDX90-VSTA R2.0 | Quick Installation Guide - Page 18
Disks Installation This motherboard adopts VIA® VT8237A southbridge chipset that supports Serial ATA (SATA) hard disks and RAID (RAID disks on this motherboard for internal storage devices. This section will guide you to install the SATA hard disks. STEP 1: Install ASRock 4CoreDX90-VSTA Motherboard - ASRock 4CoreDX90-VSTA R2.0 | Quick Installation Guide - Page 19
power-on and in working condition. 2.9 Driver Installation Guide To install the drivers to your system, please insert the support CD to your optical drive first. Then, the drivers HDMR card driver from our support CD to your system. 3. Reboot your system. 19 ASRock 4CoreDX90-VSTA Motherboard English - ASRock 4CoreDX90-VSTA R2.0 | Quick Installation Guide - Page 20
RAID installation guide in the Support CD for proper configuration. Please refer to the BIOS RAID installation guide of the document in the following path in the Support CD: .. \ RAID Installation Guide STEP 4: to install according to the OS you install. 20 ASRock 4CoreDX90-VSTA Motherboard English - ASRock 4CoreDX90-VSTA R2.0 | Quick Installation Guide - Page 21
in the following path in the Support CD: .. \ RAID Installation Guide 2. If you want to use "VIA RAID Tool" in Windows® environment, please install SATA drivers from the Support CD again so that "VIA RAID Tool" will be installed to your system as well. 21 ASRock 4CoreDX90-VSTA Motherboard English - ASRock 4CoreDX90-VSTA R2.0 | Quick Installation Guide - Page 22
Windows® VistaTM 64-bit OS on your system. 2.13 Untied Overclocking Technology This motherboard supports Untied Overclocking Technology, which means during overclocking, FSB enjoys better margin due to fixed PCI you apply Untied Overclocking Technology. 22 ASRock 4CoreDX90-VSTA Motherboard English - ASRock 4CoreDX90-VSTA R2.0 | Quick Installation Guide - Page 23
Setup, please refer to the User Manual (PDF file) contained in the Support CD. 4. Software Support CD information This motherboard supports various Microsoft® Windows® operating systems: EXE" from the BIN folder in the Support CD to display the menus. 23 ASRock 4CoreDX90-VSTA Motherboard English - ASRock 4CoreDX90-VSTA R2.0 | Quick Installation Guide - Page 24
24 ASRock 4CoreDX90-VSTA Motherboard - ASRock 4CoreDX90-VSTA R2.0 | Quick Installation Guide - Page 25
® ® ® ® ® ® ® ® ® ® ® ® 25 ASRock 4CoreDX90-VSTA Motherboard - ASRock 4CoreDX90-VSTA R2.0 | Quick Installation Guide - Page 26
® ® 26 ASRock 4CoreDX90-VSTA Motherboard - ASRock 4CoreDX90-VSTA R2.0 | Quick Installation Guide - Page 27
® ® ® ® ® 27 ASRock 4CoreDX90-VSTA Motherboard - ASRock 4CoreDX90-VSTA R2.0 | Quick Installation Guide - Page 28
® ® ® ® 28 ASRock 4CoreDX90-VSTA Motherboard - ASRock 4CoreDX90-VSTA R2.0 | Quick Installation Guide - Page 29
29 ASRock 4CoreDX90-VSTA Motherboard - ASRock 4CoreDX90-VSTA R2.0 | Quick Installation Guide - Page 30
30 ASRock 4CoreDX90-VSTA Motherboard - ASRock 4CoreDX90-VSTA R2.0 | Quick Installation Guide - Page 31
31 ASRock 4CoreDX90-VSTA Motherboard - ASRock 4CoreDX90-VSTA R2.0 | Quick Installation Guide - Page 32
32 ASRock 4CoreDX90-VSTA Motherboard - ASRock 4CoreDX90-VSTA R2.0 | Quick Installation Guide - Page 33
33 ASRock 4CoreDX90-VSTA Motherboard - ASRock 4CoreDX90-VSTA R2.0 | Quick Installation Guide - Page 34
34 ASRock 4CoreDX90-VSTA Motherboard - ASRock 4CoreDX90-VSTA R2.0 | Quick Installation Guide - Page 35
" " SATA2 SATA1 35 ASRock 4CoreDX90-VSTA Motherboard - ASRock 4CoreDX90-VSTA R2.0 | Quick Installation Guide - Page 36
CD1 36 ASRock 4CoreDX90-VSTA Motherboard - ASRock 4CoreDX90-VSTA R2.0 | Quick Installation Guide - Page 37
4 3 2 1 37 ASRock 4CoreDX90-VSTA Motherboard - ASRock 4CoreDX90-VSTA R2.0 | Quick Installation Guide - Page 38
® 38 ASRock 4CoreDX90-VSTA Motherboard - ASRock 4CoreDX90-VSTA R2.0 | Quick Installation Guide - Page 39
® ® ® ® ® ® ® ® ® ® 39 ASRock 4CoreDX90-VSTA Motherboard - ASRock 4CoreDX90-VSTA R2.0 | Quick Installation Guide - Page 40
® ® ® ® ® ® ® ® ® ® ® ® ® ® ® ® ® ® ® ® ® ® ® ® ® ® ® 40 ASRock 4CoreDX90-VSTA Motherboard - ASRock 4CoreDX90-VSTA R2.0 | Quick Installation Guide - Page 41
® ® ® ® ® ® ® ® ® ® ® ® ® ® ® ® ® ® 41 ASRock 4CoreDX90-VSTA Motherboard - ASRock 4CoreDX90-VSTA R2.0 | Quick Installation Guide - Page 42
® ® 42 ASRock 4CoreDX90-VSTA Motherboard - ASRock 4CoreDX90-VSTA R2.0 | Quick Installation Guide - Page 43
X O O O X O O O O: X: O O O O 43 ASRock 4CoreDX90-VSTA Motherboard - ASRock 4CoreDX90-VSTA R2.0 | Quick Installation Guide - Page 44
manual, la versión actualizada estará disponible en el website de ASRock sin previo aviso. También encontrará las listas de las últimas tarjetas VGA y CPU soportadas en la página web de ASRock. Website de ASRock http://www.asrock.com 1.1 Contenido de la caja Placa base ASRock 4CoreDX90-VSTA (Factor - ASRock 4CoreDX90-VSTA R2.0 | Quick Installation Guide - Page 45
Plataforma - Factor forma Micro ATX: 24,4 cm x 20.8 cm, 9,6" x 8,2" Procesador - LGA 775 para Intel® CoreTM 2 Extreme / CoreTM 2 Duo / Pentium® XE / Pentium® D / / Central/Bajos / Entrada de línea / Altavoz frontal / Micrófono (ver ATENCIÓN 5) 45 ASRock 4CoreDX90-VSTA Motherboard Español - ASRock 4CoreDX90-VSTA R2.0 | Quick Installation Guide - Page 46
, +5V, +3.3V, Vcore - En conformidad con Microsoft® Windows® 2000 / XP / XP 64 bits / VistaTM / VistaTM 64 bits (vea ATENCIÓN 7) - FCC, CE, WHQL Español 46 ASRock 4CoreDX90-VSTA Motherboard - ASRock 4CoreDX90-VSTA R2.0 | Quick Installation Guide - Page 47
aumento de la velocidad del reloj. ATENCIÓN! 1. Por favor consulte página 33 del Manual del Usuario en el soporte CD sobre la configuración de Hyper-Threading Technology. 2. así como la información relacionada. Sitio Web de ASRock: http://www.asrock.com 47 ASRock 4CoreDX90-VSTA Motherboard Español - ASRock 4CoreDX90-VSTA R2.0 | Quick Installation Guide - Page 48
presentar el logotipo de Windows® VistaTM Basic, ajuste el tamaño de la memoria compartida de la tarjeta VGA a 128 MB como mínimo. Español 48 ASRock 4CoreDX90-VSTA Motherboard - ASRock 4CoreDX90-VSTA R2.0 | Quick Installation Guide - Page 49
demasiado. Eso podría dañar la placa madre. 2.1 Instalación de Procesador Para la instalación de la CPU Intel de (Placa de carga) 775 agujas, siga los siguientes pasos. (Matriz de contacto) (Cuerpo del socket) Introducción al socket de 775 agujas Español 49 ASRock 4CoreDX90-VSTA Motherboard - ASRock 4CoreDX90-VSTA R2.0 | Quick Installation Guide - Page 50
100 grados. Paso 2. Inserte la CPU de 775 agujas: Paso 2-1. Sostenga la CPU por los bordes 775 agujas Socket de 775 agujas Para insertarla correctamente, asegúrese de que las dos muescas de orientación de la CPU coinciden con las teclas de alineación del socket. 50 ASRock 4CoreDX90-VSTA - ASRock 4CoreDX90-VSTA R2.0 | Quick Installation Guide - Page 51
de la CPU Para una correcta instalación, consulte los manuales de instrucciones del ventilador y el disipador de la CPU 775 agujas. (Aplique el material termal de interfaz) Paso 1. Aplique el material termal de interfaz en el centro del IHS de la superficie del socket. 51 ASRock 4CoreDX90-VSTA - ASRock 4CoreDX90-VSTA R2.0 | Quick Installation Guide - Page 52
un lazo para asegurarse de que el cable no interfiere en el funcionamiento del ventilador y tampoco entra en contacto con otros componentes. Español 52 ASRock 4CoreDX90-VSTA Motherboard - ASRock 4CoreDX90-VSTA R2.0 | Quick Installation Guide - Page 53
2.3 Instalación de Memoria La placa base 4CoreDX90-VSTA proporciona dos zócalos DIMM DDR (Doble velocidad de datos) de 184 contactos Asegúrese de desconectar lados queden completamente introducidos en su sitio y la DIMM se haya asentado apropiadamente. 53 ASRock 4CoreDX90-VSTA Motherboard Español - ASRock 4CoreDX90-VSTA R2.0 | Quick Installation Guide - Page 54
desea utilizar. Paso 3. Encaje el conector de la tarjeta a la ranura. Empuje firmemente la tarjeta en la ranura. Paso 4. Asegure la tarjeta con tornillos. 54 ASRock 4CoreDX90-VSTA Motherboard Español - ASRock 4CoreDX90-VSTA R2.0 | Quick Installation Guide - Page 55
y desconecte el cable de la fuente de electricidad, ponga en cortocircuito los pins de CLRCMOS1 por más que 5 segundos usando un jumper cap. Español 55 ASRock 4CoreDX90-VSTA Motherboard - ASRock 4CoreDX90-VSTA R2.0 | Quick Installation Guide - Page 56
/s. Cable de datos de serie ATA (SATA) (Opcional) Ambos extremos del cable pueden conectarse al disco duro SATA o la conexión de la placa base. 56 ASRock 4CoreDX90-VSTA Motherboard Español - ASRock 4CoreDX90-VSTA R2.0 | Quick Installation Guide - Page 57
, o tarjeta MPEG. Este es una interface para cable de audio de panel frontal que permite conexión y control conveniente de apparatos de Audio. Español 57 ASRock 4CoreDX90-VSTA Motherboard - ASRock 4CoreDX90-VSTA R2.0 | Quick Installation Guide - Page 58
el chasis debe soportar HDA para operar correctamente. Por favor, siga las instrucciones en nuestro manual y en el manual de chasis para instalar su sistema. 2. Si utiliza el panel de sonido AC'97, el cable negro 2 1 con el conector de tierra. Español 58 ASRock 4CoreDX90-VSTA Motherboard - ASRock 4CoreDX90-VSTA R2.0 | Quick Installation Guide - Page 59
a una toma de corriente con el enchufe ATX 12V, de modo que proporcione suficiente electricidad. De lo contrario no se podrá encender. Español 59 ASRock 4CoreDX90-VSTA Motherboard - ASRock 4CoreDX90-VSTA R2.0 | Quick Installation Guide - Page 60
disco duro SATA. 2.8 Función de conexión y cambio en caliente para HDDs SATA La placa base 4CoreDx90-VSTA soporta la función de conexión en caliente para Dispositivos SATA. NOTA ¿Qué es la función de que instale pueden funcionar correctamente. 60 ASRock 4CoreDX90-VSTA Motherboard Español - ASRock 4CoreDX90-VSTA R2.0 | Quick Installation Guide - Page 61
en [RAID]. PASO 2: Haga un Disquete de Controlador SATA. A. Inserte el CD de soporte de ASRock en la unidad óptica de la unidad para iniciar el sistema. (NO inserte ningún disquete en la generar un disquete de controlador de serie ATA?)", pulse . Español 61 ASRock 4CoreDX90-VSTA Motherboard - ASRock 4CoreDX90-VSTA R2.0 | Quick Installation Guide - Page 62
soporte: .. \ RAID Installation Guide PASO 4: Instale el sistema operativo Guide 2. Si desea utilizar "VIA RAID Too" en el entorno de Windows®, instale de nuevo los controladores SATA del CD de soporte de forma que "VIA RAID Tool" se instale también en su sistema. Español 62 ASRock 4CoreDX90-VSTA - ASRock 4CoreDX90-VSTA R2.0 | Quick Installation Guide - Page 63
Windows?), inserte el CD de soporte de ASRock en la unidad óptica y haga clic Guide 2. Si desea utilizar "VIA RAID Too" en el entorno de Windows®, instale de nuevo los controladores SATA del CD de soporte de forma que "VIA RAID Tool" se instale también en su sistema. 63 ASRock 4CoreDX90-VSTA - ASRock 4CoreDX90-VSTA R2.0 | Quick Installation Guide - Page 64
información sobre el posible riesgo que se asume al aumentar la velocidad del reloj antes de aplicar la tecnología de aumento de velocidad liberada. 64 ASRock 4CoreDX90-VSTA Motherboard Español - ASRock 4CoreDX90-VSTA R2.0 | Quick Installation Guide - Page 65
como configurar la BIOS, por favor refiérase al Manual del Usuario (archivo PDF) contenido en el CD. 4.Información de Software Support CD Esta placa-base soporta diversos tipos de sistema operativo el archivo "ASSETUP.EXE" para iniciar la instalación. 65 ASRock 4CoreDX90-VSTA Motherboard Español - ASRock 4CoreDX90-VSTA R2.0 | Quick Installation Guide - Page 66
ção deste manual, a versão atualizada estará disponível no website de ASRock sem prévio aviso. Pode também encontrar as listas das mais recentes placas VGA e das CPUs suportadas no site da web da ASRock. Website de ASRock http://www.asrock.com 1.1 Este pacote contém Placa-mãe ASRock 4CoreDX90-VSTA - ASRock 4CoreDX90-VSTA R2.0 | Quick Installation Guide - Page 67
Pentium® D / Pentium® Dual Core / Pentium® 4 / Celeron® / Celeron® D de 775 pinos com suporte para o processador Quad Core Kentsfield - FSB de 1066/800/533MHz - Suporta a /Graves / Entrada de linha / Altifalante frontal / Microfone (veja o AVISO 5) 67 ASRock 4CoreDX90-VSTA Motherboard Português - ASRock 4CoreDX90-VSTA R2.0 | Quick Installation Guide - Page 68
- Monitoramento de voltagem : +12 V, +5 V, +3.3 V, Vcore - Microsoft® Windows® 2000 / XP / XP de 64 bits / VistaTM / VistaTM de 64 bits (veja o AVISO 7) - FCC, CE, WHQL Português 68 ASRock 4CoreDX90-VSTA Motherboard - ASRock 4CoreDX90-VSTA R2.0 | Quick Installation Guide - Page 69
Sobre a configuração da "Tecnologia Hyper Threading", consulte a página 33 do Manual do Usuário no CD de suporte. (Somente inglês) 2. Esta placa Windows® VistaTM / VistaTM 64-bit driver e informação relative. ASRock website http://www.asrock.com 69 ASRock 4CoreDX90-VSTA Motherboard Português - ASRock 4CoreDX90-VSTA R2.0 | Quick Installation Guide - Page 70
dos 512 MB e pretender utilizar o Windows® VistaTM Basic, ajuste o tamanho da memória partilhada da especificação VGA onboard para 128 MB ou acima. Português 70 ASRock 4CoreDX90-VSTA Motherboard - ASRock 4CoreDX90-VSTA R2.0 | Quick Installation Guide - Page 71
geral do soquete de 775 pinos Antes de inserir a CPU de 775 pinos no soquete, verifique se a superfície da CPU está limpa e se há pinos tortos no soquete. Não force para inserir a CPU no soquete na situação acima. Do contrário, a CPU será seriamente danificada. 71 ASRock 4CoreDX90-VSTA Motherboard - ASRock 4CoreDX90-VSTA R2.0 | Quick Installation Guide - Page 72
ção Marcas de orientação Pino 1 Marca de alinhamento Marca de alinhamento CPU de 775 pinos Soquete de 775 pinos Para a inserção correta, certifique-se de coincidir das duas marcas de dentro do soquete e devidamente alinhada com as marcas de posicionamento. 72 ASRock 4CoreDX90-VSTA Motherboard - ASRock 4CoreDX90-VSTA R2.0 | Quick Installation Guide - Page 73
da CPU e do dissipador de calor. Veja abaixo um exemplo que ilustra a instalação do dissipador de calor para a CPU de 775 pinos. Passo 1. Aplique o material termocondutor no centro do IHS na superfície do soquete. (Aplique o material termocondutor) Português 73 ASRock 4CoreDX90-VSTA Motherboard - ASRock 4CoreDX90-VSTA R2.0 | Quick Installation Guide - Page 74
conector na placa-mãe. Passo 6. Fixe o excesso de cabo com uma braçadeira para não interferir com o funcionamento do ventilador e evitar o contato com outros componentes . Português 74 ASRock 4CoreDX90-VSTA Motherboard - ASRock 4CoreDX90-VSTA R2.0 | Quick Installation Guide - Page 75
2.3 Instalação dos Módulos de Memória (DIMM) A placa mãe 4CoreDX90-VSTA fornece 2 slots de DDR (Taxa Dupla de Dados) DIMM tem 184 pinos. Certifique-se de os lados se encaixem totalmente em seus locais e a DIMM esteja encaixada de modo apropriado. 75 ASRock 4CoreDX90-VSTA Motherboard Português - ASRock 4CoreDX90-VSTA R2.0 | Quick Installation Guide - Page 76
o conector da placa com o slot e pressiona com firmeza, até que a placa esteja totalmente encaixada no slot. 4º passo: Aparafuse a placa no chassis com os parafusos. 76 ASRock 4CoreDX90-VSTA Motherboard Português - ASRock 4CoreDX90-VSTA R2.0 | Quick Installation Guide - Page 77
favor desligue o cabo de força, ponha em curto-circuito os pins de CLRCMOS1 por mais de 5 segundos para limpar o CMOS usando um jumper. Português 77 ASRock 4CoreDX90-VSTA Motherboard - ASRock 4CoreDX90-VSTA R2.0 | Quick Installation Guide - Page 78
ATA (SATA) (opcional) Tanto a saída do cabo de Serial dados SATA pode ser conectado ao disco rígido SATA quanto o conector SATA na placa mãe. 78 ASRock 4CoreDX90-VSTA Motherboard Português - ASRock 4CoreDX90-VSTA R2.0 | Quick Installation Guide - Page 79
TV ou placa MPEG. Esta é uma interface para o cabo de áudio no painel frontal, que permite uma conexão e controle convenientes dos dispositivos de áudio. 79 ASRock 4CoreDX90-VSTA Motherboard Português - ASRock 4CoreDX90-VSTA R2.0 | Quick Installation Guide - Page 80
no chassis tem de suportar HDA para funcionar correctamente. Siga s instruções que aparecem no manual e no manual do chassis para instalar o sistema. 2. Se utilizar o painel de áudio AC'97, coincidindo o fio preto com 4 3 o pino de aterramento. 2 1 Português 80 ASRock 4CoreDX90-VSTA Motherboard - ASRock 4CoreDX90-VSTA R2.0 | Quick Installation Guide - Page 81
ário ligar uma fonte de alimentação com conector ATX 12V neste conector para fornecer alimentação suficiente. Do contrário, haverá falhas de funcionamento. Português 81 ASRock 4CoreDX90-VSTA Motherboard - ASRock 4CoreDX90-VSTA R2.0 | Quick Installation Guide - Page 82
ao disco rígido SATA. 2.8 Função e conexão a quente para unidades de discos rígidos SATA A placa-mãe 4CoreDX90-VSTA suporta a função de conexão a quente de dispositivos SATA. O que é a função de conexão a quente de disco rígido SATA ou danificá-las. Português 82 ASRock 4CoreDX90-VSTA Motherboard - ASRock 4CoreDX90-VSTA R2.0 | Quick Installation Guide - Page 83
Configuration (Utilitário de configuração da BIOS - Ecrã avançado - Configuração IDE). B. Defina a opção "SATA Operation Mode" (Modo de funcionamento SATA) para [RAID]. Português 83 ASRock 4CoreDX90-VSTA Motherboard - ASRock 4CoreDX90-VSTA R2.0 | Quick Installation Guide - Page 84
SATA. A. Insira o CD ASRock Support no acionador ótico para reiniciar seu BIOS que encontra no seguinte caminho no CD de suporte: .. \ RAID Installation Guide ETAPA 4: Instalar o Windows® 2000 / Windows® XP / Windows® XP de Operativo instalado. Português 84 ASRock 4CoreDX90-VSTA Motherboard - ASRock 4CoreDX90-VSTA R2.0 | Quick Installation Guide - Page 85
RAID Installation Guide ETAPA 3: ASRock na unidade óptica e clique no botão "Carregar controlador" que encontra no canto inferior esquerdo para carregar os controladores RAID da VIA®. Os controladores RAID da VIA® encontram-se nos seguintes caminhos no CD de suporte: 85 ASRock 4CoreDX90-VSTA - ASRock 4CoreDX90-VSTA R2.0 | Quick Installation Guide - Page 86
es RAID do Windows que encontra no seguinte caminho no CD de suporte: .. \ RAID Installation Guide 2. Se quiser utilizar a ferramenta "VIA RAID Tool" em ambiente Windows®, instale novamente os ® VistaTM / Windows® VistaTM 64 de bits OS no seu sistema. Português 86 ASRock 4CoreDX90-VSTA Motherboard - ASRock 4CoreDX90-VSTA R2.0 | Quick Installation Guide - Page 87
ligando-a novamente. Para informações mais detalhadas sobre a configuração da BIOS, consulte o manual do usuário (em pdf) contido no CD de instalação. 4. Informações do CD , explore o CD e execute o "ASSETUP.EXE" localizado na pasta "BIN". 87 ASRock 4CoreDX90-VSTA Motherboard Português - ASRock 4CoreDX90-VSTA R2.0 | Quick Installation Guide - Page 88
88 ASRock 4CoreDX90-VSTA Motherboard - ASRock 4CoreDX90-VSTA R2.0 | Quick Installation Guide - Page 89
® ® ® ® ® ® ® ® ® ® ® ® 89 ASRock 4CoreDX90-VSTA Motherboard - ASRock 4CoreDX90-VSTA R2.0 | Quick Installation Guide - Page 90
® 90 ASRock 4CoreDX90-VSTA Motherboard - ASRock 4CoreDX90-VSTA R2.0 | Quick Installation Guide - Page 91
" " ® ® ® ® 91 ASRock 4CoreDX90-VSTA Motherboard - ASRock 4CoreDX90-VSTA R2.0 | Quick Installation Guide - Page 92
® ® ® ® 92 ASRock 4CoreDX90-VSTA Motherboard - ASRock 4CoreDX90-VSTA R2.0 | Quick Installation Guide - Page 93
93 ASRock 4CoreDX90-VSTA Motherboard - ASRock 4CoreDX90-VSTA R2.0 | Quick Installation Guide - Page 94
Pin1 Pin1 94 ASRock 4CoreDX90-VSTA Motherboard - ASRock 4CoreDX90-VSTA R2.0 | Quick Installation Guide - Page 95
95 ASRock 4CoreDX90-VSTA Motherboard - ASRock 4CoreDX90-VSTA R2.0 | Quick Installation Guide - Page 96
96 ASRock 4CoreDX90-VSTA Motherboard - ASRock 4CoreDX90-VSTA R2.0 | Quick Installation Guide - Page 97
97 ASRock 4CoreDX90-VSTA Motherboard - ASRock 4CoreDX90-VSTA R2.0 | Quick Installation Guide - Page 98
"" "" "" "" 98 ASRock 4CoreDX90-VSTA Motherboard - ASRock 4CoreDX90-VSTA R2.0 | Quick Installation Guide - Page 99
SATA2 SATA1 99 ASRock 4CoreDX90-VSTA Motherboard - ASRock 4CoreDX90-VSTA R2.0 | Quick Installation Guide - Page 100
CD1 100 ASRock 4CoreDX90-VSTA Motherboard - ASRock 4CoreDX90-VSTA R2.0 | Quick Installation Guide - Page 101
4 3 2 1 ASRock 4CoreDX90-VSTA Motherboard 101 - ASRock 4CoreDX90-VSTA R2.0 | Quick Installation Guide - Page 102
® 102 " " " " ASRock 4CoreDX90-VSTA Motherboard - ASRock 4CoreDX90-VSTA R2.0 | Quick Installation Guide - Page 103
® ® ® ® ® ® ® ® ® ® ASRock 4CoreDX90-VSTA Motherboard 103 - ASRock 4CoreDX90-VSTA R2.0 | Quick Installation Guide - Page 104
" " \ ® ® ® ® ® ® ® ® ® \ ® " " ® ® " " 104 ASRock 4CoreDX90-VSTA Motherboard - ASRock 4CoreDX90-VSTA R2.0 | Quick Installation Guide - Page 105
® ® ® " " \ ® ® ® \ \ \ \ ® ® ® ® ® \ ® " " ® ® ® " " ASRock 4CoreDX90-VSTA Motherboard 105 - ASRock 4CoreDX90-VSTA R2.0 | Quick Installation Guide - Page 106
® ® ® ® ® ® ® ® ® ® ® ® ® ® ® ® 106 ASRock 4CoreDX90-VSTA Motherboard - ASRock 4CoreDX90-VSTA R2.0 | Quick Installation Guide - Page 107
" " \\ " " ASRock 4CoreDX90-VSTA Motherboard 107 - ASRock 4CoreDX90-VSTA R2.0 | Quick Installation Guide - Page 108
108 ASRock 4CoreDX90-VSTA Motherboard - ASRock 4CoreDX90-VSTA R2.0 | Quick Installation Guide - Page 109
® ® ® ® ® ® ® ® ® ® ® ® ASRock 4CoreDX90-VSTA Motherboard 109 - ASRock 4CoreDX90-VSTA R2.0 | Quick Installation Guide - Page 110
® ® ® 110 ASRock 4CoreDX90-VSTA Motherboard - ASRock 4CoreDX90-VSTA R2.0 | Quick Installation Guide - Page 111
" " TM ® ® TM ® ® TM TM ® ® TM TM ASRock 4CoreDX90-VSTA Motherboard 111 - ASRock 4CoreDX90-VSTA R2.0 | Quick Installation Guide - Page 112
® TM ® TM ® TM ® TM 112 ASRock 4CoreDX90-VSTA Motherboard - ASRock 4CoreDX90-VSTA R2.0 | Quick Installation Guide - Page 113
ASRock 4CoreDX90-VSTA Motherboard 113 - ASRock 4CoreDX90-VSTA R2.0 | Quick Installation Guide - Page 114
114 ASRock 4CoreDX90-VSTA Motherboard - ASRock 4CoreDX90-VSTA R2.0 | Quick Installation Guide - Page 115
ASRock 4CoreDX90-VSTA Motherboard 115 - ASRock 4CoreDX90-VSTA R2.0 | Quick Installation Guide - Page 116
116 ASRock 4CoreDX90-VSTA Motherboard - ASRock 4CoreDX90-VSTA R2.0 | Quick Installation Guide - Page 117
ASRock 4CoreDX90-VSTA Motherboard 117 - ASRock 4CoreDX90-VSTA R2.0 | Quick Installation Guide - Page 118
118 ASRock 4CoreDX90-VSTA Motherboard - ASRock 4CoreDX90-VSTA R2.0 | Quick Installation Guide - Page 119
SATA2 SATA1 ASRock 4CoreDX90-VSTA Motherboard 119 - ASRock 4CoreDX90-VSTA R2.0 | Quick Installation Guide - Page 120
CD1 120 ASRock 4CoreDX90-VSTA Motherboard - ASRock 4CoreDX90-VSTA R2.0 | Quick Installation Guide - Page 121
4 3 2 1 ASRock 4CoreDX90-VSTA Motherboard 121 - ASRock 4CoreDX90-VSTA R2.0 | Quick Installation Guide - Page 122
® 122 ASRock 4CoreDX90-VSTA Motherboard - ASRock 4CoreDX90-VSTA R2.0 | Quick Installation Guide - Page 123
ASRock 4CoreDX90-VSTA Motherboard 123 - ASRock 4CoreDX90-VSTA R2.0 | Quick Installation Guide - Page 124
® ® ® ® 124 ASRock 4CoreDX90-VSTA Motherboard - ASRock 4CoreDX90-VSTA R2.0 | Quick Installation Guide - Page 125
® ® ® ® ® ® ® ® ® ® ® ® ® ® ® ® ® ® ® \ \ \ \ ® ® ASRock 4CoreDX90-VSTA Motherboard 125 - ASRock 4CoreDX90-VSTA R2.0 | Quick Installation Guide - Page 126
® ® ® ® ® ® ® ® 126 ASRock 4CoreDX90-VSTA Motherboard - ASRock 4CoreDX90-VSTA R2.0 | Quick Installation Guide - Page 127
TM TM ® ® ASRock 4CoreDX90-VSTA Motherboard 127 - ASRock 4CoreDX90-VSTA R2.0 | Quick Installation Guide - Page 128
-
 1
1 -
 2
2 -
 3
3 -
 4
4 -
 5
5 -
 6
6 -
 7
7 -
8
-
9
-
10
-
11
-
12
-
13
-
14
-
15
-
16
-
17
-
18
-
19
-
20
-
21
-
22
-
23
-
24
-
25
-
26
-
27
-
28
-
29
-
30
-
31
-
32
-
33
-
34
-
35
-
36
-
37
-
38
-
39
-
40
-
41
-
42
-
43
-
44
-
45
-
46
-
47
-
48
-
49
-
50
-
51
-
52
-
53
-
54
-
55
-
56
-
57
-
58
-
59
-
60
-
61
-
62
-
63
-
64
-
65
-
66
-
67
-
68
-
69
-
70
-
71
-
72
-
73
-
74
-
75
-
76
-
77
-
78
-
79
-
80
-
81
-
82
-
83
-
84
-
85
-
86
-
87
-
88
-
89
-
90
-
91
-
92
-
93
-
94
-
95
-
96
-
97
-
98
-
99
-
100
-
101
-
102
-
103
-
104
-
105
-
106
-
107
-
108
-
109
-
110
-
111
-
112
-
113
-
114
-
115
-
116
-
117
-
118
-
119
-
120
-
121
-
122
-
123
-
124
-
125
-
126
-
127
-
128
 |
 |

1
ASRock
4CoreDX90-VSTA
Motherboard
Copyright Notice:
Copyright Notice:
Copyright Notice:
Copyright Notice:
Copyright Notice:
No part of this installation guide may be reproduced, transcribed, transmitted, or trans-
lated in any language, in any form or by any means, except duplication of documen-
tation by the purchaser for backup purpose, without written consent of ASRock Inc.
Products and corporate names appearing in this guide may or may not be registered
trademarks or copyrights of their respective companies, and are used only for identifica-
tion or explanation and to the owners’ benefit, without intent to infringe.
Disclaimer:
Disclaimer:
Disclaimer:
Disclaimer:
Disclaimer:
Specifications and information contained in this guide are furnished for informational
use only and subject to change without notice, and should not be constructed as a
commitment by ASRock. ASRock assumes no responsibility for any errors or omissions
that may appear in this guide.
With respect to the contents of this guide, ASRock does not provide warranty of any kind,
either expressed or implied, including but not limited to the implied warranties or
conditions of merchantability or fitness for a particular purpose. In no event shall
ASRock, its directors, officers, employees, or agents be liable for any indirect, special,
incidental, or consequential damages (including damages for loss of profits, loss of
business, loss of data, interruption of business and the like), even if ASRock has been
advised of the possibility of such damages arising from any defect or error in the guide
or product.
This device complies with Part 15 of the FCC Rules. Operation is subject to the
following two conditions:
(1)
this device may not cause harmful interference, and
(2)
this device must accept any interference received, including interference that
may cause undesired operation.
CALIFORNIA, USA ONLY
The Lithium battery adopted on this motherboard contains Perchlorate, a toxic
substance controlled in Perchlorate Best Management Practices (BMP) regulations
passed by the California Legislature. When you discard the Lithium battery in
California, USA, please follow the related regulations in advance.
“Perchlorate Material-special handling may apply, see
www
.dtsc.ca.gov/hazardouswa
ste/perchlorate”
ASRock Website: http://www.asrock.com
English
English
English
English
English
Published April 2007
Copyright
©
2007 ASRock INC. All rights reserved.