ASRock 775Dual-VSTA Quick Installation Guide
ASRock 775Dual-VSTA Manual
 |
View all ASRock 775Dual-VSTA manuals
Add to My Manuals
Save this manual to your list of manuals |
ASRock 775Dual-VSTA manual content summary:
- ASRock 775Dual-VSTA | Quick Installation Guide - Page 1
cause harmful interference, and (2) this device must accept any interference received, including interference that may cause undesired operation. ASRock Website: http://www.asrock.com Published October 2006 Copyright©2006 ASRock INC. All rights reserved. 1 ASRock 775Dual-VSTA Motherboard English - ASRock 775Dual-VSTA | Quick Installation Guide - Page 2
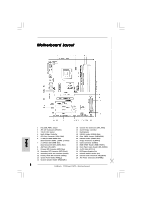
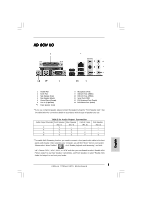
) 22 Game Connector (GAME1) 23 HDMI_SPDIF Header (HDMI_SPDIF1) 24 Front Panel Audio Header (HD_AUDIO1) 25 4 x PCI Slots (PCI1- 4) 26 PCI Express Graphics Slot 27 Infrared Module Header (IR1) 28 Internal Audio Connector: CD1 (Black) 29 ATX Power Connector (ATXPWR1) 2 ASRock 775Dual-VSTA Motherboard - ASRock 775Dual-VSTA | Quick Installation Guide - Page 3
(Orange) 6 Line In (Light Blue) *7 Front Speaker (Lime) 8 Microphone (Pink) 9 USB 2.0 Ports (USB01) 10 USB 2.0 Ports (USB23) 11 Serial Port: COM1 12 PS/2 Keyboard Port (Purple) 13 PS/2 or select "Realtek HDA Audio 2nd output" to use front panel audio. 3 ASRock 775Dual-VSTA Motherboard English - ASRock 775Dual-VSTA | Quick Installation Guide - Page 4
cards and CPU support lists on ASRock website as well. ASRock website http://www.asrock.com 1.1 Package Contents ASRock 775Dual-VSTA Motherboard (ATX Form Factor: 12.0-in x 9.6-in, 30.5 cm x 24.4 cm) ASRock 775Dual-VSTA Quick Installation Guide ASRock 775Dual-VSTA Support CD (including LGA 775 CPU - ASRock 775Dual-VSTA | Quick Installation Guide - Page 5
CPU Chipset Memory Hybrid Booster Expansion Slot Audio LAN Rear Panel I/O - ATX Form Factor: 12.0-in x 9.6-in, 30.5 cm x 24.4 cm - LGA 775 for Intel® Dual Core Pentium® XE and Pentium® D / Pentium® 4 / Celeron® D, supporting CoreTM 2 Duo Desktop (Conroe), Presler and Cedar Mill processors (in 775 - ASRock 775Dual-VSTA | Quick Installation Guide - Page 6
Sensing - CPU Overheat Shutdown to Protect CPU Life - CPU Fan Tachometer - Chassis Fan Tachometer - CPU Quiet Fan - Voltage Monitoring: +12V, +5V, +3.3V, Vcore - Microsoft® Windows® 2000/XP/XP 64-bit/VistaTM compliant (see CAUTION 10) - FCC, CE, WHQL English 6 ASRock 775Dual-VSTA Motherboard - ASRock 775Dual-VSTA | Quick Installation Guide - Page 7
PCI Express VGA cards, please refer to the "Supported PCI Express VGA Card List for PCI Express Graphics Slot" on page 9. For the proper installation of PCI Express VGA card, please refer to the installation guide on page 15. 7. Do NOT use a 3.3V AGP card on the AGP slot of this motherboard - ASRock 775Dual-VSTA | Quick Installation Guide - Page 8
can support all features in Windows® VistaTM Premium. Please follow the below table for minimum hardware requirement. CPU Memory VGA Celeron D 326 512MB Single Channel DX9.0 with WDDM Driver with 128bit VGA memory (Premium) with 64bit VGA memory (Basic) English 8 ASRock 775Dual-VSTA Motherboard - ASRock 775Dual-VSTA | Quick Installation Guide - Page 9
AX700PRO/TVD ABIT RX600XT-PCIE GECUBE Radeon X850XT 256M For the latest updates of the supported PCI Express VGA card list for PCI Express Graphics slot, please visit ASRock website for details. ASRock website: http://www.asrock.com/support/index.htm English 9 ASRock 775Dual-VSTA Motherboard - ASRock 775Dual-VSTA | Quick Installation Guide - Page 10
you insert the 775-LAND CPU into the socket, please check if the CPU surface is unclean or if there is any bent pin on the socket. Do not force to insert the CPU into the socket if above situation is found. Otherwise, the CPU will be seriously damaged. 10 ASRock 775Dual-VSTA Motherboard English - ASRock 775Dual-VSTA | Quick Installation Guide - Page 11
100 degrees. Step 2. Insert the 775-LAND CPU: Step 2-1. Hold the CPU by the edges where are marked with black support the load plate edge, engage PnP cap with right hand thumb and peel the cap from the socket while pressing on center of PnP cap to assist in removal. 11 ASRock 775Dual-VSTA Motherboard - ASRock 775Dual-VSTA | Quick Installation Guide - Page 12
them clockwise, the heatsink cannot be secured on the motherboard. Step 5. Connect fan header with the CPU fan connector on the motherboard. Step 6. Secure excess cable with tie-wrap to ensure cable does not interfere with fan operation or contact other components. 12 ASRock 775Dual-VSTA Motherboard - ASRock 775Dual-VSTA | Quick Installation Guide - Page 13
2.3 Installation of Memory Modules (DIMM) 775Dual-VSTA motherboard provides two 184-pin DDR (Double Data Rate) DIMM slots and two 240-pin DDRII DIMM slots, and supports Dual Channel Memory Technology. For dual channel configuration, you always need to install identical (the same brand, speed, size - ASRock 775Dual-VSTA | Quick Installation Guide - Page 14
permanent damage to the motherboard and the DIMM if you force the DIMM into the slot at incorrect orientation. STEP 3: Firmly insert the DIMM into the slot until the retaining clips at both ends fully snap back in place and the DIMM is properly seated. English 14 ASRock 775Dual-VSTA Motherboard - ASRock 775Dual-VSTA | Quick Installation Guide - Page 15
PCI, AGP, and PCI Express Graphics Slots) There are 4 PCI slots, 1 AGP slot, and 1 PCI Express Graphics slot on 775Dual-VSTA motherboard. PCI slots: PCI slots are used to install expansion cards that have the 32-bit PCI interface. AGP slot: The AGP slot is used to install a graphics card. The ASRock - ASRock 775Dual-VSTA | Quick Installation Guide - Page 16
ASRock patented PCI Express Graphics Technology, this motherboard supports Surround Display upgrade. With the external add-on AGP VGA card and PCI Express VGA card, you can easily enjoy the benefits of Surround Display feature. For the detailed instruction or USB . 19) ASRock 775Dual-VSTA Motherboard - ASRock 775Dual-VSTA | Quick Installation Guide - Page 17
IDE device on this motherboard, please set the IDE device as "Master". Please refer to the instruction of your IDE device vendor for the details. Besides, to optimize compatibility and performance, please hard disk or the SATA connector on the motherboard. English 17 ASRock 775Dual-VSTA Motherboard - ASRock 775Dual-VSTA | Quick Installation Guide - Page 18
) CD1 This connector allows you to receive stereo audio input from sound sources such as a CD-ROM, DVD-ROM, TV tuner card, or MPEG card. This is an interface for the front panel audio cable that allows convenient connection and control of audio devices. English 18 ASRock 775Dual-VSTA Motherboard - ASRock 775Dual-VSTA | Quick Installation Guide - Page 19
speaker to this header. Please connect the chassis fan cable to this connector and match the black wire to the ground pin. Please connect the CPU fan cable to this connector and match the black wire to the ground pin. English 19 ASRock 775Dual-VSTA Motherboard - ASRock 775Dual-VSTA | Quick Installation Guide - Page 20
VGA card to this header. Please connect the black end (A) of HDMI_SPDIF cable to the HDMI_SPDIF header on the motherboard. Then connect the white end (B or C) of HDMI_SPDIF cable to the HDMI connector of HDMI VGA card. B. white end (2-pin) C. white end (3-pin) 20 ASRock 775Dual-VSTA Motherboard - ASRock 775Dual-VSTA | Quick Installation Guide - Page 21
for connector usage in advance. Step 4. Connect the HDMI output connector to HDMI device, such as HDTV. Please refer to the user manual of HDTV and HDMI VGA card vendor for detailed connection procedures. Step 5. Install HDMI VGA card driver to your system. 21 ASRock 775Dual-VSTA Motherboard - ASRock 775Dual-VSTA | Quick Installation Guide - Page 22
motherboard adopts VIA® VT8237A southbridge chipset that supports Serial ATA (SATA) hard disks and RAID (RAID 0, RAID 1, and JBOD) functions. You may install SATA hard disks on this motherboard for internal storage devices. This section will guide SATA HDDs 775Dual-VSTA motherboard supports Hot Plug - ASRock 775Dual-VSTA | Quick Installation Guide - Page 23
and RAID Configuration", which is located in the folder at the following path: .. \ RAID Installation Guide and the document in the support CD, "Guide to VIA RAID Tool", which is located in the folder at the following path: .. \ VIA RAID Tool Information 23 ASRock 775Dual-VSTA Motherboard English - ASRock 775Dual-VSTA | Quick Installation Guide - Page 24
of BIOS setup to [Auto], which will show you the actual CPU host frequency in the following item. Therefore, CPU FSB is untied during overclocking, but AGP / PCI / PCIE bus is in the fixed mode so that FSB can operate under a more stable overclocking environment. 24 ASRock 775Dual-VSTA Motherboard - ASRock 775Dual-VSTA | Quick Installation Guide - Page 25
" This motherboard is equipped with Intel LGA 775 socket, which is a new CPU socket interface that Intel has released. Since it has several tiny pins, whcih are easily to be damaged by improper handling, ASRock sincerely presents you a clear installation guide through this "LGA 775 CPU Installation - ASRock 775Dual-VSTA | Quick Installation Guide - Page 26
26 ASRock 775Dual-VSTA Motherboard - ASRock 775Dual-VSTA | Quick Installation Guide - Page 27
® ® ® ® ® ® ® ® 27 ASRock 775Dual-VSTA Motherboard - ASRock 775Dual-VSTA | Quick Installation Guide - Page 28
- ® ® 28 ASRock 775Dual-VSTA Motherboard - ASRock 775Dual-VSTA | Quick Installation Guide - Page 29
® ® ® ® ® 29 ASRock 775Dual-VSTA Motherboard - ASRock 775Dual-VSTA | Quick Installation Guide - Page 30
® ® 30 ASRock 775Dual-VSTA Motherboard - ASRock 775Dual-VSTA | Quick Installation Guide - Page 31
31 ASRock 775Dual-VSTA Motherboard - ASRock 775Dual-VSTA | Quick Installation Guide - Page 32
32 ASRock 775Dual-VSTA Motherboard - ASRock 775Dual-VSTA | Quick Installation Guide - Page 33
33 ASRock 775Dual-VSTA Motherboard - ASRock 775Dual-VSTA | Quick Installation Guide - Page 34
DDRII_1 DDR1 DDRII_2 DDR2 ( )( )( )( ) (1) - - (2) - - 34 ASRock 775Dual-VSTA Motherboard - ASRock 775Dual-VSTA | Quick Installation Guide - Page 35
" " 35 ASRock 775Dual-VSTA Motherboard - ASRock 775Dual-VSTA | Quick Installation Guide - Page 36
36 ASRock 775Dual-VSTA Motherboard - ASRock 775Dual-VSTA | Quick Installation Guide - Page 37
" " SATA1 SATA2 37 ASRock 775Dual-VSTA Motherboard - ASRock 775Dual-VSTA | Quick Installation Guide - Page 38
CD1 38 ASRock 775Dual-VSTA Motherboard - ASRock 775Dual-VSTA | Quick Installation Guide - Page 39
39 ASRock 775Dual-VSTA Motherboard - ASRock 775Dual-VSTA | Quick Installation Guide - Page 40
C B A 40 ASRock 775Dual-VSTA Motherboard - ASRock 775Dual-VSTA | Quick Installation Guide - Page 41
® 41 ASRock 775Dual-VSTA Motherboard - ASRock 775Dual-VSTA | Quick Installation Guide - Page 42
® ® ® ® ® ® ® ® ® ® ® ® ® ® ® ® ® 42 ASRock 775Dual-VSTA Motherboard - ASRock 775Dual-VSTA | Quick Installation Guide - Page 43
® ® ® ® ® ® ® ® ® ® ® ® ® ® ® ® ® ® 43 ASRock 775Dual-VSTA Motherboard - ASRock 775Dual-VSTA | Quick Installation Guide - Page 44
® ® "LGA 775 CPU Installation Live Demo" 44 ASRock 775Dual-VSTA Motherboard - ASRock 775Dual-VSTA | Quick Installation Guide - Page 45
auf der ASRock-Website aufgelistet. ASRock-Website: http://www.asrock.com 1.1 Kartoninhalt ASRock 775Dual-VSTA Motherboard (ATX-Formfaktor: 30.5 cm x 24.4 cm; 12.0 Zoll x 9.6 Zoll) ASRock 775Dual-VSTA Schnellinstallationsanleitung ASRock 775Dual-VSTA Support-CD (einschl. LGA 775 CPU Installation - ASRock 775Dual-VSTA | Quick Installation Guide - Page 46
Plattform CPU Chipsatz Speicher Hybrid Booster Erweiterungssteckplätze Audio LAN E/A-Anschlüsse an der Rückseite - ATX-Formfaktor: 30.5 cm x 24.4 cm; 12.0 Zoll x 9.6 Zoll - LGA 775 für Intel® Dual Core Pentium® XE- und Pentium® D- / Pentium® 4- / Celeron® D-Prozessoren, CoreTM 2 Duo Desktop (Conroe - ASRock 775Dual-VSTA | Quick Installation Guide - Page 47
- Drehzahlmessung für Gehäuselüfter - CPU-Lüftergeräuschdämpfung - Spannungsüberwachung: +12V, +5V, +3.3V, Vcore Betriebssysteme - Unterstützt Microsoft® Windows® 2000 / XP / XP 64-Bit / VistaTM (siehe VORSICHT 10) Zertifizierungen - FCC, CE, WHQL Deutsch 47 ASRock 775Dual-VSTA Motherboard - ASRock 775Dual-VSTA | Quick Installation Guide - Page 48
® Windows® VistaTM ist noch nicht einsatzbereit. Sie können ihn bald von unserer Internetseite abrufen. Auf unserer Internetseite finden Sie Angaben zum Microsoft® Windows® VistaTM Treiber sowie weitere Informationen. ASRock-Internetseite: http://www.asrock.com 48 ASRock 775Dual-VSTA Motherboard - ASRock 775Dual-VSTA | Quick Installation Guide - Page 49
Premium unterstützen. Die minimalen Hardwarevoraussetzungen entnehmen Sie bitte der nachstehenden Tabelle. CPU Speicher VGA Celeron D 326 512 MB, Single Channel DX9.0 mit WDDM-Treiber mit 128 Bit-VGA-Speicher (Premium) mit 64 Bit-VGA-Speicher (Basic) Deutsch 49 ASRock 775Dual-VSTA Motherboard - ASRock 775Dual-VSTA | Quick Installation Guide - Page 50
) 775-Pin Sockel Übersicht Bevor Sie die 775-Pin CPU in den Sockel sitzen, prüfen Sie bitte, ob die CPU-Oberfläche sauber ist und keine der Kontakte verbogen sind. Setzen Sie die CPU nicht mit Gewalt in den Sockel, dies kann die CPU schwer beschädigen. Deutsch 50 ASRock 775Dual-VSTA Motherboard - ASRock 775Dual-VSTA | Quick Installation Guide - Page 51
775-Pin Sockel 775-Pin CPU Um die CPU ordnungsgemäß einsetzen zu können, richten Sie die zwei Orientierungskerben der CPU mit den beiden Markierungen des Sockels aus. Schritt 2-3. Drücken Sie die CPU vorsichtig in vertikaler Richtung in den Sockel. 51 ASRock 775Dual-VSTA Motherboard - ASRock 775Dual-VSTA | Quick Installation Guide - Page 52
Schritt 2-4. Prüfen Sie, dass die CPU ordnungsgemäß im Sockel sitzt und die Orientierungskerben einwandfrei in den entsprechenden Auskerbungen sitzen. en Sie den Ladehebel. Schritt 4-3. Sichern Sie Ladehebel und Ladeplatte mithilfe des Hebelverschlusses. 52 ASRock 775Dual-VSTA Motherboard Deutsch - ASRock 775Dual-VSTA | Quick Installation Guide - Page 53
ordnungsgemäß am Motherboard befestigt. Schritt 5. Schließen Sie den Lüfter an den CPULüfteranschluss des Motherboards. Schritt 6. Befestigen Sie überschüssiges Kabel mit Band, um eine Störung des Lüfters oder Kontakt mit anderen Teilen zu vermeiden. Deutsch 53 ASRock 775Dual-VSTA Motherboard - ASRock 775Dual-VSTA | Quick Installation Guide - Page 54
DoppelkanalSpeicherkonfigurationstabelle. Dual-Kanal- Motherboard und DIMMs beschädigt werden. 2. DDR- und DDRII-RAM dürfen nicht gleichzeitig in diesem Motherboard installiert werden; andernfalls kann es zu Schäden an Motherboard und DIMMs kommen. Deutsch 54 ASRock 775Dual-VSTA Motherboard - ASRock 775Dual-VSTA | Quick Installation Guide - Page 55
zwingen, führt dies zu dauerhaften Schäden am Mainboard und am DIMM-Modul. Schritt 3: Drücken Sie die DIMM-Module fest in die Steckplätze, so dass die Halteklammern an beiden Enden des Moduls einschnappen und das DIMM-Modul fest an Ort und Stelle sitzt. 55 ASRock 775Dual-VSTA Motherboard Deutsch - ASRock 775Dual-VSTA | Quick Installation Guide - Page 56
): Es stehen 4 PCI-, 1 AGP-, und 1 PCI Express Grafik-Slot auf dem 775Dual-VSTA Motherboard zur Verfügung. PCI-Slots: PCI-Slots werden zur Installation von Erweiterungskarten mit dem 32bit PCI-Interface genutzt. AGP-Slot: Der AGP-Steckplatz dient zur Installation einer Grafikkarte. Der ASRock AGP - ASRock 775Dual-VSTA | Quick Installation Guide - Page 57
BIOS-Parameter. Um die Systemparameter zu löschen und auf die Werkseinstellung zurückzusetzen, schalten Sie bitte den Computer ab und entfernen das Stromkabel. Benutzen Sie eine Jumperkappe, um die Pins an CLRCMOS1 für 5 Sekunden kurzzuschließen. Deutsch 57 ASRock 775Dual-VSTA Motherboard - ASRock 775Dual-VSTA | Quick Installation Guide - Page 58
Pins der Anschlussleisten. Wenn Sie die Jumperkappen auf die Anschlüsse setzen, wird das Motherboard permanent beschädigt! Anschluss Anschluss für das Floppy-Laufwerk (33-Pin FLOPPY1) (siehe ermöglicht eine Datenübertragungsrate bis 1,5 Gb/s. Deutsch 58 ASRock 775Dual-VSTA Motherboard - ASRock 775Dual-VSTA | Quick Installation Guide - Page 59
üsse auf der Rückseite. Wenn die hinteren USBAnschlüsse nicht ausreichen, steht dieser USB 2.0-Header zur Unterstützung 2 weiterer USB 2.0-Anschlüsse zur Verfügung. Dieser Header unterstützt ein optionales, drahtloses Sendeund Empfangs-Infrarotmodul. Deutsch 59 ASRock 775Dual-VSTA Motherboard - ASRock 775Dual-VSTA | Quick Installation Guide - Page 60
-Audioleiste angeschlossen werden. E. Rufen Sie das BIOS-Setup-Dienstprogramm auf. Wechseln Sie zu Erweiterte Windows-System auf. Klicken Sie auf das Symbol in der Taskleiste unten rechts, um den Realtek HD Audio-Manager aufzurufen. Klicken Sie auf "Audio an. 60 ASRock 775Dual-VSTA Motherboard - ASRock 775Dual-VSTA | Quick Installation Guide - Page 61
mit diesem Anschluss und passen Sie den schwarzen Draht dem Erdungsstift an. Verbinden Sie das CPU Lüfterkabel mit diesem Anschluss und passen Sie den schwarzen Draht dem Erdungsstift an. Verbinden Sie Anschluss der HDMI-VGA- Karte mit diesem Anschluss. 61 ASRock 775Dual-VSTA Motherboard Deutsch - ASRock 775Dual-VSTA | Quick Installation Guide - Page 62
Multimedia-Schnittstelle) ist eine komplett digitale Audio/ Video-Spezifikation, die eine Schnittstelle 1: Installieren Sie die HDMI-VGA-Karte im PCI Express-Steckplatz Ihres Motherboards. Hinweise zur Installation der HDMI-VGA-Karte finden den dreipoligen ASRock 775Dual-VSTA Motherboard Deutsch - ASRock 775Dual-VSTA | Quick Installation Guide - Page 63
Motherboard und VGA-Karte schwer beschädigt werden. In der Abbildung sehen Sie ein Beispiel für einen falschen Anschluss: Hier wird versucht, das HDMI_SPDIF-Kabel mit dem Lüfteranschluss der PCI Express- das System in Betrieb ist und einwandfrei läuft. 63 ASRock 775Dual-VSTA Motherboard Deutsch - ASRock 775Dual-VSTA | Quick Installation Guide - Page 64
Sie das CDROM-Laufwerk als Boot-Laufwerk. C. Die Meldung „Do you want to generate Serial ATA driver diskette [Y/N]?" [Serial ATA-Treiberdiskette Guide SCHRITT 3: Installieren Sie Windows® 2000 / Windows® XP / Wind- ows® XP 64-Bit / Windows® VistaTM in Ihrem System. 64 ASRock 775Dual-VSTA Motherboard - ASRock 775Dual-VSTA | Quick Installation Guide - Page 65
CPU Host-Frequenz beim folgenden Eintrag angezeigt. Der CPU-FSB wird dadurch beim Übertakten freigegeben, allerdings befindet sich der AGP/PCI/PCIE-Bus in einem fixierten Modus, so dass der FSB in einer stabileren Übertaktungsumgebung arbeiten kann. 65 ASRock 775Dual-VSTA Motherboard Deutsch - ASRock 775Dual-VSTA | Quick Installation Guide - Page 66
der CPU oder Motherboards durch unsachgemäße Handhabung zu verringern. Öffnen Sie die Datei mit Microsoft Media Player, um das Live-Demo anzusehen. Sie finden das Live-Demo auf der Motherboard Support-CD in folgendem Verzeichnis: ..\ MPEGAV \ LGA775INST.DAT 66 ASRock 775Dual-VSTA Motherboard - ASRock 775Dual-VSTA | Quick Installation Guide - Page 67
.com 1.1 Contenu du paquet Carte mère ASRock 775Dual-VSTA (Facteur de forme ATX : 12.0 pouces x 9.6 pouces, 30.5 cm x 24.4 cm) Guide d'installation rapide ASRock 775Dual-VSTA CD de soutien ASRock 775Dual-VSTA (avec Démo vidéo d'installation de processeur LGA 775) Un câble ruban IDE Ultra ATA 66 - ASRock 775Dual-VSTA | Quick Installation Guide - Page 68
ATX: 12.0 pouces x 9.6 pouces, 30.5 cm x 24.4 cm CPU - LGA 775 pour Intel® Dual Core Pentium® XE et Pentium® D / Pentium® 4 / Celeron® D, gérant les processeurs CoreTM 2 Duo Desktop (Conroe), Presler et Cedar Mill (dans le progiciel 775-land LGA) - FSB 1066/800/533 MHz - Prise en charge de - ASRock 775Dual-VSTA | Quick Installation Guide - Page 69
du CPU - Tachéomètre ventilateur CPU - Tachéomètre ventilateur châssis - Ventilateur silencieux d'unité centrale - Monitoring de la tension: +12V, +5V, +3.3V, Vcore - Microsoft® Windows® 2000 / XP / XP 64-bit / VistaTM (voir ATTENTION 10) - FCC, CE, WHQL Français 69 ASRock 775Dual-VSTA Motherboard - ASRock 775Dual-VSTA | Quick Installation Guide - Page 70
® Windows® VistaTM ne sont pas encore prêts. Nous les mettrons à jour sur notre site Web dans l'avenir. Veuillez visiter notre site Web pour obtenir les pilotes de Microsoft® Windows® VistaTM et l'information relative. Site Web de ASRock : http://www.asrock.com 70 ASRock 775Dual-VSTA Motherboard - ASRock 775Dual-VSTA | Quick Installation Guide - Page 71
Adaptateur VGA Celeron D 326 512 Mo Canal simple DX9.0 avec pilote WDDM avec mémoire VGA 128bits (Premium) avec mémoire VGA 64bits (Basic) Français 71 ASRock 775Dual-VSTA Motherboard - ASRock 775Dual-VSTA | Quick Installation Guide - Page 72
le processeur 775 broches : Etape 2-1. Tenez le processeur par ses bords là où se trouvent des lignes noires Etape 2-2. Orientez le paquet avec le dissipateur thermique intégré (IHS) vers le haut. Repérez la broche 1 et les deux encoches d'orientation. 72 ASRock 775Dual-VSTA Motherboard Ligne noire - ASRock 775Dual-VSTA | Quick Installation Guide - Page 73
775 broches Socket 775 broches Pour une insertion correcte, veuillez vérifier que vous faites bien correspondre les deux encoches d'orientation sur le processeur avec les deux détrompeurs du socket renvoyez la carte mère pour service après vente. Etape 4. Refermez ASRock 775Dual-VSTA Motherboard - ASRock 775Dual-VSTA | Quick Installation Guide - Page 74
reporter aux manuels d'instructions de votre ventilateur du dissipateur thermique pour un processeur 775 broches. (Appliquez le matériau mère) Etape 2. Placez le dissipateur thermique sur le socket. Vérifiez que les câbles du ventilateur sont orient ASRock 775Dual-VSTA Motherboard Français - ASRock 775Dual-VSTA | Quick Installation Guide - Page 75
re 775Dual-VSTA comprend deux slots pour DIMM DDR 184 broches (Débit de données double) et deux slots pour DIMM DDRII 240 broches; elle prend en charge la technologie mémoire double voie (Dual Channel Memory). re et la mémoire DIMM peuvent être endommagés Français 75 ASRock 775Dual-VSTA Motherboard - ASRock 775Dual-VSTA | Quick Installation Guide - Page 76
jusqu'à ce que les clips de maintien situés aux deux extrémités se ferment complètement et que le module DIMM soit inséré correctement. 76 ASRock 775Dual-VSTA Motherboard - ASRock 775Dual-VSTA | Quick Installation Guide - Page 77
slot AGP, et 1 slot PCI Express Graphiques sur les cartes mères 775Dual-VSTA. Slots PCI: Les slots PCI sont utilisés pour installer des cartes d'extension dotées d'une interface PCI 32 bits. Slot AGP: Le slot AGP est utilisé pour installer une carte graphique. Le slot AGP ASRock utilise un design de - ASRock 775Dual-VSTA | Quick Installation Guide - Page 78
aux technologies PCI Express Graphiques brevetées d'ASRock, cette carte mère prend en charge la mise à niveau Affichage Surround. Avec la carte VGA AGP complémentaire externe et la carte PCI Express VGA, vous pouvez facilement profiter de la fonction Affichage Surround. Pour les instructions détaill - ASRock 775Dual-VSTA | Quick Installation Guide - Page 79
mère, veuillez configurer le périphérique IDE comme "Maître". Veuillez vous reporter aux instructions du fabricant de votre IDE périphérique pour les détails. En outre, pour optimiser la au disque dur SATA ou au connecteur SATA sur la carte mère. 79 ASRock 775Dual-VSTA Motherboard Français - ASRock 775Dual-VSTA | Quick Installation Guide - Page 80
Ils vous permettent de gérer des entrées audio à partir de sources stéréo comme un CD-ROM, DVDROM, un tuner TV ou une carte MPEG. C'est une interface pour un câble audio en façade qui permet le branchement et le contrôle commodes de périphériques audio. Français 80 ASRock 775Dual-VSTA Motherboard - ASRock 775Dual-VSTA | Quick Installation Guide - Page 81
audio AC'97. E. Entrer dans l'utilitaire de configuration du BIOS. Saisir les Paramètres avancés puis sélectionner Configuration du jeu de puces. Définir l'option panneau de commande de [Auto] à [Activé]. F. Entrer dans le système Windows de terre. Français 81 ASRock 775Dual-VSTA Motherboard - ASRock 775Dual-VSTA | Quick Installation Guide - Page 82
. Connecteur HDMI_SPDIF (HDMI_SPDIF1 3-pin) (voir p.2 No. 23) Connecteur HDMI_SPDIF, fournissant une sortie audio SPDIF vers la carte VGA HDMI, et permettant au système de se connecter au un télé la carte VGA HDMI. C. extrémité blanche (3 broches) 82 ASRock 775Dual-VSTA Motherboard Français - ASRock 775Dual-VSTA | Quick Installation Guide - Page 83
Par m exemple, cette image montre le mauvais exemple de connexion du câble HDMI_SPDIF au connecteur du ventilateur de la carte VGA PCI Express. Veuillez vous c reporter au préalable au manuel de l'utilisateur de la carte VGA pour l'utilisation du connecteur. 83 ASRock 775Dual-VSTA Motherboard - ASRock 775Dual-VSTA | Quick Installation Guide - Page 84
® XP / Windows® XP 64-bit / Windows® VistaTM avec fonctions RAID Si vous voulez installer un système d'exploitation Windows® 2000, Windows® XP, Windows® XP 64-bit ou Windows® VistaTM avec fonctions RAID sur votre système, veuillez suivre la procédure ci-dessous. 84 ASRock 775Dual-VSTA Motherboard - ASRock 775Dual-VSTA | Quick Installation Guide - Page 85
Serial ATA driver diskette Windows® 2000 / Windows® XP / Windows® XP 64bit / Windows® VistaTM, si vous voulez gérer les fonctions RAID, vous pouvez utiliser à la fois "RAID Installation Guide" et "VIA RAID Tool Information" pour la configuration RAID. Veuillez 85 ASRock 775Dual-VSTA Motherboard - ASRock 775Dual-VSTA | Quick Installation Guide - Page 86
équence d'hôte de l'UC courante dans l'item suivant. Par conséquent, le bus FSB de l'UC n'est pas lié pendant le surcadençage, mais le bus AGP/PCI/PCIE est en mode fixe, si bien que le bus FSB peut opérer dans un environnement de surcadençage plus stable. 86 ASRock 775Dual-VSTA Motherboard Français - ASRock 775Dual-VSTA | Quick Installation Guide - Page 87
és. Pour des informations détaillées sur le BIOS, veuillez consulter le Guide de l'utilisateur (fichier PDF) dans le CD technique. 4. Informations sur le CD de support Cette carte mère supporte divers systèmes d'exploitation Microsoft® Windows®: 2000 / XP / XP 64 bits / VistaTM. Le CD technique livr - ASRock 775Dual-VSTA | Quick Installation Guide - Page 88
installazione CPU LGA 775 ) Un cavo IDE 80-pin Ultra ATA 66/100/133 Un cavo per floppy drive a 1,44 Mb Un cavo dati Serial ATA (SATA) (Opzionale) Un cavo alimentatore HDD Serial ATA (SATA) (Opzionale) Un cavo HDMI_SPDIF (opzionale) Un HD 8CH I/O Shield 88 ASRock 775Dual-VSTA Motherboard Italiano - ASRock 775Dual-VSTA | Quick Installation Guide - Page 89
Factor: 12.0-in x 9.6-in, 30.5 cm x 24.4 cm Processore - LGA 775 per Intel® Dual Core Pentium® XE e Pentium® D / Pentium® 4 / Celeron® D, con processori CoreTM 2 Duo Desktop (Conroe), Presler e Cedar Mill (in socket 775 LGA) - FSB 1066/800/533 MHz - Supporto tecnologia Hyper Threading (vedi - ASRock 775Dual-VSTA | Quick Installation Guide - Page 90
- Indicatore di velocità per la ventola di raffreddamento - Ventola CPU silenziosa - Voltaggio: +12V, +5V, +3.3V, Vcore Compatibi- - Microsoft® Windows® 2000 / XP / XP 64 bit / VistaTM lità SO (vedi ATTENZIONE 10) Certificazioni- FCC, CE, WHQL Italiano 90 ASRock 775Dual-VSTA Motherboard - ASRock 775Dual-VSTA | Quick Installation Guide - Page 91
. 10. Il driver Microsoft® Windows® VistaTM non è ancora pronto. Vi terremo aggiornati in futuro sul nostro sito web. Si prega di visitare il nostro sito web per il driver Microsoft® Windows® VistaTM ed informazioni relative. Sito web ASRock: http://www.asrock.com 91 ASRock 775Dual-VSTA Motherboard - ASRock 775Dual-VSTA | Quick Installation Guide - Page 92
Windows® VistaTM Premium. Fare riferimento alla tabella che segue per informazioni sui requisiti minimi dell'hardware. CPU Memoria VGA Celeron D 326 512MB ad un canale DX9.0 con driver WDDM Con memoria VGA 128bit (Premium) Con memoria VGA 64bit (Basic) Italiano 92 ASRock 775Dual-VSTA Motherboard - ASRock 775Dual-VSTA | Quick Installation Guide - Page 93
135 gradi la leva di carico per aprirla completamente. Fase 1-3. Ruotare di circa 100 gradi la piastra di carico per aprirla completamente. Fase 2. Inserire la CPU 775-Pin: Fase 2-1. Tenere la CPU dai bordi segnati con linee nere. Linea nera Linea nera Italiano 93 ASRock 775Dual-VSTA Motherboard - ASRock 775Dual-VSTA | Quick Installation Guide - Page 94
di orientamento Pin1 Dente di Tacca di allineamento orientamento Tacca di allineamento CPU da 775-Pin Socket da 775-Pin Per il corretto inserimento, verificare di far combaciare i due denti leva di carico mentre si preme leggermente sulla piastra di carico. 94 ASRock 775Dual-VSTA Motherboard - ASRock 775Dual-VSTA | Quick Installation Guide - Page 95
alimentazione della ventola al connettore ventola della CPU sulla scheda madre. Fase 6. fissare il cavo in eccesso con fascette per assicurare che il cavo non interferisca con il funzionamento della ventola o che venga a contatto con gli altri componenti. 95 ASRock 775Dual-VSTA Motherboard Italiano - ASRock 775Dual-VSTA | Quick Installation Guide - Page 96
di configurazione della memoria a doppio canale in basso. Configurazioni Dual Channel Memory DDRII_1 DDR1 DDRII_2 DDR2 (alloggiamento gialli) (alloggiamento vedere) (alloggiamento DDRII; diversamente si danneggeranno sia la scheda madre sia i DIMM. Italiano 96 ASRock 775Dual-VSTA Motherboard - ASRock 775Dual-VSTA | Quick Installation Guide - Page 97
DIMM nello slot fino a far scattare completamente in posizione i fermagli di ritegno alle due estremità e fino ad installare correttamente la DIMM nella sua sede. 97 ASRock 775Dual-VSTA Motherboard Italiano - ASRock 775Dual-VSTA | Quick Installation Guide - Page 98
Express Grafica) Esistono 4 slot PCI, 1 slot AGP, e 1 slot PCI Express Grafica su entrambe le schede madri 775Dual-VSTA. Slot PCI: Sono utilizzati per installare schede di espansione con Interfaccia PCI a 32-bit. Slot AGP: Lo slot AGP serve all'installazione di schede grafiche. Lo slot AGP ASRock - ASRock 775Dual-VSTA | Quick Installation Guide - Page 99
PCI Express Grafica brevettate da ASRock, questa scheda madre supporta l'aggiornamento del Surround Display. Con la scheda VGA AGP aggiuntiva esterna e la scheda VGA PCI Express abilitare PS/2 o USB wake up events. 2 pin) (vedi p.2 Nr. 19) jumper a 2 pin Nota: ASRock 775Dual-VSTA Motherboard - ASRock 775Dual-VSTA | Quick Installation Guide - Page 100
/s. Cavi dati Serial ATA (SATA) Entrambe le estremità del cavo dati SATA possono collegarsi all'hard disk SATA o al connettore SATA sulla scheda madre. 100 ASRock 775Dual-VSTA Motherboard Italiano - ASRock 775Dual-VSTA | Quick Installation Guide - Page 101
e riceve moduli infrarossi. Permettono di ricevere input stereo audio da fonti di suono come CD-ROM, DVD-ROM,TV tuner, o schede MPEG. È un'interfaccia per il cavo del pannello audio. Che consente connessione facile e controllo dei dispositivi audio. Italiano ASRock 775Dual-VSTA Motherboard 101 - ASRock 775Dual-VSTA | Quick Installation Guide - Page 102
del telaio a questo collettore. Collegare il cavo della ventolina telaio a questo connettore e far combaciare il filo nero al pin terra. Collegare il cavo della ventolina CPU a questo connettore e far combaciare il filo nero al pin terra. 102 ASRock 775Dual-VSTA Motherboard - ASRock 775Dual-VSTA | Quick Installation Guide - Page 103
HDMI_SPDIF (3-pin HDMI_SPDIF1) (vedi p.2 Nr. 23) Header HDMI_SPDIF, con uscita audio SPDIF su scheda HDMI VGA, consente al sistema di collegare dispositivi per TV digitale VGA. A. estremità nera B. estremità bianca (2 pin) C. estremità bianca (3 pin) ASRock 775Dual-VSTA Motherboard 103 Italiano - ASRock 775Dual-VSTA | Quick Installation Guide - Page 104
. Punto 4. Collegare il connettore di uscita HDMI al dispositivo HDMI, ad esempio HDTV. Consultare il manuale dell'utente di HDTV e della scheda HDMI VGA per il collegamento dettagliato. Punto 5. Installare il driver della scheda HDMI VGA nel sistema. ASRock 775Dual-VSTA Motherboard Italiano - ASRock 775Dual-VSTA | Quick Installation Guide - Page 105
con funzioni RAID, seguire le istruzioni esposte di seguito. Passo 1: Creare un dischetto driver SATA. A. Inserire il CD di supporto ASRock nel lettore ottico prima di accendere il sistema. (NON inserire nessun dischetto floppy nel drive in questo momento!) ASRock 775Dual-VSTA Motherboard 105 - ASRock 775Dual-VSTA | Quick Installation Guide - Page 106
Guide" sia "VIA RAID Tool Information" e eseguire la configurazione RAID. Far riferimento al documento del CD di supporto denominato "Guide to SATA Hard Disks Installation and RAID Configuration Guida all'installazione del disco rigido SATA e alla configurazione RAID" ASRock 775Dual-VSTA Motherboard - ASRock 775Dual-VSTA | Quick Installation Guide - Page 107
BIOS su [Auto] per far apparire la frequenza CPU attuale nella seguente voce. Quindi, FSB della CPU è svincolato durante l'overclocking, ma il bus AGP/PCI/PCIE si trova in modo fisso affinché FSB possa funzionare in un ambiente di overclocking più stabile. ASRock 775Dual-VSTA Motherboard - ASRock 775Dual-VSTA | Quick Installation Guide - Page 108
socket Intel LGA 775, si tratta di una nuova interfaccia socket per CPU rilasciata da Intel. Poichè è dotata di una serie di pin molto sottili, che possono essere facilmente rovinati se non utilizzati correttamente, ASRock : ..\ MPEGAV \ LGA775INST.DAT Italiano 108 ASRock 775Dual-VSTA Motherboard - ASRock 775Dual-VSTA | Quick Installation Guide - Page 109
manual de usuario incluido en el CD de soporte. Porque las especificaciones de la placa madre y el software de BIOS podrían ser actualizados, el contenido de este manual rápida de ASRock 775Dual-VSTA CD de soporte de ASRock 775Dual-VSTA (incluye la Demo de instalación de la CPU LGA 775) Una cinta de - ASRock 775Dual-VSTA | Quick Installation Guide - Page 110
Audio LAN Entrada/Salida de Panel Trasero - Factor forma ATX: 30,5 cm x 24.4 cm, 21,0" x 9,6" - LGA 775 para Intel® Dual Core Pentium® XE y Pentium® D / Pentium® 4 / Celeron® D, con soporte para los procesadores CoreTM 2 Duo Desktop (Conroe), Presler y Cedar Mill (en el paquete 775-land LGA) - FSB - ASRock 775Dual-VSTA | Quick Installation Guide - Page 111
Taquímetros de los ventiladores del procesador y del chasis - Ventilador silencioso para procesador - Monitor de Voltaje: +12V, +5V, +3.3V, Vcore - En conformidad con Microsoft® Windows® 2000 / XP / XP 64 bits / VistaTM (vea ATENCIÓN 10) - FCC, CE, WHQL Español ASRock 775Dual-VSTA Motherboard 111 - ASRock 775Dual-VSTA | Quick Installation Guide - Page 112
no está preparado aún. Se publicará en nuestra página web en el futuro. Por favor, visite nuestra página web para descargar el controlador para Microsoft® Windows® VistaTM y otra información relacionada. Página web de ASRock: http://www.asrock.com Español 112 ASRock 775Dual-VSTA Motherboard - ASRock 775Dual-VSTA | Quick Installation Guide - Page 113
MB de un solo canal DX9.0 con controlador WDDM con memoria VGA de 128 bit (Premium) con memoria VGA de 64 bit (Basic) Español ASRock 775Dual-VSTA Motherboard 113 - ASRock 775Dual-VSTA | Quick Installation Guide - Page 114
demasiado. Eso podría dañar la placa madre. 2.1 Instalación de Procesador Para la instalación de la CPU Intel de (Placa de carga) 775 agujas, siga los siguientes pasos. (Matriz de contacto) (Cuerpo del socket) Introducción al socket de 775 agujas Español 114 ASRock 775Dual-VSTA Motherboard - ASRock 775Dual-VSTA | Quick Installation Guide - Page 115
ón Muesca de orientación aguja 1 Tecla de alineación Tecla de alineación CPU de 775 agujas Socket de 775 agujas Para insertarla correctamente, asegúrese de que las dos muescas de orientación de la CPU coinciden con las teclas de alineación del socket. ASRock 775Dual-VSTA Motherboard 115 - ASRock 775Dual-VSTA | Quick Installation Guide - Page 116
de la CPU. A continuación se ofrece un ejemplo para ilustrar la instalación del disipador para la CPU de 775 agujas. (Aplique el material termal de interfaz) Paso 1. Aplique el material termal de interfaz en el centro del IHS de la superficie del socket. 116 ASRock 775Dual-VSTA Motherboard - ASRock 775Dual-VSTA | Quick Installation Guide - Page 117
cabezal del ventilador con el conector del ventilador de la CPU en la placa madre. Fije el cable que sobre con un lazo para asegurarse de que el cable no interfiere en el funcionamiento del ventilador y tampoco entra en contacto con otros componentes. Español ASRock 775Dual-VSTA Motherboard 117 - ASRock 775Dual-VSTA | Quick Installation Guide - Page 118
2 Nº 7) para activar la tecnología de memoria de canal dual. Puede consultar la tabla de configuración de memoria de canal dual que figura a continuación. Configuraciones de Memoria de Doble Canal DDRII_1 hacerlo podría dañarse la placa y el DIMM. Español 118 ASRock 775Dual-VSTA Motherboard - ASRock 775Dual-VSTA | Quick Installation Guide - Page 119
dentro de la ranura hasta que los clips de sujeción de ambos lados queden completamente introducidos en su sitio y la DIMM se haya asentado apropiadamente. ASRock 775Dual-VSTA Motherboard 119 Español - ASRock 775Dual-VSTA | Quick Installation Guide - Page 120
(Ranuras PCI, AGP, y PCI Express Gráfica) Hay 4 ranuras PCI, 1 ranuras AGP, y 1 ranura PCI Express Gráfica sobre las placas mardres 775Dual-VSTA. Ranura PCI: Para instalar tarjetas de expansión que tienen 32-bit Interface PCI. Ranura AGP: Para instalar trajeta gráfica. La ranura AGP ASRock tiene un - ASRock 775Dual-VSTA | Quick Installation Guide - Page 121
PCI Express Gráfica patentada por ASRock, esta placa madre admite la actualización a Surround Display. Con las tarjetas complementarias externas VGA AGP y VGA PCI Express standby) para PS/2 o USB wake up events. Atenci pins) (ver p.2, N. 19) jumper de 2 pins ASRock 775Dual-VSTA Motherboard 121 - ASRock 775Dual-VSTA | Quick Installation Guide - Page 122
1.5 Gb/s. Cable de datos de serie ATA (SATA) Ambos extremos del cable pueden conectarse al disco duro SATA o la conexión de la placa base. 122 ASRock 775Dual-VSTA Motherboard Español - ASRock 775Dual-VSTA | Quick Installation Guide - Page 123
(9-pin HD_AUDIO1) (vea p.2, No. 24) CD1 Permite recepción de input audio de fuente sónica como CDROM, DVD-ROM TV tuner, o tarjeta MPEG. Este es una interface para cable de audio de panel frontal que permite conexión y control conveniente de apparatos de Audio. ASRock 775Dual-VSTA Motherboard 123 - ASRock 775Dual-VSTA | Quick Installation Guide - Page 124
el cable del ventilador del chasis a este conector y haga coincidir el cable negro con el conector de tierra. Conecte el cable del ventilador de la CPU a este conector y haga coincidir el cable negro con el conector de tierra. Español 124 ASRock 775Dual-VSTA Motherboard - ASRock 775Dual-VSTA | Quick Installation Guide - Page 125
. Conecte después el extremo blanco (B o C) del cable HDMI_SPDIF en el conector HDMI de la tarjeta VGA HDMI. A. Extremo negro B. Extremo blanco (2 patillas) C. Extremo blanco (3 patillas) ASRock 775Dual-VSTA Motherboard 125 Español - ASRock 775Dual-VSTA | Quick Installation Guide - Page 126
VGA HDMI en la ranura de Gráficos PCI Express de esta placa base. Para realizar la instalación manual del usuario del HDTV y la tarjeta VGA HDMI para conocer el procedimiento detallado de conexión. Paso 5. Instale el controlador de la tarjeta VGA HDMI en su sistema. ASRock 775Dual-VSTA Motherboard - ASRock 775Dual-VSTA | Quick Installation Guide - Page 127
Windows® 2000 / Windows® XP / Windows® XP 64 bits / Windows® VistaTM con funciones RAID Si desea instalar el sistema operativo Windows® 2000 / Windows® XP / Windows® XP 64 bits / Windows® y aparecerá una ventana de selección de los dispositivos de ASRock 775Dual-VSTA Motherboard 127 Español - ASRock 775Dual-VSTA | Quick Installation Guide - Page 128
en la carpeta indicada en la siguiente ruta de acceso: .. \ RAID Installation Guide y el documento contenido en el CD de soporte, "Guía de VIA RAID Tool", situado en la carpeta que indica la ruta de acceso siguiente: .. \ VIA RAID Tool Information Español 128 ASRock 775Dual-VSTA Motherboard - ASRock 775Dual-VSTA | Quick Installation Guide - Page 129
ver la frecuencia CPU real en el elemento siguiente. Por lo tanto, CPU FSB no estará restringido durante el overclocking, pero el bus AGP/PCI/PCIE se encontrará en modo fijo de forma que el FSB pueda funcionar en un entorno de overclocking más estable. Español ASRock 775Dual-VSTA Motherboard 129 - ASRock 775Dual-VSTA | Quick Installation Guide - Page 130
los riesgos de daño a la CPU por un uso inadecuado. Para ver esta demo, puede utilizar Microsoft Media Player para reproducir el archivo. Esta demo se encuentra en el CD de soporte de la placa madre, en la siguiente ruta: ..\ MPEGAV \ LGA775INST.DAT Español 130 ASRock 775Dual-VSTA Motherboard
-
 1
1 -
 2
2 -
 3
3 -
 4
4 -
 5
5 -
 6
6 -
 7
7 -
8
-
9
-
10
-
11
-
12
-
13
-
14
-
15
-
16
-
17
-
18
-
19
-
20
-
21
-
22
-
23
-
24
-
25
-
26
-
27
-
28
-
29
-
30
-
31
-
32
-
33
-
34
-
35
-
36
-
37
-
38
-
39
-
40
-
41
-
42
-
43
-
44
-
45
-
46
-
47
-
48
-
49
-
50
-
51
-
52
-
53
-
54
-
55
-
56
-
57
-
58
-
59
-
60
-
61
-
62
-
63
-
64
-
65
-
66
-
67
-
68
-
69
-
70
-
71
-
72
-
73
-
74
-
75
-
76
-
77
-
78
-
79
-
80
-
81
-
82
-
83
-
84
-
85
-
86
-
87
-
88
-
89
-
90
-
91
-
92
-
93
-
94
-
95
-
96
-
97
-
98
-
99
-
100
-
101
-
102
-
103
-
104
-
105
-
106
-
107
-
108
-
109
-
110
-
111
-
112
-
113
-
114
-
115
-
116
-
117
-
118
-
119
-
120
-
121
-
122
-
123
-
124
-
125
-
126
-
127
-
128
-
129
-
130
 |
 |
1
ASRock
775Dual-VSTA
Motherboard
Copyright Notice:
Copyright Notice:
Copyright Notice:
Copyright Notice:
Copyright Notice:
No part of this installation guide may be reproduced, transcribed, transmitted, or
translated in any language, in any form or by any means, except duplication of
documentation by the purchaser for backup purpose, without written consent of
ASRock Inc.
Products and corporate names appearing in this guide may or may not be registered
trademarks or copyrights of their respective companies, and are used only for
identification or explanation and to the owners’ benefit, without intent to infringe.
Disclaimer:
Disclaimer:
Disclaimer:
Disclaimer:
Disclaimer:
Specifications and information contained in this guide are furnished for informational
use only and subject to change without notice, and should not be constructed as a
commitment by ASRock. ASRock assumes no responsibility for any errors or
omissions that may appear in this guide.
With respect to the contents of this guide, ASRock does not provide warranty of any
kind, either expressed or implied, including but not limited to the implied warranties or
conditions of merchantability or fitness for a particular purpose.
In no event shall ASRock, its directors, officers, employees, or agents be liable for
any indirect, special, incidental, or consequential damages (including damages for
loss of profits, loss of business, loss of data, interruption of business and the like),
even if ASRock has been advised of the possibility of such damages arising from any
defect or error in the guide or product.
This device complies with Part 15 of the FCC Rules. Operation is subject to the
following two conditions:
(1)
this device may not cause harmful interference, and
(2)
this device must accept any interference received, including interference that
may cause undesired operation.
ASRock Website: http://www.asrock.com
Published October 2006
Copyright
©
2006 ASRock INC. All rights reserved.
English
English
English
English
English