ASRock 775i65G Quick Installation Guide
ASRock 775i65G Manual
 |
View all ASRock 775i65G manuals
Add to My Manuals
Save this manual to your list of manuals |
ASRock 775i65G manual content summary:
- ASRock 775i65G | Quick Installation Guide - Page 1
guide are furnished for informational use only and subject to change without notice, and should not be constructed as a commitment by ASRock. ASRock " ASRock Website: http://www.asrock.com Published February 2007 Copyright©2007 ASRock INC. All rights reserved. 1 ASRock 775i65G Motherboard English - ASRock 775i65G | Quick Installation Guide - Page 2
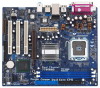
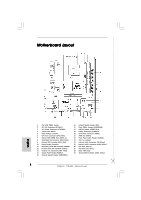
(COM1) 21 AMR Slot (AMR1) 22 Front Panel Audio Header (AUDIO1) 23 JR1 / JL1 Jumpers 24 Internal Audio Connector: CD1 (Black) 25 Internal Audio Connector: AUX1 (White) 26 PCI Slots (PCI1- 3) 27 AGP Slot (1.5V_AGP1) 28 BIOS FWH Chip 29 Shared USB 2.0 Header (USB4_5, Blue) 2 ASRock 775i65G Motherboard - ASRock 775i65G | Quick Installation Guide - Page 3
ASRock I/O PlusTM 1 Parallel Port 2 RJ-45 Port 3 Line In (Light Blue) 4 Line Out (Lime) 5 Microphone (Pink) 6 Shared USB 2.0 Ports (USB45) 7 USB 2.0 Ports (USB01) 8 USB 2.0 Ports (USB23) 9 VGA Port 10 PS/2 Keyboard Port (Purple) 11 PS/2 Mouse Port (Green) English 3 ASRock 775i65G Motherboard - ASRock 775i65G | Quick Installation Guide - Page 4
modifications of this manual occur, the updated version will be available on ASRock website without further notice. You may find the latest VGA cards and CPU support lists on ASRock website as well. ASRock website http://www.asrock.com 1.1 Package Contents ASRock 775i65G Motherboard (Micro ATX Form - ASRock 775i65G | Quick Installation Guide - Page 5
- Speed: 10/100 Ethernet - Supports Wake-On-LAN ASRock I/O PlusTM - 1 x PS/2 Mouse Port - 1 x PS/2 Keyboard Port - 1 x VGA Port - 1 x Parallel Port (ECP/EPP Support) - 6 x Ready-to-Use USB 2.0 Ports - 1 x RJ-45 Port - Audio Jack: Line In / Line Out / Microphone English 5 ASRock 775i65G Motherboard - ASRock 775i65G | Quick Installation Guide - Page 6
- Front panel audio connector - 2 x USB 2.0 headers (support 4 USB 2.0 ports; 2 of them are shared with USB4_5) (see CAUTION 9) - 4Mb AMI BIOS - AMI Legal BIOS - Supports "Plug and Play" - ACPI 1.1 Compliance Wake Up Events - Supports jumperfree - SMBIOS 2.3.1 Support - Drivers, Utilities, AntiVirus - ASRock 775i65G | Quick Installation Guide - Page 7
AGP VGA card into AGP slot. Besides, if you use a FSB1066-CPU on this motherboard, please adopt a DDR400 CL2.5 memory module. 2. About the setting of "Hyper Threading Technology", please check page 25 of "User Manual" in the support CD. 3. This motherboard supports Untied Overclocking Technology - ASRock 775i65G | Quick Installation Guide - Page 8
Before you insert the 775-LAND CPU into the socket, please check if the CPU surface is unclean or if there is any bent pin on the socket. Do not force to insert the CPU into the socket if above situation is found. Otherwise, the CPU will be seriously damaged. 8 ASRock 775i65G Motherboard English - ASRock 775i65G | Quick Installation Guide - Page 9
orient keys. Step 3. Remove PnP Cap (Pick and Place Cap): Use your left hand index finger and thumb to support the load plate edge, engage PnP cap with right hand thumb and peel the cap from the socket while pressing on center of PnP cap to assist in removal. 9 ASRock 775i65G Motherboard English - ASRock 775i65G | Quick Installation Guide - Page 10
them clockwise, the heatsink cannot be secured on the motherboard. Step 5. Connect fan header with the CPU fan connector on the motherboard. Step 6. Secure excess cable with tie-wrap to ensure cable does not interfere with fan operation or contact other components. 10 ASRock 775i65G Motherboard - ASRock 775i65G | Quick Installation Guide - Page 11
of Memory Modules (DIMM) This motherboard provides two 184-pin DDR (Double Data Rate) DIMM slots, and supports Dual Channel Memory Technology. For dual channel configuration, you always need to install two identical (the same brand, speed, size and chip-type) memory modules in the DDR DIMM slots to - ASRock 775i65G | Quick Installation Guide - Page 12
2.4 Expansion Slots (PCI, AGP and AMR Slots) There are 3 PCI slots, 1 AGP slot, and 1 AMR slot on this motherboard. PCI slots: The PCI slots are used to install expansion cards that have the 32-bit PCI interface. AGP slot: The AGP slot is used to install a graphics card. The ASRock AGP slot has a - ASRock 775i65G | Quick Installation Guide - Page 13
the system parameters to default setup, please turn off the computer and unplug the power cord from the power supply. After waiting for 15 seconds, use a jumper cap to short 2 pins on CLRCMOS0 for 5 seconds. English 13 ASRock 775i65G Motherboard - ASRock 775i65G | Quick Installation Guide - Page 14
use only one IDE device on this motherboard, please set the IDE device as "Master". Please refer to the instruction 11) SATA2 SATA1 These two Serial ATA (SATA) connectors support SATA data cables for internal storage devices. The current SATA motherboard. English 14 ASRock 775i65G Motherboard - ASRock 775i65G | Quick Installation Guide - Page 15
from sound sources such as a CD-ROM, DVD-ROM, TV tuner card, or MPEG card. Front Panel AC'97 Audio Header (8-pin AUDIO1) (see p.2 No. 22) This is an interface for the front panel audio cable that allows convenient connection and control of audio devices. English 15 ASRock 775i65G Motherboard - ASRock 775i65G | Quick Installation Guide - Page 16
wire to the ground pin. Though this motherboard provides 4-Pin CPU fan (Quiet Fan) support, the 3-Pin CPU fan still can work successfully even without the fan speed control function. If you plan to connect the 3-Pin CPU fan to the CPU fan connector on this motherboard, please connect it to Pin - ASRock 775i65G | Quick Installation Guide - Page 17
the OnBoard IDE Operate Mode option in BIOS setup is correct according to the condition of your system. For the configuration details, please refer to the instruction on page 29 of "User Manual" in the support CD. 2.8 Driver Installation Guide To install the drivers to your system, please insert the - ASRock 775i65G | Quick Installation Guide - Page 18
refer to the User Manual (PDF file) contained in the Support CD. 4. Software Support CD information This motherboard supports various Microsoft® Windows® operating systems: 98 SE / ME / 2000 / XP. The Support CD that came with the motherboard contains necessary drivers and useful utilities that will - ASRock 775i65G | Quick Installation Guide - Page 19
ützten CPUs sind auch auf der ASRock-Website aufgelistet. ASRock-Website: http://www.asrock.com 1.1 Kartoninhalt ASRock 775i65G Motherboard (Micro ATX-Formfaktor: 24.4 cm x 20.3 cm; 9.6 Zoll x 8.0 Zoll) ASRock 775i65G Schnellinstallationsanleitung ASRock 775i65G Support-CD Ein 80-adriges Ultra-ATA - ASRock 775i65G | Quick Installation Guide - Page 20
E/A-Anschlüsse ASRock I/O PlusTM an der - 1 x PS/2 Mouse Port Rückseite - 1 x PS/2 Keyboard Port - 1 x VGA Port - 1 x Parallel Port (ECP/EPP Support) - 6 x Ready-to-Use USB 2.0 Ports - 1 x RJ-45 Port - Audioanschlüsse: Line In / Line Out / Mikrofon 20 ASRock 775i65G Motherboard Deutsch - ASRock 775i65G | Quick Installation Guide - Page 21
CPU/Gehäuse-Lüfteranschluss - 20-pin ATX-Netz-Header - 4-pin anschluss für 12V-ATX-Netzteil - Interne Audio-Anschlüsse - Anschluss für Audio auf der Gehäusevorderseite - 2 x USB 2.0-Anschlüsse (Unterstützt 4 USB 2.0-Ports Overclocking verursacht wurden. Deutsch 21 ASRock 775i65G Motherboard - ASRock 775i65G | Quick Installation Guide - Page 22
den AGP-Steckplatz dieses Motherboards! Permanente Beschädigung könnte die Folge sein! 9. Das Power Management für USB 2.0 arbeitet unter Microsoft® Windows® XP SP1 oder SP2/2000 SP4 einwandfrei. Unter Microsoft® Windows® 98/ ME könnte es dagegen zu Störungen kommen. Deutsch 22 ASRock 775i65G - ASRock 775i65G | Quick Installation Guide - Page 23
(Sockel) 775-Pin Sockel Übersicht Bevor Sie die 775-Pin CPU in den Sockel sitzen, prüfen Sie bitte, ob die CPU-Oberfläche sauber ist und keine der Kontakte verbogen sind. Setzen Sie die CPU nicht mit Gewalt in den Sockel, dies kann die CPU schwer beschädigen. Deutsch 23 ASRock 775i65G Motherboard - ASRock 775i65G | Quick Installation Guide - Page 24
Orientierungskerbe 775-Pin Sockel 775-Pin CPU Um die CPU ordnungsgemäß einsetzen zu können, richten Sie die zwei Orientierungskerben der CPU mit den beiden Markierungen des Sockels aus. Schritt 2-3. Drücken Sie die CPU vorsichtig in vertikaler Richtung in den Sockel. 24 ASRock 775i65G Motherboard - ASRock 775i65G | Quick Installation Guide - Page 25
Schritt 2-4. Prüfen Sie, dass die CPU ordnungsgemäß im Sockel sitzt und die Orientierungskerben einwandfrei in den entsprechenden Auskerbungen sitzen. Schritt en Sie den Ladehebel. Schritt 4-3. Sichern Sie Ladehebel und Ladeplatte mithilfe des Hebelverschlusses. 25 ASRock 775i65G Motherboard Deutsch - ASRock 775i65G | Quick Installation Guide - Page 26
nicht ordnungsgemäß am Motherboard befestigt. Schritt 5. Schließen Sie den Lüfter an den CPULüfteranschluss des Motherboards. Schritt 6. Befestigen Sie überschüssiges Kabel mit Band, um eine Störung des Lüfters oder Kontakt mit anderen Teilen zu vermeiden. Deutsch 26 ASRock 775i65G Motherboard - ASRock 775i65G | Quick Installation Guide - Page 27
Clips nach außen drücken. Richten Sie das DIMM-Modul so über dem Slot aus, dass das Modul mit der Kerbe in den Slot passt. Deutsch Die DIMM-Module passen nur richtig herum eingelegt in die Steckplätze. einschnappen und das DIMM-Modul fest an Ort und Stelle sitzt. 27 ASRock 775i65G Motherboard - ASRock 775i65G | Quick Installation Guide - Page 28
-, AGP-, und AMR-Slots): Es stehen 3 PCI-, 1 AGP-, und 1 AMR-Slot auf dem 775i65G Motherboard zur Verfügung. PCI-Slots: PCI-Slots werden zur Installation von Erweiterungskarten mit dem 32bit PCI-Interface genutzt. AGP-Slot: Der AGP-Steckplatz dient zur Installation einer Grafikkarte. Der ASRock AGP - ASRock 775i65G | Quick Installation Guide - Page 29
Gebrückt Offen Jumper Einstellun Beschreibung PS2_USB_PWR1 Überbrücken Sie Pin2, Pin3, um (siehe S.2 - Nr. 1) +5VSB (Standby) zu setzen und die PS/2 oder USB- Weckfunktionen zu überbrücken Sie 2-pin von CLRCMOS0 mithilfe des Jumpers für 5 Sekunden. Deutsch 29 ASRock 775i65G Motherboard - ASRock 775i65G | Quick Installation Guide - Page 30
Anschlüsse sind KEINE Jumper. Setzen Sie KEINE Jumperkappen auf diese Header und Anschlüsse. Wenn Sie Jumperkappen auf Header und Anschlüsse setzen, wird das Motherboard unreparierbar beschädigt! ermöglicht eine Datenübertragungsrate bis 1,5 Gb/s. Deutsch 30 ASRock 775i65G Motherboard - ASRock 775i65G | Quick Installation Guide - Page 31
des vorseitigen USBKabels mit diesem Header (USB4_5) werden die USBAnschlüsse 4,5 auf ASRock I/O Plus™ nicht funktionieren. Anschluss für Infrarot-Modul (5-Pin IR1) (siehe S.2 - No. 16) Dieser Anschluss unterstützt einen optionalen InfrarotSender/Empfänger. Deutsch 31 ASRock 775i65G Motherboard - ASRock 775i65G | Quick Installation Guide - Page 32
mit diesem Anschluss und passen Sie den schwarzen Draht dem Erdungsstift an. CPU-Lüfteranschluss (4-pin CPU_FAN1) 1 2 (siehe S.2 - No. 6) 3 4 Verbinden Sie das CPU Lüfterkabel mit diesem Anschluss und passen Sie den schwarzen Draht dem Erdungsstift an. 32 ASRock 775i65G Motherboard - ASRock 775i65G | Quick Installation Guide - Page 33
angeschlossen werden; auch ohne Geschwindigkeitsregulierung. Wenn Sie einen dreipoligen CPU-Lüfter an den CPU-Lüferanschluss dieses Motherboards anschließen möchten, verbinden Sie ihn bitte mit den wird verwendet, um ein COM-Anschlussmodul zu unterstützen. Deutsch 33 ASRock 775i65G Motherboard - ASRock 775i65G | Quick Installation Guide - Page 34
Festplatteninstallation Auf diesem Motherboard befindet sich das Intel® ICH5 South Bridge-Chipset, das Seriell-ATA BIOS-Setup entsprechend den Bedingungen Ihres Systems richtig ist. Konfigurationsdetails finden Sie auf Seite 29 des Benutzerhandbuchs auf der Support ASRock 775i65G Motherboard Deutsch - ASRock 775i65G | Quick Installation Guide - Page 35
detaillierte Informationen zum BIOS-Setup, siehe bitte das Benutzerhandbuch (PDF Datei) auf der Support CD. 4. Software Support CD information Dieses Motherboard unterstützt eine Reiche von Microsoft® Windows® Betriebssystemen: 98 SE / ME / 2000 / XP. Die Ihrem Motherboard beigefügte Support-CD enth - ASRock 775i65G | Quick Installation Guide - Page 36
les listes de prise en charge des cartes VGA et CPU également sur le site Web ASRock. Site web ASRock, http://www.asrock.com 1.1 Contenu du paquet Carte mère ASRock 775i65G (Facteur de forme Micro ATX : 9.6 pouces x 8.0 pouces, 24.4 cm x 20.3 cm) Guide d'installation rapide ASRock 775i65G CD - ASRock 775i65G | Quick Installation Guide - Page 37
8.0 - mémoire partagée max 96 MB - Cmedia 9761A 5.1 canaux audio - Realtek PCI LAN 8101L - Vitesse: 10/100 Ethernet - Support du Wake-On-LAN ASRock I/O PlusTM - 1 x port souris PS/2 - 1 x port clavier PS/2 - 1 x port VGA - 1 x port parallèle: Support ECP/EPP Français 37 ASRock 775i65G Motherboard - ASRock 775i65G | Quick Installation Guide - Page 38
- Mesure de température de la carte mère - Tachéomètre ventilateur CPU - Tachéomètre ventilateur châssis - Ventilateur silencieux d'unité centrale - Monitoring de la tension: +12V, +5V, +3.3V, Vcore - Microsoft® Windows® 98SE / ME / 2000 / XP - FCC, CE, WHQL Français 38 ASRock 775i65G Motherboard - ASRock 775i65G | Quick Installation Guide - Page 39
. Nous ne sommes pas responsables des dommages possibles causés par l'overclocking. ATTENTION! 1. FSB1066-CPU n'est pris en charge que lorsque vous installez la carte AGP VGA dans le slot AGP. En outre, si vous utilisez FSB1066-CPU sur cette carte mère, veuillez adopter le module de mémoire - ASRock 775i65G | Quick Installation Guide - Page 40
4. A chaque désinstallation de composant, placez-le sur un support antistatique ou dans son sachet d'origine. 5. Lorsque vous placez les risquez sinon d'endommager la carte mère. 2.1 Installation du CPU Pour l'installation du processeur Intel 775 (Plaque de chargement) ASRock 775i65G Motherboard - ASRock 775i65G | Quick Installation Guide - Page 41
de votre main droite, et enlevez le capuchon du socle tout en appuyant sur le centre du capuchon PnP pour vous aider. Français 41 ASRock 775i65G Motherboard - ASRock 775i65G | Quick Installation Guide - Page 42
Ce capuchon doit être mis en place si vous renvoyez la carte mère pour service après vente. Etape 4. Refermez le socle : Etape 4-1. Faites pivoter la plaque , veuillez vous reporter aux manuels d'instructions de votre ventilateur de processeur et autres attaches. 42 ASRock 775i65G Motherboard - ASRock 775i65G | Quick Installation Guide - Page 43
DIMM) La carte mère 775i65G possède deux emplacements DIMM DDR (Double Débit de données) 184 broches, et prend en charge la technologie Dual Channel Memory. Pour la configuration Double canal, vous devez les encoches du module DIMM aux trous du connecteur. Français 43 ASRock 775i65G Motherboard - ASRock 775i65G | Quick Installation Guide - Page 44
AGP, et AMR) IIl y a 3 slots PCI, 1 slot AGP, et 1 slot AMR sur les cartes mères 775i65G. Slots PCI: Les slots PCI sont utilisés pour installer des cartes d'extension dotées d'une interface PCI 32 bits. Slot AGP: Le slot AGP est utilisé pour installer une carte graphique. Le slot AGP ASRock utilise - ASRock 775i65G | Quick Installation Guide - Page 45
dont USB les connecteurs audio du panneau avant configuration par défaut, veuillez mettre l'ordinateur hors tension et débrancher le cordon d'alimentation, puis utilisez un capuchon de cavalier pour court-circuiter la 2 broches sur CLRCMOS0 pendant 5 secondes. Français 45 ASRock 775i65G Motherboard - ASRock 775i65G | Quick Installation Guide - Page 46
seulement un périphérique IDE sur cette carte mère, veuillez configurer le périphérique IDE comme "Maître". Veuillez vous reporter aux instructions du fabricant de votre IDE périphérique pour les détails. de données pouvant aller jusqu'à 1,5 Go/s. Français 46 ASRock 775i65G Motherboard - ASRock 775i65G | Quick Installation Guide - Page 47
USB du panneau frontal à cet en-tête (USB4_5), les ports USB 4 et 5 sur ASRock I/O Plus™ ne pourront pas fonctionner. Connecteur module infrarouge (IR1 br. 5) (voir p.2 No. 16) Ce connecteur gère un module en option d'émission/réception sans fil infrarouge. Français 47 ASRock 775i65G Motherboard - ASRock 775i65G | Quick Installation Guide - Page 48
ériques audio. 1. + 5VA n'est utilisé que pour l'alimentation audio, veuillez ne pas la brancher à toute autre alimentation, tel que l'USB. 2. Le panneau frontal audio HD (Azalia) et le panneau frontal audio AC' et brancher le fil noir sur la broche de terre. 48 ASRock 775i65G Motherboard - ASRock 775i65G | Quick Installation Guide - Page 49
12V sur ce connecteur afin d'avoir une alimentation suffisante. Faute de quoi, il ne sera pas possible de mettre sous tension. Cette en-tête de port COM est utilisée pour prendre en charge un module de port COM. Français 49 ASRock 775i65G Motherboard - ASRock 775i65G | Quick Installation Guide - Page 50
"OnBoard IDE Operate Mode" dans la configuration du BIOS en fonction de l'état de votre système. Pour les détails de la configuration, veuillez vous reporter aux instructions à la page 29 du "Manuel de l'utilisateur" sur le CD d'assistance. 2.8 Guide d'installation des pilotes Pour installer les - ASRock 775i65G | Quick Installation Guide - Page 51
BIOS, veuillez consulter le Guide de l'utilisateur (fichier PDF) dans le CD technique. 4. Informations sur le CD de support Cette carte mère supporte divers systèmes d'exploitation Microsoft® Windows®: 98 SE / ME / 2000 / XP dessus pour afficher les menus. 51 ASRock 775i65G Motherboard Français - ASRock 775i65G | Quick Installation Guide - Page 52
manuale sia modificato, la versione aggiornata sarà disponibile sul sito di ASRock senza altro avviso. Sul sito ASRock si possono anche trovare le più recenti schede VGA e gli elenchi di CPU supportate. ASRock website http://www.asrock.com 1.1 Contenuto della confezione Scheda madre ASRock 775i65G - ASRock 775i65G | Quick Installation Guide - Page 53
Pannello ASRock I/O PlusTM posteriore I/O - 1 x porta PS/2 per mouse - 1 x porta PS/2 per tastiera - 1 x Porta VGA - 1 x Porta parallela: supporto ECP/EPP - 6 x porte USB 2.0 già integrate - 1 x Porta RJ-45 - Audio Jack: Line In / Line Out / Microfono 53 ASRock 775i65G Motherboard Italiano - ASRock 775i65G | Quick Installation Guide - Page 54
del processore - Indicatore di velocità per la ventola di raffreddamento - Ventola CPU silenziosa - Voltaggio: +12V, +5V, +3.3V, Vcore Compatibi- - Microsoft® Windows® 98SE / ME / 2000 / XP lità SO Certificazioni- FCC, CE, WHQL AVVISO Si prega di prendere atto che la procedura di overclocking - ASRock 775i65G | Quick Installation Guide - Page 55
da 3,3 V nello slot AGP di questa motherboard! Ciò potrebbe provocare danni permanenti! 9. La Gestione Risorse per USB 2.0 funziona perfettamente con Microsoft® Windows® XP SP1; SP2/2000 SP4. Potrebbe dare qualche problema con Microsoft® Windows® 98/ME. Italiano 55 ASRock 775i65G Motherboard - ASRock 775i65G | Quick Installation Guide - Page 56
componente. 5. Nell'usare i giraviti per fissare la scheda madre al telaio non serrare eccessivamente le viti! Altrimenti si rischia di danneggiare la scheda madre. 56 ASRock 775i65G Motherboard Italiano - ASRock 775i65G | Quick Installation Guide - Page 57
135 gradi la leva di carico per aprirla completamente. Fase 1-3. Ruotare di circa 100 gradi la piastra di carico per aprirla completamente. Fase 2. Inserire la CPU 775-Pin: Fase 2-1. Tenere la CPU dai bordi segnati con linee nere. Linea nera Linea nera Italiano 57 ASRock 775i65G Motherboard - ASRock 775i65G | Quick Installation Guide - Page 58
. Pin1 Dente di orientamento Pin1 Dente di Tacca di allineamento orientamento Tacca di allineamento CPU da 775-Pin Socket da 775-Pin Per il corretto inserimento, verificare di far combaciare di carico mentre si preme leggermente sulla piastra di carico. 58 ASRock 775i65G Motherboard - ASRock 775i65G | Quick Installation Guide - Page 59
di alimentazione della ventola al connettore ventola della CPU sulla scheda madre. Fase 6. fissare il cavo in eccesso con fascette per assicurare che il cavo non interferisca con il funzionamento della ventola o che venga a contatto con gli altri componenti. 59 ASRock 775i65G Motherboard Italiano - ASRock 775i65G | Quick Installation Guide - Page 60
2.3 Installazione dei moduli di memoria (DIMM) La motherboard 775i65G dispone di due slot DIMM DDR (Double Data Rate) a 184 pin e supporta la tecnologia Dual Channel Memory. Per attivare la configurazione Dual Channel Memory bisogna installare sempre due moduli di memoria identici (stessa marca, - ASRock 775i65G | Quick Installation Guide - Page 61
(Slot PCI, Slot AGP, e Slot AMR) Esistono 3 slot PCI, 1 slot AGP, e 1 slot AMR su entrambe le schede madri 775i65G. Slot PCI: Sono utilizzati per installare schede di espansione con Interfaccia PCI a 32-bit. Slot AGP: Lo slot AGP serve all'installazione di schede grafiche. Lo slot AGP ASRock usa - ASRock 775i65G | Quick Installation Guide - Page 62
d'impostazione del sistema. Per azzerare e ripristinare i parametri di sistema all'impostazione predefinita, spegnere il computer e scollegare il cavo d'alimentazione: utilizzare un cappuccio jumper per cortocircuitare i 2 pin su CLRCMOS0 per 5 secondi. Italiano 62 ASRock 775i65G Motherboard - ASRock 775i65G | Quick Installation Guide - Page 63
connettori su scheda NON sono dei jumper. NON installare cappucci per jumper su questi collettori e connettori. L'installazione di cappucci per jumper su questi collettori e connettori provocher attuale permette velocità di trasferimento dati fino a 1.5 Gb/s. Italiano 63 ASRock 775i65G Motherboard - ASRock 775i65G | Quick Installation Guide - Page 64
a questo collettore (USB4_5), le porte 4 e 5 su ASRock I/O Plus™ non saranno in grado di funzionare. Connettore modulo infrarossi (5-pin IR1) (vedi p.2 Nr. 16) Questo connettore supporta una wireless opzionale che trasmette e riceve moduli infrarossi. Italiano 64 ASRock 775i65G Motherboard - ASRock 775i65G | Quick Installation Guide - Page 65
del telaio a questo collettore. Collegare il cavo della ventolina telaio a questo connettore e far combaciare il filo nero al pin terra. Collegare il cavo della ventolina CPU a questo connettore e far combaciare il filo nero al pin terra. 65 ASRock 775i65G Motherboard Italiano - ASRock 775i65G | Quick Installation Guide - Page 66
della velocità della ventola. Se si intende collegare la ventola CPU a 3 piedini al connettore della ventola CPU su questa scheda madre, collegarla ai piedini 1-3. Piedini 1-3 collegati collettore porta COM è utilizzato per supportare il modulo porta COM. Italiano 66 ASRock 775i65G Motherboard - ASRock 775i65G | Quick Installation Guide - Page 67
controllare nella configurazione del BIOS che la configurazione della modalit driver del CD in dotazione. Per l'installazione dei driver necessari, procedere in base ad un ordine dall'alto verso il basso. In tal modo, i driver installati funzioneranno correttamente. 67 ASRock 775i65G Motherboard - ASRock 775i65G | Quick Installation Guide - Page 68
del BIOS, fare riferimento al Manuale dell'Utente (PDF file) contenuto nel cd di supporto. 4. Software di supporto e informazioni su CD Questa scheda madre supporta vari sistemi operativi Microsoft® Windows®: 98 SE / ME / 2000 / XP. Il CD di supporto a corredo della scheda madre contiene i driver - ASRock 775i65G | Quick Installation Guide - Page 69
de este manual, la versión actualizada estará disponible en el website de ASRock sin previo aviso. También encontrará las listas de las últimas tarjetas VGA y CPU soportadas en la página web de ASRock. Website de ASRock http://www.asrock.com 1.1 Contenido de la caja Placa base ASRock 775i65G (Factor - ASRock 775i65G | Quick Installation Guide - Page 70
2GB - Stepless control de frecuencia de CPU (vea ATENCIÓN 6) - ASRock U-COP (vea ATENCIÓN 7) - Protección de Falla de Inicio (B.F.G..) - 3 x ranuras PCI - 1 x slot AGP, soporta tarjeta AGP de 1.5V, 8X / 4X (ver ATENCIÓN 8) - 1 x slot AMR - Intel® Extreme Graphics 2 Integrado - VGA DirectX 8.0 - 96MB - ASRock 775i65G | Quick Installation Guide - Page 71
procesador - Taquímetros de los ventiladores del procesador y del chasis - Ventilador silencioso para procesador - Monitor de Voltaje: +12V, +5V, +3.3V, Vcore - En conformidad con Microsoft® Windows® 98SE / ME / 2000 / XP - FCC, CE, WHQL Español 71 ASRock 775i65G Motherboard - ASRock 775i65G | Quick Installation Guide - Page 72
tarjeta AGP de 3,3V AGP en la ranura AGP de esta placa base. Podría causar daños permanentes. 9. Power Management para USB 2.0 funciona bien bajo Microsoft® Windows® XP SP1; SP2/2000 SP4. Es posible que no funcione propiamente bajo Microsoft® Windows® 98/ME. 72 ASRock 775i65G Motherboard Espa - ASRock 775i65G | Quick Installation Guide - Page 73
demasiado. Eso podría dañar la placa madre. 2.1 Instalación de Procesador Para la instalación de la CPU Intel de (Placa de carga) 775 agujas, siga los siguientes pasos. (Matriz de contacto) (Cuerpo del socket) Introducción al socket de 775 agujas Español 73 ASRock 775i65G Motherboard - ASRock 775i65G | Quick Installation Guide - Page 74
de orientación Muesca de orientación aguja 1 Tecla de alineación Tecla de alineación CPU de 775 agujas Socket de 775 agujas Para insertarla correctamente, asegúrese de que las dos muescas de orientación de la CPU coinciden con las teclas de alineación del socket. 74 ASRock 775i65G Motherboard - ASRock 775i65G | Quick Installation Guide - Page 75
disipador de la CPU. A continuación se ofrece un ejemplo para ilustrar la instalación del disipador para la CPU de 775 agujas. (Aplique el material termal de interfaz) Paso 1. Aplique el material termal de interfaz en el centro del IHS de la superficie del socket. 75 ASRock 775i65G Motherboard - ASRock 775i65G | Quick Installation Guide - Page 76
del conector del ventilador de la CPU en la placa madre (CPU_FAN1, CPU en la placa madre. Fije el cable que sobre con un lazo para asegurarse de que el cable no interfiere en el funcionamiento del ventilador y tampoco entra en contacto con otros componentes. Español 76 ASRock 775i65G Motherboard - ASRock 775i65G | Quick Installation Guide - Page 77
2.3 Instalación de Memoria La placa base 775i65G proporciona dos ranuras DIMM DDR (Double Data Rate, es decir, Tasa doble de datos) de 184 contactos y ón de ambos lados queden completamente introducidos en su sitio y la DIMM se haya asentado apropiadamente. 77 ASRock 775i65G Motherboard Español - ASRock 775i65G | Quick Installation Guide - Page 78
para la tarjeta antes de iniciar la instalación. Paso 2. Quite la tapa que corresponde a la slot que desea utilizar. Paso 3. Encaje el conector de la tarjeta a la slot. Empuje firmemente la tarjeta en la slot. Paso 4. Asegure la tarjeta con tornillos. 78 ASRock 775i65G Motherboard Español - ASRock 775i65G | Quick Installation Guide - Page 79
borrar y restablecer los parámetros del sistema a su valor predeterminado, apague el equipo y desenchúfelo de la toma de corriente. A continuación, utilice una cubierta de jumper para aislar las agujas 2 pins en CLRCMOS0 durante 5 segundos. Español 79 ASRock 775i65G Motherboard - ASRock 775i65G | Quick Installation Guide - Page 80
/s. Cable de datos de serie ATA (SATA) (Opcional) Ambos extremos del cable pueden conectarse al disco duro SATA o la conexión de la placa base. 80 ASRock 775i65G Motherboard Español - ASRock 775i65G | Quick Installation Guide - Page 81
módulo Infrared de transmisión y recepción wireless. Conector de audio interno (4-pin CD1, 4-pin AUX1) (CD1: ver p.2, N. 24) (AUX1: ver p.2, N. 25) AUX1 CD1 Permite recepción de input audio de fuente sónica como CDROM, DVD-ROM TV tuner, o tarjeta MPEG. Español 81 ASRock 775i65G Motherboard - ASRock 775i65G | Quick Installation Guide - Page 82
control de velocidad del ventilador. Si pretende enchufar el ventilador de procesador de 3 contactos en el conector del ventilador de procesador de esta placa base, conéctelo al contacto 1-3. Contacto 1-3 conectado Instalación del ventilador de 3 contactos 82 ASRock 775i65G Motherboard Espa - ASRock 775i65G | Quick Installation Guide - Page 83
electricidad. De lo contrario no se podrá encender. Este cabezal del puerto COM se utiliza para admitir un módulo de puerto COM. Español 83 ASRock 775i65G Motherboard - ASRock 775i65G | Quick Installation Guide - Page 84
Esta placa base acepta el chipset Intel® ICH5 south bridge de la opción "OnBoard IDE Operate Mode" en la BIOS está correcta según la condición de su sistema. Para las instrucciones que aparecen en la página 29 del "Manual del usuario" en el CD de soporte. 2.8 Guía ASRock 775i65G Motherboard Español - ASRock 775i65G | Quick Installation Guide - Page 85
la BIOS, por favor refiérase al Manual del Usuario (archivo PDF) contenido en el CD. 4.Información de Software Support CD Esta placa-base soporta diversos tipos de sistema operativo Windows®: 98SE / ME / 2000 / XP El CD de instalación que acompaña la placa-base trae todos los drivers y programas
-
 1
1 -
 2
2 -
 3
3 -
 4
4 -
 5
5 -
 6
6 -
 7
7 -
8
-
9
-
10
-
11
-
12
-
13
-
14
-
15
-
16
-
17
-
18
-
19
-
20
-
21
-
22
-
23
-
24
-
25
-
26
-
27
-
28
-
29
-
30
-
31
-
32
-
33
-
34
-
35
-
36
-
37
-
38
-
39
-
40
-
41
-
42
-
43
-
44
-
45
-
46
-
47
-
48
-
49
-
50
-
51
-
52
-
53
-
54
-
55
-
56
-
57
-
58
-
59
-
60
-
61
-
62
-
63
-
64
-
65
-
66
-
67
-
68
-
69
-
70
-
71
-
72
-
73
-
74
-
75
-
76
-
77
-
78
-
79
-
80
-
81
-
82
-
83
-
84
-
85
 |
 |
1
ASRock
775i65G
Motherboard
English
English
English
English
English
Copyright Notice:
Copyright Notice:
Copyright Notice:
Copyright Notice:
Copyright Notice:
No part of this installation guide may be reproduced, transcribed, transmitted, or trans-
lated in any language, in any form or by any means, except duplication of documen-
tation by the purchaser for backup purpose, without written consent of ASRock Inc.
Products and corporate names appearing in this guide may or may not be registered
trademarks or copyrights of their respective companies, and are used only for identifica-
tion or explanation and to the owners’ benefit, without intent to infringe.
Disclaimer:
Disclaimer:
Disclaimer:
Disclaimer:
Disclaimer:
Specifications and information contained in this guide are furnished for informational
use only and subject to change without notice, and should not be constructed as a
commitment by ASRock. ASRock assumes no responsibility for any errors or omissions
that may appear in this guide.
With respect to the contents of this guide, ASRock does not provide warranty of any kind,
either expressed or implied, including but not limited to the implied warranties or
conditions of merchantability or fitness for a particular purpose. In no event shall
ASRock, its directors, officers, employees, or agents be liable for any indirect, special,
incidental, or consequential damages (including damages for loss of profits, loss of
business, loss of data, interruption of business and the like), even if ASRock has been
advised of the possibility of such damages arising from any defect or error in the guide
or product.
This device complies with Part 15 of the FCC Rules. Operation is subject to the
following two conditions:
(1)
this device may not cause harmful interference, and
(2)
this device must accept any interference received, including interference that
may cause undesired operation.
Published February 2007
Copyright
©
2007 ASRock INC. All rights reserved.
CALIFORNIA, USA ONLY
The Lithium battery adopted on this motherboard contains Perchlorate, a toxic
substance controlled in Perchlorate Best Management Practices (BMP) regulations
passed by the California Legislature. When you discard the Lithium battery in
California, USA, please follow the related regulations in advance.
“Perchlorate Material-special handling may apply, see
www
.dtsc.ca.gov/hazardouswa
ste/perchlorate”
ASRock Website: http://www.asrock.com