ASRock 870iCafe Quick Installation Guide
ASRock 870iCafe Manual
 |
View all ASRock 870iCafe manuals
Add to My Manuals
Save this manual to your list of manuals |
ASRock 870iCafe manual content summary:
- ASRock 870iCafe | Quick Installation Guide - Page 1
' benefit, without intent to infringe. Disclaimer: Specifications and information contained in this guide are furnished for informational use only and subject ASRock Website: http://www.asrock.com Published August 2010 Copyright©2010 ASRock INC. All rights reserved. 1 ASRock 870iCafe Motherboard - ASRock 870iCafe | Quick Installation Guide - Page 2
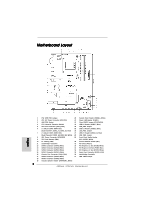
Motherboard Layout English 1 PS2_USB_PW1 Jumper 20 System Panel Header (PANEL1, White) 2 ATX 12V Power Connector (ATX12V1) 21 Power LED Header (PLED1) 3 AM3 CPU Socket 22 Clear CMOS Jumper (CLRCMOS1) 4 CPU Heatsink Retention Module 23 USB 2.0 Header (USB6_7, Blue) 5 CPU Fan Connector ( - ASRock 870iCafe | Quick Installation Guide - Page 3
"Stereo". Click "Device advanced settings", choose "Make front and rear output devices playbacks two different audio streams simultaneously", and click "ok". Then reboot your system. 3 ASRock 870iCafe Motherboard English - ASRock 870iCafe | Quick Installation Guide - Page 4
guide to BIOS setup and information of the Support CD. Because the motherboard specifications and the BIOS software might be updated, the content of this manual will be subject to change without notice. In case any modifications of this manual occur, the updated version will be available on ASRock - ASRock 870iCafe | Quick Installation Guide - Page 5
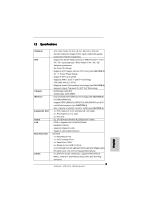
1.2 Specifications Platform CPU Chipset Memory Expansion Slot Audio LAN Rear Panel I/O SATA3 - ATX Form Factor: 12.0-in x 8.2-in, 30.5 cm x 20.8 cm - All Solid Capacitor design (100% Japan-made high-quality Conductive Polymer Capacitors) - Support for Socket AM3 processors: AMD PhenomTM II X6 / X4 - ASRock 870iCafe | Quick Installation Guide - Page 6
Monitoring: +12V, +5V, +3.3V, Vcore OS - Microsoft® Windows® 7 / 7 64-bit / VistaTM / VistaTM 64-bit / XP / XP 64-bit compliant Certifications - FCC, CE, Microsoft® WHQL Certificated - ErP/EuP Ready (ErP/EuP ready power supply is required) (see CAUTION 14) 6 ASRock 870iCafe Motherboard - ASRock 870iCafe | Quick Installation Guide - Page 7
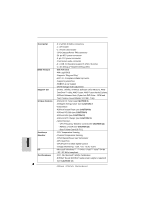
can enjoy the upgrade CPU performance with a better price. Please be noted that UCC feature is supported with AM3 CPU only, and in addition, not every AM3 CPU can support this function because some CPU's hidden core may be malfunctioned. 2. This motherboard supports Untied Overclocking Technology - ASRock 870iCafe | Quick Installation Guide - Page 8
the exciting motion controlled games. Also, please do not forget to pay attention to ASRock official website regularly, we will continuously provide you the most up-do-date supported games! ASRock website: http://www.asrock.com/Feature/Aiwi/index.asp 8 ASRock 870iCafe Motherboard English - ASRock 870iCafe | Quick Installation Guide - Page 9
driver, it makes your iPhone charged much quickly from your computer and up to 40% faster than before. ASRock APP Charger allows you to quickly charge many Apple devices simultaneously and even supports with the power supply manufacturer for more details. 9 ASRock 870iCafe Motherboard English - ASRock 870iCafe | Quick Installation Guide - Page 10
wall socket before touching any component. 2. To avoid damaging the motherboard components due to static electricity, NEVER place your motherboard the motherboard to the chassis, please do not over-tighten the screws! Doing so may damage the motherboard. 10 ASRock 870iCafe Motherboard English - ASRock 870iCafe | Quick Installation Guide - Page 11
the heatsink are securely fastened and in good contact with each other. Then connect the CPU fan to the CPU FAN connector (CPU_FAN1, see Page 2, No. 5). For proper installation, please kindly refer to the instruction manuals of the CPU fan and the heatsink. English 11 ASRock 870iCafe Motherboard - ASRock 870iCafe | Quick Installation Guide - Page 12
This motherboard provides four 240-pin DDR3 (Double Data Rate 3) DIMM slots, and supports motherboard and DIMM may be damaged. 5. If you adopt DDR3 1800/1600 memory modules on this motherboard, it is recommended to install them on DDR3_A2 and DDR3_B2 slots. English 12 ASRock 870iCafe Motherboard - ASRock 870iCafe | Quick Installation Guide - Page 13
cause permanent damage to the motherboard and the DIMM if you force the DIMM into the slot at incorrect orientation. Step 3. Firmly insert the DIMM into the slot until the retaining clips at both ends fully snap back in place and the DIMM is properly seated. 13 ASRock 870iCafe Motherboard English - ASRock 870iCafe | Quick Installation Guide - Page 14
for the card before you start the installation. Step 2. Remove the system unit cover (if your motherboard is already installed in a chassis). Step 3. Remove the bracket facing the slot that you intend the chassis with screws. Step 6. Replace the system cover. 14 ASRock 870iCafe Motherboard English - ASRock 870iCafe | Quick Installation Guide - Page 15
. 28) +5VSB (standby) for USB10_11 wake up events. Note: To select +5VSB, it requires 2 Amp and higher standby current provided by power supply. English 15 ASRock 870iCafe Motherboard - ASRock 870iCafe | Quick Installation Guide - Page 16
CLRCMOS1 for 5 seconds. However, please do not clear the CMOS right after you update the BIOS. If you need to clear the CMOS when you just finish updating the BIOS, you must boot up the system first, and then shut it down before you do the clear-CMOS action. English 16 ASRock 870iCafe Motherboard - ASRock 870iCafe | Quick Installation Guide - Page 17
2.0 headers on this motherboard. Each USB 2.0 header can support two USB 2.0 ports. (9-pin USB6_7) (see p.2 No. 23) English Infrared Module Header (5-pin IR1) (see p.2 No. 30) This header supports an optional wireless transmitting and receiving infrared module. 17 ASRock 870iCafe Motherboard - ASRock 870iCafe | Quick Installation Guide - Page 18
". For Windows® 7 / 7 64-bit / VistaTM / VistaTM 64-bit OS: Go to the "FrontMic" Tab in the Realtek Control panel. Adjust "Recording Volume". System Panel Header (9-pin PANEL1) (see p.2 No. 20) This header accommodates several system front panel functions. English 18 ASRock 870iCafe Motherboard - ASRock 870iCafe | Quick Installation Guide - Page 19
the 3-Pin CPU fan to the CPU fan connector on this motherboard, please connect it to Pin 1-3. Pin 1-3 Connected 3-Pin Fan Installation ATX Power Connector (24-pin ATXPWR1) (see p.2 No. 8) 12 24 1 13 Please connect an ATX power supply to this connector. English 19 ASRock 870iCafe Motherboard - ASRock 870iCafe | Quick Installation Guide - Page 20
motherboard provides 8-pin ATX 12V power connector, it can still work if you adopt a traditional 4-pin ATX 12V power supply. To use the 4-pin ATX power supply, please plug your 8 5 power supply along with Pin 1 and Pin 5. 4-Pin ATX 12V Power Supply Installation 4 1 English 20 ASRock 870iCafe - ASRock 870iCafe | Quick Installation Guide - Page 21
the Uncompressed pointer for future use in PMM. Copying Main BIOS into memory. Leaves all RAM below 1MB Read-Write including E000 and F000 shadow areas but closing SMRAM. Restore CPUID value back into register. Give control to BIOS POST (ExecutePOSTKernel). English 21 ASRock 870iCafe Motherboard - ASRock 870iCafe | Quick Installation Guide - Page 22
. Allocate memory for ADM module and uncompress it. Give control to ADM module for initialization. Initialize language and font modules for ADM. Activate ADM module. ASRock 870iCafe Motherboard English - ASRock 870iCafe | Quick Installation Guide - Page 23
. AB Prepare BBS for Int 19 boot. AC End of POST initialization of chipset registers. B1 Save system context for ACPI. 00 Passes control to OS Loader (typically INT19h). English 23 ASRock 870iCafe Motherboard - ASRock 870iCafe | Quick Installation Guide - Page 24
HDDs without NCQ and Hot Plug functions (IDE mode) STEP 1: Set up BIOS. A. Enter BIOS SETUP UTILITY Advanced screen Storage Configuration. B. Set the "SATA Operation Mode" option to [IDE]. STEP 2: Install Windows® XP / XP 64-bit OS on your system. English 24 ASRock 870iCafe Motherboard - ASRock 870iCafe | Quick Installation Guide - Page 25
Technology This motherboard supports Untied Overclocking Technology, which means during overclocking, FSB enjoys better margin due to fixed PCI / PCIE buses. Before you enable Untied Overclocking function, please enter "Overclock Mode" option of BIOS setup to set the selection from [Auto] to [Manual - ASRock 870iCafe | Quick Installation Guide - Page 26
detailed information about BIOS Setup, please refer to the User Manual (PDF file) contained in the Support CD. 4. Software Support CD information This motherboard supports various Microsoft® EXE" from the "BIN" folder in the Support CD to display the menus. 26 ASRock 870iCafe Motherboard English - ASRock 870iCafe | Quick Installation Guide - Page 27
benötigen, besuchen Sie bitte unsere Webseite: www.asrock.com/support/index.asp 1.1 Kartoninhalt ASRock 870iCafe Motherboard (ATX-Formfaktor: 30.5 cm x 20.8 cm; 12.0 Zoll x 8.2 Zoll) ASRock 870iCafe Schnellinstallationsanleitung ASRock 870iCafe Support-CD Zwei Seriell-ATA- (SATA) Datenkabel (Option - ASRock 870iCafe | Quick Installation Guide - Page 28
Plattform CPU Chipsatz Speicher Erweiterungssteckplätze Audio LAN E/A-Anschlüsse an der Rückseite - ATX-Formfaktor: 30.5 cm x 20.8 cm; 12.0 Zoll x 8.2 Zoll - Alle Feste Kondensatordesign (100% in Japan gefertigte, erstklassige leitfähige Polymer-Kondensatoren) - Unterstützung von Socket AM3 - ASRock 870iCafe | Quick Installation Guide - Page 29
VORSICHT 12) - ASRock U-COP (siehe VORSICHT 13) - Boot Failure Guard (B.F.G. - Systemstartfehlerschutz) Hardware Monitor - CPU-Temperatursensor - Motherboardtemperaturerkennung - Drehzahlmessung für CPU/Gehäuse/Stromlüfter - CPU-Lüftergeräuschdämpfung Deutsch 29 ASRock 870iCafe Motherboard - ASRock 870iCafe | Quick Installation Guide - Page 30
Informationen. 3. Dieses Motherboard unterstützt Dual-Kanal-Speichertechnologie. Vor Implementierung der Dual-Kanal-Speichertechnologie müssen Sie die Installationsanleitung für die Speichermodule auf Seite 12 zwecks richtiger Installation gelesen haben. 30 ASRock 870iCafe Motherboard Deutsch - ASRock 870iCafe | Quick Installation Guide - Page 31
Unter Windows® OS mit 64-Bit-CPU besteht diese Einschränkung nicht. 6. Es ist ein benutzerfreundlicher ASRock Übertaktenswerkzeug, das im BIOS-Setup-Menü Zugang zu ASRock Instant Flash. Sie brauchen dieses Werkzeug einfach nur zu starten und die neue BIOS-Datei ASRock 870iCafe Motherboard Deutsch - ASRock 870iCafe | Quick Installation Guide - Page 32
üfen Sie bitte, ob der CPU-Lüfter am Motherboard richtig funktioniert, und stecken Sie bitte den Stromkabelstecker aus und dann wieder ein. Um die Wärmeableitung zu verbessern, bitte nicht vergessen, etwas Wärmeleitpaste zwischen CPU und Kühlkörper zu sprühen. 32 ASRock 870iCafe Motherboard Deutsch - ASRock 870iCafe | Quick Installation Guide - Page 33
ausgeschaltet sind. Um dem EuP-Standard zu entsprechen, sind ein EuP-fähiges Motherboard und eine EuP-fähige Stromversorgung erforderlich. Gemäß einer Empfehlung von Intel muss wir Ihnen, weitere Details beim Hersteller der Stromversorgung abzufragen. 33 ASRock 870iCafe Motherboard Deutsch - ASRock 870iCafe | Quick Installation Guide - Page 34
und die USB8_9- Weckfunktionen zu aktivieren. Hinweis: Um +5VSB nutzen zu können, muss das Netzteil auf dieser Leitung 2A oder mehr leisten können. Deutsch 34 ASRock 870iCafe Motherboard - ASRock 870iCafe | Quick Installation Guide - Page 35
Sie nicht, den Jumper wieder zu entfernen, nachdem das CMOS gelöscht wurde. Wenn Sie den CMOSInhalt gleich nach dem Aktualisieren des BIOS löschen müssen, müssen Sie zuerst das System starten und dann wieder ausschalten, bevor Sie den CMOS-Inhalt löschen. Deutsch 35 ASRock 870iCafe Motherboard - ASRock 870iCafe | Quick Installation Guide - Page 36
angeschlossen werden. Zusätzlich zu den sechs üblichen USB 2.0-Ports an den I/O-Anschlüssen befinden sich drei USB 2.0Anschlussleisten am Motherboard. Pro USB 2.0Anschlussleiste werden zwei USB 2.0-Ports unterstützt. (9-pol. USB6_7) (siehe S.2 - No. 23) Deutsch 36 ASRock 870iCafe Motherboard - ASRock 870iCafe | Quick Installation Guide - Page 37
Bit / VistaTM / VistaTM 64 Bit: Wählen Sie im Realtek-Bedienfeld die „FrontMic" (Vorderes Mikrofon)Registerkarte. Passen Sie die „Recording Volume" (Aufnahmelautstärke) an. Deutsch 37 ASRock 870iCafe Motherboard - ASRock 870iCafe | Quick Installation Guide - Page 38
(3-pin CHA_FAN1) (siehe S.2, No. 16) (4-pin PWR_FAN1) (siehe S.2, No. 35) CPU-Lüfteranschluss (4-pin CPU_FAN1) 4 3 (siehe S.2, No. 5) 2 1 Schließen Sie den CPU Lüfterkabel mit diesem Anschluss und passen Sie den schwarzen Draht dem Erdungsstift an. Deutsch 38 ASRock 870iCafe Motherboard - ASRock 870iCafe | Quick Installation Guide - Page 39
einen traditionellen 4-Pin ATX 12V Energieversorgung adoptieren. Um die 4-Pin ATX Energieversorgung zu verwenden, stecken Sie bitte Ihre Energieversorgung zusammen mit dem Pin 1 und Pin 5 ein. 8 5 Installation der 4-Pin ATX 12V Energieversorgung 4 1 Deutsch 39 ASRock 870iCafe Motherboard - ASRock 870iCafe | Quick Installation Guide - Page 40
der Support-CD, um die Menüs aufzurufen. Das Setup-Programm soll es Ihnen so leicht wie möglich machen. Es ist menügesteuert, d.h. Sie können in den verschiedenen Untermenüs Ihre Auswahl treffen und die Programme werden dann automatisch installiert. 40 ASRock 870iCafe Motherboard Deutsch - ASRock 870iCafe | Quick Installation Guide - Page 41
1.1 Contenu du paquet Carte mère ASRock 870iCafe (Facteur de forme ATX: 12.0 pouces x 8.2 pouces, 30.5 cm x 20.8 cm) Guide d'installation rapide ASRock 870iCafe CD de soutien ASRock 870iCafe Deux câble de données Serial ATA (SATA) (Optionnelle) Un écran I/O 41 ASRock 870iCafe Motherboard Français - ASRock 870iCafe | Quick Installation Guide - Page 42
Realtek ALC662) - PCIE x1 Gigabit LAN 10/100/1000 Mb/s - Realtek RTL8111C - Support du Wake-On-LAN - Prise en charge de la détection de câble LAN I/O Panel - 1 x port souris PS/2 - 1 x port clavier PS/2 - 1 x port série: COM 1 - 6 x ports USB 2.0 par défaut 42 ASRock 870iCafe Motherboard Français - ASRock 870iCafe | Quick Installation Guide - Page 43
OC DNA (voir ATTENTION 9) - ASRock AIWI (voir ATTENTION 10) - Chargeur ASRock APP (voir ATTENTION 11) - L'accélérateur hybride: - Contrôle direct de la fréquence CPU (voir ATTENTION 12) - ASRock U-COP (voir ATTENTION 13) - Garde d'échec au démarrage (B.F.G.) Français 43 ASRock 870iCafe Motherboard - ASRock 870iCafe | Quick Installation Guide - Page 44
CPU/Châssis/Ventilateur - Ventilateur silencieux d'unité centrale - Commande de ventilateur CPU/Ventilateur à plusieurs vitesses - Monitoring de la tension: +12V, +5V, +3.3V, Vcore OS y compris ajuster les réglages du BIOS, appliquer la technologie Untied Overclocking, ASRock 870iCafe Motherboard - ASRock 870iCafe | Quick Installation Guide - Page 45
carte mère supporte la Technologie lire le guide d'installation des /1600MHz dépend du CPU AM3 que vous choisissez. OS avec CPU 64 bits, il n'y a pas ce genre de limitation. 6. Il s'agit d'un usage facile ASRock ASRock OC. ASRock website: http://www.asrock.com 45 ASRock 870iCafe Motherboard Français - ASRock 870iCafe | Quick Installation Guide - Page 46
vous suffit simplement d'installer l'utilitaire ASRock AIWI à partir du site web officiel ASRock ou du CD logiciels ASRock sur votre carte-mère, et de télécharger également l'utilitaire gratuit AIWI Lite à partir de App store sur votre iPhone/iPod touch. Il 46 ASRock 870iCafe Motherboard Français - ASRock 870iCafe | Quick Installation Guide - Page 47
UC recommandées risquent de déstabiliser le système ou d'endommager l'UC. 13. Lorsqu'une surchauffe du CPU est détectée, le système s'arrête automatiquement. Avant de redémarrer le système, veuillez vé votre fournisseur de courant pour plus de détails. 47 ASRock 870iCafe Motherboard Français - ASRock 870iCafe | Quick Installation Guide - Page 48
ériques USB8_9 de réveiller le système. Note: Pour sélectionner +5VSB, il faut obligatoirement 2 Amp et un courant standby supérieur fourni par l'alimentation. 48 ASRock 870iCafe Motherboard - ASRock 870iCafe | Quick Installation Guide - Page 49
de suite après avoir mis le BIOS à jour. Si vous avez besoin d'effacer la CMOS lorsque vous avez fini de mettre le BIOS à jour, vous devez d'abord initialiser le système, puis le mettre hors tension avant de procéder à l'opération d'effacement de la CMOS. Français 49 ASRock 870iCafe Motherboard - ASRock 870iCafe | Quick Installation Guide - Page 50
E/S, il y a quatre embases USB 2.0 sur cette carte mère. Chaque embase USB 2.0 peut prendre en charge 2 ports USB 2.0. (USB6_7 br.9) (voir p.2 No. 23) Français 50 ASRock 870iCafe Motherboard - ASRock 870iCafe | Quick Installation Guide - Page 51
(HD_AUDIO1 br. 9) (voir p.2 fig. 29) Cet en-tête supporte un module infrarouge optionnel de transfert et de réception sans fil. en charge le HDA pour fonctionner correctement. Veuillez suivre les instructions dans notre manuel et le manuel de châssis afin installer 51 ASRock 870iCafe Motherboard - ASRock 870iCafe | Quick Installation Guide - Page 52
de vitesse du ventilateur. Si vous prévoyez de connecter le ventilateur de CPU à 3 broches au connecteur du ventilateur de CPU sur cette carte mère, veuillez le connecter aux broches 1-3. Installation de ventilateur à 3 broches Broches 1-3 connectées Français 52 ASRock 870iCafe Motherboard - ASRock 870iCafe | Quick Installation Guide - Page 53
alimentation électrique avec prise ATX 12V sur ce connecteur afin ATX 12V alimentation. Pour utiliser l'alimentation des 4 broches ATX, branchez votre alimentation 8 5 avec la broche 1 et la broche 5. 4-Installation d'alimentation à 4 broches ATX 12V 4 1 Français 53 ASRock 870iCafe Motherboard - ASRock 870iCafe | Quick Installation Guide - Page 54
entrer dans le BIOS; sinon, le POST continue ses tests de routine. Si vous désirez entrer dans le BIOS après le BIOS, veuillez consulter le Guide de l'utilisateur (fichier PDF) dans le CD technique. 3. Informations sur le CD de support Cette carte mère supporte ASRock 870iCafe Motherboard Français - ASRock 870iCafe | Quick Installation Guide - Page 55
/support/index.asp 1.1 Contenuto della confezione Scheda madre ASRock 870iCafe (ATX Form Factor: 12.0-in x 8.2-in, 30.5 cm x 20.8 cm) Guida di installazione rapida ASRock 870iCafe CD di supporto ASRock 870iCafe Due cavo dati Serial ATA (SATA) (Opzionale) Un I/O Shield 55 ASRock 870iCafe Motherboard - ASRock 870iCafe | Quick Installation Guide - Page 56
Socket AM3: AMD PhenomTM II X6 / X4 / X3 / X2 (fatta eccezione per 920 / 940) / Athlon II X4 / X3 / X2 / Sempron - CPU Six-Core Ready - Supporto UCC (Unlock CPU Codec) - PCIE x1 Gigabit LAN 10/100/1000 Mb/s - Realtek RTL8111C - Supporta Wake-On-LAN - Supporta ASRock 870iCafe Motherboard Italiano - ASRock 870iCafe | Quick Installation Guide - Page 57
del processore aggio - Sensore temperatura scheda madre Hardware - Indicatore di velocita per la ventola del CPU/Chassis/ Alimentazione - Ventola CPU silenziosa - Ventola CPU/Alimentazione con controllo di varie velocità - Voltaggio: +12V, +5V, +3.3V, Vcore 57 ASRock 870iCafe Motherboard - ASRock 870iCafe | Quick Installation Guide - Page 58
di overclocking implica dei rischi, come anche la regolazione delle impostazioni del BIOS, l'applicazione della tecnologia Untied Overclocking Technology, oppure l'uso di strumenti essere ritenuti responsabili per possibili danni provocati dall'overclocking. Italiano 58 ASRock 870iCafe Motherboard - ASRock 870iCafe | Quick Installation Guide - Page 59
della CPU sono inattivi. In alter parole, permette di realizzare risparmi energetica senza pari e di migliorare l'efficienza energetica senza ridurre le prestazioni del computer. Per usare la funzione Intelligent Energy Saver (Risparmio intelligente dell'energia), 59 ASRock 870iCafe Motherboard - ASRock 870iCafe | Quick Installation Guide - Page 60
il POST, oppure il tasto nel menu BIOS per accedere ad ASRock Instant Flash. Avviare questo strumento e salvare il nuovo file BIOS nell'unità Flash USB, dischetto (disco floppy) Spegnimento (S5). Una volta installato il driver APP Charger si otterranno 60 ASRock 870iCafe Motherboard Italiano - ASRock 870iCafe | Quick Installation Guide - Page 61
sistema si chiude automaticamente. Prima di riavviare il sistema, assicurarsi che la ventolina CPU della scheda madre funzioni correttamente; scollegare e ricollegare il cavo d'alimentazione. Per consigliamo di verificare ulteriori dettagli con il produttore. 61 ASRock 870iCafe Motherboard Italiano - ASRock 870iCafe | Quick Installation Guide - Page 62
a +5VSB (standby) e abilitare USB8_9 wake up events. Nota: Per selezionare +5VSB, si richiedono almeno 2 Ampere e il consumo di corrente in standby sarà maggiore. Italiano 62 ASRock 870iCafe Motherboard - ASRock 870iCafe | Quick Installation Guide - Page 63
. Non cancellare la CMOS subito dopo aver aggiornato il BIOS. Se è necessario cancellare la CMOS una volta completato l'aggiornamento del BIOS, è necessario riavviare prima il sistema, e poi spegnerlo prima di procedere alla cancellazione della CMOS. Italiano 63 ASRock 870iCafe Motherboard - ASRock 870iCafe | Quick Installation Guide - Page 64
. 23) Italiano Collettore modulo infrarossi Questo collettore supporta (5-pin IR1) moduli ad infrarossi optional (vedi p.2 Nr. 30) per la trasmissione e la ricezione senza fili. 64 ASRock 870iCafe Motherboard - ASRock 870iCafe | Quick Installation Guide - Page 65
per far sì che questa operi in modo corretto. Attenersi alle istruzioni del nostro manuale e del manuale del telaio per installare il sistema. 2. Se si utilizza un pannello audio AC'97 in stato S1. Il LED è spento in stato S3/S4 o S5 (spegnimento). 65 ASRock 870iCafe Motherboard Italiano - ASRock 870iCafe | Quick Installation Guide - Page 66
12 24 elettrico ATX a 24 pin, ma può funzionare lo stesso se si adotta un alimentatore ATX a 20 pin. Per usare l'alimentatore ATX a 20 pin, collegare l'alimentatore con il Pin 1 e il Pin 13. Installazione dell'alimentatore ATX a 20 pin 1 13 Italiano 66 ASRock 870iCafe Motherboard - ASRock 870iCafe | Quick Installation Guide - Page 67
' ancora essere funzionante se viene utilizzata una fornitura elettrica tradizionale a 4-pin ATX 12V. Per usare tale fornitura elettrica 4-pin ATX 12V, prego collegare la presa elettrica al Pin 1 e Pin 5. 8 5 Installazione elettrica 4-Pin ATX 12V 4 1 Italiano 67 ASRock 870iCafe Motherboard - ASRock 870iCafe | Quick Installation Guide - Page 68
Test (POST) della Setup utility del BIOS; altrimenti, POST continua con i suoi test di routine. Per entrare il BIOS del BIOS, fare riferimento al Manuale supporto a corredo della scheda madre contiene i driver e utilità necessari a potenziare le caratteristiche ASRock 870iCafe Motherboard Italiano - ASRock 870iCafe | Quick Installation Guide - Page 69
/support/index.asp 1.1 Contenido de la caja Placa base ASRock 870iCafe (Factor forma ATX: 30,5 cm x 20,8 cm, 12,0" x 8,2") Guía de instalación rápida de ASRock 870iCafe CD de soporte de ASRock 870iCafe Dos Cable de Datos Serial ATA (SATA) (Opcional) Una protección I/O 69 ASRock 870iCafe Motherboard - ASRock 870iCafe | Quick Installation Guide - Page 70
ATX procesadores con conector AM3: procesador AMD PhenomTM CPU de séxtuple núcleo - Con soporte UCC (Unlock CPU Core) (vea ATENCIÓN 1) - Diseño de fases de potencia V4 + 1 - Compatible con CPU PCIE x1 Gigabit LAN 10/100/1000 Mb/s - Realtek RTL8111C - Soporta Wake-On ASRock 870iCafe Motherboard Español - ASRock 870iCafe | Quick Installation Guide - Page 71
11) - Amplificador Híbrido: - Stepless control de frecuencia de CPU (vea ATENCIÓN 12) - ASRock U-COP (vea ATENCIÓN 13) - Protección de Falla de Inicio (B.F.G..) - Sensibilidad a la temperatura del procesador - Sensibilidad a la temperatura de la placa madre Español 71 ASRock 870iCafe Motherboard - ASRock 870iCafe | Quick Installation Guide - Page 72
del ventilador de la CPU y el alimentacion - Monitor de Voltaje: +12V, +5V, +3.3V, Vcore OS - En conformidad con velocidad del reloj, incluido el ajuste del BIOS, aplicando la tecnología de aumento de os causados por el aumento de la velocidad del reloj. Español 72 ASRock 870iCafe Motherboard - ASRock 870iCafe | Quick Installation Guide - Page 73
de la configuración AM3 Procesador que adopte OS con CPU de 64-bit, no existe dicha limitación. 6. Es una herramienta de overclocking de ASRock CPU están inactivos. En otras palabras, permite ofrecer un ahorro excepcional de energía y mejorar la eficiencia energética sin 73 ASRock 870iCafe Motherboard - ASRock 870iCafe | Quick Installation Guide - Page 74
de ASRock: http://www.asrock.com 8. ASRock Instant Flash es una utilidad de programación del BIOS que se ASRock, puesto que pondremos a su disposición continuamente los juegos compatibles más actuales. Sitio web de ASRock: http://www.asrock.com/Feature/Aiwi/index.asp 74 ASRock 870iCafe Motherboard - ASRock 870iCafe | Quick Installation Guide - Page 75
va a apagarse automaticamente. Antes de reanudar el sistema, compruebe si el ventilador de la CPU de la placa base funciona apropiadamente y desconecte el cable de alimentación, a continuación, vuelva de la fuente de alimentación para obtener más detalles. 75 ASRock 870iCafe Motherboard Español - ASRock 870iCafe | Quick Installation Guide - Page 76
(standby) para USB8_9 wake up events. Atención: Para elegir +5VSB, se necesita corriente mas que 2 Amp proveida por la fuente de electricidad. Español 76 ASRock 870iCafe Motherboard - ASRock 870iCafe | Quick Installation Guide - Page 77
acuérdase de quitar el jumper cap después de limpiar el COMS. Si necesita borrar la CMOS cuando acabe de finalizar la actualización de la BIOS, debe arrancar primero el sistema y, a continuación, apagarlo antes de realizar la acción de borrado de CMOS. Español 77 ASRock 870iCafe Motherboard - ASRock 870iCafe | Quick Installation Guide - Page 78
) (ver p.2, No. 23) Español Cabezal de Módulo Infrarrojos Este cabezal soporta un (5-pin IR1) módulo infrarrojos de (vea p.2, N. 30) transmisión y recepción wireless opcional. 78 ASRock 870iCafe Motherboard - ASRock 870iCafe | Quick Installation Guide - Page 79
en el chasis debe soportar HDA para operar correctamente. Por favor, siga las instrucciones en nuestro manual y en el manual de chasis para instalar su sistema. 2. Si utiliza el panel de sonido AC'97, instá . 19) Conecte el altavoz del chasis a su cabezal. Español 79 ASRock 870iCafe Motherboard - ASRock 870iCafe | Quick Installation Guide - Page 80
de masa. Conector del ventilador de la CPU (4-pin CPU_FAN1) (vea p.2, No. 5) Conecte el cable del ventilador 4 de la CPU a este conector y 3 2 haga ATX (24-pin ATXPWR1) (vea p.2, No. 8) 12 24 1 13 Conecte la fuente de alimentación ATX a su cabezal. Español 80 ASRock 870iCafe Motherboard - ASRock 870iCafe | Quick Installation Guide - Page 81
toma de corriente con el enchufe ATX 12V, de modo que proporcione ATX 12V. Para usar el fuente de energía de 4-pin ATX 12V, por favor conecte su fuente de 8 5 energía junto con Pin 1 y Pin 5. Instalación de Fuente de Energía de 4-Pin ATX 12V 4 1 Español 81 ASRock 870iCafe Motherboard - ASRock 870iCafe | Quick Installation Guide - Page 82
información detallada sobre como configurar la BIOS, por favor refiérase al Manual del Usuario (archivo PDF) contenido en el CD. 3.Información de Software Support CD Esta placa-base soporta diversos pulse en el archivo ASSETUP.EXE para iniciar la instalación. 82 ASRock 870iCafe Motherboard Español - ASRock 870iCafe | Quick Installation Guide - Page 83
. . ASRock. ASRock ( - ATX: 12,0 x 8,2 / 30,5 x 20,8 ) ASRock ASRock Serial ATA (SATA) ( ) - I/O 83 ASRock 870iCafe Motherboard - ASRock 870iCafe | Quick Installation Guide - Page 84
12,0 x 8,2 / 30,5 x 20,8 84 ASRock 870iCafe Motherboard - ASRock 870iCafe | Quick Installation Guide - Page 85
85 ASRock 870iCafe Motherboard - ASRock 870iCafe | Quick Installation Guide - Page 86
86 ASRock 870iCafe Motherboard - ASRock 870iCafe | Quick Installation Guide - Page 87
87 ASRock 870iCafe Motherboard - ASRock 870iCafe | Quick Installation Guide - Page 88
88 ASRock 870iCafe Motherboard - ASRock 870iCafe | Quick Installation Guide - Page 89
89 ASRock 870iCafe Motherboard - ASRock 870iCafe | Quick Installation Guide - Page 90
Short Open 90 ASRock 870iCafe Motherboard - ASRock 870iCafe | Quick Installation Guide - Page 91
CMOS CMOS 91 ASRock 870iCafe Motherboard - ASRock 870iCafe | Quick Installation Guide - Page 92
SATA6 SATA5 SATA4 SATA3 SATA1 SATA2 92 ASRock 870iCafe Motherboard - ASRock 870iCafe | Quick Installation Guide - Page 93
(5- IR1) (9- PANEL1) 93 ASRock 870iCafe Motherboard - ASRock 870iCafe | Quick Installation Guide - Page 94
4 3 2 1 ATX 12 24 1 13 ATX. 94 ASRock 870iCafe Motherboard - ASRock 870iCafe | Quick Installation Guide - Page 95
12 24 12V-ATX 8 5 4 1 1 13 , ATX 12 , . . 8 5 4 1 95 ASRock 870iCafe Motherboard - ASRock 870iCafe | Quick Installation Guide - Page 96
BIOS Setup F Power-On-Self-Test - POST POST BIOS Setup POST Ctrl> + + - ASRock 870iCafe | Quick Installation Guide - Page 97
Türkçe 97 ASRock 870iCafe Motherboard - ASRock 870iCafe | Quick Installation Guide - Page 98
Türkçe 98 ASRock 870iCafe Motherboard - ASRock 870iCafe | Quick Installation Guide - Page 99
Türkçe 99 ASRock 870iCafe Motherboard - ASRock 870iCafe | Quick Installation Guide - Page 100
Türkçe 100 ASRock 870iCafe Motherboard - ASRock 870iCafe | Quick Installation Guide - Page 101
ASRock 870iCafe Motherboard 101 Türkçe - ASRock 870iCafe | Quick Installation Guide - Page 102
Türkçe 102 ASRock 870iCafe Motherboard - ASRock 870iCafe | Quick Installation Guide - Page 103
ASRock 870iCafe Motherboard 103 Türkçe - ASRock 870iCafe | Quick Installation Guide - Page 104
Short Open Türkçe 104 ASRock 870iCafe Motherboard - ASRock 870iCafe | Quick Installation Guide - Page 105
Default Clear CMOS Türkçe ASRock 870iCafe Motherboard 105 - ASRock 870iCafe | Quick Installation Guide - Page 106
SATA6 SATA5 SATA4 SATA3 SATA1 SATA2 Türkçe 106 ASRock 870iCafe Motherboard - ASRock 870iCafe | Quick Installation Guide - Page 107
ASRock 870iCafe Motherboard 107 Türkçe - ASRock 870iCafe | Quick Installation Guide - Page 108
4 3 2 1 12 24 1 13 12 24 1 13 Türkçe 108 ASRock 870iCafe Motherboard - ASRock 870iCafe | Quick Installation Guide - Page 109
8 5 4 1 8 5 4 1 Türkçe ASRock 870iCafe Motherboard 109 - ASRock 870iCafe | Quick Installation Guide - Page 110
Türkçe 110 ASRock 870iCafe Motherboard - ASRock 870iCafe | Quick Installation Guide - Page 111
ASRock 870iCafe Motherboard 111 - ASRock 870iCafe | Quick Installation Guide - Page 112
'' 112 ASRock 870iCafe Motherboard - ASRock 870iCafe | Quick Installation Guide - Page 113
ASRock 870iCafe Motherboard 113 - ASRock 870iCafe | Quick Installation Guide - Page 114
® " " " " 114 ® ® ® ASRock 870iCafe Motherboard - ASRock 870iCafe | Quick Installation Guide - Page 115
® ASRock 870iCafe Motherboard 115 - ASRock 870iCafe | Quick Installation Guide - Page 116
116 ASRock 870iCafe Motherboard - ASRock 870iCafe | Quick Installation Guide - Page 117
"" "" "" "" "" "" "" "" ASRock 870iCafe Motherboard 117 - ASRock 870iCafe | Quick Installation Guide - Page 118
118 ASRock 870iCafe Motherboard - ASRock 870iCafe | Quick Installation Guide - Page 119
SATA6 SATA5 SATA4 SATA3 SATA1 SATA2 ASRock 870iCafe Motherboard 119 - ASRock 870iCafe | Quick Installation Guide - Page 120
® " " " " ® " " " " " " 120 ASRock 870iCafe Motherboard - ASRock 870iCafe | Quick Installation Guide - Page 121
4 3 2 1 12 24 1 13 12 24 1 13 ASRock 870iCafe Motherboard 121 - ASRock 870iCafe | Quick Installation Guide - Page 122
8 5 4 1 " " 8 5 4 1 \\ " " 122 ASRock 870iCafe Motherboard - ASRock 870iCafe | Quick Installation Guide - Page 123
ASRock 870iCafe Motherboard 123 - ASRock 870iCafe | Quick Installation Guide - Page 124
'' 124 ASRock 870iCafe Motherboard - ASRock 870iCafe | Quick Installation Guide - Page 125
ASRock 870iCafe Motherboard 125 - ASRock 870iCafe | Quick Installation Guide - Page 126
® ® ® 126 ASRock 870iCafe Motherboard - ASRock 870iCafe | Quick Installation Guide - Page 127
" " " " ® ® ® ASRock 870iCafe Motherboard 127 - ASRock 870iCafe | Quick Installation Guide - Page 128
® - 128 ASRock 870iCafe Motherboard - ASRock 870iCafe | Quick Installation Guide - Page 129
ASRock 870iCafe Motherboard 129 - ASRock 870iCafe | Quick Installation Guide - Page 130
130 ASRock 870iCafe Motherboard - ASRock 870iCafe | Quick Installation Guide - Page 131
ASRock 870iCafe Motherboard 131 - ASRock 870iCafe | Quick Installation Guide - Page 132
SATA6 SATA5 SATA4 SATA3 SATA1 SATA2 132 ASRock 870iCafe Motherboard - ASRock 870iCafe | Quick Installation Guide - Page 133
® " " " ® " " " " " " " ASRock 870iCafe Motherboard 133 - ASRock 870iCafe | Quick Installation Guide - Page 134
4 3 2 1 12 24 1 13 8 5 4 1 12 24 1 13 134 ASRock 870iCafe Motherboard - ASRock 870iCafe | Quick Installation Guide - Page 135
8 5 4 1 ASRock 870iCafe Motherboard 135 - ASRock 870iCafe | Quick Installation Guide - Page 136
® ® TM TM 136 ASRock 870iCafe Motherboard - ASRock 870iCafe | Quick Installation Guide - Page 137
ASRock 870iCafe Motherboard 137 - ASRock 870iCafe | Quick Installation Guide - Page 138
138 ASRock 870iCafe Motherboard - ASRock 870iCafe | Quick Installation Guide - Page 139
® ® ASRock 870iCafe Motherboard 139 - ASRock 870iCafe | Quick Installation Guide - Page 140
® ® ® 140 ASRock 870iCafe Motherboard - ASRock 870iCafe | Quick Installation Guide - Page 141
® ® ASRock 870iCafe Motherboard 141 - ASRock 870iCafe | Quick Installation Guide - Page 142
142 ASRock 870iCafe Motherboard - ASRock 870iCafe | Quick Installation Guide - Page 143
ASRock 870iCafe Motherboard 143 - ASRock 870iCafe | Quick Installation Guide - Page 144
SATA6 SATA5 SATA4 SATA3 SATA1 SATA2 144 ASRock 870iCafe Motherboard - ASRock 870iCafe | Quick Installation Guide - Page 145
® ® ASRock 870iCafe Motherboard 145 - ASRock 870iCafe | Quick Installation Guide - Page 146
4 3 2 1 146 12 24 1 13 8 5 4 1 12 24 1 13 8 5 4 1 ASRock 870iCafe Motherboard - ASRock 870iCafe | Quick Installation Guide - Page 147
® ® ® ASRock 870iCafe Motherboard 147
-
 1
1 -
 2
2 -
 3
3 -
 4
4 -
 5
5 -
 6
6 -
 7
7 -
8
-
9
-
10
-
11
-
12
-
13
-
14
-
15
-
16
-
17
-
18
-
19
-
20
-
21
-
22
-
23
-
24
-
25
-
26
-
27
-
28
-
29
-
30
-
31
-
32
-
33
-
34
-
35
-
36
-
37
-
38
-
39
-
40
-
41
-
42
-
43
-
44
-
45
-
46
-
47
-
48
-
49
-
50
-
51
-
52
-
53
-
54
-
55
-
56
-
57
-
58
-
59
-
60
-
61
-
62
-
63
-
64
-
65
-
66
-
67
-
68
-
69
-
70
-
71
-
72
-
73
-
74
-
75
-
76
-
77
-
78
-
79
-
80
-
81
-
82
-
83
-
84
-
85
-
86
-
87
-
88
-
89
-
90
-
91
-
92
-
93
-
94
-
95
-
96
-
97
-
98
-
99
-
100
-
101
-
102
-
103
-
104
-
105
-
106
-
107
-
108
-
109
-
110
-
111
-
112
-
113
-
114
-
115
-
116
-
117
-
118
-
119
-
120
-
121
-
122
-
123
-
124
-
125
-
126
-
127
-
128
-
129
-
130
-
131
-
132
-
133
-
134
-
135
-
136
-
137
-
138
-
139
-
140
-
141
-
142
-
143
-
144
-
145
-
146
-
147
 |
 |
1
ASRock
870iCafe
Motherboard
English
English
English
English
English
Copyright Notice:
Copyright Notice:
Copyright Notice:
Copyright Notice:
Copyright Notice:
No part of this installation guide may be reproduced, transcribed, transmitted, or trans-
lated in any language, in any form or by any means, except duplication of documen-
tation by the purchaser for backup purpose, without written consent of ASRock Inc.
Products and corporate names appearing in this guide may or may not be registered
trademarks or copyrights of their respective companies, and are used only for identifica-
tion or explanation and to the owners’ benefit, without intent to infringe.
Disclaimer:
Disclaimer:
Disclaimer:
Disclaimer:
Disclaimer:
Specifications and information contained in this guide are furnished for informational
use only and subject to change without notice, and should not be constructed as a
commitment by ASRock. ASRock assumes no responsibility for any errors or omissions
that may appear in this guide.
With respect to the contents of this guide, ASRock does not provide warranty of any kind,
either expressed or implied, including but not limited to the implied warranties or
conditions of merchantability or fitness for a particular purpose. In no event shall
ASRock, its directors, officers, employees, or agents be liable for any indirect, special,
incidental, or consequential damages (including damages for loss of profits, loss of
business, loss of data, interruption of business and the like), even if ASRock has been
advised of the possibility of such damages arising from any defect or error in the guide
or product.
This device complies with Part 15 of the FCC Rules. Operation is subject to the
following two conditions:
(1)
this device may not cause harmful interference, and
(2)
this device must accept any interference received, including interference that
may cause undesired operation.
Published August 2010
Copyright
©
2010 ASRock INC. All rights reserved.
CALIFORNIA, USA ONLY
The Lithium battery adopted on this motherboard contains Perchlorate, a toxic
substance controlled in Perchlorate Best Management Practices (BMP) regulations
passed by the California Legislature. When you discard the Lithium battery in
California, USA, please follow the related regulations in advance.
“Perchlorate Material-special handling may apply, see
www
.dtsc.ca.gov/hazardouswa
ste/perchlorate”
ASRock Website: http://www.asrock.com