ASRock 890FX Deluxe5 Quick Installation Guide
ASRock 890FX Deluxe5 Manual
 |
View all ASRock 890FX Deluxe5 manuals
Add to My Manuals
Save this manual to your list of manuals |
ASRock 890FX Deluxe5 manual content summary:
- ASRock 890FX Deluxe5 | Quick Installation Guide - Page 1
please follow the related regulations in advance. "Perchlorate Material-special handling may apply, see www.dtsc.ca.gov/hazardouswaste/perchlorate" ASRock Website: http://www.asrock.com Published January 2011 Copyright©2011 ASRock INC. All rights reserved. 1 ASRock 890FX Deluxe5 Motherboard English - ASRock 890FX Deluxe5 | Quick Installation Guide - Page 2
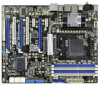
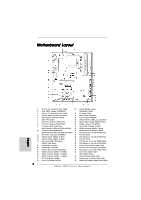
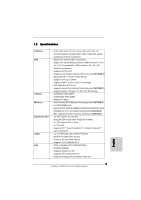
ATX 12V Power Connector (ATX12V1) 25 Reset Switch (RSTBTN) 5 CPU Heatsink Retention Module 26 Power Switch (PWRBTN) 6 AM3+ CPU Socket 10 Memory (32Mb) 44 Chassis Fan Connector (CHA_FAN1) 22 Power LED Header (PLED1) 45 HDMI_SPDIF Header (HDMI_SPDIF1, White) 2 ASRock 890FX Deluxe5 Motherboard - ASRock 890FX Deluxe5 | Quick Installation Guide - Page 3
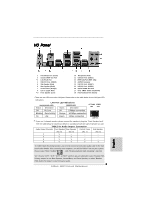
6 Rear Speaker (Black) 7 Central / Bass (Orange) 8 Line In (Light Blue) ** 9 Front Speaker (Lime) 10 Microphone (Pink) 11 USB 3.0 Ports (USB23) 12 IEEE 1394 Port (IEEE 1394) 13 eSATA3 Connector 14 USB 2.0 Ports Audio 2nd output" to use front panel audio. 3 ASRock 890FX Deluxe5 Motherboard English - ASRock 890FX Deluxe5 | Quick Installation Guide - Page 4
information about the model you are using. www.asrock.com/support/index.asp 1.1 Package Contents ASRock 890FX Deluxe5 Motherboard (ATX Form Factor: 12.0-in x 9.6-in, 30.5 cm x 24.4 cm) ASRock 890FX Deluxe5 Quick Installation Guide ASRock 890FX Deluxe5 Support CD 1 x Ultra ATA 66/100/133 IDE Ribbon - ASRock 890FX Deluxe5 | Quick Installation Guide - Page 5
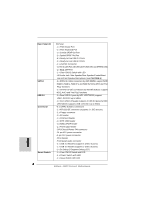
(Realtek ALC892 Audio Codec) - Premium Blu-ray audio support - Supports THX TruStudio ProTM - PCIE x1 Gigabit LAN 10/100/1000 Mb/s - Realtek RTL8111E - Supports Wake-On-LAN - Supports LAN Cable Detection - Supports Energy Efficient Ethernet 802.3az English 5 ASRock 890FX Deluxe5 Motherboard - ASRock 890FX Deluxe5 | Quick Installation Guide - Page 6
- Front panel audio connector - 2 x USB 2.0 headers (support 4 USB 2.0 ports) - 1 x USB 3.0 header (supports 2 USB 3.0 ports) - 1 x Dr. Debug (7-Segment Debug LED) - 1 x Clear CMOS Switch with LED - 1 x Power Switch with LED - 1 x Reset Switch with LED English 6 ASRock 890FX Deluxe5 Motherboard - ASRock 890FX Deluxe5 | Quick Installation Guide - Page 7
overclocking tools. Overclocking may affect your system stability, or even cause damage to the components and devices of your system. It should be done at your own risk and expense. We are not responsible for possible damage caused by overclocking. English 7 ASRock 890FX Deluxe5 Motherboard - ASRock 890FX Deluxe5 | Quick Installation Guide - Page 8
This motherboard supports Untied Overclocking Technology. Please read "Untied Overclocking Technology" on page 36 for details. 3. This motherboard supports Dual Channel Memory Technology. Before you implement Dual Channel Memory Technology, make sure to read the installation guide of memory modules - ASRock 890FX Deluxe5 | Quick Installation Guide - Page 9
7 64 bit / VistaTM / VistaTM 64 bit, and your browser version is IE8. ASRock website: http://www.asrock.com/Feature/SmartView/index.asp 12. ASRock XFast USB can boost USB storage device performance. The performance may depend on the property of the device. 9 ASRock 890FX Deluxe5 Motherboard English - ASRock 890FX Deluxe5 | Quick Installation Guide - Page 10
, the EuP ready power supply must meet the standard of 5v standby power efficiency is higher than 50% under 100 mA current consumption. For EuP ready power supply selection, we recommend you checking with the power supply manufacturer for more details. 10 ASRock 890FX Deluxe5 Motherboard English - ASRock 890FX Deluxe5 | Quick Installation Guide - Page 11
, place it on a grounded antistatic pad or in the bag that comes with the component. 5. When placing screws into the screw holes to secure the motherboard to the chassis, please do not over-tighten the screws! Doing so may damage the motherboard. 11 ASRock 890FX Deluxe5 Motherboard English - ASRock 890FX Deluxe5 | Quick Installation Guide - Page 12
above the socket such that the CPU corner with the golden triangle matches the socket corner with a small triangle. Step 3. Carefully insert the CPU into the socket until it , please kindly refer to the instruction manuals of the CPU fan and the heatsink. English 12 ASRock 890FX Deluxe5 Motherboard - ASRock 890FX Deluxe5 | Quick Installation Guide - Page 13
allowed to install a DDR or DDR2 memory module into DDR3 slot; otherwise, this motherboard and DIMM may be damaged. 5. If you adopt DDR3 1866/1800/1600 memory modules on this motherboard, it is recommended to install them on DDR3_A2 and DDR3_B2 slots. English 13 ASRock 890FX Deluxe5 Motherboard - ASRock 890FX Deluxe5 | Quick Installation Guide - Page 14
to disconnect power supply before motherboard and the DIMM if you force the DIMM into the slot at incorrect orientation. Step 3. Firmly insert the DIMM into the slot until the retaining clips at both ends fully snap back in place and the DIMM is properly seated. 14 ASRock 890FX Deluxe5 Motherboard - ASRock 890FX Deluxe5 | Quick Installation Guide - Page 15
lane width graphics cards, or used to install PCI Express graphics cards to support CrossFireXTM function. PCIE5 (PCIE x16 slot; Blue) is used for PCI Express , please make sure that the power supply is switched off or the power cord is unplugged. Please read ASRock 890FX Deluxe5 Motherboard English - ASRock 890FX Deluxe5 | Quick Installation Guide - Page 16
the future, please refer to ATITM graphics card manuals for detailed installation guide. Step 1. Insert one Radeon graphics card into PCIE2 slot and the other Radeon graphics card to PCIE4 slot. Make sure that the cards are properly seated on the slots. 16 ASRock 890FX Deluxe5 Motherboard English - ASRock 890FX Deluxe5 | Quick Installation Guide - Page 17
cards. (CrossFire Bridge is provided with the graphics card you purchase, not bundled with this motherboard. Please refer to your graphics card vendor for details.) CrossFire Bridge or Step 3. Connect D-Sub monitor cable to the DVI to D-Sub adapter.) English 17 ASRock 890FX Deluxe5 Motherboard - ASRock 890FX Deluxe5 | Quick Installation Guide - Page 18
Bridge to connect Radeon graphics cards on PCIE4 and PCIE5 slots. (CrossFireTM Bridge is provided with the graphics card you purchase, not bundled with this motherboard. Please refer to your graphics card vendor for details.) 18 ASRock 890FX Deluxe5 Motherboard - ASRock 890FX Deluxe5 | Quick Installation Guide - Page 19
D-Sub adapter to convert the DVI connector to D-Sub interface, and then connect the D-Sub monitor cable to the DVI to D-Sub adapter.) English 19 ASRock 890FX Deluxe5 Motherboard - ASRock 890FX Deluxe5 | Quick Installation Guide - Page 20
AMD website for ATITM driver updates. Step 3. Step 4. Step 5. Install the required drivers to your system. For Windows® XP OS: A. ATITM recommends Windows® XP Service Pack 2 or higher to be installed (If you have Windows® XP Service graphics cards). English 20 ASRock 890FX Deluxe5 Motherboard - ASRock 890FX Deluxe5 | Quick Installation Guide - Page 21
is used only for identification or explanation and to the owners' benefit, without intent to infringe. * For further information of ATITM CrossFireXTM technology, please check AMD website for updates and details. 21 ASRock 890FX Deluxe5 Motherboard English - ASRock 890FX Deluxe5 | Quick Installation Guide - Page 22
for 5 seconds. However, please do not clear the CMOS right after you update the BIOS. If you need to clear the CMOS when you just finish updating the BIOS, you must boot up the system first, and then shut it down before you do the clear-CMOS action. English 22 ASRock 890FX Deluxe5 Motherboard - ASRock 890FX Deluxe5 | Quick Installation Guide - Page 23
motherboard connect the black end to the IDE devices 80-conductor ATA 66/100/133 cable Note: Please refer to the instruction eight Serial ATA3 (SATA3) connectors support SATA data cables for internal storage motherboard. SATA3_1_2 SATA3_3_4 SATA3_5_6 English 23 ASRock 890FX Deluxe5 Motherboard - ASRock 890FX Deluxe5 | Quick Installation Guide - Page 24
(4-pin CD1) (CD1: see p.2 No. 40) This header supports an optional wireless transmitting and receiving infrared module. This connector allows you CD1 to receive stereo audio input from sound sources such as a CD-ROM, DVD-ROM, TV tuner card, or MPEG card. 24 ASRock 890FX Deluxe5 Motherboard - ASRock 890FX Deluxe5 | Quick Installation Guide - Page 25
Power LED): Connect to the power status indicator on the chassis front panel. The LED is on when the system is operating. The LED keeps blinking when the sys-tem is in S1 sleep state. The LED is off when the system is in S3/S4 sleep state or powered off (S5). 25 ASRock 890FX Deluxe5 Motherboard - ASRock 890FX Deluxe5 | Quick Installation Guide - Page 26
to the ground pin. CHA_FAN1/2/3 fan speed can be controlled through BIOS or OC Tuner utility. CPU Fan Connectors (4-pin CPU_FAN1) (see p.2 No. 7) 1 2 3 4 Please connect the CPU fan cable to the connector and match the black wire to the ground pin. English 26 ASRock 890FX Deluxe5 Motherboard - ASRock 890FX Deluxe5 | Quick Installation Guide - Page 27
(9-pin FRONT_1394) (see p.2 No. 14) 4-Pin ATX 12V Power Supply Installation 5 8 Besides one default IEEE 1394 port on the I/O panel, there is one IEEE 1394 header (FRONT_1394) on this motherboard. This IEEE 1394 header can support one IEEE 1394 port. English 27 ASRock 890FX Deluxe5 Motherboard - ASRock 890FX Deluxe5 | Quick Installation Guide - Page 28
(see p.2 No.30) This COM1 header supports a serial port module. HDMI_SPDIF Header (2-pin of HDMI VGA card to this header. Front USB 3.0 Panel Installation Guide Step 1 Prepare the bundled Front USB 3.0 Panel, four Step 2 ) on the motherboard. to use. English 28 ASRock 890FX Deluxe5 Motherboard - ASRock 890FX Deluxe5 | Quick Installation Guide - Page 29
Guide Step 1 Unscrew the two screws from the Front USB 3.0 Panel. Step 2 Put the USB 3.0 cable and the rear USB 3.0 bracket together. Step 3 Screw the two screws into the rear USB 3.0 bracket. Step 4 Put the rear USB 3.0 bracket into the chassis. English 29 ASRock 890FX Deluxe5 Motherboard - ASRock 890FX Deluxe5 | Quick Installation Guide - Page 30
motherboard has three smart switches: power switch, reset switch and clear CMOS switch, allowing users to quickly turn on/off or reset the system or clear the CMOS values. Power Switch (PWRBTN) (see p.2 No. 26) Power CMOS jumper" description instead. English 30 ASRock 890FX Deluxe5 Motherboard - ASRock 890FX Deluxe5 | Quick Installation Guide - Page 31
. Cache initialization CPU post-memory initialization. Application Processor(s) (AP) initialization CPU post-memory initialization. Boot Strap Processor (BSP) selection CPU post-memory initialization. System Management Mode (SMM) initialization 31 ASRock 890FX Deluxe5 Motherboard English - ASRock 890FX Deluxe5 | Quick Installation Guide - Page 32
is not available Recovery capsule is not found Invalid recovery capsule Reserved for future AMI error codes DXE Core is started NVRAM initialization English 32 ASRock 890FX Deluxe5 Motherboard - ASRock 890FX Deluxe5 | Quick Installation Guide - Page 33
0xA0 0xA1 0xA2 0xA3 0xA4 0xA5 Installation of the South Bridge Runtime Services CPU DXE initialization is started CPU DXE initialization (CPU module specific Boot Device Selection (BDS) phase is started Driver connecting is started PCI Bus initialization is started ASRock 890FX Deluxe5 Motherboard - ASRock 890FX Deluxe5 | Quick Installation Guide - Page 34
Status Codes section below) Ready To Boot event Legacy Boot event Exit Boot Services event Runtime Set Virtual Address MAP Begin Runtime Set Virtual Address MAP End Legacy (StartImage returned error) Flash update is failed Reset protocol is not available English 34 ASRock 890FX Deluxe5 Motherboard - ASRock 890FX Deluxe5 | Quick Installation Guide - Page 35
SATA3 HDDs with RAID functions, please refer to the document at the following path in the Support CD for detailed procedures: ..\ RAID Installation Guide 2.13 Installing Windows® 7 / 7 IDE]. STEP 2: Install Windows® XP / XP 64-bit OS on your system. English 35 ASRock 890FX Deluxe5 Motherboard - ASRock 890FX Deluxe5 | Quick Installation Guide - Page 36
overclocking, but PCI / PCIE buses are in the fixed mode so that FSB can operate under a more stable overclocking environment. Please refer to the warning on page 7 for the possible overclocking risk before you apply Untied Overclocking Technology. English 36 ASRock 890FX Deluxe5 Motherboard - ASRock 890FX Deluxe5 | Quick Installation Guide - Page 37
in your computer. If the Main Menu does not appear automatically, locate and doubleclick on the file "ASSETUP.EXE" from the "BIN" folder in the Support CD to display the menus. 37 ASRock 890FX Deluxe5 Motherboard English - ASRock 890FX Deluxe5 | Quick Installation Guide - Page 38
ötigen, besuchen Sie bitte unsere Webseite: www.asrock.com/support/index.asp 1.1 Kartoninhalt ASRock 890FX Deluxe5 Motherboard (ATX-Formfaktor: 30.5 cm x 24.4 cm; 12.0 Zoll x 9.6 Zoll) ASRock 890FX Deluxe5 Schnellinstallationsanleitung ASRock 890FX Deluxe5 Support-CD Ein 80-adriges Ultra-ATA 66/100 - ASRock 890FX Deluxe5 | Quick Installation Guide - Page 39
HD Audio mit dem Inhalt Schutz (Realtek ALC892 Audio Codec) - Premium Blu-ray-Audio-Unterstützung - Unterstützt THX TruStudio ProTM - PCIE x1 Gigabit LAN 10/100/1000 Mb/s - Realtek RTL8111E - Unterstützt Wake-On-LAN 39 ASRock 890FX Deluxe5 Motherboard Deutsch - ASRock 890FX Deluxe5 | Quick Installation Guide - Page 40
- CPU/Gehäuse/Stromlüfter-Anschluss - 24-pin ATX-Netz-Header - 8-pin anschluss für 12V-ATX-Netzteil - Interne Audio-Anschlüsse - Anschluss für Audio auf der Gehäusevorderseite - 2 x USB 2.0-Anschlüsse (Unterstützung 4 zusätzlicher USB 2.0-Anschlüsse) Deutsch 40 ASRock 890FX Deluxe5 Motherboard - ASRock 890FX Deluxe5 | Quick Installation Guide - Page 41
Mehrstufige Geschwindigkeitsteuerung für CPU-/ Gehäuselüfter - Spannungsüberwachung: +12V, +5V, +3.3V, Vcore Betriebssysteme - Unterstützt Microsoft® Windows® 7 / 7 64-Bit / VistaTM / VistaTM 64-Bit / XP / XP 64-Bit Zertifizierungen - FCC, CE, WHQL Deutsch 41 ASRock 890FX Deluxe5 Motherboard - ASRock 890FX Deluxe5 | Quick Installation Guide - Page 42
-Einschränkungen kann die tatsächliche Speichergröße weniger als 4 GB betragen, da unter Windows® 7 / Vista™ / XP etwas Speicher zur Nutzung durch das System reserviert wird. Unter Windows® OS mit 64-Bit-CPU besteht diese Einschränkung nicht. 42 ASRock 890FX Deluxe5 Motherboard Deutsch - ASRock 890FX Deluxe5 | Quick Installation Guide - Page 43
Sie Ihren PC und das Apple-Gerät via Bluetooth oder Wi-Fi-Netzwerk - schon können Sie die bewegungsgesteuerten Spiele genießen. Bitte denken Sie 43 ASRock 890FX Deluxe5 Motherboard Deutsch - ASRock 890FX Deluxe5 | Quick Installation Guide - Page 44
! ASRock-Webseite: http://www.asrock.com/Feature/Aiwi/index.asp 10. Windows®-Betriebssystemen 7 / 7, 64 Bit / VistaTM / VistaTM 64 Bit und dem Internet Explorer ab Version 8 nutzen. ASRock-Website: http://www.asrock.com/Feature/SmartView/index.asp 12. ASRocks ASRock 890FX Deluxe5 Motherboard Deutsch - ASRock 890FX Deluxe5 | Quick Installation Guide - Page 45
Unterlage, oder zurück in die Tüte, mit der die Komponente geliefert wurde. 5. Wenn Sie das Motherboard mit den Schrauben an dem Computergehäuse befestigen, überziehen Sie bitte die Schrauben nicht! Das Motherboard kann sonst beschädigt werden. Deutsch 45 ASRock 890FX Deluxe5 Motherboard - ASRock 890FX Deluxe5 | Quick Installation Guide - Page 46
ihn ein 2.2 Installation des CPU-Lüfters und des Kühlkörpers Nachdem Sie die CPU auf diesem Motherboard installiert haben, müssen Sie einen größeren Kühlkörper und Lüfter installieren, um Wärme auf die Handbücher des CPU-Lüfters und des Kühlkörpers. Deutsch 46 ASRock 890FX Deluxe5 Motherboard - ASRock 890FX Deluxe5 | Quick Installation Guide - Page 47
DDR3 Steckplatz zu installieren; andernfalls könnten Motherboard und DIMMs beschädigt werden. 5. Wenn Sie DDR3 1866/1800/1600-Speichermodule für dieses Motherboard übernehmen, wird empfohlen, sie in den DDR3_A2- und DDR3_B2-Steckplätzen zu installieren. 47 ASRock 890FX Deluxe5 Motherboard Deutsch - ASRock 890FX Deluxe5 | Quick Installation Guide - Page 48
in die Steckplätze, so dass die Halteklammern an beiden Enden des Moduls einschnappen und das DIMM-Modul fest an Ort und Stelle sitzt. 48 ASRock 890FX Deluxe5 Motherboard - ASRock 890FX Deluxe5 | Quick Installation Guide - Page 49
PCI- und PCI Express-Slots): Es stehen 2 PCI- und 5 PCI Express-Slot auf dem 890FX Deluxe5 Motherboard zur Verfügung. PCI-Slots: PCI-Slots werden zur Installation von Erweiterungskarten mit dem 32bit PCI 4: Befestigen Sie die Karte mit der Schraube aus Schritt 2. 49 ASRock 890FX Deluxe5 Motherboard - ASRock 890FX Deluxe5 | Quick Installation Guide - Page 50
Sie nicht, den Jumper wieder zu entfernen, nachdem das CMOS gelöscht wurde. Wenn Sie den CMOSInhalt gleich nach dem Aktualisieren des BIOS löschen müssen, müssen Sie zuerst das System starten und dann wieder ausschalten, bevor Sie den CMOS-Inhalt löschen. 50 ASRock 890FX Deluxe5 Motherboard Deutsch - ASRock 890FX Deluxe5 | Quick Installation Guide - Page 51
S.2 - No. 17) SATA3_1_2 SATA3_3_4 SATA3_5_6 Deutsch Blauer Anschluss Schwarzer Anschluss zum Motherboard zur Festplatte 80-adriges ATA 66/100/133 Kabel Hinweis: Details entnehmen Sie bitte Verbindungsstück auf dieser Hauptplatine angeschlossen werden. 51 ASRock 890FX Deluxe5 Motherboard - ASRock 890FX Deluxe5 | Quick Installation Guide - Page 52
. 27) Neben zwei Standard-USB 3.0-Ports am E/A-Panel befindet sich ein USB 3.0Header an diesem Motherboard. Dieser USB 3.0Header kann zwei USB 3.0Ports unterstützen. Deutsch Infrarot-Modul-Header (5-pin IR1) oder MPEG-Karten mit Ihrem System zu verbinden. 52 ASRock 890FX Deluxe5 Motherboard - ASRock 890FX Deluxe5 | Quick Installation Guide - Page 53
'97-Audioleiste angeschlossen werden. E. So aktivieren Sie das Mikrofon an der Vorderseite. Bei den Betriebssystemen Windows® XP / XP 64 Bit: Wählen Sie „Mixer". Wählen Sie „Recorder" (Rekorder). Hilfe des Ein-/Ausschalters ausgeschaltet werden können soll. 53 ASRock 890FX Deluxe5 Motherboard - ASRock 890FX Deluxe5 | Quick Installation Guide - Page 54
den Gehäuselautsprecher an diesen Header an. Verbinden Sie die Lüfterkabel mit den Lüfteranschlüssen, wobei der schwarze Draht an den Schutzleiterstift angeschlossenwird. Deutsch 54 ASRock 890FX Deluxe5 Motherboard - ASRock 890FX Deluxe5 | Quick Installation Guide - Page 55
-Netzteils 1 13 1 4 5 8 Beachten Sie bitte, dass Sie eine Stromversorgung mit ATX 12Volt-Stecker mit diesem Anschluss verbinden müssen, damit ausreichend Strom geliefert werden kann. Andernfalls reicht der Strom nicht aus, das System zu starten. Deutsch 55 ASRock 890FX Deluxe5 Motherboard - ASRock 890FX Deluxe5 | Quick Installation Guide - Page 56
Sie bitte Ihre Energieversorgung zusammen mit dem Pin 1 und Pin 5 ein. 1 4 Installation der 4-Pin ATX 12V Energieversorgung 5 8 IEEE-1394 Header (9-pin FRONT_1394) (siehe S.2 - No. 14) COM-Anschluss-Header , Projektoren, LCD-Geräten an das System. Deutsch 56 ASRock 890FX Deluxe5 Motherboard - ASRock 890FX Deluxe5 | Quick Installation Guide - Page 57
6 Die USB 3.0-Frontblende ist nun Frontblende am USB 3.0-Header (USB3_1_2) einsatzbereit. am Motherboard an. Installationsanleitung zum USB 3.0-Blech an der Rückwand Schritt 1 Lösen Sie die beiden das USB 3.0-Blech an der Rückwand des Gehäuses ein. 57 ASRock 890FX Deluxe5 Motherboard Deutsch - ASRock 890FX Deluxe5 | Quick Installation Guide - Page 58
2.8 Schnellschalter Dieses Motherboard besitzt drei Schnellschalter: Netzschalter, Rücksetzschalter (Reset) und CMOS löschen-Schalter, mit denen Benutzer das System schnell ein Abbildungen auf den Seiten 31, 32, 33 und 34 zum Ablesen der Debug-LED-Codes. Deutsch 58 ASRock 890FX Deluxe5 Motherboard - ASRock 890FX Deluxe5 | Quick Installation Guide - Page 59
10 CD finden: ..\ RAID Installation Guide 2.12 Installation von Windows® 7 / 7 64-Bit / VistaTM / VistaTM 64-Bit / XP / XP 64-Bit ohne RAID-Funktionen Wenn Sie Windows® 7 / 7 auf [IDE]. SCHRITT 2: Installieren Sie Windows® XP / XP 64-Bit in Ihrem System. Deutsch 59 ASRock 890FX Deluxe5 Motherboard - ASRock 890FX Deluxe5 | Quick Installation Guide - Page 60
/ VistaTM 64-Bit ohne RAID-Funktionen Wenn Sie Windows® 7 / 7 64-Bit / VistaTM / VistaTM 64-Bit ohne RAID-Funktionalität auf Ihren SATA3- Modus) auf [AHCI]. SCHRITT 2: Installieren Sie Windows® 7 / 7 64-Bit / VistaTM / VistaTM 64-Bit in Ihrem System. Deutsch 60 ASRock 890FX Deluxe5 Motherboard - ASRock 890FX Deluxe5 | Quick Installation Guide - Page 61
der Support-CD, um die Menüs aufzurufen. Das Setup-Programm soll es Ihnen so leicht wie möglich machen. Es ist menügesteuert, d.h. Sie können in den verschiedenen Untermenüs Ihre Auswahl treffen und die Programme werden dann automatisch installiert. 61 ASRock 890FX Deluxe5 Motherboard Deutsch - ASRock 890FX Deluxe5 | Quick Installation Guide - Page 62
au modèle que vous utilisez. www.asrock.com/support/index.asp 1.1 Contenu du paquet Carte mère ASRock 890FX Deluxe5 (Facteur de forme ATX: 12.0 pouces x 9.6 pouces, 30.5 cm x 24.4 cm) Guide d'installation rapide ASRock 890FX Deluxe5 CD de soutien ASRock 890FX Deluxe5 Un câble ruban IDE Ultra ATA 66 - ASRock 890FX Deluxe5 | Quick Installation Guide - Page 63
ée V8 + 2 Power Phase - Supporte les processeurs jusqu'à 140W - Supporte la technologie Cool 'n' QuietTM d'AMD - FSB 2600 MHz (5.2 GT/s) - Prend en charge la technologie Untied Overclocking (voir ATTENTION 2) - Prise en charge de la technologie Hyper Transport 3.0 (HT 3.0) - Northbridge: AMD 890FX - ASRock 890FX Deluxe5 | Quick Installation Guide - Page 64
Gigabit LAN 10/100/1000 Mb/s - Realtek RTL8111E - Support du Wake connecteurs 6,0 Gb/s SATA3 par AMD SB850, prise en charge des fonctions RAID (RAID 0, RAID 1, RAID 0+1 et RAID 5), NCQ, AHCI et « 1394 - 1 x Connecteur HDMI_SPDIF - 1 x LED di accensione 64 ASRock 890FX Deluxe5 Motherboard - ASRock 890FX Deluxe5 | Quick Installation Guide - Page 65
avec LED - 32Mb AMI UEFI Legal BIOS avec support GUI - Support du "Plug and Play" - Compatible pour événements de réveil ACPI 1.1 - Gestion jumperless - Support SMBIOS 2.3.1 - CPU, VCCM, NB é centrale - Commande de ventilateur CPU/boîtier à plusieurs vitesses 65 ASRock 890FX Deluxe5 Motherboard - ASRock 890FX Deluxe5 | Quick Installation Guide - Page 66
effectuer l'overclocking, y compris ajuster les réglages du BIOS, appliquer la technologie Untied Overclocking, ou utiliser des outils de tiers pour l'overclocking. L'overclocking peut affecter de mémoire compatibles. Site Web ASRock http://www.asrock.com 66 ASRock 890FX Deluxe5 Motherboard Français - ASRock 890FX Deluxe5 | Quick Installation Guide - Page 67
suffit simplement d'installer l'utilitaire ASRock AIWI à partir du site web officiel ASRock ou du CD logiciels ASRock sur votre carte-mère, et de télécharger également l'utilitaire gratuit AIWI Lite à partir de App store sur votre iPhone/iPod touch. Il 67 ASRock 890FX Deluxe5 Motherboard Français - ASRock 890FX Deluxe5 | Quick Installation Guide - Page 68
est Windows® 7 / 7 64 bits / VistaTM ou VistaTM 64 bits, et que la version de votre navigateur est IE8. Site web ASRock : http://www.asrock.com/Feature/SmartView/index.asp 12. ASRock XFast USB Pour être conforme à la norme EuP, une carte mère EuP et une 68 ASRock 890FX Deluxe5 Motherboard Français - ASRock 890FX Deluxe5 | Quick Installation Guide - Page 69
re à facteur de forme ATX (12,0 po x support antistatique ou dans son sachet d'origine. 5. Lorsque vous placez les vis dans les orifices pour vis pour fixer la carte mère sur le châssis, ne serrez pas trop les vis ! Vous risquez sinon d'endommager la carte mère. 69 ASRock 890FX Deluxe5 Motherboard - ASRock 890FX Deluxe5 | Quick Installation Guide - Page 70
coin de la prise. Etape 3. Insérez avec précaution le CPU dans le support jusqu'à ce qu'il soit bien en place. Le CPU ne peut être ins une bonne installation, veuillez vous référer aux manuels d'instruction sur le ventilateur du CPU et le dissipateur. Français 70 ASRock 890FX Deluxe5 Motherboard - ASRock 890FX Deluxe5 | Quick Installation Guide - Page 71
carte mère 890FX Deluxe5 dispose de quatre emplacements DIMM DDR3 (Double Data Rate 3) de 240-broches, et supporte la Technologie le Canal Double B (DDR3_A2 et DDR3_B2; slots blanc; voir p.2 No. 10), de façon à ce que la Technologie de Mémoire à Canal Double puisse ASRock 890FX Deluxe5 Motherboard - ASRock 890FX Deluxe5 | Quick Installation Guide - Page 72
jusqu'à ce que les clips de maintien situés aux deux extrémités se ferment complètement et que le module DIMM soit inséré correctement. 72 ASRock 890FX Deluxe5 Motherboard - ASRock 890FX Deluxe5 | Quick Installation Guide - Page 73
et Slots PCI Express) Il y a 2 ports PCI et 5 ports PCI Express sur la carte mère 890FX Deluxe5. Slots PCI: Les slots PCI sont utilisés pour installer des cartes d'extension dotées d'une interface PCI 32 Fixez la carte sur le châssis à l'aide d'une vis. Français 73 ASRock 890FX Deluxe5 Motherboard - ASRock 890FX Deluxe5 | Quick Installation Guide - Page 74
é le cavalier Effacer la CMOS, veuillez enlever le capuchon de cavalier. Toutefois, veuillez ne pas effacer la CMOS tout de suite après avoir mis le BIOS à jour. Si vous avez besoin d'effacer la CMOS lorsque vous avez fini 74 ASRock 890FX Deluxe5 Motherboard Français - ASRock 890FX Deluxe5 | Quick Installation Guide - Page 75
de mettre le BIOS à jour, vous devez d'abord initialiser disque dur Câble ATA 66/100/133 80 conducteurs Note: Veuillez vous reporter aux instructions du fabricant de votre IDE périphérique pour les détails. Connecteurs Série ATA3 SATA3_3_4 SATA3_5_6 Français 75 ASRock 890FX Deluxe5 Motherboard - ASRock 890FX Deluxe5 | Quick Installation Guide - Page 76
. Cette barrette USB 3.0 peut prendre en charge deux ports USB 3.0. Français En-tête du module infrarouge (IR1 br.5) (voir p.2 No. 43) Cet en-tête supporte un module infrarouge optionnel de transfert et de réception sans fil. 76 ASRock 890FX Deluxe5 Motherboard - ASRock 890FX Deluxe5 | Quick Installation Guide - Page 77
en charge le HDA pour fonctionner correctement. Veuillez suivre les instructions dans notre manuel et le manuel de châssis afin installer E. Pour activer le micro avant. Pour les systèmes d'exploitation Windows® XP / XP 64 bits : Sélectionnez "Mixer". Sélectionnez ASRock 890FX Deluxe5 Motherboard - ASRock 890FX Deluxe5 | Quick Installation Guide - Page 78
sur ce connecteur. Branchez les câbles du ventilateur aux connecteurs pour ventilateur et faites correspondre le fil noir à la broche de terre. Français 78 ASRock 890FX Deluxe5 Motherboard - ASRock 890FX Deluxe5 | Quick Installation Guide - Page 79
un support de ATX 1 4 de connecter une unité (ATX12V1 br. 8) 5 8 d'alimentation électrique avec (voir p.2 fig. 4) prise ATX 12V sur ce connecteur afin d'avoir une alimentation suffisante. Faute de quoi, il ne sera pas possible de mettre sous tension. 79 ASRock 890FX Deluxe5 Motherboard - ASRock 890FX Deluxe5 | Quick Installation Guide - Page 80
ATX 12V, il peut toujours travailler si vous adoptez une approche traditionnelle à 4 broches ATX 12V alimentation. Pour utiliser l'alimentation des 4 broches ATX sur cette carte mere. Le header de IEEE 1394 peut supporter un port de IEEE 1394. Cette en-tête de port ASRock 890FX Deluxe5 Motherboard - ASRock 890FX Deluxe5 | Quick Installation Guide - Page 81
frontal peut maintenant être utilisé. Le Guide d'installation du Support arrière USB 3.0 Etape 1 Dévissez support arrière USB 3.0. Etape 3 Vissez les deux vis dans le support arrière USB 3.0. Etape 4 Placez le support arrière USB 3.0 dans le châssis. Français 81 ASRock 890FX Deluxe5 Motherboard - ASRock 890FX Deluxe5 | Quick Installation Guide - Page 82
encore plus facile. Veuillez consulter les diagrammes des pages 31, 32, 33 et 34 pour la lecture des codes LED de débogage. Français 82 ASRock 890FX Deluxe5 Motherboard - ASRock 890FX Deluxe5 | Quick Installation Guide - Page 83
10 Guide RAID, veuillez vous référer au document de l'étape suivante sur le CD de support pour connaître la procédure détaillée: ..\ RAID Installation Guide (Guide d'installation RAID) 2.12 Installation de Windows Windows® XP / XP 64-bit sur votre système. 83 ASRock 890FX Deluxe5 Motherboard Français - ASRock 890FX Deluxe5 | Quick Installation Guide - Page 84
sans fonctions RAID Si vous voulez installer Windows® 7 / 7 64-bit / VistaTM / VistaTM 64-bit sur vos disques durs SATA3 sans les fonctions RAID, veuillez le système d'exploitation Windows® 7 / 7 64-bit / VistaTM / VistaTM 64-bit sur votre système. 84 ASRock 890FX Deluxe5 Motherboard Français - ASRock 890FX Deluxe5 | Quick Installation Guide - Page 85
le BIOS, veuillez consulter le Guide de l'utilisateur (fichier PDF) dans le CD technique. 4. Informations sur le CD de support Cette carte mère supporte divers systèmes d'exploitation Microsoft® Windows®: 7 double-cliquez dessus pour afficher les menus. 85 ASRock 890FX Deluxe5 Motherboard Français - ASRock 890FX Deluxe5 | Quick Installation Guide - Page 86
sul modello che si sta usando. www.asrock.com/support/index.asp 1.1 Contenuto della confezione Scheda madre ASRock 890FX Deluxe5 (ATX Form Factor: 12.0-in x 9.6-in, 30.5 cm x 24.4 cm) Guida di installazione rapida ASRock 890FX Deluxe5 CD di supporto ASRock 890FX Deluxe5 Un cavo IDE 80-pin Ultra ATA - ASRock 890FX Deluxe5 | Quick Installation Guide - Page 87
- 7.1 CH HD Audio con protezioni contenuti (Realtek ALC892 Audio Codec) - Supporto audio Blu-ray Premium - Supporto THX TruStudio ProTM - PCIE x1 Gigabit LAN 10/100/1000 Mb/s - Realtek RTL8111E - Supporta Wake-On-LAN - Supporta il rilevamento cavo LAN 87 ASRock 890FX Deluxe5 Motherboard Italiano - ASRock 890FX Deluxe5 | Quick Installation Guide - Page 88
alimentazione ATX - 8-pin connettore ATX 12V - Connettori audio interni - Connettore audio sul pannello frontale - 2 x Collettore USB 2.0 (supporta 4 porte USB 2.0) - 1 x Collettore USB 3.0 (supporta 2 porte USB 3.0) - 1 x Dr. Debug (LED debug con 7 segmenti) ASRock 890FX Deluxe5 Motherboard - ASRock 890FX Deluxe5 | Quick Installation Guide - Page 89
- Predisposto ErP/EuP (è necessaria l'alimentazione predisposta per il sistema ErP/EuP) (vedi ATTENZIONE 15) * Per ulteriori informazioni, prego visitare il nostro sito internet: http://www.asrock.com Italiano 89 ASRock 890FX Deluxe5 Motherboard - ASRock 890FX Deluxe5 | Quick Installation Guide - Page 90
il microfono. Questa scheda madre supporta le modalità 2 canali, 4 canali, 6 canali e 8 canali per l'uscita audio. Controllare la tavola a pagina 3 per eseguire il collegamento appropriato. 90 ASRock 890FX Deluxe5 Motherboard Italiano - ASRock 890FX Deluxe5 | Quick Installation Guide - Page 91
caricare l'iPhone più rapidamente rispetto al computer, con una velocità maggiore del 40%. ASRock APP Charger permette di caricare simultaneamente molti dispositivi Apple in modo rapido e supporta anche il caricamento continuato quando il PC accede alla 91 ASRock 890FX Deluxe5 Motherboard Italiano - ASRock 890FX Deluxe5 | Quick Installation Guide - Page 92
S4) o Spegnimento (S5). Una volta installato il driver APP Charger si otterranno prodigi e comodità mai avuti prima. Sito ASRock: http://www.asrock.com/Feature/AppCharger/index.asp 11. SmartView, una di verificare ulteriori dettagli con il produttore. 92 ASRock 890FX Deluxe5 Motherboard Italiano - ASRock 890FX Deluxe5 | Quick Installation Guide - Page 93
2. Installazione Questa è una scheda madre con Form Factor ATX (12.0 pollici x 9.6 pollici; 30,5 cm x 24,4 cm). Prima di installare la scheda madre, al telaio non serrare eccessivamente le viti! Altrimenti si rischia di danneggiare la scheda madre. 93 ASRock 890FX Deluxe5 Motherboard Italiano - ASRock 890FX Deluxe5 | Quick Installation Guide - Page 94
di 90° FASE 1: Sollevare la levetta socket Triangolo dorato CPU Triangolino angolo socket FASE 2 / FASE 3: Far corrispondere il installazione appropriata, fare riferimento al manuale d'istruzioni della ventolina CPU e del dispersore di calore. Italiano 94 ASRock 890FX Deluxe5 Motherboard - ASRock 890FX Deluxe5 | Quick Installation Guide - Page 95
(DDR3_A2 e DDR3_B2; alloggiamenti bianco; vedere pag. 2 Nr. 10), per fare sì che la tecnologia Dual Channel Memory possa essere attivata. Questa scheda madre consente anche di installare quattro DIMM madre, si consiglia di installarli sugli slot DDR3_A2 e DDR3_B2. 95 ASRock 890FX Deluxe5 Motherboard - ASRock 890FX Deluxe5 | Quick Installation Guide - Page 96
DIMM nello slot fino a far scattare completamente in posizione i fermagli di ritegno alle due estremità e fino ad installare correttamente la DIMM nella sua sede. 96 ASRock 890FX Deluxe5 Motherboard - ASRock 890FX Deluxe5 | Quick Installation Guide - Page 97
2.4 Slot di espansione (Slot PCI ed Slot PCI Express) Sulla scheda madre 890FX Deluxe5 c'è 2 slot PCI ed 5 slot PCI Express. Slot PCI: Sono utilizzati per installare schede di inserita nello slot. Step 4. Agganciare la scheda allo chassis con le viti. 97 ASRock 890FX Deluxe5 Motherboard Italiano - ASRock 890FX Deluxe5 | Quick Installation Guide - Page 98
. Non cancellare la CMOS subito dopo aver aggiornato il BIOS. Se è necessario cancellare la CMOS una volta completato l'aggiornamento del BIOS, è necessario riavviare prima il sistema, e poi spegnerlo prima di procedere alla cancellazione della CMOS. 98 ASRock 890FX Deluxe5 Motherboard Italiano - ASRock 890FX Deluxe5 | Quick Installation Guide - Page 99
) Una o altra estremità del cavo (Opzionale) di dati SATA può essere collegata al disco rigido SATA3 o al connettore di SATA3 su questa cartolina base. 99 ASRock 890FX Deluxe5 Motherboard - ASRock 890FX Deluxe5 | Quick Installation Guide - Page 100
del drive. Poi connettete l'estremità bianca del cavo di alimentazione SATA al connettore power dell'alimentatore. Oltre alle sei porte USB 2.0 predefinite nel pannello I/O, la scheda moduli ad infrarossi optional per la trasmissione e la ricezione senza fili. 100 ASRock 890FX Deluxe5 Motherboard - ASRock 890FX Deluxe5 | Quick Installation Guide - Page 101
in modo corretto. Attenersi alle istruzioni del nostro manuale e del manuale del telaio per installare il sistema. 2. Se AC'97. E. Per attivare il microfono frontale. Sistema operativo Windows® XP / XP 64-bit: Selezionare "Mixer". Selezionare "Recorder ASRock 890FX Deluxe5 Motherboard 101 Italiano - ASRock 890FX Deluxe5 | Quick Installation Guide - Page 102
). Collegare le casse del telaio a questo collettore. Collegare i cavi della ventola ai corrispondenti connettori facendo combaciare il cavo nero col pin di terra. Italiano 102 ASRock 890FX Deluxe5 Motherboard - ASRock 890FX Deluxe5 | Quick Installation Guide - Page 103
essere funzionante se viene utilizzata una fornitura elettrica tradizionale a 4-pin ATX 12V. Per usare tale fornitura elettrica 4-pin ATX 12V, prego collegare la presa elettrica al Pin 1 e Pin 5. 1 4 Installazione elettrica 4-Pin ATX 12V 5 8 ASRock 890FX Deluxe5 Motherboard 103 Italiano - ASRock 890FX Deluxe5 | Quick Installation Guide - Page 104
VGA, consente al sistema di collegare dispositivi per TV digitale HDMI/proiettori/ LCD . Collegare il connettore HDMI_SPDIF della scheda VGA HDMI a questo header. Italiano 104 ASRock 890FX Deluxe5 Motherboard - ASRock 890FX Deluxe5 | Quick Installation Guide - Page 105
il cavo USB 3.0 e il supporto USB 3.0 posteriore. Punto 3 Avvitare le due viti nel supporto USB 3.0 posteriore. Punto 4 Inserire il supporto USB 3.0 posteriore nel telaio. Italiano ASRock 890FX Deluxe5 Motherboard 105 - ASRock 890FX Deluxe5 | Quick Installation Guide - Page 106
vengono rilevati automaticamente ed elencati nella pagina del driver del CD in dotazione. Per l'installazione dei driver necessari, procedere in base ad un ordine dall'alto verso il basso. In tal modo, i driver installati funzioneranno correttamente. Italiano 106 ASRock 890FX Deluxe5 Motherboard - ASRock 890FX Deluxe5 | Quick Installation Guide - Page 107
del CD di supporto, per le relative procedure: ...\ RAID Installation Guide (Guida all'installazione RAID) 2.12 Installazione di Windows® 7 / 7 64-bit / VistaTM / VistaTM 64 ) su [IDE]. 2° PASSO: Installazione di Windows® XP / XP 64-bit sul sistema. Italiano ASRock 890FX Deluxe5 Motherboard 107 - ASRock 890FX Deluxe5 | Quick Installation Guide - Page 108
bit senza funzioni RAID Se si desidera installare Windows® 7 / 7 64 bit / VistaTM / VistaTM 64 bit sui dischi rigidi SATA3 senza funzioni RAID, seguire le AHCI]. Passo 2: Installazione di Windows® 7 / 7 64-bit / VistaTM / VistaTM 64-bit sul sistema. Italiano 108 ASRock 890FX Deluxe5 Motherboard - ASRock 890FX Deluxe5 | Quick Installation Guide - Page 109
BIOS La Flash Memory sulla scheda madre contiene le Setup Utility. Quando si avvia il computer, premi durante il Power-On-Self-Test (POST) della Setup utility del BIOS; altrimenti, POST continua con i suoi test di routine. Per entrare il BIOS ù. Italiano ASRock 890FX Deluxe5 Motherboard 109 - ASRock 890FX Deluxe5 | Quick Installation Guide - Page 110
de modelo específico de su placa. www.asrock.com/support/index.asp 1.1 Contenido de la caja Placa base ASRock 890FX Deluxe5 (Factor forma ATX: 30,5 cm x 24,4 cm, 12,0" x 9,6") Guía de instalación rápida de ASRock 890FX Deluxe5 CD de soporte de ASRock 890FX Deluxe5 Una cinta de datos IDE de conducci - ASRock 890FX Deluxe5 | Quick Installation Guide - Page 111
Contenido (Realtek ALC892 Audio Codec) - Compatible con audio Blu-ray de alta calidad - Compatible con THX TruStudio ProTM - PCIE x1 Gigabit LAN 10/100/1000 Mb/s - Realtek RTL8111E - Soporta Wake-On-LAN - Admite detección de conexión de cable LAN ASRock 890FX Deluxe5 Motherboard 111 Español - ASRock 890FX Deluxe5 | Quick Installation Guide - Page 112
6 x conectores SATA3 de 6,0 Gb/s con chip AMD SB850 compatibles con funciones RAID (RAID 0, RAID 1, RAID 0+1 y RAID 5), NCQ, AHCI y de "conexión en caliente ón ATX - 8-pin conector de ATX 12V power - Conector de Audio Interno - Conector de audio de panel frontal ASRock 890FX Deluxe5 Motherboard - ASRock 890FX Deluxe5 | Quick Installation Guide - Page 113
ajuste de la velocidad del ventilador de la CPU y Español el chasis - Monitor de Voltaje: +12V, +5V, +3.3V, Vcore OS - En conformidad con Microsoft® Windows® 7 / 7 64 bits / VistaTM / VistaTM 64 bits / XP / XP 64 bits Certificaciones - FCC, CE, WHQL ASRock 890FX Deluxe5 Motherboard 113 - ASRock 890FX Deluxe5 | Quick Installation Guide - Page 114
http://www.asrock.com 5. Debido a las limitaciones del sistema, el tamaño real de la memoria debe ser inferior a 4GB para que el sistema pueda funcionar bajo Windows® 7 / VistaTM / XP. Para equipos con Windows® OS con CPU de 64-bit, no existe dicha limitación. ASRock 890FX Deluxe5 Motherboard Espa - ASRock 890FX Deluxe5 | Quick Installation Guide - Page 115
Windows®. Gracias a esta utilidad, sólo necesitará pulsar durante la fase POST o pulsar para acceder al menú de configuración del BIOS y a la utilidad ASRock de visitar con frecuencia el sitio web oficial de ASRock, puesto que pondremos a su ASRock 890FX Deluxe5 Motherboard 115 Español - ASRock 890FX Deluxe5 | Quick Installation Guide - Page 116
sistema operativo es Windows® 7 / 7 64 bits / VistaTM / VistaTM 64 bits y que la versión de su explorador es IE8. Sitio Web de ASRock: http://www.asrock.com/Feature/SmartView/index.asp 12. ASRock XFast USB puede decir, la eficiencia de energía de 5v en modo de espera ASRock 890FX Deluxe5 Motherboard - ASRock 890FX Deluxe5 | Quick Installation Guide - Page 117
de la fuente de alimentación para obtener más detalles. 2. Instalación Esta placa base tiene un factor de forma ATX (12,0 pulgadas x 9,6 pulgadas, 30,5 cm. x 24,4 cm). Antes de instalar la placa base, apriete demasiado. Eso podría dañar la placa madre. Español ASRock 890FX Deluxe5 Motherboard 117 - ASRock 890FX Deluxe5 | Quick Installation Guide - Page 118
entonces el ventilador de la CPU al conector CPU FAN (CPU_FAN1, consulte Página 2, N. 7 o CPU_FAN2, consulte Página 2, N. 8). Para realizar la instalación correctamente, consulte el manual de instrucciones del ventilador de la CPU y el radiador. Español 118 ASRock 890FX Deluxe5 Motherboard - ASRock 890FX Deluxe5 | Quick Installation Guide - Page 119
pares idénticos DDR3 DIMM en el Doble Canal B (DDR3_A2 y DDR3_B2; Ranuras Blanco; consulte p.2 N.10), de modo que pueda activarse la Tecnología de Memoria de Doble Canal. Esta placa base también le se recomienda instalarlos en las ranuras DDR3_A2 y DDR3_B2. ASRock 890FX Deluxe5 Motherboard 119 - ASRock 890FX Deluxe5 | Quick Installation Guide - Page 120
de la ranura hasta que los clips de sujeción de ambos lados queden completamente introducidos en su sitio y la DIMM se haya asentado apropiadamente. 120 ASRock 890FX Deluxe5 Motherboard - ASRock 890FX Deluxe5 | Quick Installation Guide - Page 121
2.4 Ranuras de Expansión (ranuras PCI y ranuras PCI Express) La placa madre 890FX Deluxe5 cuenta con 2 ranuras PCI y 5 ranuras PCI Express. Ranura PCI: Para instalar tarjetas firmemente la tarjeta en la ranura. Paso 4. Asegure la tarjeta con tornillos. Español ASRock 890FX Deluxe5 Motherboard 121 - ASRock 890FX Deluxe5 | Quick Installation Guide - Page 122
érdase de quitar el jumper cap después de limpiar el COMS. Si necesita borrar la CMOS cuando acabe de finalizar la actualización de la BIOS, debe arrancar primero el sistema y, a continuación, apagarlo antes de realizar la acción de borrado de CMOS. 122 ASRock 890FX Deluxe5 Motherboard Español - ASRock 890FX Deluxe5 | Quick Installation Guide - Page 123
extremo del cable de los datos de SATA puede ser conectado con el disco duro de SATA3 o el conectador de SATA3 en esta placa base. ASRock 890FX Deluxe5 Motherboard 123 - ASRock 890FX Deluxe5 | Quick Installation Guide - Page 124
infrarrojos de transmisión y recepción wireless opcional. Permite recepción de input CD1 audio de fuente sónica como CD- ROM, DVD-ROM, TV tuner, o tarjeta MPEG. 124 ASRock 890FX Deluxe5 Motherboard - ASRock 890FX Deluxe5 | Quick Installation Guide - Page 125
operar correctamente. Por favor, siga las instrucciones en nuestro manual y en el manual de chasis para instalar su sistema. 2. Si utiliza el 97. E. Activación del micrófono frontal. En sistemas operativos Windows® XP / XP 64-bit: Seleccione "Mixer" (Mezclador). ASRock 890FX Deluxe5 Motherboard 125 - ASRock 890FX Deluxe5 | Quick Installation Guide - Page 126
favor, conecte los cables del ventilador a los conectores de ventilador, haciendo coincidir el cable negro con la patilla de masa. (3-pin PWR_FAN1) (vea p.2, N. 39) 126 ASRock 890FX Deluxe5 Motherboard - ASRock 890FX Deluxe5 | Quick Installation Guide - Page 127
de ATX 12V power (8-pin ATX12V1) 1 4 (vea p.2, No. 4) 5 8 Tenga en cuenta que es necesario conectar este conector a una toma de corriente con el enchufe ATX 12V, de modo que proporcione suficiente electricidad. De lo contrario no se podrá encender. Español ASRock 890FX Deluxe5 Motherboard - ASRock 890FX Deluxe5 | Quick Installation Guide - Page 128
su fuente de energía junto con Pin 1 y Pin 5. 1 4 Instalación de Fuente de Energía de 4-Pin ATX 12V 5 8 Jefe de IEEE 1394 (9-pin FRONT_1394) (ver p.2, N. 14) Cabezal del puerto COM (9-pin COM1) HDMI_SPDIF de la tarjeta VGA HDMI a esta cabecera. Español 128 ASRock 890FX Deluxe5 Motherboard - ASRock 890FX Deluxe5 | Quick Installation Guide - Page 129
soporte USB 3.0 posterior juntos. Paso 3 Atornille los dos tornillos en el soporte USB 3.0 posterior. Paso 4 Coloque el soporte USB 3.0 posterior en el chasis. Español ASRock 890FX Deluxe5 Motherboard 129 - ASRock 890FX Deluxe5 | Quick Installation Guide - Page 130
las páginas 31, 32, 33 y 34 si desea obtener más información acerca de la lectura de los códigos del indicador LED de depuración. Español 130 ASRock 890FX Deluxe5 Motherboard - ASRock 890FX Deluxe5 | Quick Installation Guide - Page 131
2.10 Guía detallado: ..\ RAID Installation Guide 2.12 Instalación de Windows® 7 / 7 64 bits / VistaTM / VistaTM 64 bits / XP / XP 64 bits sin Funciones RAID Si desea instalar Windows® 7 el sistema operativo Windows® XP / XP 64 bits en su sistema. Español ASRock 890FX Deluxe5 Motherboard 131 - ASRock 890FX Deluxe5 | Quick Installation Guide - Page 132
64 bits sin Funciones RAID Si desea instalar Windows® 7 / 7 64 bits / VistaTM / VistaTM 64 bits en sus HDDs SATA3 sin funciones RAID, por favor siga los Instale el sistema operativo Windows® 7 / 7 64 bits / VistaTM / VistaTM 64 bits en su sistema. Español 132 ASRock 890FX Deluxe5 Motherboard - ASRock 890FX Deluxe5 | Quick Installation Guide - Page 133
la BIOS, por favor refiérase al Manual del Usuario (archivo PDF) contenido en el CD. 4.Información de Software Support CD Esta placa-base soporta diversos tipos de sistema operativo Windows®: 7 archivo ASSETUP.EXE para iniciar la instalación. Español ASRock 890FX Deluxe5 Motherboard 133 - ASRock 890FX Deluxe5 | Quick Installation Guide - Page 134
134 ASRock 890FX Deluxe5 Motherboard - ASRock 890FX Deluxe5 | Quick Installation Guide - Page 135
ASRock 890FX Deluxe5 Motherboard 135 - ASRock 890FX Deluxe5 | Quick Installation Guide - Page 136
136 ASRock 890FX Deluxe5 Motherboard - ASRock 890FX Deluxe5 | Quick Installation Guide - Page 137
ASRock 890FX Deluxe5 Motherboard 137 - ASRock 890FX Deluxe5 | Quick Installation Guide - Page 138
138 ASRock 890FX Deluxe5 Motherboard - ASRock 890FX Deluxe5 | Quick Installation Guide - Page 139
ASRock 890FX Deluxe5 Motherboard 139 - ASRock 890FX Deluxe5 | Quick Installation Guide - Page 140
140 ASRock 890FX Deluxe5 Motherboard - ASRock 890FX Deluxe5 | Quick Installation Guide - Page 141
ASRock 890FX Deluxe5 Motherboard 141 - ASRock 890FX Deluxe5 | Quick Installation Guide - Page 142
íà 90 142 ASRock 890FX Deluxe5 Motherboard - ASRock 890FX Deluxe5 | Quick Installation Guide - Page 143
ASRock 890FX Deluxe5 Motherboard 143 - ASRock 890FX Deluxe5 | Quick Installation Guide - Page 144
144 ASRock 890FX Deluxe5 Motherboard - ASRock 890FX Deluxe5 | Quick Installation Guide - Page 145
ASRock 890FX Deluxe5 Motherboard 145 - ASRock 890FX Deluxe5 | Quick Installation Guide - Page 146
Short Open 146 ASRock 890FX Deluxe5 Motherboard - ASRock 890FX Deluxe5 | Quick Installation Guide - Page 147
la banda roja debe quedar en el mismo lado que el contacto 1 SATA3_1_2 SATA3_3_4 SATA3_5_6 SATA3_8 SATA3_7 ASRock 890FX Deluxe5 Motherboard 147 - ASRock 890FX Deluxe5 | Quick Installation Guide - Page 148
148 CD1 ASRock 890FX Deluxe5 Motherboard - ASRock 890FX Deluxe5 | Quick Installation Guide - Page 149
ASRock 890FX Deluxe5 Motherboard 149 - ASRock 890FX Deluxe5 | Quick Installation Guide - Page 150
150 ASRock 890FX Deluxe5 Motherboard - ASRock 890FX Deluxe5 | Quick Installation Guide - Page 151
1 2 3 4 12 24 1 13 1 4 5 8 12 24 1 13 ASRock 890FX Deluxe5 Motherboard 151 - ASRock 890FX Deluxe5 | Quick Installation Guide - Page 152
1 4 5 8 152 ASRock 890FX Deluxe5 Motherboard - ASRock 890FX Deluxe5 | Quick Installation Guide - Page 153
ASRock 890FX Deluxe5 Motherboard 153 - ASRock 890FX Deluxe5 | Quick Installation Guide - Page 154
RESET clr CMOS 154 ASRock 890FX Deluxe5 Motherboard - ASRock 890FX Deluxe5 | Quick Installation Guide - Page 155
ASRock 890FX Deluxe5 Motherboard 155 - ASRock 890FX Deluxe5 | Quick Installation Guide - Page 156
156 ASRock 890FX Deluxe5 Motherboard - ASRock 890FX Deluxe5 | Quick Installation Guide - Page 157
ASRock 890FX Deluxe5 Motherboard 157 - ASRock 890FX Deluxe5 | Quick Installation Guide - Page 158
Türkçe 158 ASRock 890FX Deluxe5 Motherboard - ASRock 890FX Deluxe5 | Quick Installation Guide - Page 159
ASRock 890FX Deluxe5 Motherboard 159 Türkçe - ASRock 890FX Deluxe5 | Quick Installation Guide - Page 160
Türkçe 160 ASRock 890FX Deluxe5 Motherboard - ASRock 890FX Deluxe5 | Quick Installation Guide - Page 161
ASRock 890FX Deluxe5 Motherboard 161 Türkçe - ASRock 890FX Deluxe5 | Quick Installation Guide - Page 162
Türkçe 162 ASRock 890FX Deluxe5 Motherboard - ASRock 890FX Deluxe5 | Quick Installation Guide - Page 163
ASRock 890FX Deluxe5 Motherboard 163 Türkçe - ASRock 890FX Deluxe5 | Quick Installation Guide - Page 164
Türkçe 164 ASRock 890FX Deluxe5 Motherboard - ASRock 890FX Deluxe5 | Quick Installation Guide - Page 165
ASRock 890FX Deluxe5 Motherboard 165 Türkçe - ASRock 890FX Deluxe5 | Quick Installation Guide - Page 166
Türkçe 166 ASRock 890FX Deluxe5 Motherboard - ASRock 890FX Deluxe5 | Quick Installation Guide - Page 167
ASRock 890FX Deluxe5 Motherboard 167 Türkçe - ASRock 890FX Deluxe5 | Quick Installation Guide - Page 168
Türkçe 168 ASRock 890FX Deluxe5 Motherboard - ASRock 890FX Deluxe5 | Quick Installation Guide - Page 169
Short Open Default Clear CMOS Türkçe ASRock 890FX Deluxe5 Motherboard 169 - ASRock 890FX Deluxe5 | Quick Installation Guide - Page 170
SATA3_1_2 SATA3_3_4 SATA3_5_6 SATA3_8 SATA3_7 Türkçe 170 ASRock 890FX Deluxe5 Motherboard - ASRock 890FX Deluxe5 | Quick Installation Guide - Page 171
(bkz. s.2 No. 27) Türkçe CD1 ASRock 890FX Deluxe5 Motherboard 171 - ASRock 890FX Deluxe5 | Quick Installation Guide - Page 172
Türkçe 172 ASRock 890FX Deluxe5 Motherboard - ASRock 890FX Deluxe5 | Quick Installation Guide - Page 173
1 2 3 4 Türkçe 12 24 1 13 ASRock 890FX Deluxe5 Motherboard 173 - ASRock 890FX Deluxe5 | Quick Installation Guide - Page 174
1 4 5 8 (bkz. s.2 No.14) 12 24 1 13 1 4 5 8 Türkçe 174 ASRock 890FX Deluxe5 Motherboard - ASRock 890FX Deluxe5 | Quick Installation Guide - Page 175
ASRock 890FX Deluxe5 Motherboard 175 Türkçe - ASRock 890FX Deluxe5 | Quick Installation Guide - Page 176
(bkz. s.2 No.26) (bkz. s.2 No.25) (bkz. s.3 No.17) RESET clr CMOS Türkçe 176 ASRock 890FX Deluxe5 Motherboard - ASRock 890FX Deluxe5 | Quick Installation Guide - Page 177
ASRock 890FX Deluxe5 Motherboard 177 Türkçe - ASRock 890FX Deluxe5 | Quick Installation Guide - Page 178
Türkçe 178 ASRock 890FX Deluxe5 Motherboard - ASRock 890FX Deluxe5 | Quick Installation Guide - Page 179
ASRock 890FX Deluxe5 Motherboard 179 Türkçe - ASRock 890FX Deluxe5 | Quick Installation Guide - Page 180
180 ASRock 890FX Deluxe5 Motherboard - ASRock 890FX Deluxe5 | Quick Installation Guide - Page 181
'' ASRock 890FX Deluxe5 Motherboard 181 - ASRock 890FX Deluxe5 | Quick Installation Guide - Page 182
" " " " 182 ASRock 890FX Deluxe5 Motherboard - ASRock 890FX Deluxe5 | Quick Installation Guide - Page 183
® ASRock 890FX Deluxe5 Motherboard 183 - ASRock 890FX Deluxe5 | Quick Installation Guide - Page 184
" " " " ® ® 184 ASRock 890FX Deluxe5 Motherboard - ASRock 890FX Deluxe5 | Quick Installation Guide - Page 185
® ® ASRock 890FX Deluxe5 Motherboard 185 - ASRock 890FX Deluxe5 | Quick Installation Guide - Page 186
186 ASRock 890FX Deluxe5 Motherboard - ASRock 890FX Deluxe5 | Quick Installation Guide - Page 187
ASRock 890FX Deluxe5 Motherboard 187 - ASRock 890FX Deluxe5 | Quick Installation Guide - Page 188
- " "( 188 ASRock 890FX Deluxe5 Motherboard - ASRock 890FX Deluxe5 | Quick Installation Guide - Page 189
ASRock 890FX Deluxe5 Motherboard 189 - ASRock 890FX Deluxe5 | Quick Installation Guide - Page 190
190 ASRock 890FX Deluxe5 Motherboard - ASRock 890FX Deluxe5 | Quick Installation Guide - Page 191
® ® "" "" "" ASRock 890FX Deluxe5 Motherboard 191 - ASRock 890FX Deluxe5 | Quick Installation Guide - Page 192
SATA3_1_2 SATA3_3_4 SATA3_5_6 SATA3_8 SATA3_7 192 ASRock 890FX Deluxe5 Motherboard - ASRock 890FX Deluxe5 | Quick Installation Guide - Page 193
CD1 ASRock 890FX Deluxe5 Motherboard 193 - ASRock 890FX Deluxe5 | Quick Installation Guide - Page 194
® " " " " ® " " " " " " 194 ASRock 890FX Deluxe5 Motherboard - ASRock 890FX Deluxe5 | Quick Installation Guide - Page 195
1 2 3 4 ASRock 890FX Deluxe5 Motherboard 195 - ASRock 890FX Deluxe5 | Quick Installation Guide - Page 196
12 24 1 13 1 4 5 8 12 24 1 13 1 4 5 8 196 ASRock 890FX Deluxe5 Motherboard - ASRock 890FX Deluxe5 | Quick Installation Guide - Page 197
" " ASRock 890FX Deluxe5 Motherboard 197 - ASRock 890FX Deluxe5 | Quick Installation Guide - Page 198
198 RESET clr CMOS " " ASRock 890FX Deluxe5 Motherboard - ASRock 890FX Deluxe5 | Quick Installation Guide - Page 199
® ® \ ® ® ASRock 890FX Deluxe5 Motherboard 199 - ASRock 890FX Deluxe5 | Quick Installation Guide - Page 200
® ® ® ® ® ® ® 200 ASRock 890FX Deluxe5 Motherboard - ASRock 890FX Deluxe5 | Quick Installation Guide - Page 201
" " \\ " " ASRock 890FX Deluxe5 Motherboard 201 - ASRock 890FX Deluxe5 | Quick Installation Guide - Page 202
202 ASRock 890FX Deluxe5 Motherboard - ASRock 890FX Deluxe5 | Quick Installation Guide - Page 203
'' ASRock 890FX Deluxe5 Motherboard 203 - ASRock 890FX Deluxe5 | Quick Installation Guide - Page 204
204 ASRock 890FX Deluxe5 Motherboard - ASRock 890FX Deluxe5 | Quick Installation Guide - Page 205
® ® ® ASRock 890FX Deluxe5 Motherboard 205 - ASRock 890FX Deluxe5 | Quick Installation Guide - Page 206
" " ® ® 206 ASRock 890FX Deluxe5 Motherboard - ASRock 890FX Deluxe5 | Quick Installation Guide - Page 207
® ASRock 890FX Deluxe5 Motherboard 207 - ASRock 890FX Deluxe5 | Quick Installation Guide - Page 208
208 ASRock 890FX Deluxe5 Motherboard - ASRock 890FX Deluxe5 | Quick Installation Guide - Page 209
ASRock 890FX Deluxe5 Motherboard 209 - ASRock 890FX Deluxe5 | Quick Installation Guide - Page 210
210 ASRock 890FX Deluxe5 Motherboard - ASRock 890FX Deluxe5 | Quick Installation Guide - Page 211
ASRock 890FX Deluxe5 Motherboard 211 - ASRock 890FX Deluxe5 | Quick Installation Guide - Page 212
212 ASRock 890FX Deluxe5 Motherboard - ASRock 890FX Deluxe5 | Quick Installation Guide - Page 213
ASRock 890FX Deluxe5 Motherboard 213 - ASRock 890FX Deluxe5 | Quick Installation Guide - Page 214
® ® 214 ASRock 890FX Deluxe5 Motherboard - ASRock 890FX Deluxe5 | Quick Installation Guide - Page 215
SATA3_1_2 SATA3_3_4 SATA3_5_6 SATA3_8 SATA3_7 ASRock 890FX Deluxe5 Motherboard 215 - ASRock 890FX Deluxe5 | Quick Installation Guide - Page 216
CD1 216 ASRock 890FX Deluxe5 Motherboard - ASRock 890FX Deluxe5 | Quick Installation Guide - Page 217
® " " " ® " " " " " " " ASRock 890FX Deluxe5 Motherboard 217 - ASRock 890FX Deluxe5 | Quick Installation Guide - Page 218
218 1 2 3 4 ASRock 890FX Deluxe5 Motherboard - ASRock 890FX Deluxe5 | Quick Installation Guide - Page 219
12 24 1 13 1 4 5 8 12 24 1 13 1 4 5 8 ASRock 890FX Deluxe5 Motherboard 219 - ASRock 890FX Deluxe5 | Quick Installation Guide - Page 220
" 220 ASRock 890FX Deluxe5 Motherboard - ASRock 890FX Deluxe5 | Quick Installation Guide - Page 221
RESET clr CMOS ASRock 890FX Deluxe5 Motherboard 221 - ASRock 890FX Deluxe5 | Quick Installation Guide - Page 222
® ® \ ® ® 222 ASRock 890FX Deluxe5 Motherboard - ASRock 890FX Deluxe5 | Quick Installation Guide - Page 223
® ® ® ® ® ® ® ASRock 890FX Deluxe5 Motherboard 223 - ASRock 890FX Deluxe5 | Quick Installation Guide - Page 224
® ® TM TM 224 ASRock 890FX Deluxe5 Motherboard - ASRock 890FX Deluxe5 | Quick Installation Guide - Page 225
ASRock 890FX Deluxe5 Motherboard 225 - ASRock 890FX Deluxe5 | Quick Installation Guide - Page 226
'' ™ 226 ASRock 890FX Deluxe5 Motherboard - ASRock 890FX Deluxe5 | Quick Installation Guide - Page 227
ASRock 890FX Deluxe5 Motherboard 227 - ASRock 890FX Deluxe5 | Quick Installation Guide - Page 228
® ® 228 ASRock 890FX Deluxe5 Motherboard - ASRock 890FX Deluxe5 | Quick Installation Guide - Page 229
® ® ® ASRock 890FX Deluxe5 Motherboard 229 - ASRock 890FX Deluxe5 | Quick Installation Guide - Page 230
® ® 230 ASRock 890FX Deluxe5 Motherboard - ASRock 890FX Deluxe5 | Quick Installation Guide - Page 231
ASRock 890FX Deluxe5 Motherboard 231 - ASRock 890FX Deluxe5 | Quick Installation Guide - Page 232
232 ASRock 890FX Deluxe5 Motherboard - ASRock 890FX Deluxe5 | Quick Installation Guide - Page 233
ASRock 890FX Deluxe5 Motherboard 233 - ASRock 890FX Deluxe5 | Quick Installation Guide - Page 234
234 ASRock 890FX Deluxe5 Motherboard - ASRock 890FX Deluxe5 | Quick Installation Guide - Page 235
ASRock 890FX Deluxe5 Motherboard 235 - ASRock 890FX Deluxe5 | Quick Installation Guide - Page 236
® ® 236 ASRock 890FX Deluxe5 Motherboard - ASRock 890FX Deluxe5 | Quick Installation Guide - Page 237
SATA3_1_2 SATA3_3_4 SATA3_5_6 SATA3_8 SATA3_7 ASRock 890FX Deluxe5 Motherboard 237 - ASRock 890FX Deluxe5 | Quick Installation Guide - Page 238
CD1 238 ASRock 890FX Deluxe5 Motherboard - ASRock 890FX Deluxe5 | Quick Installation Guide - Page 239
® ® ASRock 890FX Deluxe5 Motherboard 239 - ASRock 890FX Deluxe5 | Quick Installation Guide - Page 240
1 2 3 4 240 12 24 1 13 ASRock 890FX Deluxe5 Motherboard - ASRock 890FX Deluxe5 | Quick Installation Guide - Page 241
1 4 5 8 12 24 1 13 1 4 5 8 ASRock 890FX Deluxe5 Motherboard 241 - ASRock 890FX Deluxe5 | Quick Installation Guide - Page 242
" " 242 ASRock 890FX Deluxe5 Motherboard - ASRock 890FX Deluxe5 | Quick Installation Guide - Page 243
RESET clr CMOS ASRock 890FX Deluxe5 Motherboard 243 - ASRock 890FX Deluxe5 | Quick Installation Guide - Page 244
® ® ® ® ® ® ® 244 ASRock 890FX Deluxe5 Motherboard - ASRock 890FX Deluxe5 | Quick Installation Guide - Page 245
® ® ® ® ASRock 890FX Deluxe5 Motherboard 245 - ASRock 890FX Deluxe5 | Quick Installation Guide - Page 246
® ® 246 ASRock 890FX Deluxe5 Motherboard - ASRock 890FX Deluxe5 | Quick Installation Guide - Page 247
X O O O X O O O O: X: O O O O ASRock 890FX Deluxe5 Motherboard 247 - ASRock 890FX Deluxe5 | Quick Installation Guide - Page 248
248 ASRock 890FX Deluxe5 Motherboard - ASRock 890FX Deluxe5 | Quick Installation Guide - Page 249
ASRock 890FX Deluxe5 Motherboard 249 - ASRock 890FX Deluxe5 | Quick Installation Guide - Page 250
250 ASRock 890FX Deluxe5 Motherboard - ASRock 890FX Deluxe5 | Quick Installation Guide - Page 251
® ® ASRock 890FX Deluxe5 Motherboard 251 - ASRock 890FX Deluxe5 | Quick Installation Guide - Page 252
® ® ® 252 ASRock 890FX Deluxe5 Motherboard - ASRock 890FX Deluxe5 | Quick Installation Guide - Page 253
® ® ASRock 890FX Deluxe5 Motherboard 253 - ASRock 890FX Deluxe5 | Quick Installation Guide - Page 254
254 ASRock 890FX Deluxe5 Motherboard - ASRock 890FX Deluxe5 | Quick Installation Guide - Page 255
ASRock 890FX Deluxe5 Motherboard 255 - ASRock 890FX Deluxe5 | Quick Installation Guide - Page 256
256 ASRock 890FX Deluxe5 Motherboard - ASRock 890FX Deluxe5 | Quick Installation Guide - Page 257
ASRock 890FX Deluxe5 Motherboard 257 - ASRock 890FX Deluxe5 | Quick Installation Guide - Page 258
258 ASRock 890FX Deluxe5 Motherboard - ASRock 890FX Deluxe5 | Quick Installation Guide - Page 259
ASRock 890FX Deluxe5 Motherboard 259 - ASRock 890FX Deluxe5 | Quick Installation Guide - Page 260
SATA3_1_2 SATA3_3_4 SATA3_5_6 SATA3_8 SATA3_7 260 ASRock 890FX Deluxe5 Motherboard - ASRock 890FX Deluxe5 | Quick Installation Guide - Page 261
CD1 ASRock 890FX Deluxe5 Motherboard 261 - ASRock 890FX Deluxe5 | Quick Installation Guide - Page 262
® ® 262 ASRock 890FX Deluxe5 Motherboard - ASRock 890FX Deluxe5 | Quick Installation Guide - Page 263
1 2 3 4 12 24 1 13 ASRock 890FX Deluxe5 Motherboard 263 - ASRock 890FX Deluxe5 | Quick Installation Guide - Page 264
1 4 5 8 12 24 1 13 1 4 5 8 264 ASRock 890FX Deluxe5 Motherboard - ASRock 890FX Deluxe5 | Quick Installation Guide - Page 265
ASRock 890FX Deluxe5 Motherboard 265 - ASRock 890FX Deluxe5 | Quick Installation Guide - Page 266
RESET clr CMOS 266 ASRock 890FX Deluxe5 Motherboard - ASRock 890FX Deluxe5 | Quick Installation Guide - Page 267
® ® ® ® ® ® ® ® ® ASRock 890FX Deluxe5 Motherboard 267 - ASRock 890FX Deluxe5 | Quick Installation Guide - Page 268
® ® 268 ASRock 890FX Deluxe5 Motherboard - ASRock 890FX Deluxe5 | Quick Installation Guide - Page 269
® ® ® ASRock 890FX Deluxe5 Motherboard 269 - ASRock 890FX Deluxe5 | Quick Installation Guide - Page 270
HDD Larger Than 2TB This motherboard is adopting UEFI BIOS that allows Windows® OS to be installed on a large size HDD (>2TB). Please follow below procedure to install the operating system. 1. Please make sure to use Windows® VistaTM 64-bit (with SP1 or above) or Windows® 7 64-bit. 2. Set AHCI Mode
-
 1
1 -
 2
2 -
 3
3 -
 4
4 -
 5
5 -
 6
6 -
 7
7 -
8
-
9
-
10
-
11
-
12
-
13
-
14
-
15
-
16
-
17
-
18
-
19
-
20
-
21
-
22
-
23
-
24
-
25
-
26
-
27
-
28
-
29
-
30
-
31
-
32
-
33
-
34
-
35
-
36
-
37
-
38
-
39
-
40
-
41
-
42
-
43
-
44
-
45
-
46
-
47
-
48
-
49
-
50
-
51
-
52
-
53
-
54
-
55
-
56
-
57
-
58
-
59
-
60
-
61
-
62
-
63
-
64
-
65
-
66
-
67
-
68
-
69
-
70
-
71
-
72
-
73
-
74
-
75
-
76
-
77
-
78
-
79
-
80
-
81
-
82
-
83
-
84
-
85
-
86
-
87
-
88
-
89
-
90
-
91
-
92
-
93
-
94
-
95
-
96
-
97
-
98
-
99
-
100
-
101
-
102
-
103
-
104
-
105
-
106
-
107
-
108
-
109
-
110
-
111
-
112
-
113
-
114
-
115
-
116
-
117
-
118
-
119
-
120
-
121
-
122
-
123
-
124
-
125
-
126
-
127
-
128
-
129
-
130
-
131
-
132
-
133
-
134
-
135
-
136
-
137
-
138
-
139
-
140
-
141
-
142
-
143
-
144
-
145
-
146
-
147
-
148
-
149
-
150
-
151
-
152
-
153
-
154
-
155
-
156
-
157
-
158
-
159
-
160
-
161
-
162
-
163
-
164
-
165
-
166
-
167
-
168
-
169
-
170
-
171
-
172
-
173
-
174
-
175
-
176
-
177
-
178
-
179
-
180
-
181
-
182
-
183
-
184
-
185
-
186
-
187
-
188
-
189
-
190
-
191
-
192
-
193
-
194
-
195
-
196
-
197
-
198
-
199
-
200
-
201
-
202
-
203
-
204
-
205
-
206
-
207
-
208
-
209
-
210
-
211
-
212
-
213
-
214
-
215
-
216
-
217
-
218
-
219
-
220
-
221
-
222
-
223
-
224
-
225
-
226
-
227
-
228
-
229
-
230
-
231
-
232
-
233
-
234
-
235
-
236
-
237
-
238
-
239
-
240
-
241
-
242
-
243
-
244
-
245
-
246
-
247
-
248
-
249
-
250
-
251
-
252
-
253
-
254
-
255
-
256
-
257
-
258
-
259
-
260
-
261
-
262
-
263
-
264
-
265
-
266
-
267
-
268
-
269
-
270
 |
 |
1
ASRock
890FX Deluxe5
Motherboard
English
English
English
English
English
Copyright Notice:
Copyright Notice:
Copyright Notice:
Copyright Notice:
Copyright Notice:
No part of this installation guide may be reproduced, transcribed, transmitted, or trans-
lated in any language, in any form or by any means, except duplication of documen-
tation by the purchaser for backup purpose, without written consent of ASRock Inc.
Products and corporate names appearing in this guide may or may not be registered
trademarks or copyrights of their respective companies, and are used only for identifica-
tion or explanation and to the owners’ benefit, without intent to infringe.
Disclaimer:
Disclaimer:
Disclaimer:
Disclaimer:
Disclaimer:
Specifications and information contained in this guide are furnished for informational
use only and subject to change without notice, and should not be constructed as a
commitment by ASRock. ASRock assumes no responsibility for any errors or omissions
that may appear in this guide.
With respect to the contents of this guide, ASRock does not provide warranty of any kind,
either expressed or implied, including but not limited to the implied warranties or
conditions of merchantability or fitness for a particular purpose. In no event shall
ASRock, its directors, officers, employees, or agents be liable for any indirect, special,
incidental, or consequential damages (including damages for loss of profits, loss of
business, loss of data, interruption of business and the like), even if ASRock has been
advised of the possibility of such damages arising from any defect or error in the guide
or product.
This device complies with Part 15 of the FCC Rules. Operation is subject to the
following two conditions:
(1)
this device may not cause harmful interference, and
(2)
this device must accept any interference received, including interference that
may cause undesired operation.
Published January 2011
Copyright
©
2011 ASRock INC. All rights reserved.
CALIFORNIA, USA ONLY
The Lithium battery adopted on this motherboard contains Perchlorate, a toxic
substance controlled in Perchlorate Best Management Practices (BMP) regulations
passed by the California Legislature. When you discard the Lithium battery in
California, USA, please follow the related regulations in advance.
“Perchlorate Material-special handling may apply, see
www
.dtsc.ca.gov/hazardouswa
ste/perchlorate”
ASRock Website: http://www.asrock.com