ASRock 939A8X-M Quick Installation Guide
ASRock 939A8X-M Manual
 |
View all ASRock 939A8X-M manuals
Add to My Manuals
Save this manual to your list of manuals |
ASRock 939A8X-M manual content summary:
- ASRock 939A8X-M | Quick Installation Guide - Page 1
purchaser for backup purpose, without written consent of ASRock Inc. Products and corporate names appearing in this guide may or may not be registered trademarks or ASRock Website: http://www.asrock.com Published April 2005 Copyright©2005 ASRock INC. All rights reserved. 1 ASRock 939A8X-M Motherboard - ASRock 939A8X-M | Quick Installation Guide - Page 2
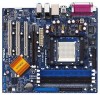
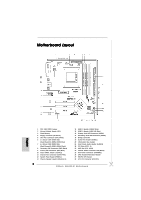
JR1 Jumper / JL1 Jumper 21 Front Panel Audio Header (AUDIO1) 22 PCI Slots (PCI1 - 3) 23 AGP Slot (1.5V_AGP1) 24 Internal Audio Connector: CD1 (Black) 25 ATX Power Connector (ATXPWR1) 26 CPU Heatsink Retention Module 27 939-Pin CPU Socket 28 ATX 12V Connector (ATX12V1) 2 ASRock 939A8X-M Motherboard - ASRock 939A8X-M | Quick Installation Guide - Page 3
details in accordance with the type of speaker you use. TABLE for Audio Output Connection Audio Output Channels Front Speaker Rear Speaker Central / Bass (No. 7) (No. 4) (No. 5) 2 V -- -- 4 V V -- 6 V V V 8 V V V Side Speaker (No. 3) ---V 3 ASRock 939A8X-M Motherboard English - ASRock 939A8X-M | Quick Installation Guide - Page 4
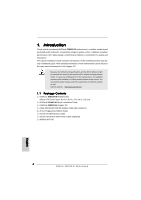
any modifications of this manual occur, the updated version will be available on ASRock website without further notice. You may find the latest memory and CPU support lists on ASRock website as well. ASRock website http://www.asrock.com 1.1 Package Contents 1 x ASRock 939A8X-M Motherboard (Micro ATX - ASRock 939A8X-M | Quick Installation Guide - Page 5
7.1 channels AC'97 Audio LAN: Speed: 802.3u (10/100 Ethernet), supports Wake-On-LAN Hardware Monitor: CPU temperature sensing Motherboard temperature sensing CPU overheat shutdown to protect CPU life (ASRock U-COP)(see CAUTION 2) CPU fan tachometer Chassis fan tachometer Voltage monitoring - ASRock 939A8X-M | Quick Installation Guide - Page 6
technology under Windows system. See APPENDIX on page 37 of "User Manual" in the Support CD to enable AMD's Cool 'n' QuietTM technology. 2. While CPU overheat is detected, the system will automatically shutdown. Before you resume the system, please check if the CPU fan on the motherboard functions - ASRock 939A8X-M | Quick Installation Guide - Page 7
while you push down the socket lever to secure the CPU. The lever clicks on the side tab to indicate that it is locked. Install CPU fan and heatsink. For proper installation, please kindly refer to the instruction manuals of your CPU fan and heatsink vendors. English 7 ASRock 939A8X-M Motherboard - ASRock 939A8X-M | Quick Installation Guide - Page 8
is unable to activate the Dual Channel Memory Technology. 3. If a pair of memory modules is NOT installed in the same Dual Channel, for example, installing a pair of memory modules in DDR1 and DDR3, it is unable to activate the Dual Channel Memory Technology . English 8 ASRock 939A8X-M Motherboard - ASRock 939A8X-M | Quick Installation Guide - Page 9
cause permanent damage to the motherboard and the DIMM if you force the DIMM into the slot at incorrect orientation. STEP 3: Firmly insert the DIMM into the slot until the retaining clips at both ends fully snap back in place and the DIMM is properly seated. English 9 ASRock 939A8X-M Motherboard - ASRock 939A8X-M | Quick Installation Guide - Page 10
with the slot and press firmly until the card is completely seated on the slot. Step 4. Fasten the card to the chassis with screws. 10 ASRock 939A8X-M Motherboard English - ASRock 939A8X-M | Quick Installation Guide - Page 11
front panel and the rear panel audio connectors can work. Clear CMOS Jumper update the BIOS. If you need to clear the CMOS when you just finish updating the BIOS, you must boot up the system first, and then shut it down before you do the clear-CMOS action. English 11 ASRock 939A8X-M Motherboard - ASRock 939A8X-M | Quick Installation Guide - Page 12
support SATA data cables for internal storage devices. The current SATA interface allows up to 1.5 Gb/s data transfer rate. Serial ATA (SATA) Data Cable Either end of the SATA data cable can be connected to the SATA hard disk or the SATA connector on the motherboard. English 12 ASRock 939A8X - ASRock 939A8X-M | Quick Installation Guide - Page 13
21) CD1 These connectors allow you to receive stereo audio input from sound sources such as a CD-ROM, DVD-ROM, TV tuner card, or MPEG card. This is an interface for the front panel audio cable that allows convenient connection and control of audio devices. English 13 ASRock 939A8X-M Motherboard - ASRock 939A8X-M | Quick Installation Guide - Page 14
item 12) Chassis Speaker Connector (4-pin SPEAKER 1) (see p.2 item 13) Chassis Fan Connector (3-pin CHA_FAN1) (see p.2 item 11) CPU Fan Connector (3-pin CPU_FAN1) (see p.2 item 5) ATX Power Connector (20-pin ATXPWR1 if the Game port bracket is installed. English 14 ASRock 939A8X-M Motherboard - ASRock 939A8X-M | Quick Installation Guide - Page 15
on SATA, SATA HDDs must be operated in "RAID" mode. 2. "RAID" and "non-RAID" mode are options under "SATA Operation Mode" in BIOS setup. Please refer to page 28 of User Manual in the support CD for details. They need different drivers during actual operation. 15 ASRock 939A8X-M Motherboard English - ASRock 939A8X-M | Quick Installation Guide - Page 16
in non-RAID mode, you don't need to make a SATA driver diskette before OS installation. Windows 98 SE and Windows ME must be installed by SATA operating in RAID mode, and you don't need to make a SATA driver diskette for these two OS before OS installation. 16 ASRock 939A8X-M Motherboard English - ASRock 939A8X-M | Quick Installation Guide - Page 17
about BIOS Setup, please refer to the User Manual (PDF file) contained in the Support CD. 4. Software Support CD information This motherboard supports various Microsoft® Windows® operating systems: 98 SE/ ME / 2000 / XP. The Support CD that came with the motherboard contains necessary drivers and - ASRock 939A8X-M | Quick Installation Guide - Page 18
18 ASRock 939A8X-M Motherboard - ASRock 939A8X-M | Quick Installation Guide - Page 19
® ® '' ™ '' ™ 19 ASRock 939A8X-M Motherboard - ASRock 939A8X-M | Quick Installation Guide - Page 20
20 ASRock 939A8X-M Motherboard - ASRock 939A8X-M | Quick Installation Guide - Page 21
DDR1 DDR2 DDR3 DDR4 ( )( )( )( ) (1) - - (2) - - (3) 21 ASRock 939A8X-M Motherboard - ASRock 939A8X-M | Quick Installation Guide - Page 22
22 ASRock 939A8X-M Motherboard - ASRock 939A8X-M | Quick Installation Guide - Page 23
23 ASRock 939A8X-M Motherboard - ASRock 939A8X-M | Quick Installation Guide - Page 24
" " SATA2 SATA1 24 ASRock 939A8X-M Motherboard - ASRock 939A8X-M | Quick Installation Guide - Page 25
CD1 25 ASRock 939A8X-M Motherboard - ASRock 939A8X-M | Quick Installation Guide - Page 26
26 ASRock 939A8X-M Motherboard - ASRock 939A8X-M | Quick Installation Guide - Page 27
27 ASRock 939A8X-M Motherboard - ASRock 939A8X-M | Quick Installation Guide - Page 28
.. \ RAID_SETUP_GUIDE \ Chinese.PDF 28 ASRock 939A8X-M Motherboard - ASRock 939A8X-M | Quick Installation Guide - Page 29
® ® 29 ASRock 939A8X-M Motherboard - ASRock 939A8X-M | Quick Installation Guide - Page 30
ASRock 939A8X-M Motherboard (Micro ATX-Formfaktor: 24.4 cm x 21.8 cm; 9.6 Zoll x 8.6 Zoll) ASRock 939A8X-M Schnellinstallationsanleitung ASRock 939A8X-M Support-CD Ein 80-adriges Ultra-ATA 66/100/133 IDE-Flachbandkabel Ein Flachbandkabel für ein 3,5-Zoll-Diskettenlaufwerk Ein Seriell-ATA- (SATA - ASRock 939A8X-M | Quick Installation Guide - Page 31
2 SATA-Anschlüsse, unterstützt bis 1.5 Gb/s Datenübertragungsrate FDD: Unterstützt bis 2 Diskettenlaufwerke Audio: 7.1 Kanal AC'97 Audio LAN: Audio Jack: Side Speaker / Rear Speaker / Central/Bass / Line In / Front Speaker / Microphone (see CAUTION 5) Deutsch 31 ASRock 939A8X-M Motherboard - ASRock 939A8X-M | Quick Installation Guide - Page 32
page 3 for proper connection. 6. Obwohl dieses Motherboard stufenlose Steuerung bietet, wird Overclocking nicht empfohlen. Frequenzen, die von den empfohlenen CPU-Busfrequenzen abweichen, können Instabilität des Systems verursachen oder die CPU beschädigen. Deutsch 32 ASRock 939A8X-M Motherboard - ASRock 939A8X-M | Quick Installation Guide - Page 33
hörbar einrastet. Installieren Sie einen aktiven CPU-Kühler, der die gesamte Fläche der CPU abdeckt und eine ausreichende Wärmeableitung für den von Ihnen verwendeten CPU-Typ bietet. Weitere Hinweise finden Sie der Installationsanleitung für Ihren CPU-Kühler. 33 ASRock 939A8X-M Motherboard Deutsch - ASRock 939A8X-M | Quick Installation Guide - Page 34
2.2 Installation der Speichermodule (DIMM) Die Motherboards 939A8X-M bieten vier 184-pol. DDR (Double Data Rate) DIMMSteckplätze und unterstützen die Dual-Kanal- wird in DDR1 und DDR3 installiert, kann es die Dual-Kanal-Speichertechnologie nicht aktivieren. Deutsch 34 ASRock 939A8X-M Motherboard - ASRock 939A8X-M | Quick Installation Guide - Page 35
zu zwingen, führt dies zu dauerhaften Schäden am Mainboard und am DIMM-Modul. Schritt 3: Drücken Sie die DIMM-Module fest in die Steckplätze, so dass die Halteklammern an beiden Enden des Moduls einschnappen und das DIMM-Modul fest an Ort und Stelle sitzt. 35 ASRock 939A8X-M Motherboard Deutsch - ASRock 939A8X-M | Quick Installation Guide - Page 36
und AGP-Slots): Es gibt 3 PCI-Steckplätze und 1 AGP-Steckplatz auf dem 939A8X-M-Motherboard. PCI-Slots: PCI-Slots werden zur Installation von Erweiterungskarten mit dem 32bit PCI-Interface genutzt 4: Befestigen Sie die Karte mit der Schraube aus Schritt 2. 36 ASRock 939A8X-M Motherboard Deutsch - ASRock 939A8X-M | Quick Installation Guide - Page 37
unmittelbar nach einer BIOS-Aktualisierung. Sollte es dennoch erforderlich sein, den CMOS-Speicher unmittelbar nach einer BIOSAktualisierung zu löschen, müssen Sie das System zunächst hochfahren und anschließend ausschalten, bevor Sie den CMOSLöschvorgang durchführen. 37 ASRock 939A8X-M Motherboard - ASRock 939A8X-M | Quick Installation Guide - Page 38
(SATA1: siehe S.2, Punkt 16) (SATA2: siehe S.2, Punkt 17) SATA2 SATA1 Diese beiden Serial ATA(SATA-)Verbínder unterstützten SATA-Datenkabel für interne Massenspeichergeräte. Die aktuelle SATA-Schnittstelle ermöglicht eine Datenübertragungsrate bis 1,5 Gb/s. Deutsch 38 ASRock 939A8X-M Motherboard - ASRock 939A8X-M | Quick Installation Guide - Page 39
) (siehe S.2 - Nr. 15) ASRock 8CH I/O (E/A) verfügt über 4 Standard-USB 2.0Anschlüsse auf der Rückseite. Wenn die hinteren USBAnschlüsse nicht ausreichen, steht dieser USB 2.0-Header (USB_H4_5) zur Unterstützung 2 weiterer USB 2.0-Anschlüsse zur Verfügung.n. Deutsch 39 ASRock 939A8X-M Motherboard - ASRock 939A8X-M | Quick Installation Guide - Page 40
. Dieses Interface zu einem Audio-Panel auf der Vorderseite Ihres Gehäuses, ermöglicht Ihnen eine bequeme Kontrolle über Audio-Geräte. Dieser Anschluss Sie das CPU Lüfterkabel mit diesem Anschluss und passen Sie den schwarzen Draht dem Erdungsstift an. Deutsch 40 ASRock 939A8X-M Motherboard - ASRock 939A8X-M | Quick Installation Guide - Page 41
reicht der Strom nicht aus, das System zu starten. Verbinden Sie ein Game-Kabel mit diesem Anschluss, wenn der Game-Anschlusshalter installiert ist. Deutsch 41 ASRock 939A8X-M Motherboard - ASRock 939A8X-M | Quick Installation Guide - Page 42
Auswahl des Boot-Laufwerkes (Startlaufwerk) erscheint. Bitte wählen Sie das CD-ROM-Laufwerk als Boot-Laufwerk. Die Meldung „Do you want to generate Serial ATA driver diskette [Y/N]?" [Serial ATA-Treiberdiskette erstellen [Y/N]?] bestätigen Sie mit . Deutsch 42 ASRock 939A8X-M Motherboard - ASRock 939A8X-M | Quick Installation Guide - Page 43
im Nicht-RAID-Betriebsmodus installieren möchten. Windows 98 SE und Windows ME dürfen nicht auf SATA-Festplatten im RAIDBetriebsmodus installiert werden. Sie müssen deshalb keine SATATreiberdiskette vor der Installation dieser zwei Betriebssysteme erstellen. Deutsch 43 ASRock 939A8X-M Motherboard - ASRock 939A8X-M | Quick Installation Guide - Page 44
der Support-CD, um die Menüs aufzurufen. Das Setup-Programm soll es Ihnen so leicht wie möglich machen. Es ist menügesteuert, d.h. Sie können in den verschiedenen Untermenüs Ihre Auswahl treffen und die Programme werden dann automatisch installiert. Deutsch 44 ASRock 939A8X-M Motherboard - ASRock 939A8X-M | Quick Installation Guide - Page 45
939A8X-M CD de soutien ASRock 939A8X-M Un câble ruban IDE Ultra ATA 66/100/133 80 conducteurs Un câble ruban pour un lecteur de disquettes 3,5 pouces Un câble de données Serial ATA (SATA) Un cordon d'alimentation DD série ATA (SATA) (en option) Un écran ASRock 8CH I/O 45 ASRock 939A8X-M Motherboard - ASRock 939A8X-M | Quick Installation Guide - Page 46
x 19.8 cm CPU: Socket 939 broches prenant en Support ECP/EPP), 4 ports USB 2.0 par défaut, 1 port RJ-45, Prise Audio: Haut-parleur latéral / Haut-parleur arrière / Central / Basses / Entrée Ligne / Haut-parleur frontal / Microphone (voir ATTENTION 5) Français 46 ASRock 939A8X-M Motherboard - ASRock 939A8X-M | Quick Installation Guide - Page 47
BIOS: OS: BIOS AMI; Support du "Plug and Play"; Compatible pour événements de réveil ACPI 1.1; Support SMBIOS 2.3.1; Contrôle direct de la fréquence CPU (utilisateurs avancés seulement, voir ATTENTION 6) Microsoft® Windows le système ou d'endommager l'UC. Français 47 ASRock 939A8X-M Motherboard - ASRock 939A8X-M | Quick Installation Guide - Page 48
support CPU. Le verrouillage du levier dans son encoche latérale est annoncé par un clic. Etape 5. Installez le ventilateur et le radiateur du CPU. Pour une installation correcte, reportez-vous aux manuels du fabricant du ventilateur et du radiateur de CPU. 48 ASRock 939A8X-M Motherboard - ASRock 939A8X-M | Quick Installation Guide - Page 49
La carte mère 939A8X-M dispose de quatre emplacements DIMM DDR (Double Data Rate) de 184-broches, et supporte la Technologie de Mé emplacement le plus éloigné vers l'emplacement le plus proche de la CPU). 1. Si vous souhaitez installer deux modules mémoire différents, il ASRock 939A8X-M Motherboard - ASRock 939A8X-M | Quick Installation Guide - Page 50
jusqu'à ce que les clips de maintien situés aux deux extrémités se ferment complètement et que le module DIMM soit inséré correctement. 50 ASRock 939A8X-M Motherboard - ASRock 939A8X-M | Quick Installation Guide - Page 51
32 bits. Slot AGP: Le slot AGP est utilisé pour installer une carte graphique. Le slot AGP ASRock utilise un design de fermoir spécial qui permet de fixer correctement la carte graphique insérée. Ne PAS 4. Fixez la carte sur le châssis à l'aide d'une vis. 51 ASRock 939A8X-M Motherboard Français - ASRock 939A8X-M | Quick Installation Guide - Page 52
sont en court-circuit, les connecteurs audio des panneaux avant et arrière BIOS. Si vous avez besoin d'effacer le CMOS juste après avoir terminé la mise à jour du BIOS, vous devez d'abord redémarrer le système puis l'arrêter avant de procéder à l'effacement du CMOS. 52 ASRock 939A8X-M Motherboard - ASRock 939A8X-M | Quick Installation Guide - Page 53
ître". Veuillez vous reporter aux instructions du fabricant de votre IDE pé SATA) prennent en charge les câbles SATA pour les périphériques de stockage internes. L'interface SATA actuelle permet des taux transferts de données pouvant aller jusqu'à 1,5 Go/s. Français 53 ASRock 939A8X-M Motherboard - ASRock 939A8X-M | Quick Installation Guide - Page 54
arrières ne sont pas suffisants, cet en-tête USB 2.0 (USB_H4_5) est capable de supporter 2 ports USB 2.0 supplémentaires. En-tête module infrarouge (IR1 br. 5) (voir p.2 fig. 2) Ce en-tête gère un module en option d'émission/réception sans fil infrarouge. Français 54 ASRock 939A8X-M Motherboard - ASRock 939A8X-M | Quick Installation Guide - Page 55
audio. Ce connecteur offre plusieurs fonctions système en façade. Connecteur du haut-parleur du châssis (SPEAKER1 br. 4) (voir p.2 fig. 13) Connecteur pour ventilateur de châssis (CHA_FAN1 br. 3) (voir p.2 fig. 11) Connecteur pour ventilateur CPU connecteur. Français 55 ASRock 939A8X-M Motherboard - ASRock 939A8X-M | Quick Installation Guide - Page 56
en mode "RAID". 2. les modes "RAID" et "non-RAID" sont des options sous le "Mode Opératoire SATA" dans la configuration du BIOS. Veuillez vous référer à la page 28 pour plus de détails. Ils ont besoin de pilotes différents durant l'opération actuelle. 56 ASRock 939A8X-M Motherboard Français - ASRock 939A8X-M | Quick Installation Guide - Page 57
le guide d'installation sur le CD de support pour une configuration adaptée. Veuillez consulter le document, "Guide pour Installation des Disques Durs SATA et Configuration RAID" à l'emplacement suivant sur le CD de support : .. \ RAID_SETUP_GUIDE \ French.PDF 57 ASRock 939A8X-M Motherboard Fran - ASRock 939A8X-M | Quick Installation Guide - Page 58
sur le BIOS, veuillez consulter le Guide de l'utilisateur (fichier PDF) dans le CD technique. 4. Informations sur le CD de support Cette carte mère supporte divers systèmes d'exploitation Microsoft Windows: 98 SE double-cliquez dessus pour afficher les menus. 58 ASRock 939A8X-M Motherboard Français - ASRock 939A8X-M | Quick Installation Guide - Page 59
cm) Guida di installazione rapida ASRock 939A8X-M CD di supporto ASRock 939A8X-M Un cavo IDE 80-pin Ultra ATA 66/100/133 Un cavo per floppy drive a 1,44 Mb Un cavo dati Serial ATA (SATA) Un cavo alimentatore HDD Serial ATA (SATA) (Opzionale) Un ASRock 8CH I/O 59 ASRock 939A8X-M Motherboard Italiano - ASRock 939A8X-M | Quick Installation Guide - Page 60
1 Porta seriale: COM 1, 1 Porta parallela (supporto ECP/EPP), 4 porte USB 2.0 già integrate, 1 porta RJ-45, Connettore Audio: cassa laterale / cassa posteriore / cassa centrale / bassi / ingresso linea / cassa frontale / microfono (vedi ATTENZIONE 5) Italiano 60 ASRock 939A8X-M Motherboard - ASRock 939A8X-M | Quick Installation Guide - Page 61
appropriato. 6. Anche se questa motherboard offre il controllo stepless, non si consiglia di effettuare l'overclocking. L'uso di frequenze diverse da quelle raccomandate per il bus CPU possono provocare l'instabilità del sistema o danneggiare la CPU. Italiano 61 ASRock 939A8X-M Motherboard - ASRock 939A8X-M | Quick Installation Guide - Page 62
ventola del processore e l'heatsink. Per una corretta installazione, per favore fare riferimento ai manuali di istruzione dei produttori della ventola e dell'heatsink del processore. 62 ASRock 939A8X-M Motherboard Italiano - ASRock 939A8X-M | Quick Installation Guide - Page 63
la tecnologia Dual Channel Memory. 3. Se una coppia di moduli di memoria NON è installata nello stesso "canale doppio", ad esempio se si installa una coppia di moduli di memoria su DDR1 e DD3, è impossibile attivare la tecnologia Dual Channel Memory. Italiano 63 ASRock 939A8X-M Motherboard - ASRock 939A8X-M | Quick Installation Guide - Page 64
DIMM nello slot fino a far scattare completamente in posizione i fermagli di ritegno alle due estremità e fino ad installare correttamente la DIMM nella sua sede. 64 ASRock 939A8X-M Motherboard - ASRock 939A8X-M | Quick Installation Guide - Page 65
della scheda con lo slot e premere con decisione finché la scheda è completamente inserita nello slot. Step 4. Agganciare la scheda allo chassis con le viti. 65 ASRock 939A8X-M Motherboard Italiano - ASRock 939A8X-M | Quick Installation Guide - Page 66
in corto, possono funzionare i connettori audio del pannello frontale e del pannello BIOS. Se è necessario azzerare la CMOS subito dopo aver aggiornato il BIOS, prima si deve riavviare il sistema, quindi spegnerlo prima di effettuare l'azzeramento della CMOS. Italiano 66 ASRock 939A8X-M Motherboard - ASRock 939A8X-M | Quick Installation Guide - Page 67
due connettori Serial ATA (SATA) supportano cavi dati SATA per dispositivi di immagazzinamento interni. ATA (SATA) supportano cavi SATA per dispositivi di memoria interni. L'interfaccia SATA attuale permette velocità di trasferimento dati fino a 1.5 Gb/s. Italiano 67 ASRock 939A8X-M Motherboard - ASRock 939A8X-M | Quick Installation Guide - Page 68
SATA possono collegarsi all'hard disk SATA o al connettore SATA sulla scheda madre. Cavo d'alimentazione Serial ATA (SATA) (Opzionale) Connettere all'ailmentazione dei dischi SATA Collegare l'estremità nera de cavo di alimentazione SATA infrarossi. Italiano 68 ASRock 939A8X-M Motherboard - ASRock 939A8X-M | Quick Installation Guide - Page 69
il cavo del pannello audio. Che consente connessione facile e controllo dei dispositivi audio. Questo connettore accoglie CPU a questo connettore e far combaciare il filo nero al pin terra. Collegare la sorgente d'alimentazione ATX a questo collettore. Italiano 69 ASRock 939A8X-M Motherboard - ASRock 939A8X-M | Quick Installation Guide - Page 70
SATA per il funzionamento dell'hard disk SATA in modalità "RAID". Se si desidera installare Windows 2000, Windows XP o Windows XP 64 bit su un hard disk SATA, è necessario creare un dischetto driver SATA prima di procedere con l'installazione del sistema operativo. 70 ASRock 939A8X-M Motherboard - ASRock 939A8X-M | Quick Installation Guide - Page 71
verificare che la configurazione venga eseguita correttamente. Il documento "Guida all'installazione degli Hard Disk SATA ed alla configurazione del RAID" si trova sul CD di supporto, selezionando il percorso seguente: .. \ RAID_SETUP_GUIDE \ Italian.PDF Italiano 71 ASRock 939A8X-M Motherboard - ASRock 939A8X-M | Quick Installation Guide - Page 72
Windows 98 SE e Windows ME devono essere installati con SATA operante in modalità RAID, senza che sia necessario creare un dischetto driver SATA prima dell'installazione del sistema operativo. 3. Informazioni sul BIOS La Flash Memory per visualizzare i menù. 72 ASRock 939A8X-M Motherboard Italiano - ASRock 939A8X-M | Quick Installation Guide - Page 73
de ASRock 939A8X-M Una cinta de datos IDE de conducción 80 Ultra ATA 66/100/133 Una cinta de datos para una unidad de disco de 3,5" Un Cable de Datos Serial ATA (SATA) Un cable serie ATA (SATA) de alimentación de disco duro (Opcional) Una protección ASRock 8CH I/O 73 ASRock 939A8X-M Motherboard - ASRock 939A8X-M | Quick Installation Guide - Page 74
ATX: 24,4 cm x 21,8 cm, 9,6" x 8,6" Procesador: Socket de 939 agujas con soporte para procesador AMD Athlon 64 / 64FX; Compatible audio: Altavoz lateral / Altavoz trasero / Central/Bajos / Entrada de línea / Altavoz frontal / Micrófono (ver ATENCIÓN 5) Español 74 ASRock 939A8X-M Motherboard - ASRock 939A8X-M | Quick Installation Guide - Page 75
Cool 'n' Quiet™ de AMD en el sistema Windows. Consulte el APÉNDICE en la página 37 del "User Manual" (Manual del usuario) del CD de soporte para activar de bus de la CPU distintas a las recomendadas pueden causar inestabilidad en el sistema o dañar la CPU. Español 75 ASRock 939A8X-M Motherboard - ASRock 939A8X-M | Quick Installation Guide - Page 76
del CPU. Si no puede encajar el CPU, examine su orientación o examine si los pins están ya encorvados. Paso 4. Encierre el zócalo bajando la palanca. Paso 5. Instale el disipador de calor con ventilador del CPU ( consulte la documentación del disipador de calor). 76 ASRock 939A8X-M Motherboard Espa - ASRock 939A8X-M | Quick Installation Guide - Page 77
en DDR1 y DDR2. (Es decir, rellenar la DIMM DDR hacia la parte más cercana a la CPU.) 1. Si desea instalar dos módulos de memoria distintos, para obtener compatibilidad y fiabilidad óptimas se será posible activar la Tecnología de Memoria de Doble Canal. Español 77 ASRock 939A8X-M Motherboard - ASRock 939A8X-M | Quick Installation Guide - Page 78
de la ranura hasta que los clips de sujeción de ambos lados queden completamente introducidos en su sitio y la DIMM se haya asentado apropiadamente. 78 ASRock 939A8X-M Motherboard Español - ASRock 939A8X-M | Quick Installation Guide - Page 79
desea utilizar. Paso 3. Encaje el conector de la tarjeta a la ranura. Empuje firmemente la tarjeta en la ranura. Paso 4. Asegure la tarjeta con tornillos. 79 ASRock 939A8X-M Motherboard Español - ASRock 939A8X-M | Quick Installation Guide - Page 80
los jumpers JR1 y JL1 son cortos, los conectores de audio del panel frontal y los del panel posterior podrán BIOS. Si necesita borrar la CMOS justo después de actualizar la BIOS, primero deberá reiniciar el sistema y volverlo a apagar antes de borrar la CMOS. Español 80 ASRock 939A8X-M Motherboard - ASRock 939A8X-M | Quick Installation Guide - Page 81
cables SATA para dispositivos de almacenamiento internos. La interfaz SATA actual permite una velocidad de transferencia de 1.5 Gb/s. Cable de datos de serie ATA (SATA) Ambos extremos del cable pueden conectarse al disco duro SATA o la conexión de la placa base. 81 ASRock 939A8X-M Motherboard - ASRock 939A8X-M | Quick Installation Guide - Page 82
) (vea p.2, No. 2) Conector de Audio Interno (4-pin CD1) (CD1: vea p.2, No. 24) Conecte el extremo negro del cable de SATA al conector de energía de la unidad. recepción de input audio de fuente sónica como CD-ROM, DVD-ROM, TV tuner, CD1 o tarjeta MPEG. Español 82 ASRock 939A8X-M Motherboard - ASRock 939A8X-M | Quick Installation Guide - Page 83
la CPU (3-pin CPU_FAN1) (vea p.2, No. 5) Cabezal de alimentación ATX (20-pin ATXPWR1) (vea p.2, No. 25) Conector de ATX 12V power (4-pin ATX12V1) (vea p.2, No. 28) Este es una interface para cable de audio de . De lo contrario no se podrá encender. Español 83 ASRock 939A8X-M Motherboard - ASRock 939A8X-M | Quick Installation Guide - Page 84
) del sistema, pulse la tecla y aparecerá una ventana de selección de los dispositivos de inicio. Seleccione el CD-ROM como unidad de inicio. 84 ASRock 939A8X-M Motherboard Español - ASRock 939A8X-M | Quick Installation Guide - Page 85
SATA antes de la instalación del sistema operativo. Windows 98 SE y Windows ME deben instalarse con SATA operando en modo RAID y no es necesario crear un disquete de controlador SATA para estos dos sistemas operativos antes de la instalación de los mismos. Español 85 ASRock 939A8X-M Motherboard - ASRock 939A8X-M | Quick Installation Guide - Page 86
la BIOS, por favor refiérase al Manual del Usuario (archivo PDF) contenido en el CD. 4.Información de Software Support CD Esta placa-base soporta diversos tipos de sistema operativo Windows: 98SE / ME / 2000 / XP El CD de instalación que acompaña la placa-base trae todos los drivers y programas - ASRock 939A8X-M | Quick Installation Guide - Page 87
ASRock 939A8X-M Um cabo-fita IDE Ultra ATA 66/100/133 de 80 condutores Um cabo-fita para unidade de disquete de 3,5 pol. Um cabo de dados ATA Serial (SATA) Um cabo de alimentação para unidade de disco rígido ATA Serial (SATA) (opcional) Uma proteção ASRock 8CH I/O 87 ASRock 939A8X-M Motherboard - ASRock 939A8X-M | Quick Installation Guide - Page 88
pol., 24,4 cm x 21,8 cm CPU: Soquete de 939 pinos compatível com processador AMD Athlon™ até 4 dispositivos IDE ATA Serial: 2 conectores SATA, suporte a taxa de transferência de dados de '97 LAN: Velocidade: 802.3u (10/100 Ethernet), suporta Wake-On-LAN Monitor do ASRock 939A8X-M Motherboard - ASRock 939A8X-M | Quick Installation Guide - Page 89
activação da tecnologia Cool 'n' Quiet da AMD no sistema Windows. Consulte o APÊNDICE na página 37 do "Manual do utilizador" no CD de suporte para activar a tecnologia Cool das recomendadas para a CPU podem provocar instabilidade do sistema ou danos à CPU. Português 89 ASRock 939A8X-M Motherboard - ASRock 939A8X-M | Quick Installation Guide - Page 90
correta, a alavanca clica na aba lateral, indicando que está travada. 5º passo: instale o ventilador da CPU e o dissipador de calor. Para fazer uma instalação correta, consulte antes os manuais de instrução dos fabricantes da CPU e do dissipador de calor. 90 ASRock 939A8X-M Motherboard Português - ASRock 939A8X-M | Quick Installation Guide - Page 91
e DDR2. Ou seja, comece por ocupar os módulos DIMM DDR a partir do extremo da CPU em direcção à parte da CPU que está mais próxima de si.) 1. Se quiser instalar dois módulos de memória diferentes á possível activar a tecnologia de memória de canal duplo. Português 91 ASRock 939A8X-M Motherboard - ASRock 939A8X-M | Quick Installation Guide - Page 92
no slot até que os clipes de retenção em ambos os lados se encaixem totalmente em seus locais e a DIMM esteja encaixada de modo apropriado. 92 ASRock 939A8X-M Motherboard Português - ASRock 939A8X-M | Quick Installation Guide - Page 93
o conector da placa com o slot e pressiona com firmeza, até que a placa esteja totalmente encaixada no slot. 4º passo: Aparafuse a placa no chassis com os parafusos. 93 ASRock 939A8X-M Motherboard Português - ASRock 939A8X-M | Quick Installation Guide - Page 94
entre os pinos 2 e 3 do CLRTC1 durante 5 segundos. No entanto, não limpe o CMOS logo após a actualização da BIOS. Se precisar de limpar o CMOS após a actualização da BIOS, terá de reiniciar o sistema primeiro e de seguida encerrá-lo antes de limpar o CMOS. Português 94 ASRock 939A8X-M Motherboard - ASRock 939A8X-M | Quick Installation Guide - Page 95
de armazenamentos internos. A atual interface SATA permite uma taxa de transferência de dados de até 1.5 Gb/s. Cabo de dados ATA (SATA) Tanto a saída do cabo de Serial dados SATA pode ser conectado ao disco rígido SATA quanto o conector SATA na placa mãe. 95 ASRock 939A8X-M Motherboard Português - ASRock 939A8X-M | Quick Installation Guide - Page 96
conecte a saída branca do cabo de alimentação SATA ao conector de alimentação da fonte. Cabezal USB 2.0 (9-pin USB67) (ver p.2, No. 14) ASRock 8CH I/O le proporciona 4 puertos USB 2.0 predeterminados en , DVD-ROM, placa sintonizadora de TV ou placa MPEG. Português 96 ASRock 939A8X-M Motherboard - ASRock 939A8X-M | Quick Installation Guide - Page 97
No. 13) Conector do ventilador do chassis (CHA_FAN1 de 3 pinos) (veja a folha 2, No. 11) Conector do ventilador da CPU (CPU_FAN1 de 3 pinos) (veja a folha 2, No. 5) Conector de força do ATX (ATXPWR1 de 20 pinos) (veja ário, haverá falhas de funcionamento. Português 97 ASRock 939A8X-M Motherboard - ASRock 939A8X-M | Quick Installation Guide - Page 98
ção SATA no modo "RAID" Se quiser instalar o sistema operativo Windows 2000, Windows XP ou Windows XP de 64 bits nas suas unidades de disco rígido SATA, terá de criar uma disquete do controlador SATA antes de iniciar a instalação do sistema operativo. 98 ASRock 939A8X-M Motherboard Portugu - ASRock 939A8X-M | Quick Installation Guide - Page 99
a instalação do sistema operativo. O Windows 98 SE e o Windows ME têm de ser instalados pela especificação SATA no modo RAID, e não é necessário criar uma disquete do controlador SATA para estes dois sistemas operativos antes da instalação dos mesmos. 99 ASRock 939A8X-M Motherboard Português - ASRock 939A8X-M | Quick Installation Guide - Page 100
da BIOS, consulte o manual do usu ário (em pdf) contido no CD de instalação. 4. Informações do CD de Suporte Esta placa Mãe suporta vários sistemas operacionais: Microsoft Windows: 98 SE/ ME/2000/XP. O CD de instalação que acompanha a placa Mãe contem: drivers ASRock 939A8X-M Motherboard
-
 1
1 -
 2
2 -
 3
3 -
 4
4 -
 5
5 -
 6
6 -
 7
7 -
8
-
9
-
10
-
11
-
12
-
13
-
14
-
15
-
16
-
17
-
18
-
19
-
20
-
21
-
22
-
23
-
24
-
25
-
26
-
27
-
28
-
29
-
30
-
31
-
32
-
33
-
34
-
35
-
36
-
37
-
38
-
39
-
40
-
41
-
42
-
43
-
44
-
45
-
46
-
47
-
48
-
49
-
50
-
51
-
52
-
53
-
54
-
55
-
56
-
57
-
58
-
59
-
60
-
61
-
62
-
63
-
64
-
65
-
66
-
67
-
68
-
69
-
70
-
71
-
72
-
73
-
74
-
75
-
76
-
77
-
78
-
79
-
80
-
81
-
82
-
83
-
84
-
85
-
86
-
87
-
88
-
89
-
90
-
91
-
92
-
93
-
94
-
95
-
96
-
97
-
98
-
99
-
100
 |
 |
1
ASRock
939A8X-M
Motherboard
English
English
English
English
English
Copyright Notice:
Copyright Notice:
Copyright Notice:
Copyright Notice:
Copyright Notice:
No part of this installation guide may be reproduced, transcribed, transmitted, or
translated in any language, in any form or by any means, except duplication of
documentation by the purchaser for backup purpose, without written consent of
ASRock Inc.
Products and corporate names appearing in this guide may or may not be registered
trademarks or copyrights of their respective companies, and are used only for
identification or explanation and to the owners’ benefit, without intent to infringe.
Disclaimer:
Disclaimer:
Disclaimer:
Disclaimer:
Disclaimer:
Specifications and information contained in this guide are furnished for informational
use only and subject to change without notice, and should not be constructed as a
commitment by ASRock. ASRock assumes no responsibility for any errors or
omissions that may appear in this guide.
With respect to the contents of this guide, ASRock does not provide warranty of any
kind, either expressed or implied, including but not limited to the implied warranties or
conditions of merchantability or fitness for a particular purpose.
In no event shall ASRock, its directors, officers, employees, or agents be liable for
any indirect, special, incidental, or consequential damages (including damages for
loss of profits, loss of business, loss of data, interruption of business and the like),
even if ASRock has been advised of the possibility of such damages arising from
any defect or error in the guide or product.
This device complies with Part 15 of the FCC Rules. Operation is subject to the
following two conditions:
(1)
this device may not cause harmful interference, and
(2)
this device must accept any interference received, including interference that
may cause undesired operation.
ASRock Website: http://www.asrock.com
Published April 2005
Copyright
©
2005 ASRock INC. All rights reserved.